


 Download code from GitHub
Getting Started with Adobe Captivate 2017
Welcome to Mastering Adobe Captivate 2017, Fourth Edition. Since its introduction in 2004, Captivate has been the leading solution for authoring interactive eLearning content. In the beginning, it was a very simple screen-capture utility called FlashCam. In 2002, a company named eHelp acquired FlashCam and turned it into a full-fledged eLearning authoring tool called RoboDemo. In 2004, another company called Macromedia acquired eHelp and changed the name of the product once again. Macromedia Captivate was born. A few months later, Adobe acquired Macromedia and, consequently, Macromedia Captivate became Adobe Captivate.
As the years passed, Adobe released Captivate 2, 3, and 4-adding tools, objects, and features along the way. One of the most significant events in the Captivate history took place in July 2010, when Adobe released Captivate 5. For that release, Adobe engineers rewrote the code of the application from the ground up. As a result, Captivate 5 was the first version to be available on both macOS and Windows. Version 6 was another milestone for Captivate as it was the first version to offer an HTML5 publishing option. More recently, version 8 has introduced the ability to create Responsive Projects, as well as a brand new user interface. A Responsive Project allows you, the eLearning developer, to automatically adjust the layout of your Captivate projects to fit the various screen sizes of tablet and smartphone devices. This makes mobile learning a whole lot easier and more powerful by creating content that looks perfect in different views.
At the time of writing this, the latest version of Captivate is called Captivate 2017. Captivate 2017 introduces many new features and enhancements, including an exciting new approach to responsive design called Fluid Boxes. Other new features introduced in Captivate 2017 include the integration of the Typekit font library, the ability to customize Closed Captions on a slide-to-slide basis, a redesigned Slide Notes panel, and tons of other enhancements.
With all this power only one click away, it is easy to overload your projects with lots of complex audiovisual effects and sophisticated interactions that can ultimately drive the learner away from the primary objective of every Captivate course: learning.
While working with Captivate, never forget that Captivate is an eLearning authoring tool. At the most basic level, it simply means that you, the developer, and your audience are united by a very special kind of relationship: a student-teacher relationship. Therefore, from now on-and for the rest of the book-you will not be called the developer or the programmer, but the teacher. The ones who will view your finished applications will not be the users or the visitors, but will be called the learners or the students. You will see that this changes everything.
In this chapter, you will:
- Discover the available options to install Captivate
- See the general steps of the Captivate production process
- Tour and customize the Captivate 2017 interface
- Work with panels and workspaces
- View the completed sample applications you will work with during the course of this book
Getting Captivate
Before you can start working with Captivate, you have to download and install the software. In this section, you will discover the three ways that Adobe makes Captivate available to you.
The Captivate perpetual license
This is the old-fashioned way of obtaining the software. You buy Captivate and get a serial number to activate your installation. The serial number is valid for a specific version of Captivate, and for a specific platform (macOS or Windows) only. Once activated, that version of Captivate is permanently available on your computer. With this option, you get all the functionalities of Captivate, and you can start working on your eLearning projects right away! You also get all the patches and bug fixes for the version you bought. This book works flawlessly with the Captivate perpetual license.
You can download and use this version of Captivate free of charge for 30 days. This should be more than enough time for you to go through the exercises of this book. However, once the trial period is over, you will not have access to Captivate unless you convert your trial to a licensed version. This can be a perpetual or a subscription license.
The Captivate subscription
With this licensing model, you subscribe to Captivate on a monthly basis. This means that you pay a certain amount each month to keep using Captivate. The main benefit of the subscription model is that you automatically get all the updates as they are released. The subscription model is the best way to ensure that you have access to the latest version of Captivate. Note that the subscription is just another licensing model; the software itself is identical to the perpetual licensing model.
Although the Captivate subscription model is very similar to the way Adobe Creative Cloud works, Captivate is-at the time of writing-not a part of the Creative Cloud.
If you already have a Creative Cloud subscription, you'll need another subscription for Adobe Captivate.
Captivate in Technical Communication Suite
The Technical Communication Suite (TCS) is yet another bundle of applications from Adobe. It is designed to create technical content such as help files and user guides. TCS includes applications such as RoboHelp, FrameMaker, Acrobat Professional, and of course, Captivate. The Technical Communication Suite itself is also available under both the perpetual and the subscription licensing model.
A first look at a typical production workflow
Creating content with Captivate is a three-step process, or to be exact, a four-step process. However, only three of the four steps take place in Captivate. That's why we like to refer to the first step as step zero!
Step zero - the preproduction phase
This is the only step of the process that does not involve working with the Captivate application. Depending on the project you are planning, it can last from a few minutes to a few months. This step is probably the most important step of the entire process as it is where you actually create the scenarios and the storyboards. This is where you develop the pedagogical approach that will drive the entire project. What will you teach the students? In what order will you introduce the topics? How and when will you assess the students' knowledge? These are some of the very important questions you should answer before opening Captivate for the first time. Step zero is where the teacher's skills fully express themselves.
In this series of posts on the Adobe eLearning community portal, Dr. Pooja Jaisingh shares her experience in creating scenario-based training. These posts clearly stress the importance of step zero, and give you a first, high-level approach to the Captivate production process. The first post of the series can be found at https://elearning.adobe.com/2012/03/my-experience-with-creating-a-scenario-based-course-part-1/.
Step one - creating the slides
At the most basic level, a typical Captivate project is a collection of slides, just like a Microsoft PowerPoint presentation. So your first task when creating a new Captivate file is probably to create a bunch of slides to work with. There are several ways to do this:
- First, Captivate has the ability to record any action you perform onscreen. You typically use this ability to create software-related interactive training or simulations. You use your mouse to perform actions on your computer, and behind the scenes, Captivate watches and records any action you do using a sophisticated screen capture engine based on screenshots. Each of these screenshots becomes a slide in your new Captivate project. Using the screen capture feature of Captivate is covered in Chapter 8, Capturing Onscreen Action.
- Very often, though, the Captivate project you are working on has nothing to do with software-related skills. In this case, you don't need to use screen capture to take screenshots. You create the slides entirely within Captivate. This is the preferred approach for new training materials that don't require the screen capture capabilities.
- A third solution is to import the slides from Microsoft PowerPoint. You typically use this solution to convert existing training material made with PowerPoint into interactive online training modules, but it is not considered best practice for new training material. Importing PowerPoint slides into Captivate is covered in Chapter 11, Using Captivate with Other Applications.
Step two - the editing phase
This step is the most time-consuming phase of the entire process. This is where your project slowly takes shape to become an actual interactive course module.
In this step, you arrange the final sequence of actions, record narrations, add objects to the slides (such as Text Captions and Buttons), arrange those objects in the Timeline, add title and ending slides, develop the advanced interactions, create the Question Slides of the quiz, configure the quiz reporting options, and so on. At the end of this step, the project should be ready for publication. Sometimes, it can take several rounds of edits until you have a project that is ready to publish.
Note that, for most projects, step one and step two overlap. Unless you use screen capture, there is no clear distinction between step one and step two. It is ok to go back and forth between those two steps when developing your next Captivate project.
Step three - the publishing phase
Step three is where you make your project available to your learners. Captivate allows you to publish your course modules in a wide variety of formats. The two formats that you will use most of the time are the Flash and the HTML5 formats.
- Flash is the historical publishing format of Captivate. It is still widely used today. Publishing the project in Flash makes the deployment of your eLearning courses very easy; only the Flash Player plugin is needed. The very same Flash Player that is used to read Flash-enabled websites or YouTube videos is all you need to play back your published Captivate projects. The major caveat of this publishing format is that it is not supported on mobile devices.
- Captivate can also publish your projects in HTML5, which makes the project available on any device, including desktops and laptops, as well as tablets and smartphones. In today's technological landscape, HTML5 has become the preferred format for publishing your online courses for computers and mobile devices.
Note that some features of Captivate are only available either in Flash or in HTML5. For example, a Responsive Project can only be published in HTML5, while a Text Animation object can only be published in Flash. It is very important to know the publishing format you will use before starting the development of a new project.
As we were writing this chapter, Adobe made an announcement that they would no longer develop and maintain the Flash Player plugin beyond 2020, and that they encourage content developers to migrate to HTML5. This is not a surprise, but it stresses the important evolution that HTML5 represents for our industry. It also clearly states that Adobe Captivate is bound to end up as an HTML5-only authoring tool somewhere in the future. You can see the original Adobe announcement at https://blogs.adobe.com/conversations/2017/07/adobe-flash-update.html and the announcement from the Captivate team at https://elearning.adobe.com/2017/07/flash-the-future-of-interactive-content-for-elearning/.
Captivate can also publish the project as a standalone application (.exe on Windows and .app on Macintosh) or as video files that can be easily uploaded to YouTube and viewed on a tablet or smartphone.
Step three will be covered in great detail in Chapter 14, Finishing Touches and Publishing.
Touring the Captivate interface
In this book, we will cover the three steps of the process requiring the use of Captivate. You will discover that Captivate has specific tools to handle each of these three steps.
Before you start reading this section, it is important that you download the sample files we refer to throughout this book. You can download the sample files for all Packt Publishing books that you have purchased from your account at http://www.packtpub.com. If you purchased this book elsewhere, you can visit http://www.packtpub.com/support and register to have the files emailed directly to you.
You will now discover this new interface using the following steps:
- Open Captivate.
- If needed, click the Recent tab at the top of the Welcome screen.
- Click the Browse button at the bottom of the Recent tab of the Welcome screen.
- Open the Chapter01/encoderDemo_800.cptx file in the exercise folder.
Your screen should look similar to this screenshot:
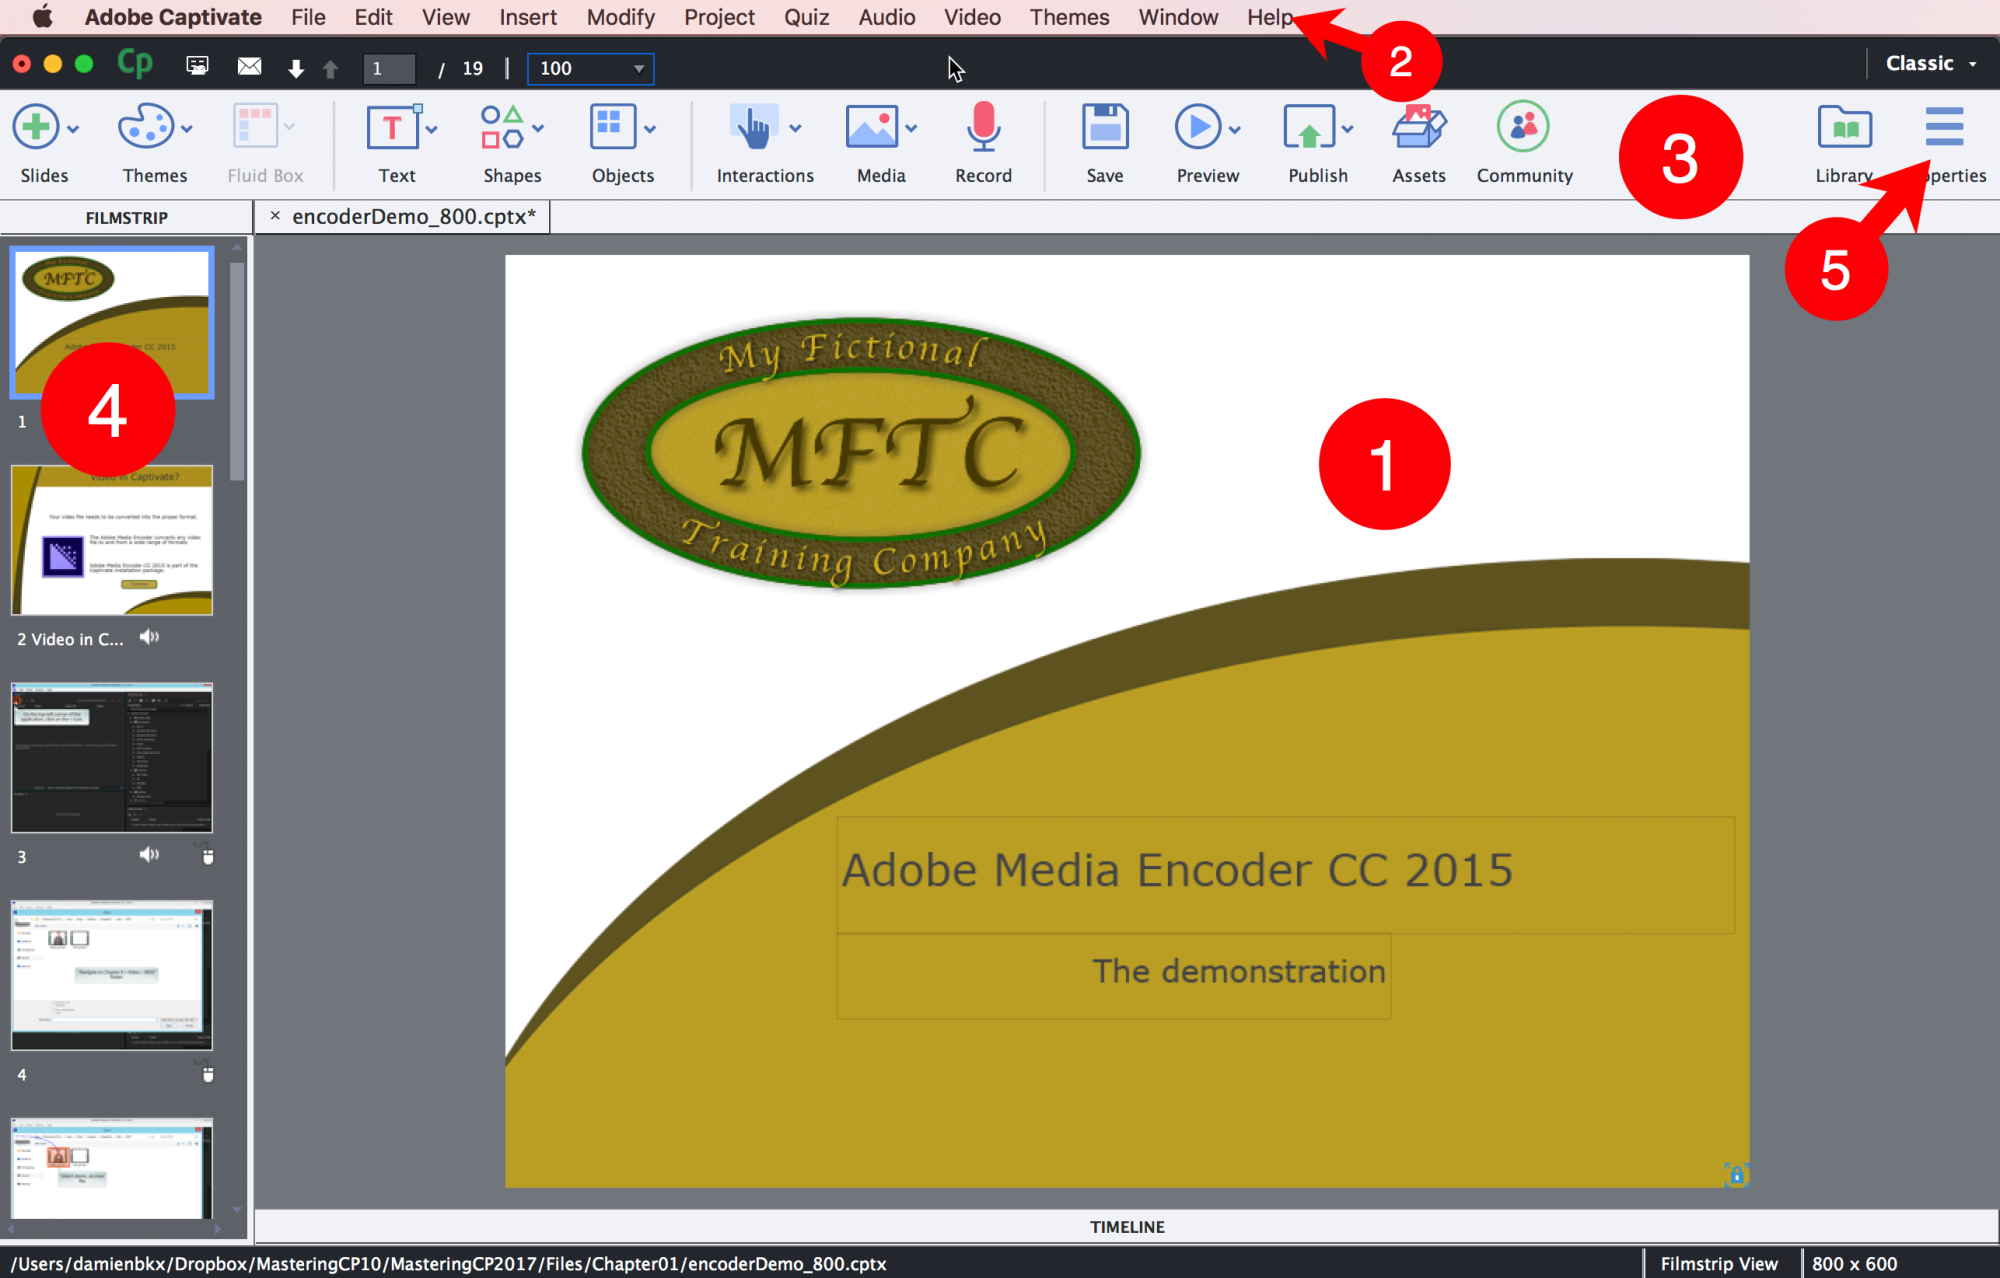
The default Captivate screen looks very simple and clean. The main area is covered by the Stage (1). The Stage is where you lay out the objects that make up each slide of the project. The objects on the Stage will appear in your course. The objects in the Scrap Area (the grey area around the slide) will not show in the slide itself.
At the very top of the screen is the Menu bar (2). The Menu bar gives you access to a wide range of Captivate features.
Below the Menu bar is the main Toolbar of Captivate 2017 (3). The Toolbar is primarily used to insert new slides and new objects into the project, but it also contains important tools for operations, such as previewing, publishing, and saving.
On the left side of the screen is the Filmstrip (4). It shows the sequence of slides in your Captivate project. The primary use of the Filmstrip is to let you select the slide(s) you want to work with, but it can also be used to perform basic operations on the slides, such as reordering or deleting slides.
- At the far right side of the Toolbar, click the Properties icon (5).
This action reveals the Properties inspector. The Properties inspector is one of the most important components of Captivate. It is used to control and adjust the properties of the selected object.
- Click the Properties button on the Toolbar again to hide the Properties inspector.
- Click the Library icon located just next to the Properties icon to open the Library panel.
The Library panel is another very important component of Captivate. It maintains a list of all the assets (such as images, audio clips, animations, and so on.) included in the current project.
- Click the Library button on the Toolbar to close the Library.
- Click the Timeline button that stretches across the bottom of the screen. This action reveals the Timeline panel.
The Timeline panel is used to arrange the sequence of objects on the current slide. In short, you use the Timeline panel to decide when an object appears on the stage and how long it stays visible. This panel is also used to set up the stacking order of the objects. You will learn more about the Timeline in Chapter 4, Working with the Timeline and Other Useful Tools.
It is possible to open many panels at the same time.
- Click the Properties button on the Toolbar to reopen the Properties inspector.
Both the Timeline and the Properties inspector should now be open.
Because the Properties inspector, Library, and Timeline are the most important panels of Captivate; they are only one mouse click away on the default user interface. However, Captivate contains many other panels that give you access to a myriad of interesting tools. To get the most out of Captivate, you should know how to turn panels on and off.
- Open the Window menu.
The Window menu displays a list of all the panels that are available in Adobe Captivate. Note the checkmark in front of the Filmstrip, Timeline, and Library entries of the Window menu. This reminds you that these panels and icons are currently visible on the interface.
- Click the Library menu item of the Window menu. This action removes the Library icon from the Toolbar.
- Click the Window | Library menu item again to reactivate the Library icon of the Toolbar and open the Library panel.
- Click the Window | Slide Notes menu item to open the Slide Notes panel.
The Slide Notes panel appears at the bottom of the screen next to the Timeline panel, as shown in the following screenshot:

If you have used Captivate before, the Slide Notes panel is one of those areas that has been entirely updated in the Captivate 2017 release. Let's now open one more panel.
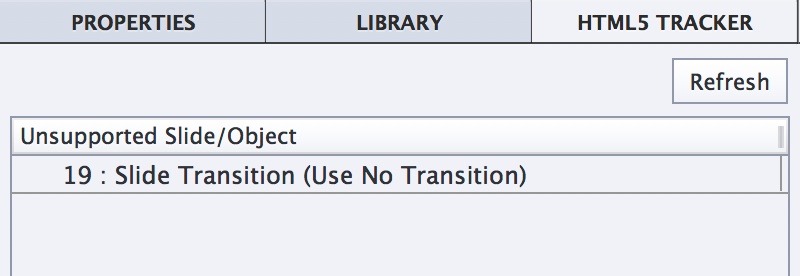
- Use the Window | HTML5 Tracker menu item to open the HTML5 Tracker panel.
The HTML5 Tracker panel lists the features and objects used in the current project that are not supported in HTML5. There should be one unsupported feature listed in the HTML5 Tracker panel because the transitions between slides are not supported in HTML5.
Note that this panel is floating on top of the interface. This is very different from the Slide Notes panel you opened earlier that was attached (docked) at the bottom of the interface.
Each panel of Captivate is either docked or floating. Also note that in Captivate 2017, it is not possible by default to dock a floating panel or undock a docked panel.
The interface is now very different from what it was when you first opened Captivate.
- Exit Captivate without saving any changes made to the open file.
- Reopen Captivate.
When Captivate reopens, you should see the Recent tab of the Welcome screen by default. There is a thumbnail showing the last open project(s).
- Double-click the encoderDemo_800 thumbnail to reopen the project.
When the project reopens, note that the default Captivate interface is displayed, even though many more panels were open when you exited Captivate.
Thanks to these little experiments, you were exposed to some important basic concepts about the Captivate interface. Before moving on, let's summarize what you have learned so far:
- The Captivate interface is composed of panels laid out around the main editing area called the Stage.
- The grey area around the Stage is called the Scrap Area. Objects on the Scrap Area do not show in your online course.
- By default, most of the panels are hidden, making the interface simple and clean.
- The Properties inspector, the Library panel, and the Timeline are the most important and most commonly used components of Captivate. This is why they are easily accessible from the default interface.
- Some panels of Captivate are not immediately available on the default interface. You must use the Window menu to show and hide these panels.
- The panels of Captivate are either docked on the interface or floating on top of it.
- When you close and restart Captivate, the interface returns to its default layout.
Using the Advanced Interface Mode
If you are used to other Adobe tools, such as Photoshop, InDesign, or Illustrator, the default behavior of the Captivate interface probably looks very different. Luckily, there is a way to make the Captivate interface behave similarly to the interface of other popular Adobe tools. This is called the Advanced Interface Mode.
- Use the Adobe Captivate | Preferences (macOS) or the Edit | Preferences (Windows) menu item to open the Preferences dialog of Captivate.
- In the General Settings category of the Preferences, select the Enable custom workspaces/panel undocking option, as shown in the following screenshot:
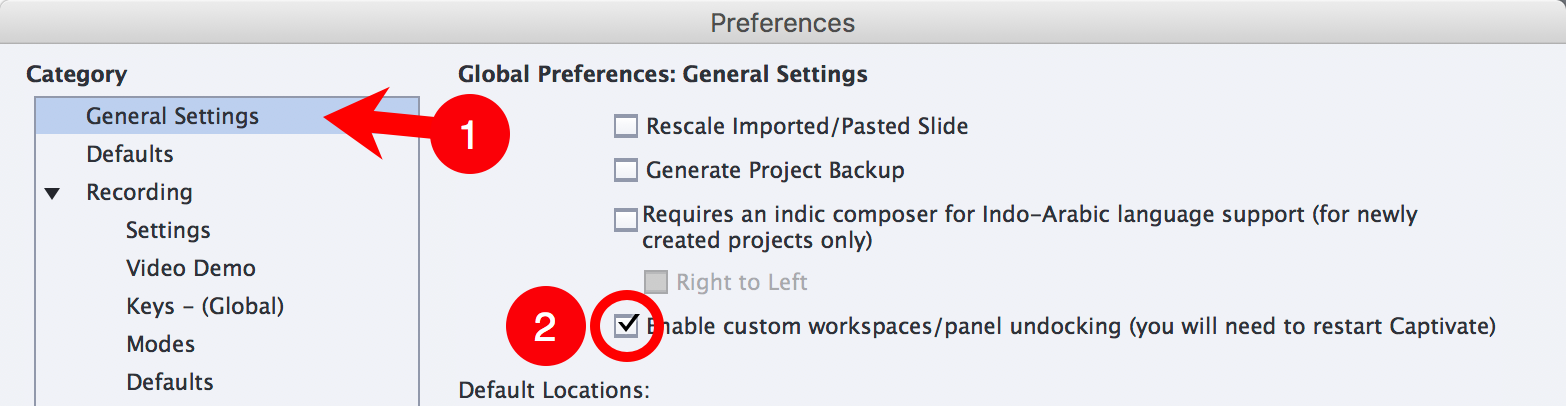
- Click OK to validate the new option and close the Preferences dialog.
- As indicated in the Preferences dialog box, restart Adobe Captivate to enable the new option (make sure you don't save the eventual changes made to the file).
- When Captivate restarts, double-click the encoderDemo_800 thumbnail of the Recent tab of the Welcome screen to reopen the project.
Note that the Properties and Library icons of the Toolbar are no longer displayed.
- Go to Window | Properties to reopen the Properties inspector.
- Use the same procedure to reopen the Library, the Timeline, and Slide Notes panels.
- Return to the Window menu again, this time to activate the HTML5 Tracker floating panel.
- At the bottom of the interface, click the Timeline button to reveal the Timeline panel.
The interface should now look pretty much the same as when you closed Captivate earlier in this chapter.
- Restart Captivate one more time without saving the changes made to the project.
- When Captivate restarts, reopen the project by clicking the encoderDemo_800 thumbnail on the Recent tab of the Welcome screen.
In Advanced Interface Mode, the panel layout is always maintained when you restart Captivate.
In the next section, you will take a closer look at those panels. But first, let's first have a quick summary of what has been covered in this section:
- To make the Captivate interface behave like the interface of other common Adobe tools, you must switch to the Advanced Interface Mode.
- To enable the Advanced Interface Mode, select Enable custom workspaces/panel undocking in the Preferences box of Captivate. It is necessary to close and restart Captivate for this change to take effect.
- In the Advanced Interface Mode, the Library and the Properties icons of the Toolbar are not displayed. Enabling and disabling panels is done exclusively through the Window menu.
- In the Advanced Interface Mode, the workspace is always maintained when you restart Captivate.
Working with panels
You already know that Captivate contains a lot of panels and that those panels can be shown or hidden using the Window menu. In the Advanced Interface Mode, the Captivate interface offers even more flexibility. In this section, you will learn how to move the panels and create a unique custom screen.
- Place your mouse on the black line at the top of the floating HTML5 Tracker panel.
- Drag the panel to the right and drop it on top of the Properties and Library labels in the top right corner of the screen.
When a panel is moved above a possible docking location, a blue outline appears on the screen. Releasing the mouse at that moment docks the panel at the location highlighted by the blue outline.
This action docks the HTML5 tracker panel with the Properties inspector and the Library panel, as shown in the following screenshot:
This first action illustrates how to dock the panels that are initially floating on the interface. You will now do the opposite to illustrate that a panel that is initially docked can be turned into a floating panel:
- Place your mouse on top of the Library label on the right side of the screen.
- Drag the Library panel out of the Library/Properties/HTML5 Tracker group and drop it on top of the stage.
The Library panel is now a floating panel, even though it was docked by default. You have now arranged the panels in a truly unique way. This customized arrangement of your panels is called a workspace.
Creating a new workspace
The Advanced Interface Mode of Captivate allows you to apply your own unique (custom) workspaces. Depending on the project you are working on, the size of your computer screen, your working habits, and so on, you might want to have several workspaces and quickly switch between them. In this section, you will first learn how to reset the default workspace. Then, you will create and save a new custom workspace.
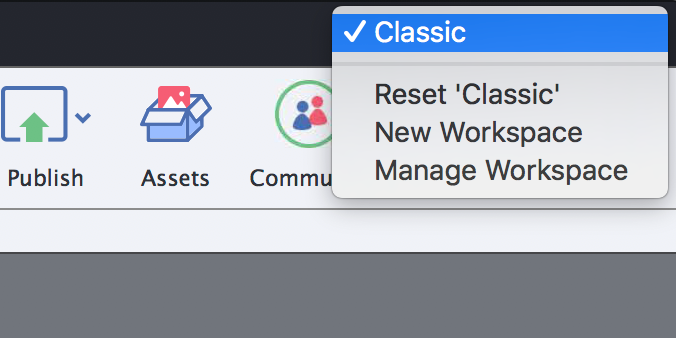
The default workspace you see when you first open Captivate is called the Classic workspace, as shown in the top right corner of your screen.
- Click the Classic button at the top right corner of the screen.
- Choose Reset Classic in the drop down menu, as shown in the following screenshot.
After doing this, your Captivate screen reverts to what it looked like when you opened the application at the beginning of this chapter:
The default Classic workspace is an excellent starting point for defining a custom workspace.
- Use the Window | Timing Properties menu item to activate the Timing panel on the right side of the screen.
- Select the Adobe Media Encode CC 2015 title on the slide and note that the Timing panel updates.
Just like the Properties inspector, the Timing panel always shows the properties pertaining to the object you select. Note that the Timing panel of Captivate precisely sets the timing of that object and also applies effects to that object.
- Use the Window | Properties menu item to activate the Properties inspector.
- Drag the Properties inspector out of the Properties/Timing group and drop it on top of the Filmstrip label on the other side of the screen. This docks the Properties inspector with the Filmstrip panel.
After this last action, your screen should look like the following screenshot:

This workspace is very practical when you have to precisely define the timing and apply effects to the selected object. You will now save this panel layout as a new workspace.
- Click the same Classic button you used earlier at the top right corner of the screen.
- Choose New Workspace from the drop down menu.
- In the New Workspace dialog, name your new workspace Timing and click OK.
Note that a Timing button now replaces the Classic button. You can use this button to switch between the Classic workspace and your own custom Timing workspace!
- Click the Timing button at the top right corner of the screen.
- Select the Classic workspace in the drop down menu to reapply the default Classic workspace.
- Click the Classic button and reapply the Timing workspace.
This demonstrates how you can quickly switch between your saved workspaces.
Extra credit
You now know all the tools to create custom workspaces. Take some time to experiment with these tools on your own. Try turning panels on and off using the Window menu. Explore the other panels of Captivate, such as the Question Pool and the Swatch Manager. When you feel like you have a great workspace, save it under a name of your choice.
Renaming and deleting custom workspaces
If you ever need to rename or delete a custom workspace, use the following steps:
- Go to Window | Workspace | Manage Workspace.
Note that the Window | Workspace menu displays the very same information as the workspace switcher button at the top right corner of the screen.
- In the Manage Workspace dialog, choose the workspace to delete/rename.
Note that the default Classic workspace is not listed. This means that this default workspace cannot be renamed or deleted.
- Click the Rename or Delete button. In this example, click the OK button to close the box without any changes.
- Open the workspace switcher one more time to reapply the Classic workspace before moving on to the next topic.
There is no menu item to update an existing workspace. If you want to update an existing workspace, use the New Workspace menu item and give the new workspace the name of the existing workspace you want to update.
Workspaces in normal mode
You can return to the normal interface mode using the following steps:
- Use the Adobe Captivate | Preferences (macOS) or Edit | Preferences (Windows) menu item to reopen the Preferences dialog of Captivate.
- In the General Settings category, deselect the Enable custom workspaces/panel undocking and click OK to validate.
- Restart Captivate without saving the changes made to the open project.
- When Captivate reopens, double-click the encoderDemo_800 thumbnail to reopen the project.
Confirm that the Properties and Library buttons are back in the top right corner. This indicates that you are back in normal interface mode.
- Click the workspace switcher button at the top right corner of your screen. It should currently read Classic.
In normal interface mode (that is, when the Enable custom workspaces/panel undocking option of the Preferences is not selected), only the Classic workspace can be applied or reset. If you want to use your custom Timing workspace again, you first need to return to Advanced Interface Mode and to restart Captivate.
Before moving on to the next topic, these are the key points to keep in mind when creating custom workspaces:
- It is necessary to set Captivate to Advanced Interface Mode to dock and undock panels and create new workspaces.
- Use the Window | Workspace | New Workspace menu item to save the current panel layout as a new workspace. This menu item is also accessible from the workspace switcher at the top right corner of your screen.
- Use the Window | Workspace | Manage Workspace menu item to rename or delete your custom workspaces.
- To update an existing workspace, use the New Workspace command to give the new workspace the same name as the workspace you want to update.
- The default Classic workspace of Captivate cannot be deleted or renamed.
- In normal interface mode, only the default Classic workspace is available.
Join the Captivate community
One of the most recent additions to the Toolbar is the Community icon. Clicking this icon opens the Adobe eLearning Community portal inside Captivate.
The Adobe eLearning Community Portal is the best place to find information and to interact with other Captivate users. The elLearning Community Portal features the following:
- Blog posts from members of the community.
- Showcases of Captivate course modules.
- A very active forum where you can ask questions and get answers from some of the most influential and popular Captivate users.
- A wide library of video tutorials.
- An agenda of upcoming events, including webinars hosted by members of the Captivate team or members of the community (including us, the authors of this book!).
- And much more!
Performing activities on the eLearning community (such as answering questions, writing blogs/articles, and so on) gives you an opportunity to score points and enhance your level as a product expert. These points can be turned into a wide variety of exciting incentives, including free Captivate licenses and invitations to live events.
From newbies to legends, there is a place for everyone on the eLearning portal!
Exploring the sample applications
Now that you know a bit more about the Captivate interface, let's take a look at the sample applications you will build in this book. These applications are designed to showcase almost every single feature of Captivate. Use them as a reference if there is something unclear while you are working through the exercises.
Experiencing the Encoder demonstration
The first application that you will explore is a typical Captivate project. It uses the screen capture feature of Captivate to create a screenshot-based course module.
- With the Chapter01/encoderDemo_800.cptx file still open, click the Preview icon on the Toolbar.
- From the drop down list, choose the Project item to preview the entire project.
Captivate generates a temporary file and opens it in the floating Preview pane. Follow the onscreen instructions to go through the project. This puts you in the same situation as a learner viewing this eLearning content for the first time.
This first sample project is called a Demonstration. As the name suggests, a demonstration is used to demonstrate something to the learner. Consequently, the learner is passive and simply watches whatever is going on. In a demonstration, the Mouse object is shown. It moves and clicks automatically. If the learners move their own mouse, it will not affect the content in any way.
This particular demonstration features some of the most popular Captivate objects, including Text Captions, Highlight Boxes, and Smart Shapes. The audio narration was generated by Captivate's Text-To-Speech tool. We have simply typed the narration in the Slide Notes panel, and Captivate turned it into audio files using the voice of a predefined speech agent. You will learn more about audio and Text-To-Speech in Chapter 3, Working with Multimedia.
Another popular feature in Adobe Captivate is the ability to add Closed Captions to the audio narration. If you have used Captivate before, this is yet another area of the application that has been completely updated in Captivate 2017. You will learn more about Closed Captions and Accessibility in Chapter 12, Creating Accessible eLearning.
- When you reach the end of the project, close the Preview pane.
- Take some time to take a closer look at the Preview icon as shown in the following screenshot:

This is one of the icons you'll use the most during this book and when you design your courses. It has seven options that control which part of the project you want to preview and how you want to preview it. Note that each of these options is associated with a keyboard shortcut which will be different depending on the system you work on (macOS or Windows). Place your mouse on top of each of the items to see the associated keyboard shortcut in a tooltip.
When in a Responsive Project, the preview options will not behave exactly as described in the following list. Responsive Projects will be covered in Chapter 10, Creating a Responsive Project.
Let's now describe the options of the Preview icon in more detail:
- Play Slide: This option plays the current slide in the Captivate interface. It is the only preview option that does not open the default web browser or a floating preview pane, so the Play Slide option is not able to render all the features of Captivate. Previewing a single slide is a good option to quickly test the timing of the objects.
- Project: This option generates a temporary Flash file and plays the entire project in the Preview pane.
- From this Slide: This option generates a temporary Flash file. Captivate opens the Preview pane and plays the project from the currently selected slide to the end.
- Next 5 slides: This is a great option to quickly test a specific sequence of the project. Captivate opens the Preview pane to play a temporary Flash file containing five slides, starting from the currently selected slide.
- In Browser: Using this preview option, you can see the project in a context very close to the one that will be used by your learners. Captivate generates a temporary Flash file as well as a temporary HTML file. It then plays the entire project in the default browser.
- HTML5 in Browser: This option is very close to the previous one. The only difference is that the project is published in HTML5, JavaScript, CSS, and images. It is then played in the default web browser. Note that some features and objects of Captivate are not supported in the HTML5 output. If you plan on publishing your project in HTML5, make sure you use this preview option to ensure that the features, animations, and objects you use in your project are supported in HTML5.
- Preview in SCORM Cloud: You can use this preview option to test the reporting features of your course. It generates a temporary Flash file of the project and uploads it to SCORM Cloud. When the upload is complete, you can see your project in a special preview pane, along with a log of all communications exchanged between the LMS and your content. You will learn more about SCORM, LMS, Quiz, and reporting in Chapter 7, Working with Quizzes. Note that this preview option is the only one that is not associated with a keyboard shortcut.
In Captivate, a panel can be floating or docked. When a panel floats, the tools and switches on the other panels are still active. But when the Preview panel is open, only the buttons of that panel are active, while the tools of the other panels are no longer active. The Preview panel is said to be a Modal floating panel because it disables every tool situated on other panels. Also note that the Preview panel cannot be docked.
Experiencing the Encoder simulation
You will now open another sample project. Actually, it is not a real other project, but another version of the Encoder demonstration you worked with in the previous section:
- Use the File | Open menu item to open the Chapter01/encoderSim_800.cptx file situated in the exercises download.
- Once the file is open, click the Preview icon on the Toolbar and choose the In Browser option.
- The project opens in the default web browser and starts playing automatically.
This project is made of exactly the same slides and assets as the demonstration you saw in the previous section. When the project reaches slide 3, it stops and waits for you to interact with the course. This is the main difference between a demonstration and a simulation.
In Captivate, a simulation is a project where the learner is active. In a simulation, the Mouse object is hidden, as learners use their own mouse to click around the screen and progress toward the end of the course. The fact that the students are active implies a new level of complexity; the learners can perform either the correct or the incorrect action.
In each case, the course must react accordingly. This concept is known as branching. This means that each student experiences the course module based on their own actions.
- Follow the onscreen instructions and try to perform the correct actions, as described in the demonstration project of the previous section.
- If you ever perform the incorrect action, a red Failure Caption will help you find the right answer. Failure captions are one of the most basic forms of branching. The caption shows only if the student's answer is incorrect.
- On slide 12, you will fill the new width of the video file. Type 400 and press Enter to continue to the next step.
- When you are done, close your browser and return to Captivate.
This second sample file features pretty much the same Captivate objects as the demonstration you completed in the previous section. Both typing and mouse actions are replaced by interactive objects. The Mouse is replaced by Click Boxes and a Text Entry Box replaces the typing object on slide 11. These interactive objects can stop the course and wait for the learner to interact. Using the interactive objects of Captivate will be covered in Chapter 5, Working with Interactive Objects.
Both the Encoder demonstration and simulation are based on the same screenshots. To create these sample courses, the first two steps of the production process described earlier were used:
- In step one (the slide creation step), the actions were performed in the actual Adobe Media Encoder. They were recorded by Captivate behind the scenes.
- In step two (the postproduction step), the course was edited in Captivate. Audio and Closed Captions were added, the title and ending slides were created, timing was adjusted, and so on.
- Step three (the publishing step) has not yet been performed on these files.
Experiencing the Encoder Video Demo
Video Demo mode is a special recording mode of Captivate that is used to produce .mp4 video files. These files can be uploaded to online services such as YouTube, Vimeo, or Daily Motion for playback on any device (including iPad, iPhone, and other internet enabled mobile devices).
- Use the File | Open menu item to open the Chapter01/encoderVideo.cpvc.
First, note that a Video Demo project does not use the same .cptx file extension as a regular Captivate project. It uses the .cpvc file extension instead. This is the first indication that this project is going to behave differently than the other ones you have worked with so far. In addition to having a specific file extension, Video Demo projects also have their own unique interface, as shown in the following screenshot:

In the preceding screenshot, note the absence of the Filmstrip panel. A Video Demo project is not based on slides. Actually, it is a single big video file. So the Filmstrip panel makes no sense in a Video Demo project.
In a video file, interactions are not possible. The file can only be experienced from start to finish in the order defined by the teacher. To use instructional design terminology, a video file gives a linear experience to the learner while branch-aware interactive projects provide a nonlinear experience where a learner can make choices that change the way the course progresses. Therefore, interactive objects, quizzes, and branching are not available in a Video Demo project.
- Take some time to inspect the rest of the Video Demo screen. Try to spot the other differences between the regular Captivate interface and Video Demos.
- When you are ready, click the Preview icon. Surprise! Only two options are available in the Preview icon!
- In the Preview dropdown, choose the Play Slide option.
- Watch the whole video as if you were viewing it on YouTube!
Experiencing the take The Train sample application
You will now preview the next sample application using the following steps:
- Use the File | Open menu item to open the Chapter01/takeTheTrain.cptx file.
- Once the file is open, click the Preview icon on the Toolbar and choose the HTML5 in Browser option.
- View the course in your web browser, as a student would.
This sample application is very different from the projects you worked with so far because it is not based on screenshots or screen recording. The Capture tool of Captivate was not used in this example. Instead, all the slides have been carefully crafted in Captivate.
For its audio narration, this project does not use Text-To-Speech. Instead, the narration was recorded and polished in an external audio application (Adobe Audition, in this case) and imported to the project.
This course is also much more involved than the Encoder examples. Advanced Actions and Variables are used throughout the project to power the dynamic features, such as the name of the student appearing in the title of slide 4. This course also features the certificate interaction at the very end (only if you pass the Quiz!), a video is inserted on slide 23 of the project, and it uses the built-in collection of characters to spice up the training with a human touch! But the most impressive feature of this particular project is probably the Quiz, one of the most important and most popular tools in Captivate.
The project contains eight Question Slides. Seven of these are stored in the Question Pool. Each time the project is viewed, three questions are randomly chosen from the Question Pool and displayed to the student. If you want to experiment with this feature, view the sample project a second time. Because we used the Question Pool to generate the questions, you should not be asked the same Quiz questions as when you first experienced the project.
Experiencing the Adobe Captivate 2017 Training application
The next sample course you will see is not part of the download that comes with this book. Instead, you will use one of the sample applications that are included in Captivate. Use the following steps to open it.
- Close every open file (without saving) and return to the Captivate Welcome screen.
- Click the Sample Projects/Tutorials icon on the right side of the Captivate Welcome screen (see 1 on the following screenshot).
As shown in the following screenshot, you can access various sample files and tutorials right from the Welcome Screen of Captivate. This is a great resource to learn Captivate and to discover the new and enhanced features of Captivate 2017:

You will now open one of the sample files provided by Adobe:
- Double click the thumbnail image on the Welcome Screen to open the AdobeCaptivate_2017_Training project (see 2 in the preceding screenshot).
- Click OK to clear the message telling you that there are lots of unused assets in the Library.
The project you just opened is a Responsive Project. This means that it can adapt itself to the screen it is viewed on. Note the extra toolbar at the top of the stage. This extra toolbar lets you switch between different devices in order to check how the project is displayed on screens of different sizes.
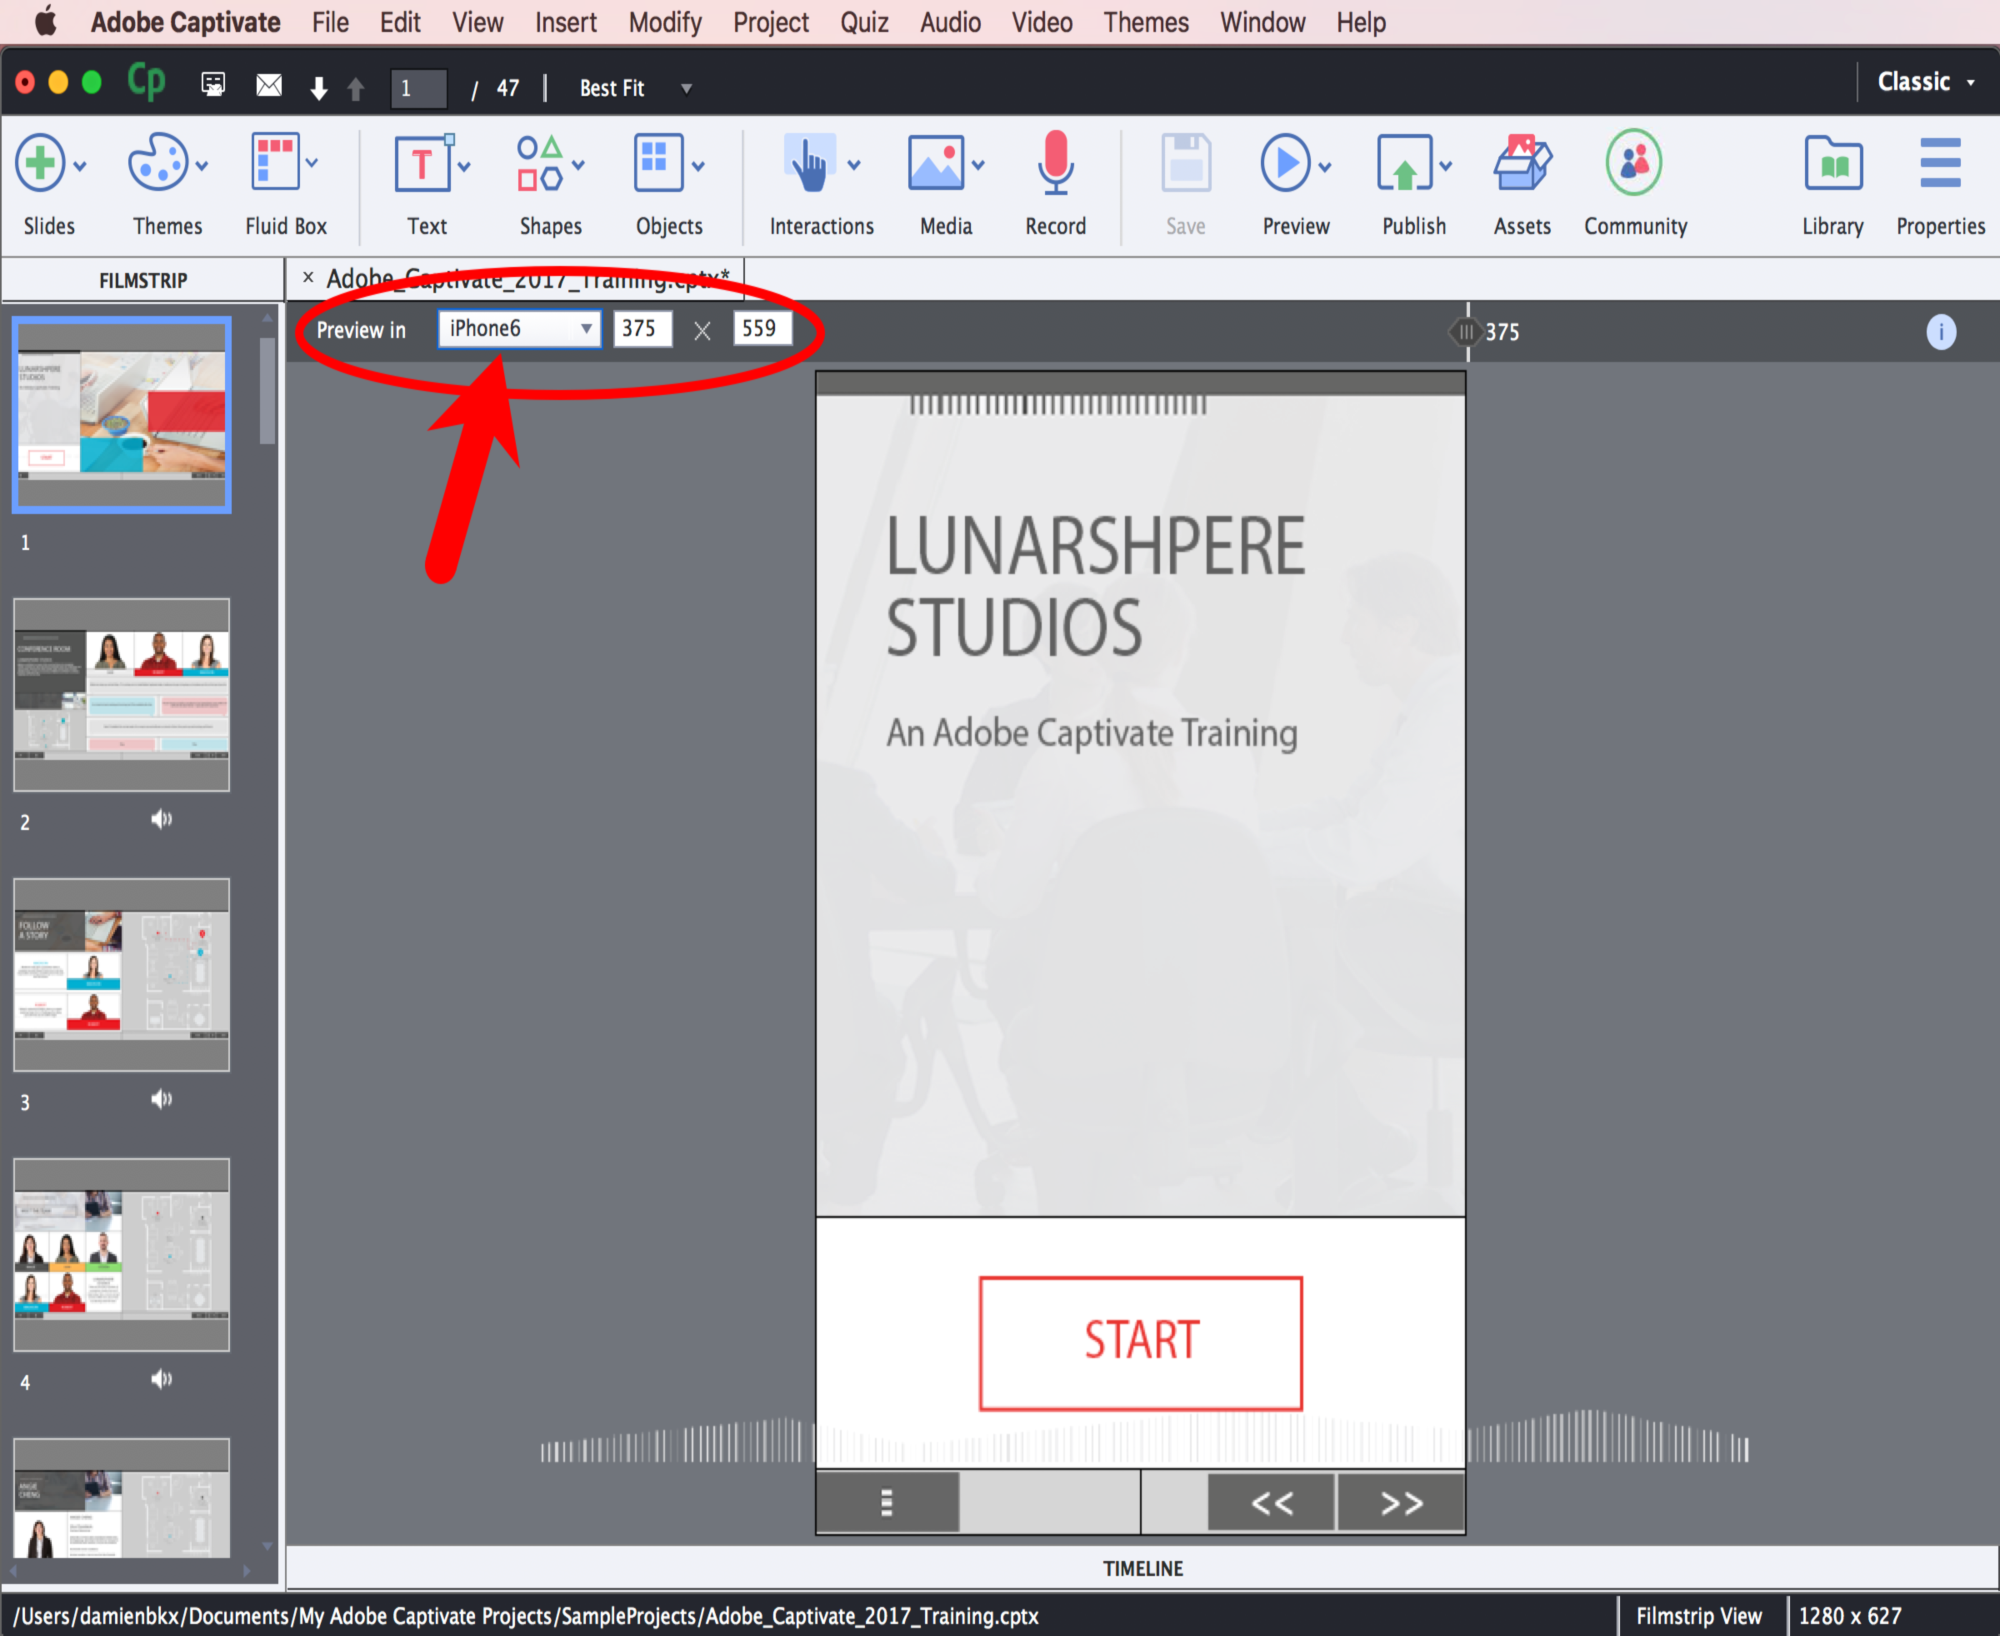
- In the top left corner of the stage, open the Custom drop down menu.
- Choose iPhone6 in the list of available devices.
This action resizes the Stage to the size of an iPhone 6 (375 px by 560 px). As shown in the following screenshot, the elements of the current slide are rearranged to fit the new size of the Stage. Some elements (such as the big image that was on the right side of the stage) have even been completely removed to accommodate the reduced real estate of a smartphone:
You will now preview this project using the following steps:
- Click the Preview | Project icon on the Toolbar.
There are a lot of differences in the way you preview a Responsive Project compared to the way you preview a nonresponsive Captivate project:
- Firstly, the Preview icon on the Toolbar contains fewer options.
- Secondly, a Responsive Project is always previewed in the default browser installed on your computer and not in the Preview pane of Captivate.
- Thirdly, in the web browser, there is a slider just above the preview to let you change the size of the Stage as you preview your project.
All these changes have a single root cause: a Responsive Project can only be published in HTML5. That's why you need a browser to preview the project.
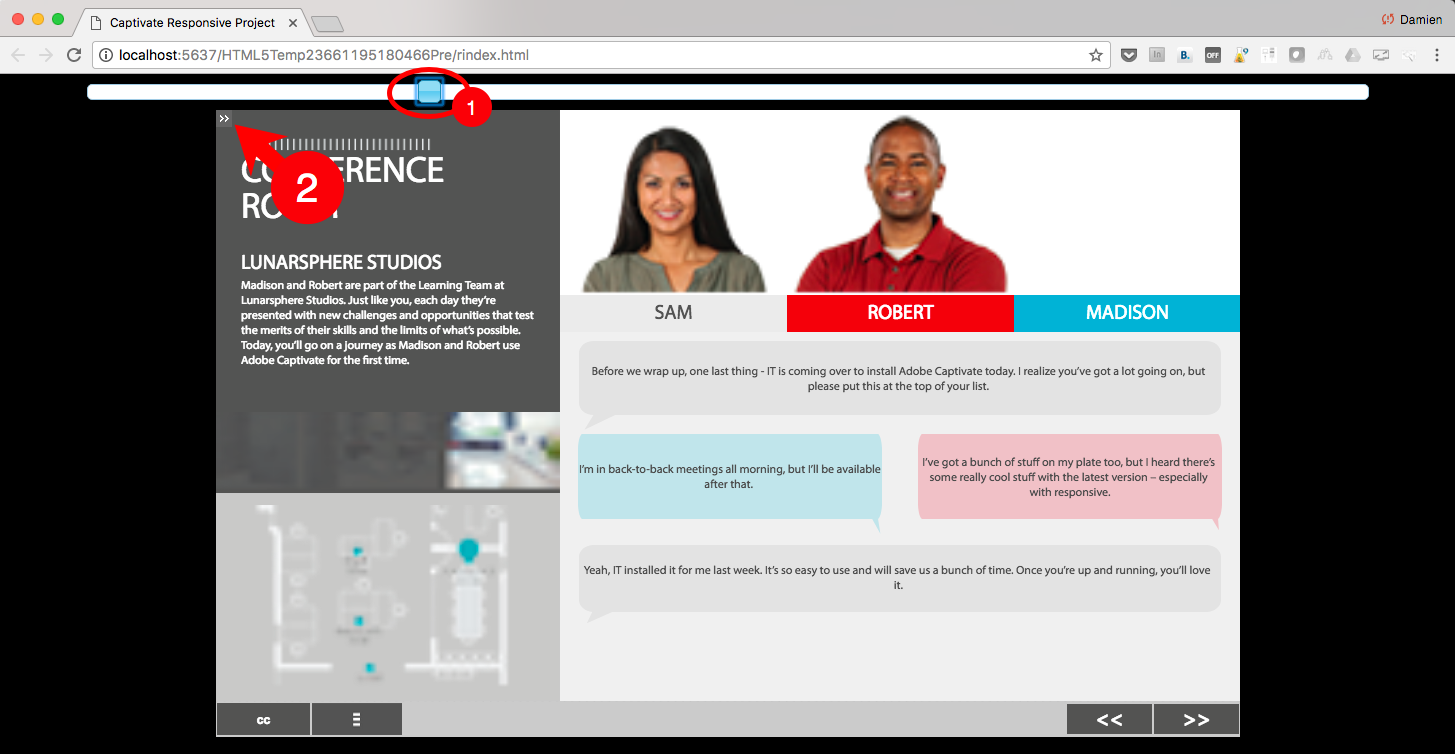
- Preview the whole project in the web browser and use the slider above the preview to change the size of the stage (see 1 in the following screenshot). Note how the elements of the various slides of the project are rearranged on the smaller screen sizes.
- During the preview, also note the very small double arrow icon in the top left corner of the preview (see 2 in the following screenshot). This icon is used to toggle the Table of Contents on and off.
- When the preview is finished, close the web browser and return to Captivate.
If you have worked with Adobe Captivate before, this project uses a brand new Responsive Design approach. We have used the exciting new Fluid Boxes of Adobe Captivate 2017 to define how the course will look on different devices.
You will learn more about Responsive Projects and Fluid Boxes in Chapter 10, Creating a Responsive Project.
The special previewing features of the Responsive Projects let you test the responsiveness of your project during the development phase, but they have one major disadvantage. Because you preview the project using the default browser of your desktop or laptop computer, you can't experience the course on an actual mobile device.
The best test drive for such a project is to view it on a mobile device using a touchscreen and tap actions (as opposed to the mouse pointer). Unfortunately, this requires using special tools such as a web server. Setting up these tools is way beyond the scope of this book, but if you have such a server available, use it to experience your project on your tablet or Smartphone.
Browsersync is an excellent tool to test your responsive projects on your actual mobile device. Browsersync can be downloaded for free at https://www.browsersync.io/. Unfortunately, Browsersync was designed as a web developer tool. It requires some configuration and the use of the command line to be used.
Experiencing the Introduction to Fluid Boxes project
This is the last sample project for you to experience before wrapping up this chapter. Use the following steps to open and preview this project:
- Open the Chapter01/Introduction to Fluid Boxes.cptx file.
- Use the Preview | Project icon on the Toolbar to preview the entire project in the Preview pane of Captivate.
This has been entirely developed in Microsoft PowerPoint and converted into a Captivate project using Captivate's ability to import PowerPoint slides. You will learn about importing PowerPoint presentations in Captivate in Chapter 11, Using Captivate with Other Applications.
- Use the File | Close All menu item to close every open file. If prompted to save the changes, make sure you do not save the changes to these files.
After viewing these sample applications, you should have a pretty good idea of the tools and general capabilities of Adobe Captivate. Before moving on, let's summarize what you have learned from these sample courses:
- Captivate is able to capture the actions you do on your computer and turn them into slides using a sophisticated capture tool based on screenshots.
- A demonstration is a project in which the learner is passive and simply watches the onscreen action.
- A simulation is a project in which the user is active.
- Audio and video can be imported to Captivate. The application also features Text-To-Speech and Closed Captioning.
- Question Slides can be created in Captivate. These Question Slides can be stored in Question Pools to create random quizzes.
- Other objects that can be included in a Captivate project include Text Captions, Highlight Boxes, Smart Shapes, Images and more.
- Captivate contains many interactive objects. Some of them are able to stop the course and wait for the user to interact.
- A Video Demo is not based on slides. It is a video file that can be published as a standalone .mp4 file or uploaded to YouTube or other video applications.
- Video Demo projects use the .cpvc file extension and have a specific user interface.
- A Responsive Project is able to adapt itself to the screen on which it is viewed. You can use the new Fluid Boxes of Captivate 2017 to decide how the elements of the slides of the project should be rearranged on various screen sizes.
- Captivate is able to import PowerPoint slides, making it very easy to convert an existing PowerPoint presentation into an interactive Captivate project.
Summary
In this chapter, you were introduced to the four steps of a typical Captivate production process. You toured the application interface and learned how to customize it to fit your needs. Thanks to the Advanced Interface Mode and to the Workspace feature, you were able to save your customized interface as a new Workspace and to reapply your custom panel layout anytime you want to.
Finally, you walked through the sample courses that you will develop in this book, giving you a first, high-level overview of the rich set of features of Adobe Captivate 2017.
In the next chapter, you will start crafting the Take the Train project and learn about the basic objects of Captivate 2017.
Meet the community
The title of the book you are reading is Mastering Adobe Captivate 2017, Fourth Edition. In order to truly master a piece of software, we are convinced that you should be introduced to the community that supports it. The Adobe eLearning community portal (http://elearning.adobe.com) makes it easier than ever for you to be a part of the community and to get in touch with the most famous Captivate legends. To help you further, we have provided a Meet the community section at the end of every chapter, in which we will introduce you to the key members of the community. By the end of this book, you'll have the names, blog addresses, twitter handles, and other contact details of some of the most influential members. We hope these resources will jump-start your own Captivate career and your involvement in the community.
Allen Partridge
At the end of this first chapter, we want to introduce you to Allen Partridge. Allen is the eLearning Evangelism Group Manager for Adobe. Allen is an awesome speaker and a wonderful teacher. His teaching background makes him an invaluable asset to the Captivate community.
Damien
Allen wrote the foreword of my first book, Mastering Adobe Captivate 6. I had the chance to meet with Allen in the summer of 2013 during the Adobe Education Leaders conference in San Jose. It was one of the highlights of my trip to California and I have a vivid memory of that moment.
Pooja
Allen is officially the best colleague a person can get. I've thoroughly enjoyed working alongside Dr. Partridge and have learned a lot from him. When I joined the Adobe eLearning team in 2011, he made me feel comfortable in my new role and environment, and he was always there to help me out. Allen is a Rockstar presenter! If you've not attended his webinars/conference presentations, you are missing something big. I'm proud to have him as a friend, colleague, and mentor!
Bio
Dr. Allen Partridge is the eLearning Evangelism Group Manager for Adobe.
He has written several books and a host of articles on topics ranging from 3D game development to instructional design for new technologies. He is active in the explorations of immersive learning as well as traditional, multimedia-enhanced eLearning and rapid eLearning. He works closely with the eLearning Suite and Captivate teams at Adobe, providing a channel to customer needs and concerns, and helping facilitate communication among the team members.
Contact details
- Blog: http://elearning.adobe.com/
- Twitter: @adobeElearning
- Facebook: http://www.facebook.com/adobecaptivate
- LinkedIn: http://www.linkedin.com/in/doctorpartridge
- YouTube: http://www.youtube.com/adobeelearning/

