


In the first chapter of this book, we will walk through building an e-mail campaign using the Eloqua platform.
Eloqua is a Software as a Service (SaaS) platform, specifically referred to as a marketing automation platform. It offers a set of tools to manage scalable digital campaigns consisting of emails, landing pages, forms, and automated processes. Utilizing marketing automation software allows marketers to collect data and digital activity, sometimes referred to as digital body language. This information can then be used for campaign performance analysis. Additionally, marketing automation helps to reduce the time and effort spent on campaign execution.
Let's say that you, as a marketer, have been tasked to send e-mails inviting prospects to an event your company is sponsoring. This event is four weeks away, and you would like to remind people if they do not respond to the first e-mail within a week before the event date. By using marketing automation, you are able to set up a workflow within a campaign, which would send the first e-mail at a scheduled date and the reminder e-mail at another scheduled date (to those prospects who do not respond to the first e-mail). This can be set up once, turned on, and left to perform the scheduled actions.
Ultimately, by leveraging the power of marketing automation, marketers gain more time to focus on their message and strategy.
This chapter will cover creating the components of a very simple e-mail campaign. The purpose of this campaign will be to send an e-mail to a group of contacts. We will build the campaign workflow, activate the campaign, and measure our results.
Let us take a closer look at the following two basic elements of our campaign:
Because our campaign is very simple, and we know the two elements that will be used, it makes sense to build the elements first, and then build the campaign using them. With more complex campaigns, it can be helpful to design the workflow and add place holders for the assets to understand the overall design and scope of the campaign, before setting up the actual components themselves.
We'll start by logging into Eloqua by going to https://login.eloqua.com. This will redirect us to the login page, where you will need to enter your login credentials.

Before creating our email and segment, let us take some time to review the navigation within Eloqua. Once logged in, you will see a navigation bar across the top of the application. Each of the following five icons in the middle of the navigation bar can be used to move to different areas:
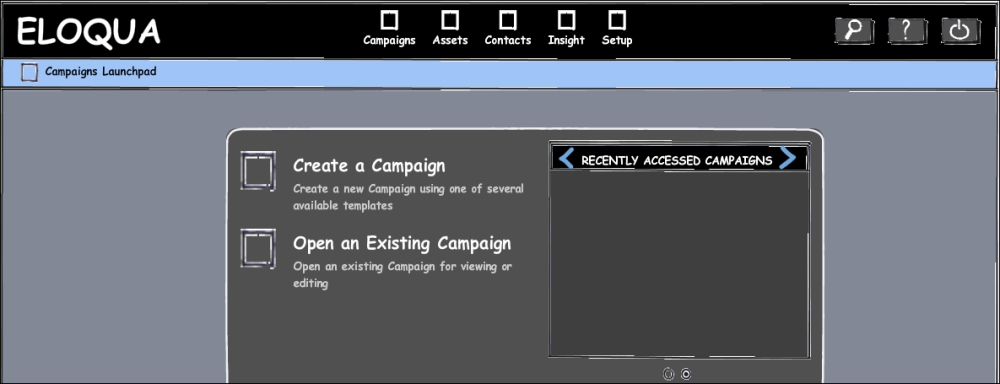
Campaigns: This will open Launchpad to create a new campaign or open an existing campaign. Once a selection is made, the campaign editor will open.
Assets: This has several subcategories. Emails, Landing Pages, and Forms are the primary digital assets you can build and manage in Eloqua. Each of the links in the navigation will bring you to Launchpad. Here, you can create, open, or upload new assets for Emails and Landing Pages. You can create, open, or integrate website forms for Forms from Launchpad. After any of these selections are made, you will be taken to the respective editors in Eloqua. Component Library contains separate components that can be used within the primary digital assets. The examples include images or blocks of HTML content that can be used across several assets.
Contacts: This has several subcategories as well. Contacts, Accounts, and Custom Objects, all take you to sections where you can view and manage the respective records in the system. Lead Scoring opens Launchpad that will take you to the lead scoring editor. Segments also open Launchpad, but it will take you to the segment editor. Data Tools and Shared Library offer additional tools and mechanisms to manage contacts, accounts, and custom objects.
Insight: This opens Eloqua's reporting engine in a separate window. This is where the data inside the system can be analyzed.
Setup: This takes you to the area where you can perform system administration tasks. Here, the fields for objects can be managed, integration with your customer relationship management (CRM) system can be configured, and many other configurations for Eloqua can be set.
The buttons on the right of the navigation bar allow you to search, access support resources and account information, and log out of the system respectively.
On clicking on the Eloqua icon on the left-hand side of the navigation bar, you will always be taken to the My Eloqua page, which has various containers of links for quick access to different specific assets, campaigns, and reports.
Now that we've reviewed the basics of navigating to the different areas of Eloqua, let's navigate to Assets| Emails in the top navigation bar. Here you will see three options: Create an Email, Open an Existing Email, and Upload an Email.
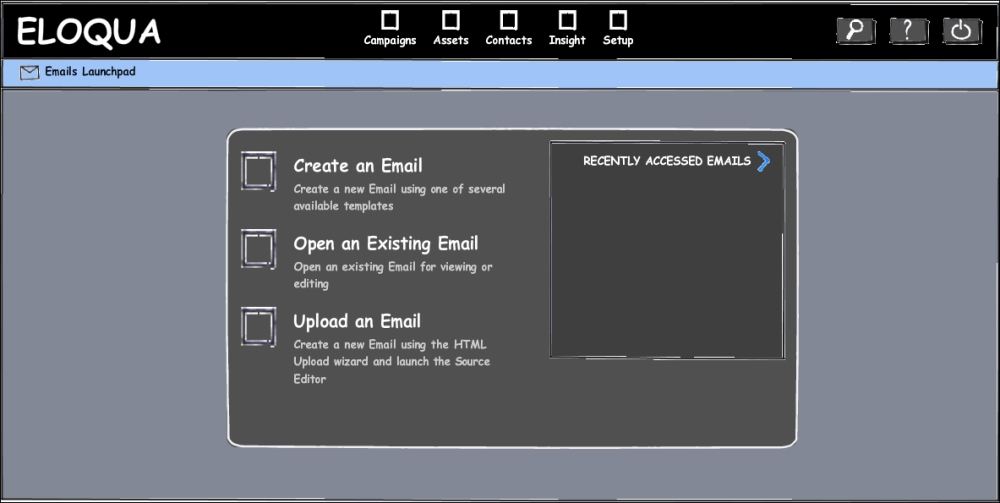
When we create an e-mail by clicking on the Create an Email option, we will be presented with a Template Chooser window. Select Blank Email and click on the Choose button.
The email what you see is what you get (WYSIWYG) editor is now open to create a new e-mail. Important settings for the e-mail are shown at the top of the editor, with more settings available in the options menu accessed by clicking on the gear button in the top-right corner of the editor. The tools available to work on the e-mail can be accessed by clicking on the icons in the left panel of the editor. The e-mail itself is shown in the large right panel of the editor, outlined by a light gray border. We will call this area of the editor the canvas. The different components of the editor will be discussed thoroughly in Chapter 5, Managing E-mails.
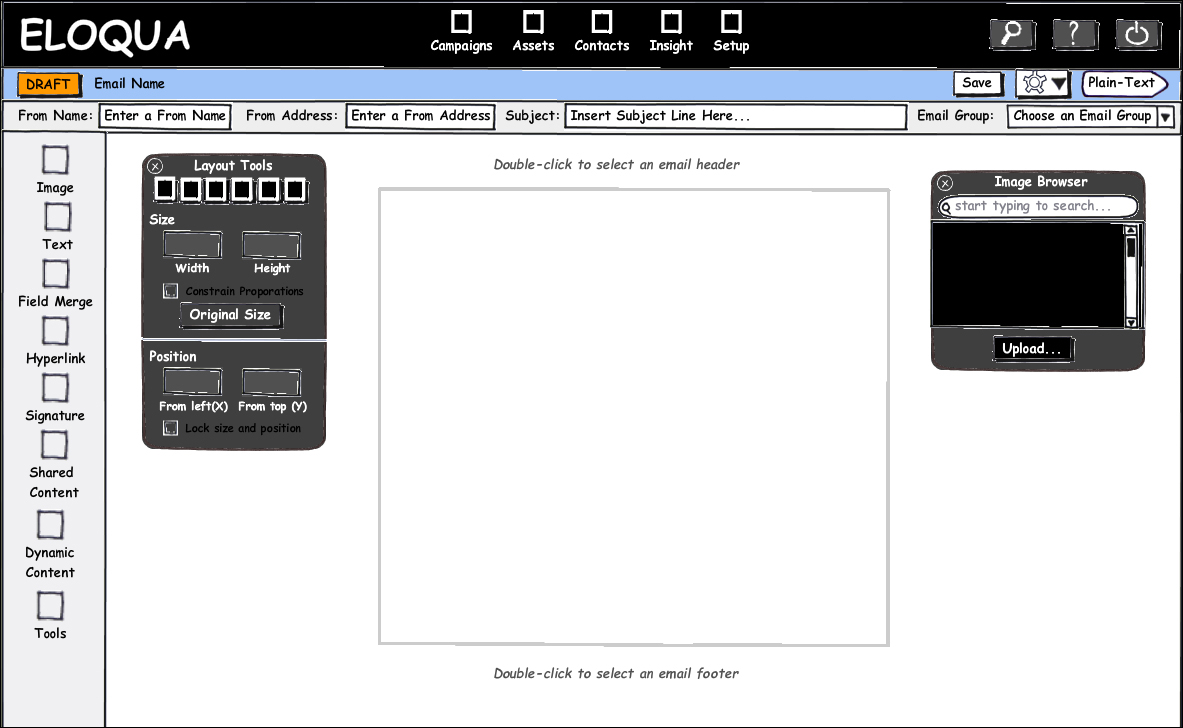
To create a simple e-mail for this campaign, we will first add an image by clicking on the Image icon in the left panel of the screen. The icons here represent the different components that can be used to build an e-mail in Eloqua. Upon clicking on the Image icon, the Image Browser window will appear. It allows us to do any of the following tasks:
Search for an existing image in the Eloqua's image library, which includes the images that have been uploaded to the system in the past.
Scroll to an existing image in the thumbnail previewer.
Upload a new image.
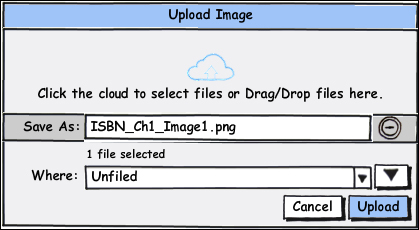
For our purposes, we'll upload a new logo image of a hypothetical company named Beyn. Beyn has just hosted its annual conference, bringing its customers and prospects together to learn about everything related to Beyn. We, as marketers, have been tasked to send a thank you e-mail to all those people who attended our event.
A logo image, logo.gif, which was included in the files for this chapter can be used.
Once you have the logo file ready, click on Upload... in the Image Browser window, then click on the cloud icon to browse for the file, and finally open it. The Save As input will display the name the file will have once it's been uploaded to Eloqua. Optionally, you may rename the image here if you would prefer to search for it by another name in the future. The Where input allows you to choose a folder in which to save the image. Saving it to the Unfiled folder is fine for this exercise. Click on Upload to complete the process.
Tip
Organizing assets
As your organization increases its usage of Eloqua, it can become very important to organize assets within Eloqua by using clear folder structures and naming patterns. A common approach to organizing assets is to create a folder structure based on business unit (if applicable), year and quarter, campaign type, and campaign name.
For example, the folder hierarchy for our campaign may look like the following: Business Services | 2013Q3 | Events | 2013Q3 Global Summit Attendee Follow Up.
Now that the logo is uploaded, searching for it by name will bring it up in the Image Browser window thumbnail previewer. Once it comes up, you can either double-click to add it to the canvas or click-and-drag it onto the canvas.
After the image has been added to the canvas, it should be positioned at the top-left corner of the e-mail. It can be moved around easily with a mouse by clicking, holding, and dragging it around the canvas. To position it more precisely, we will click on the Tools icon in the left panel of the screen to open the tools widget. This widget has six tabs along the top of it. They are Text Tools, Style Tools, Hyperlink Tools, Layout Tools (sometimes referred to as Dimensions Tools), Page Style Tools, and Page Snippet Tools.
To position only the image, we will open the fourth tab, Layout Tools. Here we are able to set the width and height of the image, or reset the size of the image if the width and height were previously adjusted. Additionally, we can control the position of the image on the canvas by setting pixel offsets from the left and top of the e-mail canvas. Let's set From left (X) to 0 and From top (Y) to 20.
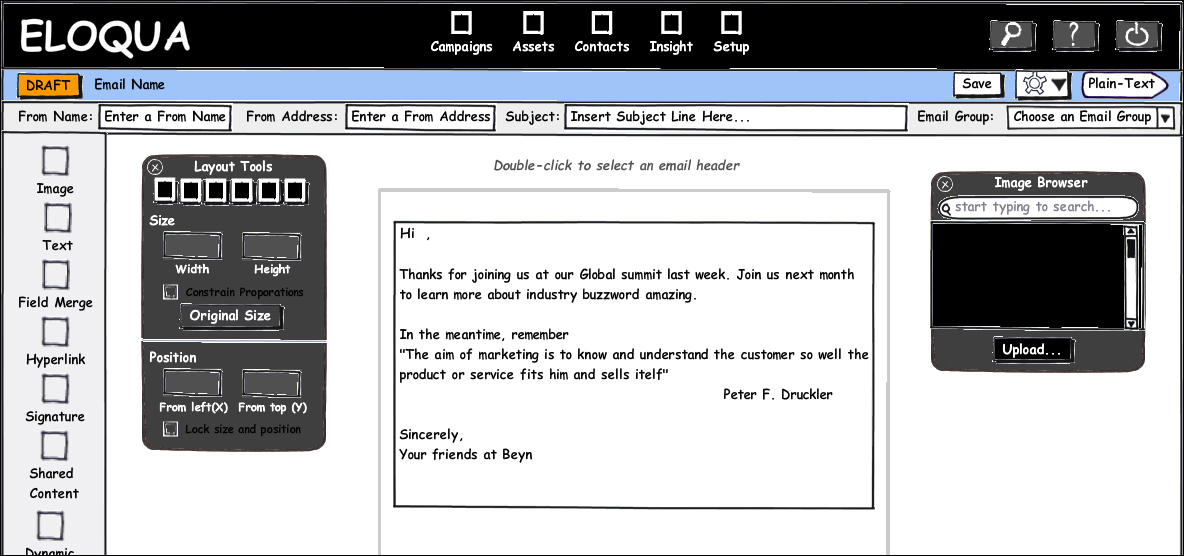
Now that we have a logo for our e-mail, let's add some text. Click on the Text icon in the left panel of the screen to add a new text box to the canvas. You will see a textbox containing the text Double-Click to Edit. Double-click within this box and enter the text.
Tip
If you are copying text from another source, such as a word document or web page, it is always a good idea to first paste the text in a text editor such as Notepad on Windows or TextEdit on Mac OS, and copy it again from there. If text is copied directly from a source, it will be copied along with its current XML tags, which may cause inconsistent formatting issues with your e-mails.
Next, we will add a field merge to the text. A field merge is a special component added in the text that will dynamically populate the field value of a particular contact field for the recipient of the e-mail. In our case, it will populate with the first name of each person who receives the e-mail, provided it exists in their contact record in Eloqua.
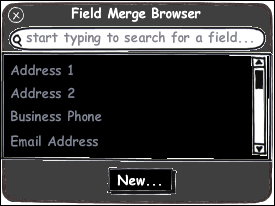
Click on the Field Merge icon in the left panel of the screen to bring up the Field Merge Browser window. It is similar to the Image Browser window in its functionality. We can perform the following tasks in the Field Merge Browser window:
Search for an existing field merge in Eloqua.
Scroll through the existing field merges in Eloqua.
Create a new field merge.
A field merge should exist by default for the first name called First Name used for Email Only. You can either search for it or just scroll through the field merges until you reach it.
If for some reason a field merge does not currently exist for the first name, you can create a new field merge by clicking on the New... button. In the window that opens, enter a name for the field merge, for example, First Name used for Email Only. Enter Colleague as the default value. Finally, select Merge From: Contact Fields, and choose First Name from the drop-down list. Click on Save to return to the editor where you may select your new field merge.
Select the First Name used for Email Only field merge by clicking on it and then click, hold, and drag the field merge to the textbox we previously created.
The textbox will be highlighted when a field merge is dragged over it. Release the mouse button, and the textbox will be emphasized. The next place you click within the textbox will be the placement of the field merge. Click right before the comma on the first line of text to add the field merge. The first line of text should now read.

As a final step to creating the e-mail content, we will turn the text Join us next month into a link to your website.
First, double-click in the textbox and select this text. Second, click on the Hyperlink icon in the left panel of the screen.
This will open the tools panel to the third tab Hyperlink Tools - Text.
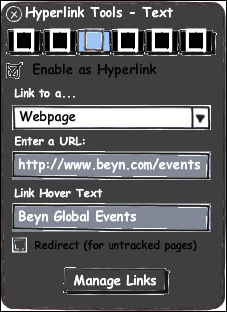
Check the Enable as Hyperlink checkbox and select Webpage. In the Enter a URL input, type the URL of your website. Optionally, enter Link Hover Text. This is the text that will be displayed when a person hovers over this link with his/her mouse before clicking.
There are two types of links that Eloqua will allow you to set up in its editors. They are as follows:
If you are linking to a page on your website, and Eloqua's tracking scripts have been added to it, those tracking scripts will track the page visit and link it back to the e-mail. If you are linking to a page that does not have Eloqua's tracking scripts on it, there is no way for Eloqua to know that someone visited that page. In this scenario we can use a redirect link to capture the visit to the page. An example of when you would check Redirect (for untracked pages) might be on a link that takes people to your company's YouTube page or LinkedIn page.
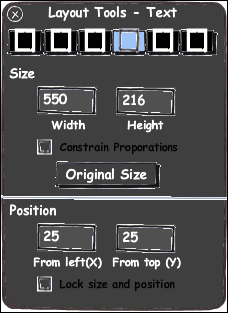
The content of the e-mail is now in place. As the last step in setting up the content, select the textbox and navigate to the fourth tool's panel tab, Dimensions Tools. Set the width of the textbox to 550 and the position from the left to 25. Additionally, you may change the From top (Y) value to position the textbox in the desired place on the e-mail canvas.
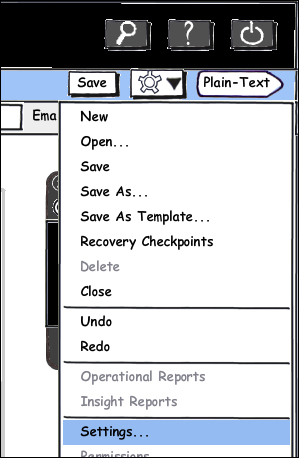
The remaining settings for the e-mail can be set by clicking on the option's drop-down menu in the top-right corner of the screen. From the drop-down menu, select Settings....
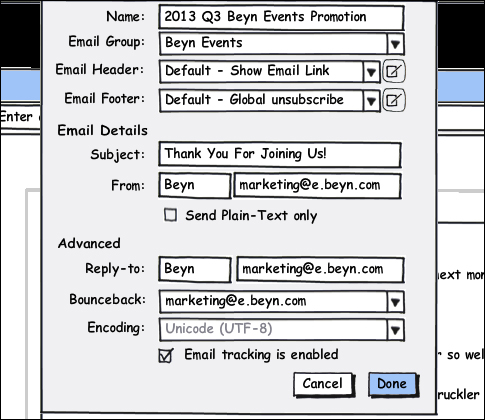
Here you may enter the data for the following fields:
Name: This is the name for your e-mail. Let's use 2013 Q3Beyn Events Promotion.
Email Group: This selects the available e-mail group in your system. It will populate a default e-mail header and e-mail footer. Select one of the available groups.
Email Header: This selects the header the e-mail will use. It will populate automatically based on the Email Group choice. If the selected Email Group selection does not have an associated header or you would like to change the header, you may pick one of the available headers from the list.
Email Footer: This selects the footer the e-mail will use. It will populate automatically based on the Email Group choice. If the selected Email Group selection does not have an associated footer or you would like to change the footer, you may pick one of the available footers from the list.
Subject: This is the subject for your e-mail. Enter the subject Thank You For Joining Us!.
From: This is to be left as it is. It should default to your system settings, unique to your company.
Encoding: This is to be set to Unicode (UTF-8) (if it is not already set).
Email tracking is enabled: This turns tracking of e-mail on or off. Ensure that it is checked.
Many of these settings should have been configured when Eloqua was initially deployed for your organization. The settings you should consistently be making unique for different e-mails are Name, Email Group, Email Header, Email Footer, and Subject.
The settings From, Reply-to, Bounceback, Encoding, and Email tracking is enabled should generally be left unchanged. The Email tracking is enabled checkbox places a small image in the footer of your e-mail. The act of downloading it by a recipient triggers the e-mail opening activity to be logged for that e-mail and recipient contact.
After the e-mail settings have been configured, click on Done to close the settings window, and then click on Save to save the e-mail.
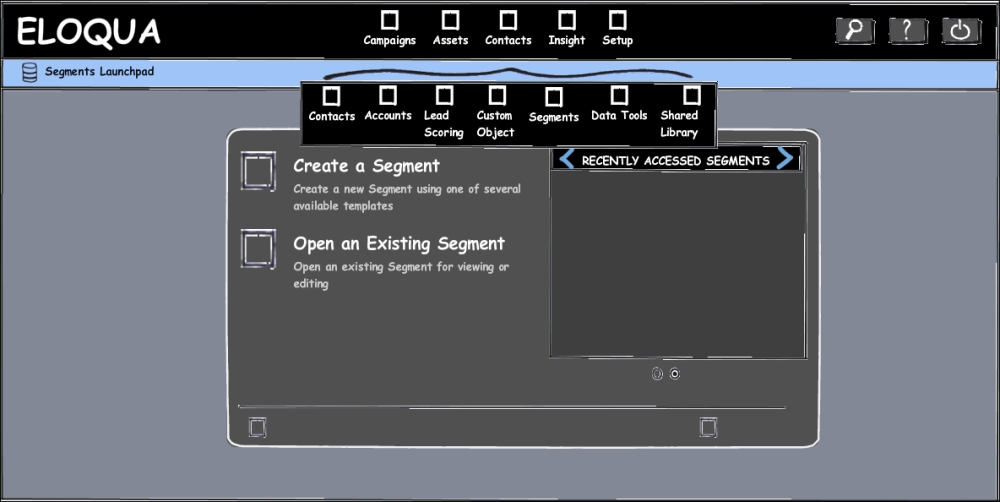
Now that the e-mail has been created, we will need a segment to send the e-mail to. Segments are groups of contacts that can be a combination of static members and members that are dynamically pulled based on filter criteria. They are used to feed campaigns in Eloqua, and will be covered in more depth in Chapter 8, Contact Segmentation. For this campaign, you will create a segment with yourself as the sole member. Navigate to Contacts | Contacts.

In the search input, enter your e-mail address.

If you are not found as a contact in the system, we will create you as a contact by clicking on the New…button near the top-right corner of the screen. All the known individuals with which you would like to interact using Eloqua must exist as contacts within the system.
You should enter at minimum: e-mail, first name, last name, and company for your contact and finish by clicking on Save.
Now that you know you exist in the system as a contact, create a segment and add yourself to it. Navigate to Contacts | Segments and click on Create a Segment. In the Template Chooser window, select Blank Segment and click on Choose.
You are now in the segment editor. In the left panel, the list of segment components will be listed once we have one or more. To add one, we can click on the large + button, where we'll have the option of adding any of the following components: Filter Criteria, Individual Contacts, Upload Contacts..., Shared Filter..., and Shared List....
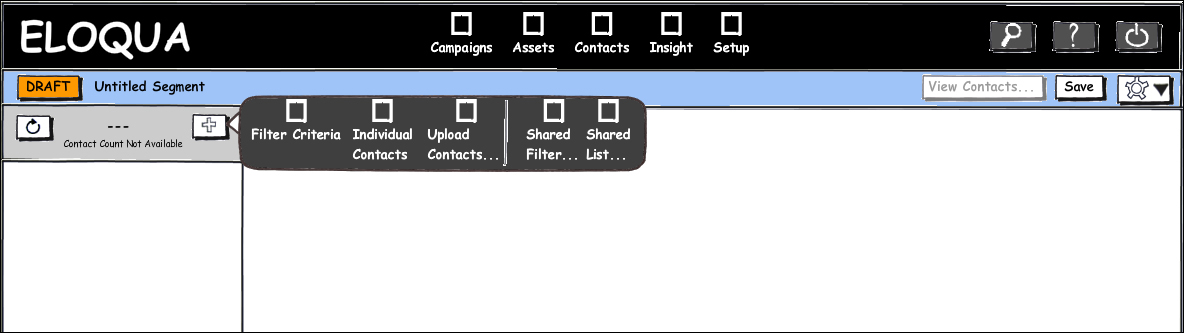
You just want to add yourself to this segment, so select Individual Contacts, which will add a segment component in the left panel and display the list of contacts for the segment component in the right panel.
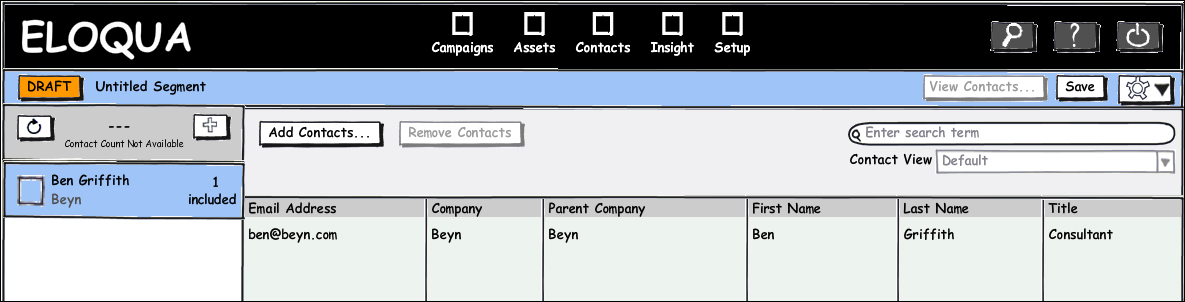
Click on Add Contacts... to open another modal window, where you can search for your contact and add it to the list. The segment component in the left panel should update to display 1 included. Before saving this segment, you may right-click on the segment component in the left panel and select Settings to enter a name and description for this segment component, such as Ben Griffith and Beyn respectively. Click on Save when finished and enter a name for the segment. For example, Beyn - Ben Griffith.
Having a segment and e-mail ready, you can now navigate to the campaign canvas by clicking on Campaigns from the top navigation. After the Campaigns Launchpad opens, click on Create a Campaign. Next, in the Template Chooser window select Blank Campaign and click on Choose.
This will open the campaign editor. In the left panel, there are AUDIENCE, ASSETS, DECISIONS, and ACTIONS components, which can be added to your campaign. This simple campaign will have an audience of the segment we just created and an asset of the e-mail we created earlier.
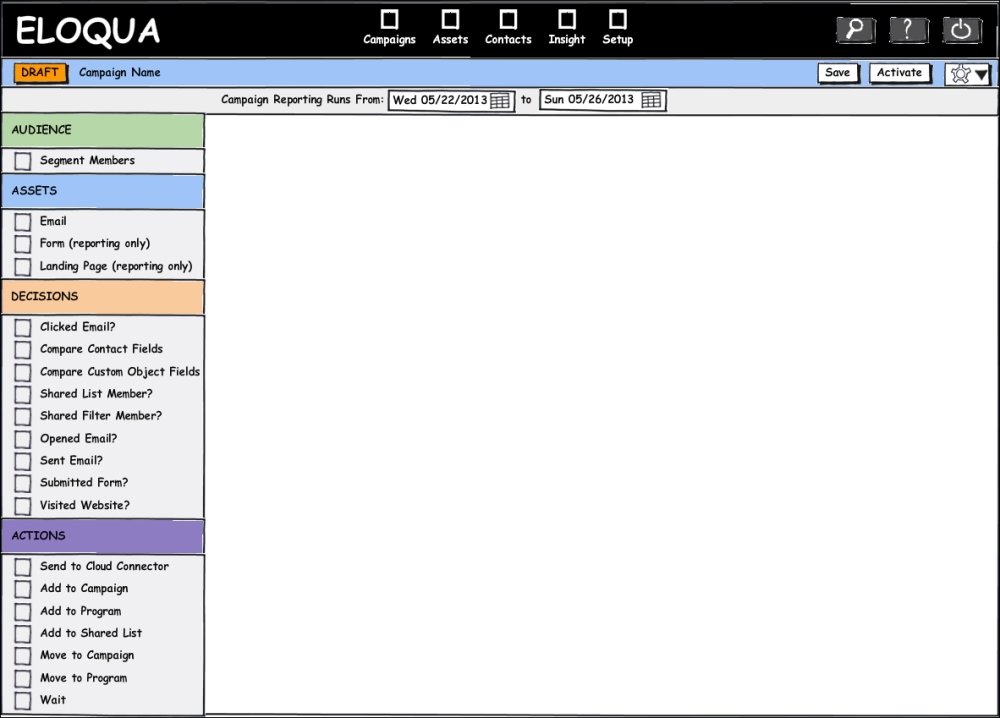
To add the segment, click on Segment Members in the left panel and drag it into the large white area on the right of the editor, the canvas. Double-click on the newly added step and enter the following data:
Step name: This is your contact's name. For example, *Ben Griffith*.
Choose a segment or create a new one: This is the segment we previously created. For example, *Beyn - Ben Griffith*.
Choose when to add segment members to the campaign: Select Add members once when the campaign is first activated.
Now, click on Email from the left panel and drag it onto the canvas. Double-click on the added step and enter 2013 Q3Beyn Events Promotion (as the step name) and 2013 Q3Beyn Events Promotion (as the e-mail).
The remaining options including Signature, Send Options, and Scheduling can be left as they are.
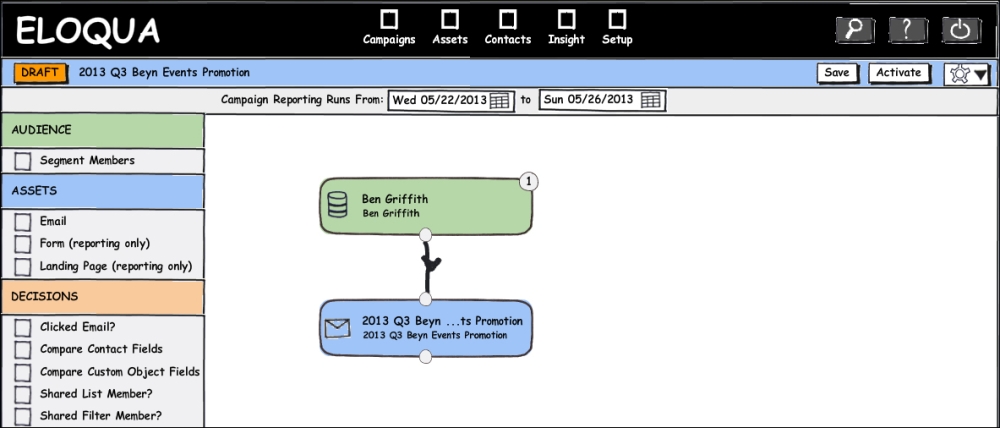
The two steps should then be connected. This can be done by clicking and dragging the connection point at the bottom of the segment step to the top connection point of the e-mail step.
Once this has been done, you should have two steps with a curved line connecting them and a small circle with 1 in the top-right corner of the segment step. The campaign canvas is now set up for the e-mail send.
The settings can then be configured for the campaign by clicking on the option's drop-down button and selecting Settings.... Enter the following settings:
Name: This is the campaign name of your choice. For example, *2013 Q3 Beyn Events Promotion*.
Description: This is an optional setting where you can enter a description. For example, *Follow up promotion to Global Summit 2013 attendees*.
Campaign Reporting Runs From: This should be entered and should include today's date. These dates control the period during which campaign metrics are collected in Eloqua. So, they should always span at least the duration for which you expect the campaign to run.
If there are additional required fields under any of the tabs Settings, Financials, or Custom Fields, you will need to fill them out as well.
Tip
It's important to understand what the start date and end date represent. Campaign activity is only collected after the start date of your campaign and for 12 months after the end date of your campaign.
The fields Product, Region, and Campaign Type are standard fields that cannot be changed. However, their requirement would depend on how the campaign module was originally set up.
The CRM Campaign ID field will automatically populate after the campaign has synced with your CRM system, assuming that Sync with CRM is checked and you have set up the closed loop reporting integration with your CRM system.
The Include in Opportunity ROI field is related to reporting for a closed loop reporting integration as well, but this setup is outside the scope of this book.
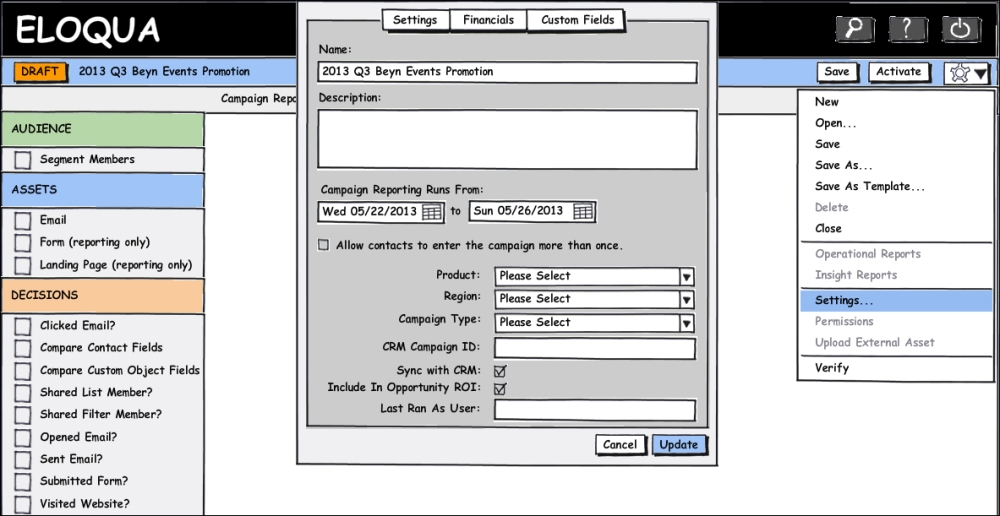
Click on Update after entering all the settings' information you would like to or are required to enter. At this point, the campaign can be saved by clicking on Save in the top-right corner, and then be activated by clicking on Activate.
Activating a campaign is the last step to actually turn it on. Once activated, a campaign will process the contacts its segments contain and run them through the workflows set up on the campaign canvas. Additionally, all the activities tied back to the campaign and its assets will start collecting as a campaign activity.
Before a campaign is activated, it will not collect activities, and it will not process contacts that are included in the segments feeding its workflows.
Congratulations! You have just created and run your first Eloqua campaign! You should receive the e-mail shortly with the personalized greeting.
In this chapter, we set up a very basic digital campaign. We created an e-mail using Eloqua's WYSIWYG editor, and created a segment and added a contact to it. The components were then used to build the flow of the campaign and upon completing the set up of the campaign in Eloqua, we activated it and sent the e-mail to ourselves.
In the next chapter, we will discuss Eloqua's digital campaigns in more detail. We will discuss the different components that make up a digital campaign and explain best practices for designing campaigns built in Eloqua.