


In this chapter we will cover:
Command retrieval and line editing
Using history
Filename auto-completion
The shell prompt
Other environment variables
Using aliases
The
.bashrcfileDealing with blanks and special characters in filenames
Understanding the
$?variableRedirection and piping
Sending output from one terminal to another
Using the Screen program
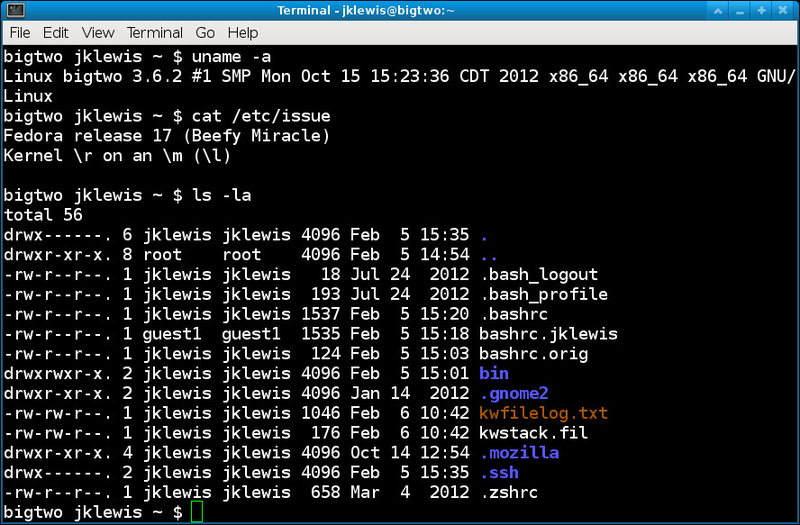
Knowing how to use the command line efficiently will really help you get the most out of your computer. There are many ways to save time and effort when typing commands, you just need to know what they are.
There are many different Linux environments available. This chapter focuses on the popular Bash shell.
A standard Bash terminal is automatically set to insert mode, so you don't have to press the Insert key to insert text. Use the up and down arrow keys to recall a previous command, and then other cursor keys to edit that line as needed.
All you need for this example is a terminal running the Bash shell. Other terminals may not have these capabilities.
We will run a few commands as follows:
Type in the command
routeand press the Enter key.Do the same for
uptime,ls,date, andsync, pressing Enter after each command.Now press the up arrow key one time. You should see the following command:
syncNow press the up arrow two more times. You should see
dateandls.Press Enter. The
lscommand will run again. Pressing Enter will always run the command shown.
The line is stored in a buffer with full editing capabilities. This buffer is sent to the OS when the Enter key is pressed.
The summary of the keys used for retrieval and editing is as follows:
Up arrow: It is used to scroll up the history buffer
Down arrow: It is used to scroll down the history buffer
Home: It is used to bring the cursor to the beginning of the line
End: It is used to bring the cursor to the end of the line
Delete: It is used to delete the character to the right of the cursor
Backspace: It is used to delete the character to the left of the cursor and shift the line
Left and right arrow: These are the cursor movement keys
The standard Bash shell includes a history function. It records each command in a database that can be shown by running the history command. In this section we have shown how this is done.
All you need is a Bash terminal to follow the given steps.
See the following screenshot:
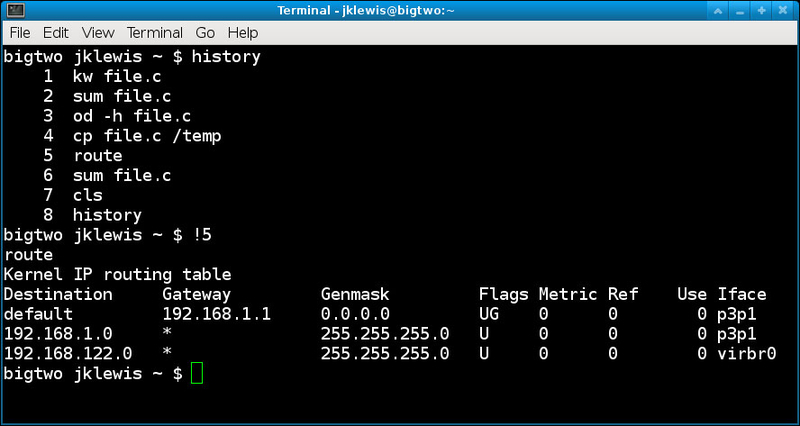
Run a few commands such as
route,uptime,date, andsync.Run the
historycommand.Look for a command you would like to run again, but instead of typing the command, type an exclamation point (
!) and then the number next to the command as shown in the history listing, and press Enter.That command will run again.
When running a command, you do not have to type the entire filename. This saves a lot of time and effort, and also helps prevent typos.
The Tab key is used to invoke filename auto-completion. See the following screenshot:
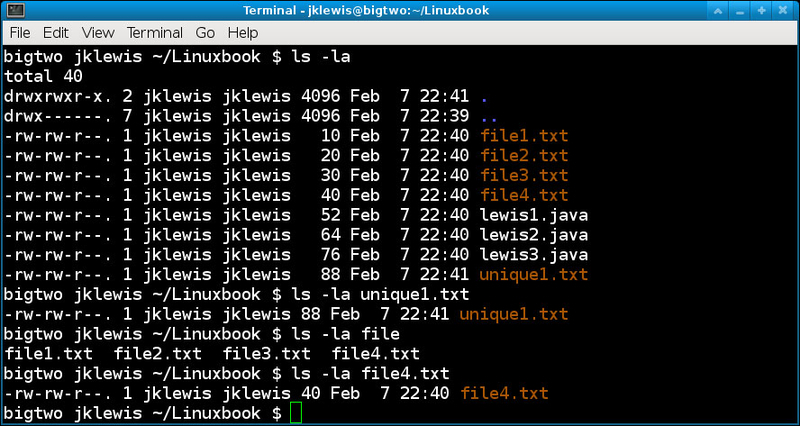
You only need to type enough characters to make the filename you want unique, and then press Tab. If you didn't type enough characters, you will hear the console beep (in most shells). If you now press Tab again, all of the possibilities will be displayed.
Change to your home directory, in my case it's:
cd /home/jklewis.Create a directory using the following command:
mkdir LinuxbookChange to it
Linuxbookusing the following command:cd Linuxbook ls > file2.txt ls > file3.txt ls > file4.txt ls > unique1.txt
Now let's create some dummy files; run using the following command:
ls > file1.txtNow type
ls -la uand then press Tab. The rest of the filename "unique1.txt" will appear. Press Enter.Now type
ls -al fileand press Tab. Nothing will happen, and your console may beep. Press Tab again. Now all 4 filenames will appear.Add a
4, press Tab again, and then Enter. The commandls -la file4will run.
This may look complicated or even clumsy but if you give it a chance you will become an expert in no time at all.
A standard terminal usually has a rather cryptic command line prompt. This should be changed by modifying the PS1 environment variable.
An example is shown in the following screenshot:
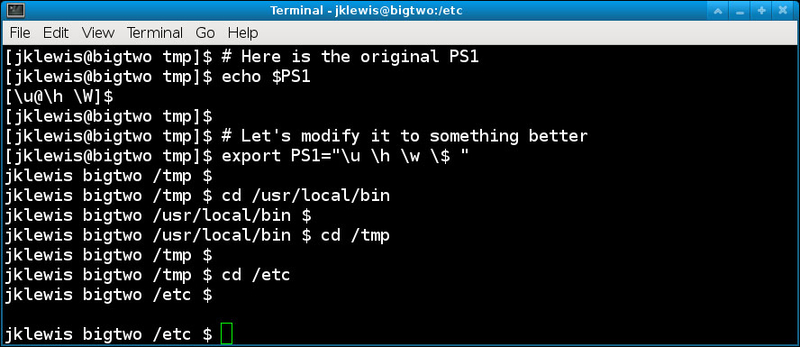
Refer to the line export PS1="\u \h \w \$ "
The
\ucommand means to show the current user of this shell.The
\hcommand shows the hostname of this machine.The
\wcommand means to show the full path of the current directory. This change is highly recommended, as the user doesn't have to type pwd (Print Working Directory) all the time to know what directory is being used.The
\$means to display a$or#depending on the effective UID.
The PS1 variable is only one of literally hundreds of environment variables. Don't worry, you don't have to know them all! The following are a few very useful ones:
Most of these are self-explanatory; however, a few need more discussion. The PATH environment variable is where commands are searched for in the filesystem.
The echo command is used to display the contents of a variable:
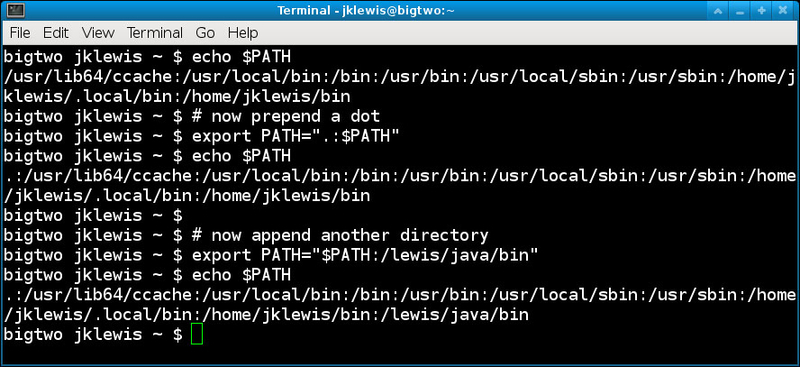
Prepending a dot to the
PATHmeans the program will be looked for in the current directory first, before searching the rest of the path. This is very useful during the code development for example. Do this by running:export PATH=".:$PATH"The
EDITORvariable can be set to your favorite text editor. Most people usevi (or vim); however, you can point it to the one you want. If you change this, be sure to use the full path. To change theEDITORvariable do this:export EDITOR=/lewis/bin64/kwAn
exportcan be removed by setting it to nothing:export EDITOR=By convention, environment variables are usually written in uppercase. View the man pages and/or search Google for more information on these variables.
Think of these environment variables just as you would if you were using a programming language. In this case, the type of the variable is determined by the OS. For example, you could type A=1 or A="This is a string".
The OS knows the difference. Also, there is variable scope. Notice I did not use export above. That means this A is local to this shell. Only exporting a variable will make it available to other shells (after sourcing the file).
Wouldn't it be nice if you could easily create a simple command without having to make a script out of it? Well, there is a way. This is done using aliases.
The following are the steps to create an alias:
Type
tput clearand press Enter. Your screen should have cleared.Now enter
alias cls="tput clear". Now when you runclsit will do the same thing.Let's create some more. To show a long directory listing enter
alias la="ls -la". Enter'la'to run the alias.To show a long listing with the most current files last enter
'alias lt="ls -latr"'.
If you create an alias and then decide you no longer want it you can remove it by using the unalias command, for example, unalias cls.
You can also use aliases to move around the filesystem efficiently. This is very handy and will save you an incredible amount of typing. Here are some examples:
mkdir /home/jklewis/linuxbookalias lbook="cd /home/jklewis/linuxbook"lbook
You will now be taken to that directory. Here is something I make frequent use of on my systems:
export LBOOK="/home/jklewis/linuxbook"alias lbook="cd $LBOOK"lbook
As you can see, running lbook will take you to the directory as shown above. However, you can also use the LBOOK variable to copy files to that directory:
cd /tmptouch f1.txtcp f1.txt $LBOOK
The file f1.txt will now exist in the /home/jklewis/linuxbook directory. This becomes even more handy when extremely long filenames are used.
You can list your aliases by just running alias without any parameters. Any time you find yourself constantly typing the same commands or filenames consider creating an alias for it.
Note that the above examples will only be effective in that terminal and will not persist across a reboot. See the next section on how to make the changes permanent.
Also, in some cases, what you want to do may be too complicated for an alias, for example, to check for the proper number of parameters. This is where you can create a shell script, which will be covered in Chapter 8, Working with Scripts.
There are many environment variables we can look at and change. However, we certainly don't want to enter these every time we start a new shell. There is a special file, named .bashrc, which is used to store your settings. It is located in the user's home directory. For example, the .bashrc file for the root user is in the /root directory.
Here is a .bashrc file from one of my systems:

The description of the lines is as follows:
To comment a line, precede it with a
#symbol.To create a variable, use the
exporttag.To create an alias, use the
aliastag (as shown earlier in this chapter).Control statements are allowed; see the
ifclause in the previous screenshot.After modifying your
.bashrcfile, remember to source it using the dot operator as follows:. .bashrc
Linux (and Unix) filesystems were not originally designed to handle blanks in filenames. This can cause quite a few problems, as the shell treats each item after a blank as another file or parameter. A solution is to use quotes, the backslash, or the Tab key.
The following sections assume the user has not modified the Bash Internal Field Separator (IFS) variable.
See the following screenshot. I purposely created three "bad" filenames:
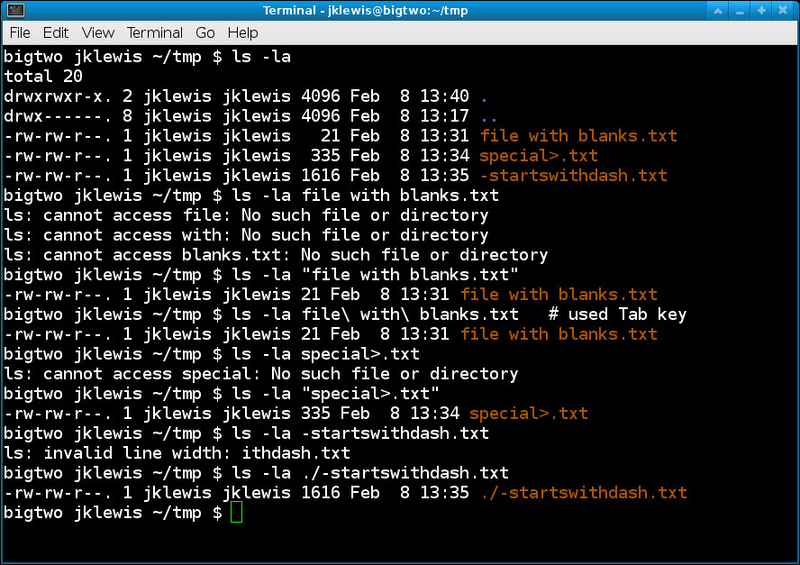
Run
ls -la file with blanks.txtand notice the errors.Now run it again, but enclose the filename in quotes:
ls -la "file with blanks.txt"; it will work properly now.Enter
ls -la fileand press Tab. It will escape the blanks for you.Run
ls -la special>.txt. Observe the error.Enclose in quotes as before using the following command:
ls -la "special>.txt"Now try
ls -la -startswithdash.txtand then try quoting it. Doesn't work, right?Precede the filename with the
./operator using the following command:ls -la ./-starWtswithdash.txt
As you can see, this can also be a problem if special characters have been used in the filename. Study this one a bit and it will become clear. Remember the Tab key; it works really well for just about every case. If the file starts with a dash, use the ./ operator. It means to refer to the file in the current directory.
The issue of blanks and special characters is even more of a problem in scripts. This will be covered in more detail in Chapter 8, Working with Scripts.
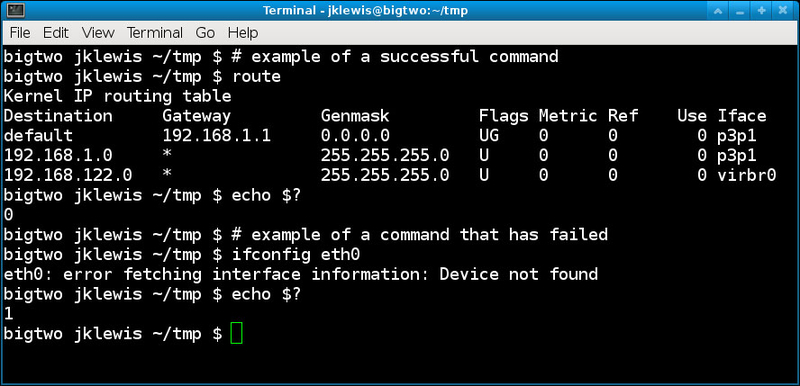
Typically, when a command is run in Linux it performs a task; it either reports what it did or indicates an error occurred. An internal return code is also generated, and is displayed by running the echo $? command. Note that this must be the very next thing typed after the original command.
The following screenshot shows echo $?:
Suppose you run a command, say route, and want to save the output in a file. The redirection (>) operator is used to do this instead of sending the output to the screen.
Let's try some redirection:
Enter
ifconfig > file1.txt. You won't see anything, because the output went into the file.Run
cat file1.txt. You should now see the output.This works the other direction as well, to read from a file run the following command:
sort < file1.txtYou can even do both in one step:
sort < file1.txt > output-file.txtYou can also send the output to another command using the pipe operator. For example, run
route | grep eth0. The above command would display only the lines fromroutethat contain the phraseeth0.
Here is something that I use all the time. Say I have written a program in C a long time ago, have several versions, and want to find the latest one. I could run locate to find them all:
locate crc.c
This might return quite a few lines. How can I run ls on each file to find the latest one? By piping the output into the xargs command and then ls:
locate crc.c | xargs ls -la
This will now show the time and date of each file.
This might seem a bit complicated at first, but if you experiment a little it will become second nature to you.
This is a really handy feature that is unique to Linux/UNIX systems. It's most useful in scripts but can be used on the command line as well. If you have a system available try the given steps.
We show how to send the output from one terminal to another in the following steps:
In one terminal run the
ttycommand. The output should be something like/dev/pts/16.In the other terminal run the
routecommand. You will see the output in that terminal.Now run
routeagain, but now using the command:route > /dev/pts/16The output will go to that other terminal.
Terminals on Linux systems are devices that have their own buffer space. By referring to the device by name you can write to it.
This feature is even more useful in scripts, which we will see in Chapter 8, Working with Scripts.
Screen is a full-screen window manager that shares a physical terminal with other processes (which are usually other terminals/shells). It is normally used when no other manager or desktop is available, such as on a server. It has a scroll-back history buffer and also allows for copy and paste of text between windows.
The following is a brief list of some of the many key bindings available with Screen:
Ctrl + A + ?: It displays a list of commands and their key bindings
Ctrl + A + C: It brings up a new window
Ctrl + A + D: It detaches a window
Ctrl + A + N: It is used to go to the next window in the sequence
Ctrl + A + P: It is used to go to the previous window in the sequence
Ctrl + A + # (where # is a number): It is used to go directly to that window
Ctrl + A + ": It shows the list of windows; user can select any one by the number
The following is a list of frequently used commands:
screen -list: It shows all of the windowsscreen <program>: It creates a new window and run that program in it
An example of running the Screen utility is as follows:
In a terminal run the
screen -Lcommand.Now press Ctrl + A and then press C. This will create another window.
Do this two more times.
Try typing Ctrl + A + 0.
Try Ctrl + A + 3.
In the previous section, step 1 will create a new window, window 0. If you are running inside a window manager you may notice the title change showing which window it is.
Step 2 will create another window. After step 3, you will have 4 windows in total.
When you perform the actions in step 4, you should be in window 0. Typing Ctrl + a + 3 will take you to window 3.
Here is a helpful hint, if you are running only a command line with no desktop, you may want to change your PS1 variable to something like the following in your .bashrc file:
export PS1="screen$WINDOW \h \u \w \$ "
Now the prompt will always show which window you are in.
This describes only a small part of what Screen can do. Consult the man page for more information.

