


In this chapter, an overview of Reporting Services 2012 is presented, highlighting the latest enhancements to SQL Server Reporting Services. This chapter is really about setting up the reader with the necessary installations so that he/she can follow the contents of the book. We will install the following applications/software in this chapter and a few others in the other chapters, where they are required:
SQL Server 2012 with Reporting Services in Native Mode
Configuring the Reporting Services using Reporting Services Configuration Manager
Sample databases used in the book
Guidance to install SharePoint Server 2010 on Windows 7 operating system
Reporting Services 2012 in SharePoint Integrated mode
A description of the computer used in the preparation of this book is also given.
The amount of information available on SQL Server 2012 is very large, so we will not be looking at the several groundbreaking developments in this area. Just browsing for SQL Server 2012 brings 10 to 50 million pages on an Internet search.
The highlights of SQL Server 2012 as perceived by Microsoft highlights these three major aspects (all in Microsoft's own words). It may be mentioned that SQL Server 2012 is a major revision of SQL Server 2008:
Mission-critical confidence with greater uptime, blazing-fast performance, and enhanced security features for mission-critical workloads:
Enhancements to audit and security and manageability for compliance with PC and HIPAA
Use of the AlwaysOn feature to build for high availability and disaster recovery
New T-SQL enhancements with best practices
New tool, known as the Distributed Replay, to test real application loads for mission-critical scenarios
Faster failover support with enhanced AlwaysOn Failover Cluster instances, making improvements to high availability service level agreement and performance
Active secondary option in high availability to offload reporting, and logging tasks to improved use of resources
Enhancements to the extended events infrastructure provide a deep insight to events using the events engine and the
XEventsmanagement namespace
Breakthrough insight with managed, self-service data exploration and stunning interactive data visualizations capabilities
Ad-hoc exploration and interactive presentation of data using the business intelligence semantic model
Expanding the reach to data by non-programmer business users
Self-servicing data-driven alerts
Effortless visualization of data in myriad ways by mere clicks of a mouse with power views
Cloud on your own terms by enabling the creation and extension of solutions across on-premises and public Cloud
The extension of Windows Azure Services to Reporting Services
Use of tools such as SQL Server SysPrep, Microsoft Assessment and Planning, the Hyper-V virtualization of SQL Server, and Self Service Portals.
Hybrid public and private Cloud to contend with security concerns
SQL Server Reporting Services (SSRS) has changed by a quantum leap from its 2000 version. From 2000 to 2012, it has gone through 2005, 2008, and 2008 R2 versions of SQL Server. It is not attempted to describe here all the changes that have taken place in details, as it would take volumes, but to highlight the major ones that have changed since the first edition of this book in 2008.
Visual Studio Business Intelligence (BI) has changed over to SQL Server Data Tools (SSDT), wherein the Visual Studio Shell is endowed with only BI project templates that are installed with SQL Server 2012. This translates to not needing a separate license for Visual Studio in order to create BI projects. Visual Studio 2012 (for example, the Ultimate edition) does not have templates of BI projects, but is used to create reports using Report Viewer Controls. This said, if you have both SQL Server 2012 and Visual Studio 2012, you will find the templates for BI projects in Visual Studio. SSDT installs when you install SQL Server 2012.
Major enhancements in SSRS 2012 are, taking ad-hoc reporting to the next level of experience, by leveraging the Business Intelligence Semantic Model (BISM) and tying it up with SharePoint Server to render, by the now famous, Power Views, and Data Alerts. Power View reports can be exported to PowerPoint maintaining the interactive features while connected to SharePoint Server, adding an extra dimension of interest to the stake holders.
The server-based SSRS in the SQL Server 2012 platform provides the following enhancements:
Comprehensive reporting functionality, including the services of SharePoint
A complete set of tools for reports from creation to delivery
APIs that help developers to integrate and/or extend custom reporting
Complete integration with Microsoft Visual Studio and SharePoint Server environments
In practical terms one can create interactive, tabular, graphical or free-form reports from relational, multidimensional, or XML data sources
Rich data visualization of data from the preceding sources is possible, including charts, sparkline, data bars, and maps
Publish immediately, or schedule reports, or access reports on-demand
Support for several report view formats—capability of exporting to Excel and subscribing to published reports are possible
Reports can be accessed over the Web or from a SharePoint site
Data alert feature when used with reports published to SharePoint can send e-mail alerts
Data extensions built in SQL Server 2012 can work with the data sources shown, and with OLE DB and ODBC included; many other sources can be accessed as well:
Microsoft SQL Server
Microsoft SharePoint List
Windows Azure SQL Database
Microsoft SQL Server Parallel Data Warehouse
OLE DB
Oracle
SAP NetWeaver BI
Hyperion Essbase
Teradata
XML
ODBC
Ad-hoc reporting gained popularity as it made it possible for non-programmer type, but business-wise information workers to create reports critical to the business. In SQL Server 2008, the Report Model Projects provided the underpinning data for creating ad-hoc reports using the Report Builder.
In SQL Server 2012, Microsoft took ad-hoc reporting to the next level in RS 2012, by creating the BISM as the core for all BI under Microsoft's umbrella. Ad-hoc reporting uses the BISM as its backbone, and uses it very effectively in creating Power View Reports in SharePoint. At the time of writing, there are two ways Power View reports can be authored—through the SharePoint with Reporting Services add-in using the BISM created with SQL Server Analysis Services, or through the Power Pivot add-in using Excel. In either case, Power View is not a substitute if one is after very complex queries on the underlying archived data, but for creating a quick and astonishingly flexible report connected to live data.
One of the biggest features new in SQL Server 2012 is Power View. Power View a browser based with Silverlight working in the background, addressing interactive data exploration and visualization features capable of presenting multiple views of data in a single report.
Although originally Power View relied on models created by what are called Analysis Services Tabular Models, Microsoft has quickly extended it to even multi-dimensional models, which are still in the Community Technology Preview stage. We will create tabular models, and using the Share Point site learn the basics of creating the Power View. In Chapter 6, Power View and Reporting Services, we will learn how to go about creating the model and using it to create Power Views.
Besides Power View for interactive data exploration, self-service Data Alerts is another important feature, which came about in SQL Server 2012. Data Alerts are alerts set up by users in a SharePoint site to alert (a third party) about changes that have occurred to a data in a report. This feature provides a pervasive insight to corporate data by being very proactive. The end user can easily configure and manage data-driven alerts by setting up what he/she wants to see and when, with the alert information being delivered by e-mails. In Chapter 7, Self-Service Data Alerts in SSRS 2012, the reader will learn about setting up this alert, managing it, and monitoring it.
Report Builder 3.0 is the reporting component of SQL Server 2008 R2 with visualizations such as maps, sparklines, and data bars, which were not a part of Report Builder 2 (introduced in SQL Server 2008). The report part gallery was also introduced in SQL Server 2008 R2 and continues in SQL Server 2012. The report part gallery enables users to re-use the existing parts of a report known as Report Parts, where the author can pick up the report part from the gallery and use it in his new report. Also, enhancements to performance while interacting with servers can be achieved. Bugs fixes are periodically applied, and the latest download of Report Builder 3.0 with SQL Server 2012 SP1 has the bugs of the previous build fixed. The enhancements to Report Builder 3.0 that started with SQL Server 2008 R2 can be summarized as follows:
Adding maps, sparklines, and indicators to reports
Rotate text 270 degrees
Control page breaks
Create report parts
Create shared datasets and save them to the Report Server
New data sources have been added—SharePoint Lists, Microsoft SQL Azure, and SQL Server parallel data warehouse
Enhanced aggregation and exporting to Excel
Report-based data feeds
Feature enhancements specific to SQL Server 2012 in Report Builder 3.0 are Excel and Word Rendering for versions 2007 to 2010, and the recent version 2013 of Microsoft Office Suite
The number of software programs and their modes used in the preparation of this book is large. Although SQL Server 2012 Enterprise Evaluation Edition is the main data engine product used in the book, the Reporting Services Component is installed both in the Native mode as well as in the SharePoint Integrated mode to describe fully the features of Reporting Services 2012 (hereafter referred to simply as RS2012). The Enterprise evaluation edition with an evaluation period of 120 days supports most of the feature sets needed, and therefore used.
In the same vein, the SharePoint 2010 Enterprise Evaluation provides the correct match of SharePoint to describe the two specific features of RS 2012's SharePoint Integrated mode of installation, namely Power View and Data Alerts. Another restriction imposed by Power View was that it required a tabular data model for creating it (although this restriction has been lifted in a recent CTP, not considered in this book), which required the installation of SQL Server Analysis Services to support generating a tabular model using SSDT.
In this chapter we will look at the following:
SQL Server 2012 Enterprise Evaluation database engine (x64-bit) with Reporting Services in Native mode and Analysis Services to support tabular models
Installing sample databases using scripts
Installing SharePoint Server 2010 Enterprise Evaluation on Windows 7 Ultimate(x 64-bit)
Installing SQL Server instance with Reporting Services 2012 in SharePoint Integrated mode
In summary, the main criterion was to create an environment to enable the reader to create Power View reports and explore other such features of Reporting Services 2012. Since SharePoint Server 2010 was chosen, the x 64-bit architecture choice was already made as SharePoint 2010 can only be installed on a Windows 7, 64-bit machine. SQL Server 2012 Enterprise was also on 64-bit, and therefore all the software used adopted this basic (x64-bit) architecture.
Another criterion was the choice of the server editions, which was not too difficult since the Evaluation Enterprise editions support all the needed features and the only one available as a free download.
We will describe the operating system requirements followed by the hardware and software requirements. There are a large number of SQL Server 2012 versions, and they can be installed on a number of Windows operating systems. The list is quite large and some of it is summarized here for the 64-bit version.
The following table (copied from the Microsoft documentation) shows the supported OS for the 64-bit version, and there is an even larger set for 32-bit SQL servers.
|
SQL Server Edition |
Windows Operating System 64-bit platform |
|
SQL Server Enterprise 2012 |
Windows Server 2012, 64-bit Data Center Windows Server 2012, 64-bit Standard Windows Server 2012, 64-bit Essentials Windows Server 2012, 64-bit Foundation |
|
SQL Server Standard 2012 |
Windows Server 2012 64-bit Data Center Windows Server 2012 Standard Windows Server 2012 Essentials Windows Server 2012 Foundation Windows 8 64-bit Windows 8 x64-bit Professional Windows 7 SP1 64-bit Ultimate Windows 7 SP1 64-bit Enterprise Windows 7 SP1 64-bit Professional Windows Vista x64-bit Ultimate Windows Vista x64-bit Enterprise Windows Vista x64-bit Business |
|
SQL Server Web 2012 |
Windows Server 2012 64-bit Datacenter Windows Server 2012 64-bit Standard Windows Server 2012 64-bit Essentials Windows Server 2012 64-bit Foundation |
While the preceding table shows only a small subset (x64) of the principle editions of SQL Server, the reader should obtain complete details from Microsoft's MSDN website or the home site for SQL servers.
The edition used in this book is indeed the evaluation edition (as only the evaluation edition is available for free download). In addition to these, Microsoft also has other special and custom editions, the details of which may be found at http://msdn.microsoft.com/en-us/library/ms144275.aspx.
The following are the minimum requirements, and depend upon the components installed:
Hard disk space requirement: A minimum of 6 GB is required, out of which more than 1.5 GB is required for client components, excluding the Book on Line and Integration Services tools, and only about 800 MB is required for the database engine.
During installation, the program checks for available space.
Data file storage: Local Disk, Shared Storage, and SMB File Share
DVD drive: This is required if you are planning to install from an ISO image
Monitor and pointing device: Super VGA (800 x 600) or a higher resolution, and a mouse
Processor speed: This should be a minimum of 1.4 GHZ; 2.0 GHZ or higher recommended
Memory: This should be a minimum of 1 GB for 64-bit; 4 GB recommended
Processor type for a 64-bit processor: AMD Opteron, AMD Athlon 64, Intel Xeon with Intel EM64T support, and Intel Pentium IV with EM64T support
Besides the OS described previously, you require the following (if they are not already installed); these will be checked during installation:
.NET 3.5 SP1 for most of the SQL Server components; it is not installed during SQL Server 2012 installation. NET 4 is required; it will be installed during SQL Server 2012 installation.
Windows Power Shell 2.0 is required. It is preinstalled for Windows 7 but not for Windows 2008 Server and Windows Vista (http://msdn.microsoft.com/en-us/library/ff637750(v=azure.10).aspx).
Supported network protocols are TCPIP, shared memory, named pipes, and VIA (deprecated in the future)
Virtualization is limited to Hyper-V role in Windows servers.
Browser support includes IE 7.0 or later for Microsoft Management Console, SSDT and Report Designer Component of Reporting Services, and HTML help.
WOW support is needed for management tools.
A Toshiba laptop (Satellite P775) is used with the following specifications:
8 Core processor (Intel Core i7-2670QM at 2.20 GHZ, RAM (8 GB), 64-bit version
No pen or touch input
Clean install of Windows 7 Ultimate 64-bit with the SP1 operating system
Free disk space of 350 GB with all the needed servers (described in this chapter) installed
Monitor display having a resolution of 1600 x 900 pixels, a mouse, and a DVD/CD-ROM drive
The Internet Explorer 9.0 browser
Note
If you are not sure of how many processor cores are there, follow this link: http://hodentekhelp.blogspot.com/2013/01/how-do-i-find-number-of-cores-in.html.
This configuration meets the requirements for installing the SQL Server 2012 software and running Reporting Services, and SharePoint 2010.
As the space available is limited, the number of installation screenshots shown is limited. Here, the major steps and some key screenshots, which are new for this version of the product, will be presented.
The installation source files for SQL Server 2012 64-bit Enterprise Evaluation can be downloaded from the following URL:
http://www.microsoft.com/en-us/download/details.aspx?id=29066
Tip
First, search for http://www.microsoft.com/en-us/download/default. Then. search for the servers on that page.
Read the System requirements section before downloading the source files. You can download a single ISO file (the first one in the bullet list) or the evaluation CAB file:
ENU\SQLFULL_ENU.iso, 4.2 GBENU\x64\SQLFULL_x64_ENU_Core.box, 1.8 GBENU\x64\SQLFULL_x64_ENU_Install.exe, 94 KBENU\x64\SQLFULL_x64_ENU_Lang.box, 655.8 MB
Double-click on the
SQLFULL_x64_ENU_Install.exefile, which begins the installation. After processing the request, the SQL Server Installation Center window will be displayed, as shown in the following screenshot: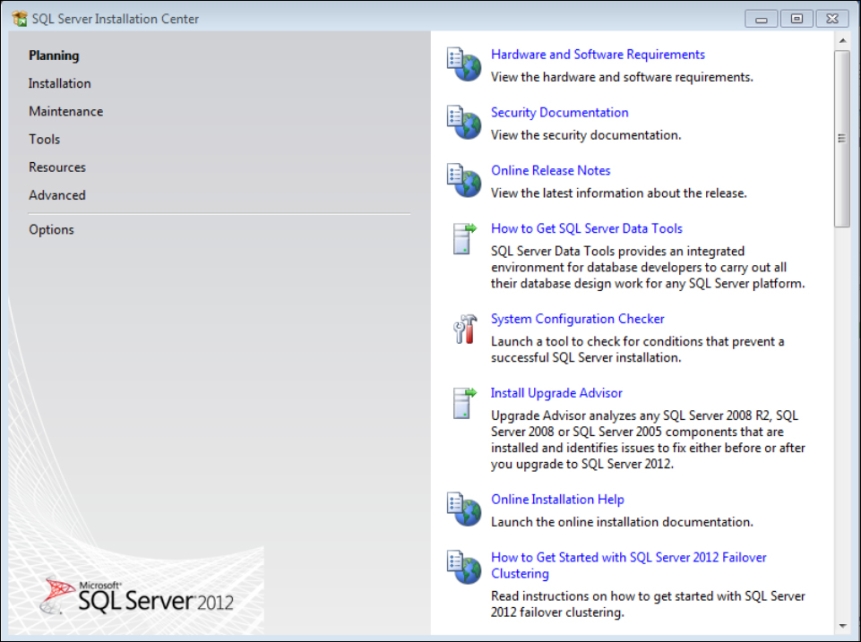
This Planning pane of the Installation center has many more linked items than displayed. The ones you would see when you scroll down are the following:
How to Get Started with a SharePoint Standalone Server Installation
How to Get Started with Reporting Services SharePoint Integration on a Standalone Server
Upgrade documentation
Install SQL Server Migration Assistant (SSMA)
How to apply SQL Server updates
Clicking on Installation displays the following window:
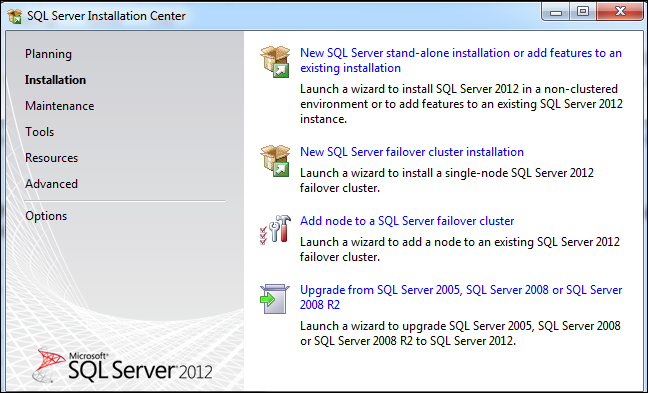
As we will be installing a single SQL Server 2012 named
instance, click on the first option—New SQL Server stand-alone installation or add features to an existing installation.In the next screen, you will be asked to specify the architecture of SQL Server 2012 to install and specify the location (where your product files are stored on your computer) of the SQL Server Installation media. There will be two options; choose the radio button for x64. You may need to browse to Installation Media Root Directory, as shown in the screenshot. The choice of x64-bit was made when a decision was taken to install SharePoint 2010 on the same machine.

In the next Setup Rules page problems are identified and flagged. The installation can proceed only after the verification passes all the rules. In the present installation, eight rules were checked. This following screenshot shows a list of rules that passed the verification:

Clicking on OK takes us to the next Product Key page. In this page, you need to choose the edition of SQL Server 2012 to install. There are two options, one of which is for the evaluation edition. This edition expires in 180 days, after which you need a product key. This edition has the largest feature set.
Click on Next. This will take you to the License Terms page, where you place check marks for the two checkboxes to signify that you agree to the terms.
Click on Next. The Product Updates page is displayed with a default to include SQL Server product updates with KB2674319 in the More Information column. You may want to learn about the updates by using the link at the bottom of this window.
Click on Next. The Install Setup Files page will be displayed. The updates are scanned; the setup files are then downloaded and extracted. The Setup Support Rules page identifies problems that may crop up; any failure must be addressed. In the present installation, only one warning is issued, as shown in the following screenshot:

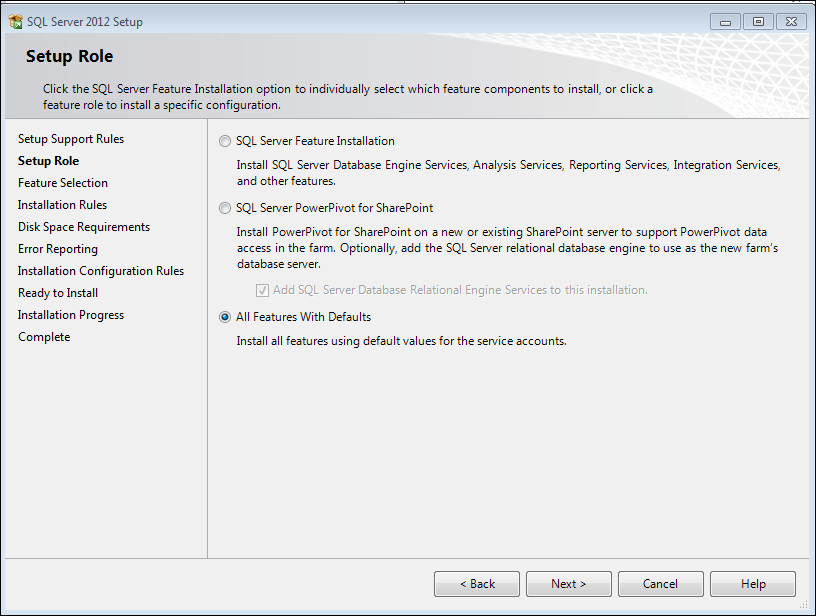
Click on Next. This brings you to the Setup Role page. Please read the information at the top of this page. The next image is a cut-out of the Setup Role page. As shown, all the features are chosen to be installed with default values for the service account:
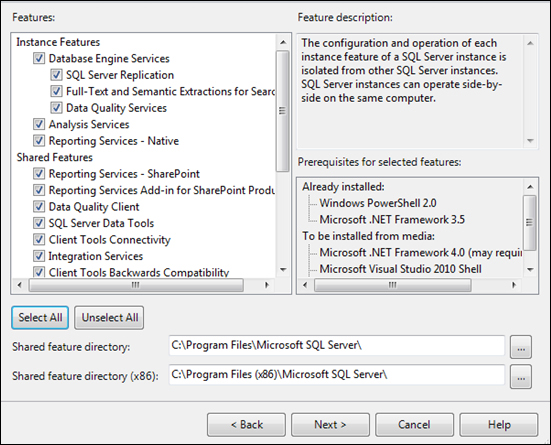
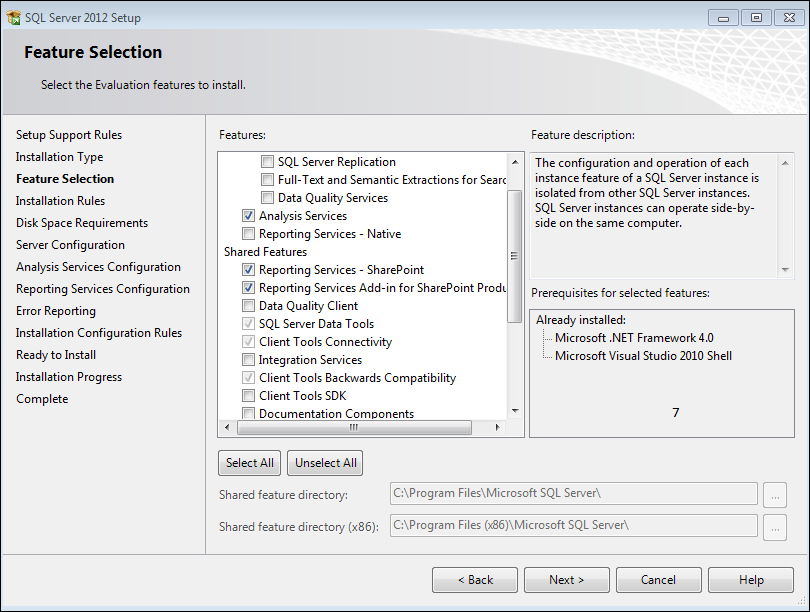
Click on Next at the bottom of the preceding page. The Feature Selection page will be displayed. Here, all the features are chosen, as shown in the next screenshot:
Note
Although the installation sequence is described here, it is always possible to come back and add features such as Reporting Services and Analysis Services separately. However, there are restrictions, such as you cannot have Native mode and SharePoint Integrated mode with the same SQL Server Instance. You may remove features as well if you want to.
Note that Reporting Services Native as well as Reporting Services SharePoint and the Reporting Services add-in for SharePoint products are installed as shared features. Please follow this link to the MSDN forum to review the options with SharePoint Integration: http://technet.microsoft.com/en-us/library/hh213532.aspx. Also note that more details about the pre-requisites are also shown on the right side of this pane.
Click on Next at the bottom of the preceding window. The installation rules will be displayed to determine if there are any blocking issues before the product is installed. In the present installation, all the three installation rules were checked without any problem. Here is a cut-out of the screenshot showing the relevant portion. If the test fails, you may fix the failed items and do a re-run. After there are no more issues, the program takes you to the next page.

Click on Next. This brings you to the Instance Configuration page. As indicated on the next image, a named instance with the name
Kailuais chosen. Note that there are no installed instances as yet. Also notice the directories for the SQL Server, Analysis Services, and Reporting Services since we selected all the features earlier. Although it is recommended to install on disks instead of the operating system, herein all software worked off the same machine; in this case a laptop computer.
Click on Next. The Disk Space Requirements page will be displayed to verify if space is available for the choices made. The page shows that the program required 8916 MB and the available space was 354, 111 MB, which includes (for this particular installation) both the instance directory as well as the shared install directory.
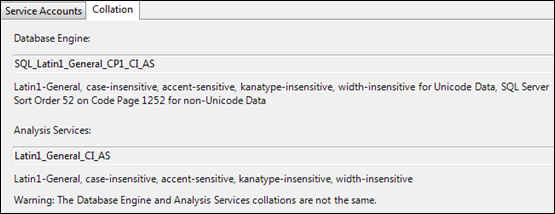
Click on Next. This brings you to the Server Configuration page, as shown, where Service Accounts as well as Collation are configured. Since we agreed the default values at the beginning, all of the features have the same value for Account Name, and a number of them start up automatically. Make a note of the ones that are to start manually:

In the Collation tabbed page, the default choice is as shown in the cut-out for both SQL Server and the Analysis Server:
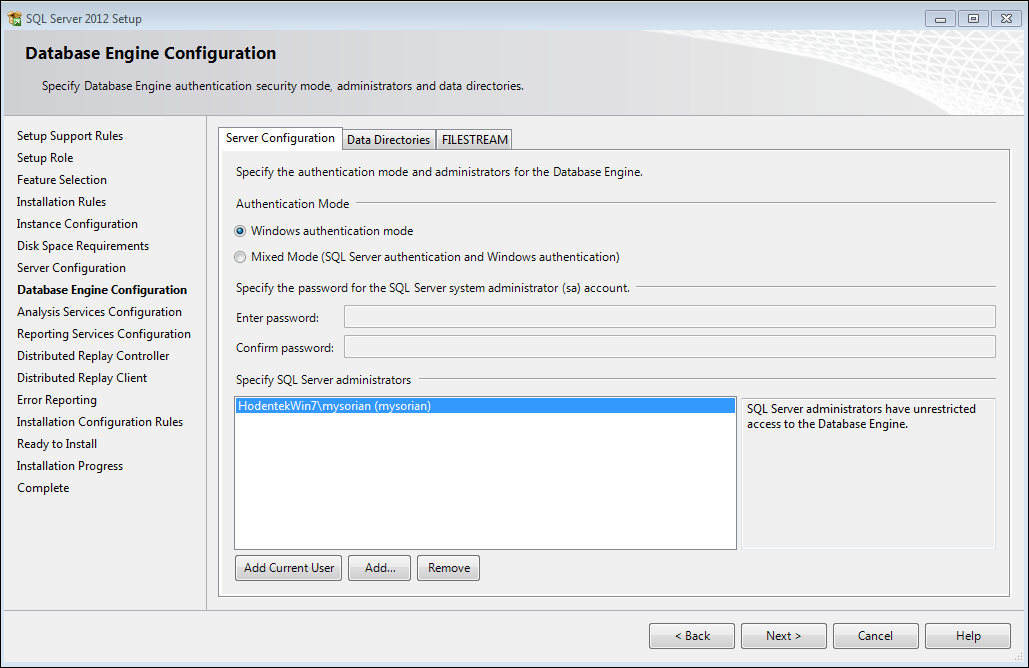
Click on Next. This brings you to the Database Engine Configuration page. You need to specify the Database Engine authentication, choice of Data Directories locations (if other than the defaults), and the choices for FILESTREAM. You can also specify SQL Server administrators on this page. Here, the Windows user (in this case, the administrator) will be chosen as the SQL Server administrator and he/she can be added by using Add Current User and the interactive windows that show up. The details of this page are as shown in the next image. You can add more than one administrator by repeatedly hitting on the Add... button. In the same screen, you can remove an administrator as well:
The default directories were accepted for data, and all the choices on the FILESTREAM tabbed page were enabled. As they are not going to be used, you may skip that tabbed page if you like.
Click on Next. The Analysis Services Configuration page will be displayed. Here, instead of the default, Tabular Mode was selected, and the current user was added as the administrator, as shown. Again, the default directories were accepted:

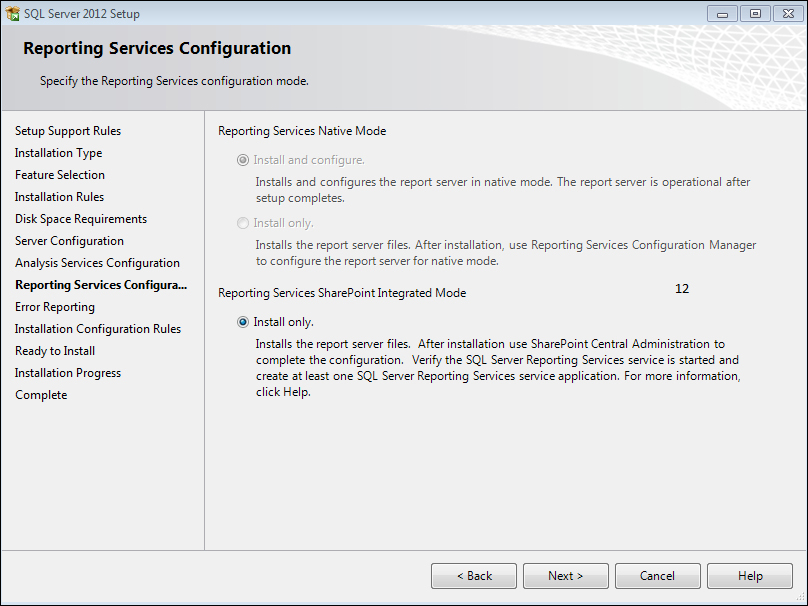
Click on Next. This takes you to the Reporting Services Configuration page shown in the next image. Here, there are two options—Reporting Services Native Mode with two options (Install Only and Install and Configure) and Reporting Services SharePoint Integrated mode with the Install only option. Here, the Install and Configure option in the Native mode is accepted:

Native mode is chosen in this section, because the chapters immediately following will use the Native mode installation. However, in Chapter 6, Power View and Reporting Services, where Power View is discussed, the installation has to be in the SharePoint Integrated mode.
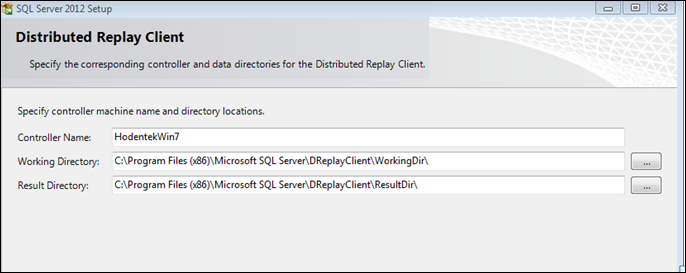
Click on Next. This brings up the Distributed Replay Controller page. The Distributed Replay Controller is very much similar to SQL Profiler, but is more scalable and used in scenarios of upgrades, hardware changes, and so on. Although, for this installation, the current user is added as the user of the preceding service, you may skip it. Follow this link to learn more on this subject: http://msdn.microsoft.com/en-us/library/ff878183(v=SQL.110).aspx. Clicking on Next brings up the Distributed Replay Client page; you need to specify the value for Controller Name and directories, as shown in the following screenshot:
Click on Next. The Error Reporting page will be displayed. Accepting this would improve the software and is highly recommended. Click on Next.
Note
The software is in the evaluation period and likely to have problems, and I believe it is better that Microsoft knows about it, since the message will also carry machine-specific information. In a corporate environment, this must be deferred to the discretion of the administration.
The Installation Configuration rules page is displayed. This is also a pass/fail and warn page. It is to verify if there are any issues preventing an installation. The lists of rules checked are shown in the following screenshot:

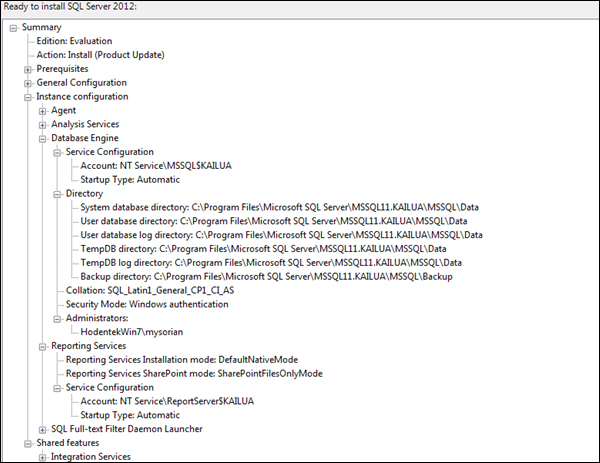
Clicking on Next brings up the Ready to Install page, where all the features to be installed are displayed. It is possible to back off by using the Back button to go and correct if some modification is needed. Here is the image showing the details of this installation:
Clicking on Install begins the installation showing the installation progress. When it is completed, you should see a Complete page showing that the installation succeeded, as shown in the following screenshot. Review the list of what was installed. In the lower-half of this page, some very useful information is provided with links; make sure you pay attention to them:

After any installation, it is a good practice to check out if everything that you wanted in the SQL Server is installed. Make yourself familiar with where to look if something did not go well.
Review the following in your computer:
Note
Note that the Always On features are available only when SQL Server 2012 is installed on a Windows server.
Verify that the shortcuts are added to All Programs, as shown in the following screenshot:

Further down in All Programs, you will see the following shortcut:

Click on Start | All Programs | Control Panel | Programs | Programs and Features. Review the items installed during this installation. The following were installed on this computer:

Review Windows Services. Click on Start | All Programs | Control Panel | System and Security | Administrative Tools | Services. In Services (Local), you will find the following:
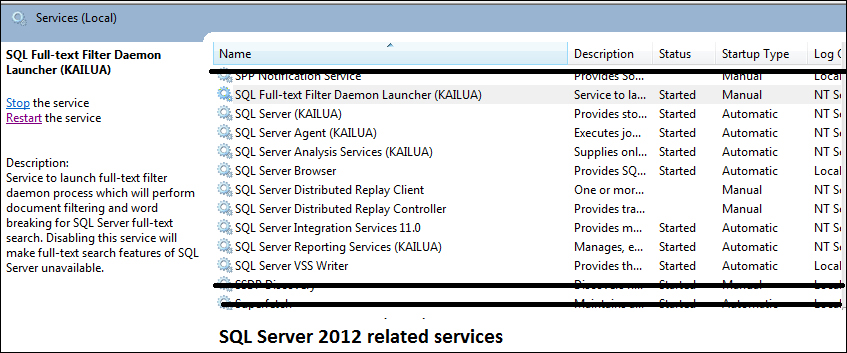
While you are on this page, make sure you can start/stop the SQL Server Services (Database Engine, Analysis Services, and so on). Since some of them are automatic, their status should be Start.
Review the services in the SQL Server Configuration Manager by going to Start | All Programs | Microsoft SQL Server 2012 | Configuration Tools | SQL Server Configuration Manager. You should find the following (you should be able to start/stop services from here as well):

Also make sure the SQL Browser Service has started before trying to connect to the installed instance.
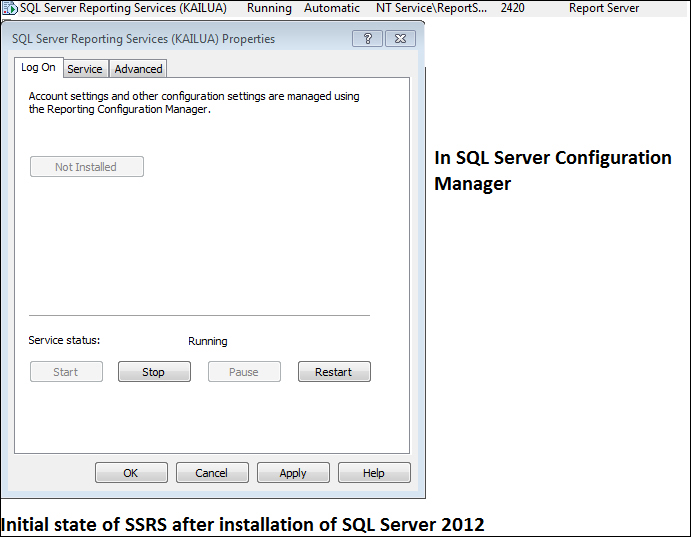
In the preceding window, right-click on SQL Server Report Services (Kailua). A new window (as displayed in the next screenshot) will be displayed.
The Reporting Services in Native mode has not been completely configured. The reason for this is, during SQL Server installation, Reporting Services is enabled but not configured completely. It is to be configured by using the Reporting Services Configuration Manager:
Since this installation is just for working with basic reporting services and savoring the features of SharePoint Integration by a single user on a single machine, the same service account was used for all of the services. During installation, the username and password chosen are of the author on this particular custom environment, as it makes meaningful screen capture easier. It is not a recommended practice to make public the security arrangement, except for a demo environment such as the one used here.
If you want to customize, you may want to choose the locations for the data and log files but for this book, however, the default locations are adequate. However, for a production environment, this is not recommended; you may have to choose proper locations for data and log files, preferably not on drives with operating system files.
Windows authentication was chosen for both the database engine as well as all the services to keep it simple. Also, to make it simple, the current user of the machine was made the sysadmin. If necessary, one may add, other SQL Server administrators using the related Database Engine page or the Analysis Services page. While configuring the database engine, the defaults were used for data directories, but these can be customized as well.
Regarding the choices for the Reporting Services configuration mode, there are three possible choices from two different modes—Native mode or SharePoint Integrated mode. For Reporting Services with SQL Server 2012, the choice of Native mode was made and most of the Report Builder reports deploy them to the Report Server.
The installation should proceed as described, without any problem. The order in which the various software items were installed closely follows the installation steps in the hands-on exercise, but is simply listed here:
SQL Server 2012 (x64) Enterprise Evaluation
Configuration of Reporting Services 2012 in Native mode
Installation of SharePoint 2010 Server Enterprise Evaluation
Installation of Reporting Services in SharePoint Integrated mode
In this section, we will consider configuring the Reporting Services in Native mode as against configuring in SharePoint Integrated mode. It may be useful to remember that Reporting Services SharePoint Integration provides two ways to work with reports (for details, refer to the link at http://msdn.microsoft.com/en-us/library/cc281311.aspx and Hands-on exercise 10.3).
The option of installing Reporting Services in Native mode was made during the SQL Server 2012 installation, as described earlier. When this is configured, the Reporting Services Report Server as well as the Report Manager can be accessed by authenticated users. Reports generated using Report Builder (version 3) can be deployed to the Report Server and handled by the frontend Report Manager.
Click on Start | All Programs | Microsoft SQL Server 2012 | Configuration Tools | Reporting Services Configuration Manager.
The Reporting Services Configuration Manager window opens and the installed Report Server is automatically discovered, as shown in the modal window:

Click on Connect. The connection is established to the server, as shown in the following screenshot; read the provided information:

You can start/stop the Report Server from the preceding window.
Click on Service Account on the left. The Service Account page opens with the default built-in account, as shown in the following screenshot:

Click on Use another account. Add the Windows domain user account with the current user as
HodentekWin7\mysorianand password asXXXXXXX. The Apply button gets enabled, as shown in the following screenshot:
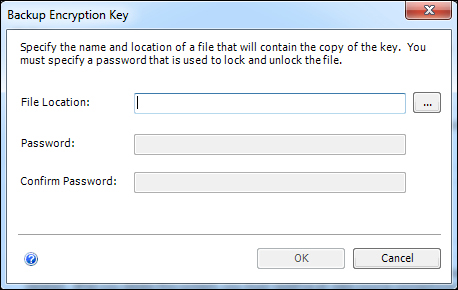
Please consult this link for security-related aspects of SQL Server installation at http://msdn.microsoft.com/en-us/library/ms144228.aspx. In this demo installation, many of the best practices are not followed just to make it easier to work with exploring the features. Also, mostly the computer administrator is the only entity interacting with the SQL Servers, the SharePoint Server, and other services, and therefore the same account (that of the administrator) is used for everything, again not the best practice. However, since Reporting Services on both Native and SharePoint Integrated Report Servers are accessed by users who assume other roles (but still Windows users), the Windows authentication is mostly used. Click on Apply; the Backup Encryption Key window will be displayed, as shown in the following screenshot:
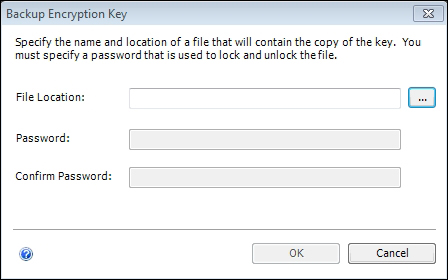
Click on on the ellipsis button for File Location and browse your computer for a location to save your key file. Saving the key is essential to recover the service, in case something untoward happens. For example, the author experienced a hacking incidence and he was able to get back to his servers. It should be deemed as one of the best practices.
The file location chosen is
C:\Users\mysorian\Desktop\Booksnarticles\SSRS\Jan-08-2013.snk.Provide a password and confirm it. In the present case, it was
xxxxxx. The SQL Server Connection Dialog window opens, as shown in the following screenshot:
Click on OK. The current user can connect to the SQL server instance with the instance name
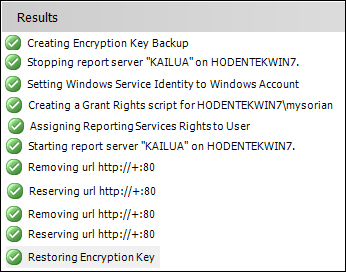
Hodentekwin7\Kailua.Click on OK. Some processing takes place (watch the Results window for the changes made). The service account now looks similar to the following screenshot:

You will see the following in the Results window:
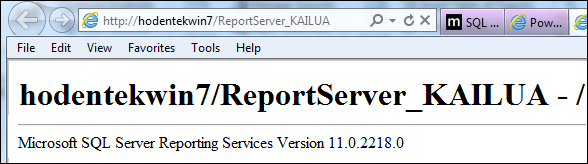
Click on Web Service URL in the left navigation pane. The Web Service URL page opens, as shown in the following screenshot:

The hyperlink at the bottom of the preceding window is the Report Server Web Service URL. The Advanced... button provides you access to create multiple HTTP/SSL identities for the RS Web service.
Click on the hyperlink on the Web Service URL window. The Windows Security login authentication window will be displayed (note that this window may go behind the larger Configuration Manager window; go, look for it). The username is not case sensitive as it responds to
Hodentekwin7\mysorian: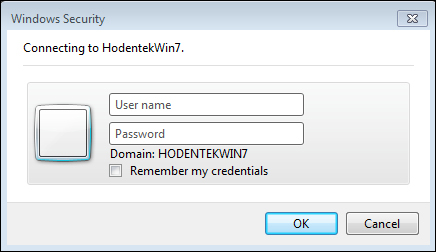
Click on OK after entering the credentials. You may get a page with an error, as follows:

Arrange to set up the IE 9 browser to open with administrator's credentials. If you want to know how to set it up follow this link: http://hodentekhelp.blogspot.com/2013/01/how-to-start-ie-browser-with.html. Click on the URL once again after this, to display the following window:
Note
If you try to access the Report Server without the elevated administrator permissions, you would get a display that would not display an error message. The information you get is often misleading, without pointing to the main reason. However, when you access it with elevated permission, you get connected right away.
Click on Database in Reporting Services Configuration Manager. The Report Server Database page will be displayed as follows:

Make sure you read the information on this page. The current Report Server database can be changed or even a new one can be created either in the Native or SharePoint Integrated mode.
This statement on the Configuration Manager is not entirely correct. Once it is in the Native mode, you cannot change or create a new one in the SharePoint Integrated mode.
You can also modify the credentials for the current Report Server database. This is something that Microsoft should take care of. As of SQL Server 2012, the SharePoint Integration configuration is only via SharePoint Central Administration and not by using the Reporting Services Configuration Manager. I believe this needs changing.
Click on Report Manager URL on the left to open its page, as shown in the following screenshot:

The Advanced button in the Report Manager URL window opens the Multiple Site Configuration page just like in the case of the Report Server URL page. Make no changes.
Click on the hyperlink to test.
The Home of the Report Manager opens as shown:

Presently, there are no items showing, as reports have been neither authored nor imported.
Click on E-mail Settings on the left in the Navigation pane. The E-mail Settings page will open, as shown in the following screenshot:
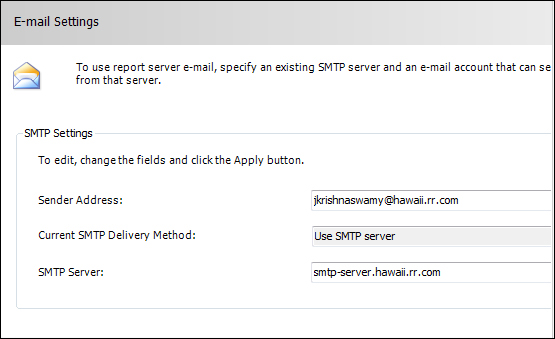
The Reporting Server uses the Simple Mail Transfer Protocol (SMTP), and the SMTP server that accepts the mails is
smtp.live.com.After filling in the details, click on Apply at the bottom. Your SMTP provider may be different.
After some processing, you should see the following displayed at the bottom of Results: "Your Configuration has been updated with your new email settings".
Click on on the Execution Account item in the navigation pane. The page opens as follows:

Make sure you read the information about this page. If you are accessing the file system or items stored on a remote server, which you may want to use in your reports, then you may need to provide a domain user account with just the needed minimum permission. You can also come back and make changes later, if you like. For the present, make no changes. Later, we will configure it for a user with this credential.
Click on the Encryption Keys item in the Navigation pane.
The Encryption Keys page will open, as shown in the next screenshot. Read the information on this page. Reporting Services uses symmetric keys to encrypt sensitive material, such as passwords and connections strings. You can back up, restore, change, and delete keys information from this page:

Click on Backup to open the following page:
Browse and find a location that you can remember. You need to provide a password and confirm it. You can later use it to restore. A Visual Studio
Strong Keynamed file with extensionSNKis saved to the location chosen.Click on Scale-out-Deployment in the Navigation pane. The Scale-Out Deployment page will open up. This book will not be considering scale-out deployment.
Click on Exit and the configuration of Reporting Services will be completed.
While configuring the Report Server, we went ahead and chose a couple of options, but the Configuration Manager provides a number of options for each of the steps. Here, the other options you could have chosen are described. What we have chosen, was for the sake of expediency rather than an example of the best practices.
You may configure multiple Report Servers. Depending upon the size of the business, there could be more than one report server. In the installation used for this book, there is only one report server named KAILUA (excluding the report server with SharePoint Integration). The name of the report server is the one you provided during the installation of SQL Server 2012. You may also see a report server in Native mode HI but it is just another instance of SQL Server.
The Report Server mode that you chose dictates most of what you see in the rest of the Report Server configuration, as most of the defaults will be configured at the end of the SQL Server installation, such as whether the service is started automatically when a window starts or not or the authentication details.
However, it is also possible to do the following:
Start and stop the Report Server from the configuration tool, make changes to the authentication, access the Report Server and Report Manager URLs
Create or change the Report Server Database
Manage e-mail settings
Manage encryption keys
Using the Configuration tool is the recommended (best) practice, if you need to make changes to the Report Server installation. Later on, you will see how the configuration is carried out when the Report Server is installed in the SharePoint Integrated mode.
The service account provided during installation passes to the Report Server as well. It is possible to change the password or use a different account as described previously. For the purpose of this book, the default account will be used. Also, as the Report Server will not be deployed on a network, we will not be concerned with registering a Report Server Service Principal Name with the domain user account. Interested readers, who may want to pursue this, should look up Register a Service Principal Name (SPN) for a Report Server in the Microsoft SQL Server documentation, or if you have created a local help library look for it at C:\Program Data\Microsoft\HelpLibrary\catalogs\SQLSERVER.
Reporting Services uses an encryption key to secure data in the Report Server database. Changing the account or password involves saving the backup encryption key-related information. We will be using the service account and password we supplied during the SQL Server installation, and do not intend to change them. However, to guard against any untoward event, we have carried out a backup of the encryption key.
Using browsers you can access the Report Server Web Service URL as well as the Report Manager URL, as seen earlier. To use any of these, at least one URL should be configured for each instance of Report Server and Report Manager. Since the Native mode for Reporting Services was chosen during the SQL Server 2012 installation, the reserved URLs are configured with default values automatically. You may also choose custom values. For this book, however, the defaults are accepted. Since Port 80 is used by the IIS 7.5 as well as the SharePoint Server site, there is a contention that can be managed by setting a different port.
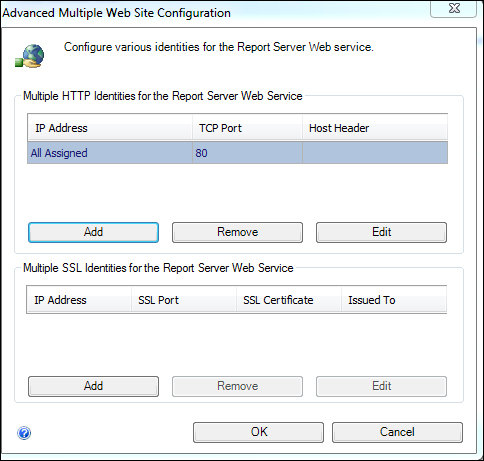
In addition to the Virtual Directory, the IP Address, the TCP Port, the SSL-related items are unique for each Report Server instance. The default IP address set to All Assigned is recommended. The SSL port and SSL certificate related information (optional) can be configured as well. These are not configured in this book. Hitting the Advanced… button brings up the window for configuring Advanced Multiple Web Site Configuration, as shown in the next image, wherein Multiple HTTP and SSL identities for the Report Server Web Service can be configured. No such identities were created for the examples in this book.
Regarding Report Server databases, the Native mode installation (install and configure) chosen during SQL Server 2012 installation creates two relational databases (together called the Report Server Catalog), ReportServer (primary) and ReportServerTempDb for storing Report Server metadata and objects.
Note
Reporting Services 2012 in Native mode has two options (refer to the installation steps of SQL Server 2012). There is an Install and Configure option and an Install Only option. In the first case, the Report Server is installed and configured for the most part, and is operational at the end of the SQL Server 2012 installation. When installed using the Install Only option, the user will have to configure the Report Server by using the Reporting Services Configuration Manager from scratch.
However, if SharePoint Integrated mode is chosen, only the required files are installed and you need to work with SharePoint Central administration to complete the configuration.
In case this option (Install Only) is chosen, you need to manually create the catalog by using this page. Using the Change Database and Change Credentials buttons, you can invoke the wizards to make your desired changes. Regarding the credentials to access the Reporting Services catalog, the Windows Integrated Security login specified during SQ Server 2012 installation is used, as we have done during the SQL Server installation. The Windows user account for the local machine (domain account for remote) and SQL Server logins can also be used for the credentials.
Although SQL Server 2012 on the local machine hosts the database, the Report Server catalog can be hosted on a remote machine or on a SQL Server 2005 instance. For this book, the default databases are accepted. The catalog schema is not public, and the applications should not run queries against this catalog. The recommended procedure is to use the Reporting Services API to access the databases.
Just like the Report Server, the Report Manager can also be accessed by a URL. The virtual directory of Report Manager is very similar to the virtual directory of the Report Server and shows the instance name. Since the Native mode installation option was chosen, it is configured with the default. The Advanced button on the Report Manager URL would bring up the Advanced Multiple Web Site Configuration window, wherein you can configure various identities for Report Manager. These options are not used in the book.
Regarding the e-mail delivery, SMTP is chosen for the mail transfer, and you must supply the correct information for configuring this screen. SMTP needs a sender's address as well as an SMTP server for sending out the mail. The SMTP server can be local or remote. Using Internet SMTP servers did not work, as the Internet Web mail providers such as gmail.com, live.com, and Yahoo.com have made changes to their SMTP servers, which make it difficult to use them from Reporting Services.
Using the exchange server makes it possible to send e-mails from RS without problems. You need to fill in information appropriate to your environment. Advanced e-mail settings can be made by using the configuration file. For this book, no further configuration of e-mail is made apart from the basic configuration using this window. Also, make sure the SQL Server agent has started.
Configuration of the Execution Account is optional. The related screen in the hands-on exercise describes most of the details. This account can be ideally a Windows User account and if it is configured, it should be maintained to avoid accessing errors. For the purposes of this book, this is not configured as we neither send connection requests over networks nor try to retrieve external image files for use in the reports while making requests when logged in anonymously.
Creating a backup copy of the symmetric key used in encrypting sensitive information is an important part of Report Server configuration, although it is strictly unnecessary for the purposes of this book. You do not need to do this for the following reasons:
We do not intend to change the Report Servers Windows Service account name or reset the password
We do not intend to rename either the computer that hosts the instance or the name of the instance
We do not intend to migrate the Report Server installation
We do not expect to have a Report Server installation failure due to hardware failure
Although it was optional for the purposes of this book, encryption keys were generated during configuration, which proved of great value as the author's site had a malware attack and the encryption keys saved the day.
The scale-out-deployment model of running reporting services is needed when multiple report servers use a shared report server database. All action buttons are disabled in the related screen, as there is only one reporting service. We do not intend to use this mode of operation, since we have no intention of having multiple report servers.
The Native mode Reporting Services configuration was completed at the end of the previous hands-on exercise.
We will be working with Microsoft's Northwind database and sometimes with the more recent AdventureWorks databases in both SQL Server 2012. These database samples comes in two forms—MDF and LDF files or script files, which when run on the server install the databases. The MDF and LDF files can be used to install the samples by using either the graphic user interface (right-click on the Databases node in the SQL Server Management Studio and choose Attach...), the Attach menu item on SQL Server, or by using T-SQL scripts.
For SQL Server 2000 database files, refer to the follow URL: http://www.microsoft.com/en-us/download/details.aspx?id=23654
For Adventure Works database files, refer to the follow URL : http://msftdbprodsamples.codeplex.com/releases
Make sure you get both the MDF and LDF files, as both are needed while attaching the databases; read the following comments at http://msftdbprodsamples.codeplex.com/workitem/19203.
For attaching the MDF/LDF files, refer to the following URL for a step-by-step procedure:
http://hodentek.blogspot.com/search?q=Sample+databases
For running the script files, refer to the follow URL and following the steps as indicated:
http://hodentekmsss.blogspot.com/2013/01/how-do-i-install-sample-database-using.html
In addition to these files, some data and even tables may be created to describe some aspects of Reporting Services, and these will be described at appropriate places.
SharePoint Server 2010 Enterprise (herein the Evaluation Edition) is necessary for configuring Reporting Services in the SharePoint Integrated mode. The designated machine platform for SharePoint Server 2010 (hereafter SP2010) is Windows 2008 Server (x64) or Windows Server 2008 R2 (x64). It is, however, possible to install SP2010 on Windows 7 platform as long as it is 64-bit and has sufficient resources. The procedure is by no means trivial, and you will want a better and simplified installer (like a Microsoft Web installer, it does not exist except on a wish list) for installing on Windows 7 (64-bit).
For finding the right version of SQL Server to use with SharePoint Server, visit the following URL:
http://technet.microsoft.com/en-us/library/dc6a3372-db26-43f0-b7aa-f725acc635c2
For installing SP2010 on Windows 7 (64-bit), refer to the follow URL:
http://msdn.microsoft.com/en-us/library/ee554869(office.14).aspx
For hardware and software requirements, before you install SP2010, refer to the follow URL:
http://technet.microsoft.com/en-us/library/cc288751(v=office.14).aspx
Read the complete list of prerequisites for SharePoint 2010 to install correctly.
Download Microsoft SharePoint Server 2010 Trial (
SharePointServer.exe, 560.5 MB) from the following URL, to a location of your choice:http://www.microsoft.com/en-us/download/details.aspx?id=16631
You need to extract the files to a folder that you create, say
SharePoint. Change to the DOS command line and run the following command (make suitable changes to the command line):
The Share Point Server 2010 files are now in the
SharePointServerFilesfolder.In this folder, locate Files | Setup | config.xml, and make changes to this file with a text editor so that the following XML code:
<Setting Id="AllowWindowsClientInstall" Value="True"/>
is typed below other
<Settings/>location but not after</configuration>. Save the file to the same location where you found it. With this when you launch the setup file, it will not complain that your computer OS is not supported.You now need to install the following prerequisite files:
Install
FilterPack.msifrom SharePointServerFiles | PreRequisitesInstallerFiles | FilterPack.msiInstall the Microsoft Sync Frame work 1.0(x64) from http://go.microsoft.com/fwlink/?LinkID=141237
Install Microsoft SQL Server 2008 Native Client MSI file from http://go.microsoft.com/fwlink/?LinkId=123718
Download and install the Windows
6.1-KB974405-x64.msufile from http://www.microsoft.com/en-us/download/details.aspx?id=17331You may also need to install Microsoft Chart Controls for Microsoft .NET Framework 3.5 (KB2500170). Read http://support.microsoft.com/kb/2500170
You will have to turn on some of the Windows features in Control Panel | Programs | Programs and Features. Click on Turn On Windows Features and place check marks for the needed items, as shown in the next image. Note that some of them might already have a check mark. These are needed for the Web Server Role and by application roles in SP2010.

After making all these modifications, the SP 2010 setup starts with the following screen:

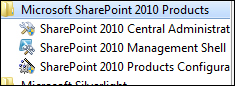
Click on Install SharePoint Server. In the Choose Installation you want window, choose to install standalone using default settings by clicking on the Standalone button. You may also need to run the configuration wizard, after which you will have the following programs added to Start | All Programs | SharePoint 2010 Products:
Installing Reporting Services 2012 in SharePoint Integrated mode consists of two basic installations:
Microsoft SharePoint add-in for SharePoint 2010 products: This installs RS user interface pages/features on a SharePoint Server; the frontend for reporting services needed for Power View, administration pages in SharePoint Central Administration, and Reporting Services data alert pages.
Microsoft SQL Server Reporting Services in SharePoint Integrated mode: The Report Server handles the data and report processing; rendering, subscription, and data alert features. The SharePoint report server is installed as a SharePoint Service.
In a previous hands-on exercise, we have seen how to install Reporting Services SQL Server 2012 in Native mode. In order to install in SharePoint Integrated mode, we need to make this choice during SQL Server 2012 installation, as shown in the following installation page:
Note
A number of combinations of Report Server, Report Server add-in for SharePoint, and SharePoint Version support reporting services integration, for example, Reporting Services 2008 R2 can be implemented in SharePoint 2010 integrated mode but does not support Power View. However, Integration of Reporting Services 2012 with SharePoint 2010 supports Power Views and Data Alerts. Hence, the number of combinations reduces to three at present. The choice made in this book is therefore SQL Server 2012 and SharePoint 2010. Review http://msdn.microsoft.com/en-us/library/dc6a3372-db26-43f0-b7aa-f725acc635c2.
SQL Server 2012 installation installs the Reporting Services add-in for SharePoint 2010 on the computer when you make the feature selection during installation. You may also verify this in the Control Panel's Add/Remove Programs.
If you do not choose it at the time of installation, you can separately download (Web download) it from http://www.microsoft.com/en-us/download/details.aspx?id=29068.
This downloads an MSI named ENU\x64\rsSharePoint.msi (26.1 MB).
With the Reporting Services add-in installed, the following functionalities are available:
The drag-and-drop ad-hoc reporting capability with Power View
Calling up the Report Builder from SharePoint Library and saving reports to SharePoint
Report Viewer Web Part for report viewing, page navigation, report export, print, and so on
SharePoint Web pages, and the ability to create subscriptions and schedules, and manage reports and data sources
Standard SharePoint Document management and deployment of report server content types
Using SharePoint permission levels and roles to control access to the report server content
Reporting Services Data Alerts, an alerting solution driven by data on the report that sends out e-mail notifications
The type of SharePoint Server 2010 installation chosen was of standalone type. We need to install the Reporting Services SharePoint Service for this installation. Starting with SQL Server 2012, the configuration of RS Integrated with SharePoint is made by using PowerShell, whereas that of the Native mode operation is by using Configuration Manager. In this section, PowerShell is used to install the Reporting Services SharePoint Service.
Note
You will learn all about PowerShell and its use for working with Reporting Services in SharePoint Integrated mode and Reporting Services Native mode configuration in Chapter 8, Reporting Services and Programming.
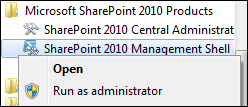
When SharePoint Server was installed, we had access to three of the shortcuts to SharePoint on Start | All Programs, one of which was SharePoint 2010 Management Shell.
Click on Start and then on Microsoft SharePoint Products Group.
Right-click on SharePoint 2010 Management Shell and select Run as administrator, as shown in the following screenshot:
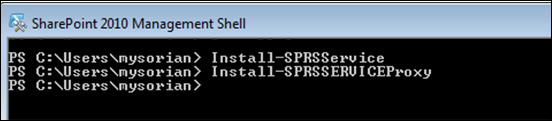
In the Power Shell command line, install the service and proxy, as shown, by using Power Shell cmdlets. First, install the service; if installed without any problem, you get no response. You just get a new line.
Run the second command in the new line to install the service proxy. You do not get a reply but a new line:
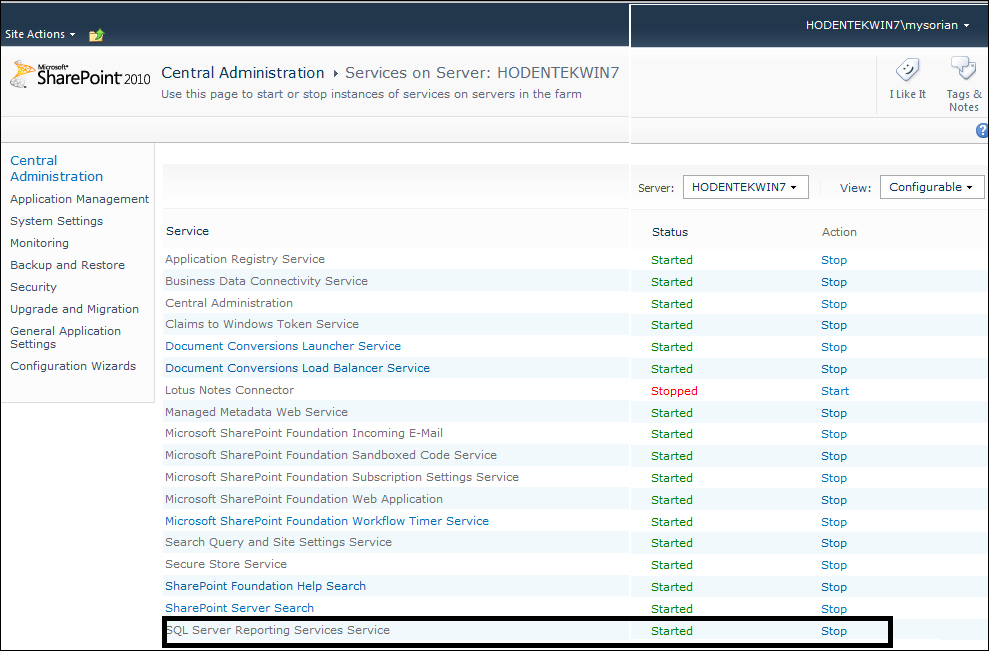
You can start the service from the command line by using another PowerShell cmdlet, but it can be started from the SharePoint Server Central Administration, as shown.
Although you can start and stop the SharePoint Administration site by using PowerShell, it can be started from the SharePoint Central Administration screens, as shown in this section.
Click on Manage Services on server in Central Administration:

In the Services on Server page, Click on Start in the Actions column for SQL Server Reporting Services, as shown in the following screenshot:
In this section, we will install a Reporting Services Service application.
In Central Administration, click on the Application Management group, then click on Manage service applications, as shown in the following screenshot:

The Service Applications tabbed page of the ribbon is displayed as shown in the next image.
Click on New.
Note
If SQL Server Reporting Services Application is not present in the drop-down menu, the shared service is not installed. You have to go back and install it using Power Shell cmdlets, as described previously.

Click on SQL Server Reporting Services Service Application in the drop-down menu of New.
The Create SQL Server Reporting Services Service Application page appears as shown in the following screenshot:

Provide a unique name for the service. Herein,
SPYGLASSwas used.For the the new service application, you need to choose Application Pool and Security Account for this application pool. This is an installation on a single computer that also hosts the Internet Information Server. Choose the option Use existing Application Pool set for
SecurityTokenServiceApplicationPoolwith a predefined security account set for the domain account (in this case,HodentekWin7\mysorian) instead of the defaultNetworkService. You may follow this link to see how you can modify Application Pool Identity:http://hodentekhelp.blogspot.com/2013/04/how-do-you-make-changes-to-application.html
Click on OK.
The Create SQL Server Reporting Services Service Application page (bottom portion of the page) with these changes appears as shown in the following screenshot:

Note that the database name is created for you. The value for the Database Server must be the one that was installed in the SharePoint Integrated mode.
The service application gets created, as shown in the following screenshot:

The databases used by the service are created, as shown on the SQL Server 2012 instance:

The Spyglass service in the Service Applications page appears as follows:

The Service Applications page can be used to manage this service from the preceding page.
Highlight Spyglass in the previous page and click on Manage.
The Manage Reporting Services Application page will be displayed as follows:

This screen functions somewhat like the configuration manager for the Native mode report server. Each of these settings open their detailed related pages, where you configure according to your needs and availability of resources.
In Chapter 7, Self-Service Data Alerts in SSRS 2012, on Data Alerts, the provision subscriptions, Data Alerts, and related information will be described.
Power View is a site collection feature, which enables interactive data exploration possible for both PowerPivot workbooks (we are not concerned here) and Analysis Services Tabular databases. Make sure it is activated. If it is not, you may activate it in SharePoint Central Administration as follows:
Click on the menu item Site Actions (top-left), then click on Site Settings (at the bottom of the drop-down menu).
Look under the section named Site Collection Administration, and click on Site Collection Features.
Click on the Power View Integration feature, then click on Activate.
Verify that Report Server Central Administration Feature and Report Server Integration Feature are both activate. Activate them if they are not.
This completes the tasks that need to be done before you build Power View Reports and Data Alerts in SharePoint.
In Chapter 6, Power View and Reporting Services, creating a data source based on a BISM is described, which is the starting point for creating Power View Reports.
This chapter describes the key features of SQL Server Reporting Services 2012. All SQL server software components used in the preparation of this book as well as bringing in sample data to these servers are also described. Step-by-step instructions are provided for most of the installation related items in this book. One of the key features of this version of SQL Server Reporting Services is the tight integration with SharePoint Server, and therefore guided instructions are provided to install SharePoint Server 2010 on the same machine. The configurations of Reporting Services for the SQL Server Reporting Services 2012 installed in Native mode, as well as installing Reporting Services in SharePoint Integrated mode are described. This is a mandatory chapter to work with the rest of the book.
In the next chapter, which is also mandatory, we will be looking at what Visual Studio provides for authoring and deploying reports. We will be working with Visual Studio 2012 and SQL Server Data Tools (SSDT).

