Welcome to iBeacon—a range of opportunity! Back in the summer of 2013, Craig Federighi, Apple's Senior Vice President of Software Engineering, quietly announced that iOS 7 would feature iBeacon and ended months of speculation about when iOS devices would feature Near Field Communication (NFC)—the answer was that they didn't.
During the conference, Craig touched on why Apple devices wouldn't feature NFC when he discussed the new sharing features of AirDrop. He said, "There's no need to wander around the room bumping your phone with others." This, in a nutshell, shows the reason behind choosing iBeacon technology and the amazing commercial potential versus the limitations of the NFC technology, as iBeacon's range massively exceeds that of NFC.
Simply put, an iBeacon is a Bluetooth low energy (BLE) device that emits a signal that conforms to the iBeacon specification. The iOS 7 SDK includes updates to the Core Location and Core Bluetooth frameworks that will allow you to build apps that respond to iBeacon signals or even act as an iBeacon transmitter.
The iBeacon specification for building hardware beacons is only available under nondisclosure agreement to vendors who sign up to the Made for iPhone (MFi) program. However, as an iOS developer, you don't need to know how to build hardware, you only need to understand how to interact with iBeacons or to simulate them with an iOS device, all of which we will cover in this book.
BLE is a groundbreaking leap in classic Bluetooth technology that allows the development of devices that can broadcast a signal up to 100 m (330 ft) with very little power consumption. This means that beacons can be produced for as little as $ 5 and broadcast for up to 2 years on a single lithium watch battery.
There's often a misconception about what information an iBeacon can broadcast. Basically, an iBeacon broadcasts its presence and nothing more. It says, "Hey, here I am", and nothing else. You can't broadcast data using iBeacon technology, and similarly, iBeacons aren't snooping into where you're going or where you've been. Any data that your apps require outside of the iBeacon identification must be retrieved from another source such as a bundled database or cloud service, as shown in the following diagram:
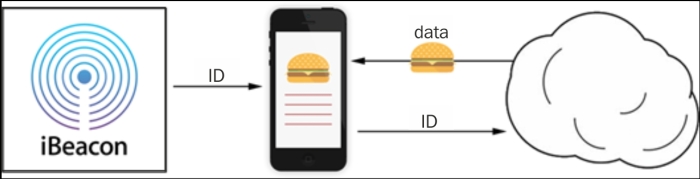
iBeacon app relationship
The best way to think about iBeacons is as a trigger for your app functionality. The trigger is based on the presence of a beacon or the relative distance of an iBeacon from your device.
iBeacons broadcast three values to help you identify which beacon your app is seeing. I call this the UUID/major/minor broadcasting triplet, discussed as follows:
UUID: The Universally Unique Identifier (UUID) is application-specific and belongs only to your app and nobody else. You generate a UUID and tell your app to look out for this value and act accordingly when you come across an iBeacon broadcasting this value. It's specific to your app deployment and use case.
Major: The major value further specifies a specific iBeacon and use case. For example, this could be the city that the beacon resides in or the actual store itself.
Minor: The minor value allows further subdivision of the use case. For example, it could be the department within a store or a particular area of a theme park.
The following table shows how this UUID/major/minor triplet might be used by Disney to develop a queue-jumping app at some of their Walt Disney parks and resorts:
|
Resort location |
Florida |
California |
Paris | |
|---|---|---|---|---|
|
UUID |
D03CA503-04B9-4D03-ABCE-54C9708A8C49 | |||
|
Major |
1 |
2 |
3 | |
|
Minor |
Terror Tower |
10 |
10 |
10 |
|
Space Mountain |
20 |
20 |
20 | |
|
Monorail |
30 |
30 |
30 | |
A single multinational Disney resort's queue-jumping app could be used to determine your location and book your slot on the ride, provided you were located within the iBeacon proximity. As you can see from the preceding table, no information is passed to the device about the park or the ride itself; this information needs to be ascertained by the app from a different source such as a local database or cloud API before triggering the functionality based on that ride.
Obviously, one of the most important factors that your app needs to be able to understand is the distance of mobile devices from the beacon itself. We'll cover this in depth in Chapter 4, Ranging Beacons – Hunting for Treasure, when we'll build a treasure hunt app that relies on the range of the beacon. For now, it's important to know that there's one extra piece of information that is broadcasted by iBeacons.
iBeacons broadcast one extra byte of data known as measured power. Measured power is a value representing the received strength signal indication (RSSI) value at a distance of 1 meter. RSSI is measured in dBm and indicates the measurable signal strength of the beacon, which decreases with distance. This RSSI value varies across the vendor beacon implementations and so isn't very reliable to determine the distance. This is where measured power comes into play.
When iBeacon vendors are configuring their hardware iBeacons, it's important that they configure the measured power broadcast value accurately because the Core Location framework uses this value to determine the distance of the beacon and converts it into a distance that you, as a developer, can utilize.
Although Apple only released the specification for BLE devices to broadcast iBeacon signals at the end of 2013, they'd been cleverly putting Bluetooth 4.0 hardware into devices since 2011, which means that even some older devices worked immediately with iBeacon with the release of iOS 7.
The following table lists some of the iBeacon-compatible iOS devices:
|
Device family |
Model |
Release date |
|---|---|---|
|
iPhone |
iPhone 4s |
October 14, 2011 |
|
iPhone 5 |
September 21, 2012 | |
|
iPhone 5s |
September 20, 2013 | |
|
iPhone 5c |
September 20, 2013 | |
|
iPad |
iPad Mini (first generation) |
November 2, 2012 |
|
iPad Mini (second generation) |
June 30, 2014 | |
|
iPad (third generation) |
March 16, 2012 | |
|
iPad (fourth generation) |
November 2, 2012 | |
|
iPad Air |
November 1, 2013 | |
|
iPod Touch |
iPod Touch (fifth generation) |
October 11, 2012 |
Tip
Although not covered in this book, it's worth noting that Bluetooth beacons also work with Android devices that have Bluetooth 4.0 and running Android 4.3 and later, which includes some of the most popular devices (Samsung Galaxy S3/S4/S5/S4 Mini, Samsung Galaxy Note 2/3, HTC One, Google/LG Nexus 7 (2013 version)/Nexus 4/Nexus 5, and HTC Butterfly).
The commercial opportunities for iBeacon are endless. By adopting BLE, Apple have essentially brought location-based technology indoors and signed iOS devices up to the Internet of Things.
By formalizing a specification for the BLE technology for vendors and developers alike, Apple has essentially brought location- and proximity-based functionality indoors, which has obviously excited the home-automation community a great deal. However, it's the commercial app potential that excites most developers. The ability to understand, within a few feet, exactly where an iOS device is within a store, museum, or theme park means that we, as app developers, have been given a great big golden ticket of opportunity.
In December 2013, Apple leveraged iBeacon themselves by installing beacons in all 254 of their U.S. stores to become their very own case study. The Apple Store leveraged micro-location awareness to provide customers who had the official Apple Store app installed on their devices with information relevant to the items they were actually looking at.
Since Apple's iBeacon implementation, there have been a whole host of high-profile commercial projects, including:
Macy's (http://bit.ly/macysibeacon): Macy's was the first major retailer to support iBeacon, which gives shoppers special offers and deals and rewards shoppers for their visits
Virgin Atlantic (http://bit.ly/virgin-ibeacon): Virgin Atlantic has deployed iBeacons into London's Heathrow airport to give promotional offers while passengers are visiting the terminal
Major League Baseball (http://bit.ly/mlb-ibeacon): Many Major League Baseball teams have now adopted iBeacons in stadiums to engage with fans on their mobile devices while at the game
Antwerp Museum (http://bit.ly/antwerp-ibeacon): The Antwerp Museum has brought its exhibits to life with iBeacon, allowing visitors to move around its Rubens House exhibit and trigger information about the current display based on the user's current location
These are just some of the actual iBeacon implementations that are available at the time of writing this book. As far as your own projects go, the sky is the limit. Here are a few ideas to whet your appetite:
Proximity marketing: Offer complete customized marketing when a customer enters your store combined with information about their previous purchases. As they pass some fine leather brogues say, "Hey, those blue leather brogues would look great with that floral shirt you bought last week."
Home automation: Imagine pulling up to your drive and your porch lights turn on. That's not groundbreaking really; we've had movement sensors for years. However, imagine that the movement sensors, as well as turning your lights on, also started running you a bath, dimming the lights, and playing some relaxing music.
Museum exhibits: Just like a personalized audio tour on your phone as you browse between exhibits and galleries without a predetermined direction, museum curators can build heatmaps of their most popular exhibits and reorganize galleries based on visitor behavior.
Venue navigation: Get geofenced navigation of large venues with a custom tour guide app.
Conference interaction: Using iBeacon, we could deliver location-context information and features. During a keynote your app could deliver features to people who are sitting in the theater, not to those walking around the exhibits outside the theater.
Car rental: Just before you get on a flight, you could order and pay for your car rental. Then, when you arrive at the airport, your car could automatically unlock when you get near to it. This would require a little more computation and extra hardware within the car, but the essence is made possible by iBeacon.
Taxi alert: Order a cab through your phone and receive a push notification when they're outside waiting for you.
You've bought this book, so I'm going to don my super-sleuth hat and say that you've either been tasked with building an iOS app that utilizes iBeacon, or you've got a project in mind that would benefit from proximity-based location. Ignoring my limited powers of deduction, I'd say that's great news. This book will arm you with all the development knowledge you need to build any iBeacon-enabled iPhone and iPad apps. What the book won't give you though is some lovely iBeacon hardware.
Don't worry; you don't actually need any hardware to complete the tutorials in the book. This book includes an accompanying OS X app, which allows your Mac to become any beacon you want. I'll take you through getting it working later in this chapter.
If you're going to build a commercial application, you'll need to make a decision about which beacons to buy. I've been an early adopter of iBeacons and have sampled lots of the most popular beta devices, and so, hopefully, I can give you some insights into the different implementations of iBeacons between vendors.
At the time of writing this book, the process to become an iBeacon vendor was to sign up to the MFi program and gain the specifications for iBeacons. The ones I've sampled personally are motes from Estimote, RedBearLab's RedBear Beacon B1, and ROXIMITY beacons. Many vendors supply their own SDKs with their hardware, and we'll explore some of these SDKs in Chapter 7, Vendor SDKs – Buying and Configuring Beacons, but for now, we'll go through the main differences between the vendors' iBeacon implementations to help you make a more informed choice when it comes to sourcing hardware for your commercial project.
Have a look at the following figure that shows what motes look like:
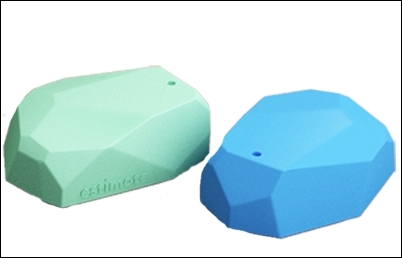
Estimote Beacons or motes
Estimote was set up with $ 3.1 million seed funding in December 2013 and have been well featured in digital press news stories, including the TechCrunch and Wired magazines. Their marketing material boasts that their motes can run up to 2 years on a single watch battery, and their stylish silicon casing means that they work beautifully outside too.
Estimote beacon sensors are already being used by large retailers in Europe, and they're working to build a large network of their sensors in the U.S.
Estimote has opted to provide a richer feature set than most beacons by including accelerometer hardware and temperature sensors. Although these sensors are only accessible when using the Estimote SDK, they do allow for a more creative set of projects to be developed.
Estimote has definitely ridden the crest of the tsunami of iBeacon technology in the press and has some very high-profile customers. At the time of writing this book, the beacons themselves were available as a $ 99 development kit containing three beacons and weren't available for larger volumes as a commercial purchase.
Estimote offers an SDK for managing and interacting with their beacons and has also provided an iOS app available in the App Store, which includes a number of development tutorials and tools such as:
Distance- and proximity-based demos: This tool shows the distance of the device in meters or in written English (near, far, and so on) from Estimote beacons
Notifications demo: This tool shows you a local push notification when you enter into the Estimote Beacon's region
Accelerometer and temperature sensor: Beacons also include an accelerometer and temperature sensor for more imaginative projects to be developed
Beacon management: This tool allows you to check the status of your Estimote beacons including battery life, temperature, and hardware settings, as well as allowing you to configure the beacon's UUID/major/minor broadcast triplet values

Some of the Estimote companion app's features
The following are some pros of Estimote beacons:
They are beautifully designed, and so once released commercially, they have all the elegant aesthetics to feature immediately in any retail- or customer-facing environment
They have good support for both iOS and Android applications using the Estimote SDK
They have a silicon cover, which means that beacons can be used outside
ROXIMITY has taken a completely different approach and made their beacons completely centrally managed. There's no Bluetooth beacon configuration and beacons can be repurposed for multiple apps simultaneously. You can use a single ROXIMITY beacon within an app dedicated to a shopping mall for direction and also for a loyalty app of a retail store within the mall itself because they don't use the UUID/major/minor broadcasting triplet. These values have been removed from you as a developer when using ROXIMITY beacons. Instead, you can work with ROXIMITY beacon identifiers and must use the ROXIMITY SDK; you can't use the Core Location framework.
"The ROXIMITY Beacon hardware and software are designed and built for large-scale deployments. Our beacons are designed for easy installation and zero maintenance." | ||
| --http://roximity.com/platform/ | ||
The ROXIMITY beacons and hardware are most definitely geared up for mobile marketing, and so may not be the best choice for highly customized functionality. However, if your goal is to provide ROXIMITY-based marketing to specialist apps such as sporting venues, shopping malls, or airports, then ROXIMITY beacons and the SDK are probably the most comprehensive beacons to use straight out of the box.
ROXIMITY features are all centrally managed via the online merchant dashboard. By following ROXIMITY's approach to beacon management, you, as a solutions provider, would need to complete the following steps to deploy beacons at your target location:

ROXIMITY merchant dashboard notification message dialog
By following this simple approach, you already have tons of features available without having to write a single line of custom code:
ROXIMITY allows you to send push notifications directly via their merchant dashboard and configure push notifications.
ROXIMITY provides in-depth analytics of visitors.
The ROXIMITY SDK is capable of verifying a device's phone number for a user. Doing so provides additional reachability and location information for that user and an additional means to look up or request that user's location.
The ROXIMITY SDK, when correctly implemented into your app, reports the exact location of your beacons placed in their commercial location. This exact location can also be configured using the ROXIMITY Beacon Explorer app that ROXIMITY offers via the App Store.
Message dialogs can be configured to capture responses when users enter a region via the merchant dashboard.
Tip
The ROXIMITY Beacon Explorer app (http://bit.ly/roximity-be) allows you to demonstrate and test your dialogs and settings without having to build the app using their SDK. This is great for testing functionality before you start building your app.
The following are some pros of ROXIMITY beacons:
Rapid development with an extensive SDK
Single beacons can be used in multiple apps because they don't rely on the UUID/major/minor broadcasting triplet
They have no hardware configuration requirements (via Bluetooth), meaning beacons can be quickly and easily reused for other purposes, and marketing campaigns can be optimized via a central management platform
The following are some cons of ROXIMITY beacons:
No control over the UUID/major/minor broadcasting triplet, and so the ROXIMITY SDK must be used, which means that the iOS SDK can't be used for development
Too much emphasis on proximity marketing means that using ROXIMITY beacons for other purposes is more difficult than simpler beacon implementations
Currently, only very limited analytics are available via the merchant dashboard
RedBearLab is a Hong-Kong-based company that specializes in BLE technology exclusively. They have many BLE products such as Arduino shields and have an established name in hardware.

The RedBear Beacon B1
RedBearLab adopted a simple, no-nonsense approach in their iBeacon product, the RedBear Beacon B1, and have focused on the hardware, not branding.
Much bigger than both the ROXIMITY and Estimote options, the RedBear Beacon B1 is powered by two AAA batteries, offering five times the battery life of beacons that are powered by a CR2032 coin battery.
RedBearLab don't provide any online management platform for their beacons; however, they do offer over-the-air firmware upgrades, which means that firmware updates can be easily done via their RedBear BeaconTool app available via the App Store (http://bit.ly/RedBear-BT).
The RedBear Beacon B1 also features very simple administration via the BeaconTool app and is very secure compared to other beacons since it has a hardware configuration button, which activates the configuration mode for a short period. Combining this hardware feature with the fact that you can very easily set custom administrator passwords on the beacon means that these devices are far less likely to be hijacked than other vendor beacons. We will discuss the security issues surrounding iBeacons in Chapter 9, iBeacon Security – Understanding the Risks.
Finally, the RedBear Beacon B1 has one unique feature that is both elegant and genius—a power switch. None of the other beacons I've had the pleasure of trialing have this feature, which when developing an app makes perfect sense. A hardware power switch allowing you to turn a beacon on and off makes simulating entering and exiting a beacon region very simple.
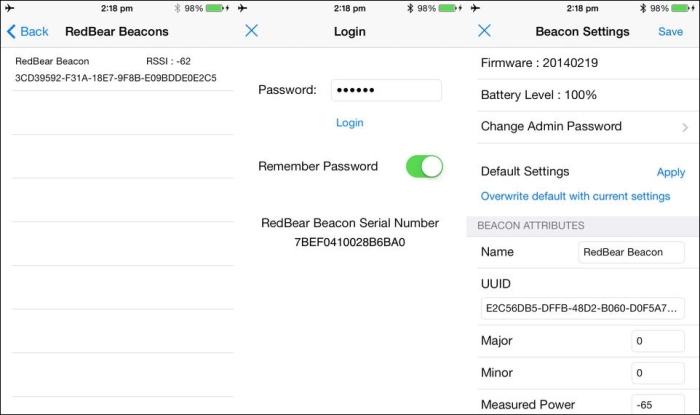
RedBear BeaconTool app for iOS
The RedBear Beacon B1 and RedBear BeaconTool app provide simple configuration, robust hardware security, and power features, which mean it's the perfect development companion.
The following are the pros of RedBear Beacon B1:
Hardware button to switch between configuration and online mode, making it more difficult for unauthorized configuration of the UUID/major/minor broadcasting triplet
Longest battery life and easiest unit to change batteries
Power switch allows easy simulation of entering and existing beacon range
The following are the cons of RedBear Beacon B1:
Largest beacon of the three discussed and heavy in comparison when including two AAA batteries.
Aesthetically, this is the least pleasing of the beacons discussed. This means it is not great for consumer-facing commercial deployments.
No extra sensors or software features present like the other two beacons discussed.
There are of course plenty of other vendors and more and more new beacons coming onto the market all the time, so there'll be lots of amazing new vendors for you to choose from.
The three discussed are just some of the most popular beacons that I've had the pleasure of testing and so can share my experiences. If you're buying beacons in bulk, then you might also want to consider using a trade website such as http://www.alibaba.com/. I've had some great beacons and some not so great beacons through this online trading platform, but overall, my experiences have been good. The three beacons we've already discussed range between $ 23 per unit and $ 35 per unit. However, when buying direct from suppliers on Alibaba.com, I've personally bought very good units for as little as $ 4 per unit.
When buying iBeacons from trade websites, my recommendation is that you order a subset first, maybe 5 to 10 units. Most vendors will charge you $ 2 to $ 3 more per unit for this type of transaction and offer you economies of scale for buying more in future.
When buying iBeacons from trade sites, you should also look out for beacons that have conformed to the Made for iPhone program; a key way of identifying these is when they show the iBeacon logo.
Made for iPhone logo
In order to complete the tutorials in this book, you don't need to be in possession of any iBeacon hardware since there's a companion app that lets your Mac act as an iBeacon using its built-in Bluetooth adapter provided it has Bluetooth 4.0.
You can download the companion app from the companion website as well as all of the code tutorials from the app. You can download the companion app and code samples from:
If your machine doesn't have Bluetooth 4.0, there's no need to worry. You can pick up a Bluetooth 4.0 USB dongle for under $ 15 that will allow the companion app to work.
To see if your Mac is Bluetooth 4.0 enabled, follow these steps:
Click on the Apple icon in the status bar.
Select About This Mac.
Click on the More Info button.
Click on the System Report button.
Select Bluetooth from the sidebar on the left, underneath Hardware.
Scan down the list of information until you find LMP Version, as shown:

If your Mac is equipped with Bluetooth 4.0, LMP Version will say 0x6. Anything lower than that is an older version of Bluetooth and will need a USB dongle.
The Mac in the preceding screenshot needs a dongle.

The earlier screenshot shows a MacBook Pro fitted with Bluetooth 3.1 and will need a USB dongle.
The Mac in the preceding screenshot shows the same MacBook Pro with a USB dongle fitted.
Tip
While writing this book, I used a MacBook Pro from late 2011, which unfortunately is only fitted with Bluetooth 3.1. I picked up a pluggable USB-BT4LE Bluetooth 4.0 USB Adapter for $ 13, which enabled my MacBook for iBeacon transmissions.
The companion app is used throughout the book and lets you use your Mac as an iBeacon. It can be downloaded from the download section of the Packt Publishing website and comes preconfigured with all of the beacons used throughout the book.
Using the companion app, you can simulate physical beacons in the real world using any Bluetooth-4.0-powered Mac running OS X Mavericks or Mountain Lion.

Companion app broadcasting an iBeacon signal
The companion OS X app has beacons configured already for every tutorial in this book. To start a beacon, simply select the beacon from the tutorial from the menu on the left, and then tap on the power button in the right panel.
The features of the companion app can be seen in the following table:


In time-honored tradition, we can't conclude the first chapter without the traditional "Hello World" tutorial. We'll be using your Mac as an iBeacon broadcaster using the companion app, and the app will simply show an alert every time it enters or exits the region.
We will cover all of these concepts in more detail in later chapters, but for reference, here are the classes we'll be using:
CLLocationManager: TheCLLocationManagerclass delivers location-related events to your app and tells you when you enter or exit a regionCLLocationManagerDelegate: TheCLLocationManagerDelegateprotocol defines the delegate methods used to receive location and heading updates fromCLLocationManagerCLBeaconRegion: ACLBeaconRegionobject defines a type of region that is based on the device's proximity to a Bluetooth beacon
Fire up Xcode and start a new project. Choose Single View Application from the iOS template menu as your project type.

A new project dialog
Set up your new project using the values shown in the following screenshot:

A new project options dialog
All of the features we need for this app to work are present in the Core Location framework.
Click on the project in the project navigator and scroll down to the Linked Frameworks and Libraries section of the General tab and then click on the add icon. We'll need to add the CoreLocation framework as shown in the following screenshot:

Adding the Core Location framework
We only really care about the LIViewController class for this tutorial as that's where we're going to be presenting to the user when we're moving in and out of regions. In order to do this, we need to add a reference to CoreLocation. Open LIViewController.h and add the following line just below the existing UIKit import:
#import <CoreLocation/CoreLocation.h>
Tip
Downloading the example code
You can download the example code files for all Packt books you have purchased from your account at http://www.packtpub.com. If you purchased this book elsewhere, you can visit http://www.packtpub.com/support and register to have the files e-mailed directly to you.
Since iOS 8.0, you must specify a location description message in your plist settings. This is a nice friendly message for the users to help them understand why they need permission to use those location services. To do this, open the project file, click on your target Hello World, and then under the Info tab, add a new item to the dictionary under Custom iOS Target Properties with the following values:
Key:
NSLocationAlwaysUsageDescriptionValue:
This app needs your location to show you how cool iBeacon is.
Our ViewController instance is where all the action happens, so it makes sense for ViewController to be aware of location events. For that, we need to make it CLLocationManagerDelegate.
Go ahead and add the declaration to the LIViewController interface declaration. Change the interface declaration in LIViewController.h so that it looks like the following code:
@interface LIViewController : UIViewController<CLLocationManagerDelegate>
We also need to implement the CLLocationManagerDelegate methods so that we can show our notification when the device enters a region. Add the following code to the end of the LIViewController implementation in the LIViewController.m file:
-(void)locationManager:(CLLocationManager *)manager didEnterRegion:(CLRegion *)region {
    UIAlertView * av = [[UIAlertView alloc] init];
    av.title = [NSString stringWithFormat:@"Entered Region '%@'", region.identifier];
    [av addButtonWithTitle:@"OK"];
    [av show];
}

-(void)locationManager:(CLLocationManager *)manager didExitRegion:(CLRegion *)region {
    UIAlertView * av = [[UIAlertView alloc] init];
    av.title = [NSString stringWithFormat:@"Left Region '%@'", region.identifier];
    [av addButtonWithTitle:@"OK"];
    [av show];
}Now, our view controller will be notified when a CLLocationManager instance receives events, but we don't have an instance of CLLocationManager yet. Add the following property to the LIViewController interface inside LIViewController.m:
@property (nonatomic, strong) CLLocationManager * locationManager;
For our app to know which region it's looking out for, we need some way of storing the UUID. Add the following line just below the implementation in LIViewController.m:
static NSString * uuid = @"EB9AB493-32C2-4E5C-BF67-76E86E338BB9";
Our app is already ready to start accepting location-based updates. All we need to do now is create a region, instantiate our location manager, and start monitoring our regions. Overwrite the viewDidLoad method of our LIViewController with the following code. We'll go through the most important code shortly.
- (void)viewDidLoad
{
    [super viewDidLoad];
    NSUUID * regionUUID = [[NSUUID alloc] initWithUUIDString:uuid];

    CLBeaconRegion * region = [[CLBeaconRegion alloc] initWithProximityUUID:regionUUID identifier:@"My Region"];

    [region setNotifyOnEntry:YES];
    [region setNotifyOnExit:YES];
    self.locationManager = [[CLLocationManager alloc] init];
    self.locationManager.delegate = self;

    [self.locationManager requestAlwaysAuthorization];

    [self.locationManager startMonitoringForRegion:region];
}Let's break the preceding code down line by line:
First, we create an
NSUUIDinstance using our string identifier (uuid) sinceCLBeaconRegionrequires an object of this type in order to be initialized:NSUUID * regionUUID = [[NSUUID alloc] initWithUUIDString:uuid];
Next, we create a new
CLBeaconRegionpassing in ourNSUUID:CLBeaconRegion * region = [[CLBeaconRegion alloc] initWithProximityUUID:regionUUID identifier:@"My Region"];
Next, we configure our region events. We're interested in being notified when we enter and leave the region:
[region setNotifyOnEntry:YES];
[region setNotifyOnExit:YES];
Next, we instantiate
CLLocationManagerand addViewControlleras its delegate:self.locationManager = [[CLLocationManager alloc] init]; self.locationManager.delegate = self;
Finally, we request permission for location services, then start monitoring for the
CLBeaconRegionwe've just created:[self.locationManager requestAlwaysAuthorization]; [self.locationManager startMonitoringForRegion:region];
Plug in an iOS device to your Mac, and compile and debug the app. You should be presented with a lovely blank white screen. Because we're using CoreLocation, you need to give permission for the app to use your location. It's important that you agree to this:

Location permission dialog
Now, open the companion app on your Mac and choose the beacon profile named Chapter 1 : Default Beacon from the list on the left-hand side and then click on the power button, as shown in the following screenshot:

Using your Mac to broadcast your first iBeacon
What you've just simulated is your device entering a region. If this was a real scenario, the beacon would have been running all along and your device would come into range because you walk towards the beacon, but the companion app serves just as well in this instance.
If all was successful, you should see the following screenshot:

Successfully entered the region
Finally, test exiting the region by turning the beacon profile off in the companion OS X app. It may take up to 30 seconds for the app to register that you've left the region. Once the event fires, you should see the following screenshot:

Successfully exited the region
Congratulations on building your first app using iBeacon technology! You've added the first building blocks to your arsenal of tools to build amazing indoor location-based applications. The rest of the book concentrates less on the technology and more on the code, and next we'll be covering more in-depth functionality by showing proximity-based marketing. Hold on to your hats!