Download code from GitHub
The Building Blocks of Programming
Any programming language starts off looking like ancient Greek to the unaccustomed eye, and C# is no exception. The good news is beneath the initial mystery, all programming languages are made up of the same essential building blocks. Variables, methods, and classes (or objects) make up the DNA of conventional programming; understanding these simple concepts opens up an entire world of diverse and complex applications. After all, there are only four different DNA nucleobases in every person on earth; yet, here we are, every one of us a unique organism.
If you are new to programming, there's going to be a lot of information coming at you in this chapter, and this could mark the first lines of code that you've ever written. The point is not to overload your brain with facts and figures; it's to give you a holistic look at the building blocks of programming using examples from everyday life.
This chapter is all about the high-level view of the bits and pieces that make up a program. Getting the hang of how things work before getting into the code directly will not only help you new coders find your feet, but it will also solidify the topics with easy-to-remember references. Ramblings aside, we'll focus on the following topics throughout this chapter:
- Defining variables
- Understanding methods
- Introducing classes
- Working with comments
- Putting the building blocks together
Defining variables
Let's start with a simple question: what is a variable? Depending on your point of view, there are a few different ways of answering that question:
- Conceptually, a variable is the most basic unit of programming, as an atom is to the physical world (excepting string theory). Everything starts with variables, and programs can't exist without them.
- Technically, a variable is a tiny section of your computer's memory that holds an assigned value. Every variable keeps track of where its information is stored (this is called a memory address), its value, and its type (for instance, numbers, words, or lists).
- Practically, a variable is a container. You can create new ones at will, fill them with stuff, move them around, change what they're holding, and reference them as needed. They can even be empty and still be useful.
You can find an in-depth explanation of variables in the Microsoft C# documentation at https://docs.microsoft.com/en-us/dotnet/csharp/language-reference/language-specification/variables.
A practical real-life example of a variable is a mailbox—remember those?

Figure 2.1: Snapshot of a row of colorful mailboxes
They can hold letters, bills, a picture from your aunt Mabel—anything. The point is that what's in a mailbox can vary: they can have names, hold information (physical mail), and their contents can even be changed if you have the right security clearance. Similarly, variables can hold different kinds of information. Variables in C# can hold strings (text), integers (numbers), and even Booleans (binary values that represent either true or false).
Names are important
Referring to Figure 2.1, if I asked you to go over and open the mailbox, the first thing you'd probably ask is: which one? If I said the Smith family mailbox, or the sunflower mailbox, or even the droopy mailbox on the far right, then you'd have the necessary context to open the mailbox I was referencing. Similarly, when you are creating variables, you have to give them unique names that you can reference later. We'll get into the specifics of proper formatting and descriptive naming in Chapter 3, Diving into Variables, Types, and Methods.
Variables act as placeholders
When you create and name a variable, you are creating a placeholder for the value that you want to store. Let's take the following simple math equation as an example:
2 + 9 = 11
Okay, no mystery here, but what if we wanted the number 9 to be its variable? Consider the following code block:
MyVariable = 9
Now we can use the variable name, MyVariable, as a substitute for 9 anywhere we need it:
2 + MyVariable = 11
If you're wondering whether variables have other rules or regulations, they do. We'll get to those in the next chapter, so sit tight.
Even though this example isn't real C# code, it illustrates the power of variables and their use as placeholder references. In the next section you'll start creating variables of your own, so keep going!
Alright, enough theory—let's create a real variable in the LearningCurve script we created in Chapter 1, Getting to Know Your Environment:
- Double-click on
LearningCurve.csfrom the Unity project window to open it in Visual Studio. - Add a space between lines 6 and 7 and add the following line of code to declare a new variable:
public int CurrentAge = 30; - Inside the
Startmethod, add two debug logs to print out the following calculations:Debug.Log(30 + 1); Debug.Log(CurrentAge + 1);
Let's break down the code we just added. First, we created a new variable called CurrentAge and assigned it a value of 30. Then, we added two debug logs to print out the result of 30 + 1 and CurrentAge + 1 to show how variables are storage for values. They can be used the exact same way as the values themselves.
It's also important to note that public variables appear in the Unity Inspector, while private ones don't. Don't worry about the syntax right now—just make sure your script is the same as the script that is shown in the following screenshot:
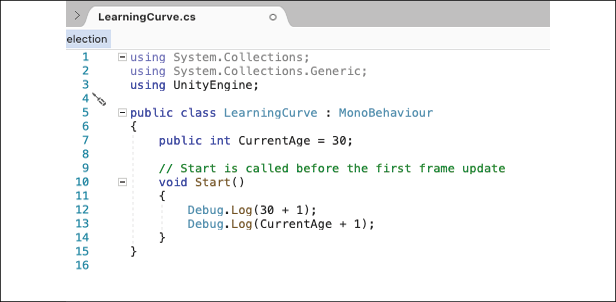
Figure 2.2: LearningCurve script open in Visual Studio
To finish, save the file using Editor | File | Save.
For scripts to run in Unity, they have to be attached to GameObjects in the scene. The sample scene in Hero Born has a camera and directional light by default, which provides the lighting for the scene, so let's attach LearningCurve to the camera to keep things simple:
- Drag and drop
LearningCurve.csonto the Main Camera. - Select the Main Camera so that it appears in the Inspector panel, and verify that the
LearningCurve.cs(Script) component is attached properly. - Click play and watch for the output in the Console panel:

Figure 2.3: Unity Editor window with callouts for dragging and dropping scripts
The Debug.Log() statements printed out the result of the simple math equations we put in between the parentheses. As you can see in the following Console screenshot, the equation that used our variable, CurrentAge, worked the same as if it were a real number:
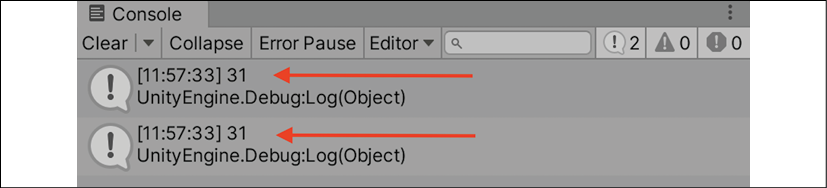
Figure 2.4: Unity console with debug output from the attached script
We'll get into how Unity converts C# scripts into components at the end of this chapter, but first, let's work on changing the value of one of our variables.
Since CurrentAge was declared as a variable on line 7 as shown in Figure 2.2, the value it stores can be changed. The updated value will then trickle down to wherever the variable is used in code; let's see this in action:
- Stop the game by clicking the Pause button if the scene is still running
- Change Current Age to
18in the Inspector panel and play the scene again, looking at the new output in the Console panel:
Figure 2.5: Unity console with debug logs and the LearningCurve script attached to Main Camera
The first output will still be 31 because we didn't change anything in the script, but the second output is now 19 because we changed the value of CurrentAge in the Inspector.
The goal here wasn't to go over variable syntax but to show how variables act as containers that can be created once and referenced elsewhere. We'll go into more detail in Chapter 3, Diving into Variables, Types, and Methods.
Now that we know how to create variables in C# and assign them values, we're ready to dive into the next important programming building block: methods!
Understanding methods
On their own, variables can't do much more than keep track of their assigned values. While this is vital, they are not very useful on their own in terms of creating meaningful applications. So, how do we go about creating actions and driving behavior in our code? The short answer is by using methods.
Before we get to what methods are and how to use them, we should clarify a small point of terminology. In the world of programming, you'll commonly see the terms method and function used interchangeably, especially in regards to Unity.
Since C# is an object-oriented language (this is something that we'll cover in Chapter 5, Working with Classes, Structs, and OOP), we'll be using the term method for the rest of the book to conform to standard C# guidelines.
When you come across the word function in the Scripting Reference or any other documentation, think method.
Methods drive actions
Similarly to variables, defining programming methods can be tediously long-winded or dangerously brief; here's another three-pronged approach to consider:
- Conceptually, methods are how work gets done in an application.
- Technically, a method is a block of code containing executable statements that run when the method is called by name. Methods can take in arguments (also called parameters), which can be used inside the method's scope.
- Practically, a method is a container for a set of instructions that run every time it's executed. These containers can also take in variables as inputs, which can only be referenced inside the method itself.
Taken all together, methods are the bones of any program—they connect everything and almost everything is built off of their structure.
You can find an in-depth guide to methods in the Microsoft C# documentation at https://docs.microsoft.com/en-us/dotnet/csharp/programming-guide/classes-and-structs/methods.
Methods are placeholders too
Let's take an oversimplified example of adding two numbers together to drive the concept home. When writing a script, you're essentially laying down lines of code for the computer to execute in sequential order. The first time you need to add two numbers together, you could just add them like in the following code block:
SomeNumber + AnotherNumber
But then you conclude that these numbers need to be added together somewhere else.
Instead of copying and pasting the same line of code, which results in sloppy or "spaghetti" code and should be avoided at all costs, you can create a named method that will take care of this action:
AddNumbers()
{
    SomeNumber + AnotherNumber
}
Now AddNumbers is holding a place in memory, just like a variable; however, instead of a value, it holds a block of instructions. Using the name of the method (or calling it) anywhere in a script puts the stored instructions at your fingertips without having to repeat any code.
If you find yourself writing the same lines of code over and over, you're likely missing a chance to simplify or condense repeated actions into common methods.
This produces what programmers jokingly call spaghetti code because it can get messy. You'll also hear programmers refer to a solution called the Don't Repeat Yourself (DRY) principle, which is a mantra you should keep in mind.
As before, once we've seen a new concept in pseudocode, it's best if we implement it ourselves, which is what we'll do in the next section to drive it home.
Let's open up LearningCurve again and see how a method works in C#. Just like with the variables example, you'll want to copy the code into your script exactly as it appears in the following screenshot. I've deleted the previous example code to make things neater, but you can, of course, keep it in your script for reference:
- Open up
LearningCurvein Visual Studio. - Add a new variable to line 8:
public int AddedAge = 1; - Add a new method to line 16 that adds
CurrentAgeandAddedAgetogether and prints out the result:void ComputeAge() { Debug.Log(CurrentAge + AddedAge); } - Call the new method inside
Startwith the following line:ComputeAge();Double-check that your code looks like the following screenshot before you run the script in Unity:

Figure 2.6: LearningCurve with new ComputeAge method
- Save the file, and then go back and hit play in Unity to see the new Console output.
You defined your first method on lines 16 to 19 and called it on line 13. Now, wherever ComputeAge() is called, the two variables will be added together and printed to the console, even if their values change. Remember, you set CurrentAge to 18 in the Unity Inspector, and the Inspector value will always override the value in a C# script:

Figure 2.7: Console output from changing the variable value in the Inspector
Go ahead and try out different variable values in the Inspector panel to see this in action! More details on the actual code syntax of what you just wrote are coming up in the next chapter.
With a bird's-eye view of methods under our belts, we're ready to tackle the biggest topic in the programming landscape—classes!
Introducing classes
We've seen how variables store information and how methods perform actions, but our programming toolkit is still somewhat limited. We need a way of creating a sort of super container, containing variables and methods that can be referenced from within the container itself. Enter classes:
- Conceptually, a class holds related information, actions, and behaviors inside a single container. They can even communicate with each other.
- Technically, classes are data structures. They can contain variables, methods, and other programmatic information, all of which can be referenced when an object of the class is created.
- Practically, a class is a blueprint. It sets out the rules and regulations for any object (called an instance) created using the class blueprint.
You've probably realized that classes surround us not only in Unity but in the real world as well. Next, we'll take a look at the most common Unity class and how classes function in the wild.
You can find an in-depth guide to classes in the Microsoft C# documentation at https://docs.microsoft.com/en-us/dotnet/csharp/fundamentals/types/classes.
A common Unity class
Before you wonder what a class looks like in C#, you should know that you've been working with a class this whole chapter. By default, every script created in Unity is a class, which you can see from the class keyword on line 5:
public class LearningCurve: MonoBehaviour
MonoBehaviour just means that this class can be attached to a GameObject in the Unity scene.
Classes can exist on their own, which we'll see when we create standalone classes in Chapter 5, Working with Classes, Structs, and OOP.
The terms script and class are sometimes used interchangeably in Unity resources. For consistency, I'll be referring to C# files as scripts if they're attached to GameObjects and as classes if they are standalone.
Classes are blueprints
For our last example, let's think about a local post office. It's a separate, self-contained environment that has properties, such as a physical address (a variable), and the ability to execute actions, such as sending out your mail (methods).
This makes a post office a great example of a potential class that we can outline in the following block of pseudocode:
public class PostOffice
{
    // Variables
    public string address = "1234 Letter Opener Dr."
    // Methods
    DeliverMail() {}
    SendMail() {}
}
The main takeaway here is that when information and behaviors follow a predefined blueprint, complex actions and inter-class communication become possible. For instance, if we had another class that wanted to send a letter through our PostOffice class, it wouldn't have to wonder where to go to fire this action. It could simply call the SendMail function from the PostOffice class, as follows:
PostOffice().SendMail()
Alternatively, you could use it to look up the address of the post office so you know where to post your letters:
PostOffice().address
If you're wondering about the use of periods (called dot notation) between words, we'll be diving into that in the next section—hold tight.
Communication among classes
Up until now, we've described classes and, by extension, Unity components as separate standalone entities; in reality, they are deeply intertwined. You'd be hard-pressed to create any kind of meaningful software application without invoking some kind of interaction or communication between classes.
If you remember the post office example from earlier, the example code made use of periods (or dots) to reference classes, variables, and methods. If you think of classes as directories of information, then dot notation is the indexing tool:
PostOffice().Address
Any variables, methods, or other data types within a class can be accessed with dot notation. This applies to nested, or subclass, information as well, but we'll tackle all those subjects when we get to Chapter 5, Working with Classes, Structs, and OOP.
Dot notation is also what drives communication between classes. Whenever a class needs information about another class or wants to execute one of its methods, dot notation is used:
PostOffice().DeliverMail()
Dot notation is sometimes referred to as the . operator, so don't be thrown off if you see it mentioned this way in documentation.
If dot notation doesn't quite click with you yet, don't worry, it will. It's the bloodstream of the entire programming body, carrying information and context wherever it's needed.
Now that you know a little more about classes, let's talk about the tool you'll use the most in your programming career—comments!
Working with comments
You might have noticed that LearningCurve has an odd line of text (10 in Figure 2.6) starting with two forward slashes, which were created by default with the script.
These are code comments! In C#, there are a few ways that you can use to create comments, and Visual Studio (and other code editing applications) will often make it even easier with built-in shortcuts.
Some professionals wouldn't call commenting an essential building block of programming, but I'll have to respectfully disagree. Correctly commenting out your code with meaningful information is one of the most fundamental habits a new programmer can develop.
Single-line comments
The following single-line comment is like the one we've included in LearningCurve:
// This is a single-line comment
Visual Studio doesn't compile lines starting with two forward slashes (without empty space) as code, so you can use them as much as needed to explain your code to others or your future self.
Multi-line comments
Since it's in the name, you'd be right to assume that single-line comments only apply to one line of code. If you want multi-line comments, you'll need to use a forward slash and an asterisk, (/* and */ as opening and closing characters respectively) around the comment text:
/* this is a
      multi-line comment */
You can also comment and uncomment blocks of code by highlighting them and using the Cmd + / shortcut on macOS and Ctrl + K + C on Windows.
Visual Studio also provides a handy auto-generated commenting feature; type in three forward slashes on the line preceding any line of code (variables, methods, classes, and more) and a summary comment block will appear.
Seeing example comments is good, but putting them in your code is always better. It's never too early to start commenting!
Adding comments
Open up LearningCurve and add in three backslashes above the ComputeAge() method:
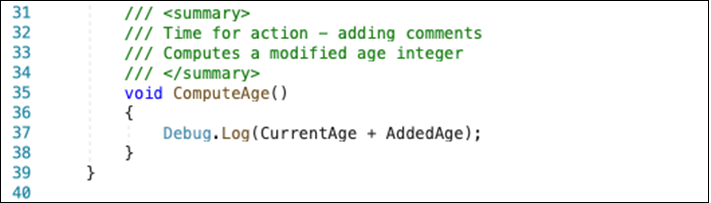
Figure 2.8: Triple-line comment automatically generated for a method
You should see a three-line comment with a description of the method generated by Visual Studio from the method's name, sandwiched between two <summary> tags. You can, of course, change the text, or add new lines by hitting Enter just as you would in a text document; just make sure not to touch the <summary> tags or Visual Studio won't recognize the comments correctly.
The useful part about these detailed comments is clear when you want to know something about a method you've written. If you've used a triple forward slash comment, all you need to do is hover over the method name anywhere it's called within a class or script, and Visual Studio will pop your summary:
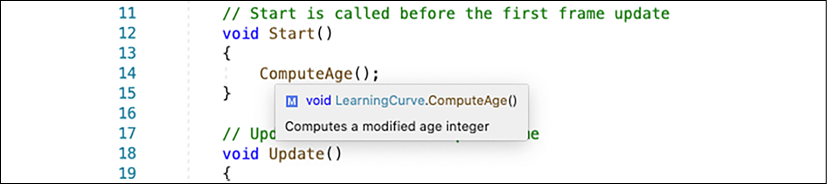
Figure 2.9: Visual Studio pop-up info box with the comment summary
Your basic programming toolkit is now complete (well, the theory drawer, at least). However, we still need to understand how everything we've learned in this chapter applies in the Unity game engine, which is what we'll be focusing on in the next section!
Putting the building blocks together
With the building blocks squared away, it's time to do a little Unity-specific housekeeping before wrapping up this chapter. Specifically, we need to know more about how Unity handles C# scripts attached to game objects.
For this example, we'll keep using our LearningCurve script and Main Camera GameObject.
Scripts become components
All GameObject components are scripts, whether they're written by you or the good people at Unity. The only difference is that Unity-specific components such as Transform, and their respective scripts just aren't supposed to be edited by users.
The moment a script that you have created is dropped onto a GameObject, it becomes another component of that object, which is why it appears in the Inspector panel. To Unity, it walks, talks, and acts like any other component, complete with public variables underneath the component that can be changed at any time. Even though we aren't supposed to edit the components provided by Unity, we can still access their properties and methods, making them powerful development tools.
Unity also makes some automatic readability adjustments when a script becomes a component. You might have noticed in Figures 2.3 and 2.5 that when we added LearningCurve to Main Camera, Unity displayed it as Learning Curve, with CurrentAge changing to Current Age.
We looked at how to update a variable in the Inspector panel in the Variables act as placeholders section, but it's important to touch on how this works in more detail. There are three situations in which you can modify a property value:
- In Play Mode in the Unity Editor window
- In Development Mode in the Unity Editor window
- In the Visual Studio code editor
Changes made in Play Mode take effect in real time, which is great for testing and fine-tuning gameplay. However, it's important to note that any changes made while in Play Mode will be lost when you stop the game and return to Development Mode.
When you're in Development Mode, any changes that you make to the variables will be saved by Unity. This means that if you were to quit Unity and then restart it, the changes would be retained.
The changes that you make to values in the Inspector panel while in Play Mode do not modify your script, but they will override any values you had assigned in your script when in Development Mode.
Any changes made in Play Mode will always reset automatically when you stop Play Mode. If you need to undo any changes made in the Inspector panel, you can reset the script to its default (sometimes called initial) values. Click on the three vertical dots icon to the right of any component, and then select Reset, as shown in the following screenshot:
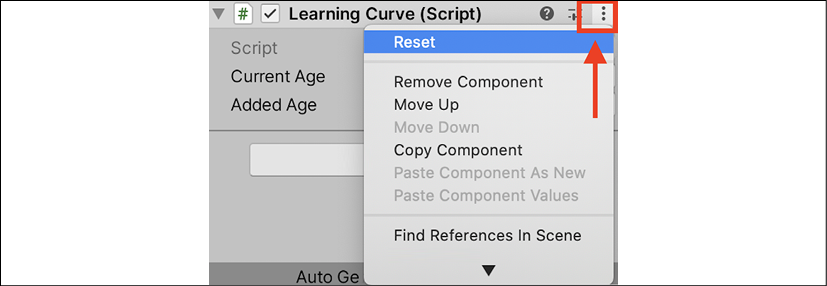
Figure 2.10: Script reset option in the Inspector
This should give you some peace of mind—if your variables get out of hand, there's always the hard reset.
A helping hand from MonoBehaviour
Since C# scripts are classes, how does Unity know to make some scripts components and not others? The short answer is that LearningCurve (and any script created in Unity) inherits from MonoBehaviour (a default class provided by Unity). This tells Unity that the C# class can be transformed into a component.
The topic of class inheritance is a bit advanced for this point of your programming journey; think of it as the MonoBehaviour class lending a few of its variables and methods to LearningCurve. Chapter 5, Working with Classes, Struct, and OOP, will cover class inheritance in practical detail.
The Start() and Update() methods that we've used belong to MonoBehaviour, which Unity runs automatically on any script attached to a GameObject. The Start() method runs once when the scene starts playing, while the Update() method runs once per frame (depending on the frame rate of your machine).
Now that your familiarity with Unity's documentation has gotten a nice bump, I've put together a short optional challenge for you to tackle!
Hero's trial – MonoBehaviour in the Scripting API
Now it's time for you to get comfortable using the Unity documentation on your own, and what better way than to look up some of the common MonoBehaviour methods:
- Try searching for the
Start()andUpdate()methods in the Scripting API to gain a better understanding of what they do in Unity, and when - If you're feeling brave, go the extra step and have a look at the
MonoBehaviourclass in the manual for a more detailed explanation
Summary
We've come a long way in a few short pages, but understanding the overarching theory of fundamental concepts such as variables, methods, and classes will give you a strong foundation to build on. Bear in mind that these building blocks have very real counterparts in the real world. Variables hold values like mailboxes hold letters; methods store instructions like recipes, to be followed for a predefined result; and classes are blueprints just like real blueprints. You can't build a house without a well-thought-out design to follow if you expect it to stay standing.
The rest of this book will take you on a deep dive into C# syntax from scratch, starting with more detail in the next chapter on how to create variables, manage value types, and work with simple and complex methods.
Pop quiz – C# building blocks
- What is the main purpose of a variable?
- What role do methods play in scripts?
- How does a script become a component?
- What is the purpose of dot notation?
JOIN us on Discord!
Read this book alongside other users, Unity/C# experts, and Harrison Ferrone. Ask questions, provide solutions to other readers, chat with the author via Ask Me Anything sessions and much more.
Join Now!
https://packt.link/csharpunity2021