


With distributed technologies evolving all the time, engineers are trying to push those technologies to their limits. Earlier, people were looking for faster, cheaper ways to process data. This need was satisfied when Hadoop was introduced. Everyone started using Hadoop, started replacing their ETLs with Hadoop-bound ecosystem tools. Now that this need has been satisfied and Hadoop is used in production at so many companies, another need arose to process data in a streaming manner, which gave rise to technologies such as Apache Spark and Flink. Features, such as fast processing engines, the ability to scale in no time, and support for machine learning and graph technologies, are popularizing these technologies among the developer community.
Some of you might have been already using Apache Spark in your day-to-day life and might have been wondering if I have Spark why I need to use Flink? The question is quite expected and the comparison is natural. Let me try to answer that in brief. The very first thing we need to understand here is Flink is based on the streaming first principle which means it is real streaming processing engine and not a fast processing engine that collects streams as mini batches. Flink considers batch processing as a special case of streaming whereas it is vice-versa in the case of Spark. Likewise we will discover more such differences throughout this book.
This book is about one of the most promising technologies--Apache Flink. In this chapter we are going to talk about the following topics:
History
Architecture
Distributed execution
Features
Quick start setup
Cluster setup
Running a sample application
Flink started as a research project named Stratosphere with the goal of building a next generation big data analytics platform at universities in the Berlin area. It was accepted as an Apache Incubator project on April 16, 2014. Initial versions of Stratosphere were based on a research paper by Nephele at http://stratosphere.eu/assets/papers/Nephele_09.pdf.
The following diagram shows how the evolution of Stratosphere happened over time:

The very first version of Stratosphere was focused on having a runtime, optimizer, and the Java API. Later, as the platform got more mature, it started supporting execution on various local environments as well as on YARN. From version 0.6, Stratosphere was renamed Flink. The latest versions of Flink are focused on supporting various features such as batch processing, stream processing, graph processing, machine learning, and so on.
Flink 0.7 introduced the most important feature of Flink that is, Flink's streaming API. Initially release only had the Java API. Later releases started supporting Scala API as well. Now let's look the current architecture of Flink in the next section.
Flink 1.X's architecture consists of various components such as deploy, core processing, and APIs. We can easily compare the latest architecture with Stratosphere's architecture and see its evolution. The following diagram shows the components, APIs, and libraries:
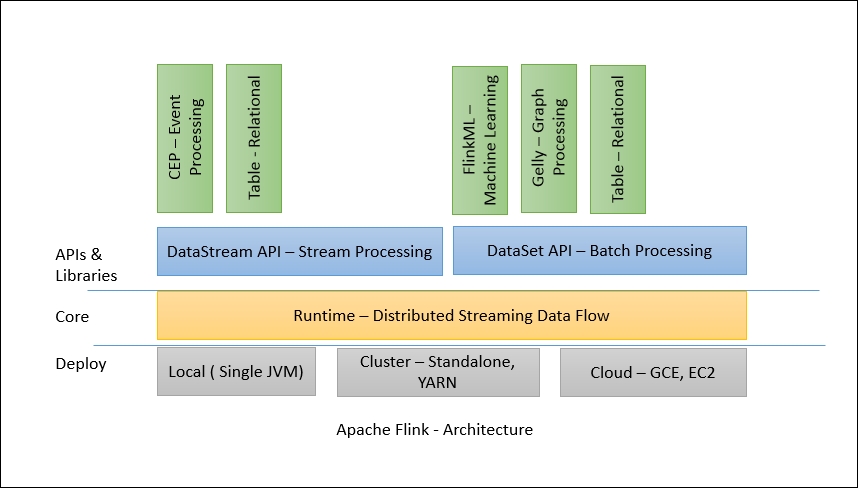
Flink has a layered architecture where each component is a part of a specific layer. Each layer is built on top of the others for clear abstraction. Flink is designed to run on local machines, in a YARN cluster, or on the cloud. Runtime is Flink's core data processing engine that receives the program through APIs in the form of JobGraph. JobGraph is a simple parallel data flow with a set of tasks that produce and consume data streams.
The DataStream and DataSet APIs are the interfaces programmers can use for defining the Job. JobGraphs are generated by these APIs when the programs are compiled. Once compiled, the DataSet API allows the optimizer to generate the optimal execution plan while DataStream API uses a stream build for efficient execution plans.
The optimized JobGraph is then submitted to the executors according to the deployment model. You can choose a local, remote, or YARN mode of deployment. If you have a Hadoop cluster already running, it is always better to use a YARN mode of deployment.
Flink's distributed execution consists of two important processes, master and worker. When a Flink program is executed, various processes take part in the execution, namely Job Manager, Task Manager, and Job Client.
The following diagram shows the Flink program execution:

The Flink program needs to be submitted to a Job Client. The Job Client then submits the job to the Job Manager. It's the Job Manager's responsibility to orchestrate the resource allocation and job execution. The very first thing it does is allocate the required resources. Once the resource allocation is done, the task is submitted to the respective the Task Manager. On receiving the task, the Task Manager initiates a thread to start the execution. While the execution is in place, the Task Managers keep on reporting the change of states to the Job Manager. There can be various states such as starting the execution, in progress, or finished. Once the job execution is complete, the results are sent back to the client.
The master processes, also known as Job Managers, coordinate and manage the execution of the program. Their main responsibilities include scheduling tasks, managing checkpoints, failure recovery, and so on.
There can be many Masters running in parallel and sharing these responsibilities. This helps in achieving high availability. One of the masters needs to be the leader. If the leader node goes down, the master node (standby) will be elected as leader.
The Job Manager consists of the following important components:
Actor system
Scheduler
Check pointing
Flink internally uses the Akka actor system for communication between the Job Managers and the Task Managers.
An actor system is a container of actors with various roles. It provides services such as scheduling, configuration, logging, and so on. It also contains a thread pool from where all actors are initiated. All actors reside in a hierarchy. Each newly created actor would be assigned to a parent. Actors talk to each other using a messaging system. Each actor has its own mailbox from where it reads all the messages. If the actors are local, the messages are shared through shared memory but if the actors are remote then messages are passed thought RPC calls.
Each parent is responsible for the supervision of its children. If any error happens with the children, the parent gets notified. If an actor can solve its own problem then it can restart its children. If it cannot solve the problem then it can escalate the issue to its own parent:

In Flink, an actor is a container having state and behavior. An actor's thread sequentially keeps on processing the messages it will receive in its mailbox. The state and the behavior are determined by the message it has received.
Executors in Flink are defined as task slots. Each Task Manager needs to manage one or more task slots. Internally, Flink decides which tasks needs to share the slot and which tasks must be placed into a specific slot. It defines that through the SlotSharingGroup and CoLocationGroup.
Check pointing is Flink's backbone for providing consistent fault tolerance. It keeps on taking consistent snapshots for distributed data streams and executor states. It is inspired by the Chandy-Lamport algorithm but has been modified for Flink's tailored requirement. The details about the Chandy-Lamport algorithm can be found at: http://research.microsoft.com/en-us/um/people/lamport/pubs/chandy.pdf.
The exact implementation details about snapshotting are provided in the following research paper: Lightweight Asynchronous Snapshots for Distributed Dataflows (http://arxiv.org/abs/1506.08603).
The fault-tolerant mechanism keeps on creating lightweight snapshots for the data flows. They therefore continue the functionality without any significant over-burden. Generally the state of the data flow is kept in a configured place such as HDFS.
In case of any failure, Flink stops the executors and resets them and starts executing from the latest available checkpoint.
Stream barriers are core elements of Flink's snapshots. They are ingested into data streams without affecting the flow. Barriers never overtake the records. They group sets of records into a snapshot. Each barrier carries a unique ID. The following diagram shows how the barriers are injected into the data stream for snapshots:

Each snapshot state is reported to the Flink Job Manager's checkpoint coordinator. While drawing snapshots, Flink handles the alignment of records in order to avoid re-processing the same records because of any failure. This alignment generally takes some milliseconds. But for some intense applications, where even millisecond latency is not acceptable, we have an option to choose low latency over exactly a single record processing. By default, Flink processes each record exactly once. If any application needs low latency and is fine with at least a single delivery, we can switch off that trigger. This will skip the alignment and will improve the latency.
Task managers are worker nodes that execute the tasks in one or more threads in JVM. Parallelism of task execution is determined by the task slots available on each Task Manager. Each task represents a set of resources allocated to the task slot. For example, if a Task Manager has four slots then it will allocate 25% of the memory to each slot. There could be one or more threads running in a task slot. Threads in the same slot share the same JVM. Tasks in the same JVM share TCP connections and heart beat messages:

The job client is not an internal part of Flink's program execution but it is the starting point of the execution. The job client is responsible for accepting the program from the user and then creating a data flow and then submitting the data flow to the Job Manager for further execution. Once the execution is completed, the job client provides the results back to the user.
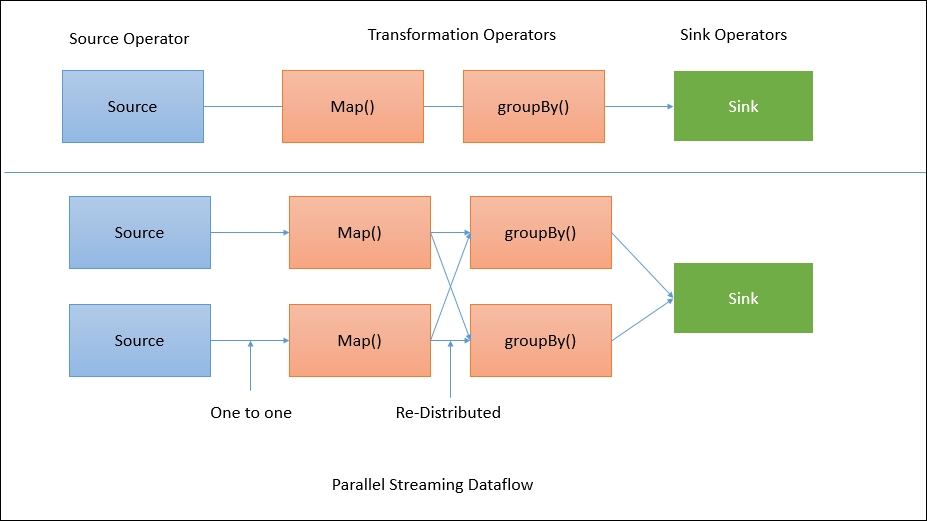
A data flow is a plan of execution. Consider a very simple word count program:

When a client accepts the program from the user, it then transforms it into a data flow. The data flow for the aforementioned program may look like this:
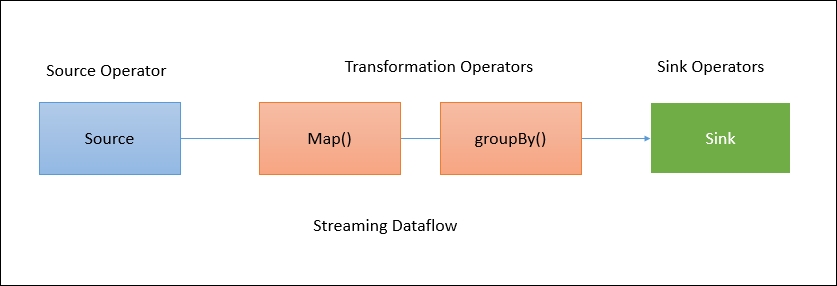
The preceding diagram shows how a program gets transformed into a data flow. Flink data flows are parallel and distributed by default. For parallel data processing, Flink partitions the operators and streams. Operator partitions are called sub-tasks. Streams can distribute the data in a one-to-one or a re-distributed manner.
The data flows directly from the source to the map operators as there is no need to shuffle the data. But for a GroupBy operation Flink may need to redistribute the data by keys in order to get the correct results:
In the earlier sections, we tried to understand the Flink architecture and its execution model. Because of its robust architecture, Flink is full of various features.
Flink is designed to achieve high performance and low latency. Unlike other streaming frameworks such as Spark, you don't need to do many manual configurations to get the best performance. Flink's pipelined data processing gives better performance compared to its counterparts.
As we discussed in the previous section, Flink's distributed checkpoint processing helps to guarantee processing each record exactly once. In the case of high-throughput applications, Flink provides us with a switch to allow at least once processing.
Flink supports data-driven windows. This means we can design a window based on time, counts, or sessions. A window can also be customized which allows us to detect specific patterns in event streams.
Flink's distributed, lightweight snapshot mechanism helps in achieving a great degree of fault tolerance. It allows Flink to provide high-throughput performance with guaranteed delivery.
Flink is supplied with its own memory management inside a JVM which makes it independent of Java's default garbage collector. It efficiently does memory management by using hashing, indexing, caching, and sorting.
Flink's batch data processing API is optimized in order to avoid memory-consuming operations such as shuffle, sort, and so on. It also makes sure that caching is used in order to avoid heavy disk IO operations.
Flink provides APIs for both batch and stream data processing. So once you set up the Flink environment, it can host stream and batch processing applications easily. In fact Flink works on Streaming first principle and considers batch processing as the special case of streaming.
Flink has a rich set of libraries to do machine learning, graph processing, relational data processing, and so on. Because of its architecture, it is very easy to perform complex event processing and alerting. We are going to see more about these libraries in subsequent chapters.
Now that we understand the details about Flink's architecture and its process model, it's time to get started with a quick setup and try out things on our own. Flink works on both Windows and Linux machines.
The very first thing we need to do is to download Flink's binaries. Flink can be downloaded from the Flink download page at: http://flink.apache.org/downloads.html.
On the download page, you will see multiple options as shown in the following screenshot:

In order to install Flink, you don't need to have Hadoop installed. But in case you need to connect to Hadoop using Flink then you need to download the exact binary that is compatible with the Hadoop version you have with you.
As I have latest version of Hadoop 2.7.0 installed with me, I am going to download the Flink binary compatible with Hadoop 2.7.0 and built on Scala 2.11.
Here is direct link to download:
http://www-us.apache.org/dist/flink/flink-1.1.4/flink-1.1.4-bin-hadoop27-scala_2.11.tgz
Flink needs Java to be installed first. So before you start, please make sure Java is installed. I have JDK 1.8 installed on my machine:

Flink installation is very easy to install. Just extract the compressed file and store it on the desired location.
Once extracted, go to the folder and execute start-local.bat:
>cd flink-1.1.4
>bin\start-local.bat
And you will see that the local instance of Flink has started.
You can also check the web UI on http://localhost:8081/:

You can stop the Flink process by pressing Cltr + C.
Similar to Windows, installing Flink on Linux machines is very easy. We need to download the binary, place it in a specific folder, extract, and finish:
$sudo tar -xzf flink-1.1.4-bin-hadoop27-scala_2.11.tgz
$cd flink-1.1.4
$bin/start-local.sh
As in Windows, please make sure Java is installed on the machine.
Now we are all set to submit a Flink job. To stop the local Flink instance on Linux, execute following command:
$bin/stop-local.sh
Setting up a Flink cluster is very simple as well. Those who have a background of installing a Hadoop cluster will be able to relate to these steps very easily. In order to set up the cluster, let's assume we have four Linux machines with us, each having a moderate configuration. At least two cores and 4 GB RAM machines would be a good option to get started.
The very first thing we need to do this is to choose the cluster design. As we have four machines, we will use one machine as the Job Manager and the other three machines as the Task Managers:

In order to set up the cluster, we first need to do password less connections to the Task Manager from the Job Manager machine. The following steps needs to be performed on the Job Manager machine which creates an SSH key and copies it to authorized_keys:
$ssh-keygen
This will generate the public and private keys in the /home/flinkuser/.ssh folder. Now copy the public key to the Task Manager machine and perform the following steps on the Task Manager to allow password less connection from the Job Manager:
sudo mkdir -p /home/flinkuser/.ssh

sudo touch /home/flinkuser/authorized_keys

sudo cp /home/flinkuser/.ssh

    sudo sh -c "cat id_rsa.pub >> /home/flinkuser/.ssh/authorized_keys"
Make sure the keys have restricted access by executing the following commands:
sudo chmod 700 /home/flinkuser/.ssh
sudo chmod 600 /home/flinkuser/.ssh/authorized_keys
Now you can test the password less SSH connection from the Job Manager machine:
sudo ssh <task-manager-1>
sudo ssh <task-manager-2>
sudo ssh <task-manager-3>
Tip
If you are using any cloud service instances for the installations, please make sure that the ROOT login is enabled from SSH. In order to do this, you need to login to each machine: open file /etc/ssh/sshd_config. Then change the value to PermitRootLogin yes. Once you save the file, restart the SSH service by executing the command: sudo service sshd restart
Next we need to install Java on each machine. The following command will help you install Java on Redhat/CentOS based UNIX machines.
wget --no-check-certificate --no-cookies --header "Cookie:
    oraclelicense=accept-securebackup-cookie"
    http://download.oracle.com/otn-pub/java/jdk/8u92-b14/jdk-8u92-
    linux-x64.rpm
sudo rpm -ivh jdk-8u92-linux-x64.rpm
Next we need to set up the JAVA_HOME environment variable so that Java is available to access from everywhere.
Create a java.sh file:
sudo vi /etc/profile.d/java.sh
And add following content in it and save it:
#!/bin/bash
JAVA_HOME=/usr/java/jdk1.8.0_92
PATH=$JAVA_HOME/bin:$PATH
export PATH JAVA_HOME
export CLASSPATH=.
Make the file executable and source it:
sudo chmod +x /etc/profile.d/java.sh
source /etc/profile.d/java.sh
You can now check if Java is installed properly:
$ java -version
java version "1.8.0_92"
Java(TM) SE Runtime Environment (build 1.8.0_92-b14)
Java HotSpot(TM) 64-Bit Server VM (build 25.92-b14, mixed mode)
Repeat these installations steps on the Job Manager and Task Manager machines.
Once SSH and Java installation is done, we need to download Flink binaries and extract them into a specific folder. Please make a note that the installation directory on all nodes should be same.
So let's get started:
cd /usr/local
sudo wget  http://www-eu.apache.org/dist/flink/flink-1.1.4/flink-
    1.1.4-bin-hadoop27-scala_2.11.tgz
sudo tar -xzf flink-1.1.4-bin-hadoop27-scala_2.11.tgz
Now that the binary is ready, we need to do some configurations.
Flink's configurations are simple. We need to tune a few parameters and we are all set. Most of the configurations are same for the Job Manager node and the Task Manager node. All configurations are done in the conf/flink-conf.yaml file.
The following is a configuration file for a Job Manager node:
jobmanager.rpc.address: localhost
jobmanager.rpc.port: 6123
jobmanager.heap.mb: 256
taskmanager.heap.mb: 512
taskmanager.numberOfTaskSlots: 1
You may want to change memory configurations for the Job Manager and Task Manager based on your node configurations. For the Task Manager, jobmanager.rpc.address should be populated with the correct Job Manager hostname or IP address.
So for all Task Managers, the configuration file should be like the following:
jobmanager.rpc.address: <jobmanager-ip-or-host>
jobmanager.rpc.port: 6123
jobmanager.heap.mb: 256
taskmanager.heap.mb: 512
taskmanager.numberOfTaskSlots: 1
We need to add the JAVA_HOME details in this file so that Flink knows exactly where to look for Java binaries:
export JAVA_HOME=/usr/java/jdk1.8.0_92
We also need to add the slave node details in the conf/slaves file, with each node on a separate new line.
Here is how a sample conf/slaves file should look like:
<task-manager-1>
<task-manager-2>
<task-manager-3>
Now the only thing left is starting the Flink processes. We can start each process separately on individual nodes or we can execute the start-cluster.sh command to start the required processes on each node:
bin/start-cluster.sh
If all the configurations are good, then you would see that the cluster is up and running. You can check the web UI at
http://<job-manager-ip>:8081/
.
The following are some snapshots of the Flink Web UI:

You can click on the Job Manager link to get the following view:

Similarly, you can check out the Task Managers view as follows:

Flink provides you with the facility to add additional instances of Job and Task Managers to the running cluster.
Before we start the daemon, please make sure that you have followed the steps given previously.
To add an additional Job Manager to the existing cluster, execute the following command:
sudo bin/jobmanager.sh start cluster
Similarly, we need to execute the following command to add an additional Task Manager:
sudo bin/taskmanager.sh start cluster
Once the job execution is completed, you want to shut down the cluster. The following commands are used for that.
To stop the complete cluster in one go:
sudo bin/stop-cluster.sh
To stop the individual Job Manager:
sudo bin/jobmanager.sh stop cluster
To stop the individual Task Manager:
sudo bin/taskmanager.sh stop cluster
Flink binaries come with a sample application which can be used as it is. Let's start with a very simple application, word count. Here we are going try a streaming application which reads data from the netcat server on a specific port.
So let's get started. First start the netcat server on port 9000 by executing the following command:
nc -l 9000
Now the netcat server will be start listening on port 9000 so whatever you type on the command prompt will be sent to the Flink processing.
Next we need to start the Flink sample program to listen to the netcat server. The following is the command:
bin/flink run examples/streaming/SocketTextStreamWordCount.jar --
hostname localhost --port 9000
08/06/2016 10:32:40     Job execution switched to status RUNNING.
08/06/2016 10:32:40     Source: Socket Stream -> Flat Map(1/1)
switched to SCHEDULED
08/06/2016 10:32:40     Source: Socket Stream -> Flat Map(1/1)
switched to DEPLOYING
08/06/2016 10:32:40     Keyed Aggregation -> Sink: Unnamed(1/1)
switched to SCHEDULED
08/06/2016 10:32:40     Keyed Aggregation -> Sink: Unnamed(1/1)
switched to DEPLOYING
08/06/2016 10:32:40     Source: Socket Stream -> Flat Map(1/1)
switched to RUNNING
08/06/2016 10:32:40     Keyed Aggregation -> Sink: Unnamed(1/1)
switched to RUNNING
This will start the Flink job execution. Now you can type something on the netcat console and Flink will process it.
For example, type the following on the netcat server:
$nc -l 9000
hi Hello
Hello World
This distribution includes cryptographic software.  The country in
which you currently reside may have restrictions on the import,
possession, use, and/or re-export to another country, of
encryption software.  BEFORE using any encryption software, please
check your country's laws, regulations and policies concerning the
import, possession, or use, and re-export of encryption software,
to
see if this is permitted.  See <http://www.wassenaar.org/> for
more
information.
You can verify the output in logs:
$ tail -f flink-*-taskmanager-*-flink-instance-*.out
==> flink-root-taskmanager-0-flink-instance-1.out <==
(see,2)
(http,1)
(www,1)
(wassenaar,1)
(org,1)
(for,1)
(more,1)
(information,1)
(hellow,1)
(world,1)

==> flink-root-taskmanager-1-flink-instance-1.out <==
(is,1)
(permitted,1)
(see,2)
(http,1)
(www,1)
(wassenaar,1)
(org,1)
(for,1)
(more,1)
(information,1)

==> flink-root-taskmanager-2-flink-instance-1.out <==
(hello,1)
(worlds,1)
(hi,1)
(how,1)
(are,1)
(you,1)
(how,2)
(is,1)
(it,1)
(going,1)
You can also checkout the Flink Web UI to see how your job is performing. The following screenshot shows the data flow plan for the execution:

Here for the job execution, Flink has two operators. The first is the source operator which reads data from the Socket stream. The second operator is the transformation operator which aggregates counts of words.
We can also look at the timeline of the job execution:

In this chapter, we talked about how Flink started as a university project and then became a full-fledged enterprise-ready data processing platform. We looked at the details of Flink's architecture and how its process model works. We also learnt how to run Flink in local and cluster modes.
In the next chapter, we are going to learn about Flink's Streaming API and look at its details and how can we use that API to solve our data streaming processing problems.

