


Adobe Connect is a flash-powered platform, and depending upon licensing and permissions within your organization, you can create web meetings, e-learning courses, and virtual classrooms and webinars. So we can say that Adobe Connect encompasses three major components:
- Adobe Connect meetings
- Adobe Connect trainings
- Adobe Connect events
In this chapter, you will learn the following:
- Basics of Connect meetings feature
- How to log in to the Connect application
- Connect home page user interface
In order to help run and manage those features, Content Management and Administration features are provided. Also, reporting is another key element of Adobe Connect.
The central topic of this book will be the Adobe Connect meeting feature. Of course, we will cover most of the Content Management feature, as well as some of Basic Event Management features.
In this chapter, you will learn the basics of the Adobe Connect application. After this chapter, you will be ready to enter the application and navigate through different pages of the Connect.
The basics of Connect meetings
Adobe Connect Meeting can be best described as an online live conference software for multiple users. It is a web-based application that you can use to run an online conference meeting. The meeting room interface is combined from various components and a number of display containers that are named pods. By using the pods functionalities, meeting room provides several features for multiple users who play the role of meeting attendees.
Users have the ability to chat, broadcast live video and audio, share files, share computer screens, or use other interactive functionalities while using the meeting room. You will learn how to use all of those functionalities in the later chapters of this book.
In addition to the predefined default layouts, you can customize your own meeting room according to your needs. This feature will be explained in detail in Chapter 10, Customizing Pod Display.
Every meeting room that is created in the application is assigned its own URL address, and it is available until you delete it. You can access your meeting by clicking on the assigned URL, and you can use the same URL address to enter created meeting rooms several times. In Chapter 2, Creating an Adobe Connect Meeting Room and Chapter 3, Managing Adobe Connect Meeting Room, you will learn how to create and manage your own meeting rooms.
Based upon your assigned role, you will have different capabilities in a meeting. In order to successfully use meeting rooms, you must have an Internet connection, any modern browser (for example, Mozilla Firefox, Google Chrome, or Internet Explorer), and an installed version of Flash Player. Minimum requirement is Flash 10.1 for AC8 and 10.3 for AC9.
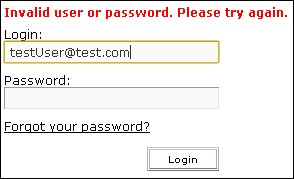
By entering the URL address of your Connect instance, you will be presented with the login screen. On this page, you will need to enter your credentials in the form of an e-mail address (usually your e-mail address or any other login information your administrator provided you with) and password provided to you by your system administrator for the specific instance of Adobe Connect. Please see the following screenshot for the example of an application login screen. Note that you will be able to customize this login page with your own logo. We will see this in the Customizing Login Page, Central Page, and Meeting Appearance section of Chapter 4, Customizing the Viewing Experience.

In addition to the fields provided for username and password on this page, you will find a link for password reset (Forgot your password?). This link can be used in case you forgot your password. In the bottom-left corner of the application, you will find the Help link that will redirect you to Adobe Connect Help page for detailed help of application functionalities. In case you enter incorrect credentials, the application will warn you and display an error message, Invalid user name or password. Please try again. Refer to the following screenshot:
In case you have forgotten your password, you can click on the Forgot your password? link, which will present you with the confirmation page for changing your password. Refer to the following screenshot:

The confirmation page will appear like the following screenshot:

The user interface of the Home page can be divided into three areas:
- The Main Menu area
- The Shortcut area
- The Main area
These areas are marked in the following screenshot:

In the Home page of Main Menu , you will find several tabs that are used to navigate through the Adobe Connect application. Users can access each of these tabs based on their group membership privileges. There are tabs for the Content Management, Meeting Management, Event Management, Training Management, Reports, and Administration pages. Each of these pages is used to create, edit, and delete different Connect entities (meetings, trainings, contents, and events). Generally, group membership is defined by the system administrator.

If you try to access any tab for which you don't have permissions, the application will prompt you with a Not Authorized alert page.
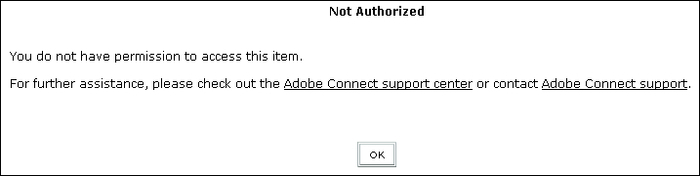
If you are the administrator, either you did not log in as an administrator user, or you may want to check the users and groups in the Administration panel to make sure you're a member of the right group.
On the right-hand side of the Main Menu bar, there is a Search text field for quick search functionality. In addition to quick search, you will find the Search link. Based on the search parameters and optional filters, when you click on the Go button, the application will take you to the Advance Search page. The search functionality helps you to find any Connect entity (meeting, training, content, event, and so on) by using advanced criteria. Refer to the following screenshot:

In the upper-right corner, there are three additional links:
- My Profile: This link is used to display information about currently logged in users
- Help: This link will redirect you to the Adobe Online Help page
Please note that this is different from the help you can access from the login page; this one is more like a user guide
- Logout: This link will log you out from the application
In the Shortcut area, marked on the screenshot, in the beginning of this section, there are shortcuts that will help you to create meetings, content, or any other entity allowed in Connect. Shortcut buttons are enabled for creating entities based on the group membership privileges of the user that is currently logged in to the application. The screenshot shows an example of a user who is only part of the Meeting Host group. Based on his group membership, the application will display only shortcuts specific for creating meetings and contents.
The Main area menu shown in the next screenshot provides you with information about all entities (meetings and trainings) that you are part of. On the left-hand side of this area is the list of all meetings in which you are participating.
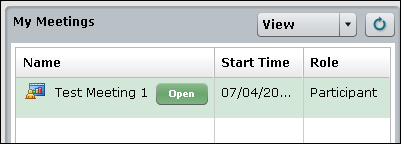
Here you can view your role in all the listed meetings and the start time of the meeting. Next to the meeting name, there is an Open button that is used to quick launch the selected meeting.
On the right-hand side of the Main area, you will find detailed information for the selected meeting. You can also access a specific meeting by clicking on the URL address of the selected meeting.

By clicking on the My Calendar tab, you will be presented with the calendar view for all events that you are participating in as shown in the following screenshot:

In this chapter, we have gone through some basic information regarding Adobe Connect. Now you know how to log in to Connect and how to navigate through the user interface of the application. We also talked about the Home page, and have described most of the functionalities that this page provides. Now you are able to go to the Meeting Creation page using Main Menu or using the shortcut button for creating meetings. In the next chapter, we will go through the meeting-creation process.
