


 Download code from GitHub
Hello and welcome to your first project. In this project, we will be building a very simple application or website using Node.js. I wanted to keep it very minimal just to show you exactly how it works. We will build a web server right from scratch with no special third-party modules, such as Express. We'll first go to nodejs.org and click on the About page; it gives us this really simple web server that basically just spits out Hello World. We will build an actual HTML server that will serve HTML web pages. We also will implement Twitter Bootstrap to make it look good. Now when I click on About, it takes us to about.html; similarly, Services takes us to services.html. Of course, you can keep adding pages to it.
In this chapter, we will learn:
- Installing Node.js
- Introduction to NPM and a basic HTTP server
- Serving HTML pages
- A basic website
We will set up our environment for our first project. We will install Node.js. We will also install a tool called Git Bash, which is a command-line tool for Windows that gives us a couple of other features that the standard Command Prompt window doesn't have (this is in no way required; you can use the standard Windows Command Prompt or Terminal in Linux or macOS or whatever you'd like to use).
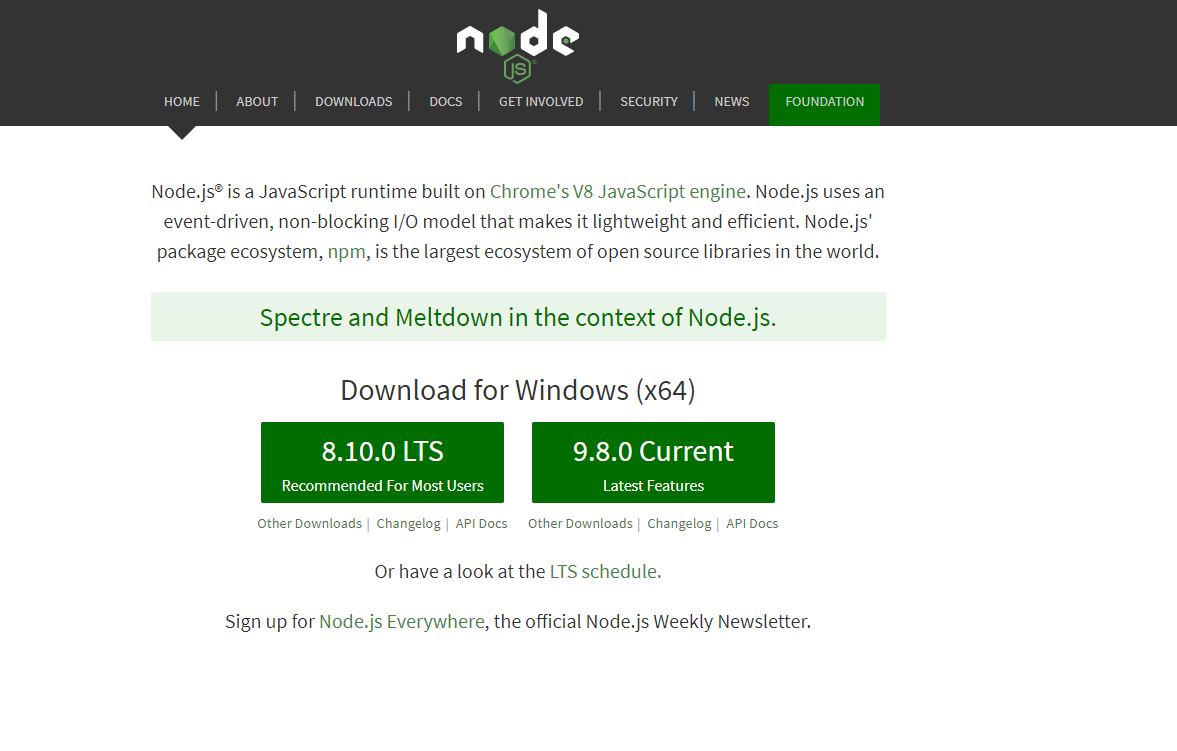
- To download Node.js, go to nodejs.org and click on the latest stable version:
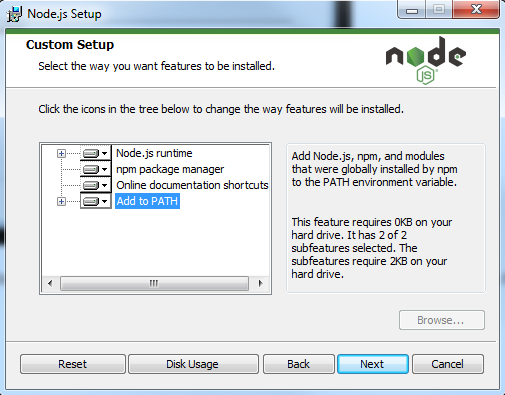
- We will select
Add to PATHto access Node and npm from the command line, from anywhere and click onNext:
The next thing is the Git Bash tool. For this, let's go to git-scm.com and proceed with the following steps:
- Let's click on
Download 2.16.2 for Windowsand download that file:

Since this is all set, let's run it. Again this is just a simple Windows installer.
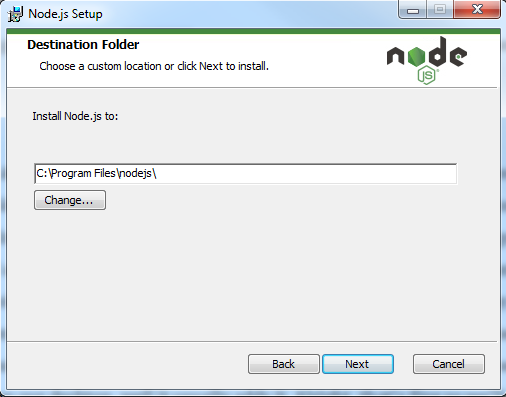
- We will put the
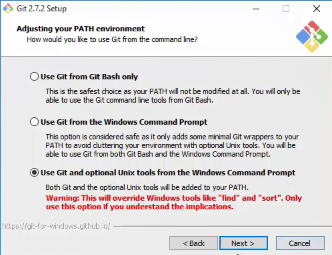
Program Filesfolder and leave the default values as they are. I actually will choose the last option; this will allow us to use some extra Unix tools from Windows Command Prompt:
We'll bring it down into our taskbar so that we can now access it from there. Let's look at another cool thing that this does; if we want to create a folder called Projects in our C: drive, and if we want to open the command line in this folder, all we have to do is to right-click and click on Git Bash from the context menus we get. This will open up the command line for us in that folder! Also, we can use commands such as ls and other Unix-based commands.
Now, just to make sure that Node was installed, we can enter node -v, which will tell us our version number; also let's try npm -v to check:
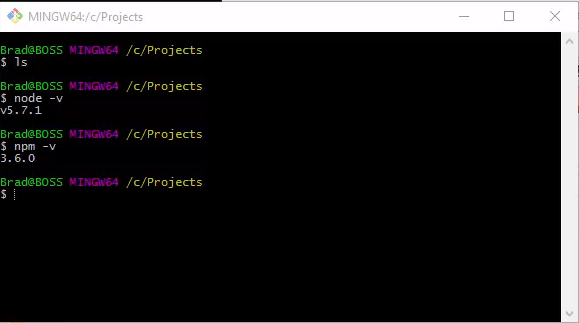
We'll get into npm later; it stands for node package modules, and it's basically just a package manager so that we can add and remove plugins or modules to and from our application. This will be it for now. In the next section, we'll look into npm more and also look at a basic HTTP server using Node.js.
Now that we have Node.js installed on our system, we will take a look at some very simple code, and we'll also will talk a little bit about npm and what that is.
First of all, let's go to the nodejs.org website and click on the About link:
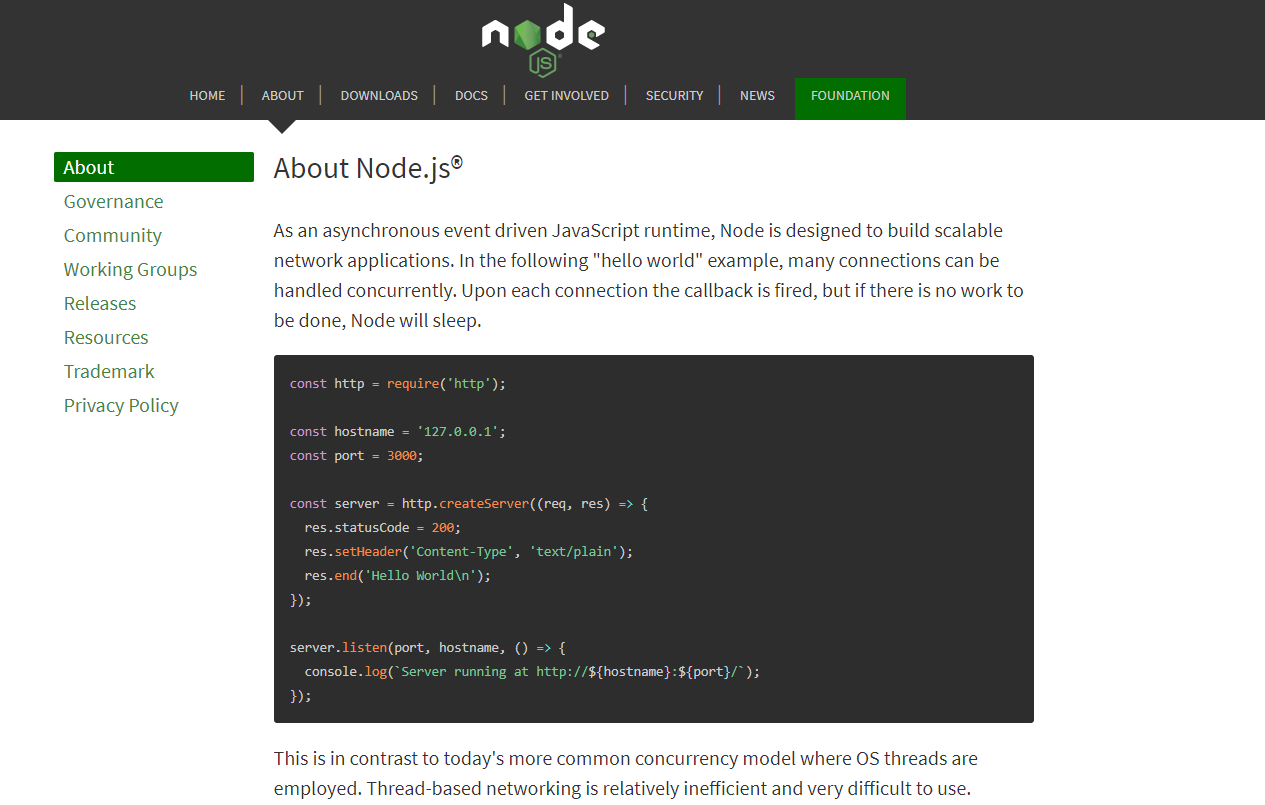
We will see a really simple example of an extremely simple web server that basically will just serve up some text for us.
Next, let's take a look at the code:
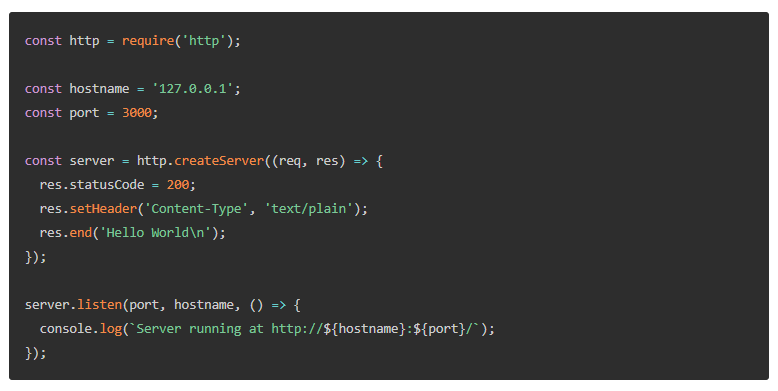
- The first line that we have is
const http; here, we're just defining a variable calledhttp, and we're defining this variable as a constant because it not will change. - We're then setting the variable to
require('http')to include thehttpmodule. Whenever you seerequire, remember that it's either including a module or another file. - Next, we have the
hostnameandportconstants (ourhostnamewill be ourlocalhost), and then,portis1337.
- We'll take that
httpmodule and use thecreateServermethod or thecreateServerfunction; this takes in a request (req) and response (res) parameter. Also, we'll use thewriteHeadmethod of the response and give it a status of200, which means that everything is okay and we're also setting theContent-Typetotext/plain. Then, we will end the response and printHello Worldin the browser. Then we have to enter.listenand pass theportandhostnamename. Once this happens, we can useconsole.log, letting the user know that the server is running.
So, this piece of code is extremely simple and we'll actually run it and see how it works. Before we do this, I just want to go over to npmjs.com and show you this website:
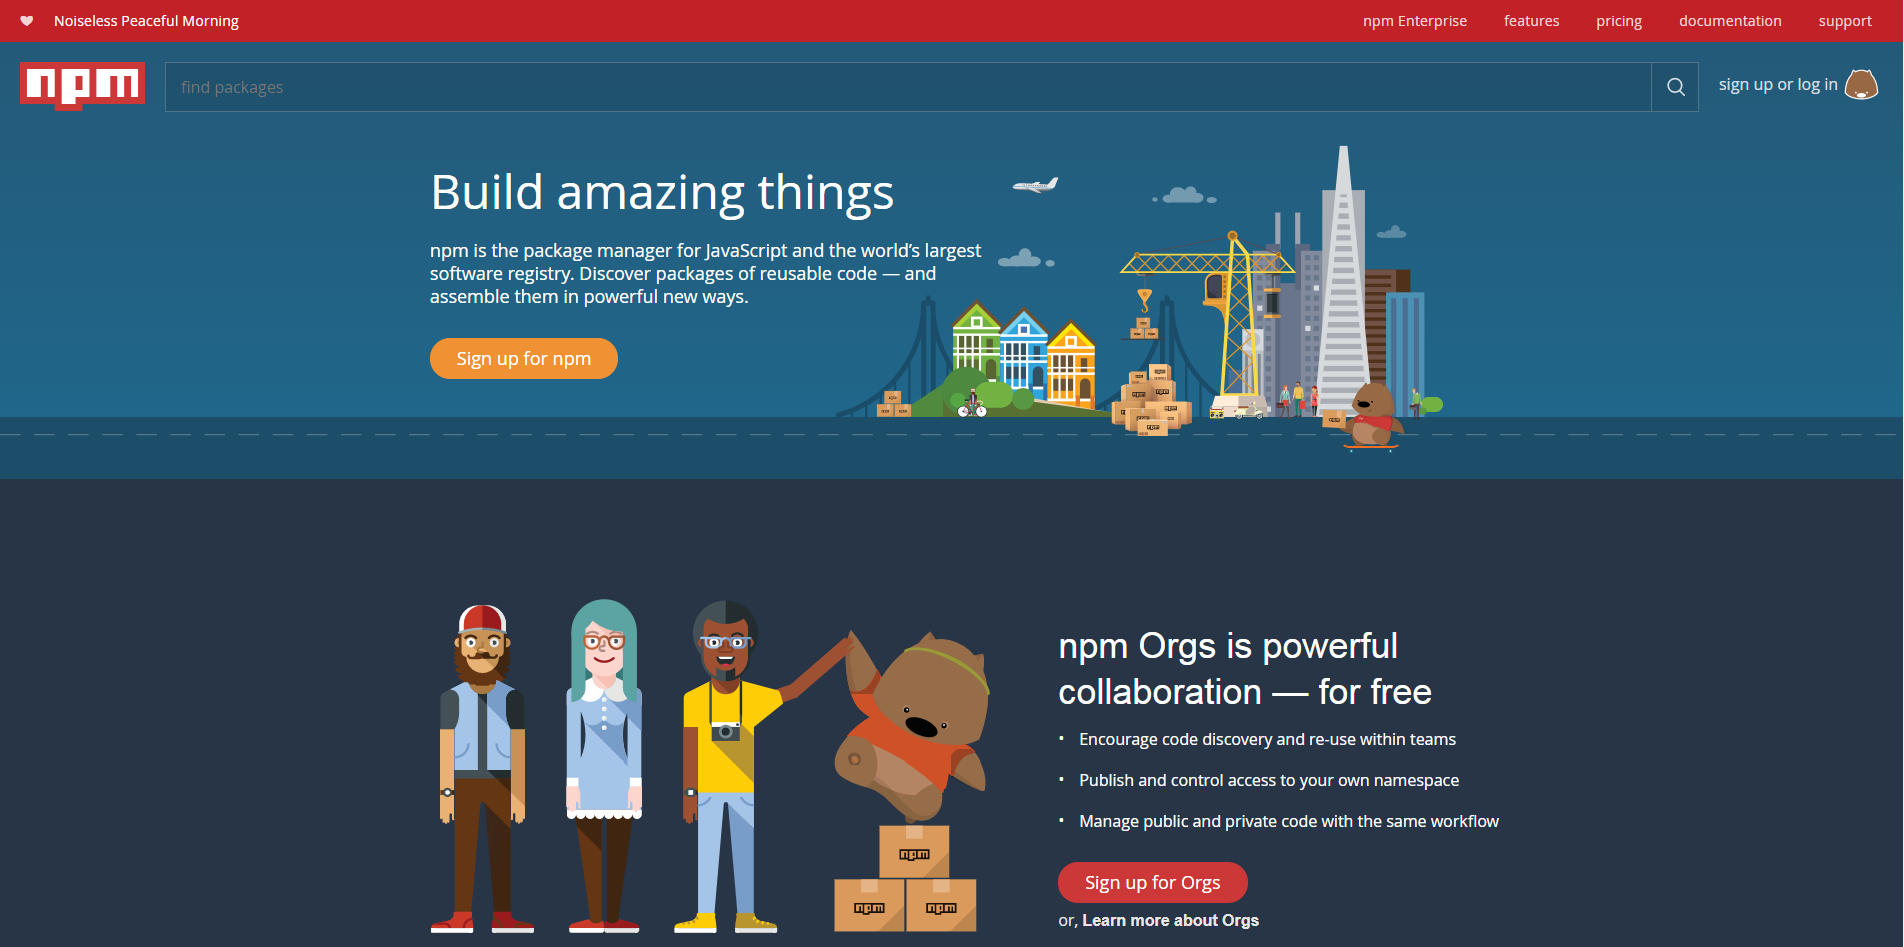
This is basically a repository for all of the Node package modules. You have modules that are extremely simple all the way up to a module such as Express, which is an entire HTTP server and framework (which we'll get into later on). You can install these modules from your command line if you have Node installed; you also have npm, which we'll get into a little later.
We'll go to the C: drive. I have a folder called Projects, and I will create another folder in there, called simpleserver. This will be our application folder. Now all of our Node applications need to have a file called package.json, which is a JSON file that holds a lot of different information such as the application name and description; we have to list all the dependency modules that we want to use. We could create that manually, but we can also use the command line. So I will use my Git Bash tool and just go right into the Git Bash folder.
To create this file, we'll run the npm init command, which will initialize a series of questions. For the app name, whatever is in parentheses is the default, since this is fine, we'll keep it; version 1.0.0 is good. For description, we'll just say Very simple server; for entry point, you could call this what you want; I like to call it server.js. We don't need any of these; for author, you can put your own name. It will verify this stuff and then, we'll press Enter.
Now, you can see that we have the package.json file. Let's open up this file and take a look at it. I'm using Sublime Text, but of course, you can use whatever editor you want. You can see that we have all that information, such as name and version, all of that:
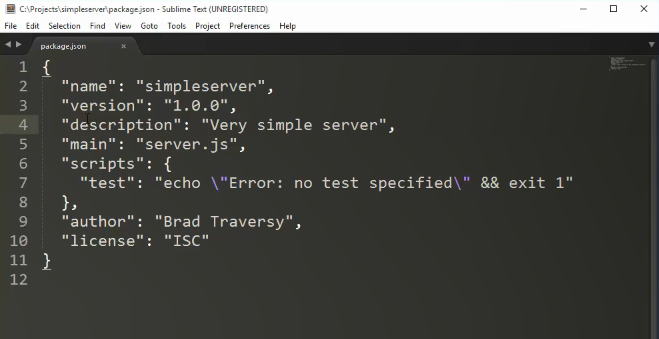
Now if we were using something such as Express or some other kind of Node module, we'd have to put that in our dependencies here; however, we'll get into that a little later.
Since we have our package.json file, let's now create the server.js file and we will open up that up; I'll just make Sublime my default application, real quick. Now, we'll go to that About page and just copy the following block of code:
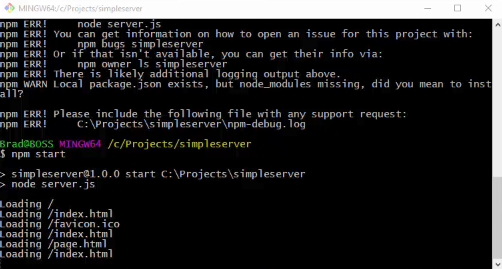
We'll just paste this code in the server.js file, save it, and go back into our command line. We'll type node and then the name of the file; you can type either server or server.js:
node server.jsYou can see that the command is running:

We get Server is running at http://127.0.0.1:1337/. Let's check this in the browser. We can enter the localhost:1337 address. We'll get Hello World. So this is, in fact, a Node application that we're running.
Now, a lot of times, you'll see that instead of writing node server, you'll see npm start; so, if I do that, remember that it does the same thing. You can either use node and then the filename, the base server filename, or npm start.
So there you go! It is a very simple application, but doesn't do much. In the next section, we'll discuss how we can actually serve HTML files instead of just serving some text like this.
Now we have a very simple web server that's just printing out some text. We'll now bring it up a notch and actually serve HTML pages, which is something that's closer to a real-life situation. So, right now, let's just get rid of the code from from the hostname constant; we'll keep the http module because we still need it. We also need a couple of other things and a couple of other modules; so we'll also enter const url. I will set this to require('url'). Since we also need the path module, we'll enter const path = require('path'). Then, we also need the filesystem module, so we will enter const fs and set it to require('fs'):
const http = require('http');
const url = require('url');
const path = require('path');
const fs = require('fs');
We'll bring in these modules. Now, we will set the type of files that we want to be able to serve. So, we will use a constant, say const mimeTypes, and this will be set to an object. We'll say html, so this will be text/html; we'll use jpeg, which will be image/jpeg; also, for jpg, we'll say image/jpg followed by image/png for png. We want to be able to serve JavaScript files, so js, which will be text/javascript, and finally, css, which will be text/css:
const mimeTypes = {
  "html": "text/html",
  "jpeg": "image/jpeg",
  "jpg": "image/jpg",
  "png": "image/png"
  "js": "text/javascript",
  "css": "text/css"
};
Next, we'll use the createServer function that we used before, so we'll enter http.createServer. Then, inside this, we will have function, which will take in a request and response, and in here, we will set a variable called uri—we will use the url module for this; we'll also enter url.parse.
Next, we will pass in req.url and add .pathname. Now we want a variable for fileName, so we'll say fileName and then use the path module—path.join. We will then enter process.cwd, which is a function; then, another parameter, which will be uri. However, we want to put the other parameter in an unescape function. Let's now enter console.log. I will enter Loading, and then we will concatenate the uri. We will then create a variable called stats:
http.createServer(function(req, res) {
  var uri = url.parse(req.url).pathname;
  var fileName = path.join(process.cwd(), unescape(uri));
  console.log('Loading'+uri);
  var stats;
});
Now, we'll check for the file that is entered. For instance, let's go to the browser, and inside the address bar, let's enter localhost:1337/page.html. We need to make sure that the page.html is actually there. So we will go right under the stats variable and do a try catch block. We'll enter try and catch and pass in an e.
Here, we want to take that stats variable and set that to fs, which is the filesystem module, and then we want lstatSync and we can just pass in fileName. Now in the catch block, we will add a code that we want to send a 404 error if this doesn't work. So we'll say res.writeHead, and then the status we want is 404; I will send along Content-type. So Content-type actually has to be in quotes, and that will be text/plain. Then, we will enter res.write; I'll just put in some text here, such as 404 Not Found. Then we will say res.end and then, return:
try{
  stats = fs.lstatSync(fileName);
} catch(e) {
  res.writeHead(404, {'Content-type': 'text/plain'});
  res.write('404 Not Found\n');
  res.end();
  return;
}
So if it doesn't find the file we'll just send a 404. Then, down below, we'll say if(stats.isFile()); so if there is a file, then let's set a variable called mimeType to mimeTypes[], which is our array. In there, we will say path.extname(fileName) and .split.
We will split it at the dot (.) because we're getting the extension of the file. We'll see whether it's .html or .jpeg, or whatever it may be. This is what extname does. We want to split it at the dot and then say .reverse. We want the first one in the array, so that will be 0. We'll end this with a semicolon. So, we'll get mimeType, and then we want a response of 200, which means everything's good. So we'll say res.writeHead, which will be status 200. We then want Content-type, and then we can simply put in the mimeType variable. We'll then create a variable for the file stream, so we'll say var fileStream. Let's set this to the filesystem module, and we'll need a function called createReadStream. We will now pass in fileName. We'll then enter fileStream.pipe and then pass in the response:
if(stats.isFile()){
  var mimeType = mimeType[path.extname(fileName).split(".").reverse()[0]];
  res.writeHead(200, {'Content-type': mimeType});

  var fileStream = fs.createReadStream(fileName);
  fileStream.pipe(res);
}
Now, we'll not have to do all this stuff here in other projects because we'll use something that does all this on its own; something like Express, which is a framework that also has an underlying HTTP server. This is just an example to show you what goes on under the hood of an HTTP server. So if any of this is a little confusing don't worry about it; chances are that you won't have to do this.
Here, we were checking to see whether it was a file or if it was a directory. If it was a file, then it will go ahead and serve that file. Now, down below, we will sayelse if because we want to check to see whether it's a directory. So we'll saystats.isDirectory. If it is a directory, then let's sayres.writeHeadand pass in a302error, and then,Location for redirection. SoLocationwill beindex.html. If there's nofileName, it will automatically loadindex.htmland then we'll just sayres.end.
Finally, we'll have anelseblock, and if it's not a file or a directory, we will send a500error because obviously it's not there. So let's sayres.writeHead; this will be a500error, so I'll sendContent-type, whichwill betext/plain. We will enterres.write('500 Internal Error'); we all love these! Then we'll put a line break,\n. That's it! At the end, we will enter.listenand listen on port1337:
if(stats.isFile()){
  var mimeType = mimeType[path.extname(fileName).split(".").reverse()[0]];
  res.writeHead(200, {'Content-type': mimeType});

  var fileStream = fs.createReadStream(fileName);
  fileStream.pipe(res);
} else if(stats.isDirectory()){
  res.writeHead(302, {
  'Location': 'index.html'
  });
  res.end();
} else {
  res.writeHead(500, {'Content-type':'text/plain'});
  res.write('500 Internal Error\n');
  res.end();
}
}).listen(1337);
So this is a web server. This will serve HTML pages as long as images and whatever else we have as the mimeTypes array or object. Let's save it and restart the server. To do this, let's go to our command line and do a Ctrl + C to stop it. Then, let's enter npm start and see what happens. Remember that we don't have any files to load.
Inside the browser, we'll get a 404 Not Found because we're looking for index.html. So let's create an index.html file. We'll open this up with the Sublime Text editor and just put in some tags there. In body, we'll just put in an h1 tag to make sure that it parses HTML correctly:
<!DOCTYPE html>
<html>
<head>
  <title>Test Page</title>
</head>
<body>
  <h1>Testing</h1>
</body>
</html>
Let's save this and reload. We'll get Testing, and now it's reading our HTML page. Let's say we create another file, page.html, and open it up. I will copy the code from the index.html file and paste it inside the page.html file. I'll say Testing Page 2 and save it. Now, if we change this to page.html, it will load up.
Now we'll just make the website look a little better and create a very simple website using our server. You can see in the command line here as we'll run it; visiting pages will tell us what pages are loading:
We will now rename the page.html file; we'll call it about.html. Then we'll create another one and call this one services.html. Now if we wanted to use something like Bootstrap, we can do that.
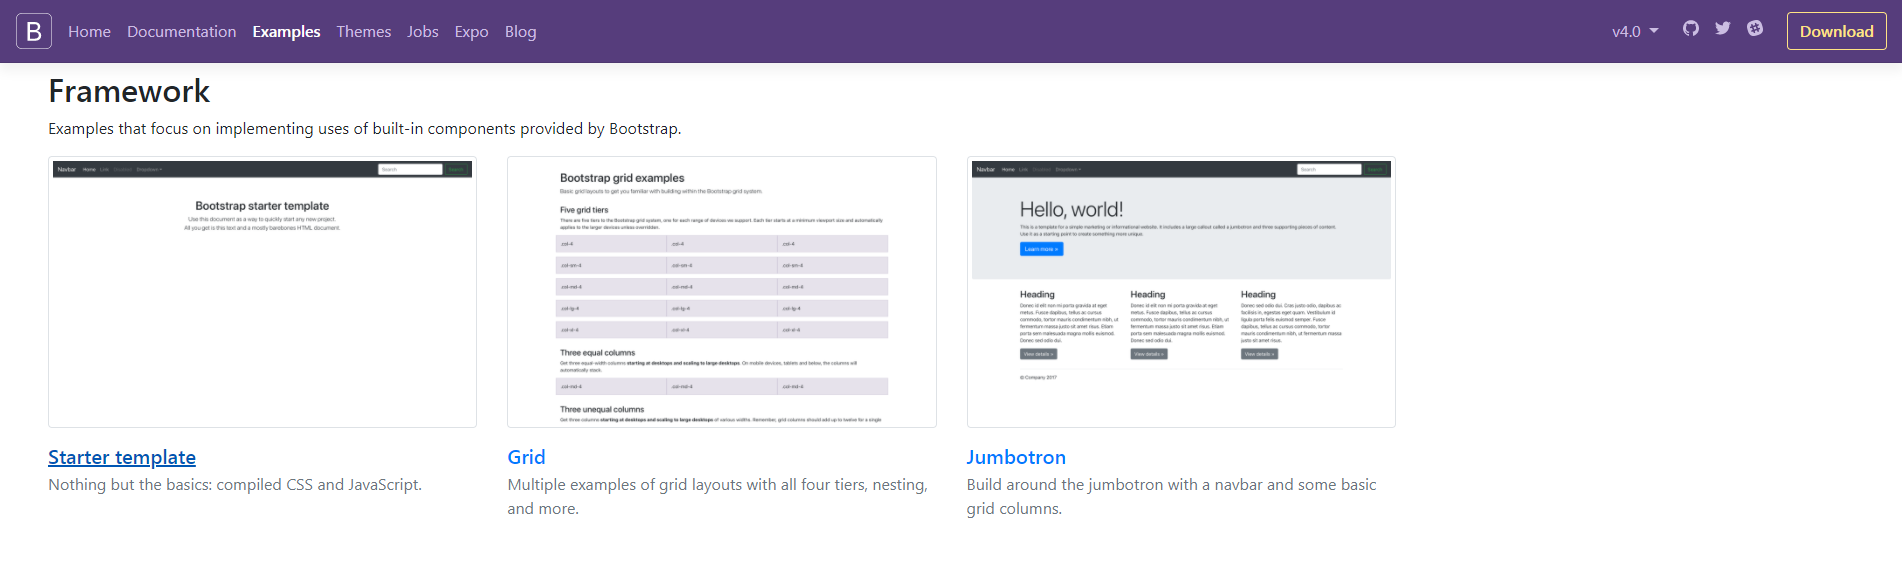
Let's go to getbootstrap.com and then to Examples. We will be using Bootstrap quite a bit through this section:
Here, this is just a sample Bootstrap template. I'll grab the code from navbar down to the container div. We'll put the code in body of index.html. We have our Home page and the link to it will be index.html, the link to the About page will be about.html, and for Contacts it will be services.html. We'll change Contacts to Services:
<ul class = "nav navbar-nav">
  <li class = "active"><a href="index.html">Home</a>
  </li>
  <li><a href = "about.html">About</a></li>
  <li><a href = "services.html">Services</a></li>
</ul>
Then, down below, we will get rid of the starter-template div and put in a div tag with the class of row. Let's enter h1 and then, Welcome. Next, we'll just put a paragraph and say This is the welcome page; we'll change the title to Welcome. We will need to include Bootstrap, so we'll download it. We'll then take the CSS folder from the downloaded Bootstrap files and put it into our file structure. We will create a folder called css, bring bootstrap.css inside the folder we created, and then, inside head, we'll enter link; this will go to css/bootstrap.css:
<head>
  <title>Welcome</title>
  <link rel="stylesheet" href="/css/bootstrap.css">
</head>
Inside the browser, let's go back to our index.html. We will get rid of the class navbar-fixed-top and save, to push the navbar down:
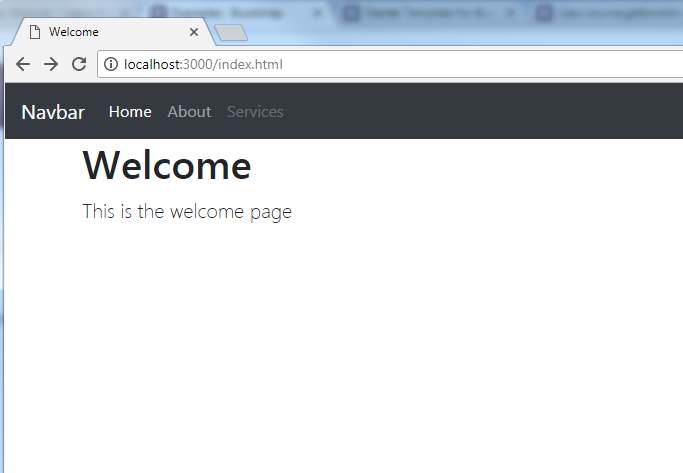
This is our Home page.
When we go to the About page, we can see that it's loading up just text; however, we want it to be formatted like the index page. So we will have to just grab everything that we have inside nav and put that in the About page; except that we will just change a couple of things. For example, for the class of the li tag, class="active", we'll cut that class out and put it in li of the About page; we'll also change the h1 heading. For the project name, we'll just say MyWebsite. We'll put this for the Home page too.
We will copy everything again and put it into the services.html page. We'll just change the class of li to class="active" and put it on the services link. So, we'll save that, reload, and go to the About page. Since I did not include the CSS, the head, and all that stuff, let's just put them in there. Now having a site like this, where you actually have to include everything on every single page such as the navbar is not really a nice way to build a website, especially if you will be using something like Node.js. This is just giving you an example of building a web server.
In the first chapter, we started with installing Node.js and the Git Bash tool. We also learned the basic HTTP server along with an introduction to NPM. We then moved to understand serving the HTML pages followed by designing a basic website.
In the next chapter, we'll actually be using Express, which is a framework and it makes it so easy that we don't have to repeat ourselves like this. I still have a project, but I didn't save it, so we won't have to include the navbar and all that stuff; we'll be able to create routes and do a bunch of other stuff really. We'll get into stuff that's a little more advanced; this project was basically just to introduce you to Node.js.

