Installing Clip Studio Paint, Recommended Systems, and Interface Basics
In this chapter, we're going to dive right into the thick of it and start getting to know Clip Studio Paint. First, we'll take a look at the recommended system specifications for running Clip Studio Paint and how to install the program. We'll also talk about graphics tablets, their importance, and how to obtain one.
Once we have Clip Studio Paint installed, we'll begin by getting to know the interface. First, we'll go over the parts of the default interface. Then, we'll learn how to customize and change the interface to suit our needs, as well as how to select tools and about the various palettes that comprise the Clip Studio Paint interface and their properties.
By the end of this chapter, you will be able to install Clip Studio Paint and identify the different parts of its interface.
In this chapter, we will learn about the following topics:
- Recommended system specifications for Clip Studio Paint
- Installing Clip Studio Paint
- The default user interface
- Moving, collapsing, and stacking palettes
- Using the tool palette
- Using the Command Bar
- Clip Studio Paint Pro terms
System specs, installation, and your serial number
Before installing Clip Studio Paint, we need to ensure that our computer hardware is capable of running the program. Graphics software can be taxing on system resources, so it is important to ensure that your computer is up to the task!
Clip Studio Paint is made for both Windows PCs as well as Mac operating systems. Once we have ensured that we can run the program on our computer, we can then download and install the software and get it running for the first time.
System requirements
To run Clip Studio Paint effectively, our computer must meet certain system requirements. These requirements are slightly different for PC than for Mac, so please check the system requirements carefully against the computer that you will be installing the software on to ensure that Clip Studio Paint will run properly.
Both PC and Mac computers have the following requirements for use of the program:
-
Storage space:
- At least 3 GB of storage space available on the hard drive
-
Tablet:
- Pen tablet or tablet monitor that supports a pressure sensitive stylus – WACOM products are recommended
-
Monitor:
- XGA (1,024 * 768) or higher required, WXGA (1,280 * 768) or higher recommended, high color (16 bit 65536 color) or higher required
-
Scanner:
- Scanners compatible with TWAIN
-
Printer:
- Printer compatible with the aforementioned OS
-
Internet access:
-
An internet connection will be necessary for license authentication
-
Windows system requirements
The following are the requirements for running Clip Studio Paint Version 1.7.4 on Windows:
-
OS:
- Microsoft Windows English OS
- Windows 7 (32 bit/64 bit) Service Pack 1 or later is required
- Windows 8.1 (32 bit/64 bit)
- Windows 10 (32 bit/64 bit)
-
Main Computer/CPU:
- Intel processors compatible with SSE2 or an AMD CPU
- GPUs compatible with OpenGL 2.1
- 2 GB memory or more is required, 8 GB or more is recommended
-
Tablet:
- Computers compatible with Windows Ink Platform
- Pen tablet or tablet monitor that supports a pressure-sensitive stylus (compatible with Wintab)
- For tablets compatible with Wintab, WACOM devices are recommended
Mac OS requirements
If you are using a macOS computer, you will need to meet the following system requirements to run Clip Studio Paint version 1.7.4:
-
OS:
- macOS English OS 10.10, 10.11, and 10.13
-
Main Computer/CPU:
- Intel processor
- GPUs compatible with OpenGL 2.1
- 2 GB memory or more is required, 8 GB or more is recommended
We'll go into tablets in more detail in the About graphics tablets section.
If your computer system meets or exceeds the requirements listed, then it's time to install the program!
Installing the program
To purchase and download the Clip Studio Paint program, you will need an internet connection. The program is available through the Clip Studio website. To access the English version of the website, you will need to visit the URL http://www.clipstudio.net/en in your internet browser.
Clip Studio does have a free trial of the program, which is very handy if you want to try the program to make sure your computer system can run it or if you want to explore the program and ensure that it will meet your needs before buying it. At the time of writing this book, the Clip Studio Paint free trial lasts for 30 days. You can try both the Clip Studio Paint Pro and Clip Studio Paint EX versions of the program. Also, when using the trial version of the software, you will need to register for a free Clip Studio account. We'll discuss more about the Clip Studio account in Chapter 19, What Is the Clip Studio App and Getting Animated.
Downloading the trial version
Once we're on the Clip Studio website, we'll need to download the trial version or buy the software. To download the trial version, complete the following steps:
- On the ClipStudio.net/en website, click on the button in the upper-right-hand corner labeled Free Trial.
- Choose the version of the software compatible with your operation system (Windows or macOS) and click on the corresponding Download Trial button.
- On the next window, click on the button labeled Start Download.
- The program installation file will be saved to your computer.
Purchasing Clip Studio Paint
If you are ready to purchase Clip Studio Paint, follow these steps:
- On the ClipStudio.net/en website, click on the button in the upper-right-hand corner labeled Buy Now.
- The price for both the Pro and the EX versions will be shown. Click on the Buy Now button beneath the version of the software that you wish to purchase.
- On the next screen, fill out your personal information, making sure to fill out all of the required fields.
- Under the Payment Option section, click on the PayPal Checkout button to pay with PayPal. Complete the PayPal payment on the next screen by following the directions.
- To use another form of payment, choose the relevant payment option from the first drop-down menu, then select your currency from the second drop-down menu.
- When Credit Card is selected under the payment option, some fields where you can enter your credit card information will be automatically displayed. Complete the necessary fields and click on the button marked Next.
- To pay with a check or another payment method, select Check - prepayment from the drop-down menu. Click the Next button.
- On the next screen, review the displayed information. To correct any errors, click on the Edit button next to that section and make the necessary changes. If all of the information is correct, click on the Buy Now button to complete your purchase.
Now that we have the program saved to our computer, we can begin the installation process. This process is the same for both the trial and purchase versions of the software. When registering a purchased version, however, we will enter the serial number for the software while launching the application for the first time.
Your serial number will be sent to the email address that you registered with when purchasing the program. It is very important to keep this serial number in a safe place where you can locate it! Your Clip Studio Paint serial number allows you to register the software on up to two computers, so long as the following conditions are met:
- The two computers must be owned and administered by a single user.
- Use of the product is limited to the primary user and one supplementary user appointed by the primary user.
- The software must NOT be used simultaneously on the two machines.
- The two computers may have a different OS (for example, Windows 8 and Mac OS X 10.8). Please refer to the official conditions of use provided in the End-User License Agreement. If you wish to use the product on three or more computers, please purchase additional licenses.
You must also have your serial number if you purchase a new PC and need to install Clip Studio Paint on it again. Save the email from your registration in a safe folder in your email client. I also keep important serial numbers in a text file in a cloud backup, such as Dropbox or Google Drive, in case something happens to my emails. You may also want to make another backup of your serial number on a removable drive like a USB drive to be extra certain that it is safe and able to be recovered in case of emergency.
Now that we have a backup of our serial number, let's install the Clip Studio Paint software so that we can start using it!
Installing on a Windows computer
Complete the following steps to install Clip Studio Paint to your Windows computer:
- Locate the install file named CSP_1XXw_setup.exe that has been saved to your computer and double-click it to launch the setup program.
- The welcome screen will be displayed. Click on Next to continue.
- Read the License Agreement. Click on the circle next to I accept the terms of the license agreement to accept the terms. Click Next to continue.
- The Choose Destination Location window will be displayed. The setup will default to a folder in Program Files for installation. If you wish to change the location of this folder, click on the button labeled Change to the right of the currently selected folder name and choose the location of the desired folder. Once the desired folder is selected, click Next.
- On the next screen, choose the desired language for installation. Note that when using a purchased version, the language that correlates with the serial number must be used. If using the trial version, select the language you wish to install. Then, click Next.
- Click Install to complete the installation.
- When the installation completion screen appears, click on the Finish button to exit setup.
Installing on a Mac computer
Complete the following steps to install Clip Studio Paint to your Mac computer:
- Locate the file named CSP_1XXENm_app.pkg that has been saved to your computer, and double-click it to launch the Installation window.
- Once the setup program launches, click on Continue.
- Read the License Agreement, then click on Continue.
- To continue, you must click on Agree in the next screen to accept the terms of the license agreement. Clicking Disagree will cause Clip Studio Paint to not be installed. Click on Agree to accept the terms and continue with the installation.
- On the Installation Type screen, click Install to continue.
- Select the desired language for installation. Note that when using a purchased version, the language that correlates with the serial number must be used. If using the trial version, select the language you wish to install. Then, click Ok.
- Once the installation completes, you will see a screen stating that the installation was successful. Click on Close to exit the setup program.
Starting the program for the first time
Now that we have the program installed, we're ready to launch it for the first time. On the initial launch, you will have the opportunity to download additional materials, enter and verify your serial number, or register to use the trial version. This is the last step before we can open the Clip Studio Paint program and begin exploring the interface, so let's get started.
Registering for a trial version of Clip Studio Paint
Follow these steps to register for a trial version of Clip Studio Paint:
- Double-click the Clip Studio application icon.
- A message will appear stating that the program is preparing for use. Click on OK to continue.
- A message will display stating that you can download additional materials provided by CELSYS. To start the material download, click on Yes. Wait until the download is complete. Depending on the size of the materials, this download may take several minutes. To skip downloading, click No. Additional materials can be downloaded later by using the instructions in the Downloading additional materials section.
- After launching Clip Studio, click on the Paint icon on the left-hand side to launch Clip Studio Paint.
- On the next screen, click on the button labeled Use trial version (without limited features) to register for your free Clip Studio account.
- Click Register for trial version on the next screen. Then, enter your email address and a password to create your Clip Studio account. Click Next when finished.
- Clicking OK on the next screen completes your trial version registration.
- In the trial version, you will be able to select the EX or PRO version of the software each time Clip Studio Paint is launched. At the version selection window, select the version you are interested in trying to launch.
Registering for a licensed version of Clip Studio Paint
Follow these steps to register for a licensed version of Clip Studio Paint:
- Double click the Clip Studio application icon.
- A message will appear stating the program is preparing for use. Click on OK to continue.
- A message will display stating that you can download additional materials provided by CELSYS. To start the material download, click on Yes. Wait until the download is complete. Depending on the size of the materials, this download may take several minutes. To skip downloading, click No. Additional materials can be downloaded later by using the instructions in the Downloading additional materials section.
- After launching Clip Studio, click on the Paint icon on the left-hand side to launch Clip Studio Paint.
- On the next screen, enter the serial number from your documentation in the appropriate text entry boxes. Click Register License.
- Select Verify license right now, then click Next.
- In the License registration screen, select Perform automatically, and then click Next.
- If the license check completes successfully, you will see a screen stating it was successful. Click Next to launch the software.
- If the license check doesn't complete successfully, you can verify the license in your web browser. From the License verification error screen, select Yes, verify license in another procedure, and then click Next.
- On the next screen, click on the link to connect to the website in your browser. This will issue an authentication key.
- Enter the authentication key in the provided text boxes, and then click Next to continue.
- If the license check is successful, click on OK to launch the software.
Changing a license
There are a few cases where the license may need to be changed:
- When changing from the trial version to the purchased version
- Upgrading the software from PRO version to EX version
- Upgrading to PRO or EX versions from the DEBUT version
To change a license, follow these steps:
- Launch the Clip Studio Paint software.
- From the Help menu, select the Register License option (or the Clip Studio Paint menu in macOS).
- Enter the new license serial number.
Downloading additional materials
If the additional materials were not downloaded during the initial registration of the program, they can be downloaded later by using the following steps:
- Launch the Clip Studio application by double-clicking the icon.
- Once Clip Studio is open, click on the Settings menu (the gear icon) in the top-right-hand corner.
- Click Download additional materials now from the menu.
- When the download confirmation message is displayed, click Yes to begin the download. Depending on the size of the materials, this download may take several minutes.
About graphics tablets
When working in an art software like Clip Studio Paint, having a graphics tablet makes life a lot easier. So, what is a graphics tablet and where can you obtain one?
What is a graphics tablet?
A graphics tablet is a computer peripheral that comes with a stylus. It allows you to hold the stylus and draw the way that you would with a pencil or pen on paper. The following diagram illustrates a basic tablet and stylus:
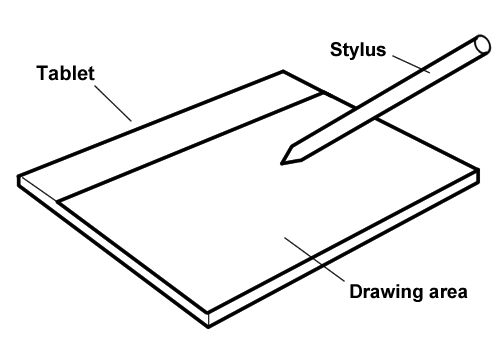
There are many different types and brands of graphics tablets, all ranging in price from under $100 to over $2,500, so it is easy to find a tablet that is in your budget. I cannot express enough how much easier working in Clip Studio Paint is when you have a tablet!
There are many different factors to consider when shopping for a graphics tablet. Let's break some of those options down so that you can make a good choice when purchasing your tablet.
What type of tablet should I buy?
There are two primary types of tablets: traditional tablets and monitor tablets. Traditional tablets are slates that plug into or connect wirelessly to your computer. You then use the stylus to draw on the tablet while looking at the separate monitor, just like using a mouse on a computer.
A monitor tablet is a tablet with a monitor screen built into it. You then use the stylus directly on the screen so that you can see your hand and what you're drawing at the same time. This method feels more like using traditional paper and pencil and requires less of an adjustment period for new tablet users because there is less disconnect between what your hand is doing and what your eyes are seeing.
However, this comes at a price. Monitor tablets are becoming more affordable every year, but they are still much more expensive than a traditional tablet. If you are purchasing a tablet for a young artist or are someone just getting into digital art, I always recommend getting a traditional tablet. They are far more affordable and usually easy to find second-hand, but still in good working order. For more established artists who do a lot of art and know for certain that they like working digitally, investing in a larger tablet or a tablet monitor will usually speed up your workflow and make life easier, so it makes sense to make the investment into a higher-end tablet.
How large of a tablet should I buy?
Tablets come in all sizes, from ones no bigger than a traditional mouse pad to the size of a table top. The size of the tablet that you buy is very much dependent on how you draw. Sit down and draw on a piece of regular paper and try to pay attention to how large or small you draw. You'll need to figure that out before you can decide on the size of the tablet you want to buy!
I find that people who draw small can be comfortable on a small tablet size. Personally, I draw rather large and tend to take up the whole sheet of paper when I draw, so I like a larger size tablet when I work because it gives me more room to work with.
Another thing to consider when looking at different sizes of tablets is the space you have to store it in. If you are using the tablet with your laptop and will be traveling with it often, or if you have only a small amount of space on your desk, you will want to purchase a smaller tablet that is more easily transported. However, if you have a larger area or will only be using the tablet at a desk, a larger tablet could be the right fit for you.
What tablet brand should I buy?
It used to be that you only had one choice of tablet brand, but in the past several years, more companies have started manufacturing their own graphics tablets. This means that there is a wide selection of tablets available, all with their own pros and cons. Some of the most well-known of these tablet brands are Wacom, Yiynova, and Huion. Each brand has a wide range of different size and price tablets, most of which you can find on their websites or by searching for them on sites like Amazon.
I often get asked what brand of tablet I would recommend, and for me there is one clear winner: Wacom. From my personal experience, Wacom tablets are of the highest quality and last the longest for me. I have tried other brand tablets that broke within two years, but every Wacom brand tablet I have ever owned has stood the test of time. This is, of course, not saying that the other brands out there are bad, and I know many people have had good experiences with those brands! But for me, personally, I find Wacom tablets to be well worth the money. Their cheapest tablets are in the $50-100 USD range, and you can often find them used on eBay and Amazon as well, so with a bit of searching, you should be able to find a tablet for any budget.
Any other considerations?
Like computers, tablets come with their own set of specifications. You'll want to look at these specifications and consider them when purchasing, of course. Things like pressure levels, hotkeys, and built-in erasers are just a few options you will encounter when shopping for a graphics tablet.
Pressure levels are the amount of sensitivity that the tablet can sense. When drawing with a tablet, how hard you press with the stylus translates on the screen to a thinner or thicker line. Drawing lightly will produce a thin line, while pressing harder will produce a thicker line. The higher the pressure levels, the more sensitive the tablet is.
Hotkeys, or shortcut keys, are buttons on the stylus or on the tablet itself that allow you to perform operations while using the tablet. For instance, two shortcut keys on the tablet stylus may simulate a left and a right mouse click. Sometimes, these buttons are programmable within the tablet driver. If you use a lot of keyboard commands while working with software, you may want a tablet with more of these hotkeys built in.
Some tablets have a stylus with a built-in eraser. This means that there is a button on the eraser end of the stylus so that while you're drawing you can just flip the stylus over and erase without having to switch tools in your software. When the stylus is flipped back to the other end, it changes back to the drawing tool. I find that having an eraser button on the end of my stylus makes the digital drawing process much easier for me, and it feels more like the experience of drawing with a pencil on paper.
Where can I purchase a graphics tablet?
Graphics tablets are sold in a variety of places. Sometimes, they can be found in office supply stores, so check with the ones in your area if you want to get one quickly and without having to wait for shipping. It can be difficult to find a tablet in a local store, however, and ordering online allows for a better selection, and you may be able to find one for a much better price.
Tablets can be ordered from lots of websites. Many manufacturers sell directly from their own sites. You can also find used or new tablets on sites like Amazon or eBay. Some websites even sell refurbished tablets: tablets that are used but have been repaired or had hardware replaced in them. When purchasing a monitor tablet, it may be best to look for a refurbished one to get the best deal if cost is a concern.
Now that we have Clip Studio Paint installed, and we have chosen our graphics tablet, it's time to start getting to know this amazing art software.
Taking a look at the default interface
Once you launch Clip Studio Paint, you will be greeted by the default interface. I have been told many times that new users often get to the default interface and panic. It can be a bit overwhelming at first because there's a lot of palettes and options, but I promise that it's not so scary! With a little bit of exploration, we can break down the default interface and understand what each section is. In the next section, we'll even learn how to customize the interface to suit our own needs. But for now, let's take a look at the default user interface.
The following screenshot shows what you may see when starting up your program for the first time:
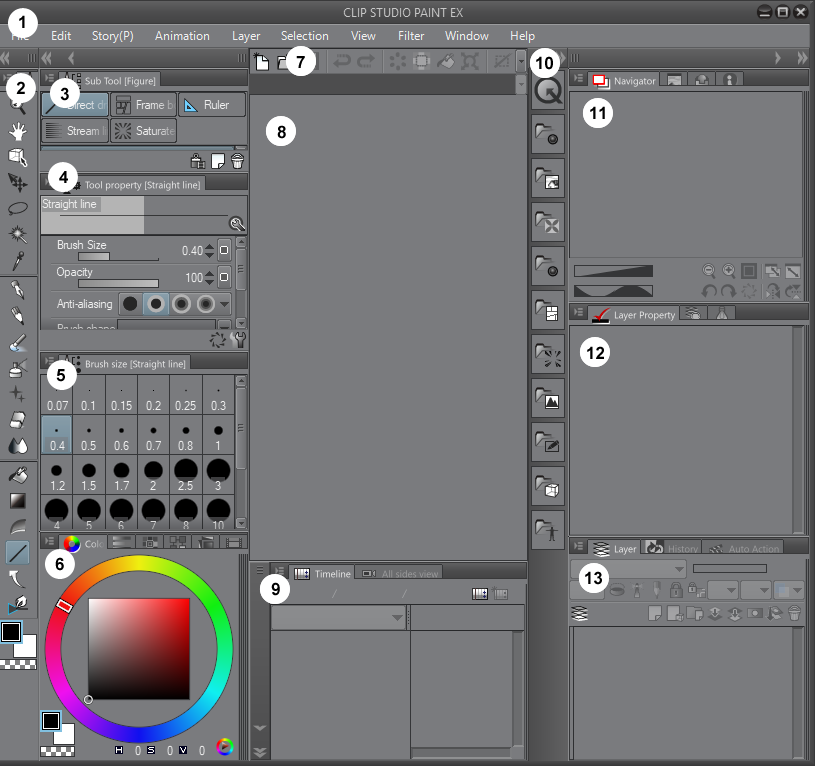
The numbers in the preceding screenshot correlate to the following:
- Menu Bar
- Tool box
- Sub Tool palette
- Tool Property palette
- Brush Size palette
- Color Palette
- Command Bar
- Canvas display
- Timeline palette
- Quick Access/Materials Library
- Navigator/Sub view palette
- Layer Property palette
- Layer/History/Auto action palette
Now, let's break down what each of these parts of the program does.
The Menu Bar is where you will find many of your options, such as creating and saving files, program preferences, viewing preferences, and more.
The Tool Box holds all of the various tools that we'll be using to create our comics and illustrations. In the top of the Tool Box are tools such as the magnifying glass, hand tool, and selection tools. Below those are drawing tools, such as the pencil, pen, brush, decoration, eraser, and blending tools. In the bottom third of the toolbox are tools such as the fill tool, gradient tool, line and ruler tools, text tools, and correct line tools. The final part of the toolbox displays our current foreground and background color selections, as well as a transparent color selection. We'll be discussing all of these tools as we continue through this book, so don't worry if you don't know what all of them do just yet.
The Sub Tool palette contains options for each of the tools in the Tool Box, and it changes depending on which tool we currently have selected.
For example, clicking on the Pencil tool in the toolbox will bring up a variety of different tools in the Sub Tool palette, like what is shown in the following screenshot:
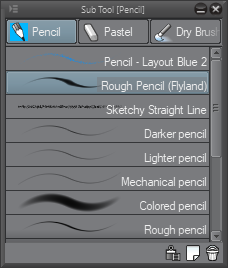
At the top of this palette are the different categories of tools under the Pencil category. Our currently displayed category is shown in blue. In the central area of the palette are the different types of pencil tools. The tools displayed in your Sub Tools may be different than what is shown in the preceding screenshot.
The Tool Property palette displays options for the currently selected tool. Each tool can be customized to meet our individual needs, but let's look at the default properties for the Darker pencil, as shown in the following screenshot:
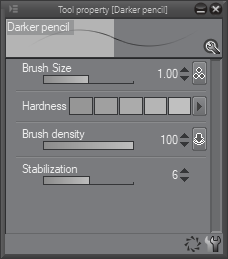
We will explore this palette in detail in Chapter 4, Pencilling: Layer Properties.
The Brush Size palette allows us to quickly change the size of our brush by selecting one of the preset brush sizes from the icons shown.
The Color Palette offers us several options for choosing and mixing colors, all of which we'll explore later on in Chapter 16, Color Palettes.
The Command Bar is a powerhouse in Clip Studio Paint, even though it doesn't look like much. This little piece of the interface gives us quick access to frequently used functions, such as creating a new file, saving, undoing, and even exporting files. The best thing is that it's completely customizable, too! We'll learn how to customize the Command Bar in Chapter 2, Preferences, Shortcuts, and Other Commands.
When there is a drawing or file currently open in Clip Studio Paint, it will be displayed in the Canvas display in the center of the program.
The Timeline palette is used when making animations in Clip Studio Paint. It also contains a tab called All Sides View, which is used when working with 3D model elements.
The Quick Access and Material Library has a lot going on, but it's an extremely useful part of the Clip Studio Paint software. The Quick Access window gives us access to more frequently used actions, much like the Command Bar. Quick Access can also be customized, but unlike the Command Bar, it has two sets inside of it. This allows for more flexibility, as Set 1 could be used for functions such as save and undo, while Set 2 could be set up with the most used tools or other commands to make tasks like coloring easier. We'll explore Quick Access more in Chapter 2, Preferences, Shortcuts, and Other Commands.
This part of the software also contains the Materials Library. Materials can be everything from comic frame templates to word balloons to photographs, to special brush designs, to 3D models. There's a huge variety of items contained in the Materials Library. We'll learn more about 3D models in Chapter 7, Using 3D Figures and Objects, and more about the Materials Library in Chapter 8, Vector Layers and the Material Palette.
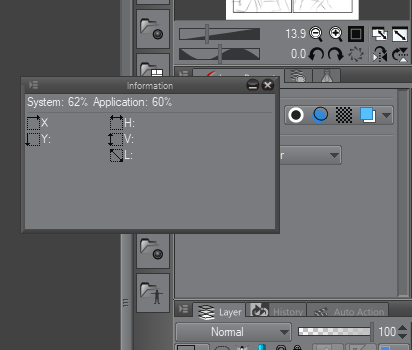
The Navigator palette contains several tabs inside of it, each with a different function. The Navigator shows the currently active file, along with a red rectangle that outlines the currently viewed section of the canvas. This is useful when working zoomed in on a page or illustration. Also in this palette is the Sub View palette, which can be used to display reference images and more. We'll discuss more about the Sub View in Chapter 5, Erasers, Selections, and the Subview Palette. The Item Bank tab displays any 3D objects that are currently being used in the open file. Finally, in this palette, we have the Information tab, which shows the percentage of system and application resources currently being used and also the X and Y coordinates of the current position of the cursor.
Beneath the Navigator palette is the Layer Property palette, which also has a few tabs inside of it. The Layer Property tab gives us the options available for the currently active layer. We'll be discussing layers and layer properties in more detail in Chapter 4, Pencilling – Layer Properties and the Brush Properties. Also in this palette is the Search Layer, which allows us to filter out layers and find layers easily depending on certain parameters. This is a very handy tool for files with lots of layers. Finally, in this palette is the Animation Cels tab. When making animations, this tab will display our animation cels.
The final part of our interface is the Layers palette, which also has several tabs in it. The first tab is the Layers tab, which shows all the layers in our currently active file. We also have the History tab, which allows us to see a list of actions performed on the currently active file and step backwards in time to easily undo unwanted changes to the file. Finally, we have the Auto action tab. Auto actions are recorded sets of processes that can then be carried out by the press of one button. We'll discuss Auto actions in detail in Chapter 13, Auto Actions and Your Workflow.
Now that we have a better grasp of the default parts of the interface, we can learn how to move elements of the program around and customize it to suit our needs. Read on to learn more!
Moving, collapsing, and closing palettes
One of my favorite things about Clip Studio Paint is how customizable it is. Not only can we customize our tools, but we can also customize the interface of the program to make it look however we want it to look. This means that we can set up the program palettes and toolbars to give us the most efficient workflow and make our process as streamlined as possible. The process of moving, closing, and rearranging palettes is very easy, so let's get right to it.
Moving a palette
Let's start off by moving a palette to a new location in the Clip Studio Paint interface. I'll be working with the Information palette in this example, but this can be done with any palette you choose. Follow these steps to move a palette:
- Locate the palette to be moved.
- Put the mouse cursor over the name tab of the palette. The tab will be highlighted in blue when the mouse cursor is in the correct position.
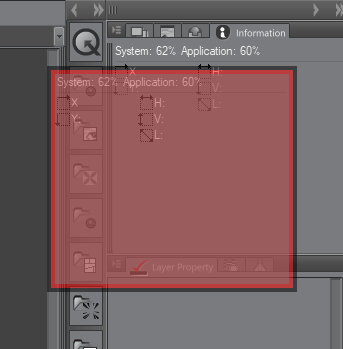
- Hold down the left mouse button to grab the palette, then move the mouse to drag the palette out of its position. The palette's new location will be shown in red, as shown in the following screenshot:
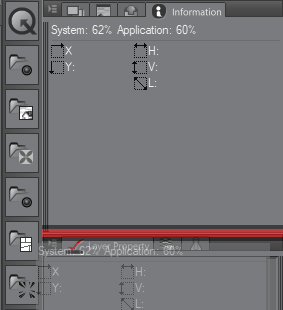
- Drag the palette to the new desired location. A red line will appear when the palette is in line to be dropped in a new place in the interface, as shown by the red line below the Navigator palette in the following screenshot:
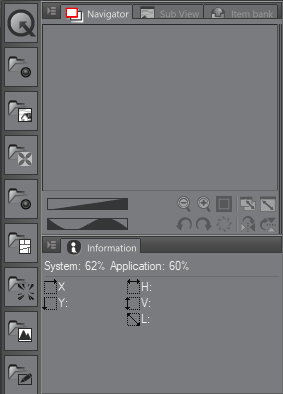
- When the palette is in the desired new location, release the left mouse button to finish moving the palette. In the following screenshot, the Information palette is now below the Navigator palette:
- A palette can also be popped out of the interface by dragging the palette out to the Canvas display window and releasing it when the palette is surrounded by a red rectangle. This will put the palette out on its own and not as part of the sidebars of the interface, as shown in the following screenshot:
Closing a palette
There are two ways to close a palette that isn't needed. In this example, I will continue using the Information palette, because it's actually not a palette that I need to use and so I usually keep it closed anyway! Follow these simple steps to close a palette:
- Follow the preceding instructions for moving a palette, and making sure to pop out the palette, as shown in step 6.
- Click on the X button in the upper-right-hand corner of the palette to close it.
- To bring a palette back once it's been closed, simply go to Window in the File menu. Click on the name of the palette to show it again. Alternately, the Window menu can also be used to close palettes by clicking on the names with check marks next to them.
Collapsing and expanding palettes
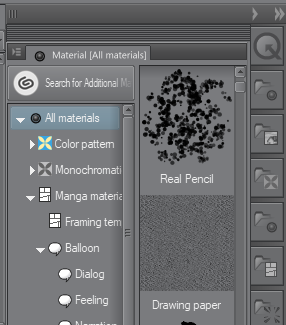
Clip Studio Paint also has the ability to temporarily hide entire banks of palettes and then bring them back when needed. In the following screenshot, the Quick Access and Materials Library are collapsed so that we can only see the category icons:

Let's learn how to expand and collapse this palette by following these steps:
- To fully expand the palette, click on the single left-facing arrow at the top of the palette window. The palette will expand, as shown in the following screenshot:
- To collapse the palette back down to icons-only, click on the single right-facing arrow at the top of the palette.
- To fully collapse the palette, click on the double right-facing arrows at the top of the palette.
The tool palette and Command Bar
Now that we've explored how to move palettes around, let's discuss the tool palette and Command Bar in more detail. Both of these parts of the Clip Studio Paint interface are very important and you'll be using them often, so let's get to know them before we start drawing.
The tool palette
The tool palette is found in the default interface down the left-hand side of the program. This is shown in the following screenshot:

The tool palette gives us access to the various drawing and editing tools in Clip Studio Paint. The tools are separated into categories, designated by the horizontal lines going across the tool palette, and are divided into thirds.
In the top third of the tool palette are the selection and editing tools. From top to bottom, they are listed in the following order:
- Zoom
- Move
- Operation
- Move layer
- Marquee
- Auto select
- Eyedropper
The middle third of the tool palette consists mainly of our drawing and other mark-making tools. From top to bottom, they are listed in the following order:
- Pen
- Pencil
- Brush
- Airbrush
- Decoration
- Eraser
- Blend
The bottom third of the toolbar holds tools that do not necessarily fit into the other two categories. They are as follows:
- Fill
- Gradient
- Contour line paint
- Figure
- Text
- Correct line
The very bottom of the tool palette shows the current foreground and background colors, as well as a transparent color that can be selected to allow mark-making tools to act like erasers. More information on this is in Chapter 5, Erasers, Selections, and the Subview Palette.
It is best to think of the tool palette as a collection of categories of tools. Clicking on one of the icons in the tool palette will change the options available in the Sub Tool palette. The desired tool is then selected from the Sub Tool palette. You can think of the tool palette as drawers holding supplies in each one. For instance, if we clicked on the pencil in the tool palette, it is like opening a drawer where all of our pencils are stored. Then, we can select the specific pencil we want out of that category of pencils. It is always good to have the Tool palette and Sub Tool palette open near each other to make tool selecting quick and easy.
Customizing the tool palette
Just like all the other parts of the Clip Studio Paint interface, the tool palette can be customized to suit our needs. Let's take a look at the different options we have to customize the toolbar.
Reordering tools
Just like the palettes of the interface, the tools in the toolbar can be moved around to suit our individual needs. For the following instructions, let's move the Pencil tool up above the Zoom tool, so that it is the first tool in the tool palette. Accomplish this by following these steps:
- Click on icon of the tool in the tool palette to be moved and hold down the left mouse button.
- While holding down the button, drag the tool icon to the new location. A red line will show the current position.
- Once the red line is in the new desired place, release the mouse button.
- To put the tool icon back in its previous place, repeat the preceding steps to move it again.
Renaming tools
Any of the tools in the tool palette can be renamed. To do this, complete the following steps:
- Locate the icon of the tool to be renamed in the palette.
- Right-click with the mouse on the icon to bring up the menu shown in the following screenshot:
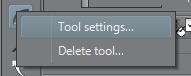
- Select Tool Settings from the menu. The following dialog box will appear:
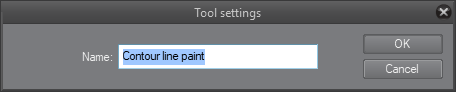
- In the text entry field, type in a new name for the tool.
- To accept the name change, click OK. If you change your mind and don't wish to rename the tool, click Cancel.
Deleting tools
Sometimes, you just don't use a certain category of tools, and you don't want them cluttering up your space. With Clip Studio Paint, we can get rid of some of the visual clutter and delete tools that we don't use from the tool palette. Use the following steps to delete a tool and all of its sub tools:
- Locate the icon of the tool to be deleted in the tool palette.
- Right-click on the icon to bring up the menu shown in step 2 of the Renaming tools section.
- Select Delete Tool from the menu. The following message will appear:
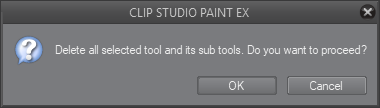
- To proceed with deleting the tool and all of its sub tools, click OK. If we've changed our mind and want to leave the tool icon in the tool palette, we can simply click Cancel.
Now that we know all about customizing the tool palette, let's take a minute to talk about Command Bars.
The Command Bars
There are two different Command Bars in Clip Studio Paint. One is the permanent one at the top of the program, between the File menu and the area where the currently active canvas is displayed. The other Command Bar only shows up when a selection is active and is sometimes called the Selection Launcher. We'll take a closer look at the primary Command Bar first.
The primary Command Bar
The primary or permanent Command Bar is located between the File menu and the Canvas display area. It is shown in the following screenshot:

The default options on the Command Bar in the preceding screenshot are as follows, from left to right:
- New File: Creates a new file
- Open File: Opens an existing file
- Save File: Saves the current file
- Undo: Reverses the last action
- Redo: Redos an undone action
- Clear: Deletes the current content (of a layer or of a selection)
- Clear Outside Selection: Deletes any content outside of the currently active selection
- Fill: Fills in the current area with a foreground color
- Scale up/Scale down/Rotate: Resizes or rotates the current layer or selection content
- Deselect: Clears active selection
- Invert selected area: Reverses the selected area
- Show border of selected area: Turns visibility of the selected area off and on
- Snap to ruler: Toggles snapping when there is an active ruler
- Snap to special ruler: Toggles snapping on a special ruler
- Snap to grid: Toggles snapping on an active grid
- Show/hide title bar and menu bar: Hides or displays the title bar and menu bar
- ClipStudio.net: This is a direct link to the ClipStudio.net website for help or downloads
We will discuss customizing the Command Bar in Chapter 2, Preferences, Shortcuts, and Other Commands.
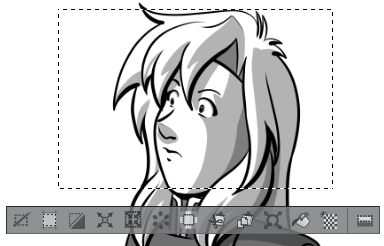
The selection Command Bar
The other Command Bar is only shown when there is a currently active selection. The following screenshot shows an area of a drawing that has been selected with the rectangle marquee tool, and below this area is the selection Command Bar:
From left to right, the options on the selection Command Bar and their functions are as follows:
- Deselect: Clears active selection
- Crop: Resizes image to the current selection
- Invert selected area: Reverses the selected area
- Expand selected area: Makes selection larger
- Shrink selected area: Makes selection smaller
- Clear: Deletes the contents of the selection
- Clear outside selection: Deletes the contents that's outside of the selection
- Cut and Paste: Cuts the selected content out and pastes it to a new layer
- Copy and paste: Makes a copy of the current content of the selection and pastes it to a new layer
- Scale up/Scale down/Rotate: Scales or rotates the contents of the selection
- Fill: Fills the selection with the currently active color
- New tone: Fills the area with a screen tone based on set parameters
- Selection Launcher Settings: Personalizes the selection Command Bar settings
Summary
In this chapter, you have learned how to obtain Clip Studio Paint and install it. You are familiar with the default interface and can move, close, and temporarily collapse menus and palettes, and know how to reorder tools in the tool palette. We have also taken a closer look at the Command Bar in the main menu and also the Selection Launcher.
In the next chapter, we are going to take a look at the program's preferences and keyboard shortcuts before we get into our actual drawings. Read on to learn more!