Azure Fundamentals
Getting started with Microsoft Azure is not an easy task. It’s a dynamic, robust, and cross-disciplinary environment that requires lots of knowledge and attention to get things done as per best practices. We’ll start our journey with a detailed explanation of the most fundamental topics that are important from the Azure administrator’s point of view.
In this chapter, we’re going to cover the following main topics:
- Azure Resource Manager, including main components in relation to Azure resources
- Entra ID for basic understanding of identity concepts in Azure
- Authorization using RBAC and ABAC with a focus on role definitions and assignments
- Basic toolset – the Azure CLI, Azure PowerShell, and Cloud Shell
Technical requirements
For the exercises from this chapter, you’ll need the following:
- The Azure CLI (https://learn.microsoft.com/en-us/cli/azure/install-azure-cli)
- Azure PowerShell (https://learn.microsoft.com/en-us/powershell/azure/install-az-ps?view=azps-9.4.0)
- Command line of any kind (either the one available in your operating system or your favorite one)
The Code in Action video for this book can be viewed at: https://packt.link/GTX9F
Exploring Azure Resource Manager
We cannot start talking about Microsoft Azure without describing one of the most important available parts of its ecosystem, which is Azure Resource Manager (or its much simpler abbreviation, ARM). It’s a foundation of all services in Azure, which allows for provisioning new instances of resources and interacting with existing ones. It’s impossible to create a database, disk, or virtual machine without calling one of the available endpoints of this API.
Important note
Don’t confuse ARM being Azure’s management layer with the ARM processor architecture. For the sake of this book, if we at any point talk about both the API and the availability of ARM processors in Azure, we’ll make a clear distinction in that section.
Let’s take a deeper dive into the topic to see what benefits ARM grants and what kinds of functionalities we can leverage for our needs.
Architecture and terminology of ARM
Although ARM is one of the most important elements where Azure is concerned, it’s not as difficult to understand as many people suppose. Let’s look at the following architecture diagram:

Figure 1.1 – High-level architecture diagram of Azure Resource Manager
To get a better understanding, we need to explain all the presented components a little bit:
- Client layer – A layer that is available for each client using Azure. It consists of various SDKs, the Azure CLI, Azure PowerShell, REST API, and, of course, the Azure portal. It’s basically an access layer for anybody who wants to interact with cloud resources.
- Authentication – Components responsible for authenticating and authorizing requests coming to ARM. It involves Entra ID and RBAC/ABAC authorization. We’ll cover that topic a little later in the chapter.
- Resource providers – APIs responsible for provisioning, configuring, and managing resources in Azure. It’s a collection of REST operations that can be called and are given the responsibility to interact with a connected resource type.
For now, that’s all you need to know – of course, there’s still more to uncover, but we’ll get there later in the book. To complete the introduction, let’s briefly cover one more concept called Infrastructure as Code (IaC), which is connected to ARM.
There are lots of different methods when it comes to deploying resources in Azure. You can do it manually in the Azure portal, use the CLI (both the Azure CLI and Azure PowerShell), or download the SDK and write a simple application in your favorite language to provision something in the cloud. This list is already quite impressive, but it’s not yet complete.
The general idea of IaC is to use a text file(s) to automate and unify a way of creating and managing resources in the cloud. ARM natively supports two different tools:
- ARM templates (https://learn.microsoft.com/en-us/azure/azure-resource-manager/templates/overview)
- Azure Bicep (https://learn.microsoft.com/en-us/azure/azure-resource-manager/bicep/)
Both tools are officially supported by Microsoft and enable you to even work with not-yet-released features (which include private preview services and functionalities, for example). Using an SDK to define your infrastructure and manage it that way could also be considered IaC, but in this book, we’ll simplify that definition. We’ll talk more about IaC in Chapter 2.
Scopes
The second topic that is important to understand when talking about ARM is scopes. Scopes are crucial because they’re related to resources, policies, and role assignments. In other words, they define multiple layers of your cloud infrastructure and can be used for separating applications and security segmentation.
In Azure, there are five different scopes available:
- Tenant
- Management group
- Subscription
- Resource group
- Resource
All these scopes have the following dependencies on each other:
- Tenants can be deployed separately without an Azure subscription assigned
- Tenants can have multiple subscriptions assigned
- Management groups are optional and may contain zero or multiple Azure subscriptions
- Subscriptions are the main layer of separation for other resources and can be assigned to both tenants and management groups
- Resource groups are required for the deployment of resources that are scoped to resource groups
- Resources require a higher scope to be deployed
We can also visualize these dependencies with the following diagram:

Figure 1.2 – Dependencies between different ARM scopes
Let’s now talk a little bit about smaller details where scopes are concerned.
Target scope
Multiple resources can be scoped to a given parent scope. For instance, to deploy a subscription, you need a tenant. To deploy a resource group, you need a subscription. When talking about resources in general, you need to understand their scope before deployment.
Important note
In Azure, there are resources that can be deployed on multiple scopes, so there’s no exact target scope to select. These are called extension resources. An example would be role assignment – it can be deployed on the subscription, resource group, or resource level and works as an extension to the parent resource.
Most of the time, you don’t need to worry about the target scope as it’ll be automatically selected, or you’ll be given hints about the correct decision.
Extension resources
Some resources in Azure can extend other resources. This means that they don’t provide a typical child-to-parent relation and instead can be used as a form of adding functionality to other resources.
The simplest example of an extension resource is a resource lock. Once added to a resource level, it can prevent it from deletion or set it as read-only.
Tenants and subscriptions
A tenant can have zero, one, or multiple subscriptions assigned. You can move subscriptions between tenants. This works well if you want to limit access to a subscription to a limited number of people (it can be done via RBAC/ABAC, but there are scenarios in which separation must be much stricter). It can also be used to transfer ownership of a subscription to another company or client. The only thing to remember is that doing this doesn’t always transfer the financial details related to a subscription. In such cases, you may need to contact Azure Support.
Resource groups
While we’ll talk about tenants, subscriptions, management groups, and other concepts very often in this book, there’s one thing that is basically the bread and butter of Azure administration. That thing is a resource group.
Resource groups are the main deployment scope for most Azure services, though, from the perspective of administration, they become even more important because they’re also a target of various policies defining allowed resource types and configurations. Resource groups can be treated as metadata storage for resources and are often referred to as resource containers.
Important note
When a resource group is deployed, one needs to select its location. While it may be unintuitive in the beginning, you’ll quickly get used to it. Selecting a proper location may be important from the compliance point of view when you need to ensure that all the infrastructure-related data is stored within compliant locations.
As mentioned before, while lots of resources require a resource group to be deployed, being an Azure administrator requires a wider perspective, as lots of resources you’ll be interested in can be deployed on higher scopes. Still, most of the development of cloud infrastructure in Azure happens on the resource group level.
Resource groups are free and provide logical separation of resources in Azure. This means that resources from one resource group can connect to another without additional configuration. If you want to limit connectivity and apply network policies, you’ll need to use dedicated resources such as virtual networks, network security groups, and firewalls.
Tags
Many resources in Azure can be tagged. A tag is a simple label consisting of a key and a value, which can be applied on the resource level for grouping, metadata, or compliance reasons. Normally, resources don’t inherit tags from their parents, though there are exceptions (including managed resource groups created for resources such as Azure Kubernetes Service or Azure Databricks) that automatically get tags applied to a parent resource.
Remember that tags are stored as plain text. Don’t attempt to store any sensitive or secret value there.
Quotas and limits
In Azure, you cannot deploy resources without limits. This means that there are certain quotas, depending on the resource type, which will block deployment exceeding a limit. For example, you may initially have a quota of 10 vCores per virtual machine family, which is considered a soft limit. If you feel that you need more, you can manually increase it on your subscription level.
Besides soft limits, there are also hard limits. While soft limits can be increased, a hard limit is something you normally cannot exceed. Individual agreements, consulted on a per-scenario basis, are possible after reaching out to Azure Support.
With some basics of ARM covered, let’s now proceed to Entra ID – a service that is very closely related to ARM but serves a different purpose and can be used without having an Azure subscription.
Microsoft Entra ID
Microsoft Entra ID (previously referred to as Entra ID or AAD) is a cloud service that is responsible for managing cloud-based identities. In other words, it’s a directory of users, applications, and devices that are centralized and managed within defined boundaries (tenant). As mentioned earlier, it can be used with or without other Azure resources (such as subscriptions, resource groups, or cloud services).
Important note
Don’t confuse Microsoft Entra ID with Active Directory. Although they are quite similar in their functionalities and general purposes, Entra ID is not a direct replacement for its on-premises counterpart. It’s rather a service that addresses gaps in common on-premises environments by enabling an organization to provide hybrid identities for its principals.
To get started, we’ll discuss a little bit of terminology regarding the service.
Terminology
As Entra ID is quite a huge cloud component, it’ll be difficult in the beginning to understand all the concepts. We’ll focus on the most important ones and try to introduce advanced features a little bit later.
Here are the most popular concepts used when talking about Entra ID:
- Tenant – Simply put, a tenant is an Entra ID directory that contains users, applications, devices, and all the configuration related to the service.
- Identity – This is an object that can be anything that can be authenticated. Depending on the context, it could be a user, application, or external service.
- Entra ID roles – These are groups of permissions that allow a given object to perform a set of operations. Note that Entra ID roles are different than the roles that you’ll use in ARM.
- Entra ID licenses – There are multiple tiers of Entra ID that offer different sets of functionalities. Depending on the chosen tier, there’s either no charge or a charge per license.
There are also things such as service principals, app registrations, and enterprise applications, which we’ll describe later in the chapter.
Users and groups
In Entra ID, the most basic principal types are users and groups. A user is a person who got their account created in an Entra ID tenant. A group is a collection of users who were put in the same container.
User and their username
When a user is created, they get their username and password that are assigned by the Entra ID tenant administrator. A username is an equivalent of an email address, though it doesn’t mean that the user can automatically use it in their email client (in fact, it depends on the organization’s setup – a username in an Entra ID tenant may not reflect an email address used by a user).
To get things a little bit clearer, let’s imagine your company is named ITMasters and owns the itmasters.com domain. If there’s somebody in your company named John Doe, they most probably have an email address like john.doe@itmasters.com.
This email address is used for both internal and external communication. Now, your boss has asked you to create an Entra ID tenant. Once the tenant is created, it automatically assigns the <yourcompany>.onmicrosoft.com domain to it. If you decide to create a user now, they’ll get the following username:
john.doe@itmasters.onmicrosoft.com
As you can see, the same person will have the following setup:
- Email address: john.doe@itmasters.com
- Entra ID username: john.doe@itmasters.onmicrosoft.com
Even though the Entra ID username looks like an email address, it’s not usable out of the box unless you introduce a change in the DNS zone, mapping this domain to your mail server. Fortunately, it’s possible to map a custom domain to an Entra ID tenant. We’ll describe that shortly.
Creating a user
The simplest way to create a user is to use either the Azure CLI or Azure PowerShell. Let’s see the syntax:
// Remember to run `az login` or `Connect-AzAccount` as the first step
// Azure CLI
az ad user create --display-name <display-name> \
  --password <password> \
  --user-principal-name <username>@<domain>
// Azure PowerShell
$PasswordProfile = New-Object -TypeName Microsoft.Open.AzureAD.Model.PasswordProfile
$PasswordProfile.Password = "<Password>"
New-AzureADUser -DisplayName "<display-name>" -PasswordProfile $PasswordProfile -UserPrincipalName "<username>@<domain>" -AccountEnabled $true
Let’s clarify those commands a little bit. As you can see, both the Azure CLI and Azure PowerShell require the same parameters (there are many other optional parameters available, but we’re not going to cover them here):
- Display name
- Password
- Username + domain
Display name and password are common parameters that are used to define the name of a user, which will be displayed (display name) with their password. There’s also a username and domain, which have the following requirement: the value of the domain parameter must reflect one of the validated domains.
For example, if you created an Entra ID tenant and assigned a custom domain (itmasters.com), you’ll have two validated domains available:
- itmasters.onmicrosoft.com
- itmasters.com
Now, when creating a user and defining their username, the following values would be accepted:
- john.doe@itmasters.onmicrosoft.com
- john.doe@itmasters.com
Assigning john.doe@itheroes.com couldn’t work unless you validate that you are the owner of that domain and then assign it to your Entra ID tenant.
Group types
In Entra ID, a group can be one of the following two types:
- Security – Used for simplifying the management of roles and permissions
- Microsoft 365 – Used for extending the capabilities of a group with a shared mailbox, calendar, and files
As Microsoft 365 groups are a concept that works mostly with Microsoft 365 tools, we won’t use them in this book. However, if your organization is working on integration with that platform, it will become helpful to you at some point.
Membership types
In Entra ID, you can select one of the available membership types. Each type defines a slightly different way of assigning members to a group:
- Assigned – You manually decide who is a member of a group and what their permissions are.
- Dynamic user – You can use the dynamic membership rule for the automated process of assigning and removing a user from a group. This feature is based on the user’s attributes and monitors them for possible changes.
- Dynamic device – This works in the same way as the dynamic user membership type, but in this case, it refers to devices.
Important note
The use of dynamic groups in Entra ID requires a paid license – Entra ID Premium P1 or Intune for Education.
Most Entra ID groups you’ll work with will be groups with the membership type set to Assigned. Still, the use of dynamic assignments and removals may be helpful in cases where you’re looking for optimizations in the process of group management.
Creating a group
Creating a group in Entra ID is even simpler than creating a user, as the only thing you need is to provide a name for a group and its members. There is, however, one gotcha – neither the CLI nor PowerShell, by default, enable you to provide advanced configuration of a group. That means that you cannot create an Entra ID group with a dynamic membership type out of the box, and you need to either install an appropriate extension or leverage the Azure portal or Entra ID admin center.
For the sake of our exercise, we’ll go for a simple example with a standard group using the assigned membership type:
// Remember to run `az login` or `Connect-AzAccount` as the first step
// Azure CLI
az ad group create --display-name <display-name> --mail-nickname <display-name>
// Azure PowerShell
New-AzureADGroup -DisplayName "<display-name>" -MailEnabled $false -SecurityEnabled $true -MailNickName "<display-name>"
As you can see, there’s a small difference between running the same command using the Azure CLI and Azure PowerShell. In the Azure CLI, you need to provide both a display name and a mail alias for that group (though, as we’re not using Microsoft 365 groups, it won’t matter). Azure PowerShell requires providing two additional parameters:
- MailEnabled – indicating whether mail is enabled for that group
- SecurityEnabled – indicating whether this group is a security group
Besides some differences in syntax, those two commands will create a group with the same configuration.
Applications and service principals
Users and groups are not the only concept when it comes to creating objects in Entra ID for managing access. Sometimes, you want to run a service or an application and give users or groups access to cloud resources. In those scenarios, Entra ID comes with a concept of applications and service principals, which work as an artificial user that can be assigned to an object outside the Entra ID directory.
Let’s consider the following situation. Somebody deployed an application to Azure; it’s a basic web application that connects to a database for obtaining data. Normally, that application can access the database using a connection string. An alternative would be to give it personality, so we can treat it as any other object inside Entra ID.
Another scenario would be an automation script that reads the metadata of Azure resources and builds a report indicating the current inventory of your cloud environment. As ARM integrates with Entra ID, that script must obtain a token that will be validated. To avoid passing our own username and password (which would be a serious security flaw), we could think about giving it an identity and receive a token based on that.
All these challenges can be solved by using applications and service principals in Entra ID. We’ll describe them in detail.
Service principals
Any entity trying to access a resource secured by Entra ID needs to have some kind of representation. If we’re talking about users or groups, things are simple – they are represented by appropriate objects in the directory. If that entity is an abstract concept, such as an application, script, or virtual machine, things require more advanced configuration.
In Entra ID, objects that are not users or groups will be represented by service principals. There are three different kinds available:
- Application – When you want to give access to Azure resources to an application or script, you can create an application object in Entra ID. Once that object is created, you may create a corresponding service principal object assigned to it. Service principal creation will also happen if the application is given consent to configured permissions (in scenarios where it can act on behalf of the user).
- Managed identity – This is a very specific kind of service principal as it’s closely connected to the development of applications and systems in Azure. The purpose of managed identity is to eliminate a need to programmatically obtain credentials for accessing Azure resources. It is assigned on a resource level and can be used from within the application’s code. We’ll talk more about it later in Chapter 11.
- Legacy – This is an old concept existing for backward compatibility. Before applications were added to Entra ID, service principals worked in a very similar way to the current app registration feature, which we’ll discuss in a moment. As this is a legacy feature, we’ll not use it throughout this book.
Let’s now talk a little bit more about a layer above service principals, which is the application layer.
Application
When talking about applications in Entra ID, we need to make a distinction between two related concepts:
- Application registration
- Application object
We already know that under the hood, each application consists of a service principal. However, a service principal is used to represent an application object on the authentication/authorization level. Before that happens, we need to delegate identity and access management to Entra ID. This is what application registration is for.
When we create application registration, we configure the way it’s going to be used. We can decide whether it’s a single or multi-tenant application. If we plan to use it to interact with user authentication flows, we’ll configure how authentication will be performed and how users will be redirected.
Once registration is completed, each application obtains a unique identifier (named ApplicationId or ClientId). This identifier will come in handy when connecting an application to other resources or creating role assignments.
Creating an application
To discuss applications in detail, let’s create one using the command line. Conceptually, this exercise isn’t much more difficult than creating a user or a group. However, we’ll split our demonstration between the Azure CLI and Azure PowerShell as they require slightly different approaches.
In the Azure CLI, you can simply use the following command:
// Remember to run `az login` or `Connect-AzAccount` as the first step
az ad app create --display-name <display-name>
This will create an application with the provided display name and default parameters. Note that we’re not passing additional configurations such as key type, optional claims, or delegated permissions (though it’s, of course, possible in more advanced scenarios).
In Azure PowerShell, you’ll need to install an additional Entra ID module:
Install-Module AzureAD
Then, we can create an application in the same way as in the Azure CLI:
// Remember to run `az login` or `Connect-AzAccount` as the first step
New-AzureADApplication -DisplayName "<display-name>"
The output of running these commands depends on the environment (the CLI versus PowerShell), but the result will be the same. Assuming I named my application AzureAdministrator01, I should be able to find its details using one of the available commands (az ad app show or Get-AzureADApplication). Unfortunately, it’s not as straightforward as we’d like it to be. Let’s see how to obtain that information.
Finding application details
As mentioned previously, we can use one of the two available commands for fetching information about an application:
- az ad app show
- Get-AzureADApplication
These two commands serve the same purpose but are used differently. The easiest way to get an application is to use its ApplicationId. ApplicationId is a unique identifier that is assigned to each application in Azure. If we know what value our application has, the whole thing will be a piece of cake. If we don’t, we need to approach it using available alternatives.
Get-AzureADApplication has a parameter called -Filter. Inside such a filter, we can provide the field and value we’re looking for. For example, for the aforementioned AzureAdministrator01, we could use the following command:
Get-AzureADApplication -Filter "DisplayName eq 'AzureAdministrator01'"
We’ll get a result with three columns – ObjectId, ApplicationId, and DisplayName. We’ll describe the difference between ObjectId and ApplicationId in a second.
In the Azure CLI, we could use a similar command, but the problem is that it accepts only one parameter. That parameter is –id and can be either ObjectId, ApplicationId, or the URI of the application. Not very helpful, is it? Fortunately, we could use a workaround with the following command:
az ad app list --display-name "AzureAdministrator01"
Alternatively, we could also leverage the –filter parameter like so:
az ad app list --filter "DisplayName eq 'AzureAdministrator01'"
All these commands can be used in the same context (though, obviously, the returned object will be slightly different for the CLI and PowerShell).
ObjectId versus ApplicationId
There’s always a little confusion when people realize that an application in Entra ID has two separate identifiers. When it comes to passing the correct identifier, there’s a moment of hesitation – should I use ObjectId or ApplicationId? Fortunately, the answer is quite simple.
We mentioned previously that when an application is registered in Entra ID, there’s a possibility to create a service principal so that the application can be authenticated and security policies can be applied to it. While the service principal itself is a separate being (at least conceptually), it’s attached to each application registration.
You can create a service principal for an application using the Azure CLI:
az ad sp create --id "<application-id>"
Once this command completes, it’ll create a new service principal object in Entra ID, which will be linked to your application. You can confirm that the service principal is created by running the following command:
az ad sp show --id "<application-id>"
The result will be a JSON object, which will contain an appId field containing the value of the ApplicationId field of your application. So, there’s even more confusion – now we have three separate identifiers (appId being the same for both objects, and two separate objectId identifiers):
- Application:
- appId – 87be43fc-f329-4f1b-a6ad-9f70499e4e1d
- objectId – f2b23bfe-53be-4ed4-8ba5-366b1f2fd06f
- Service principal:
- appId – 87be43fc-f329-4f1b-a6ad-9f70499e4e1d
- objectId – eed243a8-356e-4d5c-96bf-c603895a9645
Important note
The values of the fields presented previously will be different for each application and service principal you create. Don’t expect that they’ll be the same as in the examples from this book.
As you can see, the field that links both objects is appId. On the other hand, objectId is different for each of them. It’s important to remember how these fields are interpreted:
- appId is an identifier of an application
- objectId of an application is an identifier of that application within the Entra ID directory
- objectId from a service principal is an identifier of a service principal within the Entra ID directory
This distinction will become very important, for instance, when assigning a role to an Azure resource for an application. As a service principal is used for all the features related to security, you will need to use its objectId to create the proper assignment. appId, on the other hand, will be used when referring to an application itself.
Authenticating as a service principal
When using the Azure CLI or Azure PowerShell, you can use the following commands to authenticate:
Az login // CLI
Connect-AzAccount // PowerShell
They allow you to log in as a user and get access to resources within your Azure subscriptions.
Important note
The prior commands can be used even when there’s no subscription linked to an account. In such a scenario, you may need to use the --allow-no-subscriptions option in the Azure CLI to ignore the default mechanism of selecting a default subscription.
A scenario when you log in as a user is not always something you want – in fact, you will face many situations when you want to avoid providing your own credentials (e.g., when running an automation script). We talked a little bit about creating application registration and service principals. Let’s see how to use them to authenticate.
Each application in Entra ID can have credentials generated, which could be either a password or a certificate. You can list them using the Azure CLI, for instance, like so:
az ad app credential list --id "<application-id>"
As you can see, for this command, we are using the value of the appId field we saw earlier. For now, as this is probably an application we just created, there are credentials generated. We’ll change that with the following command:
az ad app credential reset --id "<application-id>"
As a result, you should receive output like mine:
{
  "appId": "87be43fc-f329-4f1b-a6ad-9f70499e4e1d",
  "password": "TaInm~…",
  "tenant": "c2d4fe14-…-5a65748fd6c9"
}
Note the value of the password field – we’ll use it in a moment.
Once we have generated credentials, let’s see whether we can authenticate as an application. Use one of the following commands:
// Azure CLI
az login --service-principal --username "87be43fc-f329-4f1b-a6ad-9f70499e4e1d" --password "TaInm~…" --tenant "c2d4fe14-…-5a65748fd6c9" --allow-no-subscriptions
// Azure PowerShell
$Credential = New-Object -TypeName System.Management.Automation.PSCredential -ArgumentList "87be43fc-f329-4f1b-a6ad-9f70499e4e1d", "TaInm~…"
Connect-AzAccount -ServicePrincipal -TenantId "c2d4fe14-…-5a65748fd6c9" -Credential $Credential
Here’s a short clarification – to authenticate as an application, we must use three parameters:
- ApplicationId
- TenantId
- Password
In the Azure CLI, we’re also passing --allow-no-subscriptions as our application hasn’t been added to any Azure resources yet. Once authenticated, you will act as a non-user – the policies and roles normally applied to you as a user are no longer there because you’re not using your own account.
This scenario is very common in all the cases where you need to delegate running a script or an application to an object, which can be controlled by other members of your team or organization. Throughout the book, you will see that using an application (or service principal) will become one of the most common actions you do in Azure.
Let’s extend our knowledge of Entra ID with the next section of this chapter, where we discuss authorization using RBAC and ABAC.
Authorization using RBAC and ABAC
So far, we’ve talked mostly about objects in Entra ID, which can be authenticated. Before we take a step forward, let’s quickly recap what authentication and authorization are. Understanding this distinction is important to fully understand the concepts we’re about to cover:
- Authentication – This answers the question of Who/what wants to access a resource? It’s a process that tells you what object is behind a request.
- Authorization – This answers the question of Is that object allowed to access that resource? This process is responsible for making sure that an authenticated object has the necessary permissions to make a request.
As you can see, most of the time, authorization cannot exist without authentication. Alternative scenarios are possible (mostly in cases where we don’t care who or what makes a request and base the authorization mechanism on a key or certificate passed along). However, in this book, all the scenarios we’re going to cover will follow the authentication and authorization process.
We know the difference between key concepts related to authorization, so let’s now talk a little bit about RBAC and ABAC. These abbreviations (or concepts) are not unique to Azure – in fact, you can find them in other cloud providers and even on-premises environments. If you don’t know what they mean, here’s a short introduction:
- Role-based access control (RBAC): This is an authorization mechanism that is based on roles assigned to an object. Each role consists of one or many permissions that define granular access to multiple operations.
- Attribute-based access control (ABAC): This concept is like RBAC, but instead of explicitly assigned roles, it works based on attributes, which can be assigned to resources and objects. Then, authorization is based on checking whether an object and resource have the same attribute.
While initially, both RBAC and ABAC will look similar, you’ll quickly realize that though they serve the same purpose, they allow different security models.
RBAC
In Azure, RBAC works by combining a role definition, a role assignment, and a security principal, which gets a role assigned to it. Each role is assigned on a specific level (a scope, as we discussed when talking about ARM). This can be visualized with the following diagram:
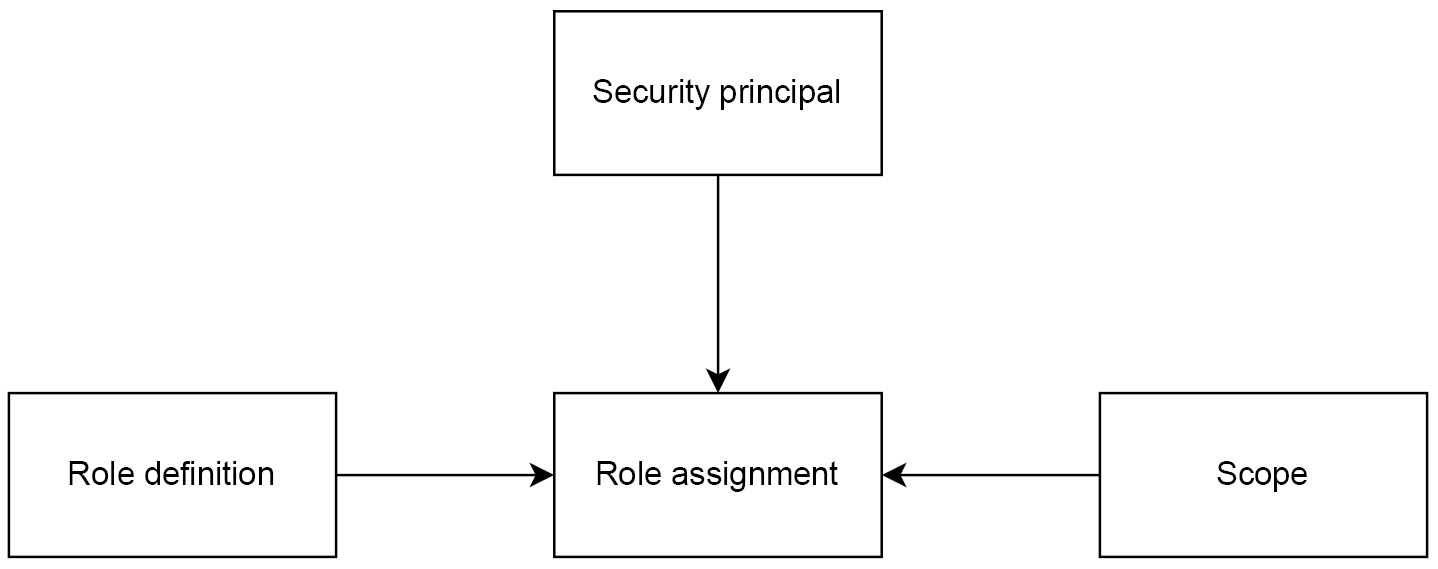
Figure 1.3 – Diagram of RBAC in Azure
Let’s discuss these concepts in detail now.
Role definition
Each role has its own definition. A definition is represented as a JSON document containing allowed actions that can (or cannot) be performed when the role is assigned to a security principal. An example definition of a Reader role (one of many in-built roles available) looks like this:
{
    "assignableScopes": [
      "/"
    ],
    "description": "View all resources, but does not allow you to make any changes.",
    "id": "/subscriptions/cf70b558…-9048-ebcefb926adf/providers/Microsoft.Authorization/roleDefinitions/acdd72a7-3385-48ef-bd42-f606fba81ae7",
    "name": "acdd72a7-3385-48ef-bd42-f606fba81ae7",
    "permissions": [
      {
        "actions": [
          "*/read"
        ],
        "dataActions": [],
        "notActions": [],
        "notDataActions": []
      }
    ],
    "roleName": "Reader",
    "roleType": "BuiltInRole",
    "type": "Microsoft.Authorization/roleDefinitions"
  }
As you can see, each definition has a couple of fields, which define how the role is interpreted:
- assignableScopes – tells us what scope a role can be assigned
- description – human-friendly description of a role
- id – unique identifier of a role (role definitions, like many other Azure concepts, are resources themselves)
- name – unique name of a role definition (do not confuse it with roleName, which is a human-friendly name of a role)
- permissions – an array of available permissions that define allowed/disallowed operations
- roleName – human-friendly name of a role
- roleType – information about the origin of a role (whether it’s an in-built/custom role)
- type – resource type (the same for each role definition)
It may be a little bit overwhelming for now, but you’ll quickly learn how to handle definitions and even build custom ones. For now, the only clarification needed is on permissions. As you probably realized, there are four different fields defining them:
- actions – operations allowed on the Azure control plane
- dataActions – operations allowed on the Azure data plane
- notActions – operations disallowed on the Azure control plane
- notDataActions – operations disallowed on the Azure data plane
Before we proceed, we need to define what the control and data planes are.
Control and data planes
In Azure, when performing operations on a resource level, you can interact with one of the available planes:
- Control plane
- Data plane
The control plane consists of operations that work on the ARM level. As each operation performed against it ends up sending a request to the REST endpoint, you can easily find it by investigating the underlying URL. If it starts with https://management.azure.com, you know that it’s a control plane you’re working with.
Important note
The ARM URL may be different depending on your Azure environment. Azure Government, Azure Germany, and Azure China have different endpoints available. While we’re not going to describe alternative environments in this book, most of the examples will be relevant no matter which one you’re using on a daily basis.
On the other hand, when the data plane is in play, it’s not limited to REST API requests. While many operations performed on the data plane in Azure will be standard HTTP calls (such as managing secrets in Azure Key Vault or many operations in Azure Cognitive Services), there will still be some actions that don’t use a typical REST endpoint. That includes logging in to Azure Virtual Machines and managing Azure SQL Database via SQL queries.
You may wonder how control and data plane operations affect your work. Well, depending on the plane type, you may need to implement different means to manage, control, and secure Azure resources. As many data plane operations may skip policies configured in your cloud environment, additional tools and processes will be needed to keep everything in control.
Creating a custom role
Azure has lots of built-in roles such as Reader, Contributor, and Owner. Many services also provide their own roles, which can be used to limit granted permissions. When talking about role definition, we used the Reader role as an example. Let’s compare it with another role that is also built in but much more specialized. Here’s a definition of the Storage Blob Data Reader role:
{
    "assignableScopes": [
      "/"
    ],
    "description": "Allows for read access to Azure Storage blob containers and data",
    "id": "/subscriptions/cf70b558-…-9048-ebcefb926adf/providers/Microsoft.Authorization/roleDefinitions/2a2b9908-6ea1-4ae2-8e65-a410df84e7d1",
    "name": "2a2b9908-6ea1-4ae2-8e65-a410df84e7d1",
    "permissions": [
      {
        "actions": [
          "Microsoft.Storage/storageAccounts/blobServices/containers/read",
          "Microsoft.Storage/storageAccounts/blobServices/generateUserDelegationKey/action"
        ],
        "dataActions": [
          "Microsoft.Storage/storageAccounts/blobServices/containers/blobs/read"
        ],
        "notActions": [],
        "notDataActions": []
      }
    ],
    "roleName": "Storage Blob Data Reader",
    "roleType": "BuiltInRole",
    "type": "Microsoft.Authorization/roleDefinitions"
  }
As you can see, when compared to the Reader role, it offers a much more narrowed set of assigned permissions. While Reader defines actions as */read, Storage Blob Data Reader is designed mostly to allow the reading of data stored in blob containers. However, sometimes, even specialized built-in roles are not enough. In that case, we need to create our own definition and then assign it to desired security principals.
Roles in Azure can be created in a variety of ways. We can use the Azure portal; alternatively, we can create them using ARM templates/Azure Bicep (as we mentioned previously, each role definition is also a resource). We can also create them using the Azure CLI or Azure PowerShell. We’ll go for the latter as it will be the simplest approach.
To create a role, we need to construct its definition. The easiest way to do that is to fetch it using an already existing role and use it as a template. You can obtain the role definition with the following command:
az role definition list -–name <role-name>
It’ll return a JSON object, which you can copy to your favorite editor and modify. For this exercise, let’s create a role that allows the reading of all resource data except the storage account:
{
    "assignableScopes": [
        "/subscriptions/<subscription-id>"
    ],
    "description": "Allows reading all data except storage account",
    "actions": [
        "*/read"
    ],
    "dataActions": [],
    "notActions": [
        "Microsoft.Storage/storageAccounts/*/read"
    ],
    "notDataActions": [],
    "name": "Custom Resource Reader"
}
As you can see, the role definition to be created differs slightly when compared to an existing one. We’re missing id and type, and the name is equivalent to roleName. The whole structure is also flattened. I defined this role in a way that will forbid performing a read action on any storage account within the used scope.
Important note
The prior definition blocks read operations only. This means that with that role assigned, it’s not possible to create/delete/modify any Azure resources. It’s caused by the fact that our actions block specifies only read operations. If we ever decide to change the definition, once changes are applied, they will immediately affect all the security principals.
To create a role definition, you can use one of the following commands:
// Azure CLI
az role definition create --role-definition @<file-name>.json
// Azure PowerShell
New-AzRoleDefinition -InputFile "<file-name>.json"
The preceding commands assume that you’re running them in the same directory where you placed your JSON with the role definition.
Assigning a role
We’ve learned about custom and built-in roles. We’ve also talked about security principals and scopes. To complete the RBAC picture, we need to create a role assignment. Once a role is assigned to a chosen security principal on the selected scope, Azure will start to evaluate it, meaning the role will become active.
Creating an assignment is actually a very simple process. It can be quickly done with one of the following commands:
// Azure CLI
az role assignment create --assignee "<assignee-name>" --role "<role-name>"
// Azure PowerShell
New-AzRoleAssignment -ObjectId <object-id>
-RoleDefinitionName <role-name>
These are the simplest versions of commands you can use. Optionally, you can pass the --scope (-Scope in PowerShell) parameter, so you can define which scope should be used for that assignment.
ABAC
When using RBAC, you can easily control who or what can access resources by assigning a role with linked permissions. This security model is enough for most scenarios but can become a little bit cumbersome when you need to manage many assignments or provide more granular access. This is where ABAC comes in handy, as it combines RBAC with additional means of security by adding an additional layer.
As of now, ABAC works only with Azure Blob Storage and Azure Queue Storage data actions. This list will expand in the future.
Assignment with conditions
Assigning proper roles can be a lengthy process, especially if you have hundreds of resources to browse. The more resources, the more time it’ll take to create assignments, and the easier it is to make a mistake. In Azure, it’s possible to create a role assignment that is based on conditions, making it easier to manage and configure access.
Important note
Some of the features used in conditions (such as security principal attributes) are currently in preview. They might still change until they reach general availability in the future.
When using ABAC, we need to use an additional parameter when creating an assignment, such as in the following example:
az role assignment create --role "Custom Resource Reader" --assignee "<assignee-name>" --condition
"@Resource[Microsoft.Storage/storageAccounts/blobServices/containers:Name] stringEquals '<container-name>'"
As you can see, here we have a --condition parameter used, where we’re passing a string containing a condition. A condition is a special syntax that provides logic used for checking whether that role assignment should be respected.
Conditions can be combined by using AND/OR operators, like so:
(@Resource[Microsoft.Storage/storageAccounts/blobServices/containers:Name] stringEquals '<container-name>')
OR | AND
(@Resource[Microsoft.Storage/storageAccounts/blobServices/containers/blobs/tags:Project StringEquals 'AzureAdministratorBook')
In fact, conditions are based on properties that are exposed to ARM (and are accessible for other tools, such as filtering in the Azure CLI/Azure PowerShell or expressions in ARM templates/Azure Bicep). You can also access other sources:
- @Resource is for accessing given resource properties
- @Request is for obtaining information from the request performed on a resource level (so it’ll be evaluated for each GET/POST/PUT/DELETE operation)
- @Principal is for accessing the properties available for a security principal performing an operation
As you can see, this functionality allows for building a much more advanced security mechanism than RBAC alone. Even though there are still many limitations in place, it can be used to extend security for Azure Storage if needed.
Let’s focus now on the last topic of this chapter – a detailed introduction to the Azure CLI, Azure PowerShell, and Cloud Shell.
Basic toolset – the Azure CLI, Azure PowerShell, and Cloud Shell
Many operations in Azure can be performed using various tools. People starting with the cloud favor using the Azure portal. When you are working as a more advanced user, the Azure CLI and Azure PowerShell will become much more useful, especially when building automation scripts. For infrastructure deployments, ARM templates and Azure Bicep will be tools used on a daily basis. This section aims to discuss them in detail and show the various tips and tricks available.
Azure CLI
The Azure CLI is a tool that was written in Python and can be used on any machine that has that runtime installed. It’s a cross-platform solution that can be used in many places – from your local machine to remote machines and CI/CD agents. Making yourself familiar with it will not only improve your knowledge of Azure but will also help when reading the documentation, as many examples are based on the Azure CLI.
Logging in
When the Azure CLI is installed, you can immediately get started working with it by running the az login command in your terminal. Depending on the scenario (authenticating as a user/service principal/managed identity), you’ll see a slightly different path for obtaining credentials:
- When authenticating as a user, most of the time a browser window will appear where you can enter your username and password. If MFA is enabled for the account, you’ll be asked to confirm your identity.
- For authenticating as a service principal, you’ll need a password/certificate.
- To use managed identity, you need to have that feature enabled on a machine/service where the command is being executed. That scenario is meant for Azure resources, and we’ll discuss it later in the book.
No matter which scenario we cover, az login will be the first command we need to execute when using the Azure CLI for the first time.
Checking the current account
To see what account was used to authenticate in the Azure CLI, you can use the az account show command. When run, it’ll display a result like this:
{
  "environmentName": "AzureCloud",
  "homeTenantId": "c2d4fe14-…-5a65748fd6c9",
  "id": "cf70b558-…-ebcefb926adf",
  "isDefault": true,
  "managedByTenants": [],
  "name": "PAUG",
  "state": "Enabled",
  "tenantId": "c2d4fe14-…-5a65748fd6c9",
  "user": {
    "name": "kamil@...com",
    "type": "user"
  }
}
The result contains the currently used account with the selected subscription. Note that it also describes the context that will be used for most of the Azure CLI commands. While it’s not always applicable (as there are commands that work no matter which context is chosen), it’s important to always double-check which subscription was selected. It’ll prevent you from making accidental changes to resources that shouldn’t be modified.
Logging in to another tenant
Sometimes, you may need to switch tenants when performing the Azure CLI commands. We have already discussed the fact that most operations are performed using a currently selected context. As context selection is an implicit thing (i.e., you don’t choose it directly – it’s evaluated based on the account you used for signing in), you need to remember to not only choose a subscription, but also a tenant if needed.
Important note
When logging in to your default tenant, you don’t need to pass tenantId as a parameter. It’s required only if there are additional tenants where you have the same username as in your default one.
To log in with a non-default tenant, we will use the same command we used previously, but with an additional parameter:
az login --tenant <tenant-id>
Once this has been run, the login process will run as usual, but the request will be forwarded to the correct Entra ID tenant. The same parameter is used no matter whether you want to log in as a user, service principal, or managed identity (though for principals other than user, there will rarely be a valid scenario).
Azure PowerShell
An alternative to the Azure CLI is Azure PowerShell, which will be useful for anybody who’s already worked with PowerShell. A few years ago, the main advantage of the Azure CLI over Azure PowerShell was the ability to run it on multiple platforms. Nowadays, with PowerShell Core, that benefit is no longer valid.
You may find Azure PowerShell useful in all the places where you need more structured language and capabilities for scripting when compared to shell scripts using the Azure CLI. What’s more, as PowerShell allows you to use .NET libraries, it opens many interesting, advanced scenarios for authentication, and interacting with the operating system or external services.
Logging in
Like the Azure CLI, to start working with Azure PowerShell, you need to authenticate. The easiest way is to use the following command:
Connect-AzAccount
This is the equivalent of az login as described previously. It’ll log you in to the default tenant and subscription of the account you selected.
An alternative authentication mode is to use device code authentication as follows:
Connect-AzAccount -UseDeviceAuthentication
This will ask you to provide a one-time code displayed in your terminal instead of authenticating using the provided credentials. It’s also possible to authenticate using the service principal:
$credential = Get-Credential -UserName <application-id>
Connect-AzAccount -ServicePrincipal -Credential $credential
As you can see, in Azure PowerShell, it’s a little bit more complicated when compared to the Azure CLI, as we need to create a PSCredential object first. Still, there’s a downside to that approach – it’ll ask us for a username and password (which, in our case, will be applicationId and a secret generated for that service principal). Such functionality will be difficult to handle in automated scenarios, so we’d need to change the code a little bit:
$sp = Get-AzureADServicePrincipal -ObjectId <object-id>
$password = $sp.PasswordCredentials.SecretText | ConvertTo-SecureString -AsPlainText -Force
$credential = New-Object -TypeName System.Management.Automation.PSCredential -ArgumentList $sp.AppId, $password
Connect-AzAccount -ServicePrincipal -Credential $credential
This will ensure that we’re not using a plain text password while preserving the desired functionality. The last option for authentication would be using managed identity:
Connect-AzAccount -Identity
Depending on the configuration (system-assigned or user-assigned identity), it’s possible that you’d need to pass an additional parameter, -AccountId, with a value of clientId assigned to the underlying security principal. Don’t worry, we’ll cover that later in the book.
Checking the current account
To identify what context will be used for Azure PowerShell commands, use the following command:
Get-AzContext
It’ll display information about the subscription, your username, the environment, and the tenant. If you want to switch the selected context, you’ll need the name or identifier of a subscription and these commands:
// List all the subscriptions your principal has access to
Get-AzSubscription
// Select a subscription
Select-AzContext -Subscription <subscription-id-or-name>
This will switch the current context to the selected subscription. Remember that for using subscriptions from different tenants, you may need to re-authenticate.
Logging in to another tenant
In Azure PowerShell, you can easily select a tenant to sign into by using the -Tenant parameter:
Connect-AzAccount -Tenant <tenant-id>
This functionality works in the same way as the one in the Azure CLI – without passing that identifier, you’ll log in to your default tenant. If there’s any other tenant where you can use the same username, use the presented parameter to redirect the authentication request.
Cloud Shell
As of now, we’ve mostly talked about using the Azure CLI or Azure PowerShell on your local computer (or, at least, that was our assumption). To complete the picture, we’ll discuss a functionality called Cloud Shell. Let’s characterize its main features:
- It’s a built-in shell available in the Azure portal, the Azure mobile app, and at https://shell.azure.com
- It’s a managed service, so you don’t need to worry about maintaining its infrastructure
- It automatically authenticates you in Azure (though it’s possible to change the context if needed)
- It’s offered with a simple graphical editor and mounted storage for persistence
- It’s free of charge – the only cost is the storage account deployed in your subscription
In this section, you’ll learn how to use the basic and advanced features of this component.
Getting started with Cloud Shell
For the exercises in this section, we’ll use https://shell.azure.com, though, in fact, it won’t matter which environment is used. Once Cloud Shell is set up, its capabilities are the same in each place it’s available.
The first time you use Cloud Shell, you will be asked to set up a storage account for it. However, in some scenarios (such as when Cloud Shell is used for the very first time), you may need to register its resource provider like so:
az account set --subscription <subscription-name-or-id>
az provider register --namespace Microsoft.CloudShell
Note that you need to do it once for each subscription you want to work with. What’s more, those commands need to be run in your terminal as without a registered resource provider, Cloud Shell won’t start.
The next step is to set up a storage account:
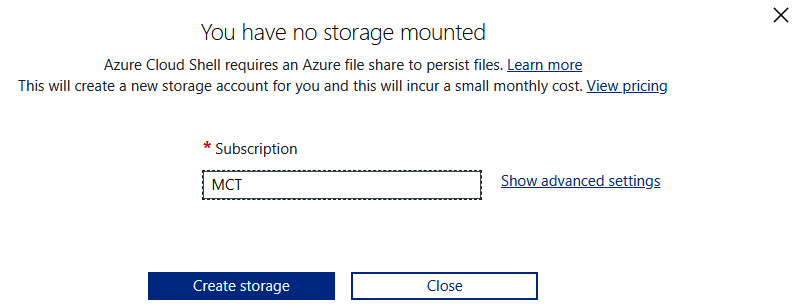
Figure 1.4 – Mounting storage for Cloud Shell
For configuration, there are two methods – you either go for a basic configuration (and select only a subscription where a storage account should be created) or use advanced settings. To simplify things for now, we’ll use the basic configuration by clicking on the Create storage button. After several seconds, a storage account will be provisioned for you and Cloud Shell will be ready to use.
Selecting the command-line tool
Cloud Shell allows you to work with either the Azure CLI or Azure PowerShell. It’s up to you which tool will be used – what’s more, you can change it at any time. A selection is made by choosing the Azure CLI or Azure PowerShell from the dropdown:
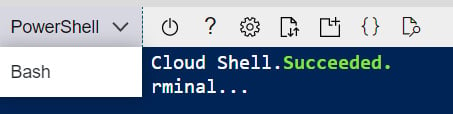
Figure 1.5 – Selecting a tool in Cloud Shell
PowerShell will allow you to use Azure PowerShell, while Bash will be a standard bash environment with the Azure CLI installed. The main difference between these two modes is the ability to use different tools compatible with the one you selected.
Working with Cloud Shell
When you’re using Cloud Shell, you should treat it as any other command-line environment where you can use different tools and commands. The availability of commands will differ depending on the selected mode (PowerShell or Bash). Still, for many scenarios, the user experience while working with Cloud Shell will stay the same, as you can use many commands no matter which mode is selected:
- You can list files in the directory with both dir and ls
- To read the contents of a file, you can use both type and cat
- You can easily use chmod in both PowerShell and Bash modes
What’s more, Cloud Shell comes with preinstalled tools and libraries that you can use out of the box. These include, but are not limited to, the following:
- Terraform
- Git
- .Net
- Java
- Python
- Node.js
This gives you a robust and useful sandbox environment for day-to-day work.
Persisting files in Cloud Shell
Once the storage account is mounted in Cloud Shell, you can use the underlying storage for file persistence. It works as your personal disk that can be used for storing the output of your work.
Important note
In general, sharing the same storage account among various users is a bad security practice. However, you need to remember that if a user has appropriate access to one of the higher scopes (resource group/subscription/management group), they will be able to read the contents of each storage account within that scope.
The mechanism of file persistence is based on the following functionalities:
- Your file share includes a disk image that is automatically synced whenever a change is persisted to the filesystem
- File shares are automatically mounted and mapped to the underlying Azure storage
You can check that very easily by running ls -la in Cloud Shell in your user’s directory. It’ll give you a list of files, directories, and mounts, where one of the elements should look like this:
lrwxrwxrwx 1 john john 22 Mar 8 14:14 clouddrive -> /usr/csuser/clouddrive
Additionally, we could check the contents of our file share:
az storage file list --share-name <file-share-name> --account-name <cloud-shell-storage-account-name> --path .cloudconsole
The result of the preceding command will be a JSON object, which should look like this:
[
  {
    "metadata": null,
    "name": "acc_john.img",
    "properties": {
      "contentLength": 5368709120,
      "contentRange": null,
      "contentSettings": {
        …
      },
      "copy": {
        …
      },
      "etag": null,
      "lastModified": null,
      "serverEncrypted": null
    },
    "type": "file"
  }
]
As you can see, it contains a file named acc_<user>.img, which is the image we talked about.
That’s all for now! Let’s summarize what you’ve learned in the very first chapter.
Summary
In this chapter, we covered the fundamentals of Azure by looking at Azure Resource Manager, Microsoft Entra ID, the authorization mechanism, and the basic toolset. By now, you should be familiar with topics such as security principals, RBAC, and ABAC. What’s more, you started building skills related to the Azure CLI and Azure PowerShell. Those come in very handy in the next chapters, where we’ll cover various Azure services in detail.
In the next chapter, we’ll talk a little bit about IaC. While that topic is a very wide area linked to various roles (development, operations, and security), getting a basic understanding of how Azure resources can be deployed will improve your skillset and simplify many tasks.