


We already know the importance of our company website and intranet. We spend a lot of time in meetings discussing ways to increase traffic, redesigning for better usability, and special promotions to increase brand awareness. One problem is the constant stream of maintenance and site update requests that continue to stretch the already thin resources. Just today, your webmaster was saying how full his inbox was with change requests. Worse yet, you've lost track of all the pages on the site. You can't remember what was on the site last week or even last year. You know this puts customers and business stakeholders in a difficult position.
These are the types of problems a Content Management System (CMS) solves. A Web Content Management System like Kentico CMS allows your team of web developers, business users, and designers to manage the entire website and publishing process, thus making it easier to create, edit, and publish content with greater consistency. Your web designers will be able to guarantee visual consistency across the site. Developers are able to deploy custom code and Rich Internet Applications (RIA). Business users are able to measure and track site usage. Online marketers are empowered to update and deploy content without the need of developer support. Regardless of the type of site, this combination of benefits will increase your team's productivity, lower cost, and reduce overall site maintenance.
Over the course of this book, you will build a production website with Kentico CMS. In this chapter, you will install a development environment and learn the management fundamentals of your new site.
By reading this chapter and following the exercises, you will:
Understand the typical uses of Kentico CMS 5
Learn the key architectural components of Kentico CMS 5
Install and configure a Kentico CMS sample site
Learn the fundamental interfaces for managing Kentico CMS
Edit an existing page
Perform basic user management
Kentico CMS is an ASP.NET web project that uses SQL Server as the content repository. ASP.NET pages provide the application services and visual interface for end users and content administrators. This includes both dynamically generated and static content pages. Supporting this is a layer of security, workflow, and document versioning exposed as an Application Programming Interface (API). The ASP.NET pages interact with the API to store and retrieve website structure and data from the SQL Server content repository.
Technically, the application architecture is implemented on top of several Microsoft Windows Server technologies. Internet Information Services (IIS) is used to serve up the requested ASP.NET web pages. The .NET Framework is used to provide the API and advanced developer customization through Visual Studio. The file system and SQL Server database are used to store content.
Now, let's start the installation process.
Note
Need the bits?
You can download Kentico CMS 5 from http://www.kentico.com/download/trial-version.aspx.
1. Start the Kentico installation by double-clicking the
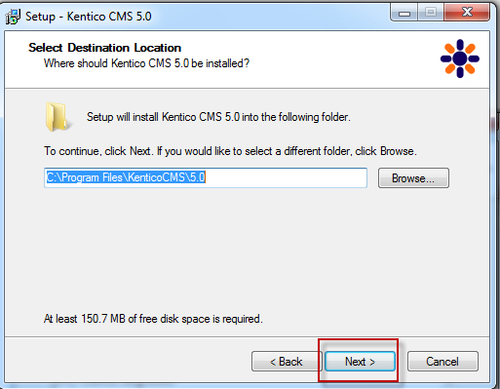
KenticoCMS_5_0.exeicon from your local computer.2. Enter the location to store Kentico program files and select Next, as shown in the following screenshot:
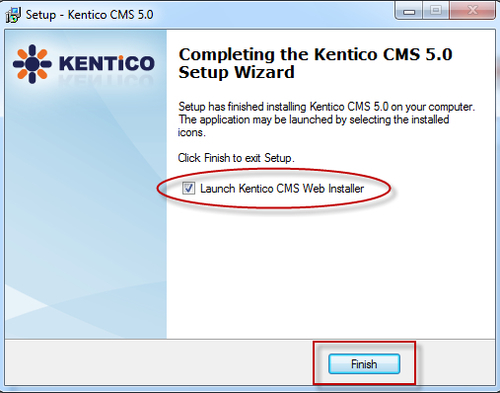
3. Select Launch Kentico CMS Web Installer and click Finish, as shown in the following screenshot:
Note
Creating websites
The next step creates the actual website using the Kentico CMS Web Installer. This program copies the ASP.NET project files into the IIS directory and creates the website. The Kentico CMS Web Installer is a program available within the Start menu under the Kentico program files.
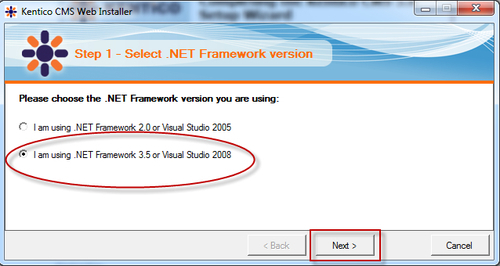
4. Select the versions of the .NET Framework and click Next, as shown in the following screenshot:
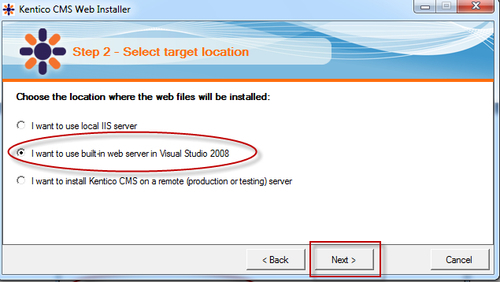
5. Select the default location for application pages and select Next, as shown below. Examples in this book will use the Visual Studio 2008 built-in Web Server.
6. Choose the location for the Kentico ASP.NET project and files, and select Next.

Note
Project files
The location selected in this step is where you will find the ASP.NET Web Project and the associated files. For this installation, we will select the default location, namely, the IIS root. If your company has naming requirements or you place your projects in other locations, then this is where you would specify these.
8. Once the files are copied to the default website directory, the Kentico website is installed. To configure the next step of the installation, select Open the web site, as shown in the following screenshot:
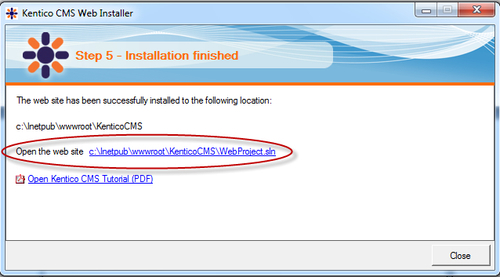
9. At this point, both the program files and website are installed and available on your local machine. Start the project in Visual Studio.
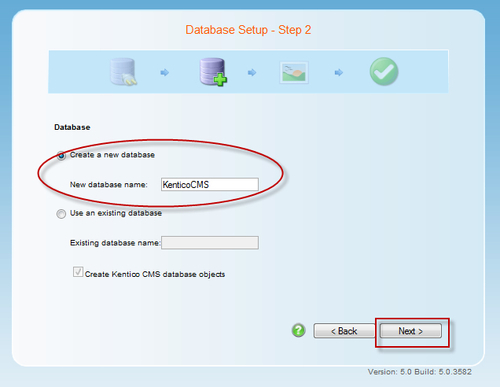
10. With the files installed, the next step is to configure the SQL Server database. Enter the name of your SQL Server installation and type of authentication and select Next, as shown in the following screenshot:

11. Enter the name of the database to use for the CMS repository and select Next, as shown in the following screenshot:
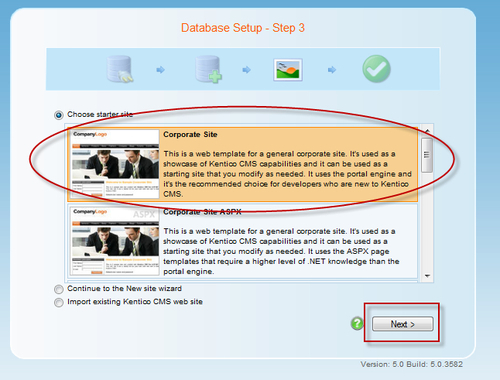
12. Select the corporate site template and select Next, as shown in the following screenshot:
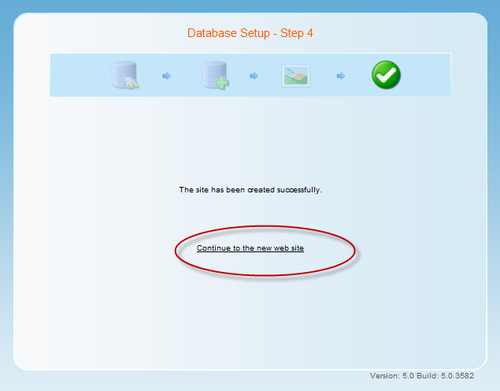
13. Click Continue to the new web site to begin setting up the website configuration, as shown in the following screenshot:
14. You will then be able to see the configured sample corporate site, as shown in the following screenshot:

Congratulations! You have just completed the installation of Kentico CMS 5 and configured your first website. The installation process was performed in two parts. In the first part, you installed the files necessary to run Kentico CMS 5 and the tools needed to create additional websites. This is a one-time installation process for your development machine. Once this was completed, we then configured the corporate sample site using the Kentico CMS Web Installer. This included the configuration of the SQL Server content repository. As we progress through the rest of this book, we will continue to build this site and use the Kentico CMS Web Installer to build additional sites.
Web Content Management System (WCMS) is designed to manage your web content. Web content is the text, structure, and navigation elements in a web page. Essentially, it is the visual and audio components that a user will encounter as part of their user experience on a website. This includes applications, code, images, sounds, data, PDFs, and spreadsheets, to name a few. Web content is maintained and presented in pages. It's these pages that are the key focus of a WCMS. Your content editors and authors are concerned about the content lifecycle. This lifecycle is concerned with the presentation and display of content within web pages and includes creating, editing, updating, publishing, and archiving content. Within Kentico CMS, the content lifecycle of an individual website is managed using the CMS Desk web interface. Developers and site administrators who need to manage system-wide settings, code, and configuration will use the Site Manager interface.
CMS Desk is a content editing interface. It allows users to edit and preview content, organize site structure, and manage modules for individual websites. Additionally, it enables users to organize multi-language content and switch between different language versions of the same document. As we will see in a later chapter, the CMS Desk also enables web masters to prepare customizable workflow and approval processes for different document types and site sections.
Now let's log in to CMS Desk.
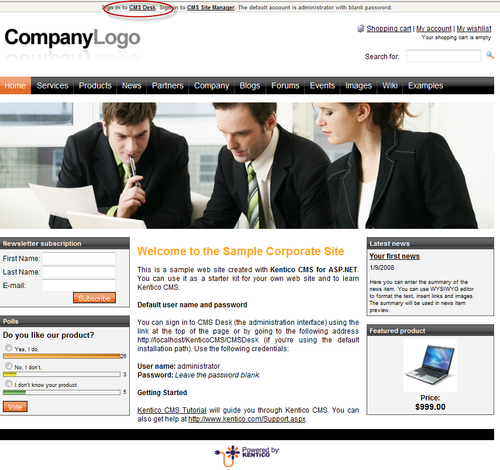
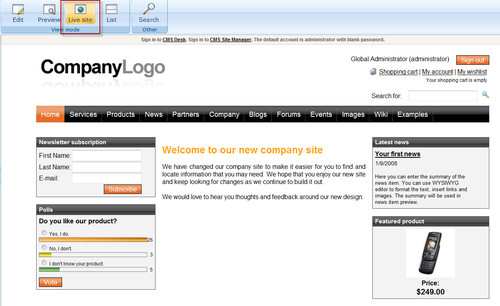
1. Select the CMS Desk hyperlink from the live site, as shown in the following screenshot:
2. Log in as the global administrator. Use the default username administrator and leave the password blank, as shown in the following screenshot:

3. When logged in, you will see the CMS Desk screen, as shown in the following screenshot:
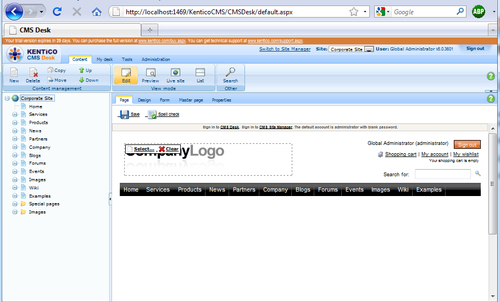
Congratulations! You have just logged into CMS Desk. When you selected the CMS Desk link, this loaded the ASPX pages for the interface. CMS Desk is a secure area that requires a valid username and password. In addition to selecting the hyperlink, you can also access CMS Desk using the default site URL and appending cmsdesk—http://www.sitename.com/cmsdesk. This feature enables decentralized authoring and allows end users to access CMS Desk directly from any location.
The following screenshot shows the different sections of the CMS Desk.
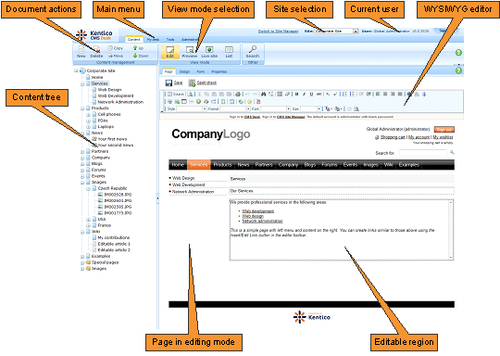
Document actions toolbar with buttons for creating new documents, deleting, copying, moving, and sorting documents
Main menu with Content, My Desk, Tools, and Administration tabs
View mode selection buttons that allow content editors to choose between editing, preview live site, and list view
Site selection that allows content editors and administrators to select different websites
Current user display that identifies the current logged in user
What You See Is What You Get (WYSIWYG) editor for editing and creating content
Content tree that presents the website map and allows content editors to organize the structure of documents
Page editing mode window for editing, page template design, and document properties management
Editable region for editing or creating content for the selected document in the content tree
Now we will edit an existing page using CMS Desk. Editing page content is one of the most important and basic tasks of a CMS.
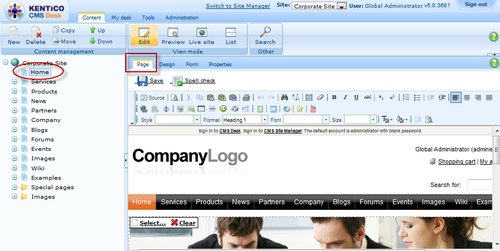
1. In CMS Desk, select the Home page on the content tree and select the Page tab, as shown in the following screenshot:
2. Select the Main text, as shown, and change the welcome text to the following:
We have changed our company site to make it easier for you to find and locate information that you may need. We hope that you enjoy our new site and keep looking for changes as we continue to build it out.
We would love to hear your thoughts and feedback around our new design.

3. Select the Save button, as shown in the following screenshot:

4. Select the Live site view button that will show the deployed content, as shown in the following screenshot:
Editing is one of the most important content functions available within any CMS application. When you selected the Home page, you identified the page that you wanted to edit. You then selected an editable text web part to make the changes to the page. Once you completed the editing and selected Save, the page automatically updated the content repository and rendered to the live site.
Profiles are used to maintain your personal information. This includes your name, e-mail address, and password. The default trial installation of Kentico provides the Global Administrator with a blank password. We will now change this.
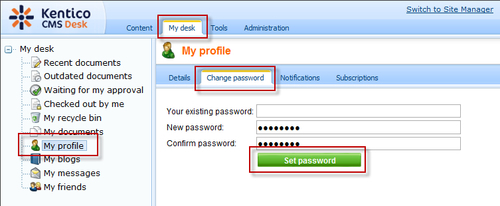
When you clicked Set password, Kentico updated the Global Administrator profile in SQL Server, so the next time you sign in, you will need to use the new password. Maintaining your own personal information and passwords is an important self-service feature.
Protecting your CMS passwords is important. A hacker breaking into CMS Desk would seriously compromise your website. After doing some research, make a recommendation on what strategies you think make sense for your company to use when managing passwords.
System-wide management tasks and advanced customization are done within the Site Manager Interface. This interface is the main tool for web masters and advanced users to monitor existing sites, create new sites, import sites, or export site objects to a ZIP archive. Developers use Site Manager to register page templates and set system-wide application defaults. If you're a content author or editor, you may not be allowed to access Kentico Site Manager since it's intended only for developers and administrators.
Now we will log in to Site Manager. Like CMS Desk, it allows for distributed management capabilities. The simplest way of accessing Site Manager from our current location in CMS Desk is the following.


Congratulations! You have successfully logged into Site Manager. Site Manager, like CMS Desk, is a secure area. When you selected the link, you loaded the Site Manager ASPX page. When accessing Site Manager from within CMS Desk, you are not prompted for credentials as they are carried over. Additionally, like CMS Desk, you can access Site Manager using the direct URL of your site and adding cmssitemanager to the end of the URL.
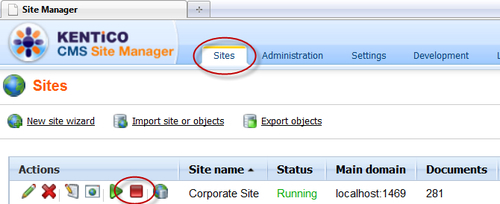
The Sites tab enables the control of the various aspects of your site. This includes the ability to shut down and restart your site. To shut down and restart your websites, carry out the following steps.
1. Within Site Manager, select the Sites tab, and then select the stop site icon, as shown in the following screenshot:
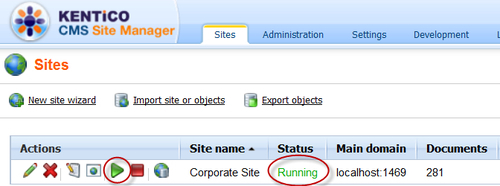
2. Validate that the site is stopped, as shown in the following screenshot:

3. Open a new browser, and enter the URL of your site.

4. Switch back to Site Manager, restart the site by selecting the start icon, and validate that your site is restarted, as shown in the following screenshot:
In shutting down the site, you have made it unavailable to site users. Incoming HTTP requests are validated against the list of available sites. When a site is shut down, the site definition is removed for the site list and the user receives the invalid website error page. A single URL may contain one or more CMS sites underneath. Each site can be stopped or started by the system administrator, as needed. Common examples are for system maintenance or other types of system functions. When a site is stopped, users are not able to access the site using the URL, and it is removed from the URL that contains it.
For a production system, we will want to create a site maintenance page that's more informative than the default screen shown in the previous screenshot. .NET applications allow you to add an HTML file called app-offline.html to the root of the project folder. Anytime this file is placed into the Kentico CMS application directory, all requests are automatically directed to this file, regardless of whether the site is offline or not. Spend some time and create a mock-up of the page.
User management is the process of assigning security permissions and identifying management to users. Let's go ahead and create a new user.
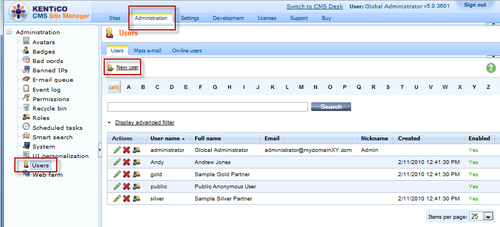
1. Within the Site Manager select Administration tab, select Users and then New user, as shown in the following screenshot:
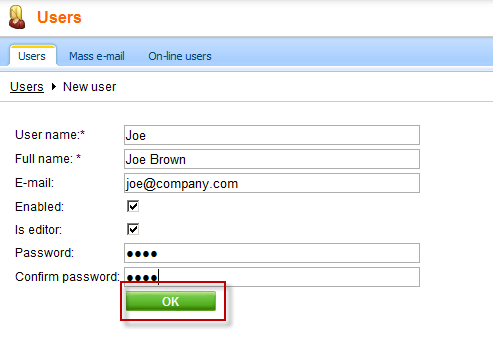
2. Within the new user screen, enter the information shown in the following screenshot and select OK.
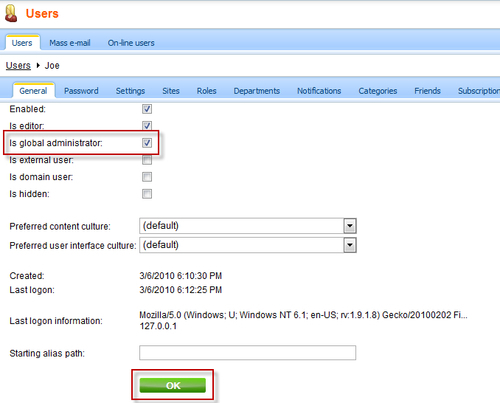
3. Check Is global administrator and select OK, as shown in the following screenshot:
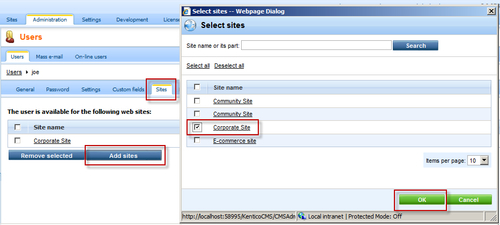
4. Select the Sites tab, Add sites, then select Corporate Site, and then select OK, as shown in the following screenshot:
5. Select Sign out from CMS Desk, as shown in the following screenshot:

6. Log into CMS Desk as Joe.

7. Log out and on the live site, select the My Account link, as shown in the following screenshot:

8. Enter the User name and Password for Joe and select Log on, as shown in the following screenshot:

9. Validate that you have successfully logged onto the system, as shown in the following screenshot:

Congratulations! You have just entered and tested a new user! When a user logs into the system, their credentials are checked against the SQL database. The validated credentials are used to build a profile that contains their personal information and security credentials. This profile is validated against pages and system areas to determine the proper access and page views. By selecting the Is editor checkbox, Joe was given permission to access CMS Desk. Then selecting the Is global administrator checkbox made Joe a Global Administrator. When we assigned Joe this right, he had access to manage all site settings and development options. You then validated Joe by logging into both the CMS Desk and the live site.
We learned a lot in this chapter about the basics of our new CMS system. Specifically, we covered installing the system and building your first website. You learned how to manage your site with CMS Desk and Site Manager and some basic configuration tasks like user management and page editing.
Now, that we have created our basic site, we're ready to dive deeper and look at the features of our new site. This is the first step in understanding our new CMS site and the subject of our next chapter.