In this chapter, we will cover the basics of theming our Joomla! website:
Finding the current default template
Locating Joomla! templates in your website's hierarchy
Understanding Joomla! templates
Changing your template's color variation
Adding a color variation
Changing your template's logo
Selecting the default Joomla! template
Editing the HTML template in the administration panel
Editing CSS in the administration panel
In this chapter, you'll cover the basics of changing your Joomla! template, from finding the location of the default Joomla! template to changing your website's logo and altering your template's color scheme.
Our first task is to discover which Joomla! template our website is using.
Log in to the Joomla! administration panel, which you can reach by going to the http://www.example.com/administrator directory (where Joomla! is installed) in your web browser.
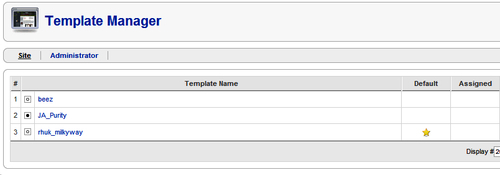
2. Once the page has loaded, you will see a list of the templates that are currently installed on your Joomla!-powered website.

3. The current default template displays a star icon under the Default title in the table, so the template that is the current default on your website is called rhuk_milkyway, which is installed by default.

Joomla!'s Template Manager feature in the administration panel allows you to see which templates are currently installed. It also allows you to change which template is the current default that your website's visitors will see.
You can view more information on a template by clicking on the name of the template in the administration panel's Template Manager section.
When building your Joomla! template it's useful to know where in Joomla! the files for each template are stored within your website's hierarchy.
Open your FTP program if your Joomla! website is stored on a remote server and locate the root directory of your Joomla! installation. Let's assume that our Joomla! installation is on example.com and that we're using FTP throughout the book. We'll use FileZilla, which can be downloaded for free from http://filezilla-project.org.
By storing related files such as CSS files, images, and the template files together in a Joomla! template, it's easier to see which files relate to a particular Joomla! template.
If you have some experience with theming other content management systems, this can be a good start for learning Joomla! template design. As with theming any content management system, Joomla! does have its quirks and it's useful to look at the structure of a Joomla! template.
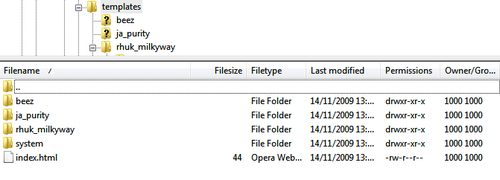
If you now view the contents of the templates\rhuk_milkyway directory, you can see what a Joomla! template is composed of:
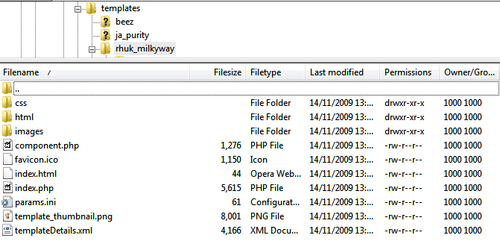
As you can see in the preceding screenshot, there are three directories, which are used in the following ways:
There are also a few other files which you'll find useful in building and customizing Joomla! templates:
The
favicon.icofile or the 'favorites icon' displays a small icon next to your website's address in the address bar of the visitors' browsers.params.inidefines the color and other variations in your Joomla! template (this file is optional).template_thumbnail.pngprovides a screenshot preview of the template that is displayed in Joomla!'s administration panel.templateDetails.xmlprovides information about the template itself, such as the designer, the designer's own website address, and any notes the author of the template may have for its users. This file is incredibly important as it is required to be able to allow the template to be installable via the standard Joomla! installation process.
When a template is enabled, Joomla! looks for certain files in the template's directory. It looks for the index.php file to generate each page's HTML, which may then reference CSS and other style files. By convention, the CSS files and images referenced in the template's index.php file of a Joomla! theme are stored in subdirectories of the template's main directory.
Some Joomla! templates allow you to change some of their aspects from the administration panel.
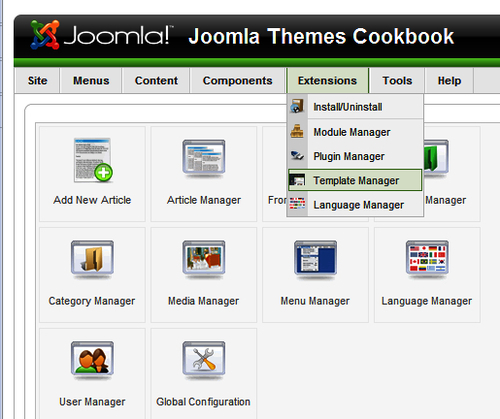
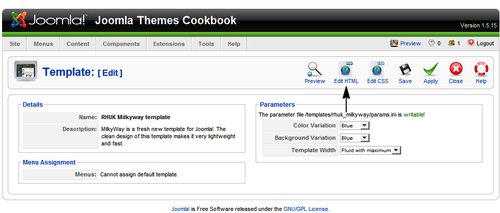
Log in to your Joomla! website's administration panel and select Extensions | Template Manager. From there, select the rhuk_milkyway template, which you'll find has been installed and enabled by default for your Joomla! website. (If you're stuck, view the recipe for Finding the current default Joomla! template.)

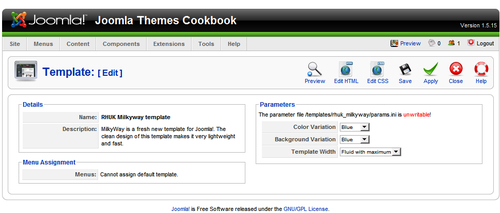
1. Under the Parameters section of the template's detailed view, you will see that the rhuk_milkyway template has three options to change:
The foreground color scheme
The background color scheme
The width of your pages
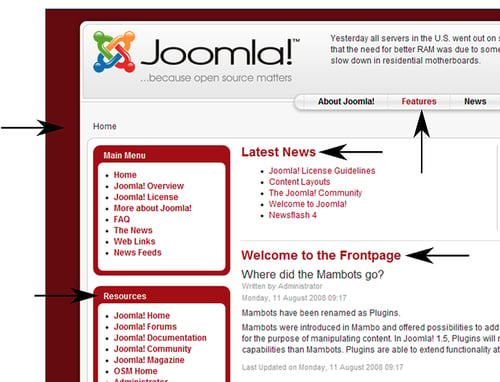
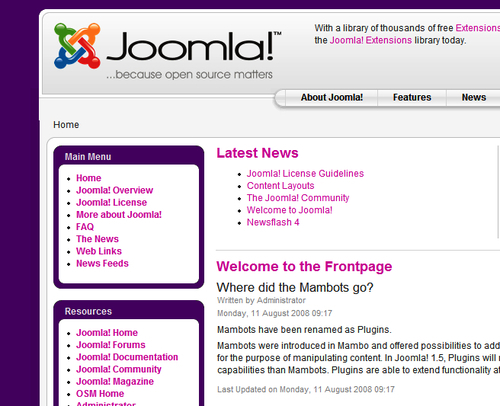
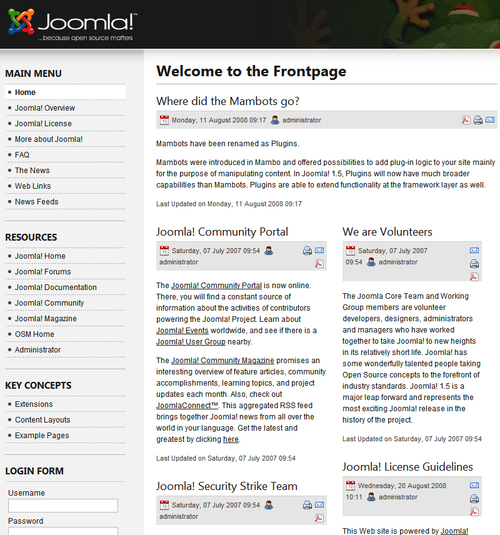
By default, with the parameters set to Blue, your Joomla! website looks like this—the background color of the page turns to blue, as do the color of headings and the panels surrounding the modules in the left-hand column.

2. Let's select Red in the Parameters section of the administration page in Joomla!'s Template Manager area as the value for the template's Color Variation and Background Variation values and select the Save or Apply button to the top-right of the screen. After refreshing your website you should now see that the colors have changed. In particular, the color of the background, headings, and links would have changed.
Changing these values alters the theme's params.ini file, which affects how a theme is displayed by loading additional CSS files in the<head> element of your Joomla! template.
The range of values for each parameter is defined in the template's templateDetails.xml file. The values that can be selected will vary by template.
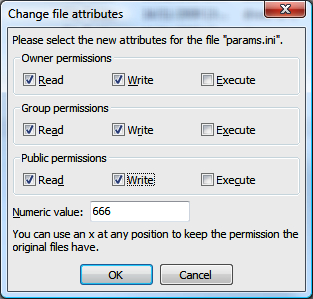
You may need to make a change to the file permissions to allow these changes to be made from the Joomla! administration panel.
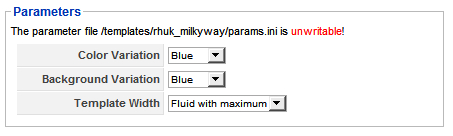
You may find that you are unable to change these values if you see a message that reads The parameter file /templates/rhuk_milkyway/params.ini is unwritable!:
To rectify this problem so that you are able to change the template's parameters, open the \templates\rhuk_milkyway\ directory in your FTP program. You should then be able to right-click on the params.ini file and see a File Permissions option in most FTP programs.
Note
You shouldn't have trouble with file permissions on the Windows operating system. For more information on file permissions, see this article on Wikipedia: http://en.wikipedia.org/wiki/Filesystem_permissions.
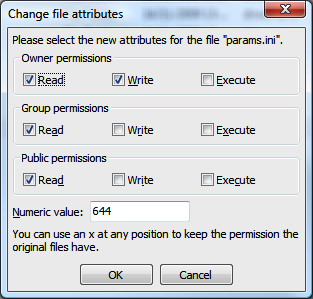
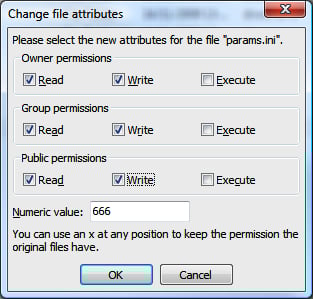
Ensure that the Group and Public write permissions are checked to allow Joomla! to change this file. Alternatively, you can change the numeric value to 666, which is the numerical representation of the permissions we need:
You are not restricted to the color variations provided with a Joomla! template; you can add your own color variations to suit.
To match our website's new logo, we'll be creating a pink/purple color variation of the rhuk_milkyway template, though this technique can be adapted for other Joomla! themes that offer color variation options too!
We'll need the hexadecimal color references for our new color variation, taken from the logo file that we'll add to the template in another recipe. These are:
#D400AAfor pink#660080for purple
We'll be calling our new color variation "pink".
There are three major stages to creating a color variation of a Joomla! template. Firstly, CSS is required. Secondly, any images that need to change with the variation are also required. Then, to make the color variation visible in our administration panel, we need to edit the templateDetails.xml file.
1. In the
templates\rhuk_milkyway\css\directory, create a CSS file namedpink.css. This file will overwrite the foreground colors for the Joomla! template that you're using:a:link, a:visited { color: #D400AA /* pink */ } a:hover { color: #660080; /* purple */ } #pillmenu a:hover { color: #D400AA; } #pillmenu a#active_menu-nav { background: url(../images/pink/mw_menu_active_bg.png) 0 0 repeat-x; color: #fff; } #pillmenu a#active_menu-nav:hover { color: #fff; } h3, .componentheading, table.moduletable th { color: #D400AA; } div.module_menu { background: url(../images/pink/mw_box_br.png) 100% 100% no-repeat; } div.module_menu div { background: url(../images/pink/mw_box_bl.png) 0 100% no-repeat; } div.module_menu div div { background: url(../images/pink/mw_box_tr.png) 100% 0 no-repeat; } div.module_menu div div div { background: url(../images/pink/mw_box_tl.png) 0 0 no-repeat; }2. If you want the background colors to change too, you'll need to create another CSS file in this directory called
pink_bg.css:#page_bg { background: #660080; } div#wrapper { background: #f7f7f7 url(../images/pink/mw_shadow_l.png) 0 0 repeat-y; } div#wrapper_r { background: url(../images/pink/mw_shadow_r.png) 100% 0 repeat-y; } div#header { background: url(../images/pink/mw_header_t.png) 0 0 repeat-x; } div#header_l { background: url(../images/pink/mw_header_t_l.png) 0 0 no-repeat; } div#header_r { background: url(../images/pink/mw_header_t_r.png) 100% 0 no-repeat; } div#footer { background: #f7f7f7 url(../images/pink/mw_footer_b.png) 0 100% repeat-x; } div#footer_l { background: url(../images/pink/mw_footer_b_l.png) 0 0 no-repeat; } div#footer_r { background: url(../images/pink/mw_footer_b_r.png) 100% 0 no-repeat; }From the CSS, you may have noticed that a large number of image files are referenced, which provide the corners within the template's design, and a color-coordinated image that appears when you hover over an item in the navigation menu of your website.
3. In the
templates\rhuk_milkyway\images\directory, copy and paste the images from one color variation (for example, black) to create a new directory, and name it pink.These images now need recreating, aliased to our new background colors. Luckily for you, they should be included in the code download provided with the book!
To ensure that the new color variation is detected by Joomla!'s administration panel, you now need to edit the
templateDetails.xmlfile intemplates\rhuk_milkyway\.4. Locate the code in
templateDetails.xmlthat begins with<param>:<param name="colorVariation" type="list" default="white" label="Color Variation" description="Color variation to use"> <option value="blue">Blue</option> <option value="red">Red</option> <option value="green">Green</option> <option value="orange">Orange</option> <option value="black">Black</option> <option value="white">White</option> </param>
5. Here, you need to add an option for your new pink color variation:
<param name="colorVariation" type="list" default="white" label="Color Variation" description="Color variation to use">
<option value="blue">Blue</option>
<option value="pink">Pink</option>
<option value="red">Red</option>
<option value="green">Green</option>
<option value="orange">Orange</option>
<option value="black">Black</option>
<option value="white">White</option>
</param>
Beneath this code, you also need an option to be able to change the template's background color scheme to your new pink variation:
<param name="backgroundVariation" type="list" default="blue" label="Background Variation" description="Background color variation to use">
<option value="blue">Blue</option>
<option value="pink">Pink</option>
<option value="red">Red</option>
<option value="green">Green</option>
<option value="orange">Orange</option>
<option value="black">Black</option>
<option value="white">White</option>
</param>
6. Save and upload the
templateDetails.xmlfile to your server.7. Now all you need to do is change the template's color variation in the Parameters area of the template's settings screen in your Joomla! website's administration panel. Select the Pink option for both the Color Variation and Background Variation values and click on Apply. Refresh the page and you should see the new color variation on your Joomla! theme:
If you need help doing this, see the Changing your template's color variation section of this chapter.
After setting the color variation parameters for the template, when Joomla! loads a page for a visitor it also loads additional CSS files that overwrite particular references for colors throughout the theme.
One of the most fundamental changes that you will want to make to your Joomla! template is to change the logo.
You will find the logo of rhuk_milkyway in the templates\rhuk_milkyway\images directory of your Joomla! website's installation. The file that we're looking for is called mw_joomla_logo.png.
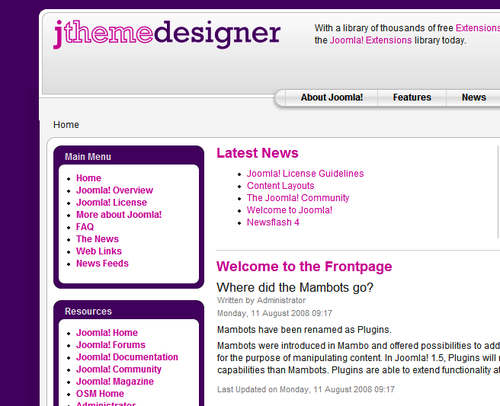
1. Save the logo file as
mw_joomla_logo.png. You'll be using this logo for your Joomla! website:
2. Upload the new logo file from your computer to the template's
imagedirectory. Refresh your website and you should see your new logo display:
You can select the default Joomla! template to be displayed on your website from the administration panel.
Log in to the administration panel and navigate to the Template Manager feature (available from the Extensions | Template Manager option in the menu).
1. Select the radio button next to the theme's name; we'll select the JA_Purity template for this example.

Notice that the content remains the same, but the design changes. For the purposes of this book, we'll now revert the default template to rhuk_milkyway.
By selecting a new template as the default, you can change Joomla!'s look and feel quite substantially.
Joomla! allows administrators of their website to edit HTML templates of their Joomla! templates within the administration panel.
Log in to your website's administration panel and navigate to the Template Manager feature. From here, select the theme that is the current default. For this example, we'll assume it's the rhuk_milkyway template:
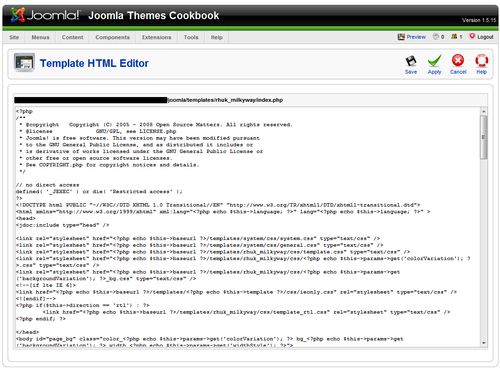
1. Select the Edit HTML option at the top-right of your screen. You'll be presented with a text box containing the contents of the template's
index.phpfile:
2. Once you have finished editing the file, click on Save or Apply, or simply click on Cancel to preserve the template file as it was.
Being able to edit a template's HTML from the administration panel is convenient for smaller tasks. For example, what if we wanted to remove the text at the bottom of the website that reads Powered by Joomla!?

3. Now locate the code that reads as follows:
<p id="power_by">
<?php echo JText::_('Powered by') ?>
<a href="http://www.joomla.org">Joomla!</a>.
<?php echo JText::_('Valid') ?>
<a href="http://validator.w3.org/check/referer">XHTML</a>
<?php echo JText::_('and') ?>
<a href="http://jigsaw.w3.org/css-validator/check/referer">CSS </a>.
</p>
By removing the highlighted lines of code in the previous code snippet, we can remove reference to the website being powered by Joomla!, if we wish to. Depending on the template you're editing, this process will almost certainly vary.
4. Once the Save or Apply button has been clicked, refresh the frontend of your website (that is, not the administration panel):

When you edit the HTML of your template in Joomla!'s administration panel, Joomla! overwrites the index.php of your template with the changes that you've made. If you have downloaded your template for editing, you will need to download the index.php file again to prevent overwriting any changes.
Joomla! also allows administrators of their website to edit the CSS files associated with their Joomla! templates from the administration panel.
Navigate to the Template Manager feature in the administration panel. From here, select the theme that is currently the default. For this example, we'll assume it's the rhuk_milkyway template again.
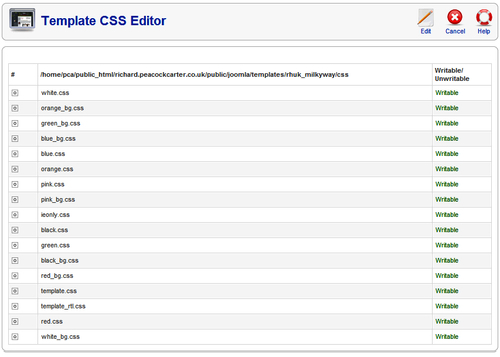
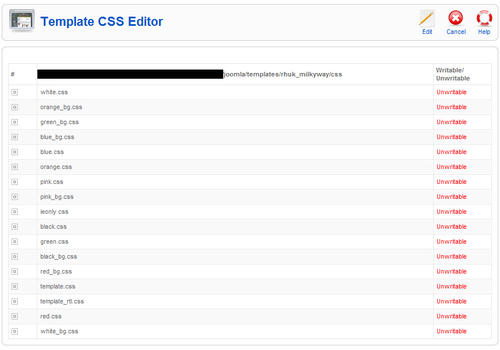
1. Select the Edit CSS option at the top-right of your screen. You'll be presented with a list of the CSS files associated with the current template:
2. Select a CSS file by selecting the radio button next to the CSS file's name, and click on the Edit button at the top-right of the screen. You will then be presented with the CSS to edit:

3. Once you have finished editing, click on Save or Apply or simply click on Cancel to negate any changes that you've made to the file.
When you edit a CSS file from your Joomla! template in the administration panel, Joomla! overwrites the relevant CSS file with the changes that you've made, so long as the file is writable.
There is one common problem that you may face when trying to edit your template's CSS files via the administration panel. You may find that the CSS files for your template are not writable from the administration panel.
To rectify this problem, navigate to the \templates\rhuk_milkyway\css directory where you have Joomla! installed. Select all of the CSS files you wish to be able to edit from the administration panel, right-click, and select File permissions:

When changing the permissions to allow access to the template's params.ini file, you need to allow Write permission for Group and Public:
Note
Don't allow execution for security
Generally, it's wise to prevent execution of files unless explicitly required, as this can prevent a security risk to your Joomla! website.
Once you refresh the page in the administration panel you should now be able to edit the CSS files associated with the template.