


In this chapter, we will cover:
Installation of an FTP program
Transferring Joomla! files to your server
Setting up and test of your database on a cPanel® server
Setting up and testing of your database on a GoDaddy.Com® webserver
Installation of Joomla! 1.5 on your webserver
Ensuring permissions are correct
Cheat sheet for access information
Installation of Joomla! 1.5 is typically very simple. While there are very few choices in hosting you need to make to install Joomla!, many users are tripped up by some common pitfalls. This chapter will help you avoid those. This chapter will show you how to install Joomla! on two different but common types of hosting platform.
We will look at setting up the database on two common hosting platforms, cPanel® and GoDaddy.com®. Both of the hosting systems offer various and important features, yet each accomplishes setup of your database in a different manner.
In this chapter we will be covering:
Setting up of the database
Getting the necessary details from your database server
Logging in to the database to ensure it's working
The first host type we'll cover is a cPanel® based host, which is found in many, many hosting platforms. The examples we use are from the popular host http://www.rochenhost.com/ which hosts Joomla.org
The other hosting platform we discuss is GoDaddy.com®.
Each approaches the task of the database setup very differently, yet they accomplish the same goal - setting up your database for Joomla!.
Once you get past the hurdle of setting up the database on the host, then the steps to install Joomla! are the same. This chapter will show you how to install an FTP client, set up each host, and then how to setup Joomla! 1.5.
Our first recipe is setting up the FTP (File Transfer Protocol) using an Open source application called FileZilla. You will use the FTP program to transfer the Joomla! 1.5 source files from your local machine to your server.
There are a few decisions you will need to make and space has been provided in this chapter to record your settings for future reference.
Note
If you write down your settings be sure and keep this manual in a safe place. Loss or exposure of these settings could result in your site being damaged or attacked by a third party. Think of your ATM PIN - this is just as important.
Joomla! has a few requirements such as username, passwords, language, and whether or not you wish to implement the FTP layer.
Getting it wrong the first time is not the end of the world and is easily fixed by reinstalling or by correcting the install. See the chapter on Troubleshooting for more information.
Downloading the source for Joomla! should only take a few minutes and opening it is easy on most any Modern Windows® or Macintosh® Machine.
Grab a pencil and paper and let's get started.
Please note GoDaddy.com® is a registered trademark of GoDaddy.com, Inc. & cPanel® is a registered trademark of cPanel, Inc. Rochenhost.com is trademark Rochen Ltd.
In this task we will gather the required materials for installation. You will need an FTP program, such as FileZilla, to upload Joomla! and other items.
Get FileZilla by visiting their site at this link: http://filezilla-project.org/download.php
Save it to a place on your computer that you can recall. If you are a Windows user, please select the first RECOMMENDED choice labeled:
FileZilla_3.3.2_win32-setup.exe
If you are on a Macintosh please locate the appropriate FTP transfer program.
Download the latest FULL PACKAGE version of Joomla! 1.5.xx from the following URL: http://www.joomla.org/download.html
Contact your host for your particular FTP settings. You will need:
ftp server address (typically
ftp.yourserver.com)Username for your ftp server
Password for your ftp server
Tip
Security Tip
If you cannot keep this book in a safe place do not write your production settings in here. If someone gains access to your settings you wrote down, it could result in someone gaining unauthorized access. A full sheet has been provided in the appendix for you to fill in and tear out should you need to.
For convenience you may record those settings here:
FTP SERVER OR IP ADDRESS: ____________________
FTP USER: __________________________________
FTP PASSWORD: ______________________________
FTP PORT (OPTIONAL): ________ (typically PORT: 21)
Admin information for your Joomla! installation
For convenience you may record those settings here:
Admin: The default user name is ADMIN - for installation that is what you will use.
Password: ________________
eMail account: _____________________________
Tip
Did you know..
FTP is not considered the most secure means to communicate with your server. In the chapter on security you will be introduced to a more secure means of communication called SSH.
Depending on your host once you set up and login with FTP you may have to navigate to the website directory (known often as public_html). Ask your host to set up your FTP account to point to the path to the web sites root directory as default.
Install FileZilla by double-clicking on the executable. This will take about two minutes.
FileZilla is very self explanatory and accepting the defaults is the best method to get it installed and working.
Once installed, it will launch and you should see this screen:

We will need to set up your FileZilla client to talk to your server.
Click File | Site Manager
You will now see the following screen:

Setting up Site Manager
This will open up the configuration for a new HOST entry.
Click the New Site button
You will need the FTP settings you wrote down previously.
HOST: Enter the your FTP information that your host gave you
PORT: Enter port number your host gave you (typically 21). Note this is in most cases automatically handled for you by FileZilla and you should not need to change it.
Servertype: Leave as FTP - File Transfer Protocol unless instructed by the webhosting provider to use a different setting
Logontype: Select Normal (it will default to Anonymous)
User: Username that your Host gave you
Password: The password your host gave you
Click Connect to save and test the connection. It should show you something like the following screenshot:

Once you see this screen you are ready to begin set up. Please note that the contents on your screen's right and left windows will be different. You should see a folder listing on the right screen of your contents.
Locate the compressed (zipped) file you downloaded in Item 2. It will be named like this:
Joomla_1.5.XX-Stable-Full_package.zip(code in text) where "xx" represents the latest version of Joomla! you downloaded.Using Windows® right-click the file and choose Extract All… - this will uncompress the file into a folder by the same name. It is worth noting that other applications such as WinZip, WinRAR or others will handle this procedure differently.
Record Joomla! path name here: ____________________________
Start your FileZilla application (if it is not already) and open Site Manager, select your host, and click Connect.
Navigate in the FileZilla window titled: Local site to your uncompressed Joomla folder. You should see something like this: (Note that is the left window of FileZilla)

This is a screen showing you what is on your machine.
Transfer files over from your local machine to Server
Left-click one of the folders in your Local site window, it will be highlighted.
Next press Ctrl+A to highlight all of the folders.
Right-click on the highlighted folders and you will see the following screen:

Click the Upload button, as circled in the preceding screenshot.
You will see the files copying to the RIGHT window. Once done, you will see this in the right-hand pane, which represents your server.
The following is a screenshot of your web server after Joomla! has been uploaded.

Tip
What is public_html?
On some web servers you may see a folder called public_html and a folder called www. If you see this on your particular setup be sure and upload the files into the folder called public_html.
This completes the upload process. Next step - establish the database on your host.
FileZilla, in this example, is being used with the FTP protocol. FTP has to have two computers to setup and conduct a transfer. The "server" itself, in our case, the web server, has FTP server software running on it. It will accept a session from a client, (FileZilla) and allow the user to add/change/delete/copy files and execute other commands.
Given the sensitive nature of FTP, it can be a security risk; therefore, strong passwords are the only choice you should make. In addition to that, turning off Anonymous FTP is vital. Anonymous means, "ANY" FTP client can connect and execute commands such as deleting all files, or uploading viruses. Always make sure you disable Anonymous FTP.
This recipe will guide you through the steps necessary to set up a database on your cPanel® enabled host. cPanel® is by far one of the most popular control panels for web hosting, and as you get to know it you will see why. It is a very powerful and well-built application. We'll refer to it several times through various recipes.
We are using a http://www.rochenhost.com/ server for our screenshots.
Setting up your database is simple and easy.
To get started you were provided login details by your host for your cPanel® or 'hosting control' - most likely they will have their own name for it. However if you login and see something like the following generic cPanel screenshot - you are in the right place:

cPanel® is trademark by cPanel, Inc.
If you are in doubt, ask your hosting technical support.
Gather your host login information:
Login URL for cPanel®: ________________________________
Username for cPanel®: _______________________________
Password for cPanel®: ________________________________
Tip
If you cannot keep this book in a safe place, do not write usernames and passwords in it. These should be kept in a safe place.
Each database needs to have a unique name. You will need to provide a name for the database, the user name (for Joomla! itself), and a password. These should be different to your other username and passwords. It is recommended that you allow cPanel® to generate the password for you. This will ensure you have a very strong password.
Login to your cPanel®
Scroll down your screen till you see DATABASES
Click the icon MySQL® Database Wizard - it should look this:

After you click this you will see the following screenshot - this is where you will start the database creation. In this example we have a "prefix" of watcher_ you will have a different prefix.

Fill in your database name which can be anything you want. It has a limitation of 16 characters. Try to choose something descriptive but not common. Write the database name here:
Database name _________________________
You should see something like:

This indicates our database watcher_cookbook was added successfully.
Create a user for Joomla! in our database
This step is necessary for Joomla! to talk to the database.

Create a username no longer than seven characters.
Record the username here _______________________
Now - for maximum security use the password generator. It will create a strong password for you. Here is an example of it in action.

Once it generates a password for you, click the I have copied this password in a safe place checkbox to use it.
Record the password here for later use: ________________________
Once you complete this step you should see this screen with your username inserted:

This completes the creation of the user. In our case we chose jadmin1 and our password of U&{u$.S1F2t_.
Give the newly created user rights to use the database.
The next screen you will see is the Privileges screen.
The Privileges screen defines the rights this user will have to the database.

Now you will see that all the boxes are checked as follows. If they are not checked, Joomla! will fail to install properly.

Click the Next Step button. You will be presented with a screen similar to the following:

This completes the setup of your database. Now click Home in the upper left of the screen.
We need to be sure the database is working. We do that by returning to the main cPanel® page and scrolling back down to the Database Section. Look for this icon and click it:

Once you click that icon it will launch the administration tool for MySQL. You will see a screen like the one following this paragraph. Please note your information will be different, and the count in your database will be ZERO (0). This partial screenshot shows we have two databases in our example setup. You will only have one.
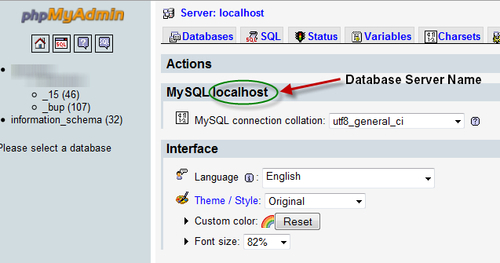
Note the circled text in the preceding screenshot. The portion following the word MySQL will be your database server name.
Record the information you see located in your version of cPANEL®.
Database Server Name: ______________________
Tip
Database Server Name Tip
Most of the time, you can simply use localhost as your Database Server Name unless you see something else indicated in the green circled area.
This completes the set up of your database on cPanel®. You may skip over the GoDaddy.Com® instructions and continue with installing Joomla!
This recipe is for websites that are hosted on GoDaddy.com® or GoDaddy.com® resellers such as PotentiaHosting.com™.
These steps detail how to set up your database on a GoDaddy.com® server.
GoDaddy.com® offers a wide range of tools equal to the tools discussed in previous section. However GoDaddy.com® handles setting up your new hosting in a very different manner.
By following these steps you will have your site's database up and running in no time.
What you will need:
GoDaddy.com®username / number and passwordYour four digit security code or credit card information - this information is required should you need to contact technical support.
To reach the database setup, we have to navigate through the menu. Follow these steps:
Click Hosting.
Under My Products choose Hosting - this will take you to the control panel:

The preceding screenshot shows (in our example) two accounts - yours will show the number of accounts you have purchased.
Now click on Manage Account next to the Hosting Account you wish to set up.
You will be taken to the Hosting Control Center control panel - choose Databases - you will see the following icon.

Once you click the MySQL icon you are taken into the set up system. Click the Database button on the upper right:

This screen is where you will enter all your information.

Provide a Description (example: Joomla! 1.5 website)
Provide a MySQL Database/User Name. Note that on
GoDaddy.com®this means both the database name and the Username are identical. This will be important for your Joomla! installationCreate a strong password and repeat it. See the tips
GoDaddy.com®provides for creating a strong password - labeled How to Generate a Strong Password.For our purposes you can leave the Read-Only User Name, New Password/Confirm Password sections blank
Choose MySQL Version 5.0
Click OK
The next step on
GoDaddy.com®can take a few hours in some cases. So don't panic if it states Pending Setup for a very long time. You will see a screen like the following until the database is set up:
In your database list (see the preceding screenshot) once it is complete click the pencil icon on the right:

Clicking this will provide the critical details you will need to set up Joomla! You should see a screen similar to the one shown in the following screenshot:

Record your details here:
Status: Should read Setup
Host Name: ______________________________
Database Name: __________________________
User Name: ______________________________
Password: _________________________________ (optional as you should have recorded it earlier)
Check database to ensure it is working
On the same screen you are currently looking at, click Open Manager in the upper right corner:

This will open the database manager for you. You will see the following screen and you will need your Username and Password:

Populate the Username and Password and click Go.
This will take you to a screen similar to this:

You will see on the left your database under information_schema. It should say (0) next to it. In our case it reads: joomlacookbook(0).
This indicates your database is set up. In the next recipe you will install Joomla!
You are now ready to install Joomla! 1.5 on your web hosting platform. In this recipe, we will go through the set up of your database and uploading of the files.
This process should only take about five to ten minutes to complete. Once done you will have a working Joomla! site ready to add your own content, templates, extensions, and more.
Most of this process is handled through your browser.
User name for database
Password for database
Database server name
Site name
Email address for Admin of the site
Site admin password
FTP client (FileZilla or other) and FTP user name and password
Open a browser and point it at your domain or IP address.
Example:
http://www.MyDomain.comhttp://192.168.1.100This will trigger your Joomla! installation script to start up. You will see this screen:

This is the initial start-up screen for Joomla! 1.5 installation. It defaults to English (US), However Joomla! is available in many languages.
Please choose your language or click Next to accept the default.

This is the Pre-installation Check screen. You should see all green in the top box and mostly or all green in the lower box. Here is a screenshot of the server's setup options close up:
In this case we have Display Errors turned On, it is recommended to be Off.
A closer look will show you each screen.

The Recommended Setting screen is a follows:

You should see all green Yes here, if you do not contact your host and tell them to adjust your settings. In our example we have purposely turned On Display Errors. You likely will not see it in your installation. However you should follow the recommended settings for maximum performance.
Once you get all green Yes and your actual settings match the Recommended settings, repeat step one or press this button on top of the screen:

Should these be set differently, you can change them in a file called
php.ini. I recommend you speak to your host about changing them should they be different.This will rerun the checks. If however everything is ok, then move to the next step.

This is an information screen showing the GNU/GPL license that applies to your use of Joomla!.
Read the license and click Next.
Database Configuration
This is the screen you will use to configure your database settings.

This is a partial screenshot of the database configuration screen. You will need to enter your details in the following screenshot:

In this screen you will need the database settings you set up in the previous recipes. You will see two versions of the same setting. One demonstrating
GoDaddy.Com®and the other representing cPanel®.The following screenshots are part of the database configuration screen. The different examples are shown to demonstrate
GoDaddy.com®versus cPanel®
If you are on
GoDaddy.com®your installation for basic settings should look like this. Note the Username and the Database Name are the same. And it has a long Host Name. Your Host Name will be different.
If you are on cPanel® your settings example will look more like this. Note that in most cases localhost will be your Host Name and the username and database name should be different from each other. Again your answers will vary.
Now fill in the Basic Settings screen with the correct responses.
Do not click Next yet.
Database configuration continued.
Under basic settings you will see Advanced Settings as follows:

Assuming this is a new installation, then no action is required on your part.
FTP Layer (THIS STEP IS OPTIONAL AND SHOULD BE SKIPPED IF YOU DO NOT NEED IT)
On some hosting setups there are various technical reasons why you cannot change permissions or upload extensions that are important to the operation of the site. This layer, while optional most of time is crucial for those hosting setups.
Contact your host and ask them specifically if they are running 'SuExec'. If so, you can skip this step.
Tip
For
GoDaddy.com®or Potentiahosting.com you should not need to install this layer and can skip this step.You will need the following information to complete this setup:

You can save the FTP password but for security it is recommended you DO NOT.
To save your password, click Yes under the Advanced Settings.
Do not change the Host or Port information.
Click Next Step
Main configuration
This step will personalize your Joomla! installation.
You should be on this screen:

There are only a few steps here.
Fill in your website's Site Name:

This will display in the browser and search engines. Don't worry - you can change it anytime.
Next fill in your (admin) email and password. You must type your password in twice.

Now the next step is optional but recommended as this is to assist you in learning. If you are going to use your site for production, you may wish to skip this step.
The Install Sample Data will install a lot of menus, content, categories, and sections.
Click the Install Sample Data button:

This step only takes a few moments. You will see this upon success:

As this is a new installation, and not a migration from Joomla! 1.0 you do not need to install the LOAD MIGRATION SCRIPT.
Click the Next button.
Completion.
Once you complete the previous step you will be greeted with the following screen:

The text in red is giving you final instructions:

DO NOT CLOSE THIS SCREEN OR NAVIGATE AWAY.
Now - Open FileZilla and connect to your web server. In the right-hand pane of FileZilla, you should see a screen similar to the following:

Highlight and right-click the installation folder. You will see the following screen.

Click Delete for the Installation folder. This will take a few moments. Once done, close FileZilla and return to your Joomla! installation.
Now you can click the Admin button and login:

You should see this screen:

This will log you in.
Press Logout.
Close and reopen your browser and open your new website
(www.yourdomain.com)This is how your website should look.

This completes the installation and testing of your new setup.
This installation program sets up all the necessary parts of the system. It will place all the proper information in the various database tables. It writes out the ever important CONFIGURATION.PHP file which provides the instructions to Joomla! on how to access your database, and a few other important settings.
If you have an older Joomla! 1.0 site, you may wish to migrate it to a 1.5 site. You can learn more about migration from the following URL. Personally I recommend building your new site from scratch to prevent any compatibility problems.
In any computer, files and programs have a 'permission' level, meaning it states who can read, write, change, or run them. In Joomla! (Linux-based machines) we have three sets of permissions: one for the 'owner', one for the 'group', and one for the 'world'. A common security mistake is setting these incorrectly.
In this short recipe, you will check your permissions for your 'files' and 'folders'.
Open your FileZilla FTP client and in your Site Manager select your web host
In the right-hand pane of FileZilla, you will see your files and folders. To the far right (scroll over ) you will see the Permissions and Owner/Group columns as shown in the following screenshot:

There are many files and they should be set (as this is a fresh install) ok. However, it won't hurt to check.
Click one of the folders then (for Windows ® users) press Ctrl+A. This will highlight all the files and folders in your site. You should see a screen similar to the following:

This partial screenshot shows you have selected everything.
Right-click in the blue colored portion. Select File permissions…:

FOLDER PERMISSIONS should be set for 755.
The following items should be checked or filled in:
Numeric value should be set for 755.
Check the box Recurse into subdirectories.
Check the box Apply to directories only.
Note that if you get it wrong, don't worry - you can repeat it.
This process will take a few minutes so be patient.

File Permissions should be set to 644
Following the same process as in step 4, highlight all your files and folders, right click, and click your file permissions selection.
This time however you will change the settings as follows:
Numeric value should be set for 644.
Check the box Recurse into subdirectories.
Check the box Apply to files only.

This step will take longer than the DIRECTORIES step.
Once complete you may exit FileZilla.
This will establish the 'permission's properly. Linux sets up three different classes for permissions on each file and folder:
User (u): This is the owner of the file
Group (g): Other users who are in a group and able to access files
Other (o): PUBLIC or the WORLD (meaning - everyone who does not belong to the other two roles)
You noted the numbers 755 and 644. These numbers are represented by the OCTAL numbering system (BASE 8). What they tell the Operating System about the files is as follows:
READ is 4
WRITE is 2
EXECUTE is 1
In OCTAL we add them the same as normal numbers. For example, 4+2+1 = 7. Meaning we give the OWNER of the folder READ, WRITE, and EXECUTE permissions.
Whereas we give the GROUP and OTHER 4+1 = 5, READ and WRITE permission.
On our FILES we give the OWNER 4+2 = 6 and for the GROUP and OTHER we give 4 only - giving them permission to READ ONLY.