


This chapter contains the following recipes:
Setting up a project
Importing a model
Using the Scene Composer
Modifying heightmaps with Terrain Editor
Adding a sky box and lighting
Adding water using a filter
Adding some ambient audio
Creating bitmap fonts with Font Creator
Retrieving an attachment node
Using ParticleEmitter—Soaring Birds
An advanced ParticleEmitter class
Welcome to the first chapter of this book! In this chapter, we'll go through various functions of the SDK. These are the features that make the development process accessible to people other than programmers. You can also, in many cases, get quick visual results by just tweaking values and without having to launch an application. In short, it's a development hub because you will return and use these functions from time to time in your project. On the difficulty scale, these recipes lean towards the easy side, with little or no programming. The exception is the last part of the chapter where modifying the core packages is necessary to achieve the results we want.
The jMonkeyEngine SDK is based around the NetBeans environment. Users familiar with the NetBeans environment will probably have little trouble finding their way around the jMonkeyEngine SDK. For those with no previous experience, some pointers on how to get started might be in place. In this recipe, we'll create a project that can access the jMonkeyEngine test-data library. By doing so, we will have some assets available from the start that can be used to try out many of the recipes.
Before setting up a project, we need to download the SDK. Doing so is as easy as going to http://hub.jmonkeyengine.org/downloads/ and selecting a suitable package for your operating system.
After downloading and installing the package, we're ready to go!
We can set up a project by performing the following steps:
First of all, find the Projects window.
Right-click somewhere inside it and select New Project.
In the window that appears, select JME3 from Categories and BasicGame from Projects.
On the next screen, choose a suitable name for the project and click on Finish to create it.
The project should now appear in the Projects window. Right-click on it and select Properties from the menu.
Select the Libraries option, click on the Add Library… button, and find the
jme3-test-datalibrary from the list.
When the project is created, it sets up the basic necessities for a jMonkeyEngine project. You will get a Project Assets folder where any content can be placed in its subfolders. It also creates the Main.java file based on the SimpleApplication class. This is the starting point for your application.
Let's start off with a pretty basic scenario. We have this model, which we've exported from a 3D modeling package, and we would like to use it for our game. The first thing we need to do is convert it to the format that jMonkeyEngine 3 uses internally (.j3o). The recommended format to use is .blend coming from the open source modeling package Blender for which the SDK has extensive support. Another common format is .obj for static models and Ogre-mesh XML files.
We can import a model by performing the following steps:
Go to the File menu and select Import Model.
Next, we need to choose the project we would like to import.
After selecting the actual model to be imported, we get to preview the model and can make sure that all the assets are properly used.
Finally, we select where to place it in the Project Assets folder structure.
The importer converts the model to the internal .j3o format. This is a binary format, which means it becomes nonreadable (compare it with a .obj file, which can be edited in Notepad). The compactness of a binary file is necessary to keep memory consumption low. It becomes impossible to edit externally, though, so keeping the original files organized is a good idea!
Here, we'll go through the basics of using Scene Composer in the SDK. Scene Composer is a place where we can preview objects, prepare them for in-game usage, and combine them to form scenes. Further usage includes viewing a model's skeleton and bones setup or playing animations. You can also apply materials, lighting, and set some basic geometry data.
Having some models to play around with will be useful if you want to create an interesting scene. We will use the Jaime model from the test-data library. You can find it in the Jaime folder inside Models and copy it to your project.
Let's start by creating a scene we can use to test our recipes later.
Right-click on the Scenes folder inside Project Assets, select New, and then select Empty jME3 Scene. The scene will open automatically in the SceneComposer window.
A scene is just an empty node, and needs to be populated to be useful. To have something to look at, let's add the Jaime model to the scene. Find it in the folder structure, right-click on Jaime.j3o, and select Link in SceneComposer. The SceneComposer window looks as follows:

Now, most likely, all we can see is a blue, wire-frame box. This is because there are no lights in the scene. At the top-left part of the screen, there is a button with a light bulb on it.
By clicking on it, we should get PointLight following the camera; it is not part of the scene, however.
Tip
Linking versus adding
Adding means you add an instance of the object itself to the scene. This can then be modified separately to the original object.
Linking means you add a reference to the object in the scene. Apart from making the scene smaller, any modifications to the original object will also affect the objects in the scene.
Basic camera orientation in the scene includes dragging with the left mouse button to rotate the camera. Dragging with the right mouse button pressed moves the camera sideways, up, and down. The mouse wheel zooms in and out.
The second icon in the top bar of the SceneComposer window is the Move icon. By clicking on it, you will see three different colored planes by Jaime. These will be highlighted as you move your mouse over them. If you press the left mouse button while they're highlighted, you will move the object in the dimensions of that plane.

The same rules apply to the next icon, Rotation. Note, though, that scaling is uniform across all the axes.
Tip
If you want to have total control over your transformations, you can use the Properties window to set the exact values for translation, rotation, and scale.
If you'd like to have an in-depth knowledge of the SDK, have a look at the videos on http://hub.jmonkeyengine.org.
In Terrain Editor, we find a number of functions that let us modify a heightmap-based terrain, something which is used in many games.
A heightmap, in its simplest form, is a 2D array (the dimensions representing x and y coordinates) usually storing floats that represent height values. These can be saved as grayscale images where brighter areas correspond to higher ground and, reversibly, darker areas correspond to lower ground.
The terrain fields of jMonkeyEngine have much more information to help you create a visually appealing terrain. Things like vertex normal data and color and texture data are available for modification through the API, for daring programmers.

A heightmap
We will begin by creating a terrain for the scene before exploring how to modify it. To do this, perform the following steps:
First, we either create a new scene or load a scene we've worked with previously.
In the SceneExplorer window, right-click on the main scene node and select Add Spatial and then Terrain...
To edit the terrain, we have to find the scene j3o file in the Projects window. It should be present in the Scenes folder inside Project Assets. Right-click on the scene file and select Edit Terrain.
Now, we have a flat and nice terrain. While it's perfectly functional, let's explore the functions in the TerrainEditor window. These functions are shown in the following screenshot:

Next to the Add Terrain icon, you have the raise/lower terrain icon. This icon uses the values of Radius and Height/Weight sliders to modify the terrain. Try it out and see how it can be used to create hills and valleys. The Level terrain icon can be used to create flat areas in the terrain. It works by right-clicking on an area, the height of which you would like to have as a reference, and then holding the left mouse button and flattening out the terrain at the selected height, creating plateaus.
While the terrain comes with basic texturing, we might want to do something more interesting. First of all, we need to add another texture layer. This is done with the icon that looks like a plane with a plus sign on top (the Add another texture layer icon).
After clicking on it, there should be another row in the Painting window, below it. Clicking on the Texture field will bring up a selector with all the textures available to the project. Select a suitable texture among the available ones.
Now, to paint, click on the button with a spray can on it. You can now paint by holding the left mouse button over the terrain, and erase by pressing the right mouse button. Like most of the other functions in the TerrainEditor window, it uses the Radius and Height/Weight values.
Tip
When painting a terrain by hand, it is a good idea to have a reference image of the terrain type at hand. That way we can, for example, see how grass grows on slopes, or snow gathers on mountains, and produce more realistic results. Always start by painting in broad strokes, gradually painting with smaller and smaller brushes.
The function of most of the buttons is pretty self-explanatory, but let's look at what happens when either of them are applied.
A little bit of smoothing is something that might be needed after generating a heightmap using an automated tool. In such a case, you most likely won't use a brush, though, but rather a filter that will apply it evenly across the whole of the heightmap. The brush might instead be used to smooth out an area where a game character is supposed to move to make it a better game experience. It might also be that the ground of an area is of a type that would most likely be smoother than the surroundings, like a beach among rocky cliffs.
Level terrain has similar uses. If we need sufficient space to place a large building for example, it is the best way to ensure that no part of the building ends up floating or submerged beneath the ground.
Sky boxes or sky domes are small pieces of every day magic in games. They're used to create a mood-setting backdrop for scenes and are excellent for making areas seem larger than they are.
Sky boxes consist of six textures, rendered on the inside of a cube, much like wallpapers. Perceived as enclosing the world, they actually don't need to be very big since they are rendered first in the queue. This means everything else will be drawn on top of them.
The recipe will consist of two sections, where the first section will create a sky box from six textures. After this, we will add sun-like light using Directional Light.
In the SceneExplorer window, right-click on your scene and select Add Spatial.. and then Skybox...
There are two options here: either we can load six independent textures or one texture with all the six textures prebaked. This particular recipe uses the six
Lagoontextures from thetest-data/Textures/Skyfolder.After this, we should now see a moody, watery scene surrounding the terrain.
The terrain and skybox don't blend together very well. First and foremost the lighting is wrong. The only light in the scene is a white light coming from the camera's origin. To get a more natural light in this outdoor scene, we can add Directional Light.
Again, right-click on the scene in the SceneExplorer window. Now, select Add Light.. and then select Directional Light. Things just got a lot brighter! It doesn't look better, however. We need to adjust the light to suit the scene.
We can see the DirectionalLight element in the SceneExplorer window. Select it and bring up the Properties window. There are just two settings:
ColorandDirection.By clicking on the box next to the color values, we see several options to set the color. We can use an image editor and the colorpicker function near the sun to get a suitable color. Grab the RGB values and insert them in that tab. This way, we know that we get a color that matches the scene's sun.
Turning off the camera light (the light bulb in the top-left corner) will help us see the blue-tinted color from the light we just added.
Tip
It's often a good rule of thumb to have a little less tint than what might first seem like a suitable one. It usually feels more natural in the end. Show it to someone else and see if they think it's "too much". As a developer, your judgment can be "tainted", as you get used to a scene, and it's easy to overdo things like lighting.
There's one more thing to do to make the scene and sky box blend better together. The shadows on the terrain are at wrong places in relation to the sun in the scene. The default setting for Directional Light is to shine in from the southwest direction and about 45 degrees downwards. This particular sky box has the main source of light coming from the northeast direction. Flipping the minus sign on the x and z values in the Direction property seems to make the shadows look more natural.
The reason sky boxes work is because of how the rendering of the scenegraph happens. Objects can be sorted into different lists or buckets, to help the rendered in drawing. A sky box is sorted into the Bucket.Sky list, which is drawn first in every rendering cycle. This is why everything else (normally in the Bucket.Opaque list) appears to be in front of it. You can achieve the same effect for any object by calling Geometry.setQueueBucket (Bucket.Sky).
If you look closely at Jaime (or any other object you added to the scene) with the camera light turned off, you will notice that the side not facing the light will be completely dark. Unless this is a place devoid of atmosphere, radiance, diffusion, and reflection of other surfaces, one should have given all sides some basic lighting. This is emulated in games by using ambient lighting. It lights all the faces evenly and is added by selecting the scene in the SceneExplorer window and choosing Add Light.
You can select the same color as Directional Light, but make it much darker to get something that will look natural. If you're really serious, and have a somewhat uniform ground color, you can try to blend in a little bit of the ground color, as well.
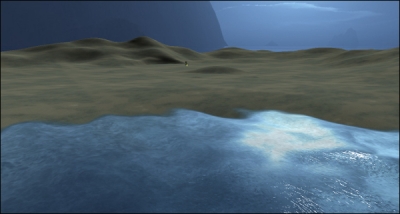
When it comes to bang-for-the-buck visuals in jMonkeyEngine, there is little that trumps using a water filter. It is very impressive and yet easy to do. Having water in the scene will greatly enhance the mood of our test scene. You can view the great looking water with little efforts in the following screenshot:
The scene used should have some height differences (or we will end up with all water or all ground). If no terrain is available or if it needs adjustments, check out the Modifying heightmaps with Terrain Editor recipe in this chapter.
If there isn't already an Effects folder in your Projects Assets folder, add it.
We can add water using a filter by performing the following steps:
Right-click on the Effects folder under Project Assets, select New, and then select Empty FilterPostProcessor file. You might have to select New, Other..., and then click on Filters to find it.
Name it
Waterand click on Finish.Right-click on the newly created Water.j3f file and open it.
We are now moved to the FilterExplorer window. From here, we can create, add, and modify scene-wide effects, choosing from a number of premade ones. Right-click on the Water filter and select Add Filter and then Water.
To see filters in the SceneComposer window, we need to click on the Eye icon shown in the following screenshot. This should give the scene a whole new look. Do it and see the scene transform.

A few properties need to be modified in order to make the water appear smoothly. The Properties window for the WaterFilter element can seem a bit overwhelming. For now, let's change the Water Height parameter. The filter will create foam wherever it meets the land and finds a good separation or where the shore height is essential. The sweet spot is dependent on the scene but starts out with -2 units. Changing the following values will affect the appearance along the shoreline:

There are also Light Direction and Light Color properties in there. Let's copy the values from our Directional Light element here to make them match. You will find them by moving to the SceneExplorer window, selecting the Directional Light element, and looking in the Properties window.
Lastly, we need to add the following lines to the
simpleInitmethod of our test application:FilterPostProcessor processor = (FilterPostProcessor) assetManager.loadAsset("Effects/Water.j3f"); viewPort.addProcessor(processor);
Post filters are rendered last as a screen effect in the rendering stage and applied to the entire scene. There are many ready-made filter variants made by the jME team and community that you can use to change how a scene appears. Filter Explorer is a great way to set up and test these before applying them to your game.
Audio is an extremely important moodsetter in games, and any other cross-media product, which is often overlooked. Bad audio can just as easily break immersion as good audio can improve it.
We're going to add some ambient audio to our scene to help set the mood. Since the sky box we use is a rather gloomy and watery scene, we're going to add the sound of ocean waves crashing against the shore.
Ambient sounds can either be sounds you hear throughout a whole scene, such as the buzzing of traffic in a city, or local to a specific place, the sound of a waterfall, and so on. In this case, we can picture our scene as a small island, and thus the waves should be heard wherever you go.
As it happens, there is a suitable .ogg file in the Environments folder inside Sound. If we have added the jme3-test-data library to our project, we can access it easily.
The SDK can handle both .ogg or uncompressed .wav files. The .ogg format is open and free, meaning you won't need any license to use it. This is not necessarily the case with other compression types.
If we've made the previous recipes, we might already have seen the audio node. The following steps will help show us how to add one to the scene:
We can find the audio node by right-clicking on a spatial, in this case the main scene node, and selecting Add Spatial and then Audio Node.
Next, select it and look at the Properties window.
The first important thing to look at is the Audio Data parameter. In the drop-down menu, the SDK will automatically show the files in the Sounds folder under Project Assets, so we should see Ocean Waves.ogg here. Unchecking the Positional checkbox means there will be no falloff in volume as you move around.
Also check the Looping box to make sure the sound doesn't end when it's finished playing one time.
It's currently not possible to hear the sound in the SDK itself, so we need to start an application to do so. Fortunately, only one line of code is needed to start the sound in our
simpleInitAppmethod. The only catch here is that we need to cast thesceneobject in anAudioNodeinstance first. After having loaded the scene, add the following lines of code:Node scene = (Node) assetManager.loadModel ("Scenes/TestScene.j3o"); rootNode.attachChild(scene); ((AudioNode)scene.getChild("AudioNode")).play();The sound we added is a very powerful sound and may be a bit overwhelming for our scene. Playing with the
Volumeproperty of theAudioNodeelement can be used to tone down the effect a bit.
Tip
Downloading the example code
You can download the example code files for all Packt books you have purchased from your account at http://www.packtpub.com. If you purchased this book elsewhere, you can visit http://www.packtpub.com/support and register to have the files e-mailed directly to you.
The AudioNode element has a position in the 3D world since it extends Spatial and can hence be made to be heard only from certain places. It can also easily be made to follow objects around. In addition to volume and falloff, audio can also be modified during runtime by area effects such as reverb.
To learn more about how effects can be used to modify audio, check out Chapter 9, Taking Our Game to the Next Level.
The Font Creator plugin is a really nifty tool for any game creator and is easily overlooked unless mentioned. By using it, you can create a bitmap font using any system font you have available. Refer to the Downloading the plugins section in Appendix, Information Fragments, to know how to download a plugin.
We can create bitmap fonts with Font Creator by performing the following steps:
Right-click on the Fonts folder under Interface in our Project Assets folder. Select New and then select Other.... Font is located in the GUI folder.
Next, we choose the font we would like to use from the available system fonts.
In the Configure Font part, we can make adjustments before actually creating the bitmap. It's recommended to use a power-of-two number for the size.
Tip
A higher resolution will make the text more detailed, but it will at the same time take up more memory, not only for the bitmap image itself but also for the text generated. Consider the application requirements or do some testing. You can also try to adjust the size of the font to fit the bitmap.
Once we have our font, there are a couple of ways we can use it. First of all, if we want to replace the default font used by the application, we have to name the font
Default.fntand make sure it's placed inside the Fonts folder under Interface. This is what the application is looking for during startup.Another way to use the custom font is to load it in the application by using the following code:
BitmapFont myFont = assetManager.loadFont("Interface/Fonts/MyFont.fnt");It can then be used to create text that can be placed anywhere on the screen, as shown in the following code:
BitmapText text = new BitmapText(myFont, false);
hudText.setText("Text!");
hudText.setColor(ColorRGBA.Red);
guiNode.attachChild(hudText);
The
BitmapText class is spatial, and needs to be attached to a node in order to be displayed. The most common node is probably the guiNode. Spatials added to the guiNode will be positioned according to the screen space and projected without depth. For this reason, using the guiNode is suitable for HUD items. Setting the localTranslation parameter to (0, 0, 0) will make the text appear in the bottom-left corner of the screen. Instead of using (screenWidth, 0, screenHeight), we will place it in the top-right corner.
In many games, the characters can be customized to carry different equipment or clothes. In these situations, jMonkeyEngine's Attachments node is extremely useful. It lets us choose a bone and creates a node for us that will follow that particular bone's movement and rotation, without any further work from our side.
We'll need a rigged model with SkeletonControl. Fortunately, the Jaime model is already rigged and animated. We'll also need something to attach to it. What goes well with monkeys if not bananas?
Open the model in the SceneComposer window by right-clicking on it in Projects and selecting Edit in SceneComposer.
Expand the
SkeletonControlclass. Located underRootis a Bone calledIKhand.R, as shown in the following screenshot:
Right-click on IKhand.R and select Get attachment Node.
We should now see a node called IKhand.R_attachnode created at the top level of the hierarchy. Attach the banana to the node by dragging it into the SceneExplorer window. The banana should now appear in Jaime's hand.
Tip
The banana will not fit perfectly in this recipe. To achieve a perfect fit, the best way will be to create an actual bone, just for attachments, in the modeling program of our choice. Since the attached item is attached using the model's center point, we can expect to have to tweak the position of the items as well.
To prove that the banana will actually follow the movement of the model, we can play an animation. Select AnimControl in the SceneExplorer window and look at the Properties window. Choose an animation from the drop-down menu.
When we first call getAttachmentsNode on a Bone object, it will create a new node. It will then keep track of it and update its translation, rotation, and scale according to the values of the Bone object. It works as a regular node in most regards, with the difference being that it follows the IKhand.R bone's movements during animations. It is very handy, isn't it?
Particle Emitters, in general, are good in order to create an atmosphere in the games. The most common case is probably for smoke or fire and explosions. Particles can, however, be used for many interesting things. In this recipe, we're going to explore that by tuning a ParticleEmitter to create birds sailing through the sky.
The particles are still sprites, 2D images, so they will work best either far up in the sky, or below us.
The recipe will be divided into two parts. The first one contains setting up the ParticleEmitter class in the SDK and writing the ParticleInfluencer interface. The second part includes changing the way the ParticleEmitter class behaves and extending our ParticleInfluencer interface to take advantage of this:

First of all, we need a suitable bird texture. There's one supplied with the project in the Birds folder inside Textures, which will be fine if the birds are supposed to be far away. Up close, it will not suffice though.
The first section will describe how to set up a material we can use. This consists of the following steps:
We're going to start by creating a material to supply to the
ParticleEmitterclass. Create a new material in the Materials folder by right-clicking and selecting New… and then Empty Material File.Rename it to something suitable, for example,
Birds.j3m.Now, we can open it and are automatically moved to the Material Editor window.
Here, we set the Material Definition value to
Common/Matdefs/Misc/Unshaded.j3md.The only thing we need to change is the ColorMap value, which should be pointed to our birds texture.
Now, we come to the configuration of the ParticleEmitter class. This section consists of the following steps:
Let's begin by creating a new scene and opening it in the SceneExplorer window. Right-click and select Add Spatial.. and then Particle Emitter. A default smoke puffing the
ParticleEmitterobject is created.Now, we can bring up the Properties window and start tweaking it.
First of all, we set the material to our newly created material for the birds. Don't worry if it looks terrible!
Looking at the
Images Xproperty, we can see that it's set to 15 by default. This is the amount of horizontal "frames" in the texture. If we look at the birds texture, we can see that it's only four frames, so let's change that value. The particles are already looking better.High LifeandLow Lifedefine the maximum or minimum lifespan of a particle. We can assume that the birds should soar across the sky for a while, so let's change it to 30 and 25 respectively.There are an awful lot of birds now. Setting
Num Particlesto 50 will make more sense.Start SizeandEnd Sizeaffect the size of the particles over time. These should be set to 1 for our birds. They shouldn't inflate.For now, let's increase the radius of the emitter to get a better view. It's a sphere by default and the last value is the radius. Set it to 30.
If we take a look at the birds now, they still just float in space. This is very unbird-like.
Let's scroll down a bit to the
ParticleInfluencerclass. TheParticleInfluencerclass has an opportunity to alter a particle's velocity when it's created, decreasing uniformity. TheDefaultParticleInfluencerclass can set an initial velocity, and a variation, from 0 to 1.Set the
InitialVelocityparameter to3.0, 0.0, 0.0and theVelocityVariationto1.0to give the particles some individuality.To make the birds look in the direction they're flying, check the Facing Velocity box.
A ParticleEmitter can be described as a cheap way to draw many identical or near-identical bitmaps. Particle Emitters have a single mesh that stores all its particles. As opposed to drawing each particle individually, it renders them all at once. This is considerably cheaper. The drawback is, of course, that they all look the same.
There is another thing we can do to improve the appearance of the generated birds. Since we are expecting to look at them from either above or below, it makes sense to flatten the shape of the emitter to be more of a plane. Let's revisit the Emitter Shape property and make a box instead of a sphere, as shown in the following code:
[Box, -30.0, -1.0, -30.0, 30.0, 1.0, 30.0]
The numbers define the extremes of a box, that is, X min, Y min, Z min and X max, Y max, and Z max. In other words, we have created a box that is 60 units wide and long and only 2 units high.
Soaring birds are nice but it's easy to feel that the result of the previous recipe could have been much better if the birds were better animated. If you've worked with the ParticleEmitter class before or have been observant of the birds, you will know that particles can actually be animated although they only cycle through every frame once per lifetime. This is much too slow for the birds.
In this recipe, we're going to look at what's needed to make the birds flap their wings. It's not as simple as it sounds and requires modifying the ParticleEmitter code and writing our own ParticleInfluencer class.
If we have a look at the ParticleEmitter class to see what we need to do, we can see that there is an updateParticle method that seems like a good place to start. This is called for every particle in each update cycle. One thing that is less obvious at first is that since we have the same ParticleInfluencer instance affecting all particles, it also needs to be updated separately for each frame. To achieve the latter, we can use a control.
To be able to modify the ParticleEmitter class, we need the source. This means we have to check it out from the repository. If you're not comfortable with this, you can still do the first part and learn more about the ParticleInfluencer instance.
After having checked out the source code for jMonkeyEngine from the repository, it should be opened as a project in the SDK.
Build it and then change the reference in the properties for this project to use the .jar files from the source code project instead of the supplied jMonkeyEngine.jar files.
In the first section, we'll create a new ParticleInfluencer instance. This consists of the following steps:
The first thing we'll do is create a new class called
BirdParticleInfluencerand have it extend theDefaultParticleInfluencerclass. Since the flat particles point in the direction they're flying, it sometimes looks weird when they have a Y-velocity. We're going to fix that by not allowing the particles to have any velocity in the y axis. We override theinfluenceParticlemethod and set the Y-velocity to0. After this we need to normalize the velocity, as shown in the following code:public void influenceParticle(Particle particle, EmitterShape emitterShape) { super.influenceParticle(particle, emitterShape); particle.velocity.setY(0); particle.velocity.normalizeLocal(); }We can now replace the
ParticleInfluencerinterface in theParticleEmitterelement's Property window with our own.That was the easy part, and that's how far we get without modifying the engine. In the next section, we will extend the current
ParticleEmitterinstance to animate particles continuously. This will consist of the following steps:Let's start by making our
ParticleInfluencerinterface ready to update the particles in every frame. Let's start by making ourParticleInfluencerinterface ready to update the particles in every frame. We're going to add two methods to it. The first one is for updating the particle, and the second one is for updating the influencer itself, as shown in the following code:public void influenceRealtime(Particle particle, float tpf); public void update(float tpf);
In our
BirdParticleInfluencerclass, we're going to need some new fields. ThemaxImagesproperty keeps track of how many images there are in a cycle. TheanimationFpsproperty defines how fast the animation should run. These two properties should be added to the class's read/write/clone methods as well to ensure that they're saved properly. ThetimeandincreaseFramesare runtime properties only:private int maxImages = 1; private float animationFps = 10f; private float time = 0f; private int increaseFrames;
Now, let's go to our
updatemethod. This is the method that runs once every frame. We add functionality to check whether it's time to change the frame in the particle or not. The logic goes like this: when the current passed time is larger than the time between frames, increase the frame index by one. Using awhileloop rather than anifstatement allows us to compensate for low frame rate, by skipping several frames, if necessary, to keep up with the frames per second:public void update(float tpf){ super.update(tpf); float timeBetweenFrames = 1f / animationFps; time += tpf; increaseFrames = 0; while (time > timeBetweenFrames){ increaseFrames++; time -= interval; } }In
influenceRealtime, which is the method that is run once per particle and frame, all we do is tell it to increase theimageIndexvalue if needed, making sure not to exceed the maximum images in the cycle:public void influenceRealtime(Particle particle, float tpf) { super.influenceRealtime(particle, tpf); if(increaseFrames > 0){ particle.imageIndex = (particle.imageIndex + increaseFrames) % maxImages; } }That's the influencer part. Let's make sure
influenceRealtimeis called from theParticleEmitterclass. At the end of theupdateParticlemethod, add the following code:particleInfluencer.influenceRealtime(p, tpf);
Unfortunately, we also need to comment out the following line:
//p.imageIndex = (int) (b * imagesX * imagesY);
In the last section of the recipe, we will create a control that will update the ParticleInfluencer class. This consists of the following steps:
We create a new class called
BirdParticleEmitterControland make it extendAbstractControl. The important bit here is thecontrolUpdatemethod where we in turn call theupdatemethod of theParticleEmitterinstance:public void controlUpdate(float tpf){ super.update(tpf); if(spatial != null && spatial instanceof ParticleEmitter){ ((ParticleEmitter)spatial).getParticleInfluencer().update(tpf); } }Apart from that, we also need to add the following code for it to work properly:
public Control cloneForSpatial(Spatial spatial) {
  return new BirdParticleEmitterControl();
}
To affect the birds by our changes, we need to do a few more things. First, we need to open the birds scene in the SceneComposer window.
Selecting the Emitter element, we need to choose Add Control.. and then select Custom Control. Our newly created control should be available in the list.
Now, we need to load the scene inside an application. We just load the scene and move it up into the sky by using the following code:
public void simpleInitApp() {
  Node scene = (Node) assetManager.loadModel("Scenes/ParticleTest.j3o");
  scene.setLocalTranslation(0, 60, 0);
  rootNode.attachChild(scene);
}
Particle emitters are normally limited in what control you have over the particles. The ParticleInfluencer class gives us some basic control during particle creation.
Since the birds are flat planes, they look best when viewed straight on. This creates a problem when we have said that they should always point in the direction they're flying if they're moving along the y axis.
The influenceParticle method is a method implemented from the ParticleInfluencer interface and it is called upon the creation of every new particle. Since the DefaultParticleInfluencer instance is already applying a velocity with variation, we just needed to remove any Y-velocity.
In the ParticleEmitter class, we commented out a line in the update method. That's the current animation logic that will override our changes every time. A workaround would be to let the ParticleInfluencer class keep track of the current frame, but that would make all the birds have the same frame. Another alternative would be to move it to one of the other ParticleInfluencer classes.
By using the control pattern to update the ParticleInfluencer class, we can offset some code and keep minimum changes in the ParticleEmitter class.
Unfortunately, the changes we made to the ParticleEmitter class won't be picked up by Scene Composer, as it uses its own compiled classes. So to see it, we had to start an application and load the scene there.
The birds now continuously flap their wings like many small birds do when flying. Larger birds tend to glide more, with only an occasional flap. They also fly in straight lines.
The influenceRealtime method we created opens up new possibilities to create better looking particles.
An additional touch would be to implement logic to have the birds both soar and flap interchangeably, and circle around a point or change their direction. Are you up for it?

