


Atlassian JIRA, as we all know, is primarily an issue tracking and project tracking system. What many people do not know, though, is the power of its numerous customization capabilities, using which we can turn it into a different system altogether! Maybe a help desk system, a user story management system, an online approval process, and a lot more. This is in addition to the issue tracking and project tracking capabilities for which JIRA, arguably, is the best player in the market.
So what are these customizations? How can we convert the JIRA we know into a product we want? Or maybe just add extra functionalities that are specific to our organization?
The answer to these questions probably can be summarized in a single word: plugins. JIRA has given the power to its users to write plugins and customize the functionality in a way they find suitable.
But is that the only way? Definitely not! JIRA itself provides a lot of customization options through its user interface, and in more demanding cases, using property files such as jira-config.properties. In some cases, you will also find yourself modifying some of the JIRA core files to tweak functionality or to work around a problem. We will see more of that in the chapters to come, but the best entry point to JIRA customizations is through plugins, and that is where we start our cookbook before we move on to the in-depth details.
So, what is a JIRA plugin? JIRA itself is a web application written in Java. That doesn't mean you need to know Java to write a plugin, though in most cases you will need to. You might end up writing a simple descriptor file to add a few links here and there. If that makes the "non-Java" developer in you happy, watch out for the different plugin modules JIRA supports.
A JIRA plugin is a JAR file that has a mandatory plugin descriptor and some optional Java classes and Velocity templates. The Velocity templates are used to render the HTML pages associated with your plugin, but in some cases, you might also want to introduce JSPs to make use of some pre-existing templates in JIRA. JSPs, as opposed to Velocity templates, cannot be embedded in the plugin, but instead they should be dropped into the appropriate folders in the JIRA web application. Using Velocity templates is therefore recommended over JSPs.
Note
You can find more details on writing Velocity templates at http://velocity.apache.org/engine/releases/velocity-1.5/user-guide.html#velocity_template_language_vtl:_an_introduction.
The plugin descriptor, the only mandatory part of a plugin, is an XML file that must be named atlassian-plugin.xml. This file is located at the root of the plugin. The atlassian-plugin.xml file defines the various modules in a plugin. The different types of available plugin modules include reports, custom field types, and so on. These are discussed in detail in the next chapter.
The process of developing a JIRA plugin can be of varying complexity depending on the functionality we are trying to achieve. The plugin development process essentially is a four-step process:
Developing the plugin
Deploying it into local JIRA
Testing the plugin functionality
Making changes and redeploying the plugin if required
Each of these steps is explained in detail through the various recipes in this book!
JIRA, on start up, identifies all the plugins that are deployed in the current installation. You can deploy multiple plugins, but there are some things you need to keep an eye on!
The atlassian-plugin.xml file has a plugin key, which should be unique across all the plugins. It is much similar to a Java package. Each module in the plugin also has a key that is unique within the plugin. The plugin key combined with the module key, separated by a colon (:), forms the complete key of a plugin module.
Following is a sample atlassian-plugin.xml file without any plugin modules in it:
<!-- the unique plugin key -->
<atlassian-plugin key="com.jtricks.demo" name="Demo Plugin" plugins-version="2">
  <!-- Plugin Info -->
  <plugin-info>
    <description>This is a Demo Description</description>
    <version>1.0</version>
    <!-- optional  vendor details -->
    <vendor name="J-Tricks" url="http://www.j-tricks.com"/>
  </plugin-info>
. . . 1 or more plugin modules . . .
</atlassian-plugin>
The plugin, as you can see from the preceding sample, has details such as description, version, vendor details, and so on.
When a plugin is loaded, all the unique modules in it are also loaded. The plugin classes override the system classes, and so if there is an action that has the same alias name as that of a JIRA action, it is the plugin action class that will be loaded. We will see more about extending actions in the coming chapters.
Suppose you have a report module in your plugin. It will look as follows:
<report key="demo-report" name="My Demo Report" ....>
..
</report>
The plugin key in the preceding case will be com.jtricks.demo, and the complete module key will be com.jtricks.demo:demo-report. Hang on, before you start writing your little plugin for a much wanted feature, have a look at the Atlassian Marketplace to see if someone else has already done the dirty work for you!
Atlassian Marketplace is a one-stop shop where you can find the entire list of commercial and open source plugins that people around the world have written. See https://marketplace.atlassian.com/plugins/app/jira for more details.
Now that we know what a plugin is, let's aim at writing one! The first step in writing a JIRA plugin is to set up your environment—if you haven't done that already. In this recipe, we will see how to set up a local environment.
To make our plugin development easier, Atlassian provides the Atlassian plugin software development kit (SDK). It comes along with Maven and a preconfigured settings.xml file to make things easier.
The Atlassian plugin SDK can be used to develop plugins for other Atlassian products, including Confluence, Crowd, and so on, but we are concentrating only on JIRA.
Following are the prerequisites for running the Atlassian plugin SDK:
The default port 2990 for the SDK should be available. This is important because different ports are reserved for different Atlassian products.
JDK should be installed and Java version 1.6.x is required.
Make sure the
JAVA_HOMEenvironment variable is set properly and thejava -versioncommand outputs the correct Java version details.
Following are the steps to set up our development environment:
Once we have installed Java and the port 2990 is ready, we can download the latest version of Atlassian plugin SDK from https://developer.atlassian.com/display/DOCS/Getting+Started.
Install the SDK by following the instructions provided on the Atlassian Developer Documentation page, depending upon the operating system. Let's call this directory
SDK_HOME.Add the SDK's
bindirectory into the environmentPathvariable.Create a new environment variable,
M2_HOME, pointing to theapache-mavendirectory in your/SDK_HOME/atlassian-plugin-sdkdirectory.A lot of commonly used dependencies are already available in the
repositoryfolder embedded in the SDK. To use this, edit thesettings.xmlfile underM2_HOME/conf/by modifying thelocalRepositoryattribute to point to the embeddedrepositoryfolder. By default, it will use theUSER_HOME/.m2/repositorydirectory.Install the IDE of your choice. Atlassian recommends Eclipse, IntelliJ IDEA, or NetBeans, as they all support Maven.
With the preceding steps executed properly, we have a development environment for JIRA plugins. The next step is to create a skeleton plugin, import it in to your IDE, and start writing some code! Creating the skeleton plugin, deploying it, and so on, is explained in detail in the forthcoming recipes of this chapter. So, ready, set, go…
If you are facing issues while downloading the dependencies using Maven, just read on.
If you are executing behind a firewall, make sure you have configured proxy settings in Maven's settings.xml file. A proxy can be configured as follows:
<settings>
  .
  <proxies>
    <proxy>
      <active>true</active>
      <protocol>http</protocol>
      <host>proxy.demo.com</host>
      <port>8080</port>
      <username>demouser</username>
      <password>demopassword</password>
      <nonProxyHosts>localhost|*.demosite.com</nonProxyHosts>
    </proxy>
  </proxies>
  .
</settings>
Note
To find out more about proxy settings for Maven and other aspects of it, go to http://maven.apache.org/index.html.
If you are a developer, in many cases you will have Maven already installed in your local machine. In that case, point the M2_HOME environment variable to your local Maven, and update the respective settings.xml file with the repository details in the default settings.xml file that ships with the Atlassian plugin SDK. Or, you can simply add the following lines to the existing settings.xml file:
<pluginRepository>
  <id>atlassian-plugin-sdk</id>
  <url>file://${env.ATLAS_HOME}/repository</url>
  <releases>
    <enabled>true</enabled>
    <checksumPolicy>warn</checksumPolicy>
  </releases>
  <snapshots>
    <enabled>false</enabled>
  </snapshots>
</pluginRepository>If you are using IntelliJ IDEA, configuring it to use the SDK is an easy job because IDEA integrates Maven out of the box. Just load the project by selecting the pom.xml file! See https://developer.atlassian.com/display/DOCS/Configure+IDEA+to+use+the+SDK for more details.
If you are using Eclipse, make sure you have m2eclipse installed. This is because Eclipse integrates Maven through the Sonatype m2eclipse plugin. You can find more details on configuring this at https://developer.atlassian.com/display/DOCS/Set+Up+the+Eclipse+IDE+for+Linux for Linux, or https://developer.atlassian.com/display/DOCS/Set+Up+the+Eclipse+IDE+for+Windows for Windows.
If you are using Netbeans, check out https://developer.atlassian.com/display/DOCS/Configure+NetBeans+to+use+the+SDK on how to configure it to use the SDK.
If you see Maven download errors such as "Could not resolve artifact", make sure you verify the following:
Entry in Maven's
settings.xmlfile is correct. That is, it points to the correct repositories.Proxy configuration is done if required.
Antivirus in the local machine is disabled and/or firewall restrictions removed if none of the above works! Seriously, it makes a difference.
In this recipe, we will look at creating a skeleton plugin. We will use the Atlassian plugin SDK to create the skeleton!
Following are the steps to create a skeleton plugin:
Open a command window and go to the folder where you want to create the plugin.
Note
Make sure you use a directory without any spaces in its name, because there are known issues with the SDK not working in directory names with spaces. See https://studio.atlassian.com/browse/AMPS-126 for more details.
Type
atlas-create-jira-pluginand press Enter.Press 1 if you want to create a JIRA 5 plugin or 2 if you want to create a plugin for JIRA 4 or earlier versions.
Enter the
group-idinformation when prompted.group-idwould normally be coming from your organization name and mostly resembles the Java package. Of course, you can enter a different package name as we move forward if you want to keep it separate.group-idwill be used to identify your plugin along withartifact-id, for example,com.jtricks.demo.Enter the
artifact-idinformation (the identifier for this artifact) when prompted. Do not use spaces here, for example,demoplugin.Enter the
versioninformation when prompted. The default version is1.0-SNAPSHOT. Enter a new version if you want to change it or press Enter to keep the default version, for example,1.0.Enter the
packageinformation when prompted. Press Enter if the package value is the same as thegroup-idvalue. If not, enter the new value here and press Enter, for example,com.jtricks.mypackage.Confirm the selection when prompted. If you want to change any of the entered values, type N and press Enter.
Wait for the BUILD SUCCESSFUL message to appear.
Tip
Downloading the example code
You can download the example code files for all Packt books you have purchased from your account at http://www.packtpub.com . If you purchased this book elsewhere, you can visit http://www.packtpub.com/support and register to have the files e-mailed directly to you.
A skeleton plugin is nothing but a set of directories and subdirectories, along with a pom.xml file (Maven Project Object Model) and some sample Java and XML files in the appropriate folders.
Following is a snapshot of how the project will look like in Eclipse. It also shows the design view of the default atlassian-plugin.xml file:
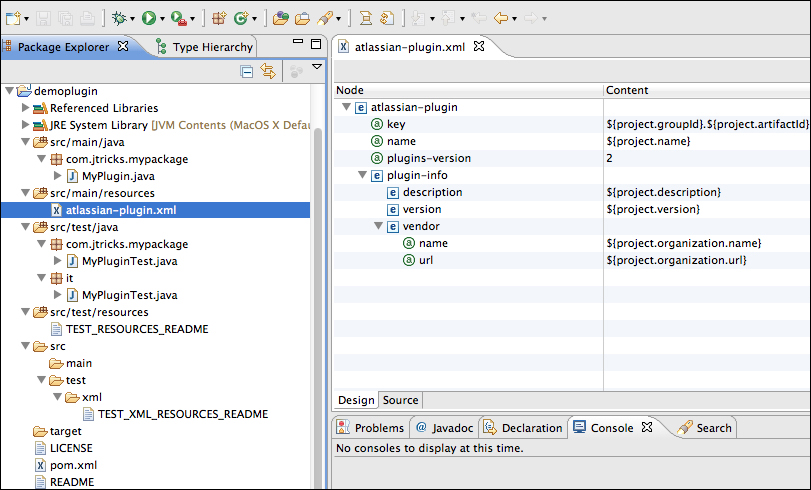
As you can see, there is a pom.xml file at the root level and a src folder. A sample LICENSE file and a README file are also created for you at the root level.
Under the src folder, you will find two folders—main and test—with an identical folder structure. All your main Java code goes under the main folder. Any JUnit tests you write will go into the same location under the test folder. There is an additional folder—it—under the test folder, where all the integration tests will go!
You will find the plugin descriptor, that is atlassian-plugin.xml, under src/main/resources with sample values already populated in it. The values shown in the previous screenshot are populated from the pom.xml file. In our case, the plugin key will be populated as com.jtricks.demo:demoplugin when the plugin is built.
There are two more folders under the src/test tree. The src/test/resources folder, which will hold any resources required for unit tests or integration tests, and the src/test/xml folder, which can hold the XML data from any other JIRA instance. If the XML is supplied, the SDK will use it to configure the JIRA instance before running the integration tests.
So, that is our plugin skeleton. All that is pending is some useful Java code and some proper module types in the atlassian-plugin.xml file!
Sometimes, for the geeks, it is much easier to run a single command to create a project, without bothering about the step-by-step creation. In the next section, we will quickly see how to do it. We will also have a look at how to create an Eclipse project if you opt out of installing m2eclipse.
You can ignore the interactive mode by passing the parameters such as group-id, artifact-id, and so on, as arguments to the atlas-create-jira-plugin command:
atlas-create-jira5-plugin -g my_groupID -a my_artefactId -v my_version -p my_package ---non-interactive
For the example values we saw earlier, the single line command will be as follows:
atlas-create-jira5-plugin -g com.jtricks.demo -a demoplugin -v 1.0 -p com.jtricks.mypackage --non-interactive
You can pick and choose the parameters and provide the rest in an interactive mode too!
If you are not using m2eclipse, just run the following command from the folder that contains the pom.xml file:
atlas-mvneclipse:eclipse
This will generate the plugin project for Eclipse and you can then import this project into the IDE. Execute atlas-mvn eclipse:clean eclipse:eclipse if you want to clean the old project and create again!
With IDEA or m2eclipse, just opening a file will do. That is, you can just import the project using the File | Import | Existing Maven Projects option, and select the relevant project.
In this recipe, we will look at adding plugin modules into an existing plugin project.
Make sure the plugin project already exists, or create a new skeleton project as explained in the previous recipe.
Following are the steps to add plugin modules into an existing plugin project:
Open a command window and go to the plugin project folder where
pom.xmlresides.Type
atlas-create-jira-plugin-moduleand press Enter. This will show all the available plugin modules as a numbered list, as shown in the following screenshot:
Select the number against the module that you are planning to add. For example, type 25 and press Enter if you want to add a simple Web Item module to the plugin.
Follow the instructions to provide details required for the selected module. Some of the options may have default values.
Once the module is completed, type Y or N and press Enter when prompted, depending on whether you want to add another module or not.
Repeat the steps for every module you want to add.
Wait for the BUILD SUCCESSFUL message to appear when no more modules are there to be added.
Similar to the skeleton plugin creation, a set of directories and subdirectories are created during the process of adding plugin modules, along with a number of Java files or Velocity templates required for the selected plugin module.
It also adds the plugin module definition in the atlassian-plugin.xml file based on our inputs in step 4. A sample plugin descriptor, after adding the Web Item module, is shown as follows:
<?xml version="1.0" encoding="UTF-8"?>
<atlassian-plugin key="${project.groupId}.${project.artifactId}" name="${project.name}" plugins-version="2">
  <plugin-info>
    <description>${project.description}</description>
    <version>${project.version}</version>
    <vendor name="${project.organization.name}" url="${project.organization.url}"/>
  </plugin-info>
  <resource type="i18n" name="i18n" location="com.jtricks.demo.demoplugin"/>
  <web-item name="My Web Item" i18n-name-key="my-web-item.name" key="my-web-item" section="system.user.options/personal" weight="1000">
    <description key="my-web-item.description">The My Web Item Plugin</description>
    <label key="my-web-item.label"></label>
    <link linkId="my-web-item-link">http://www.j-tricks.com</link>
  </web-item>
</atlassian-plugin>
As you can see, a web-item module is added. You can also see a resource module, which is added automatically the first time a plugin module is created. This will be the i18n resource file for the plugin, and more key-value pairs will be added into this file when more modules are added. The file has the name {plugin-artifact-name}.properties and is created under the src/main/resources{plugin-group-folder} folder. In our example, a demo.properties file is created under the src/main/resources/com/jtricks/demo folder.
A sample property file is shown as follows:
my-web-item.label=J-Tricks
my-web-item.name=My Web Item
my-web-item.description=The My Web Item Plugin
In this recipe, we will see how to deploy a plugin into JIRA. We will see both the automated deployment using the Atlassian plugin SDK and the manual deployment.
Make sure you have the development environment set up as we discussed earlier. Also, the skeleton plugin should now have the plugin logic implemented in it.
Installing a JIRA plugin using the Atlassian plugin SDK is a cakewalk. The following steps show how it is done:
Open a command window and go to your plugin's root folder, that is, the folder where your
pom.xmlfile resides.Type
atlas-runand press Enter. It is possible to pass more options as arguments to this command. The details regarding this can be found at https://developer.atlassian.com/display/DOCS/atlas-run.You will see a lot of things happening as Maven downloads all the dependent libraries into your local repository. As usual, it is going to take a lot of time when you run it for the first time.
If you are on Windows, and if you see a security alert popping up, click on Unblock to allow incoming network connections.
When the installation is complete, you will see the following message:
[WARNING] [talledLocalContainer] INFO: Server startup in 123558 ms
[INFO] [talledLocalContainer] Tomcat 6.x started on port [2990]
[INFO] jira started successfully and available at http://localhost:2990/jira
[INFO] Type CTRL-C to exit
Open
http://localhost:2990/jirain your browser.Log in using the username as
adminand password asadmin.Test your plugin! You can always go to Administration | Plugins | Manage Add-ons to confirm that the plugin is deployed properly.
If you already have a local JIRA installed, or if you want to manually install your plugin, all you need to do is to package the plugin JAR and install it via the Universal Plugin Manager (UPM), as described in detail at https://confluence.atlassian.com/display/UPM/Installing+Add-ons#InstallingAdd-ons-Installingbyfileupload. Or, you can copy it across to the
JIRA_Home/plugins/installed-pluginsdirectory and restart JIRA.You can package the plugin using the following command:
atlas-mvn clean packageUse
atlas-mvn clean installif you also want to install the packaged plugin into your local repository.
There is only one single command that does the whole thing: atlas-run. When you execute this command, it does the following tasks:
Builds your plugin JAR file
Downloads the latest/specified version of JIRA to your local machine if it is the first time you are running the command
Creates a virtual JIRA installation under your plugin's
/targetfolderCopies the JAR file into the
/target/jira/home/plugins/installed-pluginsdirectoryStarts JIRA in the Tomcat container
Now, if you look at your target folder, you will see a lot of new folders that were created for the virtual JIRA installation! The two main folders are the container folder, which has the Tomcat container setup, and the jira folder, which has the JIRA WAR along with the JIRA home setup!
You will find the database (HSQLDB), indexes, backups, and attachments under /target/jira/home. You can also see your jira-webapp at /target/container/tomcat6x/cargo-jira-home/webapps/jira.
If you have any JSPs that need to be put under the webapp, you will have to copy it to the appropriate folder under the aforementioned path!
It is also possible to use a specific version of JIRA or to re-use the data that we have used for testing. To find out how, just read on.
As mentioned earlier, atlas-run deploys the latest version of JIRA. But what if you want to deploy the plugin into an earlier version of JIRA and test it? There are two ways to do this:
Mention the JIRA version as an argument to
atlas-run. Make sure you runatlas-cleanif you already have the latest version deployed.Run
atlas-clean(if required).Run
atlas-run -v 5.0oratlas-run -version 5.0if you are developing for JIRA version 5.0. Replace the version number with a version of your choice.
Permanently change the JIRA version in your plugin's
pom.xmlfile.Go to your
pom.xmlfile.Modify the
jira.versionproperty value to the desired version.Modify the
jira.data.versionproperty value to a matching version.
Following is how it will look for JIRA 5.0:
<properties>
  <jira.version>5.0</jira.version>
  <jira.data.version>5.0</jira.data.version>
</properties>
Suppose you have added some data onto virtual JIRA; how do you retain it when you clean startup JIRA next time? This is where a new SDK command comes to our rescue. After the atlas-run command has finished its execution, that is, after you have pressed Ctrl + C, execute the following command:
atlas-create-home-zip
This will generate a file named generated-test-resources.zip under the target folder. Copy this file to the /src/test/resources folder or any other known locations. Now modify the pom.xml file to add the following entry under configurations in the maven-jira-plugin plugin section:
<productDataPath>${basedir}/src/test/resources/generated-test-resources.zip</productDataPath>Modify the path accordingly. This will re-use the configurations the next time you run atlas-run.
Following are some points to remember:
Missing a JAR file exception? Make sure the
local-repositoryattribute in thesettings.xmlfile points to the embedded Maven repository that comes with the SDK. If the problem still persists, manually download the missing JAR files and useatlas-mvn installto install them into the local repository.Getting a
BeanCreationExceptionerror? Make sure your plugin is of version 2. Check youratlassian-plugin.xmlfile to see if theplugins-version="2"entry is there or not. If not, add the entry shown as follows:<atlassian-plugin key="${project.groupId}.${project.artifactId}" name="${project.artifactId}" plugins-version="2">Run
atlas-cleanfollowed byatlas-runafter you have added the preceding entry.
Now that we have deployed the test plugin, it is time to add some proper logic, redeploy the plugin, and test it. Making the changes and redeploying a plugin is pretty easy. In this recipe, we will quickly look at how to do this.
You can make changes to the plugin and redeploy it while the JIRA application is still running. Following is how we do it:
Keep the JIRA application running in the window where we executed
atlas-run.Open a new command window and go to the root plugin folder where your
pom.xmlfile resides.Run
atlas-cli.Wait for the Waiting for commands message to appear.
Run the
pi.pistands for plugin install and this will compile your changes, package the plugin JAR, and install it into theinstalled-pluginsfolder.
It is also possible to run the plugin in debug mode and point your IDE's remote debugger to it.
Following are the steps to debug your plugin in Eclipse:
Once the virtual JIRA is up and running with your plugin deployed in it, go to Run | Debug Configurations in Eclipse.
Create a new remote Java application.
Give your application a name, keep the defaults, and give the port number as
5005. This is the default debug port on which the virtual JIRA runs. That's it! Happy debugging!
We have seen how to use atlas-cli to reload a plugin without having to restart atlas-run. It is a pretty good way to save time, but Atlassian have walked the extra mile to develop a plugin named
FastDev, which can be used to reload plugin changes during development to all Atlassian applications including JIRA. And that, from the browser itself!
Create a plugin and use atlas-run to run the plugin as discussed in the aforementioned recipe. Let us assume we are doing it on the plugin we created in the previous recipe—the one with the sample Web Item. If we run this sample Web Item plugin, using atlas-run, we can access JIRA at port 2990 as mentioned earlier, and the Web Item will look as highlighted in the following screenshot:
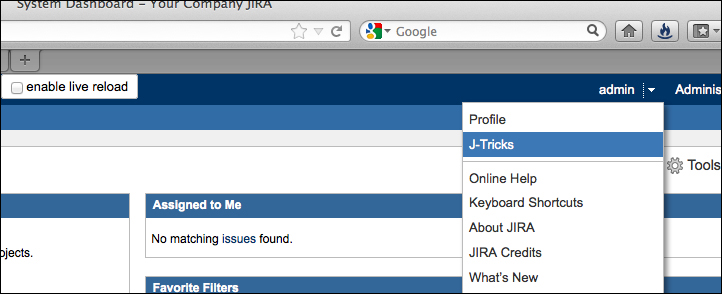
As you can see, the J-Tricks link appears along with the Profile link under the personal section. But what if you wanted the link at the jira-help section, along with Online Help, About JIRA, and so on?
Following are the simple steps to make the aforementioned change to the plugin and reload it using FastDev:
Access the FastDev servlet on the browser using the following path:
http://localhost:2990/jira/plugins/servlet/fastdevYou will find the servlet as shown in the following screenshot:

Make the change to your plugin. In this example, the change is pretty small. All we do is modify the
atlassian-plugin.xmlfile to change thesectionattribute in theweb-itemmodule fromsection="system.user.options/personal"tosection="system.user.options/jira-help".Click on the Scan and Reload button on the servlet (shown in the previous screenshot). On clicking the button, FastDev will reload the plugin. You can track the progress and see the logs on the browser itself, as shown in the following screenshot:

Once the plugin is successfully reloaded, you will see the following screenshot with a success message:

Reload the JIRA page to see if the change is effective. In our example, the new screen will be as follows:

As you can see, the J-Tricks link has moved to the help section.
When the Scan and Reload button is clicked, FastDev looks for files that have changed since the last time a plugin was installed. If it detects any changes, it starts a Maven process that reinstalls the plugin.
Note
More information on FastDev can be found at https://developer.atlassian.com/display/DOCS/Automatic+Plugin+Reinstallation+with+FastDev.
There is more to FastDev than the default configurations. They can be set in your plugin's pom.xml file by adding the required property to the systemPropertyVariables node. You will find the details in the Atlassian documentation (see the previous note box), but the most useful ones are mentioned later.
While looking for changes, FastDev ignores certain files such as .js or .css files that don't need a reinstall of the plugin. The following table shows the full list of files/directories that are ignored:
|
Type |
Property name |
Default(s) |
|---|---|---|
|
Directory |
|
|
|
Extension |
|
|
|
File |
|
– |
If you want to ignore additional files or directories, you can add them using the preceding properties, shown as follows:
<systemPropertyVariables>
...
  <fastdev.no.reload.directories>
    images
  </fastdev.no.reload.directories>
  <fastdev.no.reload.extensions>
    classpath
  </fastdev.no.reload.extensions>
  <fastdev.no.reload.files>
    ${basedir}/src/main/resources/LICENSE.txt
  </fastdev.no.reload.files>
</systemPropertyVariables>In the world of test-driven development (TDD), writing tests is a part and parcel of the development process. I don't want to bore you with why testing is important! Let us just assume that this holds true for a JIRA plugin development as well. In this recipe, we will see the various commands for running unit tests and integration tests in JIRA plugins.
Note
If you are wondering what exactly TDD is, just go to http://en.wikipedia.org/wiki/Test-driven_development.
Make sure you have the plugin development environment set up and the skeleton plugin created! You might have noticed that there are two sample test files—one each for unit tests and integration tests—created under the src/test/java/your_package/ and src/test/ java/it folders. Once you have done this, it is time to write some tests and run those tests to make sure things work as expected!
Without further delay, lets perform the following steps:
The first step is to write some tests! We recommend you use some powerful testing frameworks such as JUnit, in collaboration with mocking frameworks such as PowerMock or Mockito. Make sure you have the valid dependencies added onto your
pom.xmlfile.Let us now make a huge assumption that you have written a few tests! Following is the command to run your unit tests from the command line:
atlas-unit-testThe normal Maven command,
atlas-mvn clean test, also does the same thing.If you are running the integration tests, the command to use is:
atlas-integration-testOr, the Maven command to use is:
atlas-mvn clean integration-testOnce we are onto the stage of running tests, we will see them failing at times. Here comes the need for debugging. Checkout the
*.txtand*.xmlfiles created undertarget/ surefire-reports/, which have all the required information on the various tests that are executed.Now, if you want to skip the tests at the various stages, use
-skip-tests. For example,atlas-unit-test --skip-testswill skip the unit tests.You can also use the Maven options directly to skip the unit/integrations tests or both together:
-Dmaven.test.skip=true: Skips both unit and integration tests-Dmaven.test.unit.skip=true: Skips unit tests-Dmaven.test.it.skip=true: Skips integration tests
The atlas-unit-test command merely runs the related Maven command, atlas-mvn clean test, in the backend to execute the various unit tests. It also generates the outputs into the surefire-reports directory for reference or debugging.
The
atlas-integration-test command does a bit more. It runs the integration tests in a virtual JIRA environment. It will start up a new JIRA instance running inside a Tomcat container, set up the instance with some default data including a temporary license that lasts for three hours, and execute your tests!
But how does JIRA differentiate between the unit tests and integration tests? This is where the folder structure plays an important role. Anything under the src/test/java/it/ folder will be treated as integration tests and everything else will be treated as unit tests!
It is also possible to use custom data for integration tests and to test it against different JIRA versions.
While atlas-integration-test makes our life easier by setting up a JIRA instance with some default data in it, we might need some custom data as well to successfully run a few functional tests.
We can do this in a few simple steps:
Export the data from a preconfigured JIRA instance into XML.
Save it under the
src/test/xml/directory.Provide this path as the value for the
jira.xml.data.locationproperty in thelocaltest.propertiesfile undersrc/main/resources.
The XML resource will then be imported to JIRA before the tests are executed.
Just like the atlas-run command, you can use the -v option to test your plugin against a different version of JIRA. Just like before, make sure you run atlas-clean before executing the tests if you had tested it against another version earlier.
You can also use the -c option to test it against a different version of the Tomcat container. For example, atlas-clean && atlas-integration-test -v 3.0.1 -c tomcat5x will test your plugin against JIRA version 3.0.1 using Tomcat container 5.


