


First of all, let me welcome you to this book. If you've picked up this book, I would assume that you are interested in JavaScript testing. You most probably have experienced JavaScript, and want to enhance your skills by learning how to test your JavaScript programs.
JavaScript is most often associated with the web browser and is one of the key tools for creating interactive elements on web pages. However, unlike server-side languages like PHP, Python and so on, JavaScript fails silently in general (although browsers like IE provides warning messages at times); there are no error messages to inform you that an error has occurred. This makes debugging difficult.
In general, we will be learning about the basic building blocks for JavaScript testing. This will include the basics of HTML (Hyper-text Markup Language), CSS (Cascading Style Sheets ) and JavaScript. After this, you will learn about various techniques to make HTML, CSS, and JavaScript work together; these techniques are the building blocks of what you are going to learn in other chapters.
To be more specific, this is what we will learn about in this chapter:
The basics of HTML, CSS, and JavaScript
The syntax of HTML, CSS, and JavaScript
How to select HTML elements by using CSS and JavaScript
Why do web pages need to work without JavaScript?
What is testing and why do you need to test?
What is an error?
Types of JavaScript errors
Examples shown in this chapter are simplistic—they are designed to allow you to see the major syntax and built-in methods or functions that are being used. In this chapter, there will be minimal coding; you will be asked to enter the code. After that, we'll briefly run through the code examples and see what is happening.
With that in mind, we'll get started right now.
Every web page consists of the following properties—content, appearance, and behavior. Each of these properties is controlled by Hyper Text Markup Language (HTML), Cascading Style Sheets (CSS), and JavaScript, respectively.
HTML stands for Hyper Text Markup Language. It is the dominant markup language for web pages. In general, it controls the content of a web page. HTML defines web pages (or HTML documents) through semantic markups such as<head>, <body>, <form>, and<p> to control headings, the body of a document, forms, paragraphs, and so on. You can see HTML as a way to describe how a webpage should look like.
HTML makes use of markup tags, and these tags usually come in pairs. The syntax of HTML is as follows:
<name-of-html-tag> some of your content enclosed here </name-of-html-tag>
Notice that the HTML tags are enclosed by angular brackets; the HTML tag pair starts off with <name-of-html-tag> and ends with </name-of-html-tag>. This second HTML tags are known as the closing tags and they have a forward slash before the HTML tag.
Some of the common html elements include the following:
For a complete list of html elements, please visit http://www.w3schools.com/tags/default.asp.
We are going to create an HTML document by making use of some of the HTML tags and syntax that we have seen above. (The example you see here can be found in the source code folder of Chapter 1, with the document titled chapter1-common-html.html)
Let's start by opening your favorite text editor or tool such as Microsoft Notepad, and creating a new document.
Enter the following code into your new document and save it.
<!DOCTYPE html PUBLIC "-//W3C//DTD XHTML 1.0 Transitional//EN" "http://www.w3.org/TR/xhtml1/DTD/xhtml1-transitional.dtd">
<html xmlns="http://www.w3.org/1999/xhtml">
<head>
<title>This is a sample title</title>
</head>
<body>
<h1>This is header 1</h1>
<h2>This is header 2</h2>
<h3>This is header 3</h3>
<p>This is a paragraph. It can be styled by CSS</p>
<hr>
<div style="position:absolute; background-color:black; color:#ffffff;top:10px;right:10px;border:solid 3px yellow; height:200px; width:200px;">Your content here</div>
<div>
<div>I am enclosed within a <i>div</i> tag. And it can be styled on a document level.
<ol>
<li>This is an ordered list and it is centered</li>
<li>apple</li>
<li>orange</li>
<li>banana</li>
</ol>
<ul>
<li>This is an unordered list. And it can be styled by CSS.</li>
<li>apple</li>
<li>orange</li>
<li>banana</li>
</ul>
</div>
<div>I am enclosed within a <i>div</i> tag. And it can be styled by CSS.
<ol>
<li>This is an ordered list and it is centered</li>
<li>apple</li>
<li>orange</li>
<li>banana</li>
</ol>
<ul>
<li>This is an unordered list. And it can be styled by CSS</li>
<li>apple</li>
<li>orange</li>
<li>banana</li>
</ul>
<a href="#">This is a link. And it can be styled by CSS </a>
</div>
</div>
</body>
</html>
Finally, open the document in your browser and you will see an example similar to the following screenshot:
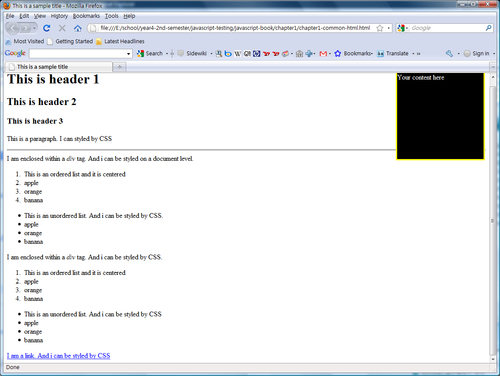
You have just created an HTML document by using the more common HTML elements and HTML syntax.
Each HTML tag has a specific purpose, as you can see from the result in the browser. For example, you must have noticed that<h1>This is header 1</h1> produced the largest text in terms of font-size,<h2>This is header 2</h2> produced the second largest text in terms of font size, and so forth.
<ol> </ol> represents an ordered list, while<ul> </ul> stands for an unordered list (list with bullet points).
You should have noticed the use of<div> </div>. This is used to define a section within an HTML document. However, the effects and power of the<div> </div> can only be seen in the next part of this chapter.
But wait, it seems that I have not done a complete introduction of HTML. That's right. I have not introduced the various attributes of HTML elements. So let's have a quick overview.
In general, the core attributes of HTML elements are the class, id, style, and title attribute. You can use these attributes in the following manner:
<div id="menu" class="shaded" style="..." title="Nice menu"> Your
content here </div>
Notice that all four attributes could be used at the same time. Also, the sequence of the attributes does not matter.
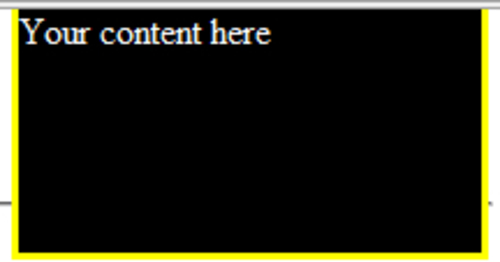
But we have not done any styling yet. The styling only takes place in the style attribute. To see an example, enter the following code between the<body> and</body> tag in the previous code.
<div style= "position:absolute; background-color:black;color:#ffffff;
top:10px;right:10px;border:solid 3px yellow; height:200px;
width:200px;">Your content here
</div>
You should be able to see a 200px by 200px black box with yellow border in the upper-right corner of your browser window (as shown in the previous screenshot). Here's a screenshot that shows only the black box:
In general, the inline style that you have specified manipulates the stylistic properties of the style attribute, to make it look the way you want it to.
Only the style attribute allows you to style the HTML element. But this method is only used for specifying inline style for an element.
In case you are wondering what the<title> tag does, it is essentially an attribute that specifies extra information about an element. This is most often used within the<head> tag. If you open up any HTML document that contains a<title> tag, you will find the contents of this tag in the tab of your browser or title of your browser window.
What about id attribute and class attribute? We'll cover these briefly in the next section.
In general, the id attribute and class attribute allows the HTML element to be styled by giving the CSS (Cascading Style Sheets, which we will be covering later in this chapter) a way to refer to these elements. You can think of the id attribute and class attribute as a 'name', or a way to identify the corresponding HTML element such that if this 'name' is referred by the CSS, the element will be styled according to the CSS defined for this particular element. Also, the id attribute and class attribute are often referred to by JavaScript in order to manipulate some of the DOM (Document Object Model) attributes, and so on.
There is one important idea that you must understand at this point of the chapter: the id attribute of each HTML element has to be unique within an HTML file, whereas the class attribute doesn't.
CSS stands for Cascading Style Sheet. A CSS is used to control the layout, appearance, and formatting of the web page. CSS is a way for you to specify the stylistic appearance of the HTML elements. Via CSS, you can define the fonts, colors, size, and even layout of the HTML elements.
If you noticed, we have not added any form of CSS styles to our HTML document yet; in the previous screenshots, what you see is the default CSS of our browser (apart from the black box on the upper-right), and most browsers have the same default CSS if no specific CSS is defined.
CSS can be internal or external; an internal CSS is embedded in a HTML document using the<style> tag, whereas an external CSS is linked to by using the<link> tag, for example:
<link rel="stylesheet" type="text/css" href="style.css">.
In general, using internal CSS is considered to be a bad practice and should be avoided. External CSS is widely favored over internal CSS because it allows us to save more time and effort as we can change the design of the website by just making changes to a .css file instead of making individual changes to each HTML document. It also helps in improving performance, as the browser will only need to download one CSS and cache it in memory.
The most important point for this section is the use of CSS selectors and the syntax of the CSS.
The CSS selectors work as follows: for selecting IDs, the name of the ID is preceded by a hash character. For a class selector, it is preceded by a dot. In the code that you will be seeing later, you will see that both ID and class selectors are used (they are also commented in the source code). Here's a quick preview of the selectors:
/* this is a id selector */
#nameOfID {
/* properties here*/
}
/* this is a class selector */
.nameOfClass {
/* properties here*/
}
The syntax of the CSS is as follows: selector { declaration } . The declaration consists of a semicolon-separated list of name or value attribute pairs, in which colons separate the name from the value.
Remember that we've mentioned the id attribute and class attribute in the preceding section? Now you will see how id attributes and class attribute are being used by CSS.
Now we are going to style the HTML document that we created in the preceding section, by using CSS. For simplicity, we'll use an internal CSS. What will happen in this section is that you will see the CSS syntax in action, and how it styles each HTML element by making use of the id attribute and class attribute of the respective HTML element. Note that both id and class selectors are used in this example.
Note
The completed version of this example can be found in the source code folder of Chapter 1, with the file name: chapter1-css-appearance.html
Continuing from the previous example, open up your text editor and insert the following code after the
</title>tag:<style type="text/css"> body{ background-color:#cccccc; } /* Here we create a CSS selector for IDs by a name preceded by a hash character */ #container{ width:750px; /* this makes the width of the div element with the id 'container' to have a width of 750px */ height:430px; border:1px solid black;solid 1px black; } /* #[nameOfElement] */ #boxed1{ background-color:#ff6600; border:2px solid black; height:360px; width:300px; padding:20px; float:left; margin:10px; } #boxed2{ HTML documentstyling, CSS usedbackground-color:#ff6600; border:2px solid black; height:360px; width:300px; padding:20px; float:left; margin:10px; } #ordered1{ font-size:20px; color:#ce0000; text-align:center; } #unordered1{ font-size:12px; color:#000f00; } #ordered2{ font-size:20px; color:#ce0000; text-align:center; } #unordered2{ font-size:12px; color:#000f00; } #unordered2.nice{ font-size:16px; } .intro{ color:black; font-weight:bold; } a:link {color:#FF0000;} /* unvisited link */ a:visited {color:#00FF00;} /* visited link */ a:hover {color:#FF00FF;} /* mouse over link */ a:active {color:#0000FF;} /* selected link */ </style>After adding the CSS code above, you will need to add
classandidattributes to your HTML elements. Here's the stuff you'll need to add:<! - Some code omitted above -- > <body> <! - Some code omitted -- > <p class="intro">This is a paragraph. I am styled by a class called "intro"</p> <hr> <div id="container"> <div id="boxed1">I am enclosed within a <i>div</i> tag. And I can be styled on a document level. <ol id="ordered1"> <li>This is an ordered list and it is centered</li> <li>apple</li> <li>orange</li> <li>banana</li> </ol> <ul id="unordered1"> <li>This is an unordered list.</li> <li>apple</li> <li>orange</li> <li>banana</li> </ul> <a class="link" href="#">I am a link that is styled by a class</a> </div> <div id="boxed2">I am enclosed within a <i>div</i> tag. And I am styled on a local level. <ol id="ordered2"> <li>This is an ordered list and it is centered</li> <li>apple</li> <li>orange</li> <li>banana</li> </ol> <ul class="nice" id="unordered2"> <li>This is an unordered list and I have a class defined</li> <li>apple</li> <li>orange</li> <li>banana</li> </ul> <a class="link" href="#">I am a link that is styled by a class</a> </div> </div> </body> </html>
The
classandidattributes that need to be added are highlighted in the code snippet above. If you are not sure if you have done it correctly, open upchapter1-css-appearance.htmland have a look.Now save the file and open it in your browser. You should see that your HTML document now looks different to how it was before it was styled by CSS. Your output should be similar to the example shown in following screenshot:
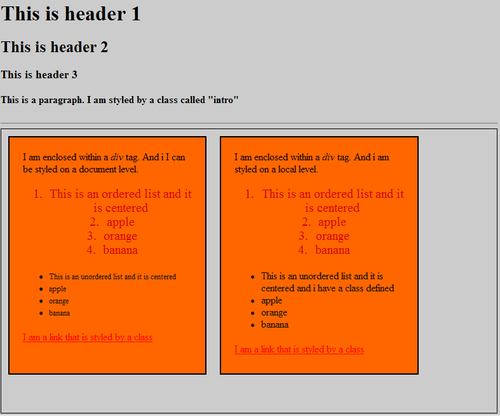
You have just applied CSS to the HTML document that you created in the previous section. Notice that you have used both the id selector and class selector syntax. Within each selector, you should also see some stylistic attributes.
The HTML elements in this example are similar to the previous example, except that the HTML elements now have id and class names.
In the following sub-sections, I'll continue to explain the techniques used for referring to the various HTML elements, and how we styled the elements by using their stylistic attributes.
We referenced various HTML elements by its id or class name. Consider the following code snippet in the above example:
<! some code omitted above-->
<p class="intro">This is a paragraph. I am styled by a class called "intro"</p>
<! some code omitted -->
<div id="boxed">This is enclosed within a <i>div</i> tag. And it is styled on a local level.
<ol id="ordered1">
<li>This is an ordered list and it is centered</li>
<li>apple</li>
<li>orange</li>
<li>banana</li>
</ol>
<ul class="nice" id="unordered1">
<li>This is an unordered list and has a class defined</li>
<li>apple</li>
<li>orange</li>
<li>banana</li>
</ul>
<a class="link" href="#">This is a link that is styled by a class</a>
</div>
The highlighted code refers to the HTML elements where ids and class name attributes are being used. Notice that some of the HTML elements have both ids and class name attributes while some do not.
Now consider the CSS snippet which is found in the example:
#boxed1{
background-color:#ff6600;
border:2px solid black;
height:360px;
width:300px;
padding:20px;
float:left;
margin:10px;
}
The #boxed1 selector refers to the<div> with the id #boxed1 in the HTML document. Notice that the<div> with the id #boxed1 is styled according to the name and value attribute pairs within the declaration. If you make some changes to the value attribute and refresh your browser, you will notice changes to the #boxed1 element as well.
Now, consider the following CSS snippets:
.intro{
color:black;
font-weight:bold;
}
And:
a:link {color:#FF0000;} /* unvisited link */
a:visited {color:#00FF00;} /* visited link */
a:hover {color:#FF00FF;} /* mouse over link */
a:active {color:#0000FF;} /* selected link */
The previous two code snippets are what we call class selectors, which have a slightly different syntax than the id selectors. For instance the .intro class selector selects the<p> with class name "intro" while the a:link , a:visited, a:hover, and a:active selectors refer to the four states of an anchor pseudo class.
Until now, we have covered how CSS selectors work to select HTML elements in an HTML document. But we have not covered the situation where an HTML element has both id and class attributes; we'll explain it now.
Although id selectors and class selectors appear to be the same, there are subtle differences. For instance, the id selector is used to specify a single HTML element, whereas the class selector is used to specify several HTML elements.
For example, you may try changing the anchor element<a class="link" href="#"> to<a class="intro" href="#"> and you would notice that the link is now bold.
In the following section, you will learn that the id and class name of an HTML element play an important role in providing interactivity on a web page. This is done by using JavaScript, where JavaScript makes a reference to an HTML element either by its id or class name, after which various actions such as DOM manipulation are performed on the HTML element that is referenced.
The examples given here are not complete. For a complete reference to CSS, you may visit http://www.w3schools.com/css/css_reference.asp.
In this section we'll cover some of the key aspects of JavaScript. In general, if HTML provides content for an HTML document and CSS styles the HTML document, then JavaScript breathes life into an HTML document by providing behavior to the webpage.
The behavior can include changing the background colour of an HTML document dynamically, or changing the font size of the text, and so on. JavaScript can even be used to create effects such as animating slideshows, and fade-in and fade-out effects.
In general, the behaviors are event-based, and are achieved by manipulating the DOM in real-time (at least from the users' point of view).
In case you are fairly new to JavaScript, JavaScript is an interpreted programing language with object-oriented capabilities. It is loosely-typed, which means that you do not need to define a data type when declaring variables or functions.
In my opinion, the best way to understand the language features of JavaScript is through an example. Now, it's time for action.
We are going to apply JavaScript to an HTML document (styled with CSS). In general, the HTML elements and CSS are not changing as compared to the previous example, except that you will see HTML buttons added to the HTML document.
The JavaScript applied to the HTML document in this example is known as inline JavaScript because it exists within the HTML document.
What we are trying to accomplish here is to show you the language features such as how to declare variables, functions, manipulating DOM of the HTML elements, and various methods of referencing HTML elements by their id or class. You will also learn about some of the commonly-used built-in methods of arrays, and elements that are referenced, and how to use them to make your tasks easier.
This example is nothing fancy, but you will learn some of the most important and commonly-used techniques for referencing HTML elements and then manipulating the DOM.
Note
(The completed code for this example can be found in the source code folder, Chapter 1, with the file name of: chapter1-javascript-behavior.html):
Continuing on from the previous example, enter the following JavaScript code after the
</style>tag:
<script type="text/javascript">
function changeProperties(d){
var e = document.getElementById(d);
e.style.position = "absolute";
e.style.fontFamily = "sans-serif";
e.style.backgroundColor = "#000000";
e.style.border = "solid 2px black";
e.style.left = "200px";
e.style.color = "#ffffff";
}
function arrangeList(f) {
// This is the element whose children we are going to sort
if (typeof f == "string"){ // check to see if the element is "string"
f = document.getElementById(f);
}
// Transfer the element (but not text node) children of e to a real array
var listElements = [];
for(var x = f.firstChild; x != null; x = x.nextSibling)
if (x.nodeType == 1){
listElements.push(x);
}
listElements.sort(function(n, m) { // .sort is a built in method of arrays
var s = n.firstChild.data;
var t = m.firstChild.data;
if (s < t){
return -1;
}
else if (s > t){
return 1;
}
else{
return 0;
}
});
for(var i = 0; i < listElements.length; i++){
f.appendChild(listElements[i]);
}
}
function insertContent(a){
var elementToBeInserted = document.getElementById(a);
elementToBeInserted.innerHTML = "<h1>This is a dynamic content</h1><br><p>great to be here</p>";
}
function changeElementUsingName(a){
var n = document.getElementsByName(a);
for(var i = 0; i< n.length; i++){
n[i].setAttribute("style","color:#ffffff");
}
}
function hideElement(a){
var header = document.getElementById(a);
header.style.visibility = "hidden";
}
function hideElementUsingTagName(a){
var n = document.getElementsByTagName(a);
for(var i = 0; i< n.length; i++){
n[i].setAttribute("style","visibility:hidden");
}
}
</script>
Now save your document and load it in your browser, and you will see an example similar to the one shown in the next screenshot:
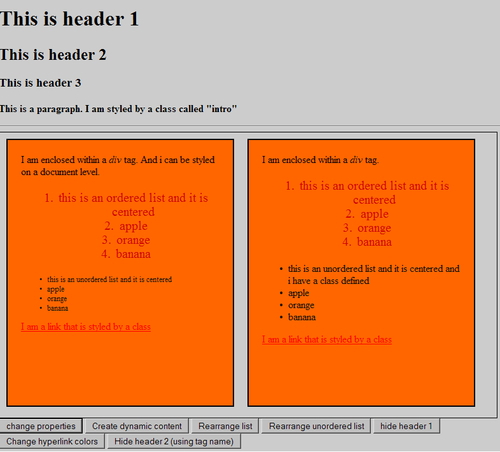
You have just created an HTML document styled with CSS, and applied JavaScript to it. There are generally no changes to the HTML elements and CSS as compared to the previous example, but you will see the<button> elements.
Now you can see the power of JavaScript in action by clicking on the HTML buttons. You should see that if you click on the change properties button, you will see the HTML box on the right shifts to the left by 200pixels, and its background change color. You can also click on other buttons to test their effect on the HTML document.
What happens when you click on each HTML button is that you are invoking a JavaScript function that manipulates the relevant HTML element in the document, via the DOM. You should see effects like hiding content, creating dynamic content, rearranging the list of items, and so on.
In the following sections, I'll first start by briefly introducing the JavaScript syntax, followed by attaching events to HTML elements, and finally using JavaScript's built-in methods to find HTML elements and manipulating them.
We'll start with learning the basic syntax of JavaScript. Consider the opening<script> tag:
<script type="text/javascript">
// code omitted
</script>
What the above <script> tag does is identify where JavaScript starts and ends. Within the type attribute, we write text/javascript to denote that this is a JavaScript code.
Now, let us consider the following code snippet:
function arrangeList(f) {
if (typeof f == "string"){ // check to see if the element is "string"
f = document.getElementById(f);
}
var listElements = [];//declaring a variable
for(var x = f.firstChild; x != null; x = x.nextSibling)
if (x.nodeType == 1){
listElements.push(x);
}
listElements.sort(function(n, m) { // .sort is a built in method of arrays
var s = n.firstChild.data;
var t = m.firstChild.data;
if (s < t){
return -1;
}
else if (s > t){
return 1;
}
else{
return 0;
}
});
for(var i = 0; i < listElements.length; i++){
f.appendChild(listElements[i]);
}
}
The above code snippet shows the function called arrangeList. We define a function by using the reserved keyword function, followed by the name of the function. Parameters are passed into the function within the ( ) and in this code snippet, f is the parameter passed into the function. The function starts with a {and ends with a}.
In short, the function syntax can be defined as follows:
function functionname(parameter1, parameter2, ... parameterX){
Body of the function
}
The second highlighted line shows decision making in JavaScript through the use of the if statement. The syntax is similar to the C programing if statement. The syntax of JavaScript's if statement is as follows:
if (condition){
code to be executed if condition is true.
}
A variation of the if statement is the if-else
if (condition){
code to be executed if condition is true.
}
else{
code to be executed if condition is not true.
}
We use the keyword var followed by a variable name. In the above example, var listElements = []; means that a variable listElements is defined, and it is given the value of an empty list denoted by []. In general, variables can be assigned arbitrary values since JavaScript is loosely-typed.
Continuing from above, you should see the for loop in action. Its syntax is also similar to the C language's for loop.
If you are new to JavaScript, you may be confused by document.getElementById() and statements like listElements.push(x). What happens in these two lines is that we are using some of the built-in methods of JavaScript to reference the HTML element with the corresponding IDs. For now, document.getElementById() will be more important to you; this will be covered in the section where you learn how to find elements in your HTML document.
Let's start off by looking at the following code snippet that is found in your JavaScript:
<button onclick="changeProperties('boxed1')">change properties</button>
<button onclick="insertContent('empty')">Create dynamic content</button>
<button onclick="arrangeList('ordered1')">Rearrange list</button>
<button onclick="arrangeList('unordered1')">Rearrange unordered list</button>
<button onclick="hideElement('header1')">hide header 1</button>
<button onclick="changeElementUsingName('lost')">Change hyperlink colors</button>
<button onclick="hideElementUsingTagName('h2')">Hide header 2 (using tag name)
</button>
The above code snippets show HTML buttons with an event attached to them via onclick. When the button is clicked, the corresponding JavaScript function is invoked.
For example,<button onclick="changeProperties('boxed1')">change properties</button> means that when this button is clicked, the changeProperties() function is invoked with the parameter boxed1, which happens to be a div element with the ID boxed1.
Remember that we've seen a few built-in methods of JavaScript. JavaScript can be used to find elements in an HTML document by using some of JavaScript's built-in methods or properties. After finding the HTML element, you can manipulate its properties. JavaScript features three properties of the Document object (which is the root of every DOM tree) that allows you to find the HTML elements that you need. The techniques mentioned here form the backbone of JavaScript testing. Understanding this section is vital to understanding the rest of the book. So make sure that you understand this section of the chapter.
Firstly, the document.getElementById(). This property allows you to select an HTML element with a specific ID. document.getElementById()returns only a single element because the value of every id attribute is (supposed to be) unique. Here's a code snippet from the example:
function changeProperties(d){
var e = document.getElementById(d);

e.style.position = "absolute";
e.style.fontFamily = "sans-serif";
e.style.backgroundColor = "#000000";
e.style.border = "2px solid black";
e.style.left = "200px";
e.style.color = "#ffffff";
}
Consider the highlighted line in the above code snippet, var e = document.getElementById(d). What happens here is that the HTML element 'd', which happens to be a parameter of the function changeProperties(), is being referred. If you look at the source code for this example, you will see an HTML button with the following:<button onclick="changeProperties('boxed1')"> change properties</button>. Notice that'boxed1' is being referenced, and this means that the parameter 'f' takes the value of the HTML element id of'boxed1'. Therefore, var e = document.getElementById(d) means that the HTML div with the ID of'boxed1' is being assigned to variable e via the document.getElementById() method.
Secondly, note the document.getElementsByName() statement. This is similar to document.getElementById(), but it looks at the name attribute instead of the id attribute. It returns an array of elements rather than a single element. Consider the following code snippet:
function changeElementUsingName(a){
var n = document.getElementsByName(a);

for(var i = 0; i< n.length; i++){
n[i].setAttribute("style","color:#ffffff");
}
}
What happens here is that the HTML element with the name 'a' (which happens to be a parameter of the function) is referenced, and because it returns an array of elements, we use a for loop to loop through the elements, and use the method .setAttribute to change the color of the text to white. The name attribute applies to<form> and<a> tags only.
Finally, look at document.getElementsByTagName(). This method looks for HTML elements by the HTML tag name. For instance, the following code:
function hideElementUsingTagName(a){
var n = document.getElementsByTagName(a);

for(var i = 0; i< n.length; i++){
n[i].setAttribute("style","visibility:hidden");
}
}
finds the HTML element by the tag name, and makes it hidden. In our example, a h2 is used as a parameter and hence when you click on the relevant button, all text that is enclosed within the<h2> tags will disappear.
Now, if you change the parameter to div, then you will notice that all of the boxes will disappear.
Now I'll briefly describe how JavaScript works to interact with HTML elements. Here's what you will learn in this subsection: after an HTML button is clicked (an event), it invokes a JavaScript function. Then, the JavaScript function receives a parameter and executes the function. Consider the following code snippets.
The following code is for an HTML button with an event attached to it:
<button onclick="insertContent('empty')">Create dynamic content</button>code
Next, the following code is for an HTML div element:
<div id="empty"></div>
Lastly, the following is code which shows the JavaScript function that is to be invoked:
function insertContent(a){
var elementToBeInserted = document.getElementById(a);
elementToBeInserted.innerHTML = "<h1>This is a dynamic content</h1><br><p>great to be here</p>";
}
Now, let me explain what we are trying to do here; after clicking the HTML button, the JavaScript function insertContent() is invoked. The parameter 'empty' is passed into insertContent(). 'empty' refers to the div element with ID 'empty'.
After insertContent() is invoked, the parameter 'empty' is passed to a variable var elementToBeInserted, by using document.getElementById(). Then, using the built-in method innerHTML() for HTML element nodes (because an HTML element node is passed to the elementToBeInserted variable), we dynamically insert the text "<h1>This is a dynamic content</h1><br><p>great to be here</p>".
Go ahead and open the file in your web browser, and click on the HTML button. You will notice a new piece of text being inserted into the HTML document, dynamically.
Note
The built-in method innerHTML() for HTML element nodes allows us to manipulate (or in this case, dynamically insert) HTML contents into) the HTML node that is using the innerHTML() method. For example, in our example, we will insert "<h1>This is a dynamic content</h1><br><p>great to be here</p>" into<div id="empty"></div>. Technically speaking, after the insertion, the end result will be: :<div id="empty"><h1>This is a dynamic content</h1><br><p>great to be here</p></div>.
Generally speaking, the main difference between JavaScript and server-side languages lies in their usage and where they are executed. In modern usage, JavaScript runs on the client side (the users' web browser), and server-side languages runs on servers, and is therefore often used to read, create, delete, and update databases such as MySQL.
This means that the JavaScript is processed on the web-browser, whereas server-side languages are executed on web servers.
Server-side languages include ASP.NET, PHP, Python, Perl, and so on.
In the context of modern web development techniques, you have probably heard of Web 2.0 applications. An important technique is that JavaScript is often used extensively to provide interactivity and to perform asynchronous data retrieval (and in some cases manipulation), which is also known as AJAX (which is a short-hand for Asynchronous JavaScript and XML).
JavaScript cannot be used to interact with databases, whereas server-side languages such as PHP, Python, and JSP can.
JavaScript is also known as front-end, whereas server-side is back-end technology.
Note
JavaScript can be used on the server side as well, although it is most frequently associated with client-side technologies. Although JavaScript is typically not associated with interacting with databases, this might change in the future. Consider new browsers such as Google Chrome, which provides a database API for JavaScript to interact with built-in databases in the browser itself.
Although there are many arguments as to whether we should make web pages work with or without JavaScript, I personally believe that it depends on how the website or application is used. But anyway, I'll start off with some of the common reasons for why pages need to work without JavaScript.
Firstly, not all users have JavaScript enabled in web browsers. This means that users whose JavaScript is not enabled will not be able to use your application (or features) if it requires JavaScript.
Secondly, if you intend to support your user on their mobile device, then you need to make sure that your website or application works without JavaScript. The main reason is because support for JavaScript on mobile devices is often less than satisfactory; if you use JavaScript, your website or application may not work as well as expected (or worse, fail to work altogether).
Another way to look at this is based on your understanding of your user base. For instance, probably the only time when you can afford to ignore users who have JavaScript disabled is when you can guarantee or know before-hand that your user base has JavaScript enabled. Such situations can occur when you are developing an application for internal use, and you know before-hand that all of your users have JavaScript enabled.
In case you are wondering what you can do to create pages that work without JavaScript, you can check out the idea of graceful degradation. Imagine that you have an application and the core features of this application are AJAX-based. This means that in order to use your application, your user will need to have JavaScript enabled. In this case, you would most probably have to consider making your pages to work without JavaScript in order to ensure that all of your users can use your application.
Generally speaking, programmers write a program with a few objectives in mind. Besides creating a program to solve a certain problem or to fulfil a certain demand, other common objectives would include ensuring that the program is at least correct, efficient, and can be easily extended.
Of the above-mentioned objectives, correctness is the most important objective at least in this book. By correct, we mean that for any given input, we need to make sure that the input is what we want or need, and that the corresponding output is correct. The implicit meaning of this is that the program logic is correct: it works the way we intended it to work, there are no syntax errors, and the variables, objects, and parameters referenced are correct and what we need.
Take, for instance, a retirement plan calculator written in JavaScript. We could expect the user to enter values such as their current age, retirement age, and savings per month. Imagine if a user were to enter incorrect data, such as a string or character. The JavaScript retirement plan calculator would not work, because the input data is incorrect. Or worse, if the user entered the correct data and our algorithm for calculating the amount of money to be set aside for retirement is incorrect, this results in the output being incorrect.
The above errors could be avoided by testing, which is the main topic of this book. In the remaining portions of this chapter, we will talk about some of the types of errors that you may face as a JavaScript programmer. But before we move into that, I'll briefly discuss why we need to test.
First and the foremost, human beings are prone to mistakes. As a programmer, you have probably made coding mistakes during your programing career. Even the best programmers on Earth have made mistakes. What makes it worse is that we may not have realized the mistake until we tested the program.
Secondly, and perhaps more importantly, JavaScript generally fails silently; there are no error messages to tell you what errors have occurred or where that error has occurred, assuming you are not using any testing unit or tools to test your JavaScript. Therefore, there is little or no way to know what has happened to your JavaScript program, if there is an error.
Note
In Microsoft's Internet Explorer, you can actually see if you have any JavaScript errors. You will need to turn on Script Debugging which is found in Tools | Internet Options | Advanced| Script Debugging. With Script Debugging turned on, you will see a yellow 'yield' icon on the bottom left hand corner for IE7 or IE8 if you have any JavaScript errors. Clicking on that icon will give you a window where you can click on Show Details to get more information about the error.
Thirdly, even if there are ways to inform you of JavaScript errors, such as enabling Script Debugging, as mentioned above, there are certain errors that cannot be detected by such means. For instance, your program syntax may be 100 percent correct, but your algorithm or program logic might be incorrect. This means that even if your JavaScript can be executed, your output could be incorrect.
Lastly, testing JavaScript will help you to identify cross-browser compatibility issues. Because there are approximately five major types of browsers (not accounting for different versions) to support—namely Microsoft's Internet Explorer, Mozilla's Firefox, Google's Chrome, Apple's Safari and the Opera Web Browser—you will certainly need to test to ensure that your website or application works across all browsers, because different browsers have different DOM compatibilities.
Ensuring that the program is correct means confirming and checking that the input is correct, and then that the output is what we intended it to be.
Before I start introducing the types of JavaScript errors, we need to understand the inner workings of JavaScript and the web browser. In general, a user requests a web document from the server, and this document is loaded into the user's web browser. Assuming that the web document has JavaScript embedded (either via an external JavaScript file or via inline JavaScript), the JavaScript will be loaded together with the web document (from top to bottom). As the web document is loaded by the web browser, the JavaScript engine of the web browser will begin to interpret the JavaScript embedded in the web document. This process will continue until the JavaScript (and the web document) is completely loaded into the user's web browser, ready for interaction. Then the user may start to interact with the web document by clicking on links or buttons that may have JavaScript events attached to them.
Now, with the above process in mind, we'll start introducing the different types of JavaScript errors, by using simple examples.
The first types of error that we'll discuss are loading errors. Loading errors are errors that are caught by the JavaScript engine of the web browser as the document is loading.
In other words, loading errors occur before the JavaScript has the opportunity to function. These errors are typically spotted by JavaScript engines before the code has the chance to execute.
With the previously-mentioned things in mind, let us now experience how such loading errors occur.
Now we'll see loading errors in action. We do not actually see it, but you will learn about some of the most common causes for loading errors.
Note
The complete code for this example can be found in the source code folder Chapter 1, with a file name of chapter1-loading-errors.html
Open up your text editor and create a new document.
Enter the following code into your document:
<html>
<head><title>JavaScript Errors - Loading Errors</title></head>
<body>
<script type="text/javascript">/*
1. Loading Errors
*/
/*
// Example 1 - syntax errors
var tests = "This is a test"; // note two s
document.write(test); // note one s
*/
/*
// Example 2 - syntax errors as the keyword "var" is not used
Var Messsage = "This is a test"; // note three s's
document.write(Message); // note two s's
*/
/*
// Example 3 - error caused by using a key word
var for = "this is a test";
document.write(in);
*/
</script>
</body>
</html>
Now, uncomment the
/*and*/wrapped around example 1, save the document and load it into your browser. You should see a blank page on your web browser.Repeat the above step for example 2 and example 3. You should see a blank page for both examples 2 and 3.
You have just created an HTML document with erroneous JavaScript code. From the comments in the code, you should realize that the errors are caused largely due to syntax errors. And when such errors occur, there is simply no response from the JavaScript in the web browser.
Some examples of common syntax errors would include missing brackets, missing semi-colons, and incorrect variable names.
In general, as long as your code is correct in terms of syntax, then you should be able to avoid loading errors.
Now, you might ask, what happens if only certain parts of the JavaScript code are incorrect? This would depend on where the error has occurred.
Now we'll see partially-correct JavaScript code in action and its implications.
Note
The completed source code for this example can be found in the source code folder, with the file name Chapter1-loading-errors-modified.html.
Open your text editor, create a new document, and enter the following code into your document:
<html>
<head><title>JavaScript Errors - Loading Errors</title></head>
<body>
<script type="text/javascript">/*
1. Loading Errors - modified
*/
// this is correct code
var tests = "This is a CORRECT test";
document.write(tests);
// this is incorrect code. The variable name referred is incorrect
var Messsage = "This is a FIRSTtest";
document.write(Message);
// this is correct code
var testing = "this is a SECOND test";
document.write(testing);
</script>
</body>
</html>
Now save your document and load your document in your web browser. You should see the text This is a test in your browser.
If you trace the code, you should see that the JavaScript executes from top to bottom. It stops executing when it encounters an error where an incorrect variable name is referenced by document.write(). Because it stops executing when it encounters an error, the remaining JavaScript code will not be executed.
Things are slightly different if your JavaScript code is organized in terms of functions. In this situation, functions that have incorrect syntax will fail to execute, whereas syntactically-correct functions will continue to work, regardless of its order in the code.
By now, you should have a brief understanding of loading errors and how to prevent them by making sure that your code is syntactically correct.
Now let us move on to the next form of error—runtime errors.
Do you remember how JavaScript is loaded together with the web document into the browser? After the web document is loaded completely into the web browser, it is ready for various events, which leads to execution of JavaScript code.
Runtime errors occur during execution; for instance, consider an HTML button that has a JavaScript event attached to it. Assuming that a JavaScript function is assigned to an event, then if the JavaScript function has an error, that function will not be executed when the user clicks on the HTML button.
Other forms of runtime error occur when you misapply an object, variable, or method, or when you reference objects or variables that do not exist yet.
Now we shall see all three common causes of runtime errors in action.
Note
The code sample is saved in the source code folder of Chapter 1, entitled: chapter1-runtime-errors.html.
Open up your text editor, enter the following code into a new document:
<html>
<head><title>JavaScript Errors</title></head>
<script type="text/javascript">/*
2. Runtime Errors
*/
alert (window.innerHTML);
var Test = "a variable that is defined";
alert(Test); // if variables is wrongly typed, than nothing wil happen
// nothing happens when the user clicks on the HTML button, which invokes the following function
function incorrectFunction(){
alert(noSuchVariable);
}
</script>
<body>
<input type="button" value="click me" onclick="incorrectFunction()" />
</body>
</html>
Save the document and load it into your web browser.
After loading the document into your browser, you will see two alert boxes: the first box says undefined and the second alert box says a variable that is defined. Then you will see an HTML button that says click me.
Click on the button, and you will see that nothing happens.
The first alert that you have seen shows you an error that is caused by misapplying a method. window.innerHTML does not exist, as .innerHTML is applied to HTML elements and not to window. The second alert window says that a variable that is defined as the variable is defined before the alert() references it. Lastly, nothing happens when you click on the HTML button because the function that is to be invoked has the error of referencing to a variable that is not defined. Hence it is not executed during the event onclick().
In this example, you should realize that the logic of your code is of great importance you will need to define your variables or objects before using them in your code. Also, make sure that the method or properties applied are correct. Otherwise, you will end up with a runtime error.
Now, we'll move on to the last form of JavaScript error—logic errors.
In this final example, you will see logic errors.
Open your text editor, enter the following code into a new document:
<html>
<head><title>JavaScript Errors</title>
<script type="text/javascript">
/* Logic Errors */
//saving some input in wrong variables
function amountOfMoneySaved(amount){
var amountSpent, amountSaved;
amountSpent = amount; // where you really meant amountSaved
var currentAmount = 100;
var totalAmountSaved = currentAmount - amountSpent;
alert("The total amount of money you have now is " +
totalAmountSaved );
}
function checkInput(amount){
if(amount>0 && amount<99)
alert("is number");
else
alert("NOT number");
}
</script>
</head>
<body>
<!-- this shows an infinite loop, an obvious logic error-->
<script>
// an infinite loop
for(var i = 0; i<10; i--){
document.write(i + "<br>");
}
</script>
<form id="moneyForm">
You currently have 100 dollars.
The amount of money you have saved is: <input type="text" id="money" name="money" /><br />
<input type="submit" value="Submit"
onclick="amountOfMoneySaved(moneyForm.money.value)" />
</form>
</body>
</html>
Now, save the code and open the document in your browser.
You will see two simple forms. The first form which has the text: You currently have 100 dollars. The amount of money you have saved is" " followed by an input box. And the second form contains the text: Checking if you have entered a digit followed by an input box.
Now try to enter a number that is larger than 99 (say, 999).
You may have noticed that after entering your input, the total amount of money appears to have decreased. This is an example of a logic error, where you are supposed to add the input, but instead the function subtracts the input. Why did the program not work the way it was intended to?
You have just witnessed a simple example of logic error in action. Logic errors can take many forms. You may have noticed a code snippet in the above example that is commented out.
<script type="text/javascript">// example 1: infinite loop
for(var i = 0; i<10; i--){
document.write(i + "<br>");
}
</script>
This is an example of an infinite for loop. In this loop, you may have noticed that the statement document.write(i+<br>"); should be executed 10 times ( from var i = 0 to when i = 9 ). However, the third expression in the initializer within the for statement is decreasing (i--).
As a result, the variable i will never be able to reach the condition where i>10. If you uncomment the code, you will notice that the statement document.write(i"<br>"); will continue to execute until the web browser hangs; if you are using Firefox on a Windows machine, the web browser will hang and you will have to quit the browser by using the Task Manager.
By now, you should have a brief understanding of the types of JavaScript errors. While we typically cannot avoid errors, we should try to minimize errors as we write code. In this section, I'll briefly discuss some of the strategies that you can take, as a beginner JavaScript programmer, to minimize the amount of errors that can occur.
As seen in the above forms of errors, you should always make sure that you are using the correct names for your objects, variables, and functions. Because such errors will not be shown in your web browser, as you write your code, it is always a good idea to check for the correct use of names.
This also includes using unique names for different variables, objects, and functions. Remember that JavaScript is case-sensitive; therefore do remember to check that you are using the correct case for your variables, objects, and functions as well.
Because you are using JavaScript, at least for this book you should check that you are using the correct syntax before you run your program. Previously, we went through some of the key features of the language syntax, for instance, ending each statement with a semi-colon, using proper and matching brackets, using correct or unique function names, and so on.
Planning before the actual coding process helps to reduce the possibility of logic errors. This helps you to think through your program and spot obvious logic errors in your code. Planning can also help you to check for blind spots, such as missing features or functions.
As you write your program, it is always a good idea to check for errors as you complete certain portions of the code. For example, if your program consists of six functions, it is always wise (and less error prone) to check the correctness of each function. Making sure that each function that you have written is correct before moving to the next function is a good practice, and can save you a lot of trouble as you write large programs.
I personally believe that a suitable text editor (or IDE) is a crucial step in minimizing coding errors. Notice that I did not say that you need a "good" text editor, but rather a "suitable" text editor. This is because different programing languages have different features and different capabilities.
For instance, if you have programmed in Python, you will notice that you do not need to have the ability to check for matching brackets, because Python is based on code blocks (tabbing or spacing to denote blocks of code). However, in the case of JavaScript, you would certainly need your text editor to help you check for matching (or missing) brackets. Some code editors that can accomplish the above includes Dreamweaver (commercial) and Eclipse (free).
In addition to matching brackets checking, here are some other features that will be useful for you when you are coding in JavaScript:
Auto-tabbing or spacing after keywords or matching brackets: This will help you in visually inspecting the code structure, and will minimize code errors.
Auto-complete or auto-suggest feature: This means that as you type your code, the editor is smart enough to suggest to some of the words (or code) that you have used in your program so that you can quickly refer to them as you code. This is especially useful for checking user-defined variables, objects, and functions.
Syntax coloring: This will help you identify if you are misusing any keywords. Remember runtime errors? Runtime errors can be caused by the misuse of keywords. If you are using any of the keywords for user-defined variables, objects, or functions, syntax coloring will help you to identify this.
Whew, we've covered a lot in this chapter. The bulk of the content covered in this chapter forms the building blocks of what we need to use in the later chapters. Specifically, we covered the following topics:
We learnt about HTML, CSS, and JavaScript in web pages. In general, HTML provides the content, CSS styles the web document, and JavaScript provides the behaviour and interactivity for the webpage.
We've also learnt about the syntax of HTML, CSS, and JavaScript.
We've also learnt about the key techniques of using ID and Class selectors in order for CSS to refer to various HTML elements and perform stylistic operations on the referenced HTML element.
For JavaScript, we learnt about three important techniques for JavaScript to reference to HTML elements. These three techniques (or rather built-in methods) are:
document.getElementById(), document.getElementsByName(), anddocument.ElementsByTagName().Next we learnt about testing and why we need to test. In general, testing is to ensure that the program works correctly—that is, for the given input, we have the correct output. Also, testing helps to uncover syntax errors and confirm that the program works in the way that we intend it to work.
We covered the types of JavaScript errors—namely loading errors, runtime errors, and logic errors. We've also covered some simple examples of each type of errors and the common causes of them.
We covered some important tips and advice on how to write error-free code.
Now that we have covered the basic building blocks of JavaScript testing, you will see how we can make use of them to perform ad hoc testing, which we will cover in the next chapter. You will notice some of the functions and built-in methods used in this chapter will be used in the next chapter.