


 Download code from GitHub
Welcome to the book on building isomorphic web applications where we will discuss the main challenges associated with building isomorphic (also known as universal) apps and will walk through the process of building a simple web application so you can learn by example.
In this chapter, we will give a brief overview of isomorphic apps; you will learn what makes your application code isomorphic; see how simple it is to get your first isomorphic application running and what a good project structure for an isomorphic app could be.
By the end of the chapter, we will have a basic working web application, powered by Node.js, Express, and React 16.
To bring it all together, we will cover the following topics:
- What are isomorphic apps?
- How to write isomorphic JavaScript code?
- Introduction to React.js
- Sample application description
- What we need to get started
- Install project dependencies
- The basic project structure
- Creating the first React component
- How to render a React app on both client and server
- How to run and test our app locally
The very name isomorphic describes this dual-purposes symmetry: iso means equal and morphous means shape.
The term isomorphic apps and the web development approach behind it were popularized by AirBnb in 2013. The main idea of this is to write a JavaScript application designed for the browser but at the same time; it must run on the server for generating HTML markup, which can dramatically improve the initial load time of such applications and naturally solve the problems associated with optimizing such web applications for search engines.
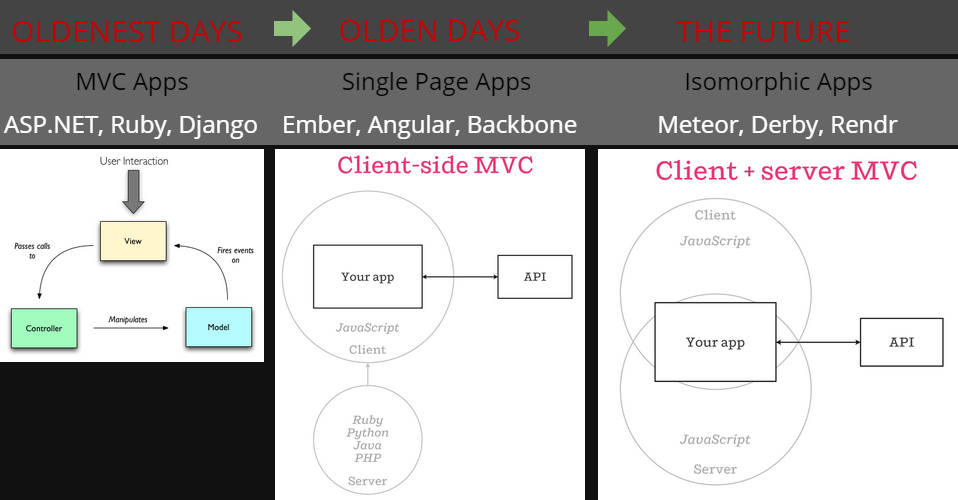
You may have noticed the trend over the last few years of how traditional server-side MVC applications evolved to client-side apps (aka single-page applications) and then to isomorphic apps:
Note
Check out this great article published by AirBnb developers, which gives a thorough introduction to the isomorphic web application development approach:http://nerds.airbnb.com/isomorphic-javascript-future-web-apps/.
Another essential benefit of isomorphic apps (other than initial page load speed and SEO) is an ability to reduce code duplication by sharing the code between client-side and server-side codebases. Since everything is written in JavaScript, it's easier to build cross-functional teams who know how to work on both client and server sides of the app.
What exactly can be shared between client and server? The presentation layer (UI), routing and navigation, data fetching and persistence, UI localization and internalization.
Is it required to have Node.js on the server in order to run isomorphic apps server side? No, you can execute JavaScript code on any platform, such as PHP, .NET, and Ruby. However, in this book, we're going to use Node.js and Express to keep things simple. Who is using this approach? Flickr, Instagram, Airbnb, and Asana, to name a few.
Isomorphic (aka universal) JavaScript code can be either environment agnostic or shimmed per environment. It means that it cannot contain browser-specific (window) or server-specific (process.env, req.cookies) properties. Alternatively, it must provide shims for accessing such properties so the module can expose a single API (window.location.path vs req.path).
Many modules in the npm repository already have this trait. For example, the Moment.js can run in both Node.js and browser environments as the following code demonstrates:
Server (Node.js):
import moment from 'moment';
moment().format('MMMM Do YYYY, h:mm:ss a');
Client (browser):
<script src="moment.js"></script>
<script>
  moment().format('MMMM Do YYYY, h:mm:ss a');
</script>
Module bundlers such as Browserify or Webpack allow to bundle and optimize JavaScript code for a specific environment. Later in this chapter, you will see how we use Webpack to generate two bundles from the same source code, one of which is optimized for running in a browser and another one is optimized for Node.js environment.
Facebook's React library is a great choice for building isomorphic web UIs; it allows creating an in-memory representation of user interfaces, which looks like a tree of UI elements (components) and can be easily rendered either on a client or a server.
Let's do a simple exercise. If you were asked to create a JavaScript representation of a UI element such as a single tweet from twitter.com, how would you do it?
Here is how this UI element should look in a browser:

The HTML code for it would look similar to this:
<div class="tweet">
<div class="header">
<a class="account" href="/koistya">
<img class="avatar" src="/koistya/avatar.png" />
<strong class="fullname">Konstantin</strong>
<span class="username">@koistya</span>
</a>
<small class="time">Jan 15</small>
</div>
<div class="content">
<p class="text">Hello, world!</p>
<div class="footer">...</div>
</div>
</div>
Most likely, you would come up with a JavaScript object, which looks as follows (some code is omitted and replaced with ... to keep it short):
const tweet = {
  node: 'div',
  class: 'tweet',
  children: [
    {
      node: 'div',
      class: 'header',
      children: [ ... ]
    },
    {
      node: 'div',
      class: 'content',
      children: [
        {
          node: 'p',
          class: 'text',
          children: 'Hello, world!'
        },
        ...
      ]
    }
  ]
};
Having this object, you can easily write two render() functions, one for Node.js, which will traverse this object and build an HTML string, and another one for a browser which will also travers this object and build a DOM tree (for example, using document.createElement(...)).
In order to make this tweet object reusable, being able to display multiple tweets on a web page, you will want to convert it to a function, which will look similar to this:
function createTweet({ author, text }) {
  return {
    node: 'div',
    class: 'tweet',
    children: [
      {
        node: 'div',
        class: 'header',
        children: [...]
      },
      {
        node: 'div',
        class: 'content',
        children: [
          {
            node: 'p',
            class: 'text',
            children: text
          },
          ...
        ]
      }
    ]
  };
}
Now, you can construct a tweet object by passing some data to this function (props, in React terminology, and render it to HTML):
const tweet = createTweet({ author: ..., text: 'Hello, world!' });
const html = render(tweet);
React.js takes this to the next level by abstracting all the complexities of this approach from you and providing a simple to use API with just a few public methods. For example, instead of writing your own render function, you can use:
// Node.js
import ReactDOM from 'react-dom';
ReactDOM.hydrate(tweet, document.body);

// Browser
import ReactDOM from 'react-dom/server';
const html = ReactDOM.renderToString(tweet);
In a browser, React can detect changes made to the virtual representation of the UI, and synchronize it with the actual DOM in the most efficient way possible. So, you do not need to worry much (if at all) about mutating browser's DOM, but instead, can focus on creating UI elements of your app in a declarative manner (using JSX syntax) and managing application's state.
That's the library we are going to use for building a UI part of our isomorphic app.
Throughout the remaining chapters of the book, we are going to build a simple web application. This will be similar to the Airbnb site where users can either list their belongings they're willing to lend or find interesting items to rent posted by other users.
The interface of the app will be very similar to this one:

By the end of the book, we're going to build a minimal viable version (MVP) of this product, let's call it rentalitems.com. In the final chapter, we will go through the deployment process and publish the site live to make things even more interesting.
We are going to build a sample isomorphic application by using JavaScript cross-stack. Therefore, the only requirement is to have the latest version of Node.js installed on your machine plus a text editor or IDE with ES6/ES2015 and JSX support. If you don't have Node.js installed, you can find the concrete steps on how to install it on the https://nodejs.org website.
Note
WebStorm, Atom, or Sublime Text 3 are generally considered good option. Those can run on any platform. Just make sure that your text editor is properly configured to work with ES6/ES2015 JavaScript, JSX, and ESLint.
Optionally, you can also install the React Developer Tools extension for Google Chrome or Firefox to help you with debugging React apps in the browser.
Let's go ahead and create an empty folder for our project, add the package.json file into it and install npm modules that we will need for the first chapter. You can either run the npm init command from a command line to generate a new package.json file or just create it manually and put { } inside to make it a valid JSON.
The table here shows that where in the app each module is going to be used:
npm Module | Client | Server | Build | Test |
babel babel-core babel-eslint express del eslint eslint-config-airbnb eslint-plugin-react extend gaze ncp moment react react-dom webpack | x x x x | x x x x x | x x x x x x | x x x x |
Some of the packages are going to be used only by the client-side portion of the app, some, only for the server-side code (Node.js), and some will be shared between client and server; there are also packages that will not be used by the app directly but will help with bundling and optimization, testing, and debugging.
Some small explanation about these packages:
babel/babel-core: JavaScript transpiler from new JavaScript syntaxes to JavaScript supported by the browsers chosen by youexpress: The web framework that we will use in this book for the server.del: This makes deleting files/folder easiereslint*: The JavaScript linter, works with the new js syntaxextend: They extend a JavaScript object with othersgaze: This watches for file system file changesncp: This is async recursive file copying utilitymoment: This is the time library for JavaScriptreact*: No need for much explanation herewebpack: The module bundler that we will use for our isomorphic app
To install these packages simply run:
$ npm install babel-core, bluebird, express \ moment, react, react-dom --save$ npm install babel babel-eslint babel-loader del eslint \ eslint-config-airbnb eslint-plugin-react \extend gaze ncp webpack --save-dev
Note, that the majority of the preceding modules should be installed as dev dependencies, by using the --save-dev command-line argument. The only packages that need to be installed as direct application dependencies are the ones that are supposed to be used at runtime by Node.js app (see Server column in the preceding table). It is also considered a good practice to use strict version numbers for the modules that application uses at runtime.
Now, the contents of your package.json file should look similar to this:
{
  "private": true,
  "dependencies": {
    "bluebird": "3.5.0",
    "express": "4.15.4",
    "moment": "2.18.1",
    "react": "16.0.0",
    "react-dom": "16.0.0"
  },
  "devDependencies": {
    "autoprefixer": "7.1.4",
    "babel-cli": "6.26.0",
    "babel-core": "6.26.0",
    "babel-eslint": "8.0.0",
    "babel-loader": "7.1.2",
    "babel-plugin-transform-runtime": "6.23.0",
    "babel-preset-node5": "12.0.1",
    "babel-preset-react": "6.24.1",
    "babel-preset-stage-0": "6.24.1",
    "del": "3.0.0",
    "eslint": "4.7.0",
    "eslint-config-airbnb": "15.1.0",
    "eslint-plugin-react": "7.3.0",
    "extend": "3.0.1",
    "gaze": "1.1.2",
    "ncp": "2.0.0",
    "webpack": "3.6.0"
  }
} Now, let's create the initial folder structure for our project, which will look like this:
.
├── /build/             # Folder for compiled output
├── /components/        # React components
├── /core/              # Core application code
├── /data/              # GraphQL data types
├── /node_modules/      # 3rd-party libraries and utilities
├── /public/            # Static files
├── /routes/            # Isomorphic application routes
├── /test/              # Unit and integration tests
├── /tools/             # Build automation scripts and utilities
├── .babelrc            # Babel configuration
├── .editorconfig       # Text editor configuration
├── .eslintrc           # ESLint configuration
├── .gitignore          # Files to exclude from SCM
├── client.js           # Client-side startup script
├── package.json        # Holds various project's metadata
└── server.js           # Server-side startup script
It is important to organize your source files in a way so that it will be easier for you to access them and reference one from one another. Avoid deeply nested folder structures. Group your files by purpose rather than by file types.
Sometimes, developers split the application's source code into client and server folders. With isomorphic apps that might be unnecessary because many of the components are shared between client-side and server-side code.
You can copy the dot files (.babelrc, .editorconfig, .eslintrc, and .gitignore) from the example source code accompanying this book into your project.
The next thing we're going to create is our first React component and then try to render it both client side and server side. Let's create components/App.js with the following content:
import React, { Component } from 'react';
import moment from 'moment';

class App extends Component {
  constructor(props) {
    super(props);
    this.state = { time: null };
  }
  componentDidMount() {
    this.tick();
    this.interval = setInterval(this.tick.bind(this), 200);
  }
  componentWillUnmount() {
    clearInterval(this.interval);
  }
  tick() {
    this.setState({ time: new Date() });
  }
  render() {
    const time = this.state.time;
    const timeString = time && moment(time).format('h:mm:ss a');
    return (
<div>
<h1>Sample Application</h1>
<p>Current time is {timeString}</p>
</div>
    );
  }
}

export default App;
Since this component is using state, we extend it from the React.Component base class and set the initial state inside the constructor() method. Also we're using two of React's life cycle methods componentDidMount() and componentWillUnmount() to start the timer when the component is mounted to the browser's DOM and clear the timer before the component is unmounted. Inside the render() method, we're using the Moment.js library to format the date object to a user-friendly time string.
Note that we set the initial time state variable to null and not new Date(). This is required in order to make the first call to the render() method (during the initial rendering) return the exact same output, in-memory representation of the UI tree. When you render this component on the client side, in a browser, React will first check if the checksum of that UI tree matches what has been rendered on the server. If so, instead of generating an HTML page from scratch, it will pick up existing HTML from the DOM and just bind necessary DOM event handlers to it, effectively mounting the top-level React component (app in our case) into the DOM.
It's worth mentioning that in the current version of React, you cannot return multiple components from the render() method. For example, the following code will fail with the error Adjacent JS elements must be wrapped in an enclosing tag:
render() {
  return (
    <h1>Sample Application</h1>
    <p>Current time is {new Date().toString()}</p>
  );
}
In most cases, this is not a big deal. If you like, you can subscribe to issue #2127 in the React repository on GitHub to track the status of this problem.
Look at the following two code snippets showing how to render the same top-level React component on the client (in a browser) and on the server (in Node.js app):
In order to render the App component on the client, you write:
import ReactDOM from 'react-dom';
import App from './components/App';
ReactDOM.hydrate(<App />, document.getElementById('app'));
In order to render the same component on the server (in Node.js app), you write:
import ReactDOM from 'react-dom/server';
import App from './components/App';
const html = ReactDOM.renderToString(<App />);
Both methods will try to build an in-memory representation of the UI tree (aka virtual DOM) of the App component. The first one will compare that virtual DOM with the actual DOM inside the <div id="app"></div> HTML element and will modify the actual DOM to make it match the virtual DOM exactly. The second method will just convert the in-memory representation of the UI tree into HTML, which then can be sent to a client.
Now, let's see how a complete example for the client-side and server-side application code looks like. Go ahead and create client.js file with the following content:
import 'babel-core/register';
import React from 'react';
import ReactDOM from 'react-dom';
import App from './components/App';

function run() {
  ReactDOM.hydrate(<App />, document.getElementById('app'));
}

const loadedStates = ['complete', 'loaded', 'interactive'];

if (loadedStates.includes(document.readyState) && document.body) {
  run();
} else {
  window.addEventListener('DOMContentLoaded', run, false);
}
This ensures that the React application is only mounted when the HTML page was fully loaded into the browsers.
For the server-side app, let's create server.js file with the following content:
import express from 'express';
import React from 'react';
import ReactDOM from 'react-dom/server';
import App from './components/App';

const server = express();
const port = process.env.PORT || 3000;
server.get('*', (req, res) => {
  const title = 'Sample Application';
  const app = ReactDOM.renderToString(<App />);
  res.send(`<!doctype html>
<html>
<head>
<title>${title}</title>
<src script="client.js"></script>
</head>
<body>
<div id="app">${app}</div>
</body>
</html>`);
});

server.listen(port, () => {
  console.log(`App is listening at http://localhost:${port}/`);
});
It renders the App component to an HTML string, wraps it into a valid HTML5 document with <head> and <body> sections, and sends it to a client on all HTTP requests to the server.
We can go further and replace that ES7 string literal above with a React-based template in order not to worry about escaping HTML fragments. In order to do so, create components/Html.js file with the following content:
import React from 'react';

const Html = (props) =>
<html>
<head>
<meta charSet="utf-8" />
<meta httpEquiv="x-ua-compatible" content="ie=edge" />
<title>{props.title || ''}</title>
<meta name="description"
            content={props.description || ''} />
<meta name="viewport"
            content="width=device-width, initial-scale=1" />
<script src="client.js" />
</head>
<body>
<div id="app"
           dangerouslySetInnerHTML={{__html: props.children}} />
</body>
</html>;

export default Html;
Since this component doesn't use state, we don't need to extend it from React.Component, but instead, we can use a regular function which accepts a collection of properties as an argument and returns a React component. Make sure that all the tags in the mark-up used in your React components are properly closed and you use valid JSX attributes. For example, instead of <meta charset="utf-8">, you should write <meta charSet="utf-8" /> and so on.
Note
If you're new to JSX syntax, visit the following two pages to get more information about it:https://facebook.github.io/react/docs/jsx-in-depthhttps://facebook.github.io/react/docs/jsx-gotchas.
Another addition which we can make to the server.js file is to add Express.js static middleware to make it serve static files, such as robots.txt from the /public folder. Now, the final server.js file should look like this:
import path from 'path';
import express from 'express';
import React from 'react';
import ReactDOM from 'react-dom/server';
import Html from './components/Html';
import App from './components/App';

const server = express();
const port = process.env.PORT || 3000;

server.use(express.static(path.join(__dirname, 'public')));

server.get('*', (req, res) => {
  const body = ReactDOM.renderToString(<App />);
  const html = ReactDOM.renderToStaticMarkup(<Html
    title="My App"
    description="Isomorphic web application sample"
    body={body} />);
  res.send('<!doctype html>\n' + html);
});

server.listen(port, () => console.log(
  `Node.js server is listening at http://localhost:${port}/`
));The next step is to configure build automation scripts, which will help us to bundle and optimize the source code so it can be deployed to a server. In addition, we'll need to set up a script, which will launch an HTTP server locally so we can test and debug our app.
It is considered a good practice to bundle the source code of a web application into distributable format, which will be optimized for running on the server and in a browser. You cannot just run server.js as it is on the server because it will contain many pieces that the current version of Node.js just doesn't understand, like, for example, async/await syntax.
In this book, we are going to use Babel and Webpack to help us transpile and bundle all the source code and other assets (images and fonts) into a distributable format and save the contents of the compiled output into the /build folder. The contents of the /build folder will look something like this:
.

├── /build/                     # Folder for compiled output
│    ├── /public/               # Static files
│    │    ├── client.js         # Client-side application bundle
│    │    ├── favicon.ico       # Application icon
│    │    └── robots.txt        # Search engine crawlers' settings
│    ├── package.json           # The list of npm modules
│    └── server.js              # Server-side application bundle
└── ...
It might also be a good idea to run your site locally from the build folder (as opposed to running it from source files), this way you can ensure that you're testing the exact same application which will eventually be deployed to a server.
Often, frontend developers use tools, such as Grunt or Gulp, to help with build automation, but in our case the majority of the work will be performed by Webpack, so we can just use plain JavaScript for automation scripts reducing the number of external dependencies in our project. Here is how the barebones of the build script (tools/build.js) may look written with plain JavaScript:
async function clean() {
  // TODO: Clean up the output directory
}

async function copy() {
  // TODO: Copy static files to the output directory
}

async function bundle() {
  // TODO: Bundle the source code with Webpack
}

async function build() {
  await clean();
  await copy();
  await bundle();
}

export default build;
We can improve it by making it writing to the console information about when a particular task (JavaScript function) started and ended, as well as how much time it took to perform any particular task. Let's add tools/run.js file with the following content:
function format(time) {
// return human readable string
return time.toTimeString()
             .replace(/.*(\d{2}:\d{2}:\d{2}).*/, '$1');
}
// run the async fn and time how much it took to complete
async function run(fn, options) {
  const start = new Date();
  console.log(`[${format(start)}] Starting '${fn.name}'...`);
  await fn(options);
  const end = new Date();
  const time = end.getTime() - start.getTime();
  console.log(
    `[${format(end)}] Finished '${fn.name}' after ${time} ms`
  );
}

if (process.mainModule.children.length === 0 && process.argv.length > 2) {
  delete require.cache[__filename];
  const module = process.argv[2];
  run(require('./' + module + '.js'))
    .catch(err => console.error(err.stack));
}

export default run;
In addition to the actual run() method, it contains code, which helps to execute our automation scripts using npm CLI.
Now, let's update our tools/build.js file to use the utility method run():
import run from './run';

async function clean() {
  // TODO: Clean up the output directory
}

async function copy() {
  // TODO: Copy static files to the output directory
}

async function bundle() {
  // TODO: Bundle the source code with Webpack
}

async function build() {
  await run(clean);
  await run(copy);
  await run(bundle);
}

export default build;
Now, we can update the package.json file in the root of our source tree to include the following lines:
{
  ...
"scripts": {
"lint": "eslint components core data routes test tools",
"build": "babel-node tools/run build",
"serve": "babel-node tools/run serve"
  }
}
This will allow us to run JavaScript-based automation scripts from the /build folder by using npm CLI. For example:
$ npm run buildThe next step is to create a configuration file, which will be used by Webpack. Let's create tools/webpack.config.js file with the following content:
import path from 'path';
import extend from 'extend';

const common = {
  stats: {
    colors: true,
    chunks: false
  },
  module: {
    loaders: [
      {
        test: /\.js$/,
        include: [
          path.join(__dirname, '../components'),
          path.join(__dirname, '../core'),
          path.join(__dirname, '../data'),
          path.join(__dirname, '../routes'),
          path.join(__dirname, '../client.js'),
          path.join(__dirname, '../server.js')
        ],
        loader: 'babel-loader'
      }
    ]
  }
};

const client = extend(true, {}, common, {
  entry: path.join(__dirname, '../client.js'),
  output: {
    publicPath: '/',
    path: path.join(__dirname, '../build/public'),
    filename: client.js'
  }
});

const server = extend(true, {}, common, {
  entry: path.join(__dirname, '../server.js'),
  output: {
    path: path.join(__dirname, '../build'),
    filename: 'server.js',
    libraryTarget: 'commonjs2'
  },
  target: 'node',
  node: {
    console: false,
    global: false,
    process: false,
    Buffer: false,
    __filename: false,
    __dirname: false
  },
  externals: /^[a-z][a-z\/\.\-0-9]*$/i
});

export default [client, server];
- At the top of the file, we have
const common = { ... }variable containing a shared configuration, which is used in both client-side and server-side bundle configurations. - The
statsproperty let us configure, what information is going to be printed to the console when Webpack is running. - The
modules.loadersproperty allows configuring the source code loaders/transpilers for different file types. In our case, we say that all.jsfiles from thecomponents,core,data, androutesfolders, as well asclient.jsandserver.jsfiles must be transpiled by Babel, usingbabel-loadernpm module, which itself pickups settings from the.babelrcfile in the root of our project's source tree.
Then, we use this common configuration object as a base for client and server bundle configurations in order to avoid code repetition since most of the configuration settings will be the same for client-side and server-side bundles as you will see in future chapters.
In the client bundle configuration, we say that the entry point of the client-side app is the /client.js file, and the resulting application bundle should be saved to the /build/public/client.js file.
Similarly, in the server bundle configuration, we say that the entry point of the server-side app is the /server.js file, and the resulting application bundle should be saved to the /buid/server.js file.
The important difference is that for the server bundle configuration, we must specify the output.libraryTarget property to be equal to 'commonjs2'; the target property should be equal to 'node'; the node property should contain the list of Node.js environment variables, which must not be mocked; the externals property should be equal to /^[a-z][a-z\/\.\-0-9]*$/i, which tells Webpack not to include any source code referenced from the node_modules folder into the bundle (build/server.js).
Now, let's implement clean(), copy(), and bundle() methods in our build script, which should now look like this:
import del from 'del';
import webpack from 'webpack';
import Promise from 'bluebird';
import run from './run';
import webpackConfig from './webpack.config';

async function clean() {
  await del(['build/*', '!build/.git'], { dot: true });
}

async function copy() {
  const ncp = Promise.promisify(require('ncp'));
// we copy everything inside public and package.json to the build folder
await ncp('public', 'build/public');
  await ncp('package.json', 'build/package.json');
}

function bundle({ watch }) {
  return new Promise((resolve, reject) => {
    let runCount = 0;
    const bundler = webpack(webpackConfig);
    const cb = (err, stats) => {
      if (err) {
        return reject(err);
      }

      console.log(stats.toString(webpackConfig[0].stats));

      if (++runCount === (watch ? webpackConfig.length : 1)) {
        return resolve();
      }
    };

    if (watch) {
      bundler.watch(200, cb);
    } else {
// run webpack normally
   bundler.run(cb);
    }
  });
}

async function build(options = { watch: false }) {
  await run(clean);
  await run(copy);
  await run(bundle, options);
}

export default build;
Lastly, let's create the tools/serve.js script, which will build the project and tell Webpack to watch for modifications in the source files so that as soon any of the source files are modified, Webpack will instantly update the /build/server.js (server) and /build/public/client.js (client) bundles. In addition to that, it will automatically restart the Node.js server whenever /build/server.js file is changed.
The source code of that script looks like this:
import path from 'path';
import cp from 'child_process';
import Promise from 'bluebird';
import build from './build';
import run from './run';

async function serve() {
  const watch = true;
  const app = path.join(__dirname, '../build/server.js')
  const gaze = Promise.promisify(require('gaze'));
  await run(build, { watch });
  await new Promise((resolve, reject) => {
    function start() {
      const server = cp.spawn(
        'node',
        [path.join(__dirname, '../build/server.js')],
        {
          env: Object.assign(
            { NODE_ENV: 'development' },
            process.env
          ),
          silent: false
        }
      );

      server.stdout.on('data', data => {
        process.stdout.write(new Date().toTimeString().replace(/.*(\d{2}:\d{2}:\d{2}).*/, '[$1] '));
        process.stdout.write(data);
        if (data.toString('utf8').includes('Node.js server is listening at')) {
          resolve();
        }
      });
      server.stderr.on('data', data => process.stderr.write(data));
      server.once('error', err => reject(err));
      process.on('exit', () => server.kill('SIGTERM'));
      return server;
    }
    let server = start();

    if (watch) {
 // when the server.js file changes, we will restart the server
   gaze('build/server.js').then(watcher => {
        watcher.on('changed', () => {
          server.kill('SIGTERM');
          server = start();
        });
      });
    }
  });
}

export default serve;
Now, you can run the app by executing the following command from a console:
<pre>$ npm run serve
If everything is alright, you should be able to see the following output in the console window:

From this output, you can see that Webpack created two application bundles: server.js, which took 744 ms to build and is 8.69 kB in size (that's because it doesn't contain any code from the referenced npm modules), and client.js bundle, which took 2768 ms to compile and it's 1.07 MB. That's because the client-side bundle contains the debug version of the source code referenced by the client-side app, namely, react, react-dom, and moment modules.
If you try to make changes to any of the source files, Webpack will recompile the bundles, but this time it will take much less time-about 50ms for the server-side bundle and about 500 ms for the client-side bundle. That's because it caches unchanged modules and output files between compilations.
In a large application, the initial compilation can take up to 30 seconds and the incremental updates about 2-3 seconds. If you notice, that your app compiles longer than that, this could mean that something is wrong with your build configuration.
Now, if you open http://localhost:3000/ URL in your browser, you should see how our app looks like:

Congratulations! You just successfully completed the first step of creating a basic React application as well as making sure that it renders both client-side and server-side. Now, you can compare your solution to the example source code, which accompanies this book and double check if you correctly completed all the steps described in this chapter.

