


This chapter will explain what we need to consider when we take our first step with the Irrlicht 3D graphics engine.
In this chapter, we will:
Learn about how the Irrlicht library is structured
Set up Irrlicht on Windows using either Visual Studio or CodeBlocks
Set up Irrlicht on Linux using the command-line
Set up Irrlicht on Mac OS X using XCode
Compile the Irrlicht library for ourselves
So let's get started.
Irrlicht is available for free and open source, which means that its source can be viewed and modified by anyone. It uses the zlib license that allows you to use the engine free of charge for private, educational, and even for commercial use. Unlike other open source licenses such as GPL (GNU Public License), you are allowed to modify Irrlicht without publishing your changes under the same license or make your changes not available to the public at all. It is recommended to give credit to the Irrlicht development team in your released application, although this is not necessary with an exception of JPEG support. Irrlicht uses libjpeg for JPEG support and you must credit JPEG group in your release application, according to their license requirement.
Irrlicht is available for free and open source, which means that its source can be viewed and modified by anyone. It uses the zlib license that allows you to use the engine free of charge for private, educational, and even for commercial use. Unlike other open source licenses such as GPL (GNU Public License), you are allowed to modify Irrlicht without publishing your changes under the same license or make your changes not available to the public at all. It is recommended to give credit to the Irrlicht development team in your released application, although this is not necessary with an exception of JPEG support. Irrlicht uses libjpeg for JPEG support and you must credit JPEG group in your release application, according to their license requirement.
While the Irrlicht 3D graphics engine should work on pretty much any computer or notebook, there are a few steps to ensure that your Irrlicht development environment, and your created applications, will run smoothly. First of all, ensure that you have installed the latest driver for your graphics card. If you want to be able to use all features of Irrlicht, your graphics card needs to support at least OpenGL 1.5. Also, an equivalent DirectX 9.0c graphics card will suffice, if you are planning to use DirectX and Microsoft Windows exclusively. If you want to modify and recompile Irrlicht, you'll have to install the necessary SDKs such as the latest DirectX SDK for Direct3D 9 support and the May 2006 version of DirectX SDK for Direct3D 8 support. We'll discuss how to set them up in the following sections.
Note
Checking for graphics card support
To check if your graphics card supports OpenGL 1.5, check the specifications of your graphics card on the official homepage of your graphics card vendor. Or alternatively, you can use a tool like DoctorGL that can be downloaded from http://ononesoft.cachefly.net/support/DoctorGL.exe.zip.
If you want to make use of Irrlicht's DirectX interface under Windows, you need to have DirectX installed. DirectX runtime files come pre-installed with Windows by default.
Note
Installing the latest DirectX Runtimes
DirectX is an application programming interface, specifically designed for multimedia and games developed by Microsoft.
You can download the latest version of DirectX at the following web address:
http://msdn.microsoft.com/en-us/directx/default.aspx. On this site click on DirectX End-User Runtimes (June 2010) Full Download in the right sidebar listed under Recent Downloads to be redirected to the download page.
Since Irrlicht is cross-platform and can be used on Windows, Linux, and Mac OS X, we will discuss how to set up Irrlicht on those different platforms with different development environments and compilers. We will create a skeletal application in the next chapter, which can be used as a starting point for the upcoming exercises. Use a compiler or an integrated development environment of your choice. Eventually, it will not matter which IDE or compiler you ultimately choose, because each code sample of this book will work on any IDE and compiler described in this chapter. You'll learn more about platform-specific requirements when you actually try to set up Irrlicht on different platforms and development environments.
The first step is to download Irrlicht from their official homepage. As of the release of this book the latest version of Irrlicht was 1.7.2. The examples in this book should work fine for that version and above.
Now, we are going to download Irrlicht and take a look at what the package has to offer out of the box:
1. Go to the official Irrlicht homepage at http://irrlicht.sourceforge.net. Choose Downloads in the left sidebar and then choose the latest stable release:

2. As with all projects hosted on sourceforge, you will then be redirected to a site where you can choose from a number of mirrors and the closest mirror to your location is selected by default. The download will start in a few seconds.
After the download has finished, extract the file at a location of your choice. To extract this file you need an unpacker. Windows, Linux, and Mac OS X have built-in applications for this task. Another solution would use a tool like 7zip (http://www.7-zip.org/), which is an open source cross-platform file archiver:
 |
The bin folder, which splits itself into different folders named after platforms, contains pre-compiled examples. Only 32-bit binaries for Windows, compiled with Visual Studio, can be found here and the examples should give you a general idea of what is possible when using Irrlicht. If you compile an example from the included package in another platform or environment, the compiled executables will be placed here.
This contains a complete documentation of the Irrlicht 3D graphics engine, generated from the source code through Doxygen. This documentation is very detailed, but may be a bit overwhelming for beginners. Since there's no function to search in these documents, it's more convenient to Google a specific function of Irrlicht that in turn will point to the online version of this API documentation.
The folder examples contains a number of examples to demonstrate various features of Irrlicht. We will compile an example after we set up our development environment to test if everything is correctly set up before we move on to the next chapter, where we will create our own template application for the examples of this book.
The directory lib contains the Irrlicht library and the files that are needed to work with the Irrlicht library. Precompiled Irrlicht library files are stored in this directory so that the application linking to Irrlicht doesn't need to recompile the whole engine every time.
This folder contains all header files that are necessary to connect with the Irrlicht library itself.
This folder contains all graphics, models, sounds, and other data needed to run the examples of the Irrlicht engine. Take a note that some of these assets are copyrighted, you should seek further permissions if you plan to use it in commercial applications.
The folder source contains the complete source code of the Irrlicht engine. I will elaborate on that part when I explain how to build the Irrlicht engine from source.
As the name suggests this folder contains a number of tools that integrate very well into Irrlicht. For example, a GUI editor or a tool for creating new fonts.
As you probably noticed, there are two text files in the root directory of the extracted package file, namely readme.txt and changes.txt. The readme file offers short instructions on how to configure and work with Irrlicht, while the changes file contains information on what has changed since the last versions of Irrlicht, for example, bug fixes or new features.
Visual Studio is a compiler and an IDE for Windows, developed by Microsoft, and is currently available in its 2010 version. While there are many high-priced versions of Visual Studio (Professional and Enterprise), there is also a free version called Express Edition. Example projects in this book used Visual Studio 2008 Professional, though they should also be able to run in Visual Studio Express Editions. To run any executable, compiled with Visual Studio, you need the Visual C++ Redistributable package that can be downloaded from the Microsoft Download Center.
Note
To use Visual Studio Express, you first need to download it from http://www.microsoft.com/express/downloads/#2010-Visual-CPP. You will have to register your copy of Visual Studio with your MSN account within 30 days after the installation.
More information on that aspect, as well as how to distribute the Visual C++ Redistributable with your application, is available in the next chapter.
After you have successfully installed Visual Studio on your computer, we need to add reference paths, where the Irrlicht-related files are located, so that Visual Studio knows where to look, whenever we refer to such files.
1. Open Visual Studio.
2. Go to Tools | Options.
3. Expand the menu item Projects and Solutions and select VC++ Directories from the list.
4. Select Include files from the drop-down menu below Show directories for as shown in the following screenshot:
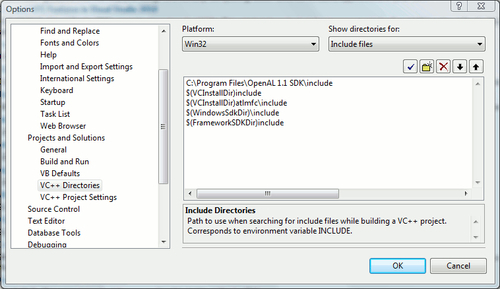
5. Add a new line to add another
includedirectory to Visual Studio.6. Click on the browse button and select the
includefolder from where you have extracted the Irrlicht package.7. Now select Library files from the combo box.
8. Add a new line like you did in step 5 and click on the button with three dots to select the
lib/Win32-visualstudiofolder. Confirm by clicking on OK: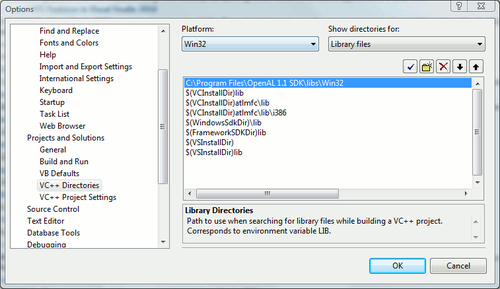
We just added the header files of Irrlicht to the global search path of Visual Studio. That means for every new project you create with Visual Studio, the IDE will first check if necessary files are listed in the global include directory and then move on to the local directory. We did the same thing with the library files.
This step is necessary, because the include files provide us with the source files necessary to interact with the Irrlicht library, while the Irrlicht.lib file is the connection between the Visual Studio and the Irrlicht dynamic library.
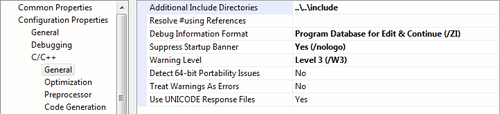
Another way would be to add these references only in the current active project. Right-click on the Project file and select Properties from the context menu. If you select Configuration Properties | C/C++ | General, you can add the Irrlicht include folder in Additional Include Directories:
 |
In Linker | General, you can add the lib directory of Irrlicht to Additional Library Directories as shown in the following screenshot:
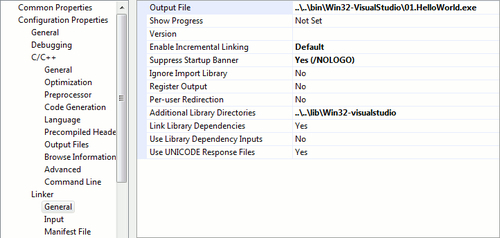 |
Remember, if you want to use the alternative configuration method, you need to repeat this step for every new Irrlicht project you set up. On the other hand, the configuration of the global search path works for every project and does not require additional steps after the project is created.
This, in fact, may not be necessary since the downloaded package already contains pre-compiled libraries for Windows and both Visual Studio and GCC. Those libraries were compiled for 32-bit operating systems only, so if you want to develop natively on a 64-bit system, recompiling the library is recommended. They are also compiled in release mode and contain no debug symbols. So if we want to debug and fix the problems inside Irrlicht DLL, we will need to recompile Irrlicht in debug mode.
Keep in mind that if you want to compile the Irrlicht library for 64-bit Windows, you need to install the Windows Platform SDK from http://msdn.microsoft.com/en-us/windows/bb980924.aspx. While installing, make sure you install the x64 and IA64 compilers from Developer Tools | Visual C++ Compilers.
Irrlicht is able to use Direct3D 8 or Direct3D 9 for rendering. In order to compile the library unmodified, having the DirectX SDK installed is absolutely necessary.
The latest version of DirectX SDK can be downloaded from http://msdn.microsoft.com/en-us/directx/. But since DirectX 8 SDK is no longer included in the latest DirectX SDK releases, you need to install an older release from summer 2004 if you need to use DirectX 8's features. It is available to download at http://bit.ly/oPI8AP. It is also possible to install more than one DirectX SDK on your system. If you wish to install a newer release of the DirectX SDK, go to http://msdn.microsoft.com/en-us/directx/default.aspx and select the DirectX SDK of your choice. You should close all the instances of Visual Studio currently running, so that the installer can set up all the necessary configurations with the IDE. Otherwise, you will need to add the include and lib folders to the global search path of Visual Studio manually, before you will be able to use DirectX to compile Irrlicht.
Let's get started with compiling Irrlicht as a dynamic library:
1. Open the
sourcefolder and open the sub-folderIrrlicht.2. Open the solution file corresponding to your Visual Studio version: If you are using Visual Studio 2003 then open
Irrlicht7.1.sln, if you are using Visual Studio 2005 then openIrrlicht8.0.sln, or if you are using Visual Studio 2008 or higher openIrrlicht9.0.sln.3. Make sure Microsoft's DirectX SDK, as well as the Windows Platform SDK are installed on your system. Otherwise you will get errors in the next step.
4. Click on Build | Build Solution:

We just built Irrlicht as a dynamic library on Windows. While the dynamic library itself is being automatically copied to bin/Win32-VisualStudio, the lib and exp files for the library can be found in lib/Win32-visualstudio.
In case you do not want the DirectX SDK from Summer 2004 or have another reason for not wanting to include DirectX 8 in the Irrlicht, follow these instructions to rebuild the library:
Let's recompile the Irrlicht library without DirectX 8:
1. Open the
sourcefolder and open the sub-folderIrrlicht.2. Open the solution file corresponding to your Visual Studio version: If you are using Visual Studio 2003 then open
Irrlicht7.1.sln, if you are using Visual Studio 2005 then openIrrlicht8.0.sln, or if you are using Visual Studio 2008 or higher openIrrlicht9.0.sln.3. Expand the folder include in your solution explorer as follows:

5. Go to line 120:
6. Comment out the define
#define _IRR_COMPILE_WITH_DIRECT3D_8_.7. Click on Build | Build Solution:
We have now built Irrlicht, which will take a while depending on your system, without DirectX 8 support and it will automatically be copied to the correct directories. If you would now launch one of the examples and select DirectX 8.1 as the rendering device the example would obviously not start.
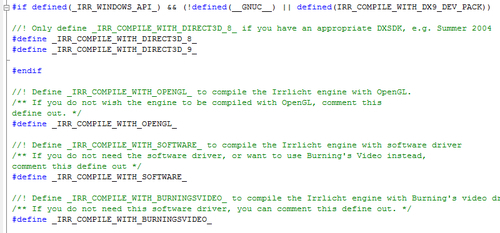
As you probably have seen when scrolling over the IrrCompileConfig.h file, there are a lot possible options to configure the Irrlicht library. You can switch different renderers on or off, if don't need them. All the setting flags are well commented. So this should be the first place to look at if you want to compile Irrlicht in a different way, rather than the default settings.
Remember that you have to recompile the complete Irrlicht library, if you change a define in the configuration file.
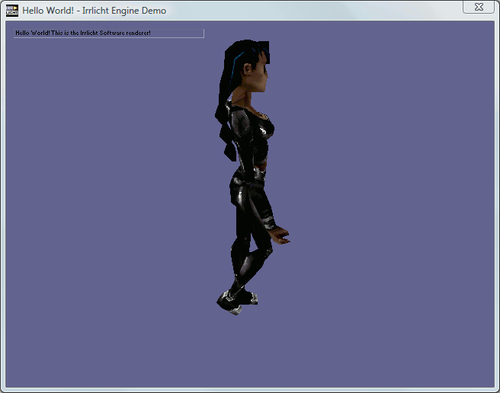
Let's compile the "Hello World" example:
1. Open the
examplesfolder.2. Open the solution file corresponding to your Visual Studio version: If you are using Visual Studio 2003 then open
BuildAllExamples_v7.sln, if you are using Visual Studio 2005 then openBuildAllExamples_v8.sln, or if you are using Visual Studio 2008 or higher openBuildAllExamples_v9.sln.3. Make sure
01.HelloWorldis checked as the startup project. Right-click on01.HelloWorldand check Set as Startup Project: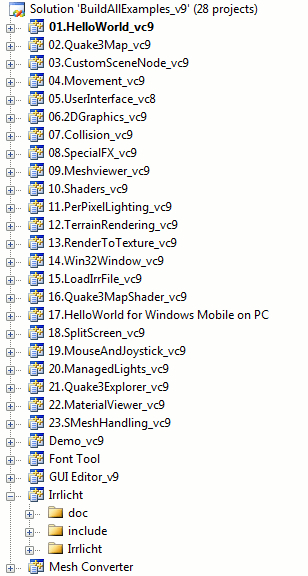
5. Press Ctrl + F5 to start the example application without the debugger:
CodeBlocks is a free open source integrated development environment for C++, which uses the GNU Compiler Collection (GCC) by default.
Note
Installing CodeBlocks on Windows
The latest release of CodeBlocks is 10.05. Go to http://www.codeblocks.org/, select Downloads from the top navigation bar. Then click on Download the binary release and download codeblocks-10.05mingw-setup.exe by clicking on BerliOS. Double-click on the downloaded file and follow the instructions of the installer.
If you don't feel comfortable using Visual Studio, CodeBlocks may be the right solution for you. While CodeBlocks may not offer as many advanced features as Visual Studio does, it has the advantage of being cross-platform and projects created with CodeBlocks can be easily used and shared on Windows, Linux, and Mac OS X. And there's no need for Redistributable files and so the application compiled with CodeBlocks won't necessarily need an installer and the redist packages. For example, Visual C++ needs Microsoft Visual C++ Redistributable package to install runtime components to run the applications created using Visual C++.
Let's create a new project with CodeBlocks:
1. Click on File | New | Project.
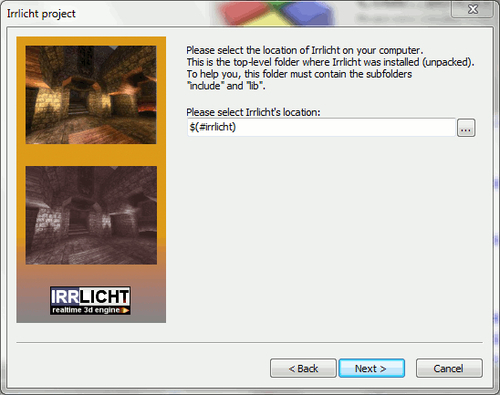
2. Select Irrlicht Project and click on Go:

3. In this window, enter a project title and select a directory where the project should be created. If you are done, click on Next as follows:

4. Next, we'll need to select the folder where you extracted Irrlicht. If you click on the browse button, a window called Global Variable Settings will pop up. Click Close to ignore this window. Now, we can select the directory where the Irrlicht engine is located:
5. The project has now been set up. If you try to compile and run the example using Build | Build and run, the example will not be built. You may get an error saying something as follows:
"error: in passing argument 2 of 'irr::IrrlichtDevice*
irr::createDevice(irr::video::E_DRIVER_TYPE, const

irr::core::dimension2d<unsigned int>&, irr::u32, bool, bool, bool,
irr::IEventReceiver*)
"
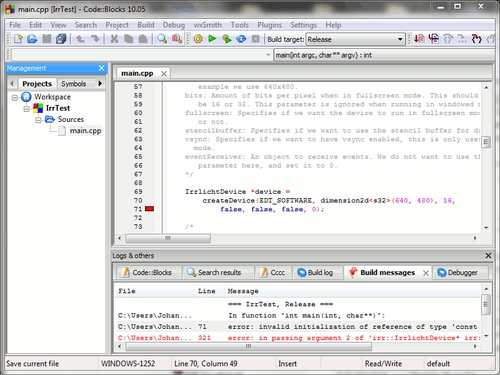
6. Change
dimension2d<s32>todimension2d<u32>in line 70.IrrlichtDevice *device = createDevice(EDT_SOFTWARE, diension2d<u32>(640, 480), 16, false, false, false, 0);
7. The example will now compile successfully:

Using the project wizard is the easiest way to set up a new example project with CodeBlocks. The CodeBlocks Irrlicht template is the same as the "Hello World" example from the Irrlicht examples folder. Since Irrlicht 1.6, there have been some changes concerning data types of Irrlicht, which in this example is the change from a platform-independent signed integer type to a platform-independent unsigned integer type. Since the CodeBlocks template has not been updated to reflect this change, we have to modify this for ourselves.
If you wish to use CodeBlocks under Linux, the project wizard may not work properly. The better way is to add the include and library directories to the global search path. Click on Settings | Compiler and debugger...:
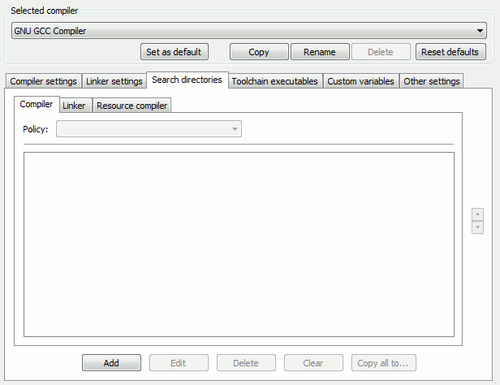 |
Switch to the Search directories tab. In the Compiler tab click on Add to add Irrlicht's include folder. Switch to the Linker and add the lib folder of Irrlicht. You still have to link against the Irrlicht library directly. This is done by right-clicking on the project file and opening the menu item Build options.... Switch to the tab Linker settings and add Irrlicht under Link libraries.
Unlike on Windows, there is no precompiled library of Irrlicht for Linux.
Before you can actually build the library or develop with Irrlicht, you should make sure all necessary development packages are installed on your system. Which development packages you install strongly depends on the distribution you are using.
Note
Getting started using Ubuntu
If you are using Ubuntu, you need to have the following packages installed:
build-essential
xserver-xorg-dev
x11proto-xf86vidmode-dev
libxxf86vm-dev
mesa-common-dev
libgl1-mesa-dev
libglu1-mesa-dev
libxext-dev
libxcursor-dev
To install those packages use either the graphical package manager called Synaptic or the command-line utility apt-get. You will need superuser privileges to perform this action.
Make sure you have the latest video card drivers installed or you may have errors when building or executing your applications like black screen or missing graphics.
Because there is no DirectX implementation for Linux, you only have software renderers and the OpenGL renderer at your disposal. There is a way around this, that is to use Windows version of CodeBlocks under Linux using Wine. But that topic is out of the scope of this book.


Now let's see if everything is working and compile the "Hello World" example from Irrlicht.
1. Go to the
examplesfolder of your extracted Irrlicht package.2. Open the sub-folder
01.HelloWorldand open the command line.3. Type in
makeand after a few moments the example will be built:
4. The binary is copied to the
bin/Linuxfolder of the extracted Irrlicht package. If you launch the application, we see that everything is working:
After we have built the static library on Linux, we are now able to compile any example from the Irrlicht examples folder. To test if everything is working, we built the "Hello World" example. It is recommended that you launch the examples from the command line because some Irrlicht examples require the user to choose a renderer before the application itself starts.
Before we start, make sure that you have the latest software updates installed that also include updates to the graphics drivers. To be able to develop with Irrlicht on Mac OS X, you need Xcode, the standard integrated development environment for Mac OS X that also uses GCC as its default compiler.
Note
Getting Xcode
To use Xcode, you need to register as an Apple Developer on their site http://developer.apple.com.
After you are a fully registered Apple developer which should only take a few minutes you will be able to download Xcode on http://developer.apple.com/technologies/xcode.html. To be able to download Xcode, you need be logged in with your Apple Developer account.
Warning: The download is about 2.3 gigabytes large
Like on Linux, Irrlicht is not able to use DirectX 8 or 9, because that is not available for this platform. Unfortunately, the software renderer has a few issues on Mac OS X, so we will have to change this manually.
But first things first.
Let's try to compile one of the Irrlicht examples to see if everything is working correctly.
1. Switch back your Xcode window and change Active Target to
01.HelloWorld.2. If you are developing on an Intel Mac (for example, every Mac produced since 2006), check if
i386is selected in Active Architecture.3. If you already tried Build & Run, you will have noticed that the colors were distorted or maybe even a blank screen:

4. Expand
examplesand expand its sub-folder01.HelloWorld. Double-click onmain.cppto open this file: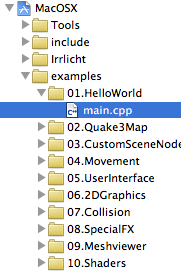
5. Go to line 125 and change
video::EDT_SOFTWAREtovideo::EDT_OPENGL.6. Click on Build & Run. The colors are not distorted any more and the example will run smoothly:

To test if Irrlicht is working correctly on Mac OS X, we compiled and ran an example. There are some problems concerning the software renderer from Irrlicht in combination with Mac OS X, so we had to modify the device creation and force Irrlicht to use the OpenGL renderer instead of the software renderer.
We learned about how the Irrlicht engine is organized and what the contents inside the package are. We also got a first glance at the Irrlicht application by running the example project that comes with the package.
Specifically, we covered:
Where and how to get Irrlicht
The portability of Irrlicht Setting up Irrlicht on different platforms, compilers, and integrated development environments
Compiling the Irrlicht library
Now that we've learned about setting up our development environment with Irrlicht, we're ready to create a skeletal template application for our upcoming exercise projects.
