


 Download code from GitHub
Ionic 2 is the latest version of Ionic, the super-heroic, hybrid mobile framework. Without any doubt, Ionic 1 was one of best tools for creating cross-platform mobile applications. Several million apps were built with Ionic 1. But it had some shortcomings. Ionic 2 is a completely rethought and rewritten version of Ionic based on Angular 2 and TypeScript, with improved performance, and reduced complexity for writing code.
In this chapter, we will create a real-time chat application using Ionic 2 and Firebase.
We will learn the following things:
How Ionic navigation works
How to use tabs in Ionic
Firebase as a backend using AngularFire2 in Ionic
Data modeling in Firebase
Structuring an Ionic project
Note
This book assumes that you have basic knowledge of Ionic 2 and Angular 2. If you are not familiar with Angular 2, go to Angular's official site at https://angular.io/docs/ts/latest/quickstart.html, and if you want to learn the basics of Ionic 2, go to http://ionicframework.com/docs/v2/.
The chat application that we will build in this chapter is a real-time chat application. By real-time, I mean that messages will be sent and received instantly. This chapter and app aim to make you familiar with Ionic 2 and AngularFire2, and also aim to show you how to use Cordova plugins inside your Ionic app.
We will first discuss Firebase and, more importantly, we will discuss the AngularFire2 library. Since we are using Firebase as our database, we will also go through the process of defining data structure, which is a very important process for Firebase applications.
Our chat application will show a login page with e-mail and password fields. The user will be able to log in or create a new account. When a user logs in, it will go to a tabs interface with the UsersPage opened. This users page will have a list of all the users of the application. The second tab, ChatsPage, will have a list of all previous chats. When a user clicks on any other user, or any previous chat, it will open a ChatViewPage, which allows users to send text and picture messages. The last tab, AccountsPage, will allow the user to upload a profile picture and log out of the app.
Firebase is a Backend as a Service (BaaS) by Google. Firebase provides a real-time backend for various kinds of applications. It provides a data store, authentication, static hosting, and lots of other features. It comes with official SDKs for various platforms including web, Android, iOS, REST API, and server-side libraries.
Note
You can learn more about Firebase at https://firebase.google.com/features/.
Firebase also comes with an Angular-specific library for Firebase called AngularFire. We will be using AngularFire2 for our Ionic 2 application, which is written in Angular 2 and can work with any Angular 2-based application.
According to official documentation, AngularFire2 integrates Firebase's real-time observers and authentication with Angular 2. This basically means that it provides various Angular 2 providers that we can use in our Angular 2 application to make a real-time application.
The most important step in using AngularFire2 with an Angular 2 application is injecting and configuring Firebase. The following code demonstrates this:
import {bootstrap} from '@angular/core';
import {
  FIREBASE_PROVIDERS,
  defaultFirebase,
  firebaseAuthConfig,
  AuthProviders,
  AuthMethods
} from 'angularfire2';
bootstrap(MyApp, [
  FIREBASE_PROVIDERS,
  defaultFirebase({
    apiKey: "AIzaSyC2gX3jlrBugfnBPugX2p0U1XiSqXhrRgQ",
    authDomain: "chat-app-1e137.firebaseapp.com",
    databaseURL: "https://chat-app-1e137.firebaseio.com",
    storageBucket: "chat-app-1e137.appspot.com",
  }),
  firebaseAuthConfig({
    provider: AuthProviders.Facebook,
    method: AuthMethods.Redirect
  });
])
Take a look; first, we have imported stuff from angularfire2 modules, and in the bootstrap process of the application, we have used the defaultFirebase method to provide the Firebase apikey, authDomain, the root endpoint of our Firebase database, and a storage bucket. You will get all these from the Firebase dashboard. We also have to configure authentication in the bootstrap method. For configuring Firebase authentication in AngularFire2, we have the firebaseAuthConfig method. In the preceding example, we are using Facebook as the authentication provider.
AngularFire2 comes with list and object constructs. A list is similar to $firebaseArray and an object is similar to $firebaseObject from the original AngularFire. Both list and object use RxJS observables under the hood. Take a look at the example codefor list, as follows:
import {Component} from 'angular2/core';
import {AngularFire, FirebaseObjectObservable} from 'angularfire2';

@Component({
  selector: 'app',
  template: `
  <h1>{{ (item | async)?.name }}</h1>
  `,
})
export class AppComponent {
  item: FirebaseObjectObservable<any>;
  constructor(af: AngularFire) {
    this.item = af.database.lists('/items');
  }
}
Let's take a look at the following example code:
<ul *ngFor="let item of items | async">
  <li class="text">
    {{item}}
  </li>
</ul>
Notice that we have used an async pipe with ngFor, which unwraps the item's Observable when an item arrives.
Note
To read more about AngularFire 2, check out the official documentation at https://angularfire2.com/api/.
First we need to create a Firebase app, so let's do it.
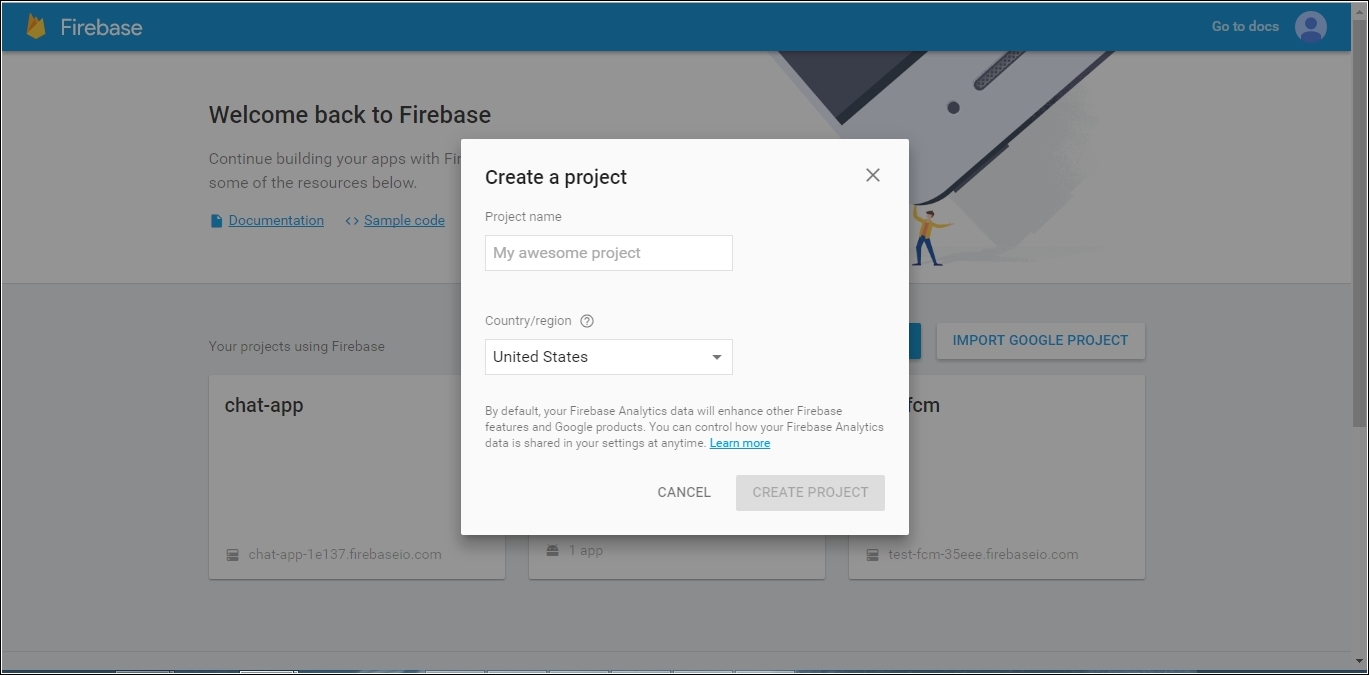
Open https://firebase.google.com, click on the SIGN IN button and proceed with your Google account. Then, click on Go to Console in the top right-hand corner of the page.
This will open the Firebase console. Click on CREATE NEW PROJECT on the page and fill in the name for your project and your region (geographical place), as shown in the following screenshot:
We will be using Firebase's password authentication system, so let's enable that too.
Open your app's dashboard. Select Auth in the side bar, then click on the SIGN-IN METHOD tab on that page. Next, enable the Email/Password provider, as shown in the following screenshot:

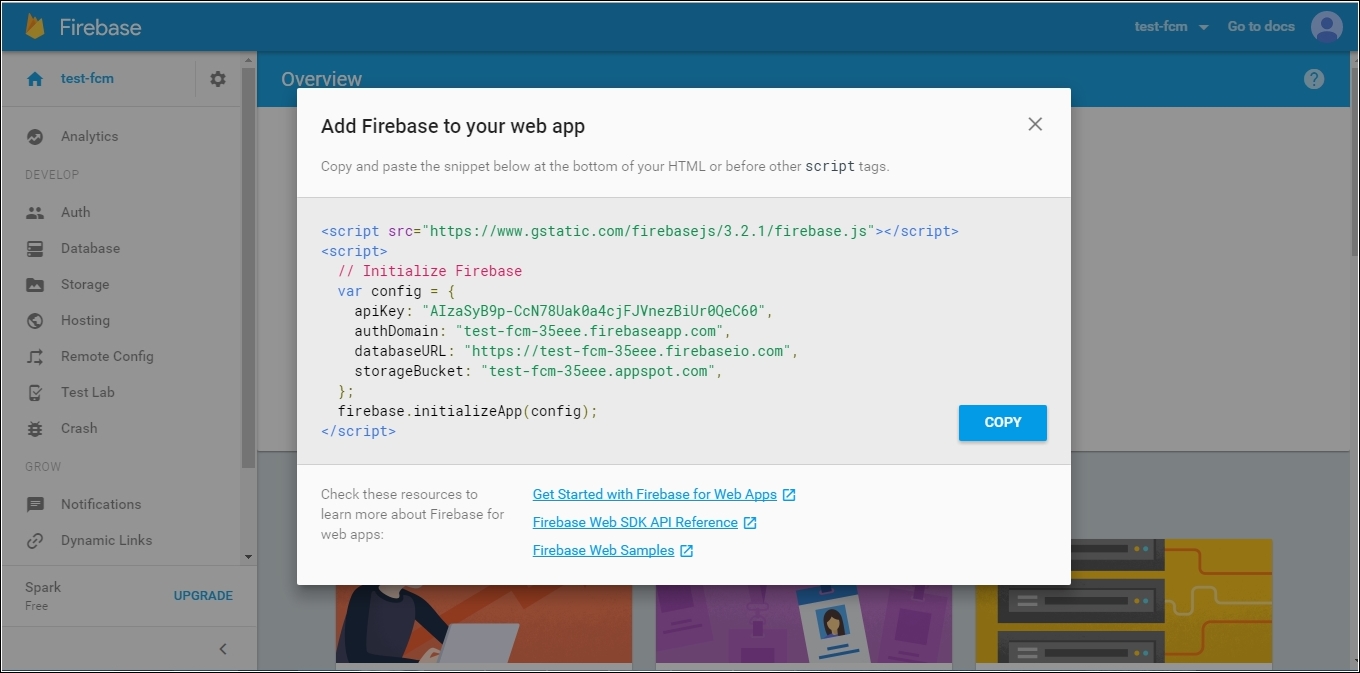
We need Firebase configuration data in order to use it in our Ionic application.
On your app's Overview screen, you will see buttons to configure your Firebase app. Click on the Add Firebase to your web app button and you will get your Firebase apiKey, authDomain, databaseURL, and storageBucket link, as shown in the following screenshot:
Before we actually start working on our app, we need the following software tools and libraries to get started.
You need to have Node.js and npm installed on your computer. Go to https://nodejs.org and follow the instructions based on your operating system to install Node.js and npm.
You can verify the installation of Node.js and npm by running the following commands in the Terminal (Unix systems) or command prompt (Windows systems):
node -v
npm -v
Git is a free and open source version control system created by Linus Torvalds. Ionic uses Git to download project templates.
To install Git, navigate to http://git-scm.com/downloads and follow the instructions to download Git for your specific operating system. You can also verify the installation of Git by running the following command:
git --version
Throughout this book, we will be creating apps that will run on an actual device, so we need to set up platform SDKs in order to build a platform-specific installer.
Note
iOS users can follow the guide at https://cordova.apache.org/docs/en/latest/guide/platforms/ios/index.html to set up iOS SDK on their local machine. Android users can follow the guide at https://cordova.apache.org/docs/en/latest/guide/platforms/android/index.html.Windows users can follow the guide at https://cordova.apache.org/docs/en/latest/guide/platforms/win8/index.html. It is important to note that you need to have an OS X machine to develop an iOS application, and you need a Windows 8 or 10 machine to develop Windows phone applications.
Alternatively, you can also use Ionic's package service to build a platform-specific installer without installing platform SDKs.
Note
Read the official documentation of the Ionic package service at http://docs.ionic.io/docs/package-overview.
You also need to install the Ionic CLI and Cordova for developing Ionic 2 applications, using the following command:
npm install -g ionic@beta cordova
In this section, we will define our application structure and architecture. I think this is probably the best way to start creating an application. We will discuss various things, starting with the functionalities we are providing in our app, how to structure our database, and how the app will be structured visually.
We will be including the following functionalities in our application:
E-mail password authentication
A list of all users of the application
A list of previous chats
Real-time text and picture messages
Profile picture
If we define how the app works and goes from one page to another page, it will become quite easy to understand. So, let's define our applications flow:
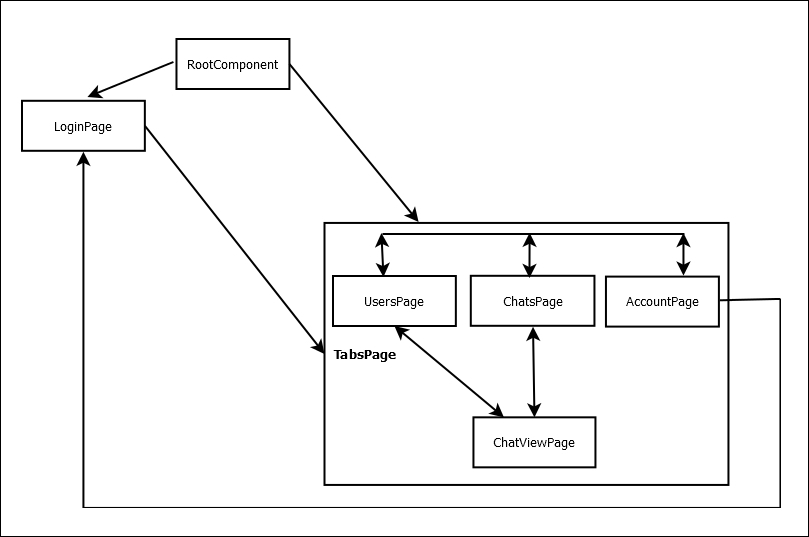
Let's understand the flow:
RootComponent: This is the root Ionic component. It is defined inside the
/app/app.tsfile. If a user is already logged in, theTabsPagewill appear. Otherwise, it will show theLoginPage.LoginPage: This provides a user with the ability to log in or create a new account. In either case, the user then goes to the
TabsPage.TabsPage: This is an abstract page. By abstract, I mean it will never open alone and always has a child page opened. This
TabsPagehas three tabs, calledUsersPage,ChatsPage, andAccountPage; each tab has its own navigation stack.UsersPage: This lists all the users of our application. By clicking on any user, it will open a
ChatViewPagefor chatting with that specific user.ChatsPage: This lists all the previous chats. By clicking on any chat, it will also open a
ChatViewPagefor chatting.ChatViewPage: This allows a user to chat with other users. It lists all the chat messages between two users, an input field to send a text message, and a button to send a picture message. We can go back to either the
UsersPageorChatsPage, depending on where we came from.AccountPage: This allows a user to upload a profile picture and to log out of the application. When a user logs out, it will then go to the
LoginPage.
Over the last couple of years, I have found it really useful to have UI mock-ups before starting to code an application. It makes it really easy to think about how you are going to write your templates. The following are the UI mock-ups for every page of our application.
The following screenshot of is of our LoginPage UI:
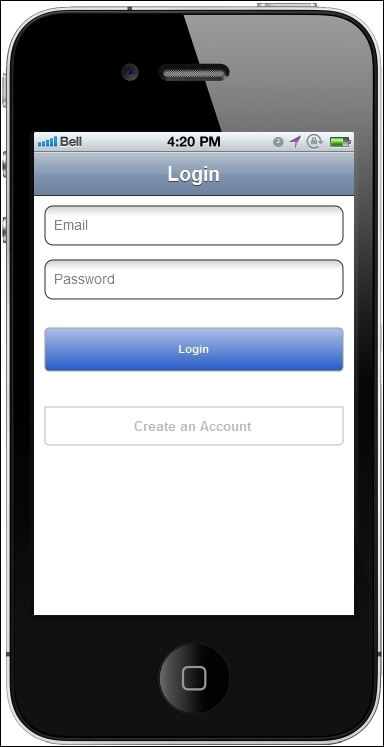
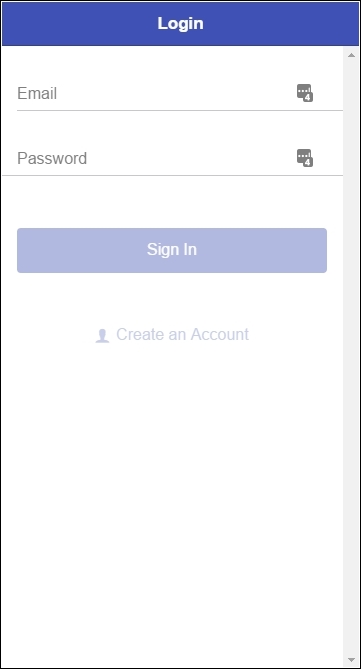
We have Email and Password fields, and two buttons. One button is for logging in and the other button is for creating an account. If the Login button is clicked, it will log in with the information provided and if the Create an Account button is clicked, it will create a new account with the same information.
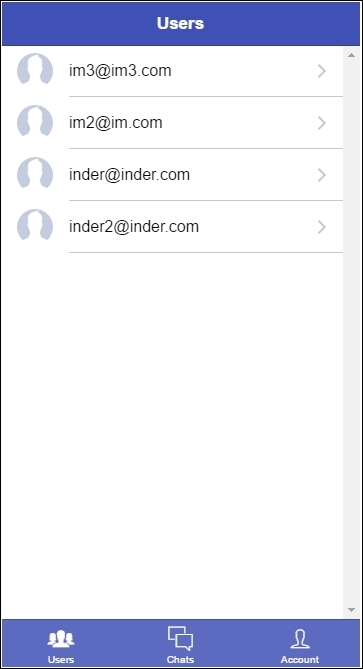
The following screenshot is of the UserPage, showing a list of all the users of our application:
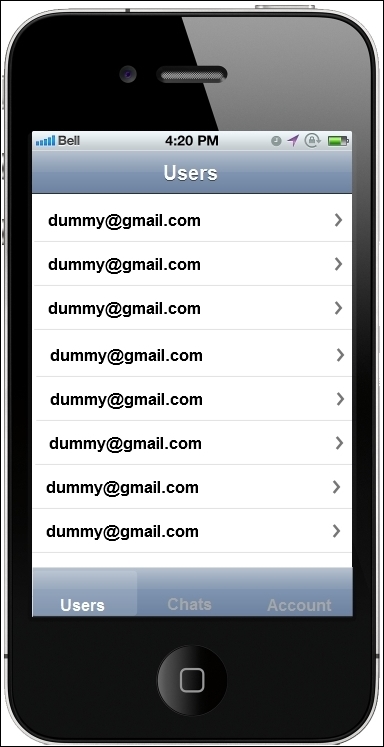
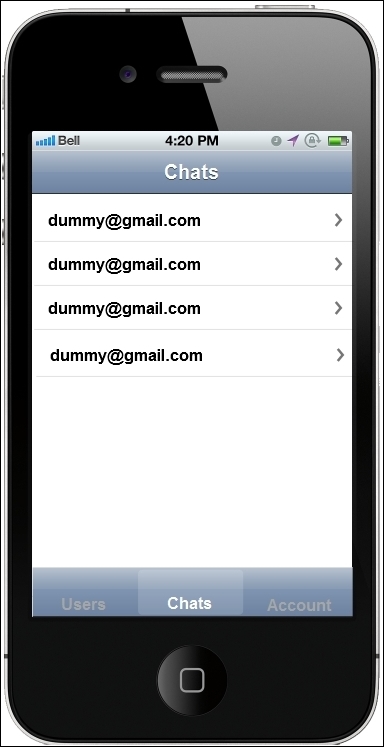
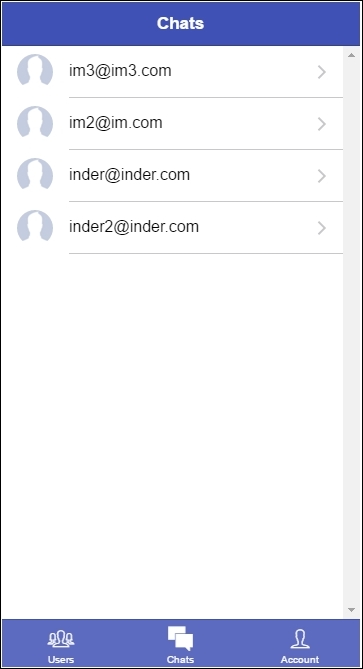
Clicking on any user will open the ChatViewPage. The following screenshot shows the ChatsPage, showing a list of all our previous chats:
Clicking on any chat will open the ChatViewPage, as shown in the following screenshot:
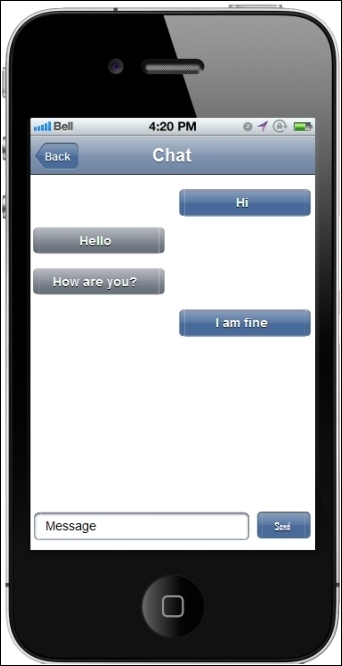
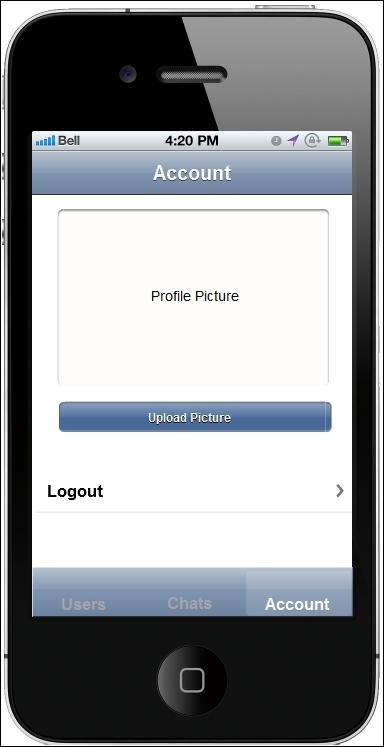
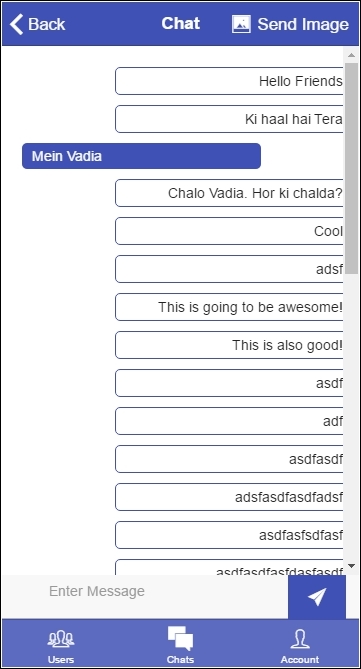
The ChatViewPage will have chats from both users, and an input box and send button at the bottom. The following is how we will design our AccountPage UI, with a profile picture and button to update it, and a logout button:
Note
These mock-ups are created with the open source tool Pencil Project (http://pencil.evolus.vn/).
Deciding on the data structure for the Firebase app before coding it is a crucial step. Since we are using Firebase as our backend, we have to structure our database in such a way that we get all the functionalities without too much redundancy of data. Since Firebase stores data as JSON, we will define our data structure using JSON.
First, we need to store users' information. Let's define it, as shown:
users: {
}
This will store the information of all users of the application. To save the information of a particular user, we need a unique key. Firebase password authentication gives us a unique ID (uid), which we will use as our unique key for each user, as follows:
uid: {
}
Each user will have information such as an e-mail and a picture, so we need to include these in our data structure, as follows:
uid: {
  email: "user@email.com",
  picture: "user's base64 encode picture"
}
We also need to track each user's chat history, so we create a chats key for each user, which stores the uid of the other user. Our complete user data structure will be as follows:
users: {
        uid: {
            email: "dummy@email.com"
            picture: "base64Encoded Picture",
            chats: {
                uid1: true,
                uid2: true
            }
        }
}
Here, uid is the unique ID of the user and uid1 and uid2 are the unique IDs of the other users to whom our user has talked previously.
So far we have stored information about the users. Now we also need to store the chat messages. Let's define the chats data structure step by step:
The following is the basic structure for chats to store messages:
    chats: {
    }
Now we need to define the data structure of chats in such a way that it creates a relationship between two users who are having a conversation. To do this, we will create a key inside our chats data structure, with the
uidof both users separated by a comma, as follows:uid1,uid2: { }This means that this key, or endpoint, will have chat messages between user
uid1and useruid2.Each chat message is just added into this object using the AngularFire2
addmethod, so each chat message will have its own Firebase-generated, unique key. Each chat message will have from, message or picture, and type keys, as shown:unique-key: { from: "UID of User", message: "Chat Message", picture: "Chat Picture Message", type: "message type" }In this,
fromstores theuidof the user who sent the message,messagestores the text message,picturestores the picture messages, andtypestores the type of message.Our final chats data structure will look something like the following:
    chats: {
        uid1,uid2: {
            unique-id: {
                from: uid,
                message: "Chat Message",
                type: "message"
            },
          unique-id: {
                from: uid,
                picture: "Picture Message",
                type: "picture"
            },
        }
    }
Ionic CLI eases the process of scaffolding and setting up an app for us, so we will be using the Ionic CLI that we installed earlier. We will start by scaffolding a blank application. Run the following command:
ionic start firebase-chat blank --v2 --ts
Notice the --v2 and --ts tag for scaffolding our Ionic 2 app based on TypeScript.
Using the cd command, go to the firebase-chat folder and run the following command to check how the blank app looks:
ionic serve
Before we start writing the code for our app, we need to install some project-specific dependencies.
We will be using a camera plugin to get pictures from a mobile device and upload them to Firebase. The following command will install the plugin:
ionic plugin add cordova-plugin-camera
Since we are using AngularFire2 for interacting with Firebase, we need to install both of these dependencies. This can be done using the following command:
npm install angularfire2 && firebase -save
Typings is the TypeScript definition manager, which is required to install TypeScript definitions. This can be done using the following command:
npm install typings -g
Now we have everything set up to start working on our application, there are three important steps for coding our app. They are as follows:
Defining our main
app.tsfileCreating providers/services for various functionalities
Creating Ionic pages for various views
This is the root of our application and it defines the root component using the @App decorator. This is where we inject all of our dependencies. The following should be present in app.ts:
/* /app/app.ts */
import {NavController, Platform, ionicBootstrap} from 'ionic-angular';
import {StatusBar} from 'ionic-native';
import {Component, Inject} from '@angular/core';
import {LoginPage} from './pages/login/login';
import {TabsPage} from './pages/tabs/tabs';
import {AuthProvider} from './providers/auth-provider/auth-provider';
import {ChatsProvider} from './providers/chats-provider/chats-provider';
import {UserProvider} from './providers/user-provider/user-provider';
import {UtilProvider} from './providers/utils';
import {
    FIREBASE_PROVIDERS,
    defaultFirebase,
    firebaseAuthConfig,
    FirebaseRef,
    AngularFire,
    AuthProviders,
    AuthMethods
} from 'angularfire2';

@Component({
  template: '<ion-nav id="nav" [root]="rootPage" #content></ion-nav>'
})
class MyApp {
  message: string;
  rootPage: any;

  constructor(public authProvider:AuthProvider, public platform:Platform) {
        let auth = authProvider.getAuth();
        auth.onAuthStateChanged(user => {
          if(user) {
            this.rootPage = TabsPage;
          } else {
            this.rootPage = LoginPage;
          }
        });
  }
}

ionicBootstrap(MyApp, [FIREBASE_PROVIDERS,defaultFirebase({
    apiKey: "AIzaSyC2gX3jlrBugfnBPugX2p0U1XiSqXhrRgQ",
    authDomain: "chat-app-1e137.firebaseapp.com",
    databaseURL: "https://chat-app-1e137.firebaseio.com",
    storageBucket: "chat-app-1e137.appspot.com",
  }),
  firebaseAuthConfig({
    provider: AuthProviders.Password,
    method: AuthMethods.Password,
    remember: 'default',
    scope: ['email']
  }),
  AuthProvider,
  ChatsProvider,
  UserProvider,
  UtilProvider] )
This is the entry point of our application. In it, we are initializing Firebase and configuring it to use password authentication. We are also checking that, if a user is authenticated, it goes to the TabsPage; otherwise, it will go to the LoginPage. We are also providing all of our dependencies. We haven't yet created our dependencies, so TypeScript will show errors. Just ignore it.
ionicBootstrap is an alternative to Angular's bootstrap method for Ionic 2 applications.
Note that we have written a template inside this file. We have used ion-nav to create a navigation stack, where we will push our views.
Note
To read more about what is going on under the hood inside IonicBootstrap, check this blog post at http://inders.in/blog/2015/10/28/introduction-to-ionic-2/.
We will have the following providers for our application:
AuthProvider
UserProvider
ChatsProvider
UtilProvider
AuthProvider is the provider that we will use for authentication purposes in our app. With the Ionic CLI, we can now generate pages and providers with the command line.
The following command will create auth-provider.js files in the app/provider/auth-provider directory, with some default content:
ionic g provider AuthProvider
Now, we have to change the extension of the file to .ts for using TypeScript in our code.
This is the module where we handle all of our authentication work. The following code should be present in auth-provider.ts:
/* /app/provider/auth-provider/auth-provider.ts */
import {Injectable, Inject} from '@angular/core';
import {FirebaseAuth, FirebaseRef, AngularFire} from 'angularfire2';
import {LocalStorage, Storage} from 'ionic-angular';

@Injectable()
export class AuthProvider {
  local = new Storage(LocalStorage);
  constructor(public af:AngularFire) {}
  getAuth() {
    return firebase.auth();
  };

  signin(credentails) {
    return this.af.auth.login(credentails);
  }

  createAccount(credentails) {
    return this.af.auth.createUser(credentails);
  };

  logout() {
     var auth = firebase.auth();
     auth.signOut();
  }
}
Let's understand the preceding code:
getAuth()returns the Firebase SDK'sfirebase.auth()method.signin()does the login process for us. Since we will be using Firebase password authentication. We are using AngularFire2'sauth.loginmethod by passing it login credentials.createAccount()takes an object with e-mail and password values and creates a Firebase account for the user. Again, we are using AngularFire2'sauth.createUserwith credentials to create a Firebase user account.logout()logs the user out. We are using Firebase SDK'sauth.signOut()function here.
First we will generate our provider using the following command:
ionic g generate UserProvider
Then, change the extension of user-provider.js to user-provider.ts.
UserProvider is for doing user-related work in our application, such as creating a user, getting a list of users, updating the profile of a user, and other things. The following code should be present in user-provider.ts:
/* /app/providers/user-provider/user-provider.ts */
import {Injectable, Inject} from '@angular/core';
import {FirebaseRef, AngularFire} from 'angularfire2';
import {LocalStorage, Storage} from 'ionic-angular';
import {Camera} from 'ionic-native';

@Injectable()
export class UserProvider {
  local = new Storage(LocalStorage);
  constructor(public af:AngularFire) { }

  // Get Current User's UID
  getUid() {
    return this.local.get('userInfo')
    .then(value => {
      let newValue = JSON.parse(value);
      return newValue.uid;
    });
  }

  // Create User in Firebase
  createUser(userCredentails) {
    this.getUid().then(uid => {
      let currentUserRef = this.af.database.object(`/users/${uid}`);
      currentUserRef.set({email: userCredentails.email});
    });
  }

  // Get Info of Single User
  getUser() {
    // Getting UID of Logged In User
    return this.getUid().then(uid => {
      return this.af.database.object(`/users/${uid}`);
    });
  }


  // Get All Users of App
  getAllUsers() {
      return this.af.database.list('/users');
  }

  // Get base64 Picture of User
  getPicture() {
      let base64Picture;
      let options = {
          destinationType: 0,
          sourceType: 0,
          encodingType:0
      };

      let promise = new Promise((resolve, reject) => {
           Camera.getPicture(options).then((imageData) => {
                base64Picture = "data:image/jpeg;base64," + imageData;
                resolve(base64Picture);
            }, (error) => {
                reject(error);
          });

      });
      return promise;
  }

  // Update Provide Picture of User
  updatePicture() {
    this.getUid().then(uid => {
      let pictureRef =
       this.af.database.object(`/users/${uid}/picture`);
      this.getPicture()
      .then((image) => {
          pictureRef.set(image);
      });
    });
  }
}
Let's understand the preceding code:
getUid()returns apromise, which resolves intotheuidof the logged-in user. It gets theuidfrom theuserInfokey ofLocalStorage.createUser()creates a new user in theusersendpoint in the Firebase database.getUser()returns theObservable, which has the information of the logged-in user from the Firebase database.getAllUsers()returns an AngularFire2 listObservable, which lists all the users of our application.getPicture()gets a picture from the user's mobile device and returns apromise. This promise resolves into a base64 Encoded JPEG Image.updatePicture()updates the user's profile picture. It takes the picture using thegetPicturemethod and sets thepicturekey of the logged-in user.
Note
In this app, we are storing images as a base64 string. It is not a very efficient method. Instead, Firebase provides us with a storage bucket to store binary data such as images, videos, and other binary data. We have used the Firebase storage-bucket approach in Chapter 7, Social App with Firebase of this book.
First, we need to generate our provider using the following command:
ionic g provider ChatsProvider
Then, change the extension of the file chats-provider.js to chats-provider.ts.
ChatsProvider is used to get a list of previous chats and check if a chat already exists between two users. The following code should be present in chats-provider.ts:
/* /app/providers/chats-provider/chats-provider.ts */
import {Injectable, Inject} from '@angular/core';
import {AngularFire, FirebaseRef} from 'angularfire2';
import {Observable} from 'rxjs/Observable';
import {UserProvider} from '../user-provider/user-provider';

@Injectable()
export class ChatsProvider {
  constructor(public af: AngularFire, public up: UserProvider) {}
  // get list of Chats of a Logged In User
  getChats() {
     return this.up.getUid().then(uid => {
        let chats = this.af.database.list(`/users/${uid}/chats`);
        return chats;
     });
  }

  // Add Chat References to Both users
  addChats(uid,interlocutor) {
      // First User
      let otherUid = interlocutor;
      let endpoint =
       this.af.database.object(`/users/${uid}/chats/${interlocutor}`);
      endpoint.set(true);

      // Second User
      let endpoint2 =
       this.af.database.object(`/users/${interlocutor}/chats/${uid}`);
      endpoint2.set(true);
  }

  getChatRef(uid, interlocutor) {
      let firstRef =
       this.af.database.object(`/chats/${uid},${interlocutor}`,
       {preserveSnapshot:true});
      let promise = new Promise((resolve, reject) => {
          firstRef.subscribe(snapshot => {
                let a = snapshot.exists();
                if(a) {
                    resolve(`/chats/${uid},${interlocutor}`);
                } else {
                    let secondRef =
                     this.af.database.object(`/chats/${interlocutor},
                      ${uid}`, {preserveSnapshot:true});
                    secondRef.subscribe(snapshot => {
                        let b = snapshot.exists();
                        if(!b) {
                            this.addChats(uid,interlocutor);
                        }
                    });
                    resolve(`/chats/${interlocutor},${uid}`);
                }
            });
      });

      return promise;
  }
}
Let's understand the preceding code:
getChats()gets a list of chats of the logged-in user-chats that a user has already initiated.addChats()takes two input values. The first is theuidof the logged-in user, and the second is theuidof the other user (interlocutor). This function adds chat references (uidof the other user) to both users' information in the Firebase database.getChatRef()takes two arguments. One is theuidof the logged-in user and the other is theuidof the other user. It returns apromise, which resolves to the Firebase database URL of the chats between these two users. If this is the first time these two users are chatting, it creates a URL in the form of/chats/${interlocutor},${uid}, where${interlocutor}is theuidof the other user and${uid}is theuidof the logged-in user.
UtilProvider is a module for abstracting some functionalities that we will use repeatedly, such as the Ionic alert. The following code should be present in utils.ts:
/* /app/providers/utils.ts */
import {Injectable, Inject} from '@angular/core';
import {Alert} from 'ionic-angular';
@Injectable()
export class UtilProvider {
    doAlert(title, message, buttonText) {
      console.log(message);
      let alert = Alert.create({
          title: title,
          subTitle: message,
          buttons: [buttonText]
      });
      return alert;
    }
}
In UtilProvider, we have created a doAlert function that takes a title, message, and buttonText as an input, and creates an Ionic alert box for us. This function becomes very useful for displaying alert messages without writing alert code again and again.
Now we have to define all the providers and services for our application. First let's define the pages of our application.
We will have the following pages in our application:
LoginPage
TabsPage
UsersPage
ChatsPage
AccountPage
ChatViewPage
Each page has two or three files. One is the .ts file, which controls the page. The other is the .html file, which is the template of the page and, if present, the last is the .scss file, which is the styling file for the page.
The LoginPage includes the login template and a controller to handle that template. This is the page where the user creates an account or logs in. The following code should be present in login.ts:
/* /app/pages/login/login.ts*/
import {Component} from '@angular/core';
import {NavController, Storage, LocalStorage} from 'ionic-angular';
import {TabsPage} from '../tabs/tabs';
import {FormBuilder, Validators} from '@angular/common';
import {validateEmail} from '../../validators/email';
import {AuthProvider} from '../../providers/auth-provider/auth-provider';
import {UserProvider} from '../../providers/user-provider/user-provider';
import {UtilProvider} from '../../providers/utils';
import {FirebaseAuth} from 'angularfire2';

@Component({
  templateUrl: 'build/pages/login/login.html'
})
export class LoginPage {
  loginForm:any;
    storage = new Storage(LocalStorage);
    constructor(public nav:NavController,
      form:FormBuilder,
      public auth: AuthProvider,
      public userProvider: UserProvider,
      public util: UtilProvider) {

        this.loginForm = form.group({
            email: ["",Validators.compose([Validators.required,
             validateEmail])],
            password:["",Validators.required]
        });
    }

  signin() {
      this.auth.signin(this.loginForm.value)
      .then((data) => {
          this.storage.set('userInfo', JSON.stringify(data));
          this.nav.push(TabsPage);
      }, (error) => {
          let errorMessage = "Enter Correct Email and Password";
          let alert = this.util.doAlert("Error",errorMessage,"Ok");
          this.nav.present(alert);
      });
    };

    createAccount() {
        let credentails = this.loginForm.value;
        this.auth.createAccount(credentails)
        .then((data) => {
           this.storage.set('userInfo', JSON.stringify(data));
           this.userProvider.createUser(credentails);
        }, (error) => {
            let errorMessage = "Account Already Exists";
            let alert = this.util.doAlert("Error",errorMessage,"Ok");
            this.nav.present(alert);
        });
    };
}
In the constructor, we have created a login form using Angular2's form builder, and we are using a custom validator that we have defined in the following code to validate the e-mail ID, since Angular2 doesn't have a validator for e-mail ID.
The signin function takes the user's e-mail and password, and authenticates the user, using the signin member function of AuthProvider. If the user is authenticated successfully they navigate to the TabsPage. Otherwise, it shows an error message using the doAlert member function of UtilProvider.
Similarly, the createAccount function takes the user's e-mail and password and creates a new user account. It also adds the user's information to the users key in the Firebase database. If the user already exists it shows an error message.
The following code should be present in login.html:
<!--  /app/pages/login/login.html -->
<ion-header>
    <ion-navbar primary>
        <ion-title>Login</ion-title>
    </ion-navbar>
</ion-header>

<ion-content class="padding">
   <form [ngFormModel]="loginForm">
    <ion-list>

        <ion-item>
            <ion-label floating>Email</ion-label>
            <ion-input type="text" ngControl="email"></ion-input>
        </ion-item>

        <ion-item>
            <ion-label floating>Password</ion-label>
            <ion-input type="password" ngControl="password"></ion-
             input>
        </ion-item>
    </ion-list>

    <div padding>
      <button primary block (click)="signin()"
       [disabled]="!loginForm.valid">Sign In</button>
    </div>

    <div padding>
      <button full clear favorite (click)="createAccount()"
       [disabled]="!loginForm.valid">
          <ion-icon name="person"></ion-icon>
          Create an Account</button>
    </div>
   </form>
</ion-content>
Both the Sign In and Create Account buttons will be enabled only when the form is valid.
We need to define a custom validator, which validates the e-mail input from users because Angular 2 doesn't have a default e-mail validator. The following code should be present in email.ts:
/* /app/validators/email.ts  */
import {Control} from '@angular/common';

export function validateEmail(c: Control) {
 let EMAIL_REGEXP = /^[a-z0-9!#$%&'*+\/=?^_`{|}~.-]+@[a-z0-9]([a-z0-
  9-]*[a-z0-9])?(\.[a-z0-9]([a-z0-9-]*[a-z0-9])?)*$/i;
  return EMAIL_REGEXP.test(c.value) ? null : {
    validateEmail: {
      valid: false
    }
  };
}
This just takes the control's value and validates it against the regular expression provided using EMAIL_REGEXP.
The TabsPage handles the tabs of our app. This is the place where we define the root page of each tab. The following code should be present in tabs.ts:
/*  /app/pages/tabs/tabs.ts  */
import {Component} from '@angular/core';
import {NavController} from 'ionic-angular';
import {ChatsPage} from '../chats/chats';
import {AccountPage} from '../account/account';
import {UsersPage} from '../users/users';

@Component({
  templateUrl: 'build/pages/tabs/tabs.html'
})
export class TabsPage {
  chats = ChatsPage;
  users = UsersPage;
    profile = AccountPage;
}
The following code should be present in tabs.html:
<!-- /app/pages/tabs/tabs.html -->
<ion-tabs light>
    <ion-tab [root]="users" tabTitle="Users" tabIcon="people"></ion-
     tab>
    <ion-tab [root]="chats" tabTitle="Chats" tabIcon="chatboxes"></ion-
     tab>
    <ion-tab [root]="profile" tabTitle="Account" tabIcon="person"></ion-tab>
</ion-tabs>
In the TabsPage, we have just defined the root pages of all our tabs. The [root] property is used to set the root page of a tab. By default, the first tab is opened when the TabsPage is pushed into the navigation stack.
The UserPage is the page where we will list all of our users. The following code should be present in users.ts:
/*  /app/pages/users/users.ts  */
import {Component} from '@angular/core';
import {NavController} from 'ionic-angular';
import {Observable} from 'rxjs/Observable';
import {UserProvider} from '../../providers/user-provider/user-provider';
import {ChatViewPage} from '../chat-view/chat-view';

@Component({
    templateUrl: 'build/pages/users/users.html'
})
export class UsersPage {
    users:Observable<any[]>;
    uid:string;
    constructor(public nav: NavController, public userProvider:
     UserProvider) {
        userProvider.getUid()
        .then(uid => {
            this.uid = uid;
            this.users = this.userProvider.getAllUsers();
        });
    }
    openChat(key) {
        let param = {uid: this.uid, interlocutor: key};
        this.nav.push(ChatViewPage,param);
    }
}
In the constructor, we got the uid of the logged-in user and a list of all users of the app as an Observable.
The openChat function opens the ChatViewPage by passing the uid of both users as navigation parameters.
The following code should be present in user.html:
<!-- /app/pages/users/users.html -->
<ion-header>
    <ion-navbar primary>
        <ion-title>Users</ion-title>
        <ion-buttons end>
            <ion-spinner *ngIf="!(users | async)"></ion-spinner>
        </ion-buttons>
    </ion-navbar>
</ion-header>

<ion-content>
    <ion-list>
      <span *ngFor="let user of users | async">
        <a ion-item (click)="openChat(user.$key)" *ngIf="user.$key !==
         uid">
             <ion-avatar item-left>
                <img *ngIf="!user.picture" src="img/default.jpg">
                <img *ngIf="user.picture" src="{{user.picture}}">
             </ion-avatar>
             <h2>{{user.email}}</h2>
        </a>
      </span>
    </ion-list>
</ion-content>
We have used ngFor to iterate over the users list and we have excluded the logged-in user from the list using ngIf. Basically, we check if the uid of the logged-in user and the user in the iteration is the same, then exclude it from the list. We are also showing the avatar of each user. If the user has uploaded his picture, we show it from Firebase; otherwise, we show a default image.
We are also showing a loading spinner in the navbar until we get the list of users.
The ChatsPage lists all previous chats. The following code should be present in chats.ts:
/* /app/pages/chats/chats.ts */
import {Component} from '@angular/core';
import {NavController, NavParams} from 'ionic-angular';
import {Observable} from 'rxjs/Rx';
import {UserProvider} from '../../providers/user-provider/user-provider';
import {ChatsProvider} from '../../providers/chats-provider/chats-provider';
import {AngularFire} from 'angularfire2';
import 'rxjs/add/operator/map';
import {ChatViewPage}  from '../chat-view/chat-view';

@Component({
    templateUrl: 'build/pages/chats/chats.html'
})
export class ChatsPage {
    chats:Observable<any[]>;
    constructor(public chatsProvider: ChatsProvider,
        public userProvider: UserProvider,
        public af:AngularFire,
        public nav: NavController) {

            this.chatsProvider.getChats()
            .then(chats => {
                this.chats = chats.map(users => {
                    return users.map(user => {
                        user.info =
                        this.af.database.object(`/users/${user.$key}`);
                        return user;
                    });
                });
            });
        }

    openChat(key) {
        this.userProvider.getUid()
        .then(uid => {
            let param = {uid: uid, interlocutor: key};
            this.nav.push(ChatViewPage,param);
        });
    }
}
The ChatsPage is similar to the UsersPage. The openChat function does exactly the same thing as it does in the UsersPage. The only difference is that instead of showing all the users of the application, we show only those users who have already had a conversation with the logged-in user. First we get all the references of his previous chats from his Firebase endpoint, which contains all the uid of other people. Then we map all those uid to keys inside the users endpoint to get the e-mails of those users. It is like a join. This is an asynchronous process, and this is what Observables are capable of. You can filter, map, search, and do lots of other stuff on Observables.
The following code should be present in chats.html:
<!-- /app/pages/chats/chats.html -->
<ion-header>
    <ion-navbar primary>
        <ion-title>Chats</ion-title>
        <ion-buttons end>
            <ion-spinner primary *ngIf="!(chats | async)"></ion-
             spinner>
        </ion-buttons>
    </ion-navbar>
</ion-header>

<ion-content>
     <a ion-item *ngFor="let chat of chats | async"
      (click)="openChat(chat.$key)">
        <ion-avatar item-left>
                <img *ngIf="!(chat.info | async).picture"
                 src="img/default.jpg">
                <img *ngIf="(chat.info | async).picture" src="
                 {{(chat.info | async).picture}}">
        </ion-avatar>
        <span>{{(chat.info | async).email}}</span>
     </a>
</ion-content>
The ChatViewPage is the place where the actual chatting takes place. The following code should be present in chat-view.ts:
/* /app/pages/chat-view/chat-view.ts */
import {Component, ViewChild} from '@angular/core';
import {NavController, NavParams, Content} from 'ionic-angular';
import {Observable} from 'rxjs/Observable';
import {AngularFire, FirebaseListObservable} from 'angularfire2';
import {ChatsProvider} from '../../providers/chats-provider/chats-provider';
import {UserProvider} from '../../providers/user-provider/user-provider';

@Component({
  templateUrl: 'build/pages/chat-view/chat-view.html',
})
export class ChatViewPage {
  message: string;
  uid:string;
  interlocutor:string;
  chats:FirebaseListObservable<any>;
  @ViewChild(Content) content: Content;
  constructor(public nav:NavController,
  params:NavParams,
  public chatsProvider:ChatsProvider,
  public af:AngularFire,
  public userProvider:UserProvider) {

    this.uid = params.data.uid;
    this.interlocutor = params.data.interlocutor;

    // Get Chat Reference
    chatsProvider.getChatRef(this.uid, this.interlocutor)
    .then((chatRef:any) => {
        this.chats = this.af.database.list(chatRef);
    });
  }

  ionViewDidEnter() {
    this.content.scrollToBottom();
  }

  sendMessage() {
      if(this.message) {
          let chat = {
              from: this.uid,
              message: this.message,
              type: 'message'
          };
          this.chats.push(chat);
          this.message = "";
      }
  };

  sendPicture() {
      let chat = {from: this.uid, type: 'picture', picture:null};
      this.userProvider.getPicture()
      .then((image) => {
          chat.picture =  image;
          this.chats.push(chat);
      });
  }
}
In the constructor, we get the uid of both users and then we get the Firebase URL of their chat's endpoint, which is something like this: /chats/uid1,uid2. With this URL, we get a list of all the messages between these two users' AngularFire2 lists.
In the sendMessage function, we send chat messages using the push function of the AngularFire2 list. Similarly, in the sendPicture function, we get a picture from the user's gallery and send it as a base64 encoded string.
The ionViewDidEnter() function is an Ionic page hook. It fires each time a page is pushed in the navigation stack. We scroll to the bottom in this function using the scrollToBottom() method of ion-content.
It is important to note that we are using a @ViewChild decorator to get hold of ion-content.
Note
For further information about Ionic page life cycle hooks, take a look at http://ionicframework.com/docs/v2/api/components/nav/NavController/.
The following code should be present in chat-view.html:
<!-- /app/pages/chat-view/chat-view.html -->
<ion-header>
  <ion-navbar primary>
    <ion-title>Chat</ion-title>
    <ion-buttons end>
      <button (click)="sendPicture()"><ion-icon name="image" ></ion-
       icon>Send Image</button>
    </ion-buttons>
  </ion-navbar>
</ion-header>

<ion-content padding class="chat-view" id="chat-view">
  <div class="messages">
      <div class="message" *ngFor="let chat of chats | async"
       [ngClass]="{'me': uid === chat.from}">
            <span *ngIf="chat.message">{{chat.message}}</span>
            <img *ngIf="chat.picture" src="{{chat.picture}}"
             class="picture">
      </div>
  </div>
</ion-content>

<ion-footer>
  <ion-toolbar>
    <ion-row>
      <ion-col width-10>
          <ion-spinner *ngIf="!(chats)"></ion-spinner>
      </ion-col>

      <ion-col width-70 [hidden]="!chats">
          <ion-input type="text"  placeholder="Enter Message"
              [(ngModel)]="message">
          </ion-input>
      </ion-col>
      <ion-col width-20 [hidden]="!chats">
          <button full (click)="sendMessage()"><ion-icon name="send">
           </ion-icon></button>
      </ion-col>
    </ion-row>
  </ion-toolbar>
</ion-footer>
The following code should be present in chat-view.scss:
/* /app/pages/chat-view/chat-view.scss */
.chat-view {
  .messages {
    width: 100%;
    position: absolute;
    .message {
      width: 70%;
      padding: 5px 10px;
      background: #3F51B5;
      color: #fff;
      border-radius: 5px;
      margin: 5px;
      float: left;
    }
    .message.me {
      float: right;
      background: #fff;
      border: 1px solid #3F51B5;
      color: #222;
      text-align: right;
    }
  }
}
The AccountPage is the place where the user updates their profile picture and logs out. The following code should be present in accounts.ts:
/* /app/pages/account/account.ts */
import {Component} from '@angular/core';
import {NavController, LocalStorage, Storage} from 'ionic-angular';
import {AuthProvider} from '../../providers/auth-provider/auth-provider';
import {UserProvider} from '../../providers/user-provider/user-provider';

@Component({
    templateUrl: 'build/pages/account/account.html'
})
export class AccountPage {
    rootNav;
    user = {};
    local = new Storage(LocalStorage);
    constructor(public nav: NavController, public auth: AuthProvider,
     public userProvider: UserProvider) {
        this.userProvider.getUser()
        .then(userObservable => {
            userObservable.subscribe(user => {
                this.user = user;
            });
        });
    }

    //save user info
    updatePicture() {
        this.userProvider.updatePicture();
    };

    logout() {
        this.local.remove('userInfo');
        this.auth.logout();
    }
}
In the AccountPage, we are just updating the user's profile picture using the updatePicture function, and we are logging out the user using the logout function. When the user logs out, we also remove the value of the userInfo key from LocalStorage.
The following code should present in accounts.html:
<!-- /app/pages/account/account.html -->
<ion-header>
    <ion-navbar primary>
        <ion-title>Account</ion-title>
    </ion-navbar>
</ion-header>

<ion-content>
    <ion-list>
        <ion-card>
            <img *ngIf="!user.picture" src="img/default.jpg"/>
            <img *ngIf="user.picture" src="{{user.picture}}"/>
        </ion-card>
        <ion-item>
            <button full (click)="updatePicture()">Change
             Picture</button>
        </ion-item>
        <a ion-item primary (click)="logout()">
            Logout
        </a>
    </ion-list>
</ion-content>
Ionic 2 uses Syntactically Awesome Style Sheets (SASS) for styling applications, so it's very easy to change the overall look and feel of an application just by changing some values. We will change the values of some default variables to make our application look unique.
Styles are defined in the app/theme folder. Inside this folder, there is an app.variable.scss file. In this file, Ionic has defined the default colors. Let's change the color values of the primary and secondary Ionic colors to this:
primary:    #3F51B5,
secondary:  #32db64,
favorite:   #7986CB
So far, we have completed all the stages of building our app, but we haven't yet tested in on any actual devices, so let's build it for a mobile device.
The following commands will add a platform and run the app on a mobile device:
ionic platform add android
ionic run android
The following are actual screenshots of our chat application.
The following screenshot is of the LoginPage:
The following screenshot is of the UsersPage:
The following screenshot is of the ChatsPage:
The following screenshot is of the ChatsViewPage:
The following screenshot is of the AccountPage:

In this chapter, we have learned how to use Firebase as a backend for our Ionic application. Along with that, we have also organized our app by dividing our app's functionality into different providers. We have used our mobile device's gallery to get pictures. Along with all these things, we have used Ionic 2's UI elements and services to build a complete app.
In the next chapter, we will create an e-commerce application using Ionic and Marketcloud. Interestingly, we will still not be using any custom backend for our e-commerce app, just like in this chat application.
