


In this chapter, we will cover the following recipes:
Customizing user permissions
Creating highly-customized reports with ODBC
Using the Employee Organizer
You will be able to use the recipes in this chapter to gain access to the often-overlooked features and capabilities that are not available in other versions of QuickBooks. Recipes for a number of features, only available in the Enterprise edition, are also included throughout this cookbook.
You will be able to use the recipes in this chapter to gain access to the often-overlooked features and capabilities that are not available in other versions of QuickBooks. Recipes for a number of features, only available in the Enterprise edition, are also included throughout this cookbook.
As compared to the Premier and Pro editions, user permissions in the Enterprise edition are much more detailed and specific. Furthermore, the role-based structure of user permissions allows the administrator to automate the process after the initial setup.
Make sure that all bank accounts that are going to be used by the company have been added to the Chart of Accounts. There are certain permissions, which are bank account-specific.
1. Go to Company | Users | Set Up Users and Roles.
2. Instead of clicking on New, as you did when adding new users, click on the Role List tab.
3. Click on New, Edit, or Duplicate to start working with a role that you wish to customize.
4. Depending on your choice in the previous step, the following pop-up box is prepared already or completely blank, as in the following illustration:

5. Edit or create the Role Name.
6. Use the Description field to detail either the type of position suitable for that user role, or the types of permissions included in this user role.

7. In the Role Access | Area and Activities section, select the + to the left of an area of interest to you.
8. Select an activity.
9. From the Activity Access Level section, make your selection as to the extent of the access level. Depending on the activity, the choices are None/Full:

Or None/Full/Partial, followed by additional options for Partial:

10. If you select Partial, select the additional checkboxes according to the access you wish to grant for this specific activity in this specific role.
From the Users and Roles dialog box displayed, after you click on Company | Users | Set Up Users and Roles, the User List tab includes a display for the roles assigned to the selected user.
Similarly, the Role List tab includes a display for the users assigned to the selected role.
This cookbook includes many recipes for customized reports, including modifying standard reports in QuickBooks, and using the QuickBooks Statement Writer. The Open Database Connectivity (ODBC) feature, available exclusively in the Enterprise edition, provides access to further customization of reports. This recipe details ODBC with Microsoft Excel 2007 or 2010, but the connection is possible with Microsoft Access as well.
Your file must be in a multi-user mode in order to use the ODBC feature. Even if you have a single-user license, you can still access the multi-user mode for this purpose, by clicking File | Switch to Multi-User Mode.
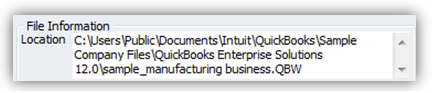
Additionally, you need to know the location of your QuickBooks file. An easy way to get this information is to open your QuickBooks file, and press the F2 key. The middle of the dialog box has a section called File Information, which contains the location:
1. Go to Reports | Custom Reporting.
2. The first time you use the ODBC feature, click on the Manage ODBC Users button to create an ODBC user.
3. Click on the New button.
4. Create a username and password. The following red message turns green when a password with at least six characters is entered.

5. Click on any number of groups from the left-hand side of the dialog box:

6. Click on the Add button, followed by OK and Close.
7. Open Microsoft Excel.
8. Go to Data | From Other Sources | From Microsoft Query | Databases | Browse.
9. Browse to the folder containing your QuickBooks file, and double-click on the appropriate file.
10. Click on OK.
11. Fill out the User ID and Password fields using the same information you entered earlier in this recipe.
12. Go to Options | In the Creator drop-down box, select QBReportAdminGroup | OK.
13. Select a desired table, and click on the> button. For just a single field, click on the + button, and select a single field, followed by the> button.
14. Click on Next.
15. If necessary, establish a join between the tables in the query. In the following example, the
v_lst_customer(Customer List) andv_lst_customer_type(Customer Type List) fields were added to the query. The join in the illustration was created by dragging the id field to thecustomer_type_idfield:
16. Sort and filter as desired.
17. Select File | Save.
18. Select File | Return Data to Microsoft Excel.
19. Use the Import Data dialog box to determine how you wish to see the information in Excel. If you wish to see details, click on Table. For a summary, click on PivotTable. For a visual summary, click on PivotChart and PivotTable report:

20. Manipulate the information as you would in any Excel spreadsheet, and interpret the information.
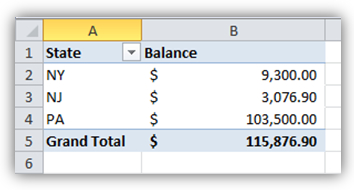
The ODBC feature can be used to get key information, which is not otherwise readily available in QuickBooks. For example, you can obtain your customer Accounts Receivable balances by state, in order to focus your collection efforts in a particular geographic region:
Also noteworthy is that for transactions and reports, the relationship between QuickBooks and Excel is one-way. That is, information can be exported from QuickBooks to Excel, but neither custom reports nor transaction information can be moved from Excel back into QuickBooks.
The Employee Organizer goes beyond the Employee Center in the administration of the human resource function. It focuses on employment processes, includes regulations guides, and provides access to additional resources, such as background checks. The Enterprise edition's array of employee reports also includes special reports that are not offered in other versions of QuickBooks. This recipe details the use of the task-based items of employment processes and special reports.
Be sure that your employees are included in the Employee List.
Open the Employee Organizer by selecting Employees | Employee Organizer | Employee Organizer Home.
Employment processes:
1. Use the links given in the following screenshot to gain access to different processes and resources:

2. Click on the Hire Employee link to view resources. Click on payroll items to jump to the Payroll Item List, to add items to the list if needed.
3. Click on the Raises and Promotions link to adjust the employee's hourly rate, title, or relevant payroll item.

4. Select the appropriate employee, and click on OK.
5. Use the Enter Raise or Promotion button or the Add Historical Record button to indicate the following changes:

6. Click on OK. If desired, click on the Report button for an employee compensation history report, for the selected employee.
7. Click on the Leave of Absence link to start the wizard regarding the leave. Options include considerations for the Family Leave Act, USERRA, disability-related leave, and paid leave.

8. Click on the Terminate Employee link to start the related wizard. Options include the reason for the termination, recommendations to re-hire, and severance. Some information from the wizard affects the payroll reports, such as whether the employee is deceased, which will be indicated on the employee's annual earnings report.
Reports
1. Go to Reports | Employees and Payroll.
2. The list includes several reports that are not included in other versions of QuickBooks:
