


In this recipe, we will cover the steps to install CasperJS and its dependencies on Windows, Mac OS X, and Linux.
The CasperJS sources are managed on GitHub. So, to get them on our local machine, we need Git.
To install Git on Windows, we can use msysGit to deploy the Git command-line utility plus a graphical interface:
Go to http://msysgit.github.io/.
Go to the Downloads page.
Download the latest version.
Run the installer.
To install Git on Mac, the easiest way is to use Git for OS X graphical interface:
Go to the Downloads page.
Download the latest version.
Run the installer.
You can also install Git from the MacPorts:
Make sure MacPorts is installed (if not, go to http://www.macports.org/ and follow the instructions).
From a command line, enter the following command:
$ sudo port install git-core +svn +doc +bash_completion +gitweb
To install Git on Linux, use the following commands:
For Debian/Ubuntu, enter the following command:
$ sudo apt-get install gitFor Fedora, enter the following command:
$ yum install git-core
First of all, we need to install PhantomJS.
Perform the following steps to install PhantomJS on Windows:
Download the Windows version.
Extract its content.
Add the
phantomjs.exepath to thePATHenvironment variable, assuming it is located atC:\PhantomJS:...the existing PATH value...;C:\PhantomJS
Perform the following steps to install PhantomJS on Mac and Linux:
Download the appropriate version (Mac OS X / Linux 32 bits / Linux 64 bits).
Extract its content.
Make
bin/phamtomjsavailable in your system path using the following command:~ sudo ln -s <path-to-extracted-folder>/bin/phantomjs /usr/local/bin
Now we should be able to run
phantomjsfrom a command line:~ phantomjs --version 1.9.0
Now, we can install CasperJS using Git. We need to locally clone the official CasperJS repository from GitHub.
This can be achieved using the following command:
~ git clone git://github.com/n1k0/casperjs.gitThis should produce an output similar to the following command:
Cloning into 'casperjs'...
remote: Counting objects: 11156, done.
remote: Compressing objects: 100% (4927/4927), done.
remote: Total 11156 (delta 6580), reused 10692 (delta 6167)
Receiving objects: 100% (11156/11156), 6.85 MiB | 113 KiB/s, done.
Resolving deltas: 100% (6580/6580), done.
To check out the last stable version, we need to run the following Git command:
~ git checkout tags/1.1-beta3We will get the following message:
Note: checking out 'tags/1.1-beta3'.


..

HEAD is now at bc0da16... bump 1.1-beta3
Let's check if CasperJS is properly installed.
To check if CasperJS is installed properly on Windows, use the following commands:
~ cd casperjs
~ bin\batchbin\casperjs.bat --version
To check if CasperJS is installed properly on Mac OS X / Linux, use the following commands:
~ cd ./casperjs
~ bin/casperjs --version
We should obtain the following result:
1.1.0-beta3To complete the installation, we will now make sure that the
casperjsexecutable is available in our system path.To complete the installation on Windows add the following path to
casperjs.batto thePATHenvironment variable, assuming the repository is located inC:\casperjs:...the existing PATH value...;C:\casperjs\batchbinTo complete the installation on Mac and Linux, link
bin/casperjsin/usr/local/binusing the following command:~ sudo ln -s `pwd`/bin/casperjs /usr/local/binWe can check if
casperjsis in the system path using the following command:~ casperjs --version 1.1.0-beta3
The setup is now complete.
Just after cloning the repository, we launched a Git command to get the Version 1.1 (which was still a beta version at the time we were writing those lines).
If we had not launched the Git command, we would still have had a correct CasperJS setup, but be careful; Git has downloaded all the CasperJS revisions since the very beginning of CasperJS's development till today, and has automatically checked out the last one. So, we try using the following command:
~ bin/casperjs --version
We will obtain something similar to the following result:
1.1.0-DEV
It means that we are running the current development version and using a development version is probably not what we want as it might be unstable or even broken.
That is why we need to check out the 1.1 tagged revision specifically.
Now, let's discuss some installation options.
Homebrew is a package manager for Mac OS X. It is a very handy way to deploy PhantomJS and CasperJS using the following command:
~ brew install casperjs
Be careful; on Ubuntu, if we install PhantomJS from the distribution packages, we will get an old version (Version 1.4 or 1.6, depending on our Ubuntu version).
But CasperJS needs at least PhantomJS 1.7. So, package installation is not an option.
On Mac OS X and Linux, the default casperjs executable is a Python script. Python should be available on our system (unless we use an exotic Linux distribution), so it makes no problem.
Nevertheless, if we prefer to launch CasperJS using a Ruby script, we do have one in ./rubybin. So, we just need to make it available in our system path this way:
~ ln -sf `pwd`/rubybin/casperjs /usr/local/bin/casperjs
This recipe will explain how to write basic CasperJS tests and will help us get familiar with the CasperJS approach.
In this recipe, we will build simple web pages in order to run our CasperJS tests in an appropriate context.
As we need to serve just static content (HTML, CSS, JavaScript), we need a very basic HTTP server and the simplest existing HTTP server is the Python 2 SimpleHTTTPServer, as it is part of the standard Python installation (so that no extra deployment is needed), and it does not need any system configuration.
On Mac OS X and Linux, Python 2 is part of the system; we just launch the following command line from the folder containing our web content:
~ python -m SimpleHTTPServer
The preceding command should return this message:
Serving HTTP on 0.0.0.0 port 8000 …
The message means that our local web server is running on the 8000 port and we can access it with our web browser using the following URL:
http://localhost:8000/
On Windows, we can do the very same thing but Python is not installed by default, so we first need to install it this way:
Go to http://www.python.org/getit/.
Download the Python 2.7 Windows installer.
Run it.
Add Python to our system path:
...the existing PATH value...;C:\Python27\
We are now ready to write CasperJS tests. For our first test, we will not need our local web server as we will use the Wikipedia website:
Let's create the following file and name it
example1.js:var casper = require('casper').create(); casper.start('http://en.wikipedia.org/', function() { this.echo(this.getTitle()); }); casper.run();When we run our script, we get the following output:

Let's see how it works:
In the first line, we get a new
'casper'instance.Then, in the second line, we start this instance and open the Wikipedia page.
We give the
start()method a function that will be executed once the page is loaded. In this function, the context (this) is thecasperinstance. Here, we just use theecho()method to display the current page title (obtained usinggetTitle()).In the last line, we launch the registered steps.
Now, let's change a little bit of our script in order to perform a search on Wikipedia about
'javascript':var casper = require('casper').create(); casper.start('http://en.wikipedia.org/', function() { this.echo(this.getTitle()); this.fill('form#searchform', { 'search': 'javascript' }, true); }); casper.then(function() { this.echo(this.getCurrentUrl()); }) casper.run();Let's run it:

We have made two changes:
We used the
fill()method to submit our search keyword to the Wikipedia search formWe added a new step in our script using the
then()method to make sure that we wait for the search result to be returned; we also displayed the current URL
As we can see, it works perfectly as we obtained the URL of the Wikipedia article about JavaScript. Now, let's "assert" the world!
We just wrote a basic CasperJS script, but it is not a very efficient test script as a test script is supposed to check if an expected behavior is properly performed by the web page that we are testing.
To do that, CasperJS provides a tester API, which can be accessed via the
testproperty of our CasperJS instance.Let's create the following example page and name it
example2.html:<html><body> <button id="button1" onclick="this.innerText='Done';">Click me</button> </body></html>
Now, let's launch our SimpleHTTPServer and see what the page looks like by going to
http://localhost:8000/example2.html.It shows a Click me button and if we click on it, its label is changed to Done.
The following is a CasperJS test that could validate this behavior:
casper.test.begin('Test my form', 3, function(test) {
    casper.start('http://localhost:8000/example2.html', function() {
        test.assertVisible("button#button1");
        test.assertSelectorHasText("button#button1", "Click me");
    });

    casper.then(function() {
        this.click("button#button1");
    });

    casper.then(function() {
      test.assertSelectorHasText("button#button1", "Done");
    })

    casper.run(function() {
        test.done();
    });
});
Let's save this script as
example2.jsand run it using thecasperjs testcommand:
The
casperjs testcommand allows us to use thecasper.testproperty, which provides all the testing methods.When using the
casperjs testcommand, we do not need to create thecasperinstance, but we need to call thebeginmethod and end the test with thedonemethod.First, with
assertVisible, we make sure that our button is visible. The most common way to designate an element is by providing an accurate CSS selector.Then, we use
assertSelectorHasTextto check the text content of the button before and after clicking on it. We can see that all our tests pass.Now, let's break our tests by changing the second
assertSelectorHasTexttester as shown in the following code:this.test.assertSelectorHasText("button#button1", "You can click again");Tip
Downloading the example code
You can download the example code files for all Packt books you have purchased from your account at http://www.PacktPub.com. If you purchased this book elsewhere, you can visit http://www.PacktPub.com/support and register to have the files e-mailed directly to you.
And the result is as follows:

We clearly see that our two assertions still pass, but one is now failing.
When developing with JavaScript, we often need to chain two pieces of code (for instance, first we load some JSON data, then we update the page content using that data). But, each step is generally non-blocking, which means that the rest of the code will continue to execute even if the step is not complete, and there is no way to predict when the first step will be complete.
The most solid and common approach to solve this problem is the callback mechanism. We put the second piece of code in a function and pass it as a parameter to the first one, so that it can call that function when it finishes.
As a result, there is no linear and predictably-ordered execution of the code. This makes testing a little bit tricky.
The following is an example (example3.html):
<html>
<head>
   <script type='text/javascript' src='http://code.jquery.com/jquery-1.9.1.js'></script>
   <style>
   .searching { color: grey;}
   .success { color: green;}
   .noresults {color: red;}
   </style>
</head>
<body>
   <script>
   function geonamesSearch() {
      $('#results').html("Searching...");
      $('#results').attr('class', 'searching');
      var url = "http://api.geonames.org/searchJSON";
      var query = $('#searchedlocation').val();
        $.getJSON(url + "?username=demo&q="+ query +"&maxRows=25&featureClass=P",null,            function(data) {
                var data = data.geonames;
                var names = [];
                if(data.length > 0) {
                    $.each(data, function(i, val){
                        names.push(val.name +" ("+val.adminName1+")");
                    });
                    $('#results').html(names.join("<br/>"));
                    $('#results').attr('class', 'success');
                } else {
                    $('#results').html("No matching place.");
                    $('#results').attr('class', 'noresults');
                }
            }
        );
   }
   </script>
   <input type="text" id="searchedlocation" />
   <button id="search" onclick="geonamesSearch();">Click me</button>
   <div id="results"></div>
</body>
</html>
The demo account we are using here to access the Geonames.org service has a daily limit, if the limit is reached, we can go http://www.geonames.org/login and create our own account. The preceding code will create a page that contains a text input field, a button, and an empty div with an ID as 'results'. When we click on the button, the JavaScript function geonamesSearch does the following:
It puts the
'searching'class on theresultsdiv and inserts the Searching... mentionIt reads the text input's current value
It calls the GeoNames JSON web services to get the place names matching the value that you input
This JSON call is performed by jQuery and we provide it with a callback function that will be called when the GeoNames web service will respond and read the results
If there is no result, it changes the
resultsdiv class to'noresults'and its text to No matching place.If there are some results, it sets the class to
'success'and displays the matching place names
We can try it with our web browser and see it work nicely.
Now, let's test this page with the following script (example3.js), which enters the value 'barcelona' and asserts that we do get Barcelona (Catalonia) in the results:
casper.userAgent('Mozilla/5.0 (Macintosh; Intel Mac OS X)');

casper.test.begin('Search a city by name', 1, function(test) {
    casper.start('http://localhost:8000/example3.html', function() {
        this.sendKeys("input#searchedlocation", "barcelona");
        this.click("button#search");
    });

    casper.then(function() {
        test.assertTextExists('Barcelona (Catalonia)', 'Barcelona (Catalonia) has been found.');
    })

    casper.run(function() {
        test.done();
    });
});
Note
We need to set up a regular user agent to make sure that geonames.org will accept to process our request.
If we run it, we get a failure:
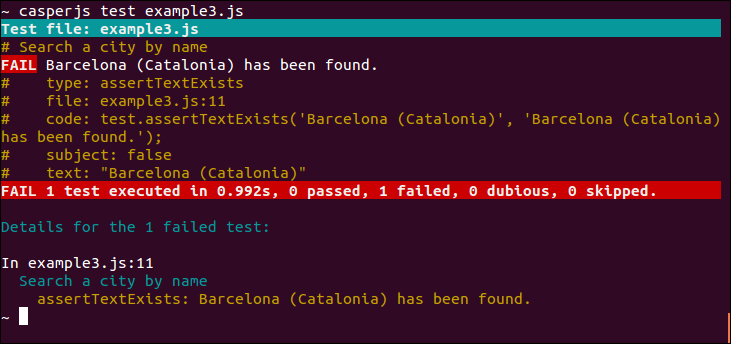
Why is that? Because our this.click() triggers the geonamesSearch function and immediately after that we try to assert the result content. However, as the GeoNames web service did not have enough time to respond, the content is not yet the one expected at the time the assertion is performed.
To manage these kinds of cases, CasperJS offers us the ability to wait before executing the rest of our tests.
The following is a working test script:
casper.userAgent('Mozilla/5.0 (Macintosh; Intel Mac OS X)');

casper.test.begin('Search a city by name', 1, function(test) {
    casper.start('http://localhost:8000/example3.html', function() {
        this.sendKeys("input#searchedlocation", "barcelona");
        this.click("button#search");
    });

    casper.waitForSelector('div.success', function() {
        test.assertTextExists('Barcelona (Catalonia)', 'Barcelona (Catalonia) has been found.');
    })

    casper.run(function() {
        test.done();
    });
});
We can see that the tests pass successfully now:

With waitForSelector, we make sure that the assertion will be performed only when the results div will have the 'success' class, and it will happen only once our JSON loading callback function has been called.
Writing tests can take time. A quick and convenient way to produce tests is to record an actual usage sequence directly from our web browser (just like the Firefox Selenium plug-in).
To record web sequences as CasperJS tests, we can use a Chrome extension named Resurrectio.
We install it from the Chrome Web Store (go to https://chrome.google.com/webstore/, search for resurrectio, and then click on the add button), and it just appends a new button next to the URL bar:
We click on the Resurrectio button to start a recording:

We can then navigate or perform any regular action in our window.
By right-clicking, we can add some assertions or screenshots:

By clicking again on the Resurrectio button, we can stop the recording and then export the previous sequence as a a CasperJS test:

Nevertheless, be careful; in some cases, we might need to manually modify the generated test because of the following reasons:
It might contain a lot of useless assertions (due to extra clicks during the recording).
It might be too heavy and verbose, making it more difficult to maintain. So, we would prefer to simplify it to focus on the most meaningful aspects.
All assertions cannot be registered from Resurrectio, and we might need different assertions.
One of the key advantages of CasperJS is its ability to chain test steps, knowing that these steps will be executed in the order they have been registered in.
As explained previously, the way to chain steps in JavaScript is by using callback functions as follows:
doStep1AndThen(function() {
   doStep2AndThen(function() {
      doStep3AndThen(function() {
         doStep4AndThen(function() {
            ...
         })
      })
   })
})
If we were using PhantomJS directly, that would be how our tests would look, and it would not be very convenient to read or maintain.
But with CasperJS, using the then() or waitFor() methods, we can declare successive steps without this infinite callback nesting cascade.
CasperJS does that callback chaining for us behind the scenes, creating much more readable test scripts.
Let's see a few more details about the different features we have just used here.
By default, CasperJS uses CSS3 selectors, but we can use XPath selectors if we prefer or if we have to.
XPath selectors are less readable than CSS3 selectors but they are more powerful (for instance, while matching text contents or putting conditions on the DOM element's ascendants or descendants).
To use XPath selectors, we just need to load the CasperJS selectXPath utility:
var x = require('casper').selectXPath;
...
test.assertExists(x("//*[contains(text(), 'Barcelona (Catalonia)')]"), 'The search results are correct');The CasperJS tester API offers a large collection of assertion methods.
We can assert conditions and function results in the following ways:
The
assert(Boolean condition[, String message])method asserts that the condition is strictlytrueThe
assertNot(mixed subject[, String message])method asserts that the condition is nottrueThe
assertTruthy(Mixed subject[, String message])method asserts that the subject istruthyThe
assertFalsy(Mixed subject[, String message])method asserts that the subject isfalsyNote
Let's explain what
true,false,truthy,andfalsyis.In JavaScript,
trueandfalseare the two Boolean values stricto sensu. Values such asnull,undefined, the empty string'', the number0, the numberNaNarefalsy, which means that if they are evaluated in a condition, they will returnfalse.And any other values are
truthy, which means that if they are evaluated in a condition, they will returntrue.The
assertEquals(mixed testValue, mixed expected[, String message])method asserts that the two parameters are equalThe
assertNotEquals(mixed testValue, mixed expected[, String message])method asserts that the two parameters are not equalThe
assertEval(Function fn[, String message, Mixed arguments])method asserts that the function evaluated in the page DOM returnstrueExample:
this.test.assertEval(function() {
   if(window.jQuery) {
      return true;
   } else {
      return false;
   }
}, "jQuery is available");
The
assertEvalEquals(Function fn, mixed expected[, String message, Mixed arguments])method asserts that the function evaluated in the DOM page returns the expected valueThe
assertMatch(mixed subject, RegExp pattern[, String message])method asserts that the value matches the regular expressionThe
assertRaises(Function fn, Array args[, String message])method asserts that the function called with the provided arguments raises an errorThe
assertType(mixed value, String type[, String message])method asserts that the value type is the expected one
We can assert the DOM elements in the following ways:
The
assertExists(String selector[, String message])method asserts that the selector matches at least one element in the pageThe
assertDoesntExist(String selector[, String message])method asserts that the selector does not match any element in the pageThe
assertField(String inputName, String expected[, String message])method asserts that the form field has the expected valueThe
assertVisible(String selector[, String message])method asserts that the element is visibleThe
assertNotVisible(String selector[, String message])method asserts that the matched element is not visibleThe
assertSelectorHasText(String selector, String text[, String message])method asserts that the matched element contains the expected textThe
assertSelectorDoesntHaveText(String selector, String text[, String message])method asserts that the matched element does not contain the given text
We can assert the page information in the following ways:
The
assertHttpStatus(Number status[, String message])method asserts that the current HTTP status is the expected oneThe
assertResourceExists(Function testFx[, String message])method asserts that the resource exists on the pageThe
assertTextExists(String expected[, String message])method asserts that the page contains the expected textThe
assertTextDoesntExist(String unexpected[, String message])method asserts that the page does not contain the given textThe
assertTitle(String expected[, String message])method asserts that the page title is the expected oneThe
assertTitleMatch(RegExp pattern[, String message])method asserts that the page title matches the given regular expressionThe
assertUrlMatch(Regexp pattern[, String message])method asserts that the page URL matches the given regular expression
The following is the list of the CasperJS waitFor methods:
The
waitForText(String|RegExp pattern[, Function then, Function onTimeout, Number timeout])method waits until the text is presentThe
waitForSelector(String selector[, Function then, Function onTimeout, Number timeout])method waits until the selector is satisfiedThe
waitWhileSelector(String selector[, Function then, Function onTimeout, Number timeout])method waits until the selector is not satisfied anymoreThe
waitUntilVisible(String selector[, Function then, Function onTimeout, Number timeout])method waits until the selected element is visibleThe
waitWhileVisible(String selector[, Function then, Function onTimeout, Number timeout])method waits until the selected element is not visible anymoreThe
waitFor(Function testFx[, Function then, Function onTimeout, Number timeout])method waits until the function returns trueThe
waitForResource(Function testFx[, Function then, Function onTimeout, Number timeout])method waits until the function matches an existing resourceThe
waitForPopup(String|RegExp urlPattern[, Function then, Function onTimeout, Number timeout])method waits until the pattern matches a pop-up URL
In the list of waitFor methods, we have not mentioned the following one:
wait(Number timeout[, Function then])
It just waits for a certain amount of time (in milliseconds).
But as discussed previously, in JavaScript, time is nothing and timing is everything. Similarly, in JavaScript, waiting for a given amount of time brings no guarantee to the accuracy of our test.Generally, we use wait() when we are desperate. For instance, if we have no way to modify the tested page, we cannot append an interesting signal to observe such as the 'noresult' and 'success' classes in our example.
Nevertheless, let's just note a relevant usage of the wait() method. When our page contains some progressive JPEG images and we want to capture a new image (see the Beyond testing (Advanced) recipe), we need to wait for some time before capturing, in order to let our images render entirely.
Resurrectio is not entirely stable yet, so it might be interesting to use the current development version.
To do so, you have to clone the resurrectio GitHub repository:
~ git clone git://github.com/ebrehault/resurrectio.git
It will produce a ./resurrectio folder.
Then, in Chrome, perform the following steps:
Go to Tools | Extensions.
Check the Developer mode checkbox.
Click on the Load unpacked extension button.
Select the
./resurrectiofolder.
This recipe will detail how to simulate rich web interactions using CasperJS, in order to achieve more complex testing.
The following sections cover the various steps in writing advanced tests.
First, let's learn how to download files. The most common way to download a file from a web page is by providing a link to this file as follows (example4.html):
<html><body>
   <h1>My example</h1>
   <a id="link-to-text" href="files/text.txt">Download a text</a>
   <a id="link-to-pdf" href="files/text.pdf">Download a PDF</a>
</body></html>
Now, let's create the following CasperJS script (example4.js):
var casper = require('casper').create();

casper.start('http://localhost:8000/example4.html', function() {
    this.click("#link-to-text");
});
casper.then(function() {
   this.echo(this.getCurrentUrl());
});

casper.thenOpen('http://localhost:8000/example4.html', function() {
   this.click("#link-to-pdf");
});

casper.then(function() {
   this.echo(this.getCurrentUrl());
});

casper.run();
It should open our page, click on the first link, log the current page URL, reopen the page, click on the second link, and log the current page URL.
To complete our test, let's create a folder named files, add two dummy files in this folder (text.txt and text.pdf), and start our SimpleHTTPServer web server.
Let's run the script:

When we clicked on the first link, we actually opened the .txt file as a page, but when we clicked on the second one, we opened the file that was kept in the original location. If we check the current folder content, we will see that nothing has been downloaded.
So the click() method will not help us in downloading any file; it will navigate to the corresponding link if PhantomJS is able to open it, or it will open the file that was kept in the original location, producing no error and no output.
The right way to download a file is by using the download() method. Let's fix our test using the following code:
var casper = require('casper').create();
casper.start('http://localhost:8000/example4.html', function() {
    this.download("http://localhost:8000/files/text.txt", "text.txt");
    this.download("http://localhost:8000/files/text.pdf", "text.pdf");
});

casper.run();
The outcome looks as follows:

Now that our files have been downloaded, let's discover how to upload files.
To perform a file upload during a test, we will use the fill() method. The fill() method allows us to fill in a form and optionally, to submit it. Plus, it is able to manage file inputs.
The following is an example (example5.js):
var x = require('casper').selectXPath;
casper.test.begin('Upload a file', 1, function(test) {
    casper.start('http://imagebin.org/', function() {
        this.click(x("//a[normalize-space(text())='Add your image now!']"));
    });

    casper.then(function() {
        this.fill("form[name=image_form]", {
            'nickname' : 'casper',
            'image': './test.png',
            'title': 'my test',
            'description': 'just a test',
            'disclaimer_agree': 'Y'
        }, true);
    });

    casper.then(function() {
        test.assertExists('img[alt="my test"]', "The image has been uploaded");
        this.echo("It is available here: " + this.getCurrentUrl());
    });

    casper.run(function() {
        test.done();
    });
});
You can perform the following steps with this test:
Go to http://imagebin.org.
Click on the Add your image now! link.
Then, fill in the image submission form.
Assert that we obtain a page containing our image.
Display this page URL.
As we can see, the 'image' field is managed the same way as the other fields; its value is just the path to our local image.
After passing the first parameter containing the fields values, we pass true as a second parameter to fill(), so that the form is submitted.
Before running the test, we make sure that we put an image named test.png in our current folder and when we run the test, the following is what we get:

Let's see how we can manage authentication. When we try to open a page that requires authentication, we get a 401 HTTP error (example6.js):
casper.test.begin('Log in', 1, function(test) {
    casper.start('http://www.plomino.net/zmiroot/testpage', function() {
        test.assertHttpStatus(401, 'We cannot see the page as we are not logged in.');
    });

    casper.run(function() {
        test.done();
    });
});
The outcome is as follows:

Now, let's use the setHttpAuth() method to log in properly:
casper.test.begin('Log in', 1, function(test) {
    casper.start();

    casper.setHttpAuth('demoaccount', 'demoaccount');

    casper.thenOpen('http://www.plomino.net/zmiroot/testpage', function() {
        test.assertTextExists('You are logged in.', 'Now we can see the page.');
    });
    casper.run(function() {
        test.done();
    });
});
The following is what we get:

The setHttpAuth() method can only be used for HTTP authentication. When our targeted page uses a web form authentication, we just need to fill the authentication form. The following is an example (example7.js):
casper.test.begin('Log in', 1, function(test) {
    casper.start('http://www.plomino.net/samples', function() {
        this.fill('#loginform',
            {
                '__ac_name': 'demouser',
                '__ac_password': 'demouser'
            }, true);
    });

    casper.then(function() {
        test.assertTextExists('Welcome! You are now logged in', 'We are logged in.');
    });

    casper.run(function() {
        test.done();
    });
});
The output looks as follows:

Simulating keyboard and mouse events is another very common use case. Let's consider the following page (example8.html):
<html><body>
   <script>
   function updateMessage(element) {
      var message = 'You have entered ' + element.value.length + ' characters.';
      document.querySelector('#message').textContent = message;
   }
   </script>
   <h1>My example</h1>
   <form id="my-form">
      <p>Firstname: <input
         type="text"
         name="firstname"
         onkeyup="updateMessage(this);"/>
      </p>
      <div id="message"></div>
   </form>
</body></html>
If we launch our simple HTTP server, we can try opening the page at http://localhost:8000/example8.html.
When we enter a value in the input text, a message is displayed under the input text, indicating the number of characters we have entered.
To test this behavior, we can use the sendKeys() method (example8.js):
casper.test.begin('Test key inputs', 1, function(test) {
   casper.start('http://localhost:8000/example8.html', function() {
      this.sendKeys('input[name="firstname"]', 'Eric');
   });
   casper.then(function() {
      test.assertSelectorHasText('#message', "You have entered 4 characters.");
   });
   casper.run(function() {
        test.done();
    });
});
When we run the code, we will see the following result. If you enter Eric in the text input, the message will display You have entered 4 characters:

The sendKeys() method inserted the text into the text input and also triggered the onkeyup event.
The sendKeys() method can produce a key event on any element of the page (not necessarily inputs).
Let's change the page example8.html so that the header becomes editable:
<h1 contenteditable="true">My example</h1>
Now if we click on the header, we can change its text content.
Let's modify our test script:
casper.test.begin('Test key inputs', 2, function(test) {
   casper.start('http://localhost:8000/example8.html', function() {
      this.sendKeys('input[name="firstname"]', 'Eric');
   });
   casper.then(function() {
      test.assertSelectorHasText('#message', "You have entered 4 characters.");
   });
   casper.then(function() {
      this.click('h1');
      this.sendKeys('h1', 'I have changed my header');
   });
   casper.then(function() {
      test.assertSelectorHasText('h1', "I have changed my header");
   });
   casper.run(function() {
        test.done();
    });
});
Now, perform the following steps with this test:
Click on the header and enter a new text at its beginning
Assert the new header content
The output will be as follows:

Note
As we have an extra assertion in our test script now, we have changed the begin() method's second parameter from 1 to 2.
Regarding mouse events, we have already used the casper.click() method. It takes a selector as a parameter and triggers a click event on the designated element.
We use it to click on links or buttons, for instance.
We can also trigger other mouse events using the mouseEvent() method; its first parameter is the event type and the second is the targeted element selector.
It can trigger the following events:
mouseupmousedownclickmousemovemouseovermouseout
Let's create the following web page (example9.html):
<html><body>
   <h1 id="chap1">Chapter 1</h1>
   <h1 id="chap2">Chapter 2</h1>
   <h1 id="chap3">Chapter 3</h1>
   <h1 id="chap4">Chapter 4</h1>
   <div>Counter: <span id="counter"></span></div>
   <script>
var counter = 0;
function incrementCounter() {
   counter =  counter + 1;
   document.querySelector('#counter').textContent = counter;
}
for(i=0;i<document.querySelectorAll("h1").length;i++) {
   document.querySelectorAll("h1")[i].onmouseover=incrementCounter;
}
   </script>
</body></html>
It presents a list of headers and when the mouse goes over any of them, a counter is incremented.
We can test this page using mouseEvent(), as shown in the following test (example9.js):
casper.test.begin('Test mouse events', 1, function(test) {
   casper.start('http://localhost:8000/example9.html', function() {
      this.mouseEvent('mouseover', '#chap1');
      this.mouseEvent('mouseover', '#chap4');
      this.mouseEvent('mouseover', '#chap1');
      this.mouseEvent('mouseover', '#chap1');
   });
   casper.then(function() {
      test.assertSelectorHasText('#counter', "4");
   });

   casper.run(function() {
        test.done();
    });

});
The outcome is as follows:

But CasperJS also provides a specific 'mouse' module to control the mouse directly. It allows to move the mouse and to control the click (down, up, click, double-click).
It might be useful if we want to test complex mouse interaction such as drag-and-drop. The following is a web page that provides a draggable box (example10.html) using the jQueryUI draggable() method:
<html>
<head>
<style>
#box {color: white; background-color: blue; width: 100px; position: absolute; top: 0; left: 0;}
</style>
</head>
<body>
   <script src="http://code.jquery.com/jquery-1.9.1.js"></script>
   <script src="http://code.jquery.com/ui/1.10.3/jquery-ui.js"></script>
   <script>
$(document).ready(function() {
   $('#box').draggable();
});
   </script>
   <div id="box">My box</div>
</body></html>
We can test this page using the CasperJS mouse module (example10.js):
casper.options.viewportSize = {width: 1024, height: 768};

casper.test.begin('Test drag&drop', 2, function(test) {
    casper.start('http://localhost:8000/example10.html', function() {
        test.assertEval(function() {
            var pos = $('#box').position();
            return (pos.left == 0 && pos.top == 0);
        }, "The box is at the top");
        this.mouse.down(5, 5);
        this.mouse.move(400, 200);
        this.mouse.up(400, 200);
    });
    casper.then(function() {
        test.assertEval(function() {
            var pos = $('#box').position();
            return (pos.left == 395 && pos.top == 195);
        }, "The box has been moved");
    });
    casper.run(function() {
        test.done();
    });
});
The output will be as follows:

We can see that there are a lot of interesting things in this test:
We set the viewport size (using the
viewportSizeoption). In our case, it is useful because we need to make sure that we have enough room to move the box where we want.We use jQuery to get the current position of the box! As jQuery is loaded in our tested page, we can use it through
assertEval(), as it runs the code in the tested page.We use
down(), thenmove(), and thenup()to produce a drag-and-drop move from point (5,5) to point (400,200).
Even if they might seem quite similar, there are differences between casper.click() and casper.mouse.click().
First of all, casper.click() only accepts a selector as a parameter, while casper.mouse.click() accepts either a selector or a (x, y) position.
But more importantly, they do not work the same way; casper.click() creates an event and dispatches it to the targeted event, but casper.mouse.click() does not deal with any element and just produces a mouse action at the given position.
If casper.click() is not able to dispatch the event (because of a preventDefault() method hanging somewhere), it will default to the casper.mouse.click() method.
Let's explore a few more details about the different features we have just used in the previous section.
The download() method might also accept two extra parameters as follows:
download(String url, String target[, String method, Object data])
So, we can produce an HTTP request using the method we want and pass the needed arguments in the data object.
Consider that we come back to our test (example6.js) about setHttpAuth() and try to chain the two versions as follows:
casper.test.begin('Log in', 2, function(test) {

    casper.start('http://www.plomino.net/zmiroot/testpage', function() {
        test.assertHttpStatus(401, 'We cannot see the page as we are not logged in.');
    });

    casper.setHttpAuth('demoaccount', 'demoaccount');

    casper.thenOpen('http://www.plomino.net/zmiroot/testpage', function() {
        test.assertTextExists('You are logged in.', 'Now we can see the page.');
    });
    casper.run(function() {
        test.done();
    });
});
We would expect the tests to be successful due to the following conditions: we get a 401 error if we are anonymous and are able to view the page if we log in.
But, the following is what we obtain:

The first test fails; we do not get a 401 error, but we get a 200 status instead! This means we are actually logged in.
Why is that? It's because CasperJS chains the steps that are enclosed into then() blocks. If setHttpAuth() is not enclosed in a then() block, it will be effective right from the beginning (the start() call) to the end.
Let's enclose it in a then() block as follows:
casper.test.begin('Log in', 2, function(test) {

    casper.start('http://www.plomino.net/zmiroot/testpage', function() {
        test.assertHttpStatus(401, 'We cannot see the page as we are not logged in.');
    });

    casper.then(function() {
        this.setHttpAuth('demoaccount', 'demoaccount');
    })

    casper.thenOpen('http://www.plomino.net/zmiroot/testpage', function() {
        test.assertTextExists('You are logged in.', 'Now we can see the page.');
    });
    casper.run(function() {
        test.done();
    });
});
And now, the tests pass as follows:

This section will discuss the essential best practices for web functional testing with CasperJS.
Our software quality depends on our tests' accuracy. Testing is always good, but if we don't test the software's behavior accurately, we might miss out on some potential problems. To create accurate tests, we must forget about the system and how it works, and we must focus on user interactions.
It might sound obvious but it is not, because most of the time we design and code the system and do not use it (as a standard user) a lot.
Let's consider a typical example of a basic web form. Here is an important thing to know about web forms: users never submit web forms. They actually do the following:
Enter values into inputs
Click on the Submit button
These actions do produce a form submission, but the users don't actually submit the form by themselves; their web browsers do it for them. Or, let's say the system does it for them.
Obviously, if we want to test this system, we cannot rely on its supposed behavior.
That is why our tests must produce the real user interactions and then assert that the resulting behavior is correct.
Let's have a look at the following example (example11.html):
<html><body>
  <form id="form1">
    <p>Firstname: <input type="text" name="firstname"/></p>
    <p>Lastname: <input type="text" name="lastname"/></p>
    <p>Age: <input type="text" name="age"/></p>
    <input type="submit" value="Save" name="save" />
  </form>
  <form id="form2">
    <p>Firstname: <input type="text" name="firstname"/></p>
    <p>Lastname: <input type="text" name="lastname"/></p>
     <p>Age: <input type="text" name="age"/></p>
  </form>
  <form id="form3">
    <p>Firstname: <input type="text" name="firstname"/></p>
    <p>Lastname: <input type="text" name="lastname"/></p>
    <p>Age: <input style="display: none;" type="text" name="age"/></p>
    <input type="submit" value="Save" name="save" />
  </form>
</body></html>
This page shows the following three forms:
The first one contains first name, last name, and age, and a Save button
The second one has the same fields but no Save button
The third one has all the fields and a Save button, but the
agefield is hidden
If we launch our simple HTTP server, the first one will work fine, but the other two will not be usable.
Now, let's test it as follows (example11-1.js):
var formid = casper.cli.options['formid'];

casper.test.begin('Test form submission', 3, function(test) {

    casper.start('http://localhost:8000/example11.html', function() {
        this.fill("#" + formid, {
            firstname: "Isaac",
            lastname: "Newton",
            age: "370",
        }, true);
    });
    casper.then(function() {
        test.assertUrlMatch(/firstname=Isaac/);
        test.assertUrlMatch(/lastname=Newton/);
        test.assertUrlMatch(/age=370/);
    });
    casper.run(function() {
        test.done();
    });
});
This test uses casper.fill() to submit the form with a value for each field and then asserts so we obtain the three values in the resulting URL.
Tip
In this test, we use casper.cli.options to read options passed to the casperjs command; this way, we can use the same script to test the three different forms.
Let's run it. The following screenshot shows the output:

The tests pass with the first form as expected, but they also pass with the other two!
Why is that? It's because the fill() method is blind to the mistakes we have introduced in the forms; it just performs a submission without checking if a real user could actually do the same.
The following is a test that is closer to real user interaction (example11-2.js):
var formid = casper.cli.options['formid'];

casper.test.begin('Test form submission', 3, function(test) {
    casper.start('http://localhost:8000/example11.html', function() {
        this.sendKeys("form#"+formid+" input[name='firstname']", "Isaac");
        this.sendKeys("form#"+formid+" input[name='lastname']", "Newton");
        this.sendKeys("form#"+formid+" input[name='age']", "370");
        this.click("form#"+formid+" input[type=submit][value='Save']");
    });
    casper.then(function() {
        test.assertUrlMatch(/firstname=Isaac/);
        test.assertUrlMatch(/lastname=Newton/);
        test.assertUrlMatch(/age=370/);
    });

    casper.run(function() {
        test.done();
    });
});
Here we use sendKeys() to enter the values in the inputs, and we use the click()method to click on the Submit button. This is basically what the user would do with his or her keyboard and mouse.
Now let's run it. The following screenshot shows the output:

This is much better; now our tests fail at the second and third forms.
This does not mean that we must never use the fill() method. That was just an example. The main point here is that we must always be careful to keep as close as possible to the user interactions. But of course, we also need to create concise and maintainable tests.
So a good approach is to write several kinds of tests, such as the following:
Some precise tests focusing on the user interactions (where we will use
sendKeys()andclick()instead offill(), for instance) to make sure each page is usable by itselfSome concise tests focusing on screen chaining and usage scenarios (where we can use
fill(), for instance) to make sure the complete application is working fine
Some people prefer to write tests at the end of their development, when they know everything is pretty much stable.
But the best time to write tests is from the beginning to the end of the development. This has already been demonstrated in a lot of books, but one of the most obvious reasons is that we usually produce the biggest part of our bugs during the development phase, and tests are a great help to fight bugs.
Unfortunately, people who write tests at the end are right: the website is (usually) more stable after development than during development.
One of the aspects that might change a lot is the design. Design changes should not impact application features. But sometimes they do, and there may be a lot of reasons for it, such as a CSS attribute can make a button invisible, modification in an element's ID can break a JavaScript call, and so on. But we do not mind this much, because if the design breaks any feature, our tests will warn us immediately.
The problem is that sometimes our tests fail even if the design changes haven't broken any features. This is very bad because it implies that we cannot trust our tests to know whether something is broken or not.
Why our tests would fail if all the features have been preserved? This is just because our tests are less design-proof than our web page features, and the writing of design-proof tests depends mainly on selectors.
Indeed, our test inner logic (for example, if we click here, we should get that) should not be impacted by design changes.
But what could easily break if we are not careful enough is the way we define here and that. They will be defined using selectors. We must choose selectors that focus on the logic and not on the layout.
The following are some examples:
|
Instead of |
Prefer |
Because |
|---|---|---|
|
|
|
We only depend on form elements and their names |
|
|
|
We use IDs and classes instead of tag names |
|
|
|
We use the link text instead of its ID (and to do this, we switch to the XPath selector) |
By doing this, we can change our design, switch from Bootstrap to Foundation, reorganize the layout, and so on, and be sure that if the tests fail, they do for a good reason: because we have actually broken the logic.
Until now, we have created single test scripts for our different example pages, but when we test our real applications, we will need to test a lot of different features and scenarios.
It will definitely work if we do it in a single long test script, but obviously, it will be more difficult to refactor it, maintain it, share it with a team, and so on.
So, quite a simple, good practice is to split our different feature tests and testing scenarios into separate scripts. And fortunately, CasperJS provides the casperjs test command so we can run all our tests at once.
Let's reuse our example8.html page from the previous chapter. This page proposes two features: an editable header and a simple form with text input.
Let's imagine that we want to create two different tests for these two features. So let's create a folder (named suit, for instance), and in this folder, create the files test_editable_header.js and test_form.js.
Create test_editable_header.js as follows:
casper.test.begin('Test editable header', 1, function(test) {
  casper.start('http://localhost:8000/example8.html', function() {
    this.click('h1');
    this.sendKeys('h1', 'I have changed ');
  });
  casper.then(function() {
    test.assertSelectorHasText('h1', "I have changed my header");
  });
  casper.run(function() {
    test.done();
  });
});
Create test_form.js js as follows:
casper.test.begin('Test editable header', 1, function(test) {
  casper.start('http://localhost:8000/example8.html', function() {
    this.sendKeys('input[name="firstname"]', 'Eric');
  });
  casper.then(function() {
    test.assertSelectorHasText('#message', "You have entered 4 characters.");
  });

  casper.run(function() {
    test.done();
  });
});
And now, let's launch our tests:

As we can see in the preceding screenshot, we have passed our folder path to the casperjs test command, and it has run all the tests contained in this folder.
The casperjs test command offers interesting options, as follows:
--fail-fast: This is used to stop the test suite at the first error--pre=pre-test.js: This is used to run a test before executing the test suite--post=post-test.js: This is used to run a test after executing the test suite--includes=file1.js,file2.js: This is used to include some tests before running each test in the suite--direct: This is used to output the log message in the console--log-level=<level>: This is used to choose the log level (DEBUG,INFO,WARNING, orERROR)--xunit=<filename>: This is used to export the test results to the xUnit format
The --pre and --post options are typically used to implement a pre-test setup and post-test tear down, respectively.
For instance, if our system allows users to modify their preferences and we want to test it, the pre-test setup will create a fake user profile so we can test profile preference change. The post-test tear down will remove this fake user profile, so the next time we run the test suite, it will not break because the profile already exists.
Writing tests is a good starting point, but then we have to make sure we run them often enough. One of the Continuous Integration (CI) principles is to run the tests each time we commit a change in the source repository. To do this, we need a CI tool, and Jenkins is one of the most widely used ones.
Note
We will not cover the detailed Jenkins installation and configuration here as it is not a desktop application but a service exposed by a server. We assume it is deployed on one of our servers.
To run our CasperJS tests on Jenkins, we need first to make sure that PhantomJS and CasperJS are installed on the machine where Jenkins is running (refer to the Installing CasperJS section).
Then, we open the Jenkins web interface and click on New Job as shown in the following screenshot:

In the Build section, we add a new Execute shell step:

Then we click on Save and enter our test command in the Build section.
Assuming our tests are in a folder named tests at the root of our repository, we would enter the following:
casperjs test ./tests
The following screenshot shows the textbox in which we will add the preceding command:

We can now launch a build manually or let Jenkins launch builds automatically (depending on the triggers we have chosen). Jenkins will directly interpret the CasperJS output, and we will get a build history showing failures and successes as follows:

We can also see the details of a given build as in the following screenshot:

Travis-CI is a Cloud service that can be hooked to our GitHub repositories. It is free for public repositories. Each time we push changes to GitHub, Travis-CI does the following:
Creates a blank virtual machine
Checks the current sources from GitHub
Deploys our application
Runs the tests
Notifies the user (via e-mail, IRC, and so on)
It also does the same when we receive a pull request on our GitHub repository so we know whether the submitted pull request breaks the tests or not before merging it. This information is displayed directly on GitHub.
To run CasperJS tests on Travis-CI, we need to do the following:
Go to travis-ci.org and sign in with our GitHub account.
Go to Profile and copy the token.
Go to the GitHub repository, click on Settings / Service Hooks, choose Travis-CI, enter our GitHub ID and the previously copied Travis token, check Active, and click on Update.
Add a
.travis.ymlfile in the root of our repository.
This .travis.yml file is used to explain to Travis how to deploy the test environment and how to run the tests.
We just need to deploy CasperJS because PhantomJS is preinstalled on Travis.
The following is a typical .travis.yml file:
install:
  - git clone git://github.com/n1k0/casperjs.git
  - cd casperjs; git checkout tags/1.1; cd -
before_script:
  - "export PHANTOMJS_EXECUTABLE='phantomjs --local-to-remote-url-access=yes --ignore-ssl-errors=yes'"
script:
  - ./casperjs/bin/casperjs test ./tests
In the install section, we download the CasperJS code and check the last stable version. In the before_script section, we set up PhantomJS to allow access to external URLs, and in the script section, we launch the tests.
Just like Jenkins, Travis-CI will interpret the CasperJS output result as a success or failure, and we will be notified accordingly. Our tests can target a local server, and if so, our .travis.yml file will need to deploy the needed HTTP server and its components.
But the tests can also target an external URL, and if so, we have to make sure the code is updated on the real server as soon as it is pushed to GitHub. This can be done conveniently using GitHub pages.
This section will present other CasperJS usages apart from testing.
Web scripting means to run a script that will use web pages as a backend service.
Of course, scripting a web page is quite a brutal way to obtain a service. Using a REST API (or any API) would be much more elegant. But in some cases there is no API. CasperJS is able to simulate user interaction on our web pages in order to test them.
But obviously, we can use its abilities to simulate user interaction on any web page in order to automate a process. That is why CasperJS is a very efficient web scripting tool.
Let's say we want a script to tell us how many unread messages we have in our Gmail inbox. We could use a script like the following (example12.js):
var casper = require('casper').create();

casper.userAgent('Mozilla/5.0 (Macintosh; Intel Mac OS X)');
casper.start("http://mail.google.com");

casper.waitForSelector("form#gaia_loginform", function() {
  this.sendKeys('form#gaia_loginform input[name="Email"]', "<my_account>@gmail.com");
  this.sendKeys('form#gaia_loginform input[name="Passwd"]', "<password>");
});

casper.then(function() {
    this.click("#signIn");
});

casper.then(function() {
    var inbox_link_text = this.fetchText('table.m a[accesskey="i"]');


    var search_unread = /\((\d+)\)/.exec(inbox_link_text );
    if(!search_unread) {
         this.echo("No new emails.", 'INFO');
    } else {
         this.echo("You have " + search_unread[1] + " new emails.", 'INFO');
    }
});

casper.run();
In this script, we log in and get the HTML code for the Inbox link (in the left menu) as it contains the number of unread e-mails, like the following:
Inbox (53)
To extract the number, we use a regular expression, /\((\d+)\)/, that will look for any number enclosed in brackets.
And the following is what we get:

Now let's try to get a local weather report (example13.js):
var casper = require('casper').create();

casper.start("http://weather.yahoo.com/");

casper.then(function() {
    var current_location = this.fetchText('#location-chooser .name');
    var current_temp = this.fetchText('.temp .f .num');
    this.echo("Current temperature in " + current_location + ": " + current_temp + "°F");
});
casper.run();
Here, we just load the Yahoo! Weather home page and then extract the information we want (the current temperature, our location, and the immediate forecast). After we have done this, we get the following:

Nice!
But be careful; if Yahoo! decides to change its weather page's layout, the selectors we have used might become invalid and our service would be down. This is the main weakness of the web scripting approach. And, in this very use case (getting Yahoo! Weather reports), we will build a much safer service by using the excellent Yahoo! Query Language REST API.
Nevertheless, web scripting might sometimes be a light and convenient solution when we are facing complex cross-platform integration issues.
CasperJS is able to produce an image from the current page using the following two methods:
this.capture(String filepath): This takes a screenshot of the entire pagethis.captureSelector(String filepath, String selector): This restricts the capture to a specific element
A simple example (example14.js) is as follows:
var casper = require('casper').create();

casper.start('http://en.wikipedia.org/wiki/Solar_System');

casper.then(function() {
    this.capture("screenshot1.png");
});

casper.run();
If we run it, it'll work just fine, but we will obtain a very large image because this Wikipedia page is very long and we have captured it entirely.
Being able to obtain a screenshot of a very long page is not always easy, so this feature can be helpful. If we want to reduce the captured area, we can set the viewport size and use captureSelector on the html element as follows:
var casper = require('casper').create();

casper.options.viewportSize = {width: 1300, height: 700};
casper.start('http://en.wikipedia.org/wiki/Solar_System');

casper.then(function() {
    this.captureSelector("screenshot1.png", "html");
});

casper.run();
And now we get a smaller image.
A typical usage of the capture methods is obviously debugging; when we do not know why our CasperJS is not working as expected, before spending time logging everything or inspecting all the elements, a simple screenshot might show us that we just forgot to perform a valid authentication due to which we are still blocked at the login page.
Another interesting usage is documentation. Writing a good user manual often involves inserting a lot of screenshots. Producing these screenshots can be quite long and painful, and it will be even more painful when we have to update them because the design may have changed since the last time we published the user manual.
So, how about using CasperJS to generate all the screenshots we need automatically from the current version of our web application? The principle is simple: we write a CasperJS script that reproduces the usage scenarios described in our documentation, we obtain a set of images, and we fuse them with our documentation text. Markdown, reStructuredText4, Textile, or similar formats are good candidates.
Resurrectio (see the Getting started with CasperJS (Simple) section) proposes to export any recorded sequence in two versions: a CasperJS version (which has our actual test scripts) and a reStructuredText version (which only contains comments and screenshots).
So we can run the test, obtain the screenshots, and compile our reStructuredText (with rst2html, rst2doc, rst2pdf, or so on) to get our document. Every time the design changes, we just re-run the test, recompile the text, and the document is updated automatically.
We can also use the capture methods from dynamically generated rendering to produce static contents.
For instance, if we use d3.js (http://d3js.org/) to draw gorgeous charts on our web page but would like to insert them in a newsletter or allow an old web browser to see them, we can turn them into images using CasperJS.
Let's take the following example from the d3js.org tutorial (example15.html):
<html>
<head>
<style>
body {
font: 10px sans-serif;
color: white;
}
.arc path {
stroke: #fff;
}
.arc text {
fill: #fff;
}
</style>
</head>
<body>
<script src="http://d3js.org/d3.v3.min.js"></script>
<script>
var width = 400,
height = 200,
radius = Math.min(width, height) / 2;
var color = d3.scale.ordinal()
.range(["#98abc5", "#8a89a6", "#7b6888", "#6b486b", "#a05d56", "#d0743c", "#ff8c00"]);
var arc = d3.svg.arc()
.outerRadius(radius - 10)
.innerRadius(radius - 70);
var pie = d3.layout.pie()
.sort(null)
.value(function(d) { return d.population; });
var svg = d3.select("body").append("svg")
.attr("width", width)
.attr("height", height)
.append("g")
.attr("transform", "translate(" + width / 2 + "," + height / 2 + ")");
d3.csv("data.csv", function(error, data) {
data.forEach(function(d) {
d.population = +d.population;
});
var g = svg.selectAll(".arc")
.data(pie(data))
.enter().append("g")
.attr("class", "arc");
g.append("path")
.attr("d", arc)
.style("fill", function(d) { return color(d.data.age); });
g.append("text")
.attr("transform", function(d) { return "translate(" + arc.centroid(d) + ")"; })
.attr("dy", ".35em")
.style("text-anchor", "middle")
.text(function(d) { return d.data.age; });
});
</script>
</body>
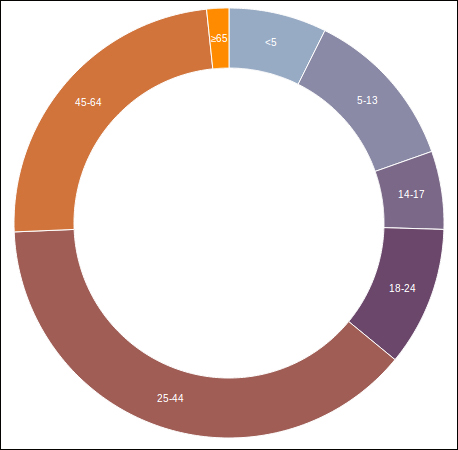
</html>It reads a CSV file that contains population by age group and draws a donut chart using SVG.
Let's provide the needed data (data.csv):
age,population
<5,2704659
5-13,4499890
14-17,2159981
18-24,3853788
25-44,14106543
45-64,8819342
≥65,612463
Now we can launch our simple HTTP server and have a look. It will work well if we are using Chrome, for instance, but won't work with Internet Explorer 8.
CasperJS can be used to capture this chart so we can serve an equivalent image to the web browser that is not able to render SVG (example15.js):
var casper = require('casper').create();

casper.start('http://localhost:8000/example15.html');

casper.then(function() {
    this.captureSelector("chart.png", 'svg');
});

casper.run();
And the following is what we get:
CasperJS can also be a smart way to provide a server-side printing service.
When we want our users to print our web pages, the most common and simple approach for them to use would be the web browser print feature. If we need to customize the rendering for printing (hide the navigation bar, change some colors or fonts, and so on), we can easily do so using a specific CSS for print (by mentioning media="print" inside the link tag). However, sometimes this is not enough.
Background images are a typical instance of where standard printing can be annoying; background images are hidden during printing, and it makes sense as we prefer to print text on a white background. But if we use them for a specific goal, such as filling the different bars of a bar chart, the printed result will be disappointing. (In our case, all the bars will be white, so we will not be able to distinguish between them.)
We will also have problems when we want to change the displayed information between screen and print. For instance, our page might contain a map with few markers. On the screen, we display a label when the mouse goes over a marker, but on print, we would prefer that all the labels are displayed.
In these problematic cases, a good solution is to use CasperJS as a backend printing service. The purpose is to highlight a service that takes as a parameter any URL, which returns an image capture of the corresponding page ready to be printed.
Our service will simply run a CasperJS script that will open the provided URL and then capture it:
var casper = require('casper').create();
var url = casper.cli.options['targeturl'];
var output = casper.cli.options['outputfile'];

casper.start(url);

casper.then(function() {
    this.capture(output);
});

casper.run();
As we cannot use the media="print" attribute to apply some print-specific CSS (as CasperJS will open the page in the screen mode), we can dynamically add a specific class on the body element before capturing so we can easily style the rendering:
casper.thenEvaluate(function () {
  var bodyclass = document.querySelector('body').getAttribute('class');
  bodyclass = bodyclass + " print-mode";
  document.querySelector('body').setAttribute('class', bodyclass);
});
And if we want to allow a specific process to be performed before capturing (such as displaying all the marker labels on a map as discussed before), we might wait for a specific selector to be available. The list of selectors is as follows:
In our target page, we add a JavaScript in charge of setting up the page for printing and adding a marker class on the
bodyelement as desired:if(location.search.indexOf("print") > -1) { set_up_as_expected(); document.querySelector('body').className += " ready-for-printing"; }In CasperJS, we wait for this marker class to appear before capturing the output:
casper.waitForSelector(".ready-for-printing", function() {
    capture(this, selector, output);
});
This service can be implemented with any web framework (we just need to be able to make a system call to run our CasperJS script).
Django Screamshot is a Django implementation and can be found at https://github.com/makinacorpus/django-screamshot.