


Welcome to Instant Selenium Testing Tools Starter. This book has been especially created to provide you with all the information that you need to get up to speed with Selenium IDE and Selenium WebDriver. You will learn the basics of Selenium, get started with installing Selenium, creating a test suite and tests cases, and then running these tests on your web application, using WebDriver, and some tips and tricks for using Selenium.
This book contains the following sections:
So what is Selenium? helps you find out what Selenium actually is, what you can do with it, and why it's so great.
Installation teaches you how to download and install Selenium with the minimum fuss and then set it up so that you can use it as soon as possible.
Quick start teaches you how to record a test, save a test case, enhance a test by adding commands, and run a test with Selenium IDE. This section will also get you started on programming with Selenium WebDriver. Here you will learn how to perform some core tasks in Selenium WebDriver such as creating an instance of a desired browser. It explains interacting with page elements using WebElement, adding verification points, and writing user defined methods.
Top 5 features you'll want to know about will introduce you to various features that Selenium provides in order to automate your web applications. This section will introduce you to some of the key features of Selenium such as running tests on various browsers, locating elements, working with HTML elements, synchronizing steps, and the Page Object pattern.
People and places you should get to know provides you with many useful links to the project page and forums, as well as a number of helpful articles, tutorials, blogs, and the Twitter feeds of Selenium super-contributors, as every open source project is centered around a community.
In this section, you will get to know a bit about Selenium; its basic features, what you can do with it, and how you can put it to work with automating tasks in a browser window, or build automated tests to validate your web application.
Selenium is a browser automation framework. It provides a number of tools and APIs for automating user interaction on pure HTML and JavaScript applications in browsers such as IE, Firefox, Google Chrome, Safari, and many more. However, Selenium does not support Rich Internet Application (RIA) technologies such as Silverlight, Flex/Flash, and JavaFx out of the box.
Selenium offers the following set of tools for automating interaction with browsers:
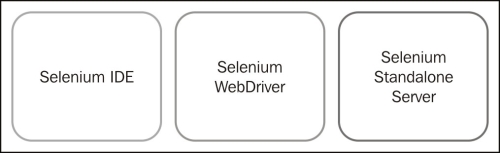
Selenium IDE: This is a Firefox add-on for recording and playing back Selenium scripts with Firefox. It provides a GUI for recording user actions using Firefox. It's a great tool to start learning and using Selenium, but it can only be used with Firefox while other browsers are not supported.
However, you can convert the recorded scripts into various programming languages supported by Selenium WebDriver and run these scripts on browsers other than Firefox.
Selenium WebDriver: This is a programming interface for developing more advanced Selenium scripts using different programming languages. You can also run tests on multiple browsers supported by Selenium. The following figure provides a high-level architecture of Selenium WebDriver:

Selenium WebDriver supports browsers including Mozilla Firefox, Google Chrome, Microsoft Internet Explorer, Safari, and Opera.
It supports writing scripts with various programming languages including Java, .NET Languages (C#, VB.NET), Python, Ruby, PHP, and JavaScript.
Selenium Standalone Server: This allows remote and distributed execution of Selenium scripts. You can also use the Grid feature of a standalone server to run tests in parallel and run tests on mobile platforms such as Android or Apple iOS for iPhone and iPad.
Selenium is widely used for automated testing of web applications; however, its usage is not limited to testing. Selenium mimics user actions such as entering text into a text field, clicking on buttons or links, selecting an option from a drop-down list, and many more, in a browser window as if a human user is interacting with the application. Selenium is also used for screen scraping and automating repetitive tasks in web applications.
You can use Selenium for functional/acceptance testing of your web applications. You can create automated regression tests using Selenium and run them whenever you need to test a new build of your application.
You can use Selenium to automate repetitive tasks such as data entry, filling out forms, check status, or perform complex navigation steps while manual testing.
In three easy steps, you can install Selenium IDE and get it set up on your system.
Before you install Selenium IDE, you will need to check that you have all of the required elements, as listed:
Disk space: 500 MB free (minimum).
Memory: 1 GB (minimum).
Selenium IDE requires Mozilla Firefox web browser to be installed on the system.
For developing tests with Selenium WebDriver, you will need Eclipse IDE installed on the system. You can download and install Eclipse from http://www.eclipse.org/downloads/packages/eclipse-ide-java-developers/junosr2.
The easiest way to download Selenium IDE as a Firefox add-on is from http://seleniumhq.org.
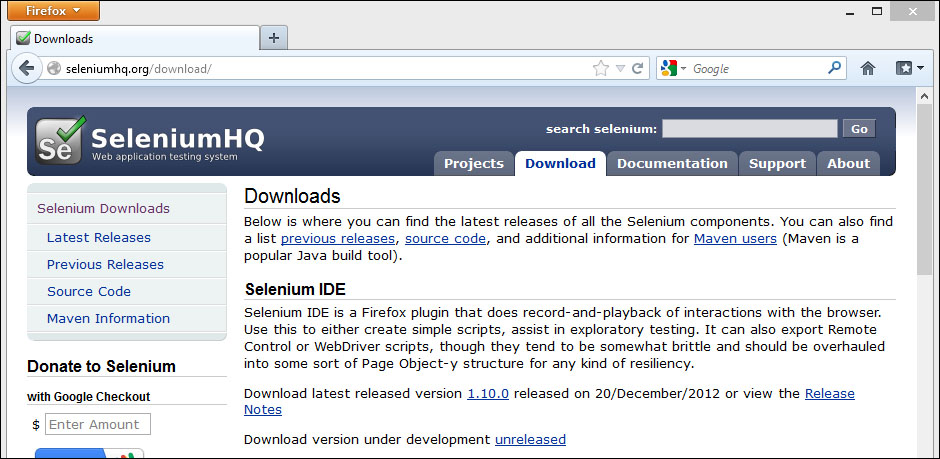
Start the Firefox browser and navigate to the Selenium home page at http://seleniumhq.org and click on the Download tab as shown in the following screenshot:

On the Download page, go to the Selenium IDE section and click on the version link as shown in the following screenshot. We suggest that you download the most current stable build and as of writing this book the most stable build is 1.10.0:
Installing Selenium IDE is quick and easy, similar to installing any other add-on in Firefox. Selenium IDE Version 1.10.1 is supported on Firefox Version 19:
After downloading, Firefox will request your permission to install the add-on. Click on the Allow button as shown in the following screenshot:

Firefox will download the add-on and display the Software Installation dialog box as shown in the following screenshot. Click on the Install Now button:

Firefox will install the Selenium IDE. Firefox will restart after the add-on is installed.
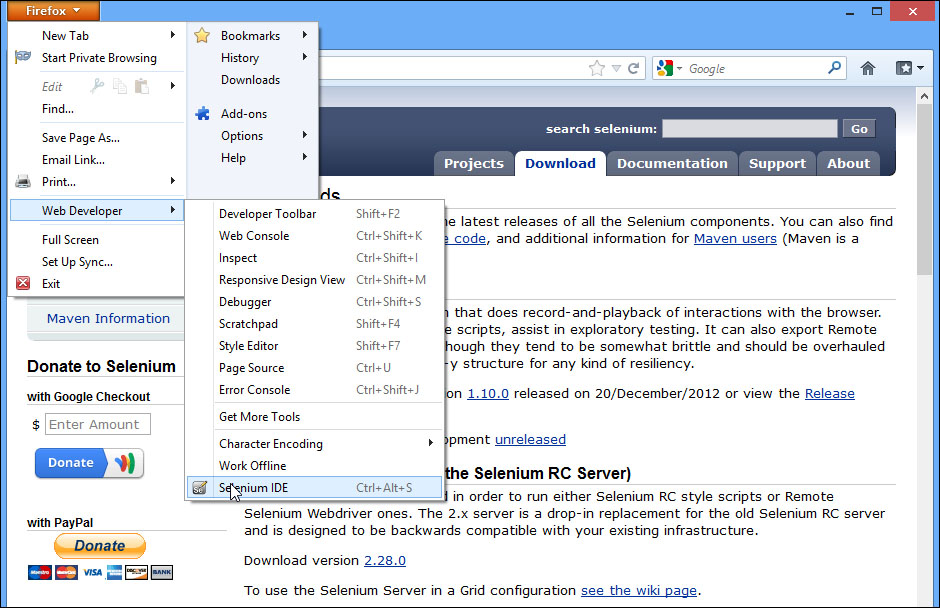
To launch the Selenium IDE, click on Firefox | Web Developer | Selenium IDE as shown in the following screenshot. You might see a Firefox menu in some cases (on operating systems such as Linux, Ubuntu, and Mac OS X), where you can open the Selenium IDE by clicking on Tools | Selenium IDE from the Firefox main menu:
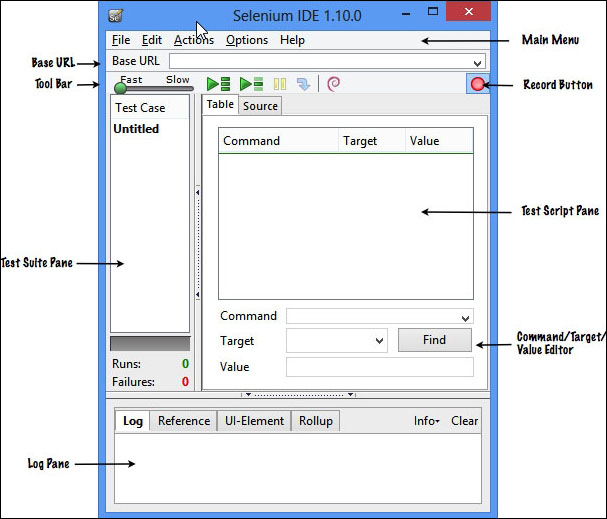
Selenium IDE will be launched on top of the Firefox window as shown in the following screenshot:
By this point, you should have a working installation of Selenium IDE, and you should be free to play around and discover more about it. Installing Selenium IDE is as simple as installing any other add-on or extension for Firefox. In the next section, you will see the power Selenium IDE has and how useful it is for automating and testing web applications.
In this section we will show you how to record a test using Selenium IDE. During the recording, we will add some additional commands to the test and run the recorded test. At the end of this section, we will show you how to export the recorded test to Selenium WebDriver.
A test is a basic building block in Selenium IDE. It contains commands for navigation, test steps, and checks for expected versus the actual state of the application. In this section we will show you how to create your first test and execute this test with Selenium IDE.
In this section we will show you how to record a test on a demo e-commerce application. We will test the product search feature of the application using the following steps:
Launch the Firefox browser.
Open the website for testing in the Firefox browser. For this example we will use http://demo.magentocommerce.com/.
Open Selenium IDE from the Tools menu.
-
Selenium IDE by default sets the recording mode on. If it's not pressed, you can start recording by pressing the
 (record) button in the top-right corner.
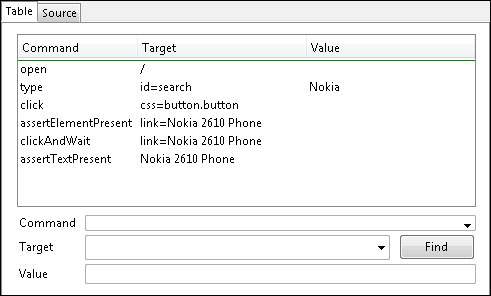
Now switch back to the Firefox browser window and type
Nokiain the search textbox and click on the Search button as shown:
Check if the link Nokia 2610 Phone is present in the search results. We can do that by selecting the link and opening the context menu (right-click) and selecting Show All Available Commands | assertElementPresent link=Nokia 2610 Phone.

Next, we will click on the Nokia 2610 Phone link to open the product page and check if the Nokia 2610 Phone text is displayed on the product page. To do this, select the Nokia 2610 Phone text and open the context menu (right-click) and select Show All Available Commands | assertTextPresent link=Nokia 2610 Phone:

Go back to Selenium IDE. All the previous steps are recorded by Selenium IDE in the Command-Target-Value format as shown in the following screenshot. Stop the recording session by clicking on the Recording button:
Before we play back the recorded test, let's save it in Selenium IDE:
Select File | Save Test Case from the Selenium IDE main menu:
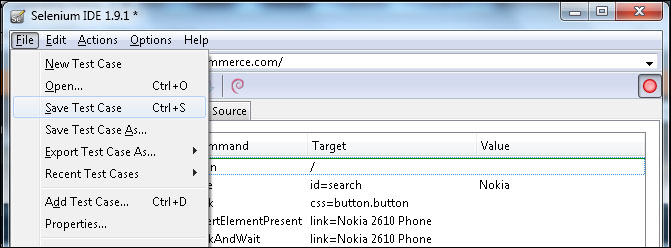
In the Save As dialog box, enter the test case name as
SearchTest.htmland click on the Save button. The test will be saved with the name SearchTest.
In Selenium IDE, we can group multiple tests in a test suite. Let's create a test suite and Selenium IDE will automatically add SearchTest to this suite:
Select File | Save Test Suite from the Selenium IDE main menu.
In the Save As dialog box, enter the test case name as
SearchFeatureTests.htmland click on the Save button.You can create and record more than one test case in a test suite.
Selenium IDE provides multiple ways to execute the tests:
Option 1 – running a single test case
-
Select the test which you want to execute from the test suite pane and click on the
 (play current test case) button.
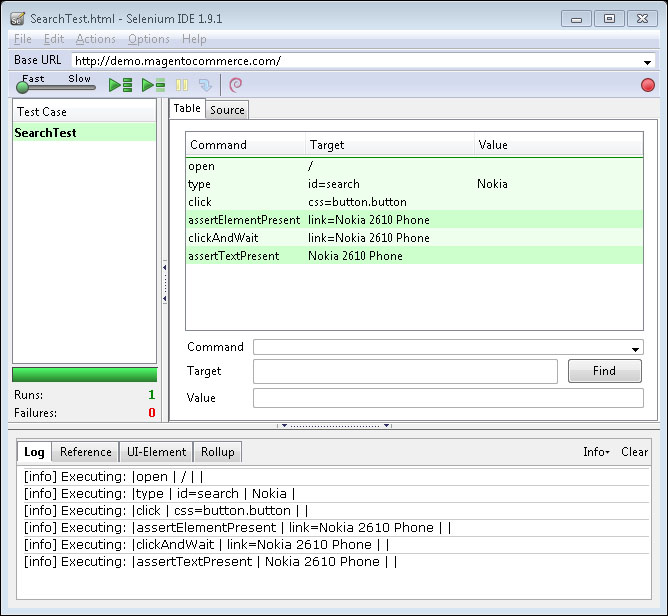
Selenium IDE will start the playback of the test and you can see the steps that we recorded earlier are being played automatically in the browser window. At end of execution, Selenium IDE will display results as per the following screenshot:
-
Select the test which you want to execute from the test suite pane and click on the
Option 2 – running all tests from a test suite
If you have multiple tests in a test suite, you can use the
 (play the entire test suite) button to play all the test cases.
After the test is executed in Selenium IDE, you can see the results in Log tab. All the steps which are successfully completed will be heighted in green and checks in dark green. If there are any failures in the test, those will be highlighted in red. This is how Selenium IDE helps you testing your web application.
Selenium IDE is great to start, however, you will need more to build a test automation framework. Complex tests, with conditional statements and logic, parameterization cannot be automated very well using Selenium IDE. In addition to this you might need features such as detailed logging and reporting, error handling particularly unexpected errors, database testing, and integration with other testing tools and frameworks that are not supported by Selenium IDE.
For building a flexible, maintainable, and robust framework, you will need to use Selenium WebDriver.
Selenium WebDriver is a simple API that helps you with browser automation. However, when using it for testing and building a test framework, there is much more needed. You will need to integrate Selenium WebDriver API with different libraries, tools, and so on, for test development. You will need an integrated development environment (IDE) to build your test project and inject other dependencies in to the framework.
We will show how to use Eclipse for developing tests with Selenium WebDriver. Eclipse is a very popular IDE in the Java world. Eclipse provides a feature-rich environment for Selenium WebDriver test development in Java. Along with Eclipse, Apache Maven also provides support for managing the entire lifecycle of a test project. Maven is used to define project structure, dependencies, build, and test management.
You can use Eclipse and Maven for building your Selenium WebDriver test framework from a single window. Another important benefit of using Maven is that you can get all the Selenium library files and their dependencies by configuring the pom.xml file. Maven automatically finds and downloads the dependencies to the project from the Maven central repository while building the project. In this section we will show you how to configure a new Maven project in Eclipse with the following steps:
Launch the Eclipse IDE.
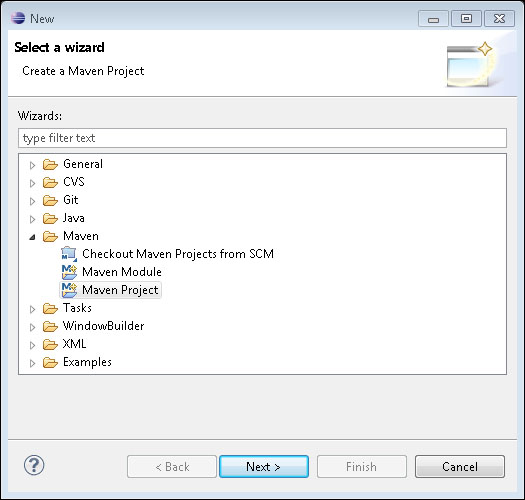
Create a new project by selecting File | New | Other from the Eclipse main menu.
On the New dialog, select Maven | Maven Project as shown in the following screenshot:
Next, the New Maven Project dialog box will be displayed; select the Create a simple project (skip archetype selection) checkbox and keep everything as default and click on the Next button:

On the New Maven Project dialog box, enter
com.demoapp.seleniumtestsin the Group Id: and Artifact Id: textboxes. You can also add a name and description. Keep everything as default and click on the Finish button, as shown in the following screenshot:
Eclipse will create the com.demoapp.seleniumtests project with a folder structure (in Package Explorer) similar to the one shown in the following screenshot:

Select pom.xml from Package Explorer. This will open the
pom.xmlfile in the editor area with the Overview tab open. Select the pom.xml tab instead.Add the WebDriver and JUnit dependencies highlighted in the following code to pom.xml in the
<project>node:<project xmlns="http://maven.apache.org/POM/4.0.0" xmlns:xsi="http://www.w3.org/2001/XMLSchema-instance" xsi:schemaLocation="http://maven.apache.org/POM/4.0.0 http://maven.apache.org/xsd/maven-4.0.0.xsd"> <modelVersion>4.0.0</modelVersion> <groupId>com.demoapp.seleniumtests</groupId> <artifactId>com.demoapp.seleniumtests</artifactId> <version>0.0.1-SNAPSHOT</version> <dependencies> <dependency> <groupId>org.seleniumhq.selenium</groupId> <artifactId>selenium-java</artifactId> <version>LATEST</version> </dependency> <dependency> <groupId>junit</groupId> <artifactId>junit</artifactId> <version>4.8.1</version> <scope>test</scope> </dependency> </dependencies> </project>You can get the latest dependency information for Selenium WebDriver and JUnit from
Add the com.example.tests package in the
src/test/javafolder.Create a new class
SearchTest.javain the com.example.tests package.Now let's go back to Selenium IDE and click on Options | Options from the main menu.
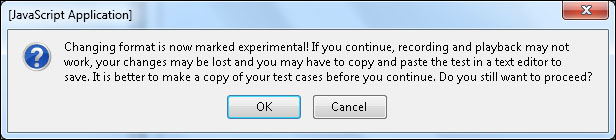
In the Selenium IDE Options dialog box, check the Enable experimental features checkbox and click on the OK button.
To view the test in Java, select Options | Format | Java / JUnit 4/ WebDriver from the main menu as shown in the following screenshot:

Click on the OK button in the [JavaScript Application] dialog box as shown:
The Source tab on the Selenium IDE window will now display the test in Java:
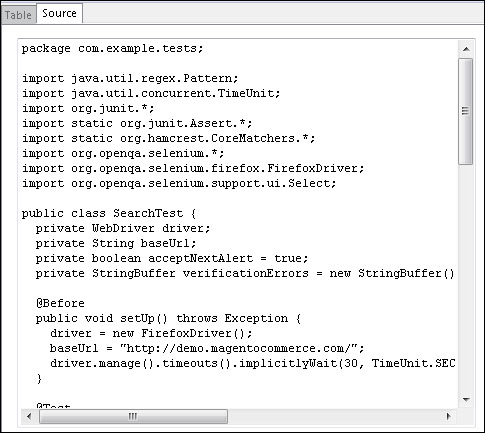
Copy the entire contents from the Source tab and add it to the
SearchTestclass:package com.example.tests; import java.util.regex.Pattern; import java.util.concurrent.TimeUnit; import org.junit.*; import static org.junit.Assert.*; import static org.hamcrest.CoreMatchers.*; import org.openqa.selenium.*; import org.openqa.selenium.firefox.FirefoxDriver; import org.openqa.selenium.support.ui.Select; public class SearchTest { private WebDriver driver; private String baseUrl; private boolean acceptNextAlert = true; private StringBuffer verificationErrors = new StringBuffer(); @Before public void setUp() throws Exception { driver = new FirefoxDriver(); baseUrl = "http://demo.magentocommerce.com/"; driver.manage().timeouts().implicitlyWait(30, TimeUnit.SECONDS); } @Test public void testSearch() throws Exception { driver.get(baseUrl + "/"); driver.findElement(By.id("search")).clear(); driver.findElement(By.id("search")).sendKeys("Nokia"); driver.findElement(By.cssSelector("button.button")).click(); assertTrue(isElementPresent(By.linkText("Nokia 2610 Phone"))); driver.findElement(By.linkText("Nokia 2610 Phone")).click(); // Warning: assertTextPresent may require manual changes assertTrue(driver.findElement(By.cssSelector("BODY")).getText().matches("^[\\s\\S]*Nokia 2610 Phone[\\s\\S]*$")); } @After public void tearDown() throws Exception { driver.quit(); String verificationErrorString = verificationErrors.toString(); if (!"".equals(verificationErrorString)) { fail(verificationErrorString); } } private boolean isElementPresent(By by) { try { driver.findElement(by); return true; } catch (NoSuchElementException e) { return false; } } private String closeAlertAndGetItsText() { try { Alert alert = driver.switchTo().alert(); if (acceptNextAlert) { alert.accept(); } else { alert.dismiss(); } return alert.getText(); } finally { acceptNextAlert = true; } } }To run the tests in the Maven lifecycle, select the com.demoapp.seleniumtests project in Package Explorer. Right-click on the project name and select Run As | Maven test. Maven will execute all the tests from the project using Selenium WebDriver with other language bindings.
Apart from Java, Selenium WebDriver bindings are available for a number of other programming languages:
Ruby language bindings
You can use Selenium with Ruby by installing the
selenium-webdrivergem with the following command:gem install selenium-webdriverFor more information on Ruby bindings, see http://code.google.com/p/selenium/wiki/RubyBindings.
Python language bindings
For using Selenium with Python, use the following command:
pip install seleniumFor more information on Python bindings, see http://code.google.com/p/selenium/wiki/PythonBindings.
.NET bindings
You can also use Selenium along with .NET by adding Selenium's NuGet package to the project in Visual Studio. For more information, refer to the bonus chapter Integration with other tools from Packt Publishing's Selenium Testing Tools Cookbook at http://www.packtpub.com/sites/default/files/downloads/Integration_with_Other_Tools.pdf.
As you start using Selenium, you will realize that there are a wide variety of things that you can do with it. In this section, you will learn about the 5 most important Selenium IDE and WebDriver programming features that you will certainly want to know about. Here, you will learn how to work with running tests on different types of web browsers, locating elements, working with WebElements, synchronization, and capturing screenshots during test runs.
One of the key features of Selenium is support for running tests on a variety of web browsers available. You can develop a test on one browser and run it on all the supported browsers as needed. This feature is essential for cross-browser testing of your web application. You can run tests on combinations of operating systems and web browsers.
Option 1 – running Selenium IDE tests on various browsers
In the Quick start section, we created a test in Selenium IDE; however, as we saw, it only allows us to record and reply tests in Firefox. We can use the Selenium standalone server to run tests that are created with Selenium IDE on different browsers other than Firefox using the following steps:
Download the latest release of Selenium standalone server from http://code.google.com/p/selenium/downloads/list.
Open a command prompt/console window and type the following command:
java -jar selenium-server-standalone-2.29.0.jar -htmlSuite *googlechrome http://demo.magentocommerce.com/ C:\SearchTests.html C:\Result.htmlNote
We have used
*googlechromein the preceding command to run the tests in Google Chrome. You can also use*iexplore(Internet Explorer),*safari(Safari), and*firefox(Firefox) to run tests on these browsers.This command will launch the Selenium standalone server. We used the
–htmlSuiteoption through which we can tell the server to execute the tests created using Selenium IDE. We also specified the browser on which we want to run the tests and the name of the test suite along with the path and name for the output result file. The server will launch Google Chrome and execute all the tests from the specified test suite.
Option 2 – running Selenium WebDriver tests on various browsers
Selenium WebDriver implements support for various web browsers through driver classes, which provide driver specific functionality to the tests. The following list is of the major drivers supported by WebDriver:
Firefox
FirefoxDriveris widely used and is a mature driver supporting most of the WebDriver core APIs including HTML5. Firefox driver is supported on major OS platforms including Windows, Linux, and Mac OS X.Language
Syntax
Java
WebDriver driver = new FirefoxDriver();C#
IWebDriver driver = new FirefoxDriver();Ruby
driver = Selenium::WebDriver.for :firefoxPython
driver = webdriver.Firefox()For more information on
FirefoxDriver, see http://code.google.com/p/selenium/wiki/FirefoxDriver.Google Chrome
ChromeDriveris supported by installing a standaloneChromeDriverserver, which uses a JSON wire protocol to communicate between the Chrome browser and your test.chromeDriveris supported on major OS platforms including Windows, Linux, and Mac OS X. Chrome has certain minor support limitations and does not support the HTML5 API.Language
Syntax
Java
WebDriver driver = new ChromeDriver();C#
IWebDriver driver = new ChromeDriver();Ruby
driver = Selenium::WebDriver.for :chromePython
driver = webdriver.Chrome()For more information on
ChromeDriver, see http://code.google.com/p/selenium/wiki/ChromeDriver.Internet Explorer
InternetExplorerDriveris now a standalone server, which implements WebDriver's wire protocol. The driver supports running 32-bit and 64-bit versions of the browser on Windows.Language
Syntax
Java
WebDriver driver = new InternetExplorerDriver();C#
IWebDriver driver = new InternetExplorerDriver();Ruby
driver = Selenium::WebDriver.for :iePython
driver = webdriver.Ie()For more information on
InternetExplorerDriver, see http://code.google.com/p/selenium/wiki/InternetExplorerDriver.Safari
SafariDriveris added to the list of supported browsers recently. It is implemented as a Safari browser extension instead of the client/server model used inChromeDriverandInternetExplorerDriver. It communicates with the WebDriver client using WebSockets supported on the Mac OS X and Windows platforms.Language
Syntax
Java
driver = new SafariDriver();C#
IWebDriver driver = new SafariDriver();Ruby
driver = Selenium::WebDriver.for :safariPython
driver = webdriver.Remote("http://localhost:4444/wd/hub ",webdriver.DesiredCapabilities.SAFARI)For information on
SafariDriver, see http://code.google.com/p/selenium/wiki/SafariDriver.Opera
OperaDriveris developed by Opera Software and its community. It is supported on all major OS platforms and is available as a core API and standalone server.Language
Syntax
Java
WebDriver driver = new OperaDriver();C#
IWebDriver driver = new RemoteWebDriver(new Uri("http://localhost:4444/wd/hub"), DesiredCapabilities.Opera());Ruby
driver = Selenium::WebDriver.for :operaPython
driver = webdriver.Opera()For more information on
OperaDriver, see http://code.google.com/p/selenium/wiki/OperaDriver.iPhone/iPad
IPhoneDriverallows testing web applications on iOS using a special application that usesUIWebView(a WebKit browser accessible for third-party applications) on iOS devices. This is done by installing and running a iWebDriver app on the iOS device or simulator.Language
Syntax
Java
WebDriver driver = new IPhoneDriver();C#
IWebDriver driver = new RemoteWebDriver(new Uri("http://localhost:3001/wd/hub"), DesiredCapabilities.IPhone());Ruby
driver = Selenium::WebDriver.for :iphonePython
driver = webdriver.Remote("http://localhost:3001/wd/hub", webdriver.DesiredCapabilities.IPHONE)For more information on
iPhoneDriver, see http://code.google.com/p/selenium/wiki/IPhoneDriver.Android
AndroidDriverallows testing of web applications on the Android browser. Similar toiPhoneDriver, an Android application running on the device or emulator is used to run the tests.Language
Syntax
Java
WebDriver driver = new AndroidDriver();C#
IWebDriver driver = AndroidDriver();Ruby
driver = Selenium::WebDriver.for :androidPython
driver = webdriver.Remote("http://localhost:3001/wd/hub", webdriver.DesiredCapabilities.ANDROID)For more information on
AndroidDriver, see http://code.google.com/p/selenium/wiki/AndroidDriver.RemoteWebDriver
RemoteWebDriveris a critical component of Selenium that allows testing on browsers located on remote machines. You can useRemoteWebDriverfor running your tests in a distributed architecture. TheRemoteWebDriverconsists of a client and server. The server is simply a Java Servlet running within the Jetty Servlet container. This servlet interacts with the various browsers. In the beginning of this section we sawselenium-server-standalone, which is theRemoteWebDriverserver. The client is an instance ofRemoteWebDriver, which communicates with the server via a JSON wire protocol similar to other drivers. We can specify what configuration is needed for testing by usingDesiredCapabilities. For example we need to test an application on an iPad, and we can configure theRemoteWebDriverin the following way to run the test:WebDriver driver = new RemoteWebDriver(new URL("http://localhost:3001/wd/hub"), DesiredCapabilities.ipad());For more information on
RemoteWebDriver, see http://code.google.com/p/selenium/wiki/RemoteWebDriver.
One of the key features of Selenium is its ability to locate different types of elements used on a page and the ability to interact with them. Selenium provides various ways or strategies to locate elements and perform actions such as clicking, typing text, selecting an option from the element, or performing verification on the state or property of the element, such as a text value. We can also check if the element is enabled or disabled, is checked or unchecked.
Selenium IDE: For locating elements using Selenium IDE, you need to specify locator details in the Target field.
Selenium WebDriver: For locating elements using WebDriver, the
driverinterface provides thefindElement()andfindElements()methods, which take locator expressions and search for the matching element(s).
The following table describes some of the important locator strategies that you can use with IDE or WebDriver API:
|
Strategy |
Description |
Selenium IDE |
Selenium WebDriver (Java) |
|---|---|---|---|
|
|
Locates the first element that has the specified value for the |
|
|
|
|
Locates the first element with the specified value for the |
|
|
|
|
Locates the link (anchor) element that matches the specified pattern in link text. |
|
(You can specify a partial link text instead of complete link text. This might be useful when links partially contain dynamic values.) |
|
|
Locates elements using CSS selectors (refer to http://goo.gl/a9v7T and http://goo.gl/c1IRf for more details). CSS selectors are useful when the above selectors do not work to identify elements uniquely. You can also use XPath as an alternative, but CSS is considered faster with respect to strategy as compared to XPath. |
|
|
|
|
Locates elements using an XPath query. XPath is used to query XML documents and while HTML is subset of XML and browsers represent HTML documents as XHTML. We can use this strategy to locate elements. |
|
|
|
|
This strategy uses JavaScript expressions to find elements from the document object model (DOM). |
|
NA |
In addition to the aforementioned strategies, Selenium WebDriver supports the following strategies:
|
Strategy |
Description |
WebDriver API (Java) example |
|---|---|---|
|
By class name |
Locates the first element that has the specified value for the |
|
|
By tag name |
Locates elements using their HTML tag |
For example, we can locate all the link (anchor) elements from a page with |
Note
Refer to Packt Publishing's Selenium Testing Tools Cookbook (http://www.packtpub.com/recipes-to-master-selenium-2-testing-tools-cookbook/book) for more information on locators.
Selenium provides an extensive support for the standard HTML elements used on a web page. You can interact with the HTML elements by using built-in commands and APIs for building simple to complex tests. The following table shows some key commands and API methods for interacting with a page and its elements:
|
Purpose |
Selenium IDE |
Selenium WebDriver (Java) |
|---|---|---|
|
Click on an element |
|
|
|
Type a text |
|
|
|
Check a checkbox/radio button |
|
|
|
Uncheck Checkbox/Radio Button |
|
|
|
Select item(s) in a list or drop-down list |
|
|
|
Remove selection from a list or a drop-down list |
|
or
or
|
|
Get the inner text from the element |
|
|
|
Get attribute value |
- |
|
Selenium WebDriver provides the WebElement class for interacting with HTML elements.
When Selenium scripts are played back, the application may not always respond with the same speed, especially for applications using AJAX. For example, it might take a few seconds for the following:
To load page contents
For a window or pop up message to open
For a progress bar to reach 100 percent
For a status message to appear
For a button to become enabled
You can handle these anticipated timing problems by synchronizing your script to ensure that Selenium waits until your application is ready before performing a certain step. There are several options that you can use to synchronize your script using Selenium IDE and Selenium WebDriver.
Selenium IDE provides various built-in waitFor commands for handling synchronization problems in tests. The following is a is list of some waitFor commands:
|
Command |
Condition |
|---|---|
|
|
Delays execution until the page is fully loaded in the browser |
|
|
Delays execution until the specified element is present on the page |
|
|
Delays execution until the specified element is removed from the page |
|
|
Delays execution until the specified text is present on the page |
|
|
Delays execution until the contents of the frame are fully loaded in the browser |
|
|
Delays execution until an alert window is displayed on the page |
A number of these commands are run implicitly when other commands are being executed. For example, with respect to the clickAndWait command, when you click on an element, the waitForPageToLoad command is also executed.
Selenium WebDriver provides implicit and explicit wait conditions to handle synchronization problems. You can use these conditions in the following ways:
Option 1 – the implicit wait condition
When an implicit wait condition is implemented, if Selenium WebDriver cannot find an element in the DOM, it will wait for a defined amount of time for the element to appear in the DOM. In other terms, an implicit wait condition polls the DOM for a certain amount of time when trying to find an element(s) if it is not immediately available. The default setting is 0. Once set, the implicit wait condition is set for the life of the WebDriver object's instance. Here is a sample test using the implicit wait condition:
@Test
public void testWithImplicitWait()
{
  //Go to the Demo AJAX Application
  WebDriver driver = new FirefoxDriver();
  driver.get("http://dl.dropbox.com/u/55228056/AjaxDemo.html");

  //Set the Implicit Wait time Out to 10 Seconds
  driver.manage().timeouts().implicitlyWait(10, TimeUnit.SECONDS);

  try {
      //Get link for Page 4 and click on it
      WebElement page4button = driver.findElement(By.linkText("Page4"));
      page4button.click();

      //Get an element with id page4 and verify it's text
      WebElement message = driver.findElement(By.id("page4"));
      assertTrue(message.getText().contains("Nunc nibh tortor"));
  } catch (NoSuchElementException e) {
    fail("Element not found!!");
    e.printStackTrace();
  } finally {
    driver.close();
  }
}
However, an implicit wait condition may slow down your tests when an application responds normally, as it will wait for each element appearing in the DOM and increase the overall execution time. It is recommended to avoid or minimize the use of an implicit wait condition.
Option 2 – the explicit wait condition
The explicit wait condition provides a better control compared with an implicit wait condition. Unlike an implicit wait condition, you can write custom code or conditions for a wait before proceeding further in the code. An explicit wait condition can only be implemented in cases where synchronization is needed and the rest of the script is working fine.
The Selenium WebDriver provides the
WebDriverWaitandExpectedConditionclasses for implementing an explicit wait condition. You can use these classes in the following way:@Test public void testExplcitWaitTitleContains() { //Go to the Google Home Page WebDriver driver = new FirefoxDriver(); driver.get("http://www.google.com"); //Enter a term to search and submit WebElement query = driver.findElement(By.name("q")); query.sendKeys("selenium"); query.click(); //Create Wait using WebDriverWait. //This will wait for 10 seconds for timeout before title is updated with search term //If title is updated in specified time limit test will move to the text step //instead of waiting for 10 seconds WebDriverWait wait = new WebDriverWait(driver, 10); wait.until(ExpectedConditions.titleContains("selenium")); //Verify Title assertTrue(driver.getTitle().toLowerCase(). startsWith("selenium")); driver.quit(); }The
ExpectedConditionclass provides a set of predefined conditions to wait before proceeding further in the code. The following table shows some common conditions that we frequently come across when automating web browsers supported by theExpectedConditionclass:
|
Predefined condition |
Selenium WebDriver (Java) |
|---|---|
|
An element is visible and enabled |
|
|
An element is selected |
|
|
Presence of an element |
|
|
Specific text present in an element |
|
|
Element value |
|
|
Title |
|
Note
For more conditions, visit http://selenium.googlecode.com/svn/trunk/docs/api/java/org/openqa/selenium/support/ui/ExpectedConditions.html.
The Page Object pattern provides tests for an interface, where a test can operate on the logical functionality offered by the page in a manner similar to the user accessing the page, but by hiding its internals. For example, if we build a Page Object for a login page that will provide a method to log in by accepting the username and password, and will take the user to the home page of the application. The test need not worry about what type of input controls are used for the login page, their locator details, navigation, and so on.
Tests should use objects of a page at a high level, where any change in layout or attributes used for the fields in the underlying page should not break the test.
Selenium WebDriver provides outstanding support for implementing the Page Object pattern via its PageFactory class. The Page Object pattern brings the following advantages for your tests:
It helps in building a layer of abstraction separating automation code, which knows about locating application elements and the one which interacts with these elements for actual testing
It provides a central repository of pages from the application for tests
It provides high maintainability and reduction in code duplication
The login page class provides an interface to the login page of the application to the tests as shown in the following diagram:
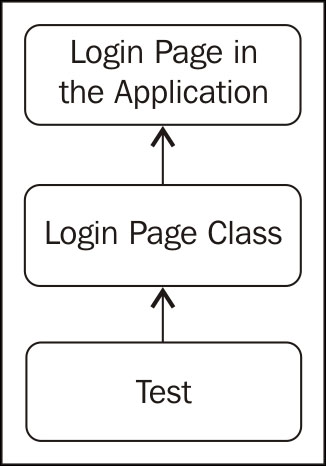
Here is Page Object for the login page of the test application.
The login page class contains locator details for the key elements needed for user login functionality. Elements from the login page are defined as private members of the LoginPage class. The test code will not have access to these elements. The LoginPage class provides a public login() method to the tests. The test needs to pass the e-mail address and password for a registered user to this method. The constructor of the LoginPage class uses the PageFactory.initElements() method to initialize WebElements defined in the class in the following way:
package demo.magentocommerce.pages;


import org.openqa.selenium.WebDriver;
import org.openqa.selenium.WebElement;
import org.openqa.selenium.support.FindBy;
import org.openqa.selenium.support.PageFactory;

public class Login {

  @FindBy(id="email")
  private WebElement emailField;

  @FindBy(id="pass")
  private WebElement passwordField;

  @FindBy(id="send2")
  private WebElement loginButton;

  public Login(WebDriver driver) {
    PageFactory.initElements(driver, this);
  }

  public void login(String email, String password) {
    emailField.sendKeys(email);
    passwordField.sendKeys(email);
    loginButton.click();
  }
}
Here is a sample test using the LoginPage class. The instance of the LoginPage class is created by passing the current driver instance. The login() method is called in the following way:
...
//Navigate to the Login Page
WebDriver driver = new FirefoxDriver();
driver.get("http://demo.magentocommerce.com/customer/account/login/");

//Create an instance of Login page and call the Login function
LoginPage loginPage = new LoginPage(driver);
loginPage.login("xxx@xx.com","xxxx");

//Verify the user is logged in
...If you need help with Selenium, here are a few people and places which will prove to be invaluable:
Home page: http://www.seleniumhq.org and http://code.google.com/p/selenium
Manual and documentation: http://seleniumhq.org/docs/
Source code: https://code.google.com/p/selenium/source/checkout
An Introduction To Selenium IDE, available at http://blog.softwaretestingclub.com/2011/03/an-introduction-to-selenium-ide/
Data Driven Testing with Selenium IDE, available at http://unmesh.me/2012/12/04/data-driven-testing-with-selenium-ide/
Using WebDriver, available at http://code.google.com/p/selenium/wiki/UsingWebDriver
How to use WebDriverWait, available at https://blog.mozilla.org/webqa/2012/07/12/how-to-webdriverwait/
XPath, CSS, DOM and Selenium: The Rosetta Stone available at http://www.simple-talk.com/dotnet/.net-framework/xpath,-css,-dom-and-selenium-the-rosetta-stone/
Official mailing list: selenium-users@googlegroups.com
Official forums: https://groups.google.com/forum/?fromgroups#!forum/selenium-users
Unofficial forums: http://sqa.stackexchange.com/ and http://www.sqaforums.com/forums/forumdisplay.php?f=72&s=b671fbd058460956e6f50e44989e24d0
Official IRC channel:
#seleniumat Freenode (irc.freenode.net)User FAQ: http://code.google.com/p/selenium/wiki/FrequentlyAskedQuestions
The blog of Adam Goucher at http://element34.ca/?cat=blog & http://adam.goucher.ca/?p=1331
The blog of David Burns at http://www.theautomatedtester.co.uk/
Alister Scott at http://watirmelon.com/
The official Sauce Labs blog at http://sauceio.com/
You can also get a list of all Selenium bloggers at http://it-kosmopolit.de/Selenium/blog/selenium-blogs/selenium_blogs.php
Follow Selenium HQ on Twitter at http://twitter.com/seleniumhq for latest updates and announcements
Simon Stewart: http://twitter.com/shs96c
David Burns: http://twitter.com/automatedtester
Adam Goucher: http://twitter.com/adamgoucher
Sauce Labs: https://twitter.com/saucelabs
For more open source information, follow Packt at http://twitter.com/#!/packtopensource
