


Welcome to Pygame for Python Game Development How-to. This book is for developers who want to create games with Pygame quickly and easily and get familiar with the important aspects of it. The typical things you would learn are as follows:
Pygame basics
Sprites
OpenGL
Pygame is part of the Python framework, originally written by Pete Shinners, that as its name suggests can be used to create video games. Pygame is free and open source since 2004 and licensed under the GPL license, which means that you are allowed to basically make any type of game. Pygame is built on top of the Simple DirectMedia Layer (SDL). SDL is a C framework that gives access to graphics, sound, keyboard, and other input devices on various operating systems including Linux, Mac OS X, and Windows.
We will install Python, Pygame, and other software we will need.
Before we install Pygame, we need to have Python installed. On some operating systems Python is already installed. Pygame should be compatible with all Python versions. We will also need the NumPy numerical library. I am the author of two books published by Packt Publishing about NumPy – NumPy Beginner's Guide and NumPy Cookbook. Please refer to these books for more info about NumPy.
Installing on Debian and Ubuntu
Python might be already installed on Debian and Ubuntu, but the development headers are usually not. On Debian and Ubuntu, install python and python-dev with these commands:
sudo apt-get install python
sudo apt-get install python-dev
Pygame can be found in the Debian archives http://packages.qa.debian.org/p/pygame.html. We can install NumPy with the following command:
sudo apt-get install python-numpyInstalling on Windows
The Windows Python installer can be found on www.python.org/download. On this website we can also find installers for Mac OS X and source tarballs for Linux, Unix, and Mac OS X.
From the Pygame website (http://www.pygame.org/download.shtml), we can download the appropriate binary installer for the Python version we are using.
Download a NumPy installer for Windows from the SourceForge website (http://sourceforge.net/projects/numpy/files/).
Installing Python on the Mac
Python comes preinstalled on Mac OS X. We can also get Python via MacPorts, Fink, or similar projects. We can install for instance the Python 2.6 port by running the following command:
sudo port install python26Binary Pygame packages for Mac OS X 10.3 and up can be found on http://www.pygame.org/download.shtml. We can get a NumPy installer from the SourceForge website (http://sourceforge.net/projects/numpy/files/). Download the appropriate
.DMGfile. Usually the latest one is the best.Installing from source
Pygame is using the
distutilssystem for compiling and installing. To start installing Pygame with the default options, simply run the following command:python setup.pyIf you need more information about the available options, type the following command:
python setup.py helpIn order to compile the code, you need to have a compiler for your operating system. Setting this up is beyond the scope of this book. More information about compiling Pygame on Windows can be found on http://pygame.org/wiki/CompileWindows. More information about compiling Pygame on Mac OS X can be found at http://pygame.org/wiki/MacCompile.
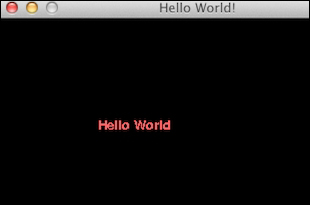
We will create a simple game that we will improve on further in the book. As is traditional in books about programming, we will start with a Hello World! example. It's not a game per se. It's important to notice the so-called main game loop where all the action happens and the usage of the Font module to render text. In this program we will manipulate a Pygame's Surface object, that is used for drawing and we will handle a quit event.
Imports: First we will import the required Pygame modules. If Pygame is installed properly, we should get no errors, otherwise please return to the Preparing your development environment (Simple) recipe:
import pygame, sys
from pygame.locals import *
Initialization: We will initialize Pygame by creating a display of 400 by 300 pixels and setting the window title to
Hello world:pygame.init() screen = pygame.display.set_mode((400, 300)) pygame.display.set_caption('Hello World!')The main game loop: Games usually have a game loop, which runs forever until, for instance, a quit event occurs. In this example, we will only set a label with the text
Hello worldat coordinates (100, 100). The text has a font size of 19, red color, and falls back to the default font:while True: sys_font = pygame.font.SysFont("None", 19) rendered = sys_font.render('Hello World', 0, (255, 100, 100)) screen.blit(rendered, (100, 100)) for event in pygame.event.get(): if event.type == QUIT: pygame.quit() sys.exit() pygame.display.update()We get the following screenshot as the end result:
The following is the complete code for the Hello World example:
import pygame, sys
from pygame.locals import *

pygame.init()
screen = pygame.display.set_mode((400, 300))

pygame.display.set_caption('Hello World!')

while True:
   sysFont = pygame.font.SysFont("None", 19)
   rendered = sysFont.render('Hello World', 0, (255, 100, 100))
   screen.blit(rendered, (100, 100))
   for event in pygame.event.get():
      if event.type == QUIT:
         pygame.quit()
         sys.exit()

   pygame.display.update()
It might not seem like much, but we learned a lot in this recipe. The functions that passed the review are summarized in the following table:
|
Function |
Description |
|---|---|
|
|
This function performs the initialization and needs to be called before any other Pygame functions are called. |
|
|
This function creates a so-called |
|
|
This function sets the window title to a specified string value. |
|
|
This function creates a system font from a comma-separated list of fonts (in this case none) and a font size parameter. |
|
|
This function draws text on a surface. The second parameter indicates whether anti-aliasing is used. The last parameter is a tuple representing the RGB values of a color. |
|
|
This function draws on a surface. |
|
|
This function gets a list of |
|
|
This function cleans up resources used by Pygame. Call this function before exiting the game. |
|
|
This function refreshes the surface. |
Before we start creating cool games, we need an introduction to the drawing functionality of Pygame. As we noticed in the previous recipe, in Pygame we draw on the Surface objects. There is a myriad of drawing options—different colors, rectangles, polygons, lines, circles, ellipses, animation, and different fonts.
The following steps will help you diverge into the different drawing options you can use with Pygame:
Imports: We will need the NumPy library to randomly generate RGB values for the colors, so we will add an extra import for that:
import numpy
Initializing colors: Generate four tuples containing three RGB values each with NumPy:
colors = numpy.random.randint(0, 255, size=(4, 3))
Then define the white color as a variable:
WHITE = (255, 255, 255)
Set the background color: We can make the whole screen white with the following code:
screen.fill(WHITE)
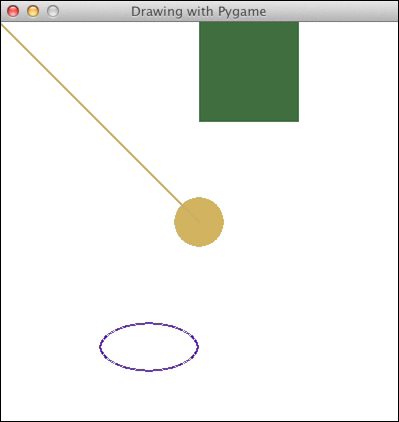
Drawing a circle: Draw a circle in the center with the window using the first color we generated:
pygame.draw.circle(screen, colors[0], (200, 200), 25, 0)
Drawing a line: To draw a line we need a start point and an end point. We will use the second random color and give the line a thickness of
3:pygame.draw.line(screen, colors[1], (0, 0), (200, 200), 3)
Drawing a rectangle: When drawing a rectangle, we are required to specify a color, the coordinates of the upper-left corner of the rectangle, and its dimensions:
pygame.draw.rect(screen, colors[2], (200, 0, 100, 100))
Drawing an ellipse: You might be surprised to discover that drawing an ellipse requires similar parameters as for rectangles. The parameters actually describe an imaginary rectangle that can be drawn around the ellipse:
pygame.draw.ellipse(screen, colors[3], (100, 300, 100, 50), 2)
The resulting window with a circle, line, rectangle, and ellipse using random colors:
The code for the drawing demo is as follows:
import pygame, sys
from pygame.locals import *
import numpy

pygame.init()
screen = pygame.display.set_mode((400, 400))

pygame.display.set_caption('Drawing with Pygame')
colors = numpy.random.randint(0, 255, size=(4, 3))

WHITE = (255, 255, 255)

#Make screen white
screen.fill(WHITE)

#Circle in the center of the window
pygame.draw.circle(screen, colors[0], (200, 200), 25, 0)

# Half diagonal from the upper-left corner to the center
pygame.draw.line(screen, colors[1], (0, 0), (200, 200), 3)

pygame.draw.rect(screen, colors[2], (200, 0, 100, 100))

pygame.draw.ellipse(screen, colors[3], (100, 300, 100, 50), 2)

while True:
   for event in pygame.event.get():
      if event.type == QUIT:
         pygame.quit()
         sys.exit()

   pygame.display.update()
Now that we know how to draw with Pygame, it's time to try something more dynamic. Most games, even the most static ones, have some level of animation. From a programmer's standpoint, animation is nothing more than displaying an object at a different place at a different time, thus simulating movement.
Pygame offers a Clock object that manages how many frames are drawn per second. This ensures that animation is independent of how fast the user's CPU is.
We will load an image and use NumPy again to define a clockwise path around the screen:
First, we need to create a clock as follows:
clock = pygame.time.Clock()
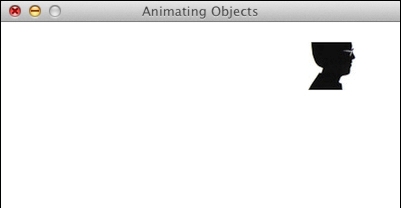
Loading an image: As part of the source code accompanying this book, there should be a picture of a head. We will load this image and move it around on the screen:
img = pygame.image.load('head.jpg')Initializing arrays: We will define some arrays to hold the coordinates of the positions, where we would like to put the image during the animation. Since the object will be moved, there are four logical sections of the path: right, down, left, and up. Each of these sections will have 40 equidistant steps. We will initialize all the values in the sections to 0:
steps = numpy.linspace(20, 360, 40).astype(int)
right = numpy.zeros((2, len(steps)))
down = numpy.zeros((2, len(steps)))
left = numpy.zeros((2, len(steps)))
up = numpy.zeros((2, len(steps)))
Setting the coordinates of the positions: It's trivial to set the coordinates of the positions of the image. However, there is one tricky bit to notice, the
[::-1]notation leads to reversing the order of the array elements:right[0] = steps right[1] = 20 down[0] = 360 down[1] = steps left[0] = steps[::-1] left[1] = 360 up[0] = 20 up[1] = steps[::-1]
Joining the sections: The path sections can be joined, but before we can do this, the arrays have to be transposed with the
Toperator:pos = numpy.concatenate((right.T, down.T, left.T, up.T))
Setting the clock rate: In the main event loop, we will let the clock tick at a rate of 30 frames per second:
clock.tick(30)
The following screenshot is of the moving head:
Note
You should be able to watch a movie of this animation on https://www.youtube.com/watch?v=m2TagGiq1fs.
The code of this example uses almost everything we learned so far, but should still be simple enough to understand:
import pygame, sys
from pygame.locals import *
import numpy

pygame.init()
clock = pygame.time.Clock()
screen = pygame.display.set_mode((400, 400))

pygame.display.set_caption('Animating Objects')
img = pygame.image.load('head.jpg')

steps = numpy.linspace(20, 360, 40).astype(int)
right = numpy.zeros((2, len(steps)))
down = numpy.zeros((2, len(steps)))
left = numpy.zeros((2, len(steps)))
up = numpy.zeros((2, len(steps)))

right[0] = steps
right[1] = 20

down[0] = 360
down[1] = steps

left[0] = steps[::-1]
left[1] = 360

up[0] = 20
up[1] = steps[::-1]

pos = numpy.concatenate((right.T, down.T, left.T, up.T))
i = 0

while True:
   # Erase screen
   screen.fill((255, 255, 255))

   if i >= len(pos):
      i = 0

   screen.blit(img, pos[i])
   i += 1

   for event in pygame.event.get():
      if event.type == QUIT:
         pygame.quit()
         sys.exit()

   pygame.display.update()
   clock.tick(30)
We learned a bit about animation in this recipe. The most important concept we learned is the clock. The new functions that we used are described in the following table:
|
Function |
Description |
|---|---|
|
|
This function creates a game clock |
|
|
This function creates an array with 40 equidistant values between 20 and 360 |
|
|
This function creates an array of the specified dimensions filled with zeroes |
|
|
This function concatenates arrays to form a new array |
|
|
This function executes a tick of the game clock, where 30 is the number of frames per second |
Frequently there is a need to display some text, for instance, a counter or a message.
Pygame has a font module that can help us to show text.
Creating a font: We can create a font by specifying, the font filename, and font size as constructor parameters:
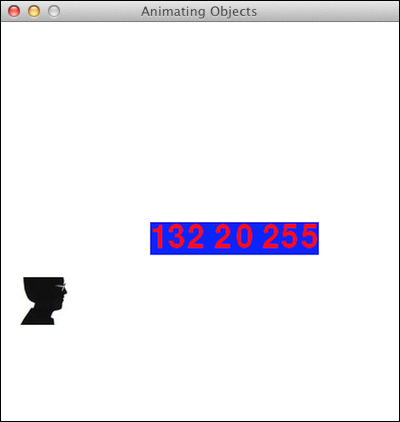
font = pygame.font.Font('freesansbold.ttf', 32)Displaying text: Since we made an image move around the edge in the previous recipe, it would be great to display a counter and the position of the image in the center of the screen with a blue background and red letters. The following code snippet accomplishes this:
text = "%d %d %d" % (i, pos[i][0], pos[i][1])
rendered = font.render(text, True, RED, BLUE)
screen.blit(rendered, (150, 200))
Note
A screenshot of the animation is shown as follows and should be on YouTube too at https://www.youtube.com/watch?v=xhjfcFhaXN0.
The code is almost the same as for the previous recipe, with the addition of code for the creation and display of fonts:
import pygame, sys
from pygame.locals import *
import numpy

pygame.init()
clock = pygame.time.Clock()
screen = pygame.display.set_mode((400, 400))

pygame.display.set_caption('Animating Objects')
img = pygame.image.load('head.jpg')

steps = numpy.linspace(20, 360, 40).astype(int)
right = numpy.zeros((2, len(steps)))
down = numpy.zeros((2, len(steps)))
left = numpy.zeros((2, len(steps)))
up = numpy.zeros((2, len(steps)))

right[0] = steps
right[1] = 20

down[0] = 360
down[1] = steps
left[0] = steps[::-1]
left[1] = 360

up[0] = 20
up[1] = steps[::-1]

pos = numpy.concatenate((right.T, down.T, left.T, up.T))
i = 0

# create a font
font = pygame.font.Font('freesansbold.ttf', 32)
RED = (255, 0, 0)
BLUE = (0, 0, 255)

while True:
   # Erase screen
   screen.fill((255, 255, 255))

   if i >= len(pos):
      i = 0

   screen.blit(img, pos[i])

   # displaying text in the center of the screen
   text = "%d %d %d" % (i, pos[i][0], pos[i][1])
   rendered = font.render(text, True, RED, BLUE)
   screen.blit(rendered, (150, 200))
   i += 1

   for event in pygame.event.get():
      if event.type == QUIT:
         pygame.quit()
         sys.exit()

   pygame.display.update()
   clock.tick(30)
Matplotlib is an open source library for easy plotting. We can integrate Matplotlib into Pygame game and create various plots. You can find the Matplotlib installation instructions at http://matplotlib.org/users/installing.html.
In this recipe we will take the position coordinates of the previous recipe and make a graph of them:
Using a non-interactive backend: In order to integrate Matplotlib with Pygame, we need to use a non-interactive backend, otherwise Matplotlib will present us with a GUI window by default. We will import the main Matplotlib module and call the
usefunction. This function has to be called immediately after importing the mainmatplotlibmodule and before othermatplotlibmodules are imported:import matplotlib matplotlib.use("Agg")Creating a Matplotlib canvas: Non-interactive plots can be drawn on a Matplotlib canvas. Creating this canvas requires imports, a figure, and a subplot. We will specify the figure to be 3 by 3 inches large. More details can be found at the end of this recipe:
import matplotlib.pyplot as plt
import matplotlib.backends.backend_agg as agg

fig = plt.figure(figsize=[3, 3])
ax = fig.add_subplot(111)
canvas = agg.FigureCanvasAgg(fig)
Plotting data: In a non-interactive mode, plotting data is a bit more complicated than in the default mode. Since we need to plot repeatedly, it makes sense to organize the plotting code in a function. The plot is eventually drawn on the canvas. The canvas adds a bit of complexity to our setup. At the end of this example, you can find more detailed explanation of the functions:
def plot(data):
   ax.plot(data)
   canvas.draw()
   renderer = canvas.get_renderer()

   raw_data = renderer.tostring_rgb()
   size = canvas.get_width_height()

   return pygame.image.fromstring(raw_data, size, "RGB")
Note
The following screenshot shows the animation in action. You can also view a screencast on YouTube at https://www.youtube.com/watch?v=t6qTeXxtnl4.

We get the following code after the changes:
import pygame, sys
from pygame.locals import *
import numpy
import matplotlib

matplotlib.use("Agg")

import matplotlib.pyplot as plt
import matplotlib.backends.backend_agg as agg

fig = plt.figure(figsize=[3, 3])
ax = fig.add_subplot(111)
canvas = agg.FigureCanvasAgg(fig)

def plot(data):
   ax.plot(data)
   canvas.draw()
   renderer = canvas.get_renderer()

   raw_data = renderer.tostring_rgb()
   size = canvas.get_width_height()

   return pygame.image.fromstring(raw_data, size, "RGB")

pygame.init()
clock = pygame.time.Clock()
screen = pygame.display.set_mode((400, 400))

pygame.display.set_caption('Animating Objects')
img = pygame.image.load('head.jpg')

steps = numpy.linspace(20, 360, 40).astype(int)
right = numpy.zeros((2, len(steps)))
down = numpy.zeros((2, len(steps)))
left = numpy.zeros((2, len(steps)))
up = numpy.zeros((2, len(steps)))

right[0] = steps
right[1] = 20

down[0] = 360
down[1] = steps

left[0] = steps[::-1]
left[1] = 360

up[0] = 20
up[1] = steps[::-1]

pos = numpy.concatenate((right.T, down.T, left.T, up.T))
i = 0
history = numpy.array([])
surf = plot(history)

while True:
   # Erase screen
   screen.fill((255, 255, 255))

   if i >= len(pos):
      i = 0
      surf = plot(history)


   screen.blit(img, pos[i])
   history = numpy.append(history, pos[i])
   screen.blit(surf, (100, 100))

   i += 1

   for event in pygame.event.get():
      if event.type == QUIT:
         pygame.quit()
         sys.exit()

   pygame.display.update()
   clock.tick(30)
The plotting-related functions are explained in this table:
|
Function |
Description |
|---|---|
|
|
This function specifies to use the non-interactive backend |
|
|
This function creates a figure of 3 by 3 inches |
|
|
This function creates a subplot (in this case we only need 1 subplot) |
|
|
This function creates a canvas in non-interactive mode |
|
|
This function creates a plot using specified data |
|
|
This function draws on the canvas |
|
|
This function gets a renderer for the canvas |
The Pygame surfarray module handles the conversion between Pygame Surface objects and NumPy arrays. As you may recall, NumPy can manipulate big arrays in a fast and efficient manner.
In this recipe we will tile a small image to fill the game screen.
Copying pixels to array: The
array2dfunction copies pixels into a two-dimensional array. There is a similar function for three-dimensional arrays. We will copy the pixels from the avatar image into an array:pixels = pygame.surfarray.array2d(img)
Creating the game screen: A NumPy array has a shape attribute that corresponds to the dimensions of the array. This attribute is a tuple. A two-dimensional array for instance, will have a two-element shape tuple. Let's create the game screen from the shape of the pixels array using the
shapeattribute of the array. The screen will be seven times larger in both directions:X = pixels.shape[0] * 7 Y = pixels.shape[1] * 7 screen = pygame.display.set_mode((X, Y))
Tiling the image: Tiling the image is easy with the NumPy
tilefunction. The data needs to be converted to integer values, since colors are defined as integers:new_pixels = numpy.tile(pixels, (7, 7)).astype(int)
Displaying the array: The
surfarraymodule has the following special function (blit_array) to display the array on the screen:pygame.surfarray.blit_array(screen, new_pixels)
The following screenshot displays the result of the code:

The following code does the tiling of the image:
import pygame, sys
from pygame.locals import *
import numpy

pygame.init()
img = pygame.image.load('head.jpg')
pixels = pygame.surfarray.array2d(img)
X = pixels.shape[0] * 7
Y = pixels.shape[1] * 7
screen = pygame.display.set_mode((X, Y))
pygame.display.set_caption('Surfarray Demo')
new_pixels = numpy.tile(pixels, (7, 7)).astype(int)


while True:
   screen.fill((255, 255, 255))
   pygame.surfarray.blit_array(screen, new_pixels)

   for event in pygame.event.get():
      if event.type == QUIT:
         pygame.quit()
         sys.exit()

   pygame.display.update()
The following table gives us a brief description of the new functions and attributes we used:
|
Function |
Description |
|---|---|
|
|
This copies pixel data into a 2D array |
|
|
The |
|
|
This tiles an array the given dimensions specified as a tuple |
|
|
This displays array values on the screen |
A good game needs to have great music and sound effects. The Pygame mixer module lets us play a sound or any audio for that matter.
We will download a WAV audio file using standard Python. We will play this sound when the game quits. This example requires you to actually execute the example code, because this book has no audio support.
Creating a sound object: We can create a Pygame
Soundobject after specifying the name of the audio file. This class as you would expect embodies the concept of sounds:audio = pygame.mixer.Sound(WAV_FILE)
Playing the sound: The
Soundobject has aplaymethod, which has a number of loops parameters. If the value of this parameter is set to -1, the sound will loop indefinitely:audio.play(-1)
Pausing the game: Sometimes we need to pause the execution of a game, as in our case in order to be able to hear a sound. We can do this with the following code snippet:
pygame.time.delay(TIMEOUT * 1000)
The delay is specified in milliseconds, that's why we are multiplying by 1000.
Stopping the sound: After a while we need to stop the sound with the corresponding
stopmethod:audio.stop()
The audio demo code is listed as follows:
import pygame, sys
from pygame.locals import *
import numpy
import urllib2
import time

WAV_FILE = 'smashingbaby.wav'

def play():
    audio = pygame.mixer.Sound(WAV_FILE)
    audio.play(-1)
    TIMEOUT = 1
    pygame.time.delay(TIMEOUT * 1000)
    audio.stop()
    time.sleep(TIMEOUT)

pygame.init()
pygame.display.set_caption('Sound Demo')
response = urllib2.urlopen('http://www.thesoundarchive.com/austinpowers/smashingbaby.wav')
filehandle = open(WAV_FILE, 'w')
filehandle.write(response.read())
filehandle.close()
screen = pygame.display.set_mode((400, 400))

while True:
   sys_font = pygame.font.SysFont("None", 19)
   rendered = sys_font.render('Smashing Baby', 0, (255, 100, 100))
   screen.blit(rendered, (100, 100))

   for event in pygame.event.get():
      if event.type == QUIT:
         play()
         pygame.quit()
         sys.exit()

   pygame.display.update()
The most important functions of this demo are summed up in the following table:
|
Function |
Description |
|---|---|
|
|
This function creates a |
|
|
This function plays and loops indefinitely (-1 means indefinitely). By default the sound is played only once. This corresponds with 0 loops. If the value is 2, the sound will be played once and then repeated 2 more times. |
|
|
This function pauses the game for a specified number of milliseconds. |
|
|
This function stops audio playback. |
Most commercial games these days have small movie clips that try to explain the plot to us. For instance, a first-person shooter could have a movie showing a briefing about the next mission. Movie playback is a cool feature to have. Pygame offers limited support for MPEG movies.
We need to have a MPEG movie for this demo. Once you have a movie you can convert it to be used in a Pygame game with the following command:
ffmpeg -i <infile> -vcodec mpeg1video -acodec libmp3lame -intra <outfile.mpg>
Installing ffmpeg and the command-line options are outside the scope of this book, but shouldn't be too difficult (see http://ffmpeg.org/).
The movie playback is set up similarly to the audio playback that we covered in the previous recipe. The following code demonstrates playing a MPEG video. Pay particular attention to the play function:
import pygame, sys
from pygame.locals import *
import time

pygame.init()
screen = pygame.display.set_mode((400, 400))
pygame.display.set_caption('Movie Demo')

def play():
    movie = pygame.movie.Movie('out.mpg')
    movie.play()
    TIMEOUT = 7
    pygame.time.delay(TIMEOUT * 1000)
    movie.stop()

while True:
   screen.fill((255, 255, 255))

   for event in pygame.event.get():
      if event.type == QUIT:
         play()
         pygame.quit()
         sys.exit()

pygame.display.update()The relevant functions for the movie playback can found in this table:
|
Function |
Description |
|---|---|
|
|
This function creates a |
|
|
This function starts playing the movie |
|
|
This function stops playback of the movie |
Android is an open source smartphone operating system initially developed by Google. Most of the Android apps are written in the Java programming language and run on a Java-based virtual machine. Fortunately, we can create Pygame games for Android phones. This is not a trivial matter and we will only cover the bare basics.
We will install the Pygame Subset For Android (PGS4A). You will need to have the JDK, Python 2.7 or a later version installed before we start. Download the appropriate software for your operating system from http://pygame.renpy.org/dl.
To install the necessary software, we will require an Internet connection and quite a lot of room on your hard drive. If you don't have a couple of gigabytes to spare, you may need to make more space. We can install the Android SDK and other software we will need such as Apache Ant by running the following command:
android.py installsdk
This will start a wizard that will guide you through the installation. It's safe to accept all the default options during the installation procedure, but you do have to generate a key. Unless you are really serious about creating apps, you don't have to worry how secure this key is.
We will create a simple game that prints "Hello World From Android!" and call it mygame.
Setting up the game: Create a directory with the same name as the name of the game and place a
main.pyfile in there with the following contents:import pygame # Import the android module. If we can't import it, set it to None - this # lets us test it, and check to see if we want android-specific # behavior. try: import android except ImportError: android = None # Event constant. TIMEREVENT = pygame.USEREVENT # The FPS the game runs at. FPS = 30 def main(): pygame.init() # Set the screen size. screen = pygame.display.set_mode((480, 800)) # Map the back button to the escape key. if android: android.init() android.map_key(android.KEYCODE_BACK, pygame.K_ESCAPE) # Use a timer to control FPS. pygame.time.set_timer(TIMEREVENT, 1000 / FPS) while True: ev = pygame.event.wait() # Android-specific: if android: if android.check_pause(): android.wait_for_resume() # Draw the screen based on the timer. if ev.type == TIMEREVENT: screen.fill((255, 255, 255)) font = pygame.font.Font('freesansbold.ttf', 32) rendered = font.render('Hello From Android!', 0, (255, 100, 100)) screen.blit(rendered, (100, 100)) pygame.display.flip() # When the user hits back, ESCAPE is sent. Handle it and # end the game. elif ev.type == pygame.KEYDOWN and ev.key == pygame.K_ESCAPE: break # This isn't run on Android. if __name__ == "__main__": main()This is basically the code from the PGS4A website changed to print a welcome message. A more thorough explanation will be given at the end of the recipe.
Configuring the game: We can configure the game with the following command:
android.py configure mygameWe will accept all the defaults and set the storage setting to internal.
Building, installing, and running the game: Android is essentially a Java framework, so there is a lot of compiling involved. This is a bit different than in the Python world. Since this game is simple, building will not take that long. First we will start the emulator—this is an application that mimics the behavior of an actual phone. Find the
androidexecutable that is part of the Android SDK. Launch it and choose Tools | Manage AVDs… | New… in the GUI application that opens. Create an Android Virtual Device (AVD) and give it a name. Hit the Launch… button. A phone emulator will start. If it is locked, you can unlock it by pressing F2.We can now build and install the game with the command:
android.py build mygame release install
The relevant functions used in this code are described as follows:
|
Function |
Description |
|---|---|
|
|
This function initializes Android |
|
|
This function maps the Android back button to the Pygame escape button |
|
|
This function fires events at specified time intervals given in milliseconds |
|
|
This function checks for a pause request |
|
|
This function puts the game in sleep mode |
Often we need to mimic intelligent behavior within a game. The scikits-learn project aims to provide an API for Machine Learning. What I like most about it is the amazing documentation.
We can install scikit-learn by typing the following command at the command line:
pip install -U scikit-learn
Or:
easy_install -U scikit-learn
This might not work because of permissions, so you might need to put sudo in front of the commands or log in as admin.
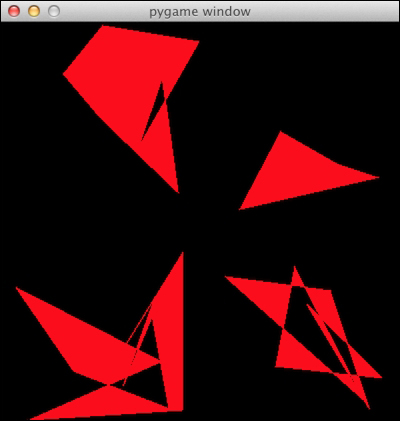
We will generate some random points and cluster them, which means that points that are close to each other are put in the same cluster. This is only one of the many techniques that you can apply with scikits-learn. Clustering is a type of machine learning algorithm that aims to group items based on similarities.
Generating random points: We will generate 30 random point positions within a square of 400 by 400 pixels:
positions = numpy.random.randint(0, 400, size=(30, 2))Calculating the affinity matrix: We will use the Euclidean distance to the origin as the affinity metric. The affinity matrix is a matrix holding affinity scores, in this case distances:
positions_norms = numpy.sum(positions ** 2, axis=1)
S = - positions_norms[:, numpy.newaxis] - positions_norms[numpy.newaxis, :] + 2 * numpy.dot(positions, positions.T)
Clustering the points: Give the
AffinityPropagationclass the result from the previous step. This class labels the points with the appropriate cluster number:aff_pro = sklearn.cluster.AffinityPropagation().fit(S) labels = aff_pro.labels_
Drawing polygons: We will draw polygons for each cluster. The function involved requires a list of points, a color (let's paint it red), and a surface:
pygame.draw.polygon(screen, (255, 0, 0), polygon_points[i])The result is a bunch of polygons for each cluster as shown in the following screenshot:
The clustering example code is shown as follows:
import numpy
import sklearn.cluster
import pygame, sys
from pygame.locals import *


positions = numpy.random.randint(0, 400, size=(30, 2))

positions_norms = numpy.sum(positions ** 2, axis=1)
S = - positions_norms[:, numpy.newaxis] - positions_norms[numpy.newaxis, :] + 2 * numpy.dot(positions, positions.T)

aff_pro = sklearn.cluster.AffinityPropagation().fit(S)
labels = aff_pro.labels_

polygon_points = []

for i in xrange(max(labels) + 1):
   polygon_points.append([])


# Sorting points by cluster
for i, l in enumerate(labels):
   polygon_points[l].append(positions[i])

pygame.init()
screen = pygame.display.set_mode((400, 400))


while True:
   for point in polygon_points:
      pygame.draw.polygon(screen, (255, 0, 0), point)

   for event in pygame.event.get():
      if event.type == QUIT:
         pygame.quit()
         sys.exit()

   pygame.display.update()
The most important lines in the artificial intelligence recipe are described in more detail in the following table:
|
Function |
Description |
|---|---|
|
|
This creates an array of 30 by 2 random integers. This corresponds to 30 points in two-dimensional space. The values are between 0 and 400. |
|
|
This sums an array of the square of the positions array. |
|
|
This computes the dot product of the positions array and its transpose. |
|
|
This creates an |
|
|
This draws a polygon given a surface, a color (red in this case), and a list of points. |
Sprite is a term from computer graphics meaning a two-dimensional visible object, that has been optimized for rendering. Pygame offers the Sprite class that deals with sprites. It can draw sprites on a Surface object. It also has collision functions. For complex games, we can group sprites together for easy management. Sprites are not thread safe, so you should take care when using multiple threads.
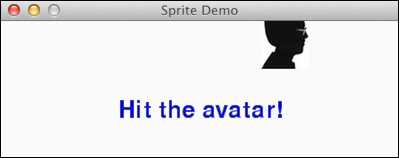
We will redo the animation demo, but this time with sprites and using Rect objects, which represent rectangles. A Rect object has left, top, width, and height attributes. We will use these and other attributes throughout the example. Also we will let the avatar spin when the mouse button is clicked. However, we will not care for now where we click exactly.
We will create a class that extends the Sprite class. Sprite classes have an update method which fires for each frame. All logic involving the movement of the sprite should be placed here.
Constructor: First, we need to create the sprite and perform subclassing. All the initialization logic goes here. Further details for the functions can be found in the next section. We define an image, rectangle, and variables tracking the movement of the avatar:
class Head(pygame.sprite.Sprite):
    def __init__(self):
        pygame.sprite.Sprite.__init__(self)
        self.image, self.rect = load_image('head.jpg', -1)
        screen = pygame.display.get_surface()
        self.area = screen.get_rect()
        self.STEP = 9
        self.MARGIN = 12
        self.xstep = self.STEP
        self.ystep = 0
        self.dizzy = 0
        self.direction = 'right'
The update method: The
updatemethod calls helper methods that either cause the head to spin or move it in clockwise direction. The movement is achieved with this line:newpos = self.rect.move((self.xstep, self.ystep))The following line take care of the rotation:
self.image = pygame.transform.rotate(self.original, self.degrees)Note
You can find a short clip of the game on YouTube (https://www.youtube.com/watch?v=EFQlc_siPrI). A screenshot of the game is shown as follows:
The complete code of the Sprite demo is listed as follows:
import os, pygame
from pygame.locals import *

def load_image(name, colorkey=None):
    try:
        image = pygame.image.load(name)
    except pygame.error, message:
        print 'Cannot load image:', name

    image = image.convert()

    return image, image.get_rect()

class Head(pygame.sprite.Sprite):
    def __init__(self):
        pygame.sprite.Sprite.__init__(self)
        self.image, self.rect = load_image('head.jpg', -1)
        screen = pygame.display.get_surface()
        self.area = screen.get_rect()
        self.STEP = 9
        self.MARGIN = 12
        self.xstep = self.STEP
        self.ystep = 0
        self.degrees = 0
        self.direction = 'right'

    def update(self):
        if self.degrees:
            self._spin()
        else:
            self._move()

    def _move(self):
        newpos = self.rect.move((self.xstep, self.ystep))

        if self.direction == 'right' and self.rect.right > self.area.right - self.MARGIN:
            self.xstep = 0
            self.ystep = self.STEP
            self.direction = 'down'

        if self.direction == 'down' and self.rect.bottom > self.area.bottom - self.MARGIN:
            self.xstep = -self.STEP
            self.ystep = 0
            self.direction = 'left'

        if self.direction == 'left' and self.rect.left < self.area.left + self.MARGIN:
            self.xstep = 0
            self.ystep = -self.STEP
            self.direction = 'up'

        if self.direction == 'up' and self.rect.top < self.area.top + self.MARGIN:
            self.xstep = self.STEP
            self.ystep = 0
            self.direction = 'right'

        self.rect = newpos

    def _spin(self):
        center = self.rect.center
        self.degrees = self.degrees + 12
        if self.degrees >= 360:
            self.degrees = 0
            self.image = self.original
        else:
            self.image = pygame.transform.rotate(self.original, self.degrees)
        self.rect = self.image.get_rect(center=center)

    def hit(self):
        if not self.degrees:
            self.degrees = 1
            self.original = self.image


def main():
    pygame.init()
    screen = pygame.display.set_mode((400, 400))
    pygame.display.set_caption('Sprite Demo')

    background = pygame.Surface(screen.get_size())
    background = background.convert()
    background.fill((250, 250, 250))

    if pygame.font:
        font = pygame.font.Font(None, 36)
        text = font.render("Hit the avatar!", 1, (0, 0, 200))
        textpos = text.get_rect(centerx = background.get_width()/2, centery = background.get_height()/2)
        background.blit(text, textpos)

    screen.blit(background, (0, 0))
    pygame.display.flip()

    clock = pygame.time.Clock()
    head = Head()
    sprite = pygame.sprite.RenderPlain(head)

    while True:
        clock.tick(60)

        for event in pygame.event.get():
            if event.type == QUIT:
                return
            elif event.type == MOUSEBUTTONDOWN:
               head.hit()

        sprite.update()

        screen.blit(background, (0, 0))
        sprite.draw(screen)
        pygame.display.flip()


if __name__ == '__main__':
   main()
A more in-depth description of the various functions used in this demo is given as follows:
|
Function |
Description |
|---|---|
|
|
This creates sprites. |
|
|
This gets a |
|
|
This gets a |
|
|
This moves a rectangle given a |
|
|
This rotates an image given a |
|
|
This gets the rectangle for the image given its center coordinates. |
|
|
This renders the sprite. |
OpenGL specifies an API for 2D and 3D computer graphics. The API consists of functions and constants. We will be concentrating on the Python implementation called PyOpenGL.
Install PyOpenGL with the following command:
pip install PyOpenGL PyOpenGL_accelerate
You might need to have root access to execute this command. The corresponding easy_install command is as follows:
easy_install PyOpenGL PyOpenGL_accelerate
For the purpose of demonstration we will draw a Sierpinski gasket with OpenGL. This is a fractal pattern in the shape of a triangle created by the mathematician Waclaw Sierpinski. The triangle is obtained via a recursive and in principle infinite procedure.
OpenGL Initialization: First, we will start out by initializing some of the OpenGL-related primitives. This includes setting the display mode and background color. A line-by-line explanation is given at the end of the recipe:
def display_openGL(w, h):
  pygame.display.set_mode((w,h), pygame.OPENGL|pygame.DOUBLEBUF)

  glClearColor(0.0, 0.0, 0.0, 1.0)
  glClear(GL_COLOR_BUFFER_BIT|GL_DEPTH_BUFFER_BIT)


  gluOrtho2D(0, w, 0, h)
Displaying points: The algorithm requires us to display points, the more the better. First, we set the drawing color to red. Second, we define the vertices (I call them points myself) of a triangle. Then we define random indices, which are to be used to choose one of the three triangle vertices. We pick a random point somewhere in the middle, it doesn't really matter where. After that we draw points halfway between the previous point and one of the vertices picked at random. Finally, we "flush" the result:
    glColor3f(1.0, 0, 0)
    vertices = numpy.array([[0, 0], [DIM/2, DIM], [DIM, 0]])
    NPOINTS = 9000
    indices = numpy.random.random_integers(0, 2, NPOINTS)
    point = [175.0, 150.0]

    for index in indices:
       glBegin(GL_POINTS)
       point = (point + vertices[index])/2.0
       glVertex2fv(point)
       glEnd()

    glFlush()
The Sierpinski triangle looks like this:

The full Sierpinski gasket demo code with all the imports is shown as follows:
import pygame
from pygame.locals import *
import numpy

from OpenGL.GL import *
from OpenGL.GLU import *

def display_openGL(w, h):
  pygame.display.set_mode((w,h), pygame.OPENGL|pygame.DOUBLEBUF)

  glClearColor(0.0, 0.0, 0.0, 1.0)
  glClear(GL_COLOR_BUFFER_BIT|GL_DEPTH_BUFFER_BIT)


  gluOrtho2D(0, w, 0, h)


def main():
    pygame.init()
    pygame.display.set_caption('OpenGL Demo')
    DIM = 400
    display_openGL(DIM, DIM)
    glColor3f(1.0, 0, 0)
    vertices = numpy.array([[0, 0], [DIM/2, DIM], [DIM, 0]])
    NPOINTS = 9000
    indices = numpy.random.random_integers(0, 2, NPOINTS)
    point = [175.0, 150.0]

    for index in indices:
       glBegin(GL_POINTS)
       point = (point + vertices[index])/2.0
       glVertex2fv(point)
       glEnd()

    glFlush()
    pygame.display.flip()

    while True:
        for event in pygame.event.get():
            if event.type == QUIT:
                return


if __name__ == '__main__':
  main()
As promised here is a line-by-line explanation of the most important parts of the example:
|
Function |
Description |
|---|---|
|
|
This sets the display mode to the required width, height, and OpenGL display. |
|
|
This clears the buffers using a mask. Here we clear the color buffer and depth buffer bits. |
|
|
This defines a 2D orthographic projection matrix with the coordinates of the left, right, top, and bottom clipping planes. |
|
|
This defines the current drawing color using three float values for RGB (0-1 instead of 0-255 that is usual for Pygame). In this case we will be painting in red. |
|
|
This delimits the vertices of primitives or a group of primitives. Here the primitives are points. |
|
|
This renders a point given a vertex. |
|
|
This closes a section of code started with |
|
|
This forces execution of GL commands. |
In the sprite demo, we left out the collision detection bit. Pygame has a number of useful collision detection functions in the Rect class. For instance, we can check whether a point is in a rectangle or whether two rectangles overlap.
Beside the collision detection we will replace the mouse cursor with an image of a hammer that we created. It's not a very pretty image, but it beats the boring old cursor.
Updating the hit method: We will update the
hitmethod of the sprite demo code. In the new version, we check whether the mouse cursor is within the avatar sprite. Actually to make it easier to hit the head, we create a slightly bigger rectangle:def hit(self): mouse_x, mouse_y = pygame.mouse.get_pos() collided = False bigger_rect = self.rect.inflate(40, 40) if bigger_rect.collidepoint(mouse_x, mouse_y): collided = True if not self.degrees and collided: self.degrees = 1 self.original = self.image self.nhits += 1 else: self.nmisses += 1Replacing the mouse cursor: All the steps necessary to replace the mouse cursor were already covered. Except making the mouse cursor invisible:
pygame.mouse.set_visible(False)
A screenshot of the game is shown as follows:

The complete code for this example can be found in the code bundle of this book.
We learned a bit about collision detection, the mouse cursor, and rectangles in this recipe:
|
Function |
Description |
|---|---|
|
|
This gets the mouse position as a tuple. |
|
|
This creates a bigger rectangle based on an offset. If the offset is negative this results in a smaller rectangle. |
|
|
This checks whether a point is within a rectangle. |
|
|
This hides the mouse cursor. |
Games become more engaging when you are able to play against other people. Usually this means playing over the Internet using some sort of client-server architecture. In the Python world, Twisted is commonly used for this kind of architecture.
Twisted can be installed in several ways depending on your operating system. For more information see https://twistedmatrix.com/trac/wiki/Downloads.
Unfortunately, we cannot create a massive multiplayer game in this tutorial, but we can create a simple client-server setup, which will lay the foundations for a puzzle we will create in a later recipe.
The server: First, we will set up the server, which will echo the message from the client and prepend it with a sequence number:
from twisted.internet import reactor, protocol

class Server(protocol.Protocol):
    def __init__(self):
       self.count = 0

    def dataReceived(self, msg):
         self. count += 1
         self.transport.write("%d %s" % (self.count, msg))


def main():
    factory = protocol.ServerFactory()
    factory.protocol = Server
    reactor.listenTCP(8888,factory)
    reactor.run()

if __name__ == '__main__':
    main()
As you can see the server runs on port 8888 over TCP (see http://en.wikipedia.org/wiki/Transmission_Control_Protocol).
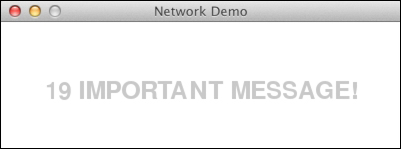
Client setup: The client sends messages over the same port as the server and also shows the messages from the server in a Pygame GUI. We will go over the details in the next section. In a later example we will do more interesting things with this code:
from twisted.internet import reactor, protocol
from pygame.locals import *
import pygame

class Client(protocol.Protocol):
    def __init__(self):
       self.msg = 'Hello'
       self.end_msg = False

    def sendMessage(self, msg):
        self.transport.write(msg)
        self.update(msg)

    def dataReceived(self, msg):
       self.msg = msg

       if msg.startswith("19"):
          self.end_msg = True

    def update(self, msg):
        screen = pygame.display.get_surface()

        screen.fill((255, 255, 255))
        font = pygame.font.Font(None, 36)
        text = font.render(self.msg, 1, (200, 200, 200))
        textpos = text.get_rect(centerx=screen.get_width()/2, centery=screen.get_height()/2)
        screen.blit(text, textpos)
        pygame.display.flip()

        if self.end_msg:
           reactor.stop()

def send(p):
    p.sendMessage("Hello!")

    for i in xrange(1, 20):
      reactor.callLater(i * .1, p.sendMessage, "IMPORTANT MESSAGE!")

def main():
    pygame.init()
    screen = pygame.display.set_mode((400, 400))
    pygame.display.set_caption('Network Demo')

    c = protocol.ClientCreator(reactor, Client)
    c.connectTCP("localhost", 8888).addCallback(send)
    reactor.run()


    while True:
       for event in pygame.event.get():
         if event.type == QUIT:
             return

if __name__ == '__main__':
    main()
We need to start the server, before we can start the client. In the game GUI, you should see Hello being displayed followed by 1 IMPORTANT MESSAGE! to 19 IMPORTANT MESSAGE! as shown in the following screenshot:
We saw in this example how to create a simple server and client with a Pygame GUI. In principle, we can now extend this setup to create a multiplayer game. The details of the Twisted client and server setup are given as follows:
|
Function |
Description |
|---|---|
|
|
This writes a message. In this case we are prepending a sequence number to the message. |
|
|
This creates a Twisted server factory, which itself creates Twisted servers. |
|
|
This listens to port 8888 using the given factory. |
|
|
This starts the server or client. |
|
|
This stops the client or server. |
|
|
This registers a callback function with a parameter to be executed after a specified time in seconds. |
|
|
This creates a Twisted client. |
|
|
This connects the client via TCP on port 8888 and registers a callback function. |
Debugging is one of those things that nobody really likes, but is very important to master. It can take hours, and because of Murphy's law you, most likely, don't have that time. Therefore, it is important to be systematic and know your tools well. After you are done finding the bug and implementing a fix, you should have a test in place. This way at least you will not have to go through the hell of debugging again.
PuDB is a visual full screen, console-based Python debugger that is easy to install. PuDB supports cursor keys and vi commands. The debugger can also be integrated with IPython, if required.
In order to install puDB, we only need to execute the following command:
sudo easy_install pudb
To debug the collision demo code, type the following command on the command line:
python -m pudb collision_demo.py
The following screenshot shows the most important debugging commands at the top:
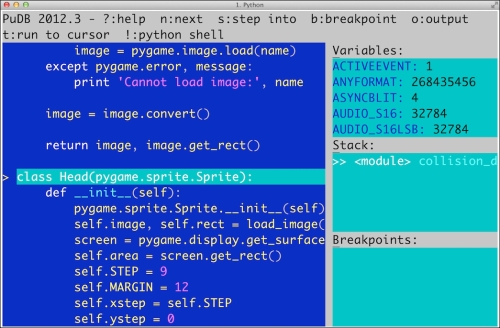
We can also see the code being debugged, variables, the stack, and the defined breakpoints. Typing q exits most menus. Typing n moves the debugger to the next line. We can also move with the cursor keys or vi J and K keys to, for instance, set a breakpoint by typing b.
Performance is important for games, luckily there are many Python profiling tools. Profiling is about building a profile of a software program in order to collect information about memory usage or time complexity.
cProfile is a C extension introduced in Python 2.5. It can be used for deterministic profiling. Deterministic profiling means that the time measurements are precise and no sampling is used. Contrast this with statistical profiling, where measurements come from random samples.
The following steps will help you profile your code:
Creating a profile file: We will profile the collision demo code and store the profile output in a file as follows:
python -m cProfile -o collision_demo.profile collision_demo.py
The pstats browser: After creating the file, we can view and sort the data in a special command-line browser:
python -m pstats collision_demo.profile
Welcome to the profile statistics browser.
Getting help: Being able to get help is always a good thing, just type the following commands at the command line:
collision_demo.profile% help

Documented commands (type help <topic>):
========================================
EOF  add  callees  callers  help  quit  read  reverse  sort  stats  strip
Sorting: We can sort with the following
sortcommand:collision_demo.profile% sort Valid sort keys (unique prefixes are accepted): stdname -- standard name nfl -- name/file/line pcalls -- call count file -- file name calls -- call count time -- internal time line -- line number cumulative -- cumulative time module -- file name name -- function name
Top 3 called functions: We can get the top 3 called functions by sorting and calling
stats:collision_demo.profile% sort calls collision_demo.profile% stats 3 380943 function calls (380200 primitive calls) in 18.056 seconds Ordered by: call count List reduced from 801 to 3 due to restriction <3> ncalls tottime percall cumtime percall filename:lineno(function) 52156 0.013 0.000 0.013 0.000 {method 'endswith' of 'str' objects} 31505/31368 0.003 0.000 0.003 0.000 {len} 27573 0.022 0.000 0.022 0.000 {method 'lower' of 'str' objects}
We profiled the collision demo. The following table summarizes the profiler output:
|
Column |
Description |
|---|---|
|
|
Number of calls |
|
|
Total time spent in a function |
|
|
Time per call, calculated by dividing the total time by the calls count |
|
|
Cumulative time spent in function and functions called by the function, including recursive calls |
We will pick up where we left in the networking example. This time we will create a puzzle game that lets us guess a word. This is just a prototype mind you. It still needs a lot of polishing.
The following steps will help you to create the intended puzzle game:
Server changes: The changes in the server are pretty trivial. We just check whether we guessed the correct word:
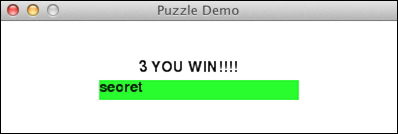
from twisted.internet import reactor, protocol

class Server(protocol.Protocol):
    def dataReceived(self, msg):
         resp = '*' * 20
         print msg

         if msg == 'secret':
            resp = msg

         self.transport.write(resp)


def main():
    factory = protocol.ServerFactory()
    factory.protocol = Server
    reactor.listenTCP(8888,factory)
    reactor.run()

if __name__ == '__main__':
    main()
Client changes: The most important changes are the handling of key presses in an input box and handling of the response from the server. The input box lets us type text, edit it with the Backspace key, and submit with the Enter key. A label above the textbox displays the number of attempts and the game status. We use a Twisted looping callback to update the GUI every 30 milliseconds:
from twisted.internet import reactor, protocol
from pygame.locals import *
import pygame
from twisted.internet.task import LoopingCall

class Client(protocol.Protocol):
    def __init__(self):
       self.STARS = '*' * 20
       self.msg = self.STARS
       self.font = pygame.font.Font(None, 22)
       self.screen = pygame.display.get_surface()
       self.label = 'Guess the word:'
       self.attempts = 0


    def sendMessage(self, msg):
        self.transport.write(msg)

    def dataReceived(self, msg):
       self.msg = msg

       if self.msg != self.STARS:
         self.label = 'YOU WIN!!!!'

       self.update_prompt()

    def update_prompt(self):
        self.screen.fill((255, 255, 255))
        BG = (0, 255, 0)
        FG = (0, 0, 0)

        pygame.draw.rect(self.screen, BG, (100, 200, 200, 20))

        self.screen.blit(self.font.render(self.msg, 1, FG), (100, 200))
        self.screen.blit(self.font.render("%d %s" % (self.attempts, self.label), 1, FG),
              (140, 180))
        pygame.display.flip()

def handle_events(p):
   while True:
      for event in pygame.event.get():
         if event.type == QUIT:
            reactor.stop()
            return
         elif event.type == KEYDOWN:
            key = event.key

            if p.msg == '*' * 20:
               p.msg = ''

            if key == K_BACKSPACE:
               p.msg = p.msg[0:-1]
               p.update_prompt()
            elif key == K_RETURN:
               p.attempts += 1
               p.sendMessage(p.msg)
               return
            elif ord('a') <= key <= ord('z'):
               p.msg += chr(key)
               p.update_prompt()

def send(p):
   p.update_prompt()
   tick = LoopingCall(handle_events, p)
   tick.start(.03)


def main():
    pygame.init()
    screen = pygame.display.set_mode((400, 400))
    pygame.display.set_caption('Puzzle Demo')

    c = protocol.ClientCreator(reactor, Client)
    c.connectTCP("localhost", 8888).addCallback(send)
    reactor.run()

if __name__ == '__main__':
    main()
The following screenshot was taken after guessing the word:
Although this seems to be a pretty extensive recipe, only a few lines of the code might require some explanation:
|
Function |
Description |
|---|---|
|
|
This creates a looping callback. A callback function that is called periodically. |
|
|
This starts the looping callback with a period of 30 milliseconds. |
As the last example, we will simulate life with Conway's Game of Life. The original game of life is based on a few basic rules. We start out with a random configuration on a two-dimensional square grid. Each cell in the grid can be either dead or alive. This state depends on the eight neighbors of the cell. Convolution can be used to evaluate the basic rules of the game. We will need the SciPy package for the convolution bit.
Install SciPy with either of the following two commands:
sudo pip install scipyeasy_install scipy
The following code is an implementation of Game of Life with some modifications:
Clicking once with the mouse draws a cross until we click again
The R key resets the grid to a random state
Pressing B creates blocks based on the mouse position
G creates gliders
The most important data structure in the code is a two-dimensional array holding the color values of the pixels on the game screen. This array is initialized with random values and then recalculated in the game loop. More information about the involved functions can be found in the next section. As previously mentioned, the following is the code:
import os, pygame
from pygame.locals import *
import numpy
from scipy import ndimage

def get_pixar(arr, weights):
  states = ndimage.convolve(arr, weights, mode='wrap')

  bools = (states == 13) | (states == 12 ) | (states == 3)

  return bools.astype(int)

def draw_cross(pixar):
   (posx, posy) = pygame.mouse.get_pos()
   pixar[posx, :] = 1
   pixar[:, posy] = 1

def random_init(n):
   return numpy.random.random_integers(0, 1, (n, n))

def draw_pattern(pixar, pattern):
     print pattern

     if pattern == 'glider':
      coords = [(0,1), (1,2), (2,0), (2,1), (2,2)]
     elif pattern == 'block':
      coords = [(3,3), (3,2), (2,3), (2,2)]
     elif pattern == 'exploder':
      coords = [(0,1), (1,2), (2,0), (2,1), (2,2), (3,3)]
     elif pattern == 'fpentomino':
      coords = [(2,3),(3,2),(4,2),(3,3),(3,4)]


     pos = pygame.mouse.get_pos()

     xs = numpy.arange(0, pos[0], 10)
     ys = numpy.arange(0, pos[1], 10)

     for x in xs:
        for y in ys:
           for i, j in coords:
               pixar[x + i, y + j] = 1


def main():
    pygame.init ()

    N = 400
    pygame.display.set_mode((N, N))
    pygame.display.set_caption("Life Demo")

    screen = pygame.display.get_surface()

    pixar = random_init(N)
    weights = numpy.array([[1,1,1], [1,10,1], [1,1,1]])

    cross_on = False

    while True:
       pixar = get_pixar(pixar, weights)

       if cross_on:
          draw_cross(pixar)

       pygame.surfarray.blit_array(screen, pixar * 255 ** 3)
       pygame.display.flip()

       for event in pygame.event.get():
         if event.type == QUIT:
             return
         if event.type == MOUSEBUTTONDOWN:
            cross_on = not cross_on
         if event.type == KEYDOWN:
            if event.key == ord('r'):
               pixar = random_init(N)
               print "Random init"
            if event.key == ord('g'):
               draw_pattern(pixar, 'glider')
            if event.key == ord('b'):
               draw_pattern(pixar, 'block')
            if event.key == ord('e'):
               draw_pattern(pixar, 'exploder')
            if event.key == ord('f'):
               draw_pattern(pixar, 'fpentomino')


if __name__ == '__main__':
    main()
Note
You should be able to view a screencast on YouTube at https://www.youtube.com/watch?v=NNsU-yWTkXM.
A screenshot of the game in action is shown as follows:
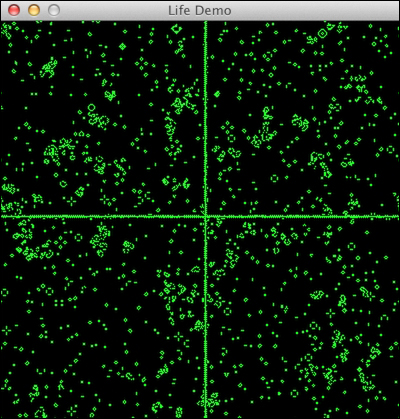
We used some NumPy and SciPy functions that need explaining:
|
Function |
Description |
|---|---|
|
|
This applies the convolve operation on the given array, using weights in wrap mode. The mode has to do with the array borders. See http://en.wikipedia.org/wiki/Convolution for the mathematical details. |
|
|
This converts the array of Booleans to integers. |
|
|
This creates an array from |
