This book is intended to serve as a hands-on reference manual for Windows Server administrators who are performing migrations from their existing Windows Server 2008 / 2008 R2 environment to Windows Server 2012. In this book, we provide you with many "how-to″ deployment, migration, and administration scenarios. We will also walk you through different scenarios of installing, configuring, and migrating Windows Server 2012 in a real-world environment.
There are many ways to upgrade the current environment to a Windows Server 2012 environment. The in-place upgrade and migration are two key approaches. The in-place upgrade refers to the upgrade of your current server to a new state or operating system without reinstalling or reconfiguring the software or hardware components. The migration approach introduces a new server or operating system on a new hardware platform, and moves/migrates all existing resources into the new server. Both of these options have pros and cons. If you are performing an in-place upgrade, you need to make sure all the hardware, software, and applications support the new operating system. Microsoft Windows Server 2012 is only available in 64-bit. Since the in-place upgrade does not provide you with an option to select the components or the data you need to migrate, this process is often called the garbage-in and garbage-out method. The migration scenario involves more processes than just upgrading the operating system. It requires an actual migration process for all existing resources in the environment. It also requires additional hardware which can lead to more operational and maintenance costs during the migration or coexistence period. If a business can afford the cost of the new hardware, the migration approach is a safer and cleaner method than performing an in-place upgrade.
The focus of this book is on the migration approach. It provides a step-by-step instruction on migrating the existing services into a new Windows Server 2012 environment using native tools available on Windows Server 2012. The flow of the book is to provide you the administration and deployment details first, and then the migration details of various services. The goal is to have a complete Windows Server 2012 environment after the migration. This can be achieved by migrating the existing Active Directory domain, network services, file and print servers, and many more onto a Windows Server 2012 server.
The following figure graphically represents the high-level tasks involved in this migration process:

All these details and step-by-step instructions are included in the various recipes of this book in the following order:
Windows Server 2012 Core and GUI installation and configuration
Windows Server 2012 local and remote administration
Active Directory and domain controller migration
Network Services (DNS and DHCP) migration
Data and file server migration
Printer and print server migration
Hyper-V and virtual server migration
Decommissioning old servers and domain controllers
The installation and configuration sections ensure that the new Windows Server 2012 is functional and configured correctly. The migration sections provide you the details of migrating existing services into the previously configured server. The Decommissioning old domain controllers (Must know) recipe provides the details of decommissioning old servers and bringing the current infrastructure into a native Windows Server 2012 environment.
Now it is time to start installing servers in your environment. In this recipe, we will start installing Windows Server 2012 in Server Core and later it will be converted to a Server with a GUI. We will cover the following:
Installing Windows Server 2012 with Server Core option
Converting from Server Core to Server with a GUI and vice versa
Basic configuration tasks
Windows Server 2012 is only available as a 64-bit version. So the hardware needs to support this requirement. The following is the minimum hardware requirement for Windows Server 2012:
Processor: 1.4 GHz 64-bit processor
RAM: 512 MB
Hard disk: 32 GB
You also need to select the correct edition (Data Center, Standard, Essential, or Foundation) of the server based on your business and technical requirements.
Note
The preceding hardware requirement is an absolute minimum requirement to install Windows Server 2012. The actual hardware and software requirements will vary based on the environment and the types of application you are going to support. It is recommended to perform a capacity planning session with various team owners before you finalize the hardware and server edition. Upgrade from the same server edition of Windows Server 2008 and Windows Server 2008 R2 to Windows Server 2012 is supported. Also, the Essentials and Foundation versions of Windows Server 2012 are on a separate install DVD.
Boot the server from the Windows Server 2012 CD.
Like other operating system (OS) installations, in the first screen you will see an option to select Language to Install, Time and Currency Format, and Keyboard of input method. Select the correct options based on your region. Click on Next.
Click on Install Now in the next window to continue the installation.
As shown in the following screenshot, you will see the Server Core Installation and Server with a GUI options. For this installation, I will select Server Core Installation. Click on Next.

Accept the license agreement. Click on Next.
Since this is a new installation, you need to select the Custom: Install Windows Only (advanced) option. For an upgrade, select the Upgrade: Install Windows and keep files, settings, and applications option. Click on Next.
Select the drive where you want to install the operating system. Click on Next.
Note
Use the advanced option to format the drive, change the partition size, load drivers, and so on.

Select the drive where you want to install the operating system. Click on Next. The installation process will start at this point. The installation process is categorized into five different stages: Copying Windows Files, Getting files ready for installation, Installing features, Installing updates, and Finishing up.
The server will be rebooted after the initial installation. After the reboot, the server will prompt you to enter a password for the built-in Administrator account. Enter a new password and click on OK to complete the installation.
As I mentioned before, the default install option is Server Core. The previously mentioned procedure completes the installation of Windows Server 2012. At this point this server will be a standalone server.
In Windows Server 2012, you can use the Setres (Set Resolution) command to change the default command windows resolution. Now you have completed the installation of a Server Core operating system (OS). Before we start configuring this server, I will explain the process of converting this server into a Server with a GUI option.
You have a few options using PowerShell, Server Manager, Deployment Image Servicing and Management (DISM) tool, and a few others to convert a Server Core into Server with a GUI and vice versa. In this book I will be explaining a procedure using Windows PowerShell. The following recipe explains these details.
The minimum hardware and software requirements for a Server with a GUI is the same as a Server Core, which is described in the previous recipe.
Log on to the Windows Server 2012 core server with administrative credentials.
Start the PowerShell console from the command window by typing the command
PowerShell.From the PowerShell prompt, enter
Install-WindowsFeature Server-Gui-Mgmt-Infra, Server-Gui-Shell –Restart.Note
You can install multiple features in a single command line by separating these features by a comma.

The Install-WindowsFeature Server-Gui-Mgmt-Infra, Server-Gui-Shell cmdlet installs Server-Gui-Mgmt-Infra and Server-Gui-Shell Windows features on the Server Core. The –Restart parameter will force to reboot the server after the installation. After the reboot the server will be converted to a Server with a GUI.
In the preceding procedure, we were using Windows Update as the source instead of a Windows Imaging File (WIM). Alternately, you can mount the WIM file locally to install additional features without accessing the Windows Update Service by using the –Source parameter in the previous cmdlet.
This recipe explains the procedure to convert the Server with a GUI into Server Core using a PowerShell cmdlet.
The minimum hardware and software requirements for a Server with a GUI is the same as a Server Core which is described in the previous recipe.
Log on to the Windows Server 2012 server with administrative credentials.
Start the PowerShell console from the command window by typing the command
PowerShell.From the PowerShell prompt, enter the
Uninstall-WindowsFeature Server-Gui-Mgmt-Infra –restartcmdlet.Restart the server.
The preceding process uninstalls the Server-Gui-Mgmt-Infra feature and the associated components from the server. If you are not sure which components will be affected by this cmdlet, you can use the –whatif parameter with the previous command.
As you can see in the following screenshot, if we use the previous command, it will remove Graphical Management Tools and Infrastructure, Server Graphical Shell, User Interfaces and Infrastructure, and Windows PowerShell ISE.

You can specify a –Remove option with the preceding command to remove the installation binaries from the hard drive (disabled with payload removed). If you don′t specify the –Remove option, the installation binaries will remain in the Windows Side-by-Side (WinSxS) folder. It can be used for future use without using an installation media or getting it from Windows Update.
You can verify the installation type by validating the ServerCore, ServerCoreExtended, Server-Gui-Mgmt, and Server-Gui-Shell registry values in the HKEY_LOCAL_MACHINES\SOFTWARE\Microsoft\WindowsNT\CurrentVersion\Server\ServerLevels registry hives. These registry keys will be added based on the features installed on the server.
A Windows Server with a GUI will have ServerCore, ServerCoreExtended, Server-Gui-Mgmt, and Server-Gui-Shell registry keys as shown in the following screenshot. The Server Core will only contain the ServerCore registry key.

You can also use Server Manager from a local or remote machine to add or remove a feature on a server. The Deployment Image Servicing and Management (DISM) command Enable-WindowsOptionalFeature –online -Featurename ServerCore-FullServer, Server-Gui-Shell, Server-Gui-Mgmt can also be used to install additional features on a server.
After the initial server installation, you need to configure the server with correct IP address, name, and so on before you start deploying new roles onto this server. Most of these components can be configured using Control Panel or Server Manager, which can be directly opened from the Start window of the server. As an Administrator, you need to get familiarized with the new Start window and Server Manager, so I would recommend you to configure these tasks using these options.
The following are some of the recommended administrative tasks which you can include in your server configuration checklist:
Configure a static IP address, disable used network card, and so on
Rename the default computer name
Change/validate the time zone
Activate the operating system
Install updates and patches
Install an antivirus software
Enable RDP/remote administration options
Join the computer to the domain
Note
Some of these tasks can be automated through domain/Group Policy Objects or some other deployment mechanism.
The configuration options for the Server Core are the same as in Windows Server 2008 and Windows Sever 2008 R2.
Log on to Windows Server 2012 Server with a GUI with administrative credentials.
From the Start screen select Control Panel. As you can see in the following screenshot, most of these components can be configured using Control Panel.

Note
Joining a Windows Server 2012 to your existing domain doesn′t require an Active Directory Schema upgrade. However, you need to upgrade the schema if you are planning to add Windows Server 2012 as a domain controller. You will see these details in the Active Directory migration (Must know) recipe of this book.
The computer name and IP Address can be changed from Server Manager as shown in the following screenshot:
From Server Manager, select Local Server in the left node.
Change the Name, Workgroup, and so on from this window.

When you select the Computer name or Workgroup options from the Server Manager dashboard, it will bring up the old-fashioned System Properties window, where you can change the server properties.
To configure Windows Server 2012 Server Core, enter the
sconfig(Server Configuration) command from the command prompt.This will bring up the Server Configuration wizard as shown in the following screenshot. From this window, you can change Name, Workgroup, and so on.

The Server Manager in Windows Server 2012 Server with a GUI and sconfig (Server Configuration Wizard) in Windows Server 2012 Server Core, allows you to modify the default server name, IP address, and so on to customize the system based on your requirement.
Most of these configurations can also be completed using PowerShell. Since the primary scope of this book is about migrating from Windows Server 2008/R2 to Windows Server 2012, we won′t be including the detailed server configuration steps in this book.
I believe now we have a fully functional Windows Server 2012 in the existing Active Directory domain. The next recipe will cover some of the basic administration tasks before we explain the migration procedure in the later recipes of this book.
In this recipe, we will explain the new features and options available in Windows Server 2012 to manage and administer remote or local servers. This recipe also covers some of the deployment tasks that are relevant for migrating Windows Server 2008/R2 to Windows Server 2012.
Like other operating systems, Remote Server Administration Tools (RSAT) is available in Windows Server 2012 also. This tool pack includes administration tools, PowerShell cmdlets, and other utilities to manage and administer local and remote servers. This is a feature in Windows Server 2012. It can be added by using the Add Roles and Features wizard from Server Manager.
In this recipe, I will explain a procedure to deploy Remote Server Administration Tools.
Open Server Manager.
From the Manage tab in the top-right section of the screen, select Add Roles and Features.

Click on Next in the Add Roles and Features Wizard window.
In the Select Installation Type window, select Role-based or Feature-based installation. Click on Next.
In the Select destination server window, select the Select a server from the server pool option and select the server names where you want to deploy the administrative tools. Click on Next.
Click on Next on the Select server roles window.
In the Select features window, select Remote Server Administration Tools. It will prompt you to add the required components such as IIS and so on. Click on Next.

In the Confirm Installation window, select the Restart the destination server Automatically if required option. Click on Install.
You will see progress in the Installation Progress window. The window can be closed but the installation will continue in the background. You can get the status update in the notification section in the Server Manager window. You can also export the configuration into an XML file by selecting the Export Configuration Setting hyperlink in the bottom of the page.
Click on Close when the installation finishes.
In the background, Server Manager uses standard Windows Management Instrumentation (WMI), PowerShell, and the Distributed Component Object Model (DCOM) to add or remote roles and features to local or remote servers.
Most of these administrative tools will be added to the Start screen of the Windows Server 2012. Other tools can be opened by typing the command in the Start screen itself or you will see some of these administrative tools in the Tools menu in the Server Manager window as shown in the following screenshot:

The Remote Server Administration Tools is available for Windows 8 operating systems as a standalone executable application. This can be downloaded from the Microsoft website. It is available for both 32-bit and 64-bit systems.
In Windows Server 2012, understanding the Server Manager dashboard and its capabilities are essential for an administrator to efficiently manage the servers. The Server Manager starts automatically on a Windows Server 2012 server when the user has local administrator permission. You can change this default behavior by modifying the properties. These details are explained in the following recipe.
If the Server Manager does not open automatically, you can manually open it from the taskbar by clicking on the Server Manager icon as shown in the following screenshot:

By default, the Server Manager polls the information every 10 minutes. However, you can change this configuration from the Server Manager Properties window as explained in the following recipe.
Open Server Manager.
From the Manage tab on the top–right section of the screen, select Server Manager Properties.
In the Server Manager Properties window, you can change the refresh period in minutes.
You will also see an option to disable the Server Manager startup option during the system restart.


The Server Manager Properties window allows you to change the default time interval. The allowed values are from 1 to 14400 minutes. If you want to get a real-time alert, you can decrease the value.
You can manage Windows Server 2008 and Windows Server 2008 R2 from the Windows Server 2012 management console. However, the functionality will be limited. The Windows .NET Framework 4 and Management Framework 3 should be installed on the server running the Windows Server 2008 or Windows Server 2008 R2 operating system in order to get the update from these servers onto the new Server Manager.
In Windows Server 2012, you have an option to manually add servers to the Server Manager. The following recipe explains this procedure.
Open Server Manager.
From the Manage tab on the top-right section of the screen, select Add Server.
You can add servers from the Active Directory, DNS, or Import tab as shown in the following screenshot:

Select the appropriate servers using the right arrow button and click on OK. You will see these new servers in the Server Manager dashboard.
Note
At a later stage, unwanted servers can be removed from the list by right-clicking and selecting the Remove Server option from the Server Manager dashboard.

The Server Manager uses XML-based configuration files to maintain the list of the servers. These configurations and custom settings are stored in the %appdata%\Microsoft\Windows\ServerManager\ServerList.xml and %appdata%\Microsoft\Windows Client\1.0\user.config files. These settings can be exported to other servers by copying these files to other servers.
With the new server group concept, you can now manage and administer local and remote servers based on roles, features, or custom categories. Server group supports Windows Server 2012, Windows Server 2008/R2, and Windows Server 2003 operating systems (OS). The following recipe explains these procedures.
Open Server Manager.
From the Manage tab on the top right, select Create Server Group.
Enter a name for the group in the Server Group Name box.
You can add servers from the Active Directory, DNS, or Import tab.
Select the appropriate servers using the right-hand side arrow button and click on OK. You will see this new group in the Server Manager dashboard.
More servers can be added to an existing server group by selecting the Edit Server Group option from the Server Manager dashboard.

The Remote Desktop Protocol (RDP) is a common method used in server administration. In Windows Server 2012, the new Server Manager is capable of remotely managing multiple servers. However, in certain instances, the administrators have to remotely login to these servers using a remote desktop connection. This procedure is explained in the following recipe:
From the Start window, right-click My Computer and select Properties.
This will bring up the old-fashioned System Properties page.

Select Remote Settings from the left-hand side page.
From the Remote tab, you can modify the remote desktop configuration.
Additional roles and features can be deployed onto local or remote machines using the same procedure described in the Installing Administration Tools (Must know) recipe of this book. In this recipe we will explain a procedure to remove roles and features using Server Manager.
Open Server Manager.
From the Manage tab, select the Remove Roles and Features option.

Click on Next on the Remove Roles and Features Wizard window.
In the Select Destination Server window, select the Select a server from the server pool option and select the appropriate server name and click on Next.
Click on Next in the Select server roles window.
Select the appropriate server roles. In this example I am planning to remove graphical tools. So in the Remote Features window, uncheck Graphical Management Tools and Infrastructure and Server Graphical Shell. Uninstalling Graphical Management Tools and Infrastructure will automatically uninstall Server Graphical Shell and Windows PowerShell ISE. Click on Next. Server Manager will automatically detect the dependent software and uninstall them if necessary.
On the Confirm Removal selection, select Restart the destination Server automatically if required checkbox and accept the warning message. Click on Remove.
The preceding procedure adds or removes roles and features from a local or remote server. You can deploy multiple roles and features to multiple servers using this procedure.
In the previous 10 recipes, I have explained the Windows Server 2012 installation, configuration, and administration details. With this knowledge, it is now time for you to prepare and migrate your existing environment using Windows Server 2012. In the next few recipes, I will be explaining the details of migrating all services from the current operating system into Windows Server 2012.
We will start with the Active Directory migration. At this point, we have the proven migration plan and tested all procedures in the lab.
The following prerequisites have to be met before we can introduce the first Windows Server 2012 Domain Controller into the existing Active Directory domain:
In order to add a Windows Server 2012 Domain Controller, the Forest Functional Level (FFL) must be Windows Server 2003.
ADPREP is part of the domain controller process and the schema will get upgraded during this process. So the account must have the Schema and Enterprise admins privileges to install the first Windows Server 2012 Domain Controller.
If there is a firewall between the new server and the existing domain controllers, make sure all the RPC high ports are open between these servers. The domain controller installation and replication can be controlled by a static or a range of RPC ports by modifying the registry on the domain controllers.
The new Windows 2012 server′s primary DNS IP address must be the IP address of an existing domain controller.
The new server must be able to access the existing Active Directory domain and controllers by NetBIOS and Fully Qualified Domain Name (FQDN).
If the new domain controller will be in a new site or in a new subnet, make sure to update the Active Directory Sites and Services with this information.
In Windows Server 2012, domain controllers can be remotely deployed by using the Server Manager. The following recipe provides the step-by-step instructions on how to deploy a domain controller in an existing Active Directory environment.
Install and configure a Windows Server 2012. Refer to the recipes Installing Windows Server 2012 (Must know) and Configuring Windows Server 2012 (Must know) for more details.
Join the new Windows Server 2012 to the existing Active Directory domain. Refer to the recipe Configuring Windows Server 2012 (Must know) for more details.
Open Server Manager. Navigate to the All Servers group in the left-hand side pane.
From the Server Name box, right-click on the appropriate server and select the Add Roles and Features option. You can also select Add Roles and Features from the Manage menu in the command bar. If the correct server is not listed here, you can manually add it from the Manage tab on the top right-hand side and select Add Server.

Click on Next on the Welcome window.
In the Select Installation Type window, select Role based or Feature based installation. Click on Next.
In the Select destination server window, select Select a server from the server pool option and the correct server from the Server Pool box. Click on Next.

On the Select server roles window, select Active Directory Domain Services. You will see a pop-up window to confirm the installation of Group Policy Management Tool. It is not required to install the administrative tools on a domain controller. However, this tool is required for the Group Policy Object management and administration. Click on Next.

Click on Next in the Select features window.
Click on Next on the Active Directory Domain Services window.
In the Confirm Installation Selections window, select the Restart the destination server automatically if required option. In the pop-up window click on Yes to confirm the restart option and click on Install. This will begin the installation process.
You will see the progress on the installation window itself. This window can be closed without interrupting the installation process. You can get the status update from the notification section in the command bar as shown in the following screenshot:

The Post-deployment Configuration option needs to be completed after the Active Directory Domain Services role installation. This process will promote the new server as a domain controller.
From the notification window, select Promote this server to a domain controller hyperlink.
From the Deployment Configuration window, you should be able to:
Install a new forest
Install a new child domain
Add an additional domain controller for an existing domain
Specify alternative credentials for the domain controller promotion, and so on
Since our goal is to install an additional domain controller to an existing domain, select the Add a domain controller to an existing domain option. Click on Next.

In the Domain Controller Options window, you will see the following options:
Domain Name System (DNS) server
Global Catalog (GC)
Read only Domain controller (RODC)
Site name:
Type the Directory Service Restore Mode (DSRM) password

Select Domain Name System (DNS) server and Global Catalog (GC) checkboxes and provide the Directory Services Restore Mode (DSRM) password. Click on Next.
Click on Next on the DNS Options window.
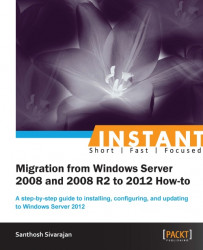
In the Additional Options window you will see the following options:
Install from media
Replicate from
Accept the default options unless you have technical reasons to modify these. Click on Next.
In the Paths window, you can specify the AD Database, Log, and SYSVOL locations. Select the appropriate locations and then click on Next.
Click on Next on the Preparation Options window. During this process the Active Directory Schema and Domain Preparation will happen in the background.
You should be able to review the selected option on the next screen. You can export these settings and configurations to a PowerShell script by clicking on the View Script option in the bottom-right corner of the screen. This script can be used for future domain controller deployments.

Click on Next to continue with the installation.
The prerequisite checking process will happen in the background. You will see the result in the Prerequisites Check window. This is a new enhancement in Windows Server 2012. Review the result and click on Install.

The progress of the domain controller promotion will display on the Installation window.
The following warning message will be displayed on the destination server before it restarts the server:

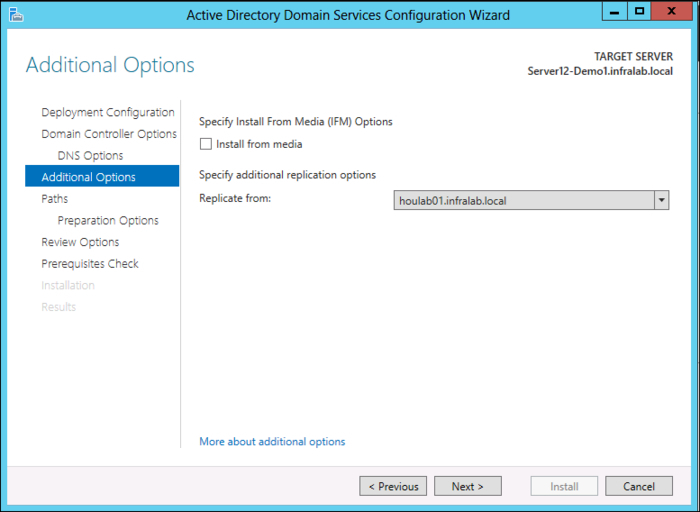
The preceding process adds an additional domain controller in the exiting Active Directory forest. At this time the current Active Directory environment has both Windows Server 2008/R2 and Windows Server 2012 domain controllers. This is technically called a mixed mode environment. The Server Manager will be updated with the new roles and features on this server as shown in the following screenshot:
If you are planning to perform an in-place upgrade of a domain controller (the first Windows Server 2012 Domain Controller), the Active Directory Schema and Domain Preparation (ADPREP) commands need to be run manually. The ADPrep.exe tool is available in the D:\Support\Adprep\ folder in the Windows Server 2012 installation media. Keep in mind that the ADPREP tool is only available in a 64-bit version. After the schema upgrade, the schema version can be manually verified by using the following dsquery command:
dsquery * cn=schema,cn=configuration,dc=domain,dc=com -scope base -attr objectVersion

The objectVersion value is 56 for the Windows Server 2012 schema.
Note
You can also identify objectVersion based on the LDIF filename. The latest Sch56.ldf filename indicates that schema version as 56. Their files are available in the D:\Support\Adprep\ folder.
The Group Policy Preparation (/gprep) is not a requirement while adding Windows Server 2012 Domain Controllers to the existing domain. However, in order to use the Result Set of Policy (RSoP) in planning mode, the /gprep process needs to be completed by using the adprep/gpprep command. The Read Only Domain Controller Preparation (adprep /rodocprep) process needs to be completed before you can add the Read Only Domain Controllers (RODC).
Note
You can review the ADPREP log file (%windir%\System32\Debug\Adprep\Logs) to get more information about ADPREP-related issues.
The health of the domain controller and domain can be verified by using native tools such as DCDiag. Microsoft has a new tool called ADRELSTATUS (Active Directory Replication Status Tool) to verify and monitor Active Directory replication. As a best practice it is recommended to have multiple domain controllers for the same domain. You can use the same procedure to add more domain controllers. It is also recommended to install Remote Server Administration Tools on a Windows 8 machine to administer Active Directory instead of directly logging on to a domain controller.
Transferring or migrating a Flexible Single Master Operations (FSMO) role is not a requirement at this point. However, some of the new features in Windows Server 2012 such as cloning of virtual domain controllers, and so on, won′t be available until the PDC emulator (PDCe) role is transferred to a Windows Server 2012 Domain Controller. To take advantage of improvements in RID Master, this role must be running on Windows Server 2012 Domain Controller. The placement and optimization of FMSO roles is beyond the scope of this book. For this scenario, we will be moving all FMSO roles (Schema, Domain Naming Master, PDCe, Infrastructure Master, and RID) to a new Windows Server 2012 Domain Controller.
Using PowerShell:
Log on to Windows Server 2012 and open the PowerShell window.
In the PowerShell window enter the following cmdlet:
Move-ADDirectoryServerOperationMasterRole -Identity "DCName″ -OperationMasterRole SchemaMaster,DomainNamingMaster,PDCEmulator,RIDMaster,InfrastructureMasterTo confirm the FSMO transfer, press Y.

Using MMC:
Log on to the Windows Server 2012 Server or Windows 8 machine and open the Active Directory User and Computers (ADUC) MMC.
Right-click on the domain name and select Operations Masters….
In the Operations Masters tab, click on the Change button to transfer the FMSO role to the new Windows Server 2012 Domain Controller. Repeat these steps for transferring the PDC emulator and Infrastructure Master roles.

The forest-specific role—Domain Naming Master—can be transferred using Active Directory Domains and Trust MMC.
Log on to the Windows Server 2012 or Windows 8 machine and open the Active Directory Domains and Trust console.
Right-click on the Active Directory Domains and Trust node and select Operations Master….
In the Operations Master tab click on the Change button to transfer the Domain Naming Master FMSO role.
The forest-specific role—Schema Master FMSO—can be transferred using the Active Directory Schema MMC. You may need to register schmmgmt.dll using the regsvr32 schmmgmt.dll command in order to view the Active Directory Schema MMC.
Log on to the Windows Server 2012 or Windows 8 machine and open the Active Directory Schema console.
Right-click on the Active Directory Schema node and select Operations Master….
In the Operations Masters tab, click on the Change button to transfer the Schema Master FMSO role.

The Move-ADDirectoryServerOperationMasterRole PowerShell cmdlet is part of the Active Directory PowerShell module. Instead of using FSMO roles, you could use numeric values. For example, 0 for PDC emulator, 1 for RID Master, 2 for Infrastructure Master, 3 for Schema Master, and 4 for Domain Naming Maser.
Alternatively, the NTDSUTIL tool can be used to transfer the FSMO roles. The domain-specific roles—RID, PDC, and Infrastructure Master—can be transferred using the Active Directory User and Computer (ADUC) tool.
The FSMO roles can be verified using the Netdom Query FSMO command as shown in the following screenshot:

The following PowerShell cmdlet can also be used to verify the FMSO roles:
Get-ADDomain domain.com | Format-List PDCEmulator,RIDMaster,InfrastructureMaster
Get-ADForest domain.com | Format-List SchemaMaster,DomainNamingMaster
Some of the migrations can be accomplished by using native and built-in tools. So far we were using the built-in tools to migrate these services. Microsoft has included the latest version of the Windows Server Migration Tools in Windows Server 2012. We will be using this tool in the rest of the migrations. These are PowerShell cmdlets and are part of the Windows Server Migration Tools PowerShell module. In Windows Server 2008 and Windows Server 2008 R2, the source and target server have to be in the same subnet to migrate data using this tool. However, the new version of the Server Migration tool supports cross-subnet migrations. The TCP and UDP ports 7000, 7001, and 7002 must be open between source and target servers to support this scenario.
The following key PowerShell cmdlets will be used for this migration effort:
Export-SmigServerSetting: Export role, feature, and so on from the source server to a target serverImport-SmigServerSetting: Import role, feature, and so on from an export fileSend-SmigServerData: Send/migrate data and its associated permissions, properties, and so on from the source serverReceive-SmigServerData: Receive/copy data and its associated permissions, properties, and so on to the target server
It is time to install Windows Server Migration Tools on the Windows Server 2012. It is a best practice to use the latest version of the tool even if the older versions are available on the source servers.
Log on to a Windows Server 2012.
Open Server Manager. From Server Manager, install the Windows Server Migration Tools feature. Refer to the Add and remove roles and features (Must know) recipe for role and feature installation details.

From the Start screen, right-click on Command Prompt and select the Run as administrator option.

Change the directory to
C:\Windows\System32\ServerMigraitonTool. Run theSmigDeploy.exe /Package /Architecture amd64 /os WS08 /Path /C:\MigTools\command. This will create a migration tool package for 64-bit servers in theC:\MigToolsfolder.
Note
The SmigDeploy.exe tool creates a migration tool installation package. This package can be directly copied over to the source Windows Server 2008 and Windows Server 2008 R2 servers. Copy the C:\MigTools folder to a network share. We will be using this migration package for the rest of the migrations.
Copy the C:\MigTools folder to a network share. For this scenario, I will be copying the C:\MigTools folder to the \\HOU-MGR-01 server and this will be referenced in the migrations described in this book.
At this point the Windows Server Migration Tools for a 64-bit server is available on a network share. This package can be copied to the source and target servers for the migration. No other configuration is required. The necessary parameters will be configured based on the role or feature that we will migrate.
If you have a 32-bit server, you can generate a 32-bit installation package by modifying the /Architecture parameter in the preceding command.
In this recipe I will explain a procedure for migrating DHCP scope and lease information using the Windows Server Migration Tools. Migrating infrastructure services such as DHCP, DNS, WINS, and so on will have some impact on network operations. So make sure to schedule a maintenance window and place proper change control before you perform these activities.
If the DHCP role is not installed on the target server, the Windows Server Migration Tools will install it during the migration process. However, in this scenario, we will be manually installing the DHCP role and authorizing the DHCP server in Active Directory.
The following diagram explains the high level steps involved in this migration:

Log on to Windows Server 2012.
Open Server Manager. From the Server Manager option, install the DHCP Server role. Refer to the Add and remove roles and features (Must know) recipe for roles and feature installation details.

From the DHCP Admin console, authorize the new DHCP server in Active Directory.
Log on to the source DHCP server. Copy the migration tool package from
\\HOU-MGR-01\MigToolstoC:\MigTools.Stop the DHCP Server service.
Open Command Prompt with elevated permission and navigate to the
C:\MigToolsfolder. Run theSmigDeploy.execommand. This will register the migration tool on the source server and open a PowerShell window as shown in the following screenshot:
The next step is to export the current DHCP configuration from the source server. From the PowerShell window type
Export-SmigServerSetting –FeatureID DHCP –Path C:\DHCPExport\cmdlet. It will prompt you for a password for the export file. Hit Enter to continue with the export process. The export file will be in theC:\DHCPExportfolder.
Copy this export file (
C:\DHCPExport\svrmig.mig) over to the target Windows Server 2012 DHCP server.The next step is to import this file onto the new DHCP server. Log on to the target Windows Server 2012 server and open Windows Server Migration Tools from the Start window as an administrator. If this role is not locally installed on the server, you can copy the installation package from the
\\HOU-MGR-01\MigToolsfolder and run theSmigDeploy.exetool.
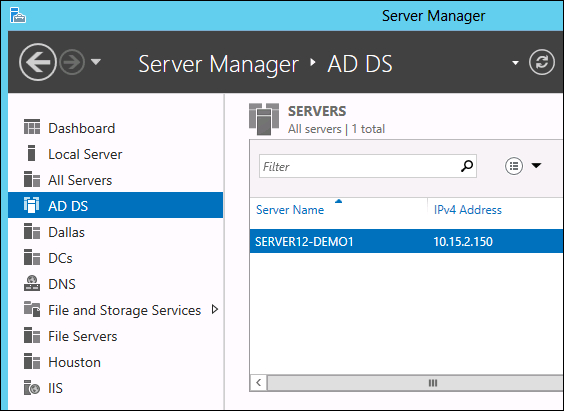
From the PowerShell window, run the
Import-SmigServerSetting –FeatureID DHCP –Path D:\DHCPExportcmdlet and hit Enter. You need to provide only the folder name.As I mentioned before, if the DHCP feature was not installed, the migration tool will install this feature as shown in the following screenshot:

Since we already installed the DHCP feature, it will start the import process. You need to provide the same password as configured in the export process.
The new server needs to be restarted after the import process has completed.
The preceding process migrates DHCP information onto the new Windows Server 2012 server. At this point the new DHCP server will have all the DHCP scope and lease information.
You can verify the scope and lease information from the DHCP admin console. The IP helper address on the router has to be changed with the new DHCP server′s IP address if it is configured with the old DHCP server′s IP address. Once you verified these configurations, the old DHCP server can be decommissioned. Windows Server 2012 provides high-availability and failover capability for DHCP. You may want to take advantage of this new feature right away.
The DHCP scope and lease information can also be migrated using Netsh Export and Netsh Import commands.
If the DNS zone is Active Directory Integrated (ADI), the zone information will be replicated as part of the Active Directory replication. The scope of the replication is based on the Replication configuration in the zone itself as shown in the following screenshot:

If the zone is Active Directory Integrated and the proper replication scope is configured, you don′t need to perform any other migration for the DNS zone. Both forward lookup and reverse lookup zones will replicate to the new Windows Server 2012 Domain Controller during the Active Directory replication.
However, if you have a primary or secondary zone on a standalone server or a member server, you need to perform a migration. There are many ways to achieve this. One option is to perform the migration using a secondary to primary conversion method. Then decommission the old DNS server. Before the DNS zone can be replicated, you need to make sure that the zone transfer is allowed to the new Windows Server 2012 server. These settings can be changed from the Zone Transfers tab as shown in the following screenshot:

To migrate a DNS zone using the secondary to primary method, refer to the following recipe.
Create a secondary zone on the new Windows Server 2012 server.
Open the DNS Management console.
Right-click on the Forward Lookup Zone node. Click on New Zone.
Click on Next on the Welcome window.
Select Secondary Zone as the Zone Type. Click on Next.
Enter the zone name. Click on Next.
On the Master DNS Servers window, enter the IP address of the primary DNS server.
Click on Finish.
Convert the secondary zone to primary zone.
Verify that the zone information has been completely transferred over to the new server.
Right-click on the zone and go to Properties.
From the General Tab, click on Change. Select the zone type as Primary. Click on OK.
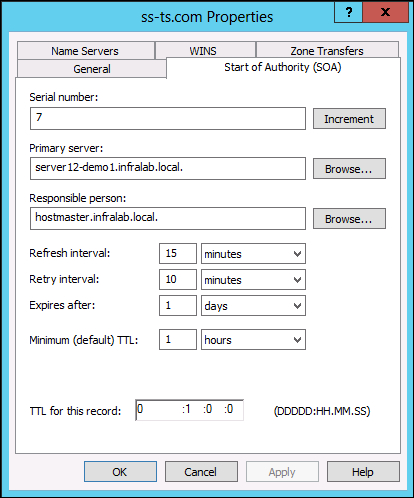
Verify the Start of Authority (SOA) tab and make sure that the primary server is updated with your new Windows Server 2012 name.
Verify the Name Servers tab for name servers.
Repeat the same procedure for other DNS zones and decommission the old DNS server.
The preceding method creates a secondary DNS zone on Windows Server 2012 and converts them to a primary DNS zone after the zone replication. After the DNS zone conversion, Windows Server 2008/R2 and Windows Server 2012 servers will have the Primary DNS zone.
The other option is to use the dnscmd command. The following commands can be used to export and import zone information between two DNS servers:
Export - dnscmd /zoneexport <ZoneName> <ExportFileName>
Import - dnscmd /zoneadd /Primary /File < ExportFileName>
The dnscmd command is still available on Windows Server 2012. However, this command may be discontinued in the future versions of the product or release. So it is recommended to use the PowerShell cmdlet for the future use. The DnsServer PowerShell module has many cmdlets which can support DNS migration scenarios.
Unless you have valid business and technical requirements, it is a best practice to use the Active Directory Integrated zone. Also, you may want to look at the DNS Security Extensions (DNSSEC) in Windows Server 2012 and how it can be beneficial to your environment.
File server or data migration can be achieved by migrating the data from the existing server using tools such as Microsoft Robocopy and Microsoft File Server Migration Tool (FSMT), or directly presenting the storage Logical Unit Number (LUNs) onto a new server. In this scenario, I will be explaining the data migration procedure using Windows Server Migration Tools. Send-SmigServerData and Receive-SmigServerData are the two PowerShell cmdlets that we will use for this migration.
The Send-SmigServerData cmdlet, as it sounds, is responsible for sending (migrating) data from the source server. This tool can migrate folders, files, permission, share, and so on. However, it doesn′t support migrating any Encrypted File Systems (EFS). Unlike other cmdlets in the Windows Server Migration Tools, the Send-SmigServerData cmdlet does not store the data in a staging area or an export file. It will directly copy over to the target server. So the required ports (7000, 7001, and 7002) must be open between the source and target servers. The Receive-SmigServerData cmdlet has to be running on the target server to be able to receive the migrated data. The Send-SmigServerData and Receive-SmigServerData cmdlets have to be running on the source and target servers at the same time. The default time out value is five minutes, but this value can be changed by modifying the registry.
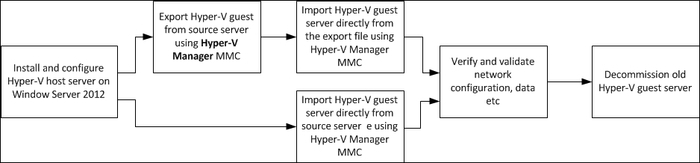
For this migration, we need to run the Send-SmigServerData cmdlet on the source server and Receive-SmigServerData cmdlet on the target server. The following diagram graphically represents the high-level tasks:

The following recipe explains the data migration procedure.
Log on to the source file server and copy the previously created Windows Server Migration Tools package from the
\\HOU-MGR-01\MigToolsfolder toC:\MigToolsfolder on the local server.Open Command Prompt with elevated privilege and navigate to
C:\MigTools.From the
C:\MigToolsfolder, give theSmigDeploy.execommand. This will register the Windows Server Migration Tools on the server and open a PowerShell window as shown in the following screenshot:
If you close the PowerShell window by mistake, you can re-open it from the Windows Server Migration Tools menu in Administrative Tools.
At this time you need to make sure that the users are not connected to the file server or are not accessing the data from this server. If you have any backup or any other software running on this server, make sure to disable them during the migration process.
Run the following cmdlet from the PowerShell window to initiate the migration process:
Send-SmigServerData -ComputerName server12-demo1 -SourcePath ″D:\Hou-Fil-Data-01″ -DestinationPath ″C:\Data\″ -Recurse -Include All –Force
In the preceding command,
–ComputerNameis the target file server,-SourcePathis the location of the source data, and you also need to specify the destination location on the target server by using the–DestinationPathparameter. You have the following three options that can be used with the–Includeparameter:All: This migrates data and shareData: This copies only the files and folders and their associated permissionShare: This copies only the share properties and permission
The
–Forceparameter overwrites the existing files on the target server if the source files are current.It will prompt you for a password. Once it accepts the password you will have five minutes to run the
Receive-SmigServerDatacmdlet on the target server. As you can see in the following screenshot, the source server is waiting for the destination server request to transfer the data.
Log on to the target Windows Server 2012 file server. Copy the Windows Server Migration Tools package from
\\HOU-MGR-01\Migtoolsto theC:\MigToolsfolder.Open Command Prompt with elevated privilege and navigate to
C:\MigTools.From the
C:\MigToolsfolder, type theSmigDeploy.execommand. This will register the Windows Server Migration Tools on the source server and open a PowerShell window.From the PowerShell command window, type the
Receive-SmigServerDatacmdlet. It will prompt you for the same password which you used on the source server.
Once the password is validated, it will copy the data from the source server.

A migration summary report will be generated as shown in the following screenshot:

For migrating printers from a Windows Server 2008 or Windows Server 2008 R2 server to Windows Server 2012, we will be using the Print Management console. This administration tool is part of the Print and Document Services role in Windows Server 2012. This tool can be used to migrate printers from both x86 and x64 servers. If you are migrating printers from a 32-bit server, make sure to install 64-bit drivers prior to the migration. The print drivers, queues, shares, directory listing, and security settings can be migrated using this migration tool. During the migration you will have an option to list (publish) these printers in Active Directory. So if these printers were listed in Active Directory previously, the migration utility can maintain the same configuration after the migration.
The following diagram graphically represents all the high-level tasks:

The following steps will help you migrate printers using the print management console:
Log on to the new Windows Server 2012 server.
Open Server Manager and install the Print and Document Services role. Refer to the Add and remove roles and features (Must know) recipe for role and feature installation details.

On the Select role services window, select the Print Server service. Click on Next and complete the role installation.

Open the Print Management console from the Start screen.
Right-click on the Print Management node and select the Migrate Printers… option.

Select Export printer queues and printer drivers to a file option and click on Next.

On the Select a print server window, select the source print server in the Server name box. Make sure that the account you are using can access the source server from the target server and has full permission on both servers. Click on Next.

The discovery process will identify Print Queues, Print Drivers, and Printer Processors. You will see this information in the Review the list of items to be exported window. Review the items and click on Next to continue.
In the Select file location window, select a destination folder. Click on Next. You will see the progress in the next window. You can also open Printer Migration Events in Event Viewer to get more details as shown in the following screenshot:

Click on Finish to complete the export process.
The next step is to import these printers onto the new Windows Server 2012 print server. Right-click on the Print Management node and select the Migrate Printers… option.
This time, select Import printer queues and printer drivers from a file. Click on Next.

In the Select the file location window, select the export file. Click on Next.
The printer information can be reviewed in the Review the list of items to be imported window. Click on Next.
In the Select a print server window, select the destination Windows Server 2012 print server. Click on Next.

In the Select import options window, you have the fields Import mode and List in the directory:
In Import mode we have Keep existing printers and Overwrite existing printers. Since we are migrating into a new print server, our assumption is that we don′t have any printers available on this new server. So we will select the Overwrite existing printers option.
In List in the directory we have List printers that were previously listed, List all printers, and Do not list any printers. For this scenario, we will select the List printers that were previously listed option. This will automatically update the Active Directory with the new print server information.
Click on Next to start the import process.

Click on Finish to complete the process.
At this point all the printers are migrated onto the new printer server. The migration log and Event Viewer will provide more information about the migration process and result. If you don′t see any errors in any of these logs, you can start decommissioning the old print servers. If the printer mappings or automatic deployment of printer are configured through Group Policy Object or Group Policy Preference, these policies should to be updated with the new printer server information.
Instead of using the Print Management console, you could use the Printbrm.exe command line tools to achieve the same result. By default, these tools are located in the C:\Windows\System32\spool\tools folder. The Printbrm.exe -s <\\SourceServer> -b -f <File> command will export the printers from the source server and the Printbrm.exe -s <\\TargetServer> -r -f <File> command will import printers into the target server.
As you know, in Windows Server 2008 or Windows Server 2008 R2, an export file was a requirement before it can be imported onto a new Hyper-V server. I am sure you are all familiar with the following error message in Windows Server 2008/R2 if the export file is not available:

In Windows Server 2012, Microsoft supports importing virtual machines (VM) into a Hyper-V host without an export (.exp) file. In other words, you can use raw Hyper-V files from the source server. The import and export feature is also available.
Installation and configuration of Windows Server 2012 Hyper-V is beyond the scope of this book. So for this migration scenario, the assumption is that the target Windows Server 2012 Hyper-V servers are in place and running. Before you begin the export and import process, you need to make sure that the local or network share has enough storage space to accommodate these virtual machines. Another common issue related to virtual machine migration is the permission issues. The export/import folder must have full permission for the user and computer account.
The following diagram provides high level task details:
We will start the migration process without an export file.
Shutdown the source Hyper-V guest machine.
Log on to the target Windows Server 2012 Hyper-V server and open Hyper-V Manager from the Start screen.
Right-click on the Hyper-V host server node and click on the Import Virtual Machine option.

In the Before You Begin window click on Next.
In the Locate Folder window, specify the location of the existing virtual machine from the source server. Click on Next.

On the Select Virtual Machine window, select the correct server name. Click on Next.
You will see the following options on the Choose Import Type window:
Register the virtual machine in-place (use the existing unique ID)
Restore the virtual machine (use the existing unique ID)
Copy the virtual machine (create a new unique ID)
Click on Next.

In the Choose Folders for Virtual Machine files window, you can change the default location of the Configuration, Snapshot store, and Smart Paging folders. Click on Next.
In the Choose Folders to Store Virtual Hard Disks window, select the location of the hard disks. Click on Next.
Review the configuration details on the Summary window. Click on Finish. The import process will start and you will see the progress in the Hyper-V manager console.
For some reason, you cannot directly import the Virtual Machines from the source server, the export and import method is also available in Hyper-V 3.0. The following steps explain the procedure of exporting a virtual machine from an existing Hyper-V server:
Log on to the source Hyper-V server. Open Hyper-V Manager console.
Shutdown the Hyper-V guest server.
From the Virtual Machines column, select the virtual server you want to export.
From the Action pane, select Export.

In the Export path window, enter the location for the export file. Click on Export.
This process will generate an export (
.exp) file which can be used to import virtual machines into the target Windows Server 2012 Hyper-V server.The import process is the same as mentioned previously in this recipe.
Turn on the target guest machine and verify the settings.
Depending on the network configuration, you may need to reconfigure the network settings for the new virtual server. Repeat the same procedure for the other virtual machines on the network to complete the migration.
If you are using VMWare, the Microsoft Virtual Machine Converter can be used to convert VMware servers into Hyper-V format. It is a standalone application and can convert the entire virtual machine, which includes the following:
Disk
Network
Configuration
Memory
Processor details, and so on
Before you can decommission the old domain controllers, you will need to make sure that no other servers or equipment are statically configured to use this server as the DNS server. If so, the DNS IP address needs to be updated with the IP address of the new Windows Server 2012 Domain Controller. The DCPROMO command can be used to remove the existing domain controllers from Active Directory.
Log on to the existing domain controller. From the Run window, type
DCPROMO.Click on Next on the Welcome to the Active Directory Domain Services Installation Wizard page.
If the domain controller is a Global Catalog server, a warning message will appear. Click on OK.
In the Delete the Domain window, click on Next. Do NOT select the Last Domain Controller in the Domain option.
Click on Next on the Remove DNS Delegation window.
It will prompt you for administrative credentials to remove the DNS delegation.
In the Summary window, click on Next to continue the domain controller demotion process.
In the Completing the Active Directory Domain Services Installation Wizard window, click on Finish.
After the reboot, this server will be a member server in the Active Directory domain. The Active Directory Domain Services role can be uninstalled from this server at this point. The failed or orphaned domain controllers should be removed from the Active Directory database using the NTDSUtil utility. This process is called metadata cleanup.
You need to understand the role of the forest and domain functional levels before it can be raised. Some of the new features will only be available when the forest or domain functional level is set to a certain state. For example, in Windows Server 2012, the Dynamic Access Control is only available when the domain functional level is set to Windows Server 2012. Also keep in mind that, after you configure the forest or domain function level to a certain value, you will not be able to revert it. There are some exceptions to this rule. If the Recycle Bin is not enabled, you can lower the forest functional level from Windows Server 2012 to Windows Server 2008 R2 or Windows Server 2008.
At this point, we have only Windows Server 2012 Domain Controller in the environment and I am not planning to add any down level domain controllers. So we can raise the domain and forest functional level to Windows Server 2012. The pre-Windows Server 2012 Domain Controllers cannot be added in Windows Server 2012 domain functional mode.
Note
The functional level can be lowered by using the Set-AdForestMode PowerShell cmdlet. For example, the Set-AdForestMode –identity domain.com –forestmode WindowsServer2008R2Forest cmdlets lowers the forest functional level to Windows Server 2008 R2 and the Set-AdForestMode –identity domain.com -domainmode WindowsServer2008R2Domain cmdlet lowers the domain functional level to Windows Server 2008 R2.
The following procedure can be used to raise the domain functional level:
Open Active Directory Domain and Trust from a Windows Server 2012 server or Windows 8 Remote Administration Tools.
Right-click on the domain and select Raise Domain Functional Level… option.
In the Select an available domain functional level window, select Windows Server 2012 and click on Raise.

The following procedure can be used to raise the forest functional level
Open Active Directory Domain and Trust from a Windows Server 2012 server or Windows 8 Remote Administration Tools.
From the Active Directory Domain and Trust console, right-click on the Active Directory Domain and Trust node and select Raise Forest Functional Level.
In the Select an available forest functional level window, select Windows Server 2012 and then click on Raise.
In the background, the Active Directory Domain Trust console changes the msDS-Behavior-Version attribute value. The msDS-Behavior-Version attribute controls which version of operating system can run on a domain controller within the forest and domain. The msDS-Behavior-Version value is 5 for Windows Server 2012.
Here is an example to verify the value of the msDS-Behavior-Version attribute using the dsquery command:
To identify forest functional level:
dsquery * CN=Partitions,CN=Configuration,DC=domain,DC=com -scope base -attr msDS-Behavior-VersionTo identify domain functional level:
dsquery * DC=domain,DC=com -scope base -attr msDS-Behavior-Version