


The Kendo UI Mobile library comes with several widgets and a framework that aids you in building mobile applications quickly. Firstly, you need to download the framework and then include the necessary files in your HTML page.
To download the Kendo UI Mobile framework, navigate to www.kendoui.com and click on the Download button. You will be provided with the following five options on the download page:
Kendo UI WEB: It is an open source version that includes components for building applications for the Web. Please note that this does not include the mobile library.
Kendo UI Complete for PHP: A 30-day free trial version of Kendo UI Web, mobile, data-visualization libraries, and server wrappers for PHP.
Kendo UI Complete for JSP: A 30-day free trial version of Kendo UI Web, mobile, data-visualization libraries, and server wrappers for JSP.
Kendo UI Complete for ASP.NET MVC: A 30-day free trial version of Kendo UI Web, mobile, data-visualization libraries, and server wrappers for ASP.NET MVC.
Kendo UI Complete: A 30-day free trial version of Kendo UI Web, mobile, and data-visualization libraries.
It is recommended that you download the free trial version of Kendo UI Complete (the last option in the previous list). However, if you prefer any of the server-side programming languages mentioned previously to generate the client-side JavaScript code, you can download the respective option. Now, perform the following steps:
Click on the Download Free Trial button under Kendo UI Complete.
You will be required to sign up before downloading the trial version.
Once you have signed up, the download page will be shown and an automatic download of files will start immediately.
The downloaded ZIP archive will contain the following directories:
/examples: A set of examples for the Kendo UI Web, mobile, and data visualization/js: A set of minified JavaScript files/cssor/styles: A set of minified CSS files/vsdoc: The completion helper for Visual Studio 2008 SP1 or newer/license-agreements: This contains the license agreement documentsChangelog.html: This contains the release notesREADME: This contains the readme document
You can run the applications that have been built using this library, which can be found in the examples directory. In the next recipe, we will see how you can build a sample application using the Kendo UI Mobile library.
A Kendo Mobile application is built using HTML5, CSS, and JavaScript. The framework provides JavaScript and CSS files that should be included in your project. A Kendo mobile application can be viewed as being made up of two pieces – the framework and a set of widgets. The framework provides core functionality such as loading views, managing application history, and navigation. The widgets allow you to add visual elements to the page and Kendo UI Mobile comes with several of them that aid you in building the application.
To create an application, include the JavaScript and CSS files in your page. Perform the following steps:
Create an HTML document,
index.html, under your project directory. Please note that this directory should be placed in the web root of your web server.Create the directories
stylesandscriptsunder your project directory.Copy the CSS file
kendo.mobile.all.min.css, from<downloaded directory>/stylesto thestylesdirectory created in step 2. Then add a reference to the CSS file in the head section of the document.Download the jQuery library from jQuery.com. Place this file in the scripts directory and add a reference to this file in the document before closing the body tag. You can also specify the CDN location of the file in the document.
Copy the JavaScript file
kendo.mobile.min.js, from the<downloaded directory>/jstag to thescriptsdirectory created in step 2. Then add a reference to this JavaScript file in the document (after jQuery).Add the text "Hello Kendo!!" in the body tag of the
index.htmlfile as follows:<!DOCTYPE HTML> <html> <head> <title>My first Kendo Mobile Application</title> <link rel="stylesheet" type="text/css" href="styles/kendo.mobile.all.min.css"> </head> <body> Hello Kendo!! <script type="text/javascript" src="scripts/jquery.min.js"> </script> <script type="text/javascript" src="scripts/kendo.mobile.min.js"> </script> </body> </html>
Tip
Downloading the example code
You can download the example code files for all Packt books you have purchased from your account at http://www.packtpub.com. If you purchased this book elsewhere, you can visit http://www.packtpub.com/support and register to have the files e-mailed directly to you.
The preceding code snippet is a simple HTML page with references to Kendo Mobile CSS and JavaScript files. These files are minified and contain all the features, themes, and widgets. In production, you would like to include only those that are required. The downloaded ZIP file includes CSS and JavaScript files for specific features. However, in development you can use the minified files that contain all features.
Tip
Another thing to note is that apart from the reference to the script kendo.mobile.min.js, the page also includes a reference to jQuery. It is the only external dependency for Kendo UI.
When you view this page on a mobile device, you will see the text Hello Kendo!! shown. This page does not include any of the widgets that come as a part of the library. Now let's build on top of our Hello World application and add some visual elements; that is, UI widgets to the page. This can be done with the following steps:
Add a layout first. A mobile application generally has a header, a footer, and multiple views. It is also observed that while navigating through different views in an application, the header and footer remain constant. The framework allows you to define a global layout that may contain a header and a footer for all the views in the application. Also, the framework allows you to define multiple views that can share the same layout. The following is the same page that now includes a header and footer defined in the layout:
<body>

<div
  data-role="layout"
  data-id="defaultLayout">

  <header data-role="header">

    <div data-role="navbar">
      My first application
    </div>

  </header>
  <footer data-role="footer">

    <div data-role="tabstrip">
      <a data-icon="about">About</a>
      <a	data-icon="settings">Settings</a>
     </div>

  </footer>

</div>

</body>
The body contains a few
divtags with data attributes. Let's look into one of these tags in detail.<div data-role="layout" data-id="defaultLayout">
Here, the
divtag contains two data attributes,roleandid. Theroledata attribute is used to initialize and configure a widget. Thedata-roleattribute has a value,layout, identifying the target element as alayoutwidget. All the widgets are expected to have aroledata attribute that helps in marking the target element for a specific purpose. It instructs the library which widget needs to be added to the page. Theiddata attribute is used to identify the widget (thelayoutwidget) in the page. A page may define several layout widgets and each one of these must be identified by a unique ID. Here, thedata-idattribute hasdefaultLayoutas its value. Now there can be many views referring to this layout by its id (views are explained in the next recipe and in detail in the later ones).Similarly, there are other elements in the page with the
data-roleattribute, defining them as one of widgets in the page. Let's take a look at theheaderandfooterwidgets defined inside the layout.<header data-role="header">... </header> <footer data-role="footer">...</footer>
The header and footer tags have the
roledata attribute set toheaderandfooterrespectively. This aligns them to the top and bottom of the page, giving the rest of the available space for different views to render. Also, note that there is anavbarwidget in the header and atabstripwidget defined in the footer. As mentioned earlier, the framework comes with several widgets that can help you build the application rapidly. The usage ofnavbar,tabStrip, and many other widgets will be covered in the later recipes of this book.Now add views to the page. The
index.htmlpage now has a layout defined and when you run the page in the browser, you will see an error message in the console which says:Uncaught Error: Your kendo mobile application element does not contain any direct child elements with data-role="view" attribute set. Make sure that you instantiate the mobile application using the correct container.
Views represent the actual content that has to be displayed between the header and the footer that we defined while creating a layout. A layout cannot exist without a view and hence you see that error message in the console. To fix this error, you need to define a view for your mobile application.
Add the following to your
index.htmlpage:<div data-role="view" data-layout="defaultLayout"> Hello Kendo!! </div>
As mentioned earlier, every widget needs to have a
roledata attribute to identify itself as a particular widget in the page. Here, the target element is defined as aviewwidget and tied to the layout by defining thedata-layoutattribute. Thedata-layoutattribute has a valuedefaultLayoutthat is the same as the value for thedata-idattribute of the layout that we defined earlier. This attaches the view to the layout and you will not see the error message anymore.Similarly, you can have multiple Views defined in the page that can make use of the same layout (we will see this in the later part of this book). Now, there's only one pending task for the application to start working: initializing the application. A Kendo Mobile application can be initialized using the
Applicationobject. To do that, add the following code to the page:<script> var app = new kendo.mobile.Application(); </script>
Include the previous script block right after references to jQuery and Kendo Mobile and before closing the body tag. This single line of JavaScript code will initialize your Kendo Mobile application and all the widgets with the
data-roleattribute.
The Application object is used for many other purposes and those will be covered in the upcoming recipes.
When you run the index.html page in a browser, you will see a navbar and a tabstrip in the header and footer of the page. Also, the message Hello Kendo!! being shown in the body of the page. The following screenshot shows how it will look like when you view the page on an iPhone:
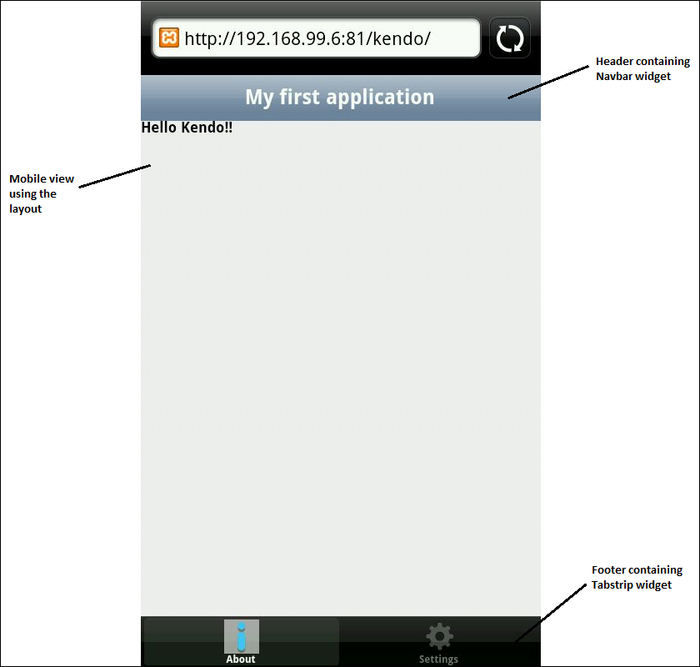
If you have noticed, this looks like a native iOS application. The framework has the capability to render the application that looks like a native application on a device. When you view the same page on an Android device, it will look like an native Android application, as shown in the following screenshot:
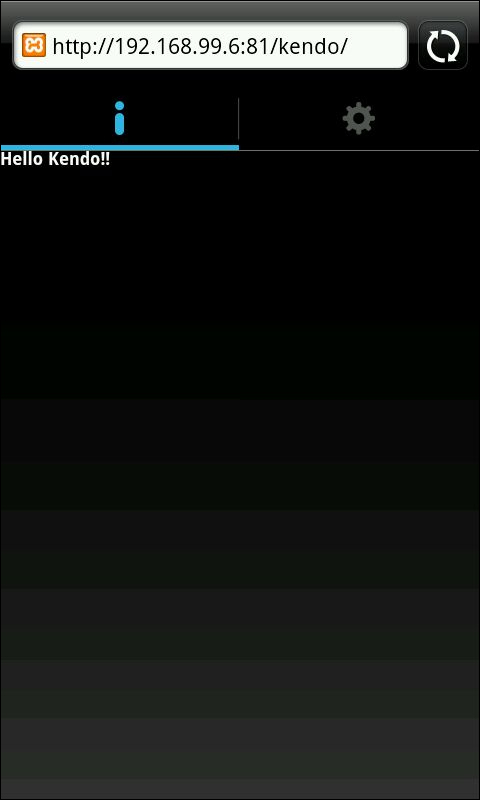
The framework identifies the platform on which the mobile application is being run and then provides native look and feel to the application. There are ways in which you can customize this behavior and this will be covered in the upcoming recipes.
In the next series of recipes, you will learn about the following core components of framework:
Application
Touch events
Views
Forms
As seen in the earlier recipes, a Kendo Mobile application is initialized using the kendo.mobile.Application object. The Application object can also be used to provide initial configuration details and also in managing application navigation.
While initializing the mobile application, the Application object can be used to provide several configuration details. Perform the following steps:
The function
kendo.mobile.Application()is called to initialize the application.The first parameter to
kendo.mobile.Application()is the target element, which is the container of various widgets withdata-roleattributes. Usually, it is the document's body tag, containing various widgets; hence, the default value for the first parameter is the reference to thedocument.bodyelement.The second parameter is an object that can be used to provide configuration details.
When you set the initial layout in a relatively larger application, you are likely to define multiple layouts and views. One of these layouts can be defined as an initial layout, which would then be rendered when the application loads. This configuration is provided while initializing the application using kendo.mobile.Application().
The following code snippet defines two layouts – defaultLayout and applicationLayout. Also, it defines two views, view1 and view2, as follows:
<div data-role="layout"
  data-id="defaultLayout">

  <header data-role="header">
  <div data-role="navbar">
      Default Layout Title
    </div>
  </header>

</div>

<div data-role="layout"
  data-id="applicationLayout">

  <header data-role="header">
    <div data-role="navbar">
      Application Layout Title
    </div>
  </header>

</div>

<div data-role="view"
  id="view1">
    Hello Kendo!!
</div>

<div data-role="view"
  id="view2">
    Hello Application!!
</div>
In the previous code snippet, the views (view1 and view2) do not specify any references to the layout widget that it likes to be associated with. Now, when you have two layouts in the page, the application would not be able to determine the layout to render when the application loads. This can be specified when the application is initialized using the Application object.
var app = new kendo.mobile.Application(document.body, {
  layout: "applicationLayout"
});
The layout key specifies the layout to be used when the application loads; here, applicationLayout is the value of the data-id attribute of the layout widget(data-role="layout").
Similar to specifying an initial layout, you can also specify the initial view to render when the application loads. The first view in the page would be rendered by default, and if you would like to render any other view, specify the same while initializing the application as follows:
var app = new kendo.mobile.Application(document.body, {
  layout: "applicationLayout",
  initial: "view2"
});
Please note that here view2 is the value of the id attribute that you want to render, while applicationLayout is the value of the data-id attribute.
This screenshot shows how the application works:
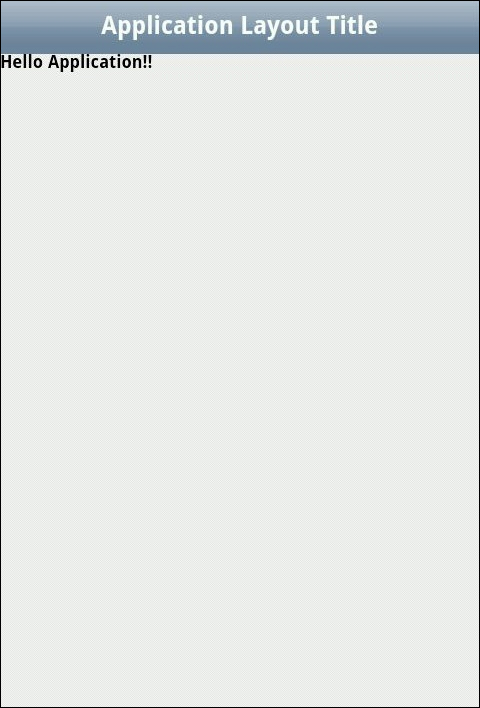
When you execute the previous page, you will see that the view with the id attribute view2 is shown on the layout with the data-id attribute applicationLayout.
The Application object can also be used to provide other configuration details. For example, the Application object can be used to navigate to different views.
Consider an example where you have the following three views:
indexloginviewsignupview
The index view has two buttons for Login and Sign Up as shown in the following code:
<div data-role="view"
  id="loginview">
  Login page
</div>
<div data-role="view"
  id="signupview">
  Sign Up page
</div>

<div data-role="view"
  id="index">

  <span class="button"
    data-role="button"
    id="login">
    In Login view
  </span>

  <span class="button"
    data-role="button"
    id="signup">
    In Sign Up view
  </span>

</div>
As explained earlier, you can set the initial view by specifying the same during application initialization.
var app = new kendo.mobile.Application(document.body, {
  initial: "index"
});
When the application loads, the index view will be shown, which contains two buttons: Login and Sign Up. On clicking on the Login button, you would like the application to navigate to loginview; similarly, on clicking on the Signup button, show signupview. To navigate to a different view, call navigate on the Application object as follows:
$('#login').on('click', function (event) {
  app.navigate('#loginview');
});

$('#signup').on('click', function (event) {
  app.navigate('#signupview');
});
The previous code snippet specifies a mouse-click event listener for all the Login and Sign Up buttons in the index view as shown in the following screenshot:
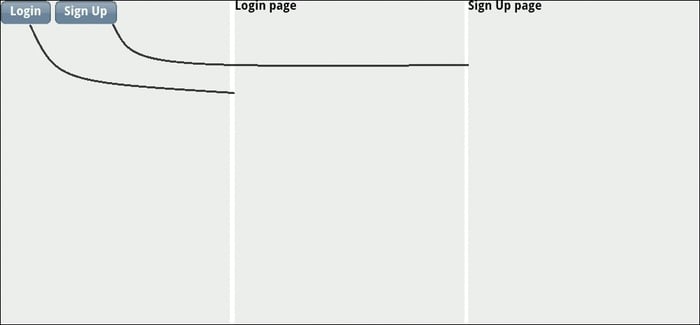
On clicking on the Login button, the navigate method is called on the Application object, specifying the view to navigate (loginview). This will then show the login view. Similarly, the signup view is shown when you click on the Sign Up button.
A user interacts with a mobile application using a touch-based interface. The mobile application should be able to provide quality support for touch-based user interfaces by interpreting finger activity on touch screens. The Kendo UI Mobile framework provides a set of APIs, using which the mobile application can handle user-initiated touch events, event sequences such as drags and swipes, and also in recognizing multi-touch gestures.
Create a document containing a layout or a view.
Define a widget with its
data-roleattribute set totouch.Place this widget in the layout or the view created in step 1 as shown in the following code:
<div data-role="view"
  id="touchWidgetContainer">

  <div id="touchSurface"
    data-role="touch"
    data-touchstart="touchstart"
    data-tap="tap">
    This is a touch surface.
  	</div>

</div>
When the mobile application first runs, the touch widgets inside a view or a layout will be initialized. In the previous markup, you will notice that a widget with the data-role attribute touch is defined. It also defines a couple of other data attributes, touchstart and tap. These declare touch event handlers that need to be invoked when the user starts the touch (touchstart) and for handling user taps on the screen (tap).
The definition for the touch event handlers, touchstart and tap, are as shown in the following code:
function touchstart(event) {
  alert('Event - Touch Start' + " X= " + event.touch.x.location + " Y= " + event.touch.y.location);
  }
  function tap(event) {
    alert("Event - tap");
  }.
The touch event object contains information on the active touch. It contains touch axis information; that is, the x and y coordinate where the touch was initiated. The properties x.location and y.location on the touch event object indicates the offset of the touch relative to the entire document. When a user touches the screen, the touchstart event is triggered. On the other hand, the tap event is fired when the user taps; that is, touches and then leaves the screen, similar to mouseclick and mouseleave on a desktop web application.
Apart from touchstart and tap, the framework can handle various other events such as double tap, hold, and swipe.
The following code snippet handles various touch events that have been mentioned previously:
<div data-role="view"
  id="touchWidgetContainer">

  <div id="touchSurface"
    data-role="touch"
    data-touchstart="touchstart"
    data-tap="tap"
    data-doubletap="doubletap"
    data-hold="hold"
    data-enable-swipe="true"
    data-swipe="swipe">
    Touch surface to handle various touch events<br>
    Touch, tap, double-tap, swipe and hold
  </div>

</div>
Notice that there is another attribute, data-enable-swipe, that is set to true. By default, swipe events are not enabled; to enable them, you need to set the data-enable-swipe attribute to true. This will also disable the dragStart, drag, and dragEnd events that were to be triggered.
The corresponding event handlers are defined as follows:
<script>
  function touchstart(event) {
    alert('Event - Touch Start' + " X= " +event.touch.x.location + " Y= " + event.touch.y.location);
  }

  function tap(event) {
    alert('Event - Tap');
  }

  function doubletap(event) {
    alert('Event - Double tap');
  }

  function hold(event) {
    alert('Event - Hold');
  }

  function swipe(event)
  {
    alert('Swipe direction ' + event.direction);
  }
</script>
The previous code snippet defines event handlers for touchstart, tap, doubletap, hold, and swipe. Note that the swipe event handles horizontal swipes, and as observed in the previous code snippet, in the swipe event handler the touch event object includes the direction information indicating the direction in which the swipe was triggered. It can either be left or right.

As we have seen in the earlier recipes, a mobile application consists of a single HTML page with one or more mobile views in it. A Kendo Mobile View represents the screen in a Kendo Mobile application and it is a widget with the data-role attribute set to view. There are various types of views that can be added to the document, such as listView, modalView, scrollView, and others. The next few recipes focus on adding these views to the document.
A large application contains several views and specifying all of them in a single page would increase the size of the document.
Specify these views in separate pages (HTML pages) and specify the location of the HTML page in the
hrefattribute of the anchor element.The following is sample code that defines two buttons that are placed in the index page of the application:
<div data-role="view"
  data-title="Index View">

  <header data-role="header">
    <div data-role="navbar">
      <span data-role="view-title"></span>
    </div>

  </header>

  <div data-role="view">

    <a href="#localview"
      class="button"
      data-role="button">
      Local View
    </a>

    <a  href="./remoteview.html"
      class="button"
      data-role="button">
      Remote View
    </a>

  </div>

</div>
The previous code snippet defines an Index view, which includes a header containing a Navbar widget. Inside the Navbar widget, there is a span element with its data-role attribute set to view-title. This allows different views to define their choice of title to be shown in the Navbar widget. Notice that the container view defines the data-title attribute. The value of this attribute will be shown when the mobile application is initialized.
There are two buttons on the page, one to show a local view and another to show a remote view. Now let's define a widget that will be shown when you click on the localview button.
<div data-role="view"
  id="localview"
  data-layout="mobile-view"
  data-title="Local view">
  From Local view
</div>
The previous div element is added to the same document and it has an id attribute that is, localview. The previous view widget also specifies the data-layout attribute. Now let's define a layout for this view as follows:
<div data-role="layout"
  data-id="mobile-view">
    <header data-role="header">

    <div data-role="navbar">
    <a  class="nav-button"
      data-align="left"
      data-role="backbutton">

      Back
    </a>

    <span data-role="view-title"></span>
    </div>

  </header>

</div>
The previous layout defines the header with a Navbar and it is very similar to the viewthat we defined earlier, except that this layout defines a widget backbutton (data-role='backbutton'). This widget is used to navigate to the previous page in the browser's history.
Now, when you tap on the Local view button, you will see that the application is navigated to the local view, the Navbar shows the title as Local view, and the body of the page will show the text From local view. Also, on tapping the back button defined in the header, you will be taken to the index page. We have already defined an anchor element in the document with it's href attribute set to remoteview.html. Now let's create a new page, remoteview.html, and define a view in it as follows:
<div data-role="view"
  data-layout="mobile-view"
  data-title="Remote view">

  This page is from Remote view
</div>
This widget is similar to the widget that we defined while creating a local view, except that it is defined in a different document, that is, remoteview.html. Also notice that it makes a reference to the layout widget that we defined in the index document. Now, when you tap on the remote view button, the view defined in the remoteview.html page will be shown.
Note
Please note that the CSS and JavaScript files required for the remote document (remoteview.html) should be specified in the index document. This is because these files will not be evaluated when they are specified in the remote document.
When you tap on the Local view button, the view defined in the same document is shown; when you tap on the Remote View button, the view defined in remote.html is shown.
Here we will see how you can define transition effects while navigating from one view to the other.
While transitioning from one view to the other, you can specify the transition effect that needs to be applied, using the data-transition attribute. The following values can be set as value to the data-transition attribute:
slide: This transition effect slides the old view content to the left and the new view content slides in its place. You can specify the direction using the slide (direction). By default, the direction is left; the other option is right.
zoom: Here, the new view content zooms from the center of the old view. The old view content will fade out and the new view content will be shown.
fade: The new content fades in on top of the old view. The old view content will fade out, showing the content from the new view.
overlay: The overlay effect is similar to the slide effect, except that the previous view remains under the new one. The transition direction can be specified using overlay (direction). By default, the direction is left; other supported directions include right, up, and down.
In all of the transition effects mentioned, the content along with its header and footer are shown.
It is also possible to specify the transition effect for the entire application instead of specifying the data-transition attribute for each view widget in the document. When initializing the application using the Application object, specify the transition property with the desired effect as its value.
var app = new kendo.mobile.Application(document.body, {
  transition: "zoom"
});
This allows the transition effect to be applied to the entire application.
Most mobile applications require data to be captured from the user input fields and they make use of forms. The Kendo UI Mobile framework allows you to add form elements to the page and provides styling for various platforms.
The mobile framework supports the adding of various types of input elements to the form such as text, password, e-mail, number, telephone, search, URL, date, time, month, and date time.
Create an HTML document containing a form element.
Add input fields of type
text,password,email,date, andradio. The following is a sample markup that shows a form on a page:<div id="forms" data-role="view" data-title="Form Elements" data-layout="mobile-view"> <form action="./index.html"> <ul data-role="listview" data-style="inset"> <li> <label>Full Name</label> <input type="text" placeholder="Full Name"/> </li> <li> <label>Password</label> <input type="password" placeholder="Password" /> </li> <li> <label>Email</label> <input type="email" placeholder="username@domain.com" /> </li> <li> <label>Date of Birth</label> <input type="date" /> </li> <li> <label>Education</label> <select> <option value="Bachelors"> Bachelors </option> <option value="Masters"> Masters </option> <option value="Postgraduation"> Post Graduation </option> </select> </li> </ul> <ul data-role="listview" data-style="inset" data-type="group"> <li>Gender <ul> <li> <label> <input name="units" type="radio" checked="checked" /> MALE</label> </li> <li> <label> <input name="units" type="radio" /> FEMALE</label> </li> </ul> </li> <li> <button type="submit" data-role="button">Submit</button> </li> </ul> </form> </div>
As seen in the previous markup, the form elements are added to the document, and when you run the same on a mobile device, the following output is shown:
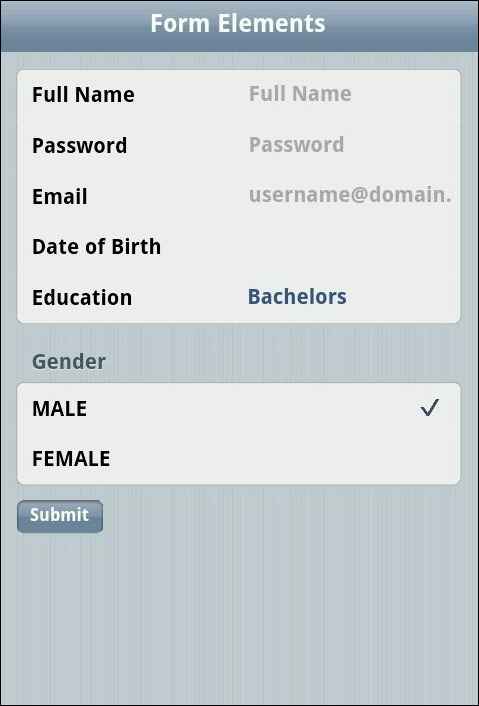
If you have noticed the code snippet, we have made use of a new widget, ListView. The ListView widget is generally used when you have a list of elements to be shown on the page.
Next, you will learn about the various widgets that are available for use in building a Kendo mobile application.
The Kendo Mobile ListView widget allows you to display a list of items on the page. The list can be flat or grouped. We have already seen an example of the ListView widget in the previous recipe. A ListView widget can be created by assigning the value listview to the data-role attribute of an ordered or unordered list. The list values can be specified in the markup or bound to a DataSource instance.
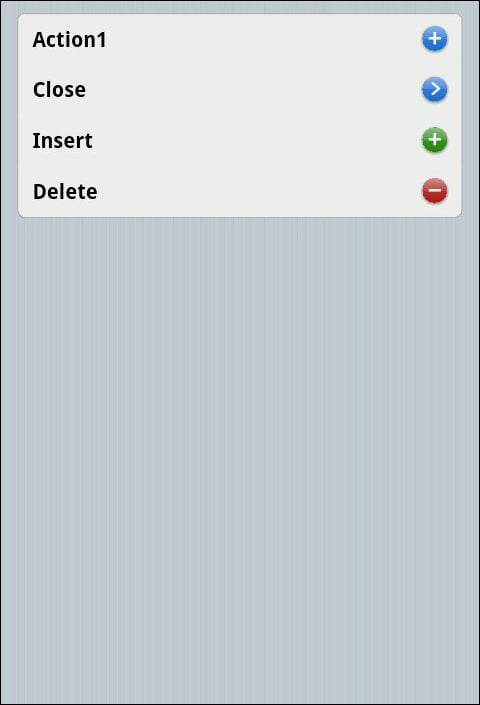
Let's add a ListView widget containing detail buttons to the page. A detail button allows you to specify an action button for each list item (each row) in the list.
To create a
ListViewwidget, create an unordered list and set thedata-roleattribute tolistview.Add detail buttons by adding anchor elements with the
data-roleattribute set todetailbutton. The following is the sample code:<div data-role="view"> <ul data-role="listview" data-style="inset" data-type="group"> <li>Default Buttons <ul> <li> <a>Add </a> <a data-role="detailbutton" data-style="contactadd"> </a> </li> <li> <a>Close </a> <a data-role="detailbutton" data-style="detaildisclose"> </a> </li> <li> <a>Insert </a> <a data-role="detailbutton" data-style="rowinsert"> </a> </li> <li> <a>Delete </a> <a data-role="detailbutton" data-style="rowdelete"> </a> </li> </ul> </li> </ul> </div>
The previous code snippet creates a ListView widget and specifies detail buttons for each item in the list.
When you run the previous page, you will see a list of items with detail buttons aligned to the right of the list item.
The data-styles attribute of a Detail button can contain one of these values: contactadd, detaildisclose, rowinsert, and rowdelete. Apart from specifying the data-style attribute for a detailbutton widget, you can specify custom icons through the data-icon attribute:
<li>
  <a>Favorites </a>
  <a data-role="detailbutton"
  data-icon="favorites">
  </a>
</li>
The list item mentioned previously does not include the data-style attribute; instead, a data-icon attribute is defined. Now, when you run the page, you will see the favorites icon shown for the list item as shown in the following screenshot:
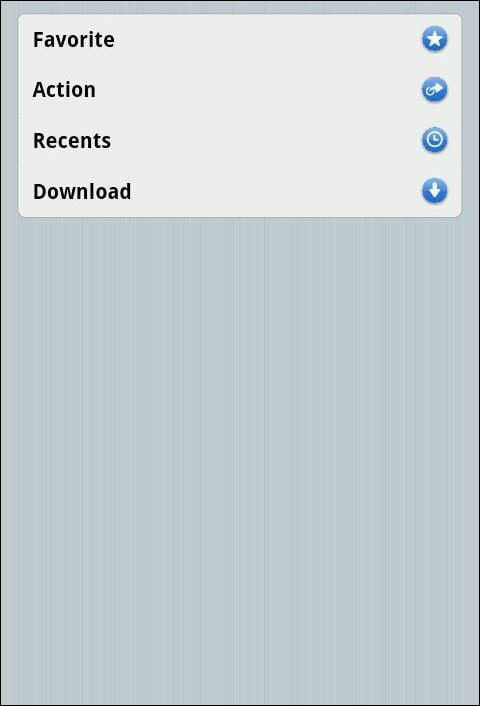
The data-icon attribute can contain one of these values: about, action, add, bookmarks, camera, cart, compose, contacts, details, downloads, fastforward, favorites, featured, toprated, globe, history, home, info, more, mostrecent, mostviewed, organize, pause, play, recents, refresh, reply, rewind, search, settings, share, stop, and trash.
The mentioned icons would suffice for most of the applications. However, you can include your own icon by defining a CSS class and specifying the data-icon value as custom. This will look for the class definition, km-class, in your CSS stylesheet.
In the previous recipe, we have created ListView using an unordered list and specified a list of items in the markup. It is also possible to create a ListView widget that is populated from a DataSource widget.
The mobile ListView widget can be bound to a JavaScript array and the mobile framework allows you to specify the DataSource for the ListView widgets:
<div data-role="view"
  data-init="flatlistviewinit">

  <ul id="flatlistview"></ul>

</div>
The previous markup does not contain any list items. It specifies the container's ul element, which will contain the list of items from the DataSource. Note that the view contains the data-init attribute. This attribute specifies the JavaScript callback function to invoke when the framework is initializing the widgets in the document.
The function flatlistviewinit is used to bind the DataSource to the unordered list in the markup.
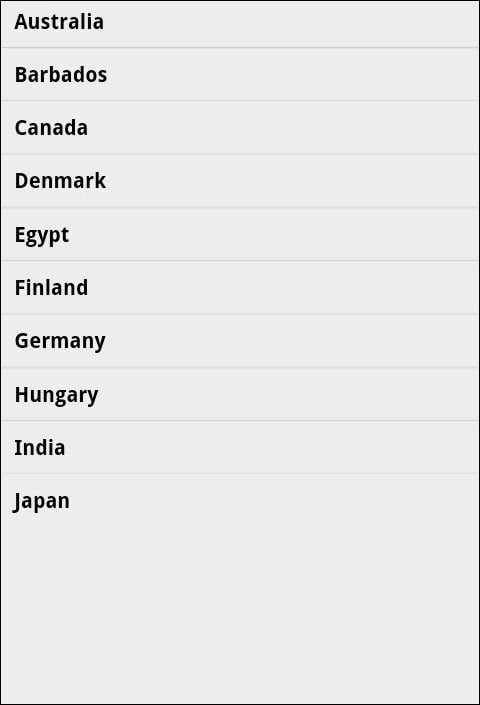
var flatData = ["Australia", "Barbados", "Canada", "Denmark", "Egypt", "Finland", "Germany", "Hungary", "India", "Japan"];

function flatlistviewinit(){

  $('#flatlistview').kendoMobileListView({
    dataSource: flatData
  });

}
The previous code snippet defines an array containing a list of country names. The function flatlistviewinit is invoked by the framework when it tries to initialize the view in the document. This function binds the array to the ul element defined in the markup. The function kendoMobileListView is called on the specified selector to initialize it as a ListView widget. The function also specifies the datasource value to be used for the ListView widget. In this case, the DataSource widget is the array containing the list of country names.
When you execute this page, you will see that a list view is created, which displays a list of countries that we specified in the array.
In the previous example, we listed countries; in this section, we will group these countries based on the continent in which they belong.
To group each of these countries, let's create an array of JavaScript objects. Each object in the array will contain the country name and the continent to which it belongs.
var groupedData = [
   {name: "Ghana", continent: "Africa"},
  {name: "India", continent: "Asia"},
  {name: "Australia", continent: "Oceania"},
  {name: "France", continent: "Europe"},
  {name: "Mexico", continent: "N. AMERICA"},
  {name: "Sri Lanka", continent: "Asia"},
  {name: "Argentina", continent: "S. AMERICA"},
  {name: "Kenya", continent: "Africa"},
  {name: "Italy", continent: "Europe"},
  {name: "United States", continent: "N. AMERICA"},
  {name: "New Zealand", continent: "Oceania"},
  {name: "Brazil", continent: "S. AMERICA"},
];
Now let's create a function that will initialize the ListView widget with the previous array.
function groupedlistviewinit() {
  $('#groupedlistview').kendoMobileListView({
    dataSource: kendo.data.DataSource.create({
      data: groupedData, group: "continent"
    }),
    template: '${name}',
    fixedHeaders: true
  });
}
Here we are initializing an unordered list with an array of objects. While initializing the widget, we are specifying the datasource value to be used and also the property by which the list items should be grouped. The template property specifies the template to use when adding list elements to the ListView widget. The value of the template property in this case is ${name}. When the application is run, it will replace ${name} with the name property specified in the object. The fixedHeaders property contains a Boolean true as its value; this makes the headers fix to the top when you scroll the list.
When you run this page, you will see a list of items shown on the page and these are grouped by the continent names.
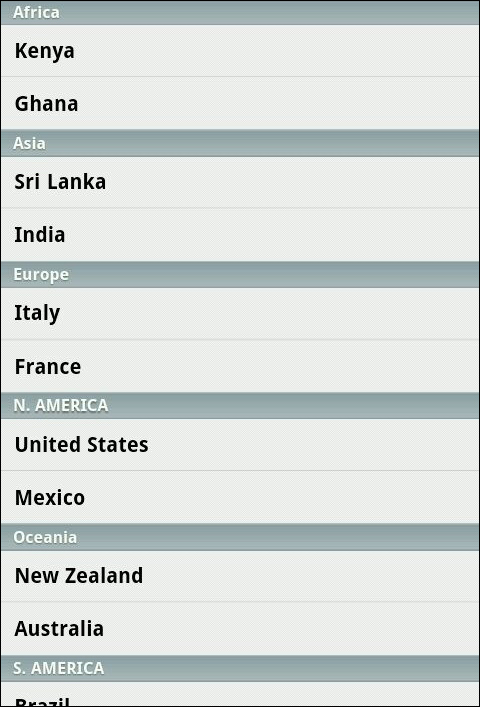
When you scroll, you will see that the headers containing the continent name fix to the top, as shown in the following screenshot:
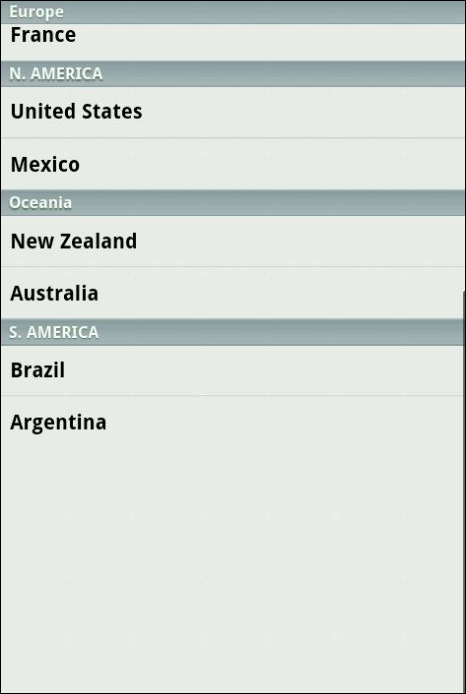
The header will change only when a new group containing a list of country names is shown at the top of the list.
The Kendo Mobile ActionSheet widget is used to show a list of actions to perform when a user taps on an element on the screen. The ActionSheet widget slides from the bottom and shows a list of actions to perform against the tapped element on the screen.
Create a
ListViewwidget with each list item containing an anchor element with itsdata-relattribute set toactionsheet.Create an
ActionSheetwidget by setting thedata-roleattribute toactionsheet.The
hrefattribute of the anchor elements in theListViewwidget should be the same as theidattribute of theactionsheetwidget.<div data-role="view"> <ul data-role="listview" data-style="inset" data-type="group"> <li> <ul> <li> <a data-rel="actionsheet" href="#optionActionSheet"> Action 1 </a> </li> <li> <a data-rel="actionsheet" href="#optionActionSheet"> Action 2 </a> </li> <li> <a data-rel="actionsheet" href="#optionActionSheet"> Action 3 </a> </li> </ul> </li> </ul> <ul data-role="actionsheet" id="optionActionSheet"> <li><a data-action="option1">Option 1</a></li> <li><a data-action="option2">Option 2</a></li> <li><a data-action="option3">Option 3</a></li> </ul> </div>
The previous code snippet defines a view containing a ListView widget. The ListView widget contains anchor elements of the following form:
<a data-rel="actionsheet"
  href="#optionActionSheet">
  Action 1
</a>
Here, the anchor element specifies the data-rel attribute with its value as actionsheet. This data-rel attribute is used to open the ActionSheet widget from any navigational widget such as a button, an anchor link item, or a tabstrip. Also, the href attribute of the anchor element specifies the id value of the ActionSheet widget (openActionSheet) to be invoked.
The ActionSheet widget is defined with the data-role attribute set to actionsheet and its id attribute set to openActionSheet. This widget contains three list items containing a list of actions to perform. The data-action attribute is used to specify the JavaScript function to invoke when the user taps one of the options.
When you execute the previous code snippet, you will see that a ListView widget is shown as follows:
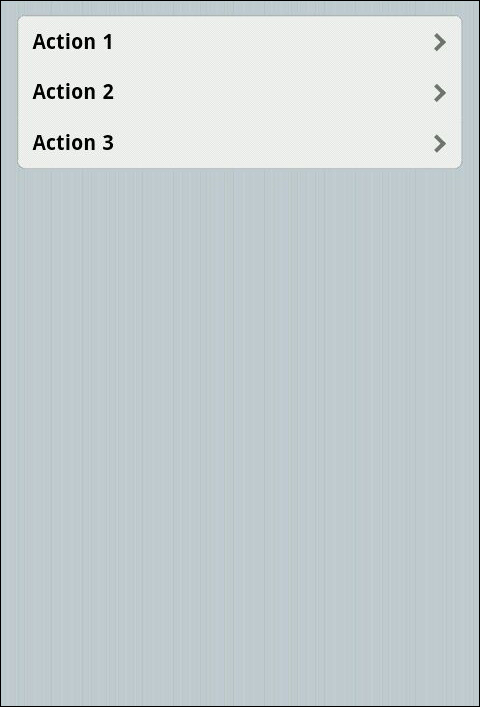
On clicking on any of the list items in the ListView widget, the ActionSheet widget will slide in from the bottom of the screen to show a list of options, as shown in the following screenshot:
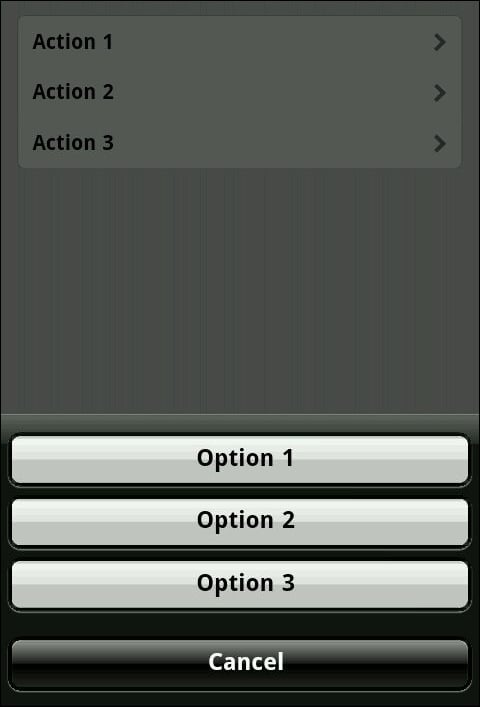
Notice that along with the three options, another option with the value Cancel is also added to the list. This allows the user to cancel the task and hide the ActionSheet widget.
As mentioned earlier, the data-action attribute is used to specify the JavaScript callback function to be invoked when the user selects one of the options in the ActionSheet widget. This callback function receives an object with two fields, namely, target and context. The target field holds the reference to the DOM element that opened the ActionSheet widget and the context field will contain the value passed from the same DOM element. To pass a value to the ActionSheet widget, specify the data-actionsheet-context attribute with the value that you need to pass.
<a id="firstItem"
  data-rel="actionsheet"
  data-actionsheet-context="1"
  href="#optionActionSheet">
  Action 1
</a>
In the previous markup, one of the list items is updated to contain a data-actionsheet-context attribute with the value 1. The JavaScript function is defined as follows:
function option1 (e) {
  console.log(e.target); // $('#firstItem')
  console.log(e.context); // 1
}
Here, the target field will refer to the DOM element that invoked the ActionSheet widget and the context field will contain the value 1, which was passed from the DOM element that invoked the ActionSheet widget.
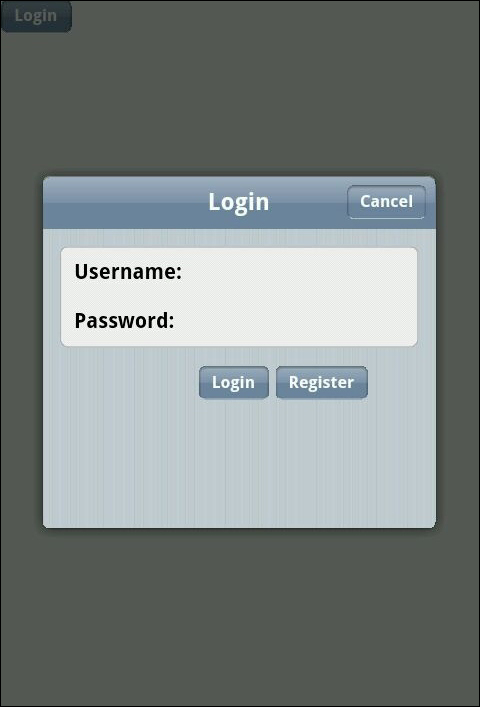
A ModalView widget is similar to an ActionSheet widget, which is invoked by tapping on one of the widgets on the screen. A ModalView widget is used to present a window-like view as an overlay over an existing view in the page. In case of ActionSheet, the widget will slide up from the bottom of the screen, whereas a ModalView widget will be shown at the center of the screen.
Create an anchor element with its
data-relattribute set tomodalview.Create a
ModalViewwidget by setting thedata-roleattribute tomodalview.The anchor element's
hrefattribute should be same as the modal view'sidattribute, as shown in the following code:<div data-role="view"> <a data-role="button" data-rel="modalview" href="#modalview-form"> Login </a> </div> <div data-role="modalview" id="modalview-form" style="width: 70%; height: 270px;"> <div data-role="header"> <div data-role="navbar"> <span>Login</span> <a data-click="closeBtnHandler" data-role="button" data-align="right"> Cancel </a> </div> </div> <ul data-role="listview" data-style="inset"> <li> <label for="username">Username:</label> <input type="text" id="username" /> </li> <li> <label for="password">Password:</label> <input type="password" id="password" /> </li> </ul> <a data-click="loginBtnHandler" type="button" data-role="button" style="margin-left: 40%;"> Login </a> <a data-click="registerBtnHandler" type="button" data-role="button"> Register </a> </div>
The previous code is very similar to the ActionSheet widget that we created in the last recipe. Here, the view specifies the value of the data-rel attribute as modalview and also specifies the id value of the ModalView widget (that is, modalview-form) as it's href attribute.
The ModalView widget has the id attribute set to modalview-form and the data-role attribute set to modalview to mark the target element as a ModalView widget. The widget can then contain any number of elements in it. The following widgets are added to the previous code snippet: a header containing the Navbar with the Cancel button, form elements that would capture the user's login credentials, and buttons to handle the login and register functionality.
When the page loads, you will see a Login button shown. On clicking on the Login button, a modal view containing the form elements is shown.
For a ModalView widget, you can specify the data-open attribute whose value will be the name of a JavaScript callback function. This function is invoked whenever the ModalView widget is opened.
<div
  data-role="modalview"
  id="modalview-form"
  data-open="openModalView">

  ....
</div>
This is particularly helpful when you are managing the state of the application. For example, you may want to execute a JavaScript function that changes the state of the application when the ModalView widget is opened.
A TabStrip widget is used to display a group of navigation buttons. More often than not, these navigation buttons are placed in the footer of the application's layout widget.
The TabStrip widget is created by assigning the value tabstrip to the data-role attribute of the target element. Each tab or button in the TabStrip widget is used to show one of the views defined in the application. On clicking the tab, the current view as well as the selected tab's state is updated.
Create a document containing a layout widget with a navbar in the header.
Create a
TabStripwidget by setting thedata-roleattribute totabstrip.Place the
Tabstripwidget in the footer of the layout widget.<div data-role="layout" data-id="applayout"> <div data-role="header"> <div data-role="navbar"> <span data-role="view-title"></span> </div> </div> <div data-role="footer"> <div data-role="tabstrip"> <a href="#contactslist" data-icon="contacts"> Contacts </a> <a href="#favorites" data-icon="favorites"> Favorites </a> <a href="#about" data-icon="about"> About </a> </div> </div> </div>
The previous code snippet defines an application-wide layout widget and it has the header and footer widgets defined in it. The footer widget has the TabStrip widget (data-role='tabstrip'). The TabStrip widget has three anchor elements and each of these anchor elements have an href and data-icon attribute. The href attribute refers to the view that should be displayed when the user selects the tab. The data-icon attribute specifies the icon to use for the tab. The framework provides several icons that can be used while defining tabs in the TabStrip widget. You can also add your own set of icons by defining the respective CSS class in the stylesheet.
Now let's add the three views that are mentioned in the TabStrip widget.
<div data-role="view"
id="contactslist"
data-layout="applayout"
data-title="Contacts">
<ul data-role="listview"
data-style="inset"
data-type="group">
<li>
<ul>
<li>Adam</li>
<li>Ben</li>
<li>Charlie</li>
<li>David</li>
<li>Earl</li>
<li>Frank</li>
<li>Greg</li>
<li>Hamish</li>
<li>Jack</li>
<li>Mellisa</li>
<li>Terry</li>
<li>Victoria</li>
</ul>
</li>
</ul>
</div>
<div data-role="view"
id="favorites"
data-layout="applayout"
data-title="Favorites">
<ul data-role="listview"
data-style="inset"
data-type="group">
<li>
<ul>
<li>Ben</li>
<li>Charlie</li>
<li>David</li>
<li>Frank</li>
<li>Terry</li>
<li>Victoria</li>
</ul>
</li>
</ul>
</div>
<div data-role="view"
id="about"
data-layout="applayout"
data-title="About">
A simple Tabstrip application
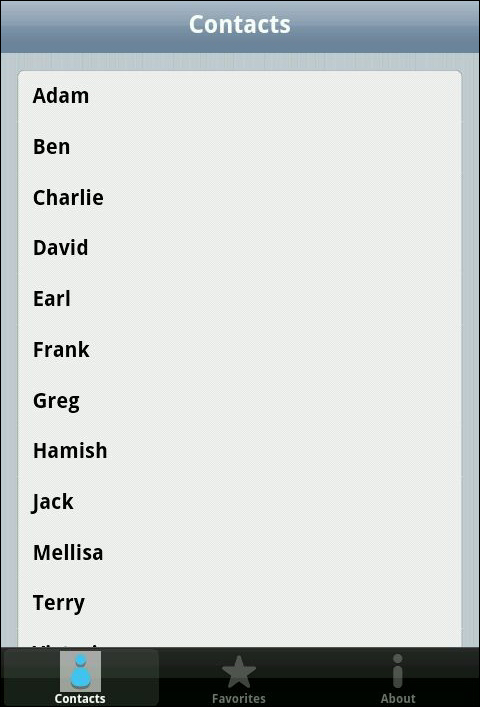
</div>The previous code snippet defines three views. Notice that the id attribute of each of these views is specified as href for the anchor elements defined in TabStrip.
When you load the previous page, you will see that a list of contacts (the contactslist view) is shown and the first tab in the TabStrip widget is selected, as shown in the following screenshot:
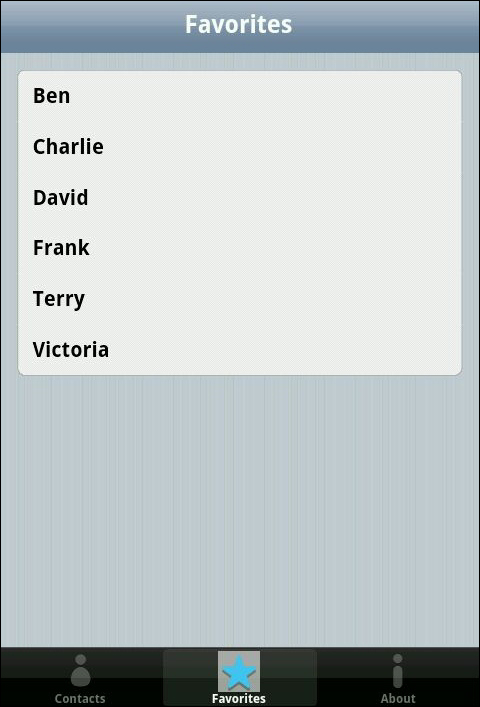
When you select the Favorites tab (<a href=#favorites>Favorites</a>), the selected tab and the view is updated to show a list of contacts marked as Favorites, as shown in the following screenshot:
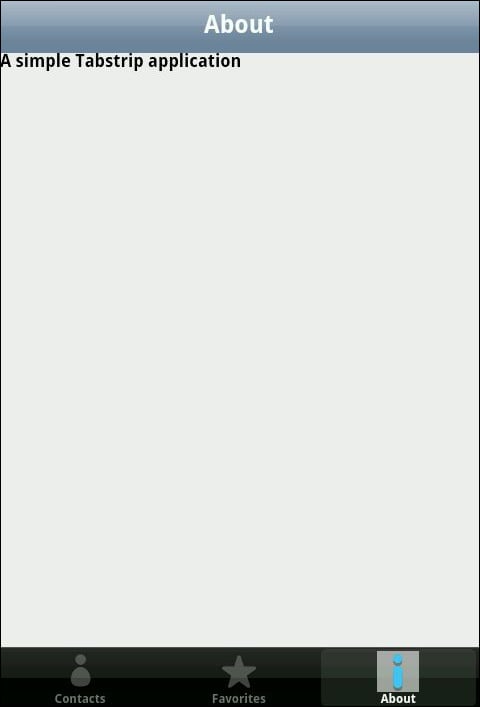
Again, when you select the About tab, the About view is shown.
You can define a JavaScript callback function that is fired when you select a tab in the TabStrip widget. To do that, specify the data-select attribute for the Tabstrip widget as follows:
<div data-role="tabstrip"
  data-select="selectEvent">
  ....
</div>
Now define the JavaScript callback function selectEvent.
function selectEvent () {
  console.log('Select Event');
}
The previous JavaScript callback function will be called whenever the user selects the tab in the TabStrip widget. A callback function can be used to make a call to the analytics server, which will record the user behavior on the screen.
A ScrollView widget is used in Picture-Gallery-like applications, where you would like to scroll to the next page to see the next picture in the gallery. The widget allows you to move to the next page or to the previous page by swiping from right to left or left to right.
A
ScrollViewwidget is created by setting the valuescrollviewto thedata-roleattribute on the target element.Each widget inside the
ScrollViewwidget is defined as apagewidget by setting thedata-roleattribute topage.
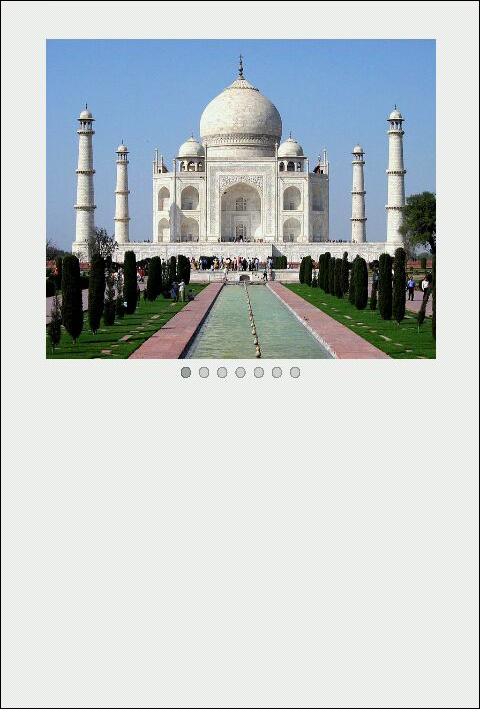
Let's use the ScrollView widget to create a photo gallery application. This application will show one image at a time, and on swiping from right to left or vice versa, the image defined in the next or the previous page will be shown.
<div data-role="view"
  id="scrollviewContainer">

  <div data-role="scrollview">

    <div data-role="page">
      <img src="images/image1.jpg"/>
    </div><div data-role="page">
      <img src="images/image2.jpg"/>
    </div><div data-role="page">
      <img src="images/image3.jpg"/>
    </div><div data-role="page">
      <img src="images/image4.jpg"/>
    </div><div data-role="page">
      <img src="images/image5.jpg"/>
    </div><div data-role="page">
      <img src="images/image6.jpg"/>
    </div><div data-role="page">
      <img src="images/image7.jpg"/>
    </div>

  </div>

</div>
The previous code snippet defines a view that contains the ScrollView widget. The ScrollView widget contains seven page widgets (data-role='page'), each of which has an image tag specified in it.
When the page loads, it initializes the ScrollView widget and displays the first image in the set. It also displays seven buttons corresponding to the seven images on the screen. By default, the first button in the set is selected since the first page is shown when the application is viewed.
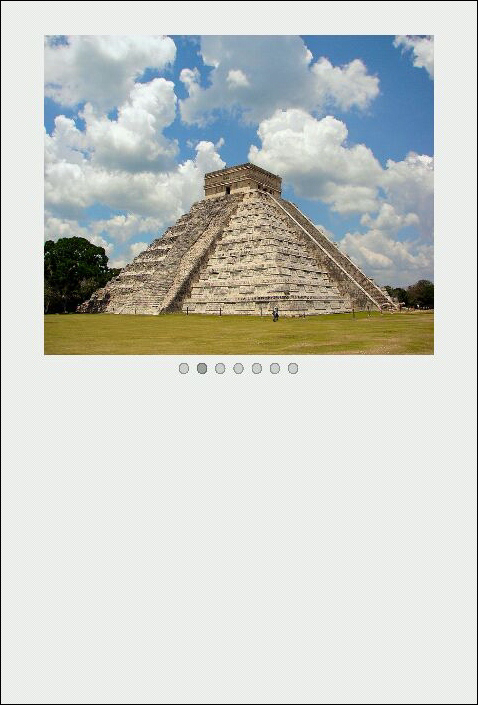
On swiping from right to left, the next page containing the image is shown. This will also update the selected button in the ScrollView widget, as shown in the following screenshot:
You can also specify a JavaScript callback function when the page widget has changed. To do that, define the data-change attribute on the ScrollView widget.
<div data-role="scrollview"
  data-change="pageChange">
  ......
</div>
The JavaScript callback function would be as follows:
function pageChange() {
  console.log('New Page');
}
The pageChange function is executed when you swipe on the device to see the next page.
Here we will see how an application created with Kendo UI Mobile is rendered on different platforms, namely iOS, Android, and Blackberry. Also, how the framework handles different orientations, portrait and landscape.
Today, developers are challenged to build applications that are not only rich in functionality but also render on different devices with native look and feel. Maintaining a different code base for different devices can slow down the developer productivity and will require more time and effort to get the right output.
The Kendo UI Mobile framework is designed to solve the mentioned problems. It allows developers to build great experiences for the mobile applications using HTML5 and JavaScript. The framework itself takes care of rendering the application on different devices and provides native look and feel on different platforms. This allows developers to focus on building the functionality and letting the framework handle the differences between different platforms.
In most of the recipes mentioned in the book, you would have seen the output that resembles the native look and feel of an iOS device. When you view the same application on an Android or Blackberry device, you will see that the application renders differently on these devices. The framework takes care of rendering the application on different mobile platforms in a way that gives a native look and feel to your application. The framework supports adaptive rendering on iOS, Android, and Blackberry platforms.
Let's take a look at the applications we have built in the previous recipes and see how they render on different devices. Applications containing
NavbarandTabStripwill be displayed as shown in the following screenshot:
Notice how the application changes the layout on the Android device to show the
TabStripwidget at the top and also the look and feel of theListViewwidget. Another thing to notice here is thatNavbaris not visible on the Android device. To force the application to the show theNavbarwidget on an Android device, you can add the following CSS code snippet:.km-android .km-navbar .km-view-title { visibility: visible; }This forces the application to the show Navbar and it is rendered at the bottom of the screen:

The adaptive rendering capability of the Kendo Mobile framework certainly allows you to build applications rapidly without being concerned about its rendering on different platforms. However, in some scenarios, you would like to render the same look and feel across all platforms. For example, you would like the iOS look and feel to be applied across all platforms. The framework can be configured to force the look and feel of a particular platform. To do that, specify the platform property with the platform name as its value when initializing the application.
var app = new kendo.mobile.Application(document.body, {
  platform: "ios"
  });
The previous code snippet will force the application to render the iOS look and feel on all platforms.
Another functionality that the framework provides is in handling of the change in the layout orientation. The framework re-renders the application when the layout's orientation is changed from portrait to landscape and vice versa.
Take a look at the same application containing the
Navbar, aTabStripwidget, and a list of elements inListView.When you change the orientation of the device, the framework's layout engine will automatically position elements as shown in the following screenshot:

As shown in the previous screenshot, the layout changes to adapt to the new orientation.
