


In order to write effective jQuery, it's important to write well marked-up HTML. Browsers are generally forgiving, and will render most markup to the best of their abilities. But jQuery, which has been referred to as the "find-something/do-something" framework, accomplishes the "find-something" part with its powerful selector engine (see http://api.jquery.com/cateogry/selectors/).
For example, including <thead>, <tbody>, and <tfoot> tags in your table give jQuery direct access to those DOM elements. Consider the following table markup:
<table id="myTable">
<thead>
<tr><th>Column 1</th></tr>
<tr><th>Column 2</th></tr>
</thead>
<tfoot>
<tr><td colspan="2">© Charlie Griefer. So there!</td></tr>
</tfoot>
<tbody>
<tr>
<td class="firstColumn">Column 1 data</td>
<td>Column 2 data</td>
</tr>
<tr>
<td class="firstColumn">More Column 1 data</td>
<td>More Column 2 data</td>
</tr>
</tbody>
</table>With the properly structured table, selecting the <tr> in the table footer is as simple as:
$( "#myTable tfoot tr" );
What this does is select the element with an ID of myTable, then selects that element's <tfoot>, and then <tr> within.
Without the <tfoot> tag, the selector would look more like:
$( "#myTable tr:last" );
While this selector doesn't look any worse, what it's doing is actually selecting all of the <tr> elements within the table, and then filtering out all but the last of the rows. This is inefficient at best. Why select all of the rows if you only want one?
Another aspect of well marked-up HTML that helps tremendously with jQuery is the use of id and class attributes.
An id, as the name implies, should identify a unique element. There should only be one ID of a given value on any particular page. The table in the preceding markup has an ID of myTable. Not particularly original, but descriptive. No other elements on the page should be assigned that ID.
A class, on the other hand, is reused and identifies a group of elements. The preceding markup shows that all of the <td> elements that make up the first column have a class of firstColumn. This would allow us to easily display all of the text in all cells in the first column in bold via:
$( "#myTable .firstColumn" ).css( "font-weight", "bold" );
Prefacing the class with the ID of the element is optional. The following code works as well:
$( ".firstColumn" ).css( "font-weight", "bold" );
But this code searches the entire page for any elements with the class of firstColumn. The first code sample is concerned only with elements inside of a specified element. This makes it more efficient.
Besides a well marked-up table, the only other thing you need to get started is jQuery itself.
Including jQuery into your pages is simple. You can either download it from http://www.jquery.com/download/, or include it from a CDN such as Google's or jQuery's.
All of the code samples in this book will include the beta version of jQuery 2.0 from jQuery's CDN. However, all of the recipes should work with any recent version of jQuery.
jQuery 2.0 should work with most modern browsers. See http://jquery.com/browser-support/ for the list of supported browsers in both jQuery 2.0 as well as jQuery 1.9. If any of the code samples fail to run in your browser, please either update to a newer browser, or modify the code samples to include and use an older version of jQuery that supports your browser.
In this section, we will add color to alternate rows so that we can easily distinguish between the table rows.
You will need a simple HTML table. The table can be written by hand in HTML, or generated by a client-side language, such as PHP. The beauty of the jQuery solution is that it is completely unobtrusive to the markup. Your sample table might look as follows:

Give the table an
idattribute. As a general rule, most elements should have eitheridorclassattributes, and many times both. This will make them easier to be selected via jQuery. For this recipe, give the table anidofplanetsTable,<table id="planetsTable">.Add some rows to the
tbodyas follows:<tr> <td>Mercury</td> <td>1,516 miles (2,440 km)</td> <td>74,800,000 km<sup>2</sup></td> <td>35,980,000 miles (57,910,000 km)</td> <td>No</td> </tr> <tr> <td>Venus</td> <td>3,760 miles (6,052 km)</td> <td>460,200,000 km<sup>2</sup></td> <td>67,240,000 miles (108,200,000 km)</td> <td>No</td> </tr>Tip
Downloading the example code
You can download the example code files for all Packt books you have purchased from your account at http://www.packtpub.com. If you purchased this book elsewhere, you can visit http://www.packtpub.com/support and register to have the files e-mailed directly to you.
With the table in place, you can now write the jQuery to perform the row striping as follows:
<script type="text/javascript">
  $( document ).ready( function() {
    $( "#planetsTable tbody tr:even" ).css( "background-color", "#CECECE" );
  });
</script>
Now when the page is rendered, you should see a nicely striped table as shown in the following screenshot:
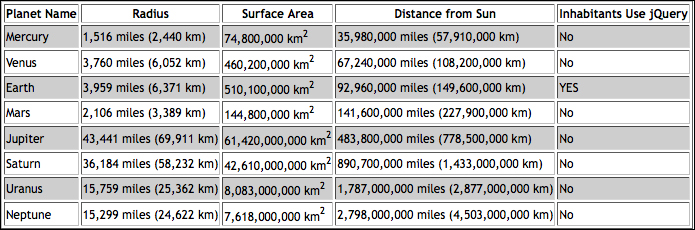
This one-liner makes use of jQuery selectors to first find every even row within the tbody of the table with the planetsTable ID. ID values should be unique, so there should be only one.
An id attribute in jQuery is identified with a # character. #planetsTable tells jQuery to select that particular table, but you need to drill further down to get into the table rows.
The next piece of the selector is tbody tr. You've directed jQuery to select the table rows that are inside the tbody of the table with an ID of planetsTable. But you need to drill further down to get every other row.
The selected table rows are part of a collection. Applying the :even selector to the collection returns records whose index is even, starting with 0.
Reading back to front, you've selected every other table row (evens, in this case) that belong to the tbody of the table with the ID of planetsTable.
You have successfully found something. Now, you need to do something.
In this case, you're going to use jQuery's built-in css() method. The css() method, when used as a setter, takes two arguments. First, the CSS property to set, and second, the value to set. In this case, set the background-color property to #ECECEC. This is done via .css( "background-color", "#ECECEC" ).
Putting it all together, you have the following:
$( "#planetsTable tbody tr:even" ).css( "background-color", "#ECECEC" );
As with the :even selector, jQuery also has an :odd selector. They both work the same, so use whichever one looks more appealing to you.
Declaring a style inline, as in the css() method, is a bit of a "code smell". Styles should ideally be defined in classes in a valid <style> block or an external CSS file. With that in mind, let's see the following class declaration:
<style type="text/css">
  .trGrey { background-color: #ECECEC; }
</style>.
The table row colors can be manipulated with jQuery's built-in addClass() method:
$( "#planetsTable tbody tr:even" ).addClass( "trGrey" );
This allows the CSS, which is a style concern, to be modified without touching the jQuery, which is a code concern.
This section shows us how to use jQuery to create an array of cells that make up a table column, add the values together, and display the total in the bottom-row.
You will need a simple HTML table (this will be a recurring theme under each Getting ready section). Make sure your table has a <tfoot> section with one row, which will hold the sums. Make sure your table has a <tfoot> section with one row, which will hold the sums.

Once again, give the table an
idattribute. The table should have a column of numeric values that can be added together.<table border="1" id="populationTable">
Add a
theadand a few rows to thetbody, as follows:<thead> <tr> <th>Country</th> <th>Population</th> </tr> </thead> <tbody> <tr> <td>Canada</td> <td class="numeric">34482779</td> </tr> <tr> <td>China</td> <td class="numeric">1344130000</td> </tr> </tbody>Don't forget to add the
tfootbefore closing the table!<tfoot> <tr> <td> </td> <td id="sum" class="numeric"> </td> </tr> </tfoot> </table>The following script will sum all of the values in the Population column, and display that sum in the table footer:
<script type="text/javascript">
  $( document ).ready( function() {
    var sum_population = 0;
    $( "#populationTable tbody tr ).each( function( index ) {
      sum_population += $( this )children().eq( 1 ).text() * 1;
    });

    $( "td#sum" ).text( sum_population );
  });
</script>
Refresh or load the page with the script in place, and you should see a sum in the footer of your table's numeric column:

Start off by declaring a local variable called sum_population and set it to 0.
Now look at the selector:
$( "#populationTable tbody tr" )
This isn't much different than the selector used in the previous recipe, Table row striping (Must know). It's simply selecting all of the table rows within the table body.
With this collection of <tr> elements selected, loop over that collection, summing the text of the second <td> in each row. You can perform that loop with jQuery's built-in each() iterator. Each() iterates over a jQuery collection. For each iteration of this loop, add the text in the second <td> of the current row.
sum_population += $( this ).children().eq( 1 ).text() * 1;
The syntax is standard JavaScript shorthand syntax for adding a value to an existing value, and assigning the result to the existing value. In other words, a = a + b is more concisely written as a += b.
For each iteration of the loop, $( this ) is a reference to a <tr> element. To get the <td> elements that exist within the <tr>, use jQuery's children() method, which will return the collection of <td> elements. Elements at specific index positions within a collection can be referenced via eq(), which takes a single integer argument, the index position to select. Remember that jQuery indexes are zero based, so the second <td> is at the index position 1. To get the text from <td>, use jQuery's built-in text() method.
Because JavaScript is a typeless language, it's not uncommon to see 1 + 2 evaluated as 12. "+" is not only the addition operator, but also the concatenation operator. At runtime, JavaScript tries to determine types of variable values. If it determines that they're numeric, it adds them. If it determines that they're strings, it concatenates them. Multiplying the values by 1 removes any ambiguity and firmly establishes to the JavaScript engine that the values are numeric.
Once the iterations are complete, the sum of the values is stored in the sum_population variable, which is displayed in the table footer.
$( "td#sum" ).text( sum_population );
This is a very straightforward selector. Select the <td> element with an id attribute of "sum". Once that element is found, set the text to the current value of sum_population.
Each of the <td> elements that display the population numbers has a class attribute of numeric. This was initially done in order to assign a style to those elements and align the text to the right.
It also allows you to use the class name in your selectors. The current selector works just fine, but so would the following, which is arguably cleaner:
$( "#populationTable tbody tr td.numeric" )
Rather than selecting all of the <td> elements by index value, they're now selecting them by class name. This is also safer, as it's not out of the realm of possibility to think that additional columns could be added to the table. Maybe before the "population" column, "latitude" and "longitude" columns are added. Now the "population" column is at index position 3, and the selector is no longer valid.
It's also arguably more efficient as it only selects the specific <td> that it needs. The prior code sample selected all the <td> elements, and then filtered out those that don't meet a second criteria. Why select something if it's just going to be filtered out?
Click a link to trigger hiding or displaying of table rows.
Once again, start off with an HTML table. This one is not quite as simple a table as in previous recipes. You'll need to create a few <td> tags that span the entire table, as well as provide some specific classes to certain elements.

Again, give the table an
idattribute. Each of the rows that represent a department, specifically the rows that span the entire table, should have a class attribute value ofdept.<table border="1" id="employeeTable"> <thead> <tr> <th>Last Name</th> <th>First Name</th> <th>Phone</th> </tr> </thead> <tbody> <tr> <td colspan="3" class="dept"> </td> </tr>Each of the department names should be links where the
<a>elements have a class ofrowToggler.<a href="#" class="rowToggler">Accounting</a>
Each table row that contains employee data should have a class attribute value that corresponds to its department.
Note
Note that class names cannot contain spaces. So in the case of the
Information Technologydepartment, the class names should beInformationTechnologywithout a space. The issue of the space will be addressed later.<tr class="Accounting"> <td>Frang</td> <td>Corey</td> <td>555-1111</td> </tr>
The following script makes use of the class names to create a table whose rows can be easily hidden or shown by clicking a link:
<script type="text/javascript">
$( document ).ready( function() {
  $( "a.rowToggler" ).click( function( e ) {
    e.preventDefault();
    var dept = $( this ).text().replace( /\s/g, "" );
    $( "tr[class=" + dept + "]" ).toggle();
  })
});
</script>
With the jQuery implemented, departments are "collapsed", and will only reveal the employees when the link is clicked.

The jQuery will "listen" for a click event on any <a> element that has a class of rowToggler. In this case, capture a reference to the event that triggered the action by passing e to the click handler function.
$( "a.rowToggler" ).click( function( e )
In this case, e is simply a variable name. It can be any valid variable name, but e is a standard convention. The important thing is that jQuery has a reference to the event. Why? Because in this case, the event was that an <a> was clicked. The browser's default behavior is to follow a link. This default behavior needs to be prevented.
As luck would have it, jQuery has a built-in function called preventDefault(). The first line of the function makes use of this by way of the following:
e.preventDefault();
Now that you've safely prevented the browser from leaving or reloading the page, set a variable with a value that corresponds to the name of the department that was just clicked.
var dept = $( this ).text().replace( /\s/g, "" );
Most of the preceding line should look familiar. $( this ) is a reference to the element that was clicked, and text() is something you've already used. You're getting the text of the <a> tag that was clicked. This will be the name of the department.
But there's one small issue. If the department name contains a space, such as "Information Technology", then this space needs to be removed.
.replace( /\s/g, "" )
replace() is a standard JavaScript function that uses a regular expression to replace spaces with an empty string. This turns "Information Technology" into "InformationTechnology", which is a valid class name.
The final step is to either show or hide any table row with a class that matches the department name that was clicked.
Ordinarily, the selector would look similar to the following:
$( "tr.InformationTechnology" )
Because the class name is a variable value, an alternate syntax is necessary.
jQuery provides a way to select an element using any attribute name and value. The selector above can also be represented as follows:
$( "tr[class=InformationTechnology]" )
The entire selector is a literal string, as indicated by the fact that it's enclosed in quotes. But the department name is stored in a variable. So concatenate the literal string with the variable value:
$( "tr[class=" + dept + "]" )
With the desired elements selected, either hide them if they're displayed, or display them if they're hidden. jQuery makes this very easy with its built-in toggle() method.
Use built-in jQuery traversal methods and selectors to parse the contents of each cell in a table and apply a particular style (for example, a yellow background or a red border) to all cells that meet a specified set of criteria.
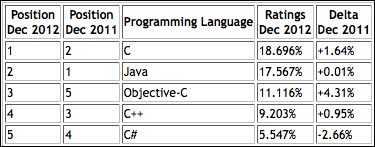
Borrowing some data from Tiobe (http://www.tiobe.com/index.php/content/paperinfo/tpci/index.html), create a table of the top five programming languages for 2012. To make it "pop" a bit more, each <td> in the Ratings column that's over 10 percent will be highlighted in yellow, and each <td> in the Delta column that's less than zero will be highlighted in red. Each <td> in the Ratings column should have a class of ratings, and each <td> in the Delta column should have a class of delta.
Additionally, set up two CSS classes for the highlights as follows:
.highlight { background-color: #FFFF00; }      /* yellow */
.highlight-negative { background-color: #FF0000; }  /* red */
Initially, the table should look as follows:
Once again, give the table an
idattribute (but by now, you knew that), as shown in the following code snippet:<table border="1" id="tiobeTable"> <thead> <tr> <th>Position<br />Dec 2012</th> <th>Position<br />Dec 2011</th> <th>Programming Language</th> <th>Ratings<br />Dec 2012</th> <th>Delta<br />Dec 2011</th> </tr> </thead>
Apply the appropriate class names to the last two columns in each table row within the
<tbody>, as shown in the following code snippet:<tbody> <tr> <td>1</td> <td>2</td> <td>C</td> <td class="ratings">18.696%</td> <td class="delta">+1.64%</td> </tr>
With the table in place and properly marked up with the appropriate class names, write the script to apply the highlights as follows:
<script type="text/javascript">
$( document ).ready( function() {
  $( "#tiobeTable tbody tr td.ratings" ).each( function( index ) {
    if ( parseFloat( $( this ).text() ) > 10 ) {
      $( this ).addClass( "highlight" );
    }
  });

  $( "#tiobeTable tbody tr td.delta" ).each( function( index ) {
    if ( parseFloat( $( this ).text() ) < 0 ) {
      $( this ).addClass( "highlight-negative" );
    }
  });
});
</script>
Now, you will see a much more interesting table with multiple visual cues:

The selector for the Ratings column is almost identical to the selector used in the Sum columns (Must know) recipe. Select the <td> elements within the tbody tag's table rows that have a class of ratings. As with the code in the Sum columns (Must know) recipe, use jQuery's each() function to iterate over the collection.
For each iteration of the loop, test whether or not the value (text) of the <td> is greater than 10. Because the values in <td> contain non-numeric characters (in this case, % signs), we use JavaScript's parseFloat() to convert the text to actual numbers:
parseFloat( $( this ).text() )
Much of that should be review. $( this ) is a reference to the element in question. text() retrieves the text from the element. parseFloat() ensures that the value is numeric so that it can be accurately compared to the value 10.
If the condition is met, use addClass() to apply the highlight class to <td>. Do the same thing for the Delta column. The only difference is in checking to see if the text is less than zero. If it is, apply the class highlight-negative.
The end result makes it much easier to identify specific data within the table.
Pressed for space? Don't want to overwhelm your users with too much data at once? Paginate.
For this recipe, we're back to a relatively simple HTML table. No special classes are needed for the purpose of this exercise, as we're going to be focused exclusively on an array of rows within the table. Specifically, rows within the table body.
As always, create a table with a unique ID. Also for this recipe create a style block to add some formatting as follows:
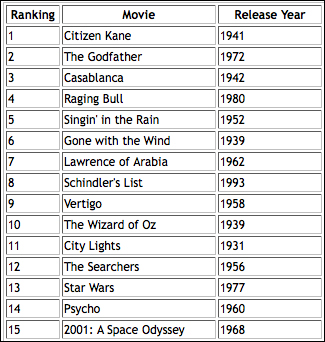
<style type="text/css">
  table, a.paginate { font: normal 75% "Trebuchet MS", Verdana, Helvetica, Arial, sans-serif; }
  th.ranking { width: 50px; }
  th.title { width: 150px; }
  th.year { width: 100px; }
</style>

<table border="1" id="pagetable">
<thead>
  <tr>
    <th class="ranking">Ranking</th>
    <th class="title">Movie</th>
    <th class="year">Release Year</th>
  </tr>
</thead>
Next add some rows in the
tbodytag:<tbody> <tr> <td>1</td> <td>Citizen Kane</td> <td>1941</td> </tr> <tr> <td>2</td> <td>The Godfather</td> <td>1972</td> </tr> … <tr> <td>15</td> <td>2001: A Space Odyssey</td> <td>1968</td> </tr> </tbody>Pagination wouldn't be worth much without Previous and Next links. Create a
divunderneath the table to hold each link. Give both links a class ofpaginate, but give each a unique ID as follows:<div> <a href="#" class="paginate" id="previous">Previous</a> | <a href="#" class="paginate" id="next">Next</a> </div>
All that's left is to set up the script. For now page four records at a time:
<script type="text/javascript"> $( document ).ready( function() { var firstRecord = 0; var pageSize = 4; var tableRows = $( "#movies tbody tr" ); $( "a.paginate" ).click( function( e ) { e.preventDefault(); if ( $( this ).attr( "id" ) == "next" ) { if ( firstRecord + pageSize <= tableRows.length ) { firstRecord += pageSize; } } else { if ( firstRecord != 0 ) { firstRecord -= pageSize; } } paginate( firstRecord, pageSize ); }); var paginate = function( startAt, pageSize ) { var endAt = startAt + pageSize – 1; $( tableRows ).each( function( index ) { if ( index >= startAt && index <= endAt ) { $( this ).show(); } else { $( this ).hide(); } }); } paginate (firstRecord, pageSize ); }); </script>The table is now less overwhelming, and allows the user to page through via Previous and Next links, as shown in the following screenshot:

There's quite a lot happening here. Start off by defining three variables as follows:
firstRecord: All of the table rows will be stored in an array. This variable holds the value, or the array index position, of the row that's currently being displayed at the first position.pageSize: How many records do we want to display per page? This value is referred to several times in the code, so assigning it to a variable makes it easier to change down the road, should the need arise.tableRows: A collection of all of the rows in the table. The selector syntax used to select the rows should be familiar by now.$( "#pagetable tbody tr" )
Next, listen for a click event that occurs on an <a> element with a class of paginate. This would be both the Previous and Next links.
$( "a.paginate" ).click( function( e )
Make sure the browser doesn't try to reload the page or follow the link by preventing the default behavior from occurring. You did this in the Show/hide rows (Must know) recipe.
e.preventDefault();
The next bit of code conditionally checks to see which link was clicked, the Previous link or the Next link. This is done by checking the id attribute. Remember, while each link has the same class name, each link has a unique ID.
if ( $( this ).attr( "id" ) == "next" )
The first condition fires if the Next link is clicked. The else obviously fires if the Previous link is clicked.
Regardless of which link is clicked, calculate a new value for the firstRecord variable. To start, firstRecord variable's value is 0. Guard conditions within each of the Previous and Next conditions ensure that the value of firstRecord can neither fall below 0, nor exceed the number of records in the collection.
The guard condition around the Next link is as follows:
if ( firstRecord + pageSize <= tableRows.length ) {
firstRecord += pageSize;
}The value of firstRecord should never exceed the number of records in the collection. In order to check that clicking on Next will not result in that happening, add the value of pageSize (currently set to 4) to the value of firstRecord (initially 0). As long as that condition is met, a new value can be set for firstRecord.
The guard condition around Previous is a bit more straightforward:
if ( firstRecord != 0 ) {
firstRecord -= pageSize;
}As long as the user is not on the first page, where the value of firstRecord is 0, "activate" the Previous link by setting the value of firstRecord to be firstRecord minus the value of pageSize.
If either condition is not met, the existing value of firstRecord simply remains unchanged.
With the value of firstRecord now properly calculated (either to reflect moving forward or backwards, or staying the same in the case that upper/lower boundaries are exceeded), call a named function, passing in both the calculated value for firstRecord as well as pageSize.
paginate( firstRecord, pageSize );
Let's look at that the function a little more closely:
var paginate = function( startAt, pageSize ) {
var endAt = startAt + pageSize - 1;
$( tableRows ).each( function( index ) {
if ( index >= startAt && index <= endAt ) {
$( this).show();
} else {
$( this ).hide();
}
});
}
paginate() knows which record to start with, as that value is passed in as an argument to the function. Within the function, the first line calculates the record to end with.
The script has determined which rows to display. It will either be rows 0-3, 4-7, 8-11, or 12-14. Remember that JavaScript is a zero-based system, and the records are being paged four at a time. All of the rows are stored in our tableRows variable. You're already familiar with jQuery's each() function, as it was used in the Sum columns (Must know) and Highlighting cells (Must know) recipes. Loop over the table rows and use jQuery's built-in show() and hide() methods as needed.
$( tableRows ).each( function( index ) {
if ( index >= startAt && index <= endAt ) {
$( this).show();
} else {
$( this ).hide();
}
});You've used each() before, but you haven't yet made use of the index variable. index simply holds the value of the current iteration of the loop. You're free to name it anything you'd like.
For each iteration of the loop, a conditional runs to determine whether or not the index value of the current element in the collection (the table row) falls in between the startAt and endAt values.
If the current value of index is within the specified range, display the table row by applying jQuery's .show() function.
Otherwise, hide the table row by applying jQuery's .hide() function.
Both show() and hide() are built-in jQuery methods that manipulate an element's display property.
The final line of the script block kicks off the pagination by explicitly calling paginate() with a startAt value of 0.
This is a fairly simple/straightforward demonstration of client-side pagination. However, it's not particularly user friendly.
For example, it might be nice to disable the Previous and Next links if the user is at the first or last page within the set.
It also might be nice to display a div above and/or below the table that shows a message, "Now displaying n-m of x records".
But now that we've done the basics, try making the interface a bit more user friendly on your own for extra credit.
Paginating on the client side, as we did in the previous recipe, is great, but it's not necessarily efficient. If you only want to display four records, why retrieve more than that? If you have a database such as Microsoft SQL Server, MySQL, or PostgreSQL, for example, and a server-side language such as PHP, Ruby, or ASP.NET, you can use jQuery's built-in AJAX functions to retrieve specific subsets of data.
We're not going to delve into the server-side code, as that will vary depending on your choice of server-side technologies. Even within a given technology, there are often various frameworks and/or approaches.
What we'll discuss is how to use jQuery on the client side to communicate with your server. I'm going to trust that you'll know how to write the server-side code to query your database and return the appropriate JSON data.
For this recipe, start off with the simplest table of all. Use the same data as in the previous recipe, but start off with a completely empty table body. Keep the Previous and Next links, as they'll still be needed.

Create the table with an ID of your choice. Leave the
tbodytag empty. On the initial page load, an AJAX call will retrieve data from the server, and populate the rows within thetbody.<table border="1"> <thead> <tr> <th class="ranking">Ranking</th> <th class="title">Movie</th> <th class="releaseYear">Release Year</th> </tr> </thead> <tbody> </tbody> </table>Reuse the same Previous and Next links that were used in the previous recipe:
<div>
  <a href="#" class="paginate" id="previous">Previous</a> |
  <a href="#" class="paginate" id="next">Next</a>
</div>
Finally, add the script. Continue to page four records at a time.
<script type="text/javascript">
$( document ).ready( function() {
  var firstRecord = 0;
  var pageSize = 4;

  var recordcount = $.ajax({
    type: "GET",
    url: "_recordcount.php",
    async: false
  }).responseText;

  $( "a.paginate" ).click( function( e ) {
    e.preventDefault();

    if ( $( this ).attr( "id" ) == "next" ) {
      if ( firstRecord + pageSize <= recordcount ) {
        firstRecord += pageSize;
      }
    } else {
      if ( firstRecord != 0 ) {
        firstRecord -= pageSize;
      }
    }

    paginate( firstRecord, pageSize );
  });

  var paginate = function( startAt, pageSize ) {
    $( "#movies tbody tr" ).remove();

    $.ajax({
      type: "POST",
      url: "_paginate.php",
      data: { startAt: firstRecord, pageSize: pageSize },
      dataType: "json"
    }).done( function( data ) {
      $.each( data, function( index, val ) {
        var tablerow = "<tr><td>" + val[ 0 ] + "</td><td>" + val[ 1 ] + "</td><td>" + val[ 2 ] + "</td></tr>";
        $( "#movies tbody" ).append( tablerow );
      });
    });
  }

  paginate( firstRecord, pageSize );
});
</script>
The table should initially load with the first four records displayed, even though the table markup was empty:

Once again, there's quite a lot happening here, but some of it should be familiar from the previous recipe.
Let's start by defining three variables:
firstRecord: All of the table rows will be stored in an array. This variable holds the value, or the array index position, of the row that's currently being displayed at the first position. This is exactly the same as in the previous recipe.
pageSize: How many records do we want to display per page? This value is referred to several times in the code, so assigning it to a variable makes it easier to change down the road, should the need arise. This is exactly the same as in the previous recipe.
recordcount: In the previous recipe, there was a variable called
tablerows, which held the number of rows in the table. That was used to ensure that the user didn't try to page past the number of total rows. But since the data is being retrieved only as it's needed, the total number of table rows isn't immediately known. So make the first of two$.ajax()calls. Take a closer look at the$.ajax()call before moving on:var recordcount = $.ajax({ type: "GET", url: "_recordcount.php", async: false }).responseText;
$.ajax() is a built-in jQuery function. The options being used here are as follows:
type: "GET"– No data is being posted, justGETtherecordcount.URL:– This is the page that jQuery will interact with.async: false– Because the result of this AJAX call is being assigned to a variable, it should not happen asynchronously. If it does, there is a risk of trying to reference the variable before the value is set.
The AJAX call returns an object. Among the properties returned is the responseText. That's the specific value that is assigned to the recordcount variable.
Now that the total number of records is known, continue.
The next section handles the click events on the Previous and Next links. This block remains unchanged from the previous recipe. Simply calculate the firstRecord variable for the next set of records, and call the paginate() function.
The paginate() function itself is rather different than in the previous recipe, but still fairly straightforward.
The first thing to do is to remove all of the table rows within the table body. On initial page load, there are none, but subsequent calls to the function will have some displayed. Removing the rows is accomplished using jQuery's built-in remove() method.
$( "#movies tbody tr" ).remove();
Now for another AJAX call, this time to retrieve the records. It's similar to the first AJAX call with a couple of notable exceptions. First, it's doing a POST rather than a GET, because data is being sent to the server. That data is the startAt value and the pageSize value. Because JSON is being sent back, specify that as the dataType.
The returned data will look as follows (taken from Firefox's Firebug plugin):

This is an array of arrays. Loop over that data manually, and construct the table rows to be displayed.
This looping is done via the .done() method, which is built into the $.ajax() object. The done() method has a hook into the data that was returned from the AJAX call. Being the creative sort, I refer to that in the code as data. This is just a variable name, however. You can name it whatever you like. In this case, movierecords might have been a more descriptive name.
Loop over that array data via jQuery's $.each() function. You've seen something similar before, where .each() was used to iterate over a jQuery collection. In this case, it's not a reference to a specific jQuery object or collection, but a generic iterator that's part of jQuery itself. In fact, the $ in front of it is a direct reference to jQuery.
$.each() takes two arguments. The object that will be iterated over, and a callback function that holds an index variable and a variable reference to the current item:
$.each( data, function( index, val )
For each loop iteration, create a table row with three table cells. The value of each cell will be val[ 0 ], val[ 1 ], and val[ 2 ]. Remember that the arrays are zero-based. The constructed table row is then assigned to a variable, tablerow (yes, once again, creatively named).
var tablerow = "<tr><td>" + val[ 0 ] + "</td><td>" + val[ 1 ] + "</td><td>" + val[ 2 ] + "</td></tr>";
The final step is to append the newly constructed table row into the table body of the table. .append() is another built-in jQuery function that, surprisingly enough, appends an element into an existing element.
$( "#movies.tbody" ).append( tablerow );
That's it for the function. All that's left to do is to call it on initial page load, and four rows should appear in the table.
While it's much nicer to only retrieve the specific records to display, this can still be cleaned up a bit. As with client-side paging, you might want to disable the Previous and Next links when the user is at the lower or upper boundaries of the recordset.
Additionally, we show a great deal of faith that our server will be up and running, and that our server-side code will be error free. As with the .done() method, $.ajax() also has a built-in .error() method that will fire if something unexpected should occur. It's probably a good idea to make use of this and be prepared for the worst.
Add interactivity to your HTML tables by allowing users to sort table columns.
Stick with the table of the top 15 movies that's been used a few times already. Unlike the last recipe, where we started with an empty table body, this time we'll populate all 15 rows.
Start with the same table that was used in the past few recipes. Because columns will be sorted by clicking on the headers, add
<a>elements to the table header text. Each<a>element should have a class of sorter and a unique ID,column_n, wherenis the number of the column in the table, starting at0.<table border="1" id="movies"> <thead> <tr> <th class="ranking"> <a href="#" class="sorter" id="column_0">Ranking</a> </th> <th class="title"> <a href="#" class="sorter" id="column_1">Movie</a> </th> <th class="releaseYear"> <a href="#" class="sorter" id="column_2">Release Year</a> </th> </tr> </thead>Manually enter all of the movies into rows in the
tbody, as follows:<tbody> <tr> <td>1</td> <td>Citizen Kane</td> <td>1941</td> </tr> <tr> <td>2</td> <td>The Godfather</td> <td>1972</td> </tr> … <tr> <td>15</td> <td>2001: A Space Odyssey</td> <td>1968</td> </tr> </tbody>
Finally, add the sorting script, as follows:
<script type="text/javascript">
$( document ).ready( function() {
  var tablerows = $( "#movies tbody tr" ).get();

  $( "a.sorter" ).click( function( e ) {
    e.preventDefault();

    $( "#movies tbody tr" ).remove();

    // on which column are we sorting?
    var sort_pos = $( this ).attr( "id" ).split( "_" )[ 1 ];

    tablerows.sort( function( a, b ) {
      var atext = $( a ).children( "td" ).eq (sort_pos ).text();
      var btext = $( b ).children( "td" ).eq( sort_pos ).text();

      var nums_only = /^\d+$/;
      if ( nums_only.test( atext ) ) atext *= 1;
      if ( nums_only.text( btext ) ) btext *= 1;

      if ( atext == btext ) return 0;
      return atext < btext ? -1 : 1;
    });

    $.each( tablerows, function( index, tablerow ) {
      $( "#movies tbody" ).append( tablerow );
    });
  });

});
</script>
The first thing to do is to get an array of the table rows. Once again, jQuery makes this ridiculously simple with its built-in get() function. Assign this array to a variable, since it will be referenced later.
var tablerows = $( "#movies tbody tr" ).get();
The selector itself should be familiar by now. The only thing that's new is the addition of .get(), which will create an array of the elements retrieved.
Each of the table headers is surrounded by an <a href> tag with a class attribute of sorter. Listen for a click event on those elements to kick off the function:
$( "a.sorter" ).click( function( e ) {Because a link was clicked, prevent the default behavior via e.preventDefault(). This was used in previous recipes, so it should be familiar.
As in the previous recipe, clear out all of the table rows within the table body. They'll be added back once they're properly sorted. But before that is done, they need to be removed.
$( "#movies.tbody tr" ).remove();
Now it starts to get a little bit trickier. Determine which column should be sorted. Each of the header links contains a unique ID whose value has a very specific format: column_n, where n is the index of the column. Start the index at 0, so there are IDs column_0, column_1, and column_2.
This specific format will allow you to get the ID via $( this ).attr( "id" ). You can then use JavaScript's built-in split() function to explode the string into an array. split() takes a string argument, which is the substring or pattern on which to split the original string. Use the underscore character to create the array. Because the ID values are all in the column_n format, split() will result in a two element array. The first element, which is at the 0 position, will hold the literal string column. The second element, which is at the 1 position, will hold the column number.
var sort_pos = $( this ).attr( "id" ).split( "_" )[ 1 ];
sort_pos now holds the value 0, 1, or 2, for this table.
Now for the actual sort. JavaScript provides a .sort() method that works on arrays. This isn't jQuery, but standard JavaScript. It's a pretty straightforward algorithm that looks as follows:
array.sort( function( a, b ) {
  if ( a == b ) return 0;
  if ( a < b ) return -1;
  if ( a > b ) return 1;
}
Kick off the sort function on the tablerows array as follows:
tablerows.sort( function( a, b ) {Unfortunately, that can't be used directly. The array holds table rows. Table row a can't be compared to table row b. The text is in a specific td within table row a and table row b.
var atext = $( a ).children( "td" ).eq( sort_pos ).text();
var btext = $( b ).children( "td" ).eq( sort_pos ).text();
Since both a and b reference specific table rows, drill down into that table row to a specific <td>, and grab the text using jQuery's .text() method.
$( a ) and $( b ) are jQuery hooks into the table rows being compared. This returns an array of the child td elements via .children( "td" ), but a specific td is needed. Remember that a variable sort_pos was set earlier? This is where it gets implemented. Having traversed down to the appropriate td element, use .text() to get its value.
Now run the comparisons for the sort algorithm, but use atext and btext rather than a and b.
if ( atext == btext ) return 0;
if ( atext < btext ) return -1;
if ( atext > btext ) return 1;
With that, the tablerows array is properly sorted. Loop over it and append each row back into the table body:
$.each( tablerows, function(index, tablerow) {
  $( "#movies tbody" ).append( tablerow );
});Note that if the Ranking column is sorted, the results are not 1,2,3,...,15 as one might expect. Rather, the results are 1,10,11,12,13,14,15,2,3,...9. This is also a result of JavaScript being a typeless language. JavaScript is seeing the values as strings, and the string 10 comes before the string 2.
It's a bit of a kludge, but you can do a test to see if the values being compared are numeric. If they are, multiply them by 1. This will leave the value unchanged, but let JavaScript know that these are numeric values.
Prior to the comparison, do the following:
var nums_only = /^\d+$/;
The nums_only variable is a regular expression that checks for one or more digits. Then use JavaScript's native .test() method to test the values. If they're true, multiply the value by 1. This will address the issue of sorting the numeric values.
if ( nums_only.test( atext ) ) atext *= 1;
if ( nums_only.test( btext ) ) btext *= 1;
This sort only sorts in one direction. Take this opportunity to allow a column heading to be clicked and re-sort the column in the opposite direction. If it was ascending, now sort it in descending order, and vice versa. As a hint, store some variables to allow you to determine which column is currently sorted, and in which direction. Then re-sort in the opposite direction, which would involve a small change to the sort algorithm.
With a reasonably-sized record set, client-side table sorting is a nice option. But if there are too many records, browsers might buckle under the strain. In those cases, let the server do the work and sort with AJAX.
As with the previous recipe that dealt with AJAX, we won't delve into the server-side code. I trust that you've got your favorite server-side language and database, and know how to set them up.
The initial setup for this chapter is exactly the same as it was for the previous recipe. Stick with the table of top movies. Assume a database table with columns Ranking, Movie, and Release Year.

As usual, create a table with a unique ID. As with the previous recipe, clicking the column headings will sort, but this time it's going to be a server-side sort. To simplify the server-side code, give each column ID values that correspond with the database column name. Continue to use
class="sorter"for all of the headings.<table border="1" id="movies"> <thead> <tr> <th> <a href="#" class="sorter" id="ranking">Ranking</a> </th> <th> <a href="#" class="sorter" id="movie">Movie</a> </th> <th> <a href="#" class="sorter" id="releaseYear">Release Year</a> </th> </tr> </thead>The
tbodywill contain all 15 movie rows, the same as in the previous recipe.The script will be notably different, since we're now going out to the server to retrieve the sorted records.
<script type="text/javascript">
  $( document ).ready( function() {

  $( "a.sorter" ).click( function( e ) {
    e.preventDefault();

    $( "#movies tbody tr" ).remove();

    $.ajax({
      type: "POST",
      url: "_sort.php",
      data: { orderby: $( this ).attr( "id" ) },
      dataType: "json"
    }).done( function( data ) {
      $.each( data, function( index, val ) {
        var tablerow = "<tr><td>" + val[ 0 ] + "</td><td>" + val[ 1 ] + "</td><td>" + val[ 2 ] + "</td></tr>";
        $( "#movies tbody" ).append( tablerow );
      });
    });
  });

});
</script>
Since there's absolutely nothing new about the table or markup, let's jump right into the script. Much of this should be just review, as there's nothing in this script that hasn't already been covered. Trigger the sort when a link with class sorter is clicked.
$( "a.sorter" ).click( function( e ) {As you know by now, prevent the default behavior so that the browser doesn't try to follow the link and/or reload the page.
Jumping right into the $.ajax() call. You've done an AJAX post before, where you sent startAt and pageSize as data. In this recipe, send a variable called orderby, which is the value of the id attribute of each of the links in the column headers. This is accessible via $( this ).attr( "id" ).
The .done() method that's baked into jQuery's $.ajax() is also something that has already been used. In fact, the entire body of the .done() method is identical here to the body of the .done() method in the Pagination – server side (Should know) recipe. Use jQuery's built-in $.each() iterator to loop over the results. With each iteration of the loop, construct a table row, and use .append() to append it to the tbody of the table.
The only real difference between the AJAX call in the Pagination – server side (Should know) recipe and the AJAX call here is what happens on the server. In the Pagination – server side (Should know) recipe, a specific subset of records was retrieved, which I did via mySQL's LIMIT directive.
For sorting, we're merely doing an ORDER BY in the SQL. The value of the ORDER BY is the value that passed as data in the $.ajax() call.
This should be pretty consistent among most databases.
For my setup using PHP and mySQL, the relevant code from _sort.php is as follows:
$orderby = $_POST[ "orderby" ];
$result = mysql_query( "SELECT `ranking`,`movie`,`releaseYear` FROM `movies` ORDER BY $orderby" );

$data = array();

while ( $row = mysql_fetch_row( $result ) ) {
  $data[] = $row;
}

echo json_encode($data);
As in the previous recipe, this sort only sorts in one direction. It should be a little bit easier to modify this one to be able to reverse the sort if a specific column head is clicked on twice. You'll still need to store a variable locally in order to know which column is sorted and in which direction, but there will be no need to modify the sort algorithm. There is none! Simply pass an "ASC" or "DESC" as part of the data to the $.ajax() call. It might look something similar to the following:
$.ajax({
            type: "POST",
            url: "_sort.php",
            data: { orderby: $( this ).attr( "id" ), direction: "ASC" },
            dataType: "json"
          })
A small modification to the server-side code to sort the ORDER BY in a particular direction is the only change needed.
Paging and sorting a table adds interactivity to your site, and can help your users locate specific bits of information. But if they know what they're looking for, rather than having to page or sort, it would be efficient to give them a filter field.
We've come to love it, so stick with the table of movies. This time, underneath the table, add a form field.
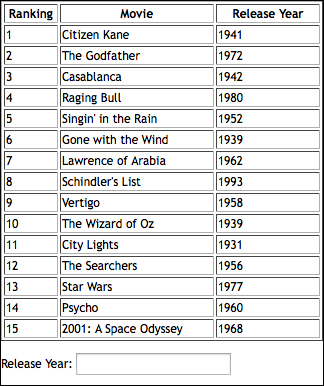
You should be able to bang out this particular table code in your sleep, so we'll forego displaying that code. But underneath the table, add a form field as follows:
<div>
  Release Year: <input type="text" name="filter" id="filter" />
</div>
The script will let users filter the release year. As they type into the form field, the
keyupevent will trigger the jQuery function, which will hide any rows that don't contain the text input by the user:<script type="text/javascript"> $( document ).ready( function() { $( "input#filter" ).keyup( function() { var filtertext = $( this ).val(); $( "#movies tbody tr" ).each( function( rowindex ) { $( this ).children( "td" ).eq( 2 ).each( function( cellindex ) { if ( $( this ).text().indexOf( filtertext ) < 0 ) { $( this ).parents( "tr" ).hide(); } else { $( this ).parents( "tr" ).show(); } }); }); }) }); </script>
Start off by listening for a keyup event this time, rather than the click event that has been used in previous recipes. It's implemented the same way:
$( "input#filter" ).keyup( function() {The first thing to do is to store the input in a local variable:
var filtertext = $( this ).val();
Now compare that text with the text in the Release Year column. To accomplish this, use two .each() loops.
The first loop will iterate over all of the rows in the tbody:
$( "#movies tbody tr" ).each( function( rowindex ) {With each loop over the table rows, then loop over each td at index position 2. Say it with me, indexes start at 0, so position 2 is column 3.
$( this ).children( "td" ).eq( 2 ).each( function( cellindex ) {With each iteration of the inner loop, compare the text in the td element to the text in the filter input. As long as the text in the td contains a substring of the text in the filter input, display it. For example, 193 would display 1932 and 1939, but would hide 1940, 1941, and so on. Do this with JavaScript's indexOf() function. indexOf() checks for the existence of a substring within a string. If the substring is not found, it returns -1. Otherwise, it returns the starting position of the first instance of the substring. For now, know that if the value returned is less than 0, the substring was not found, so hide the row.
if ( $( this ).text().indexOf( filtertext ) < 0 ) {
  $( this ).parents( "tr" ).hide();
} else {
   $( this ).parents( "tr" ).show();
}
Beyond just hiding rows that don't meet the criteria, use .show() to display rows that do, as they may have been hidden before, but now meet the filter criteria.
Filter functions can be very powerful. This was just a basic example of how to demonstrate the concept. You could have iterated over every table cell, or given the user a drop-down menu to select the column on which they want to filter. You also could have provided a submit button that filtered only when the button was clicked, rather than on each keyup.
I know what you've been thinking all this time. "Charlie, why do I need to know how to do these things when there are so many plugins available for jQuery?" That's a very good question.
There are numerous plugins available for jQuery, and specifically for table manipulation. Sometimes the plugins are overkill, though. Maybe a particular plugin doesn't work exactly the way you'd like it to. Perhaps your employer is shy about using third-party code (except, of course, for jQuery itself).
Plugins are great, and they are a significant part of the reason that jQuery is so popular. It's always good to know how to do something on your own, though. Of course once you know how, it never hurts to work smarter, and not harder.
There are two table-related plugins that I generally use when the need arises: tablesorter (http://tablesorter.com/docs/) and DataTables (http://www.datatables.net/).
For both tablesorter and DataTables, download the plugins to your server and call them from your pages. You still need to include jQuery, as the plugins assume you have jQuery set up properly.
After downloading the .js files from the URLs listed above, add appropriate link's paths to your page's <head> section. For example:
<script type="text/javascript" src="/path/to/jquery.tablesorter.min.js"></script>
<script type="text/javascript" src="/path/to/jquery.datatables.min.js"></script>
Some plugins also offer .css files, which will be needed to achieve a particular look and feel. We'll forego the aesthetics and dive right into functional implementation.
Both tablesorter and DataTables can be applied to any well-marked up HTML table. As per usual, assume a table with an ID of
movies.To apply tablesorter to the table, add the following script to the bottom of the page:
<script type="text/javascript">
  $( document ).ready( function() {
    $( "#movies" ).tablesorter();
  });
</script>
To apply DataTables to the table, add the following script to the bottom of the page:
<script type="text/javascript">
  $( document ).ready( function() {
    $( "#movies" ).dataTable();
  });
</script>
It may be worth pointing out that you would apply one plugin or the other to your
#moviestable, but not both!
For basic functionality, there's very little magic. Simply include the scripts as shown and the rest just works. That's the beauty of the extensible jQuery plugin architecture.
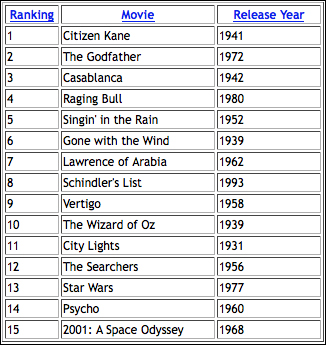
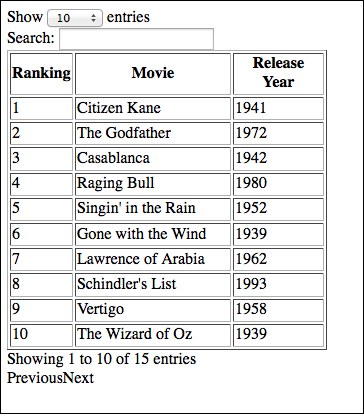
You might not notice any significant changes to the appearance of your table with either plugin. Although with DataTables you'll see some extra goodies around the table, such as a dropdown to display "n" records, a filter form field, and Previous/Next links for pagination. See the following screenshot for reference:
Both tablesorter and DataTables include CSS files with their downloads. Include them into the page in much the same way that you included the .js files, and you will have tables that are not only functional but also aesthetically pleasing.
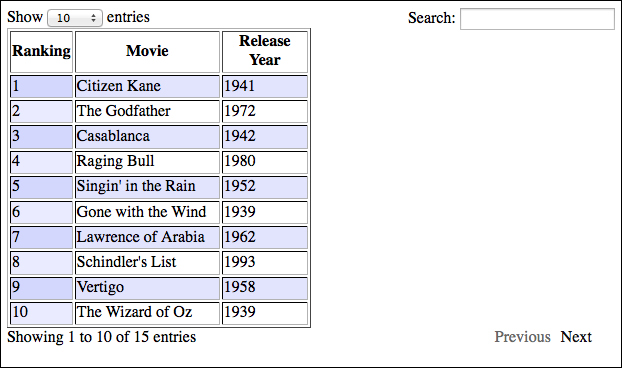
Add the following line to your tablesorter page:
<link rel="stylesheet" href="tablesorter.css" type="text/css" media="print, projection, screen" />
The preceding code yields the following table:
Likewise, add the following line of code to your DataTables page:
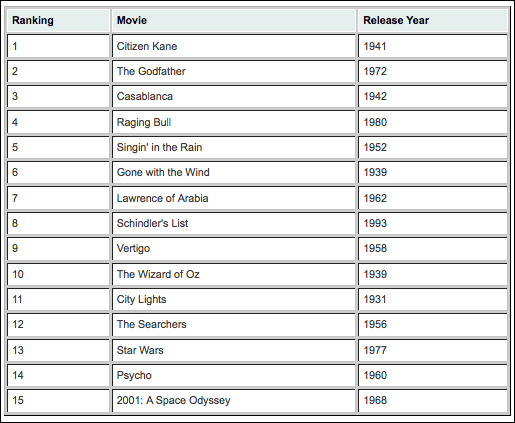
<link rel="stylesheet" href="dataTables.css" type="text/css" media="print, projection, screen" />
The preceding code yields the following table:
Both downloads include additional stylesheets as well as images, such as up/down arrows for column headers to indicate sorting. Additionally, you can tweak the styles as you see fit.
As impressive as the out-of-the-box functionality may be, both plugins also offer a number of options.
Tablesorter shows a number of examples at http://tablesorter.com/docs/#Examples. They include forcing a default sort order, appending table data with AJAX, and sorting fields that contain markup (for example, ignoring the markup and sorting on the text).
DataTables examples are located at http://www.datatables.net/examples/. While by default both tablesorter and DataTables can be utilized in a single line of code, and while they both have various options, DataTables is insanely configurable.
No disrespect to tablesorter. It essentially does one thing, and it does it well. If table sorting is all that you need, DataTables may be overkill. But for a Swiss army knife of table-related functionality, DataTables is impressive.