


Welcome to Instant HubSpot Dashboard Customization. HubSpot is a powerful all-in-one inbound marketing tool that helps a marketer to bring in more visitors to their website, convert visitors to leads, and transform those leads into sales.
This concise book will guide you through some of the customization features of HubSpot. It consists of easy, step-by-step procedures, from integrating your website with HubSpot to executing marketing campaigns and tracking the results. This book is ideal for anyone who wants to use HubSpot to help them attract more visitors to their website and convert them into leads.
Why add users to a HubSpot account? If you are a premium user, HubSpot gives you the option of creating multiple logins for an account. This feature can be used by an individual to assign tasks to team members within or outside their organization depending on their requirements. Do take a look at the How it works... section of this recipe to understand more about the user roles. Let's take a look at how we can add users and assign roles to them.
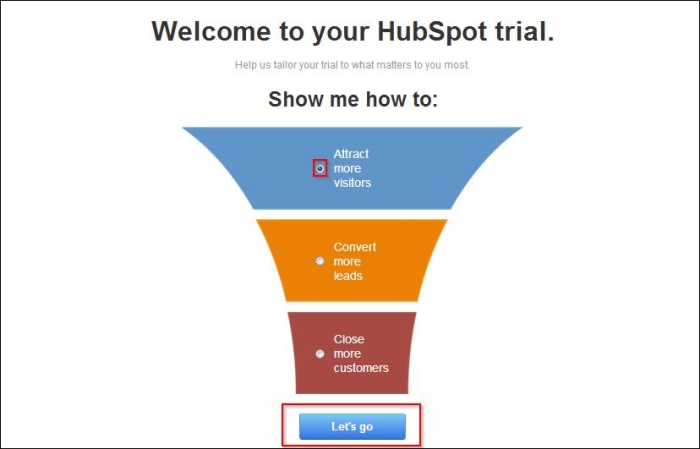
As soon as you log in to your HubSpot account, you will get a pop up that asks you to provide your objectives. If you are a newbie, it's always better to start with Attract more visitors. Then, click on Let's go, as shown in the following screenshot:
Next, you will be logged in to your account. Here, you will see five icons as shown in the following screenshot:
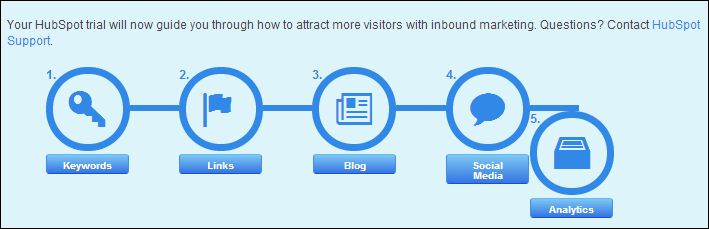
We will discuss these icons in the following recipes. Now, let's cover the basics that users need to know before they kick-start their optimization and marketing campaigns using HubSpot.
The HubSpot dashboard is extensive. It can be a challenge for a single individual to handle all of the end-to-end activities of an organization running multiple marketing campaigns. Most such companies set up additional user accounts and assign responsibilities accordingly to make the process easier.
The following is the step-by-step procedure to add users to your HubSpot account:
Click on your username located in the top-right corner of your account screen. Click on Settings from the drop-down menu as shown in the following screenshot:

Click on Manage Users, located on the left-hand side of your browser:

Click on the Add User button located in the top-right corner of your browser:

In the pop-up window, as shown in the following screenshot, enter information in the Email, First Name, Last Name, and User Role textboxes (refer to the table that immediately follows in the How it works... section of this recipe to read the detailed explanation), and then click on Add User at the bottom. Both you and the added user will be notified through e-mail at the completion of this process.

The following table explains the different user roles:
|
User role |
Access |
|---|---|
|
Administrator |
An administrator will have access to all the settings within your HubSpot account. This role is generally assigned to the owner of a website who has complete control over user management and domain settings. |
|
Blog Author |
A blog author can only create or modify the content of the blog app but not publish anything. This role is generally assigned to the content creators. |
|
Blog Publisher |
A blog publisher can create, modify, and publish the blog's content, but he/she will not have access to any other applications in the system. |
|
Marketer |
A marketer can access all the applications to perform core marketing tasks other than the settings for social media and analytics. This role is generally assigned to the marketing managers of an organization. |
|
Content Creator |
A content creator can access blogs, social media, keywords, call-to-actions, and other file manager applications. This role is generally assigned to the content creators who can create and promote content but don't need access to other technical aspects such as landing pages and workflows. |
|
Business Analyst |
A business analyst can access all the reporting tools in your HubSpot account. This role is generally assigned to professionals who deal with marketing metrics, intelligence, and creating reports. |
|
Sales Rep |
A sales rep can access the prospect's application but can only view the read-only version of any prospect's profile to which they've been assigned. |
The objective of connecting a domain to HubSpot is very similar to the objective of an user to go for a HubSpot account which is to manage many at one place. A website plays a major role in being an identity for one's business and it should be given the utmost priority in terms of having quality content, adding additional pages for indexing, appropriate call-to-actions, and so on.
If you've created landing pages through your HubSpot account, here's how you can connect your domain name to your HubSpot-hosted landing page:
Go to your home page. Click on Content and then on Content Settings from the drop-down menu as shown in the following screenshot:

Click on Domain Manager under Content Optimization System Tools located on the left-hand side of your browser and then click on Connect another HubSpot COS Domain in the newly opened window. You will get a screen similar to the one shown in the following screenshot:

Enter the domain that you want to connect with HubSpot under the section Your Domain. You also have to provide HubSpot with your objective for connecting this domain. Is it only for landing pages? Or, is it for a blog or an entire website?
Click on the Use for Content Publishing (email, landing pages) option for landing pages, and click on Use for Classic CMS (blog, full website pages) if you want to connect your complete website. In case you are hosting your complete website through HubSpot, you will have to use a different subdomain name like we've used in the previous screenshot, hub.digitometry.com, where hub should be replaced with your subdomain name and digitometry should be replaced with your main domain name. Select one of the options according to your objective. If you want to connect the complete website, refer to the following screenshot:

Once you have selected your option, click on Connect domain. You will get a screen similar to the following screenshot (if you've selected the Use for Classic CMS option in your previous step):

Copy the CNAME (the zone marked with red in the preceding screenshot).
If your domain is not hosted by HubSpot, you'll need to log in to your registrar and point the CNAME record to the one you've copied in the previous step. Now, get back to your HubSpot account and you will see the WAITING message removed from the Status column in somewhere between 30 minutes to 48 hours.
Monitoring social media channels can prove cumbersome if the brand or company you're working for has its presence in multiple platforms. With this feature, HubSpot enables you to have complete control over your major social media channels in one place. Do read it completely to understand which social channels can be integrated into your HubSpot account.
Why should you integrate your social media channels with HubSpot? If you do this, all your blog posts can be automatically shared on your social channels. You'll also be able to view your social analytics through the Social Media Reach report.
Click on the Social tab and then select Social Settings as shown in the following screenshot:

You will see plugins for popular social networks. Select a plugin based on your requirements by clicking on its appropriate button (for example, if you want to connect your Facebook page, click on Add Facebook account). As of the time of writing, you can connect a maximum of seven social media accounts. HubSpot might roll out other social network plugins soon.

Let's add a Facebook page to make it clear. When you click on Add Facebook account, a response screen will prompt you to authorize your account on Facebook. Click on the call-to-action and you will be taken to the Facebook login page:

After logging in to your Facebook account, HubSpot will ask you to grant access to information such as friends and contact info, websites, descriptions, and others.
Next, HubSpot will ask for permission to post publicly on your behalf, and you can either choose the option Okay or Skip. Most prefer clicking on the Skip button when providing access to third-party applications, as people don't want anything posted on their page or profile without prior notice.
The next step in this process is that HubSpot will request for your permission to manage your pages. Click on Okay during this step as shown in the following screenshot:

Once you complete the process, you will be taken back to your HubSpot account where you can see the pages you manage (with your Facebook account). Select the Follow Me, Reach, and Blog Auto-Post options only for the pages you want to integrate with Facebook:

We all need to know what our competitors are up to. With the HubSpot competitor monitoring tool, you can quickly and easily monitor your competitors' activities.
Monitoring competition is not just an activity to check what your competitors are upto but to spot positive or negative remarks around them, in order to improve your business operations or to collect information needed to plan your promotional activities and so on. The following steps will guide you to monitor your competition with the HubSpot competitor monitoring tool:
Click on the Reports tab and select Competitors as shown in the following screenshot:

Click on Add New Competitor, enter the website URL of your competitor, and click on Add:

Perform step 2 again to add more competitors. After the completion of this process, you will find your competitors listed in the chart at the bottom of the Competitors page (right below the graph):

Click on the graph icon that is placed before the name of your competitors to view their activity on the graph. You can try changing the metrics (such as Traffic Rank, Indexed Pages, Facebook Fans, and mozRank) in the first filter and the date range in the second filter (Last 30 days, Last 3 months, and so on):
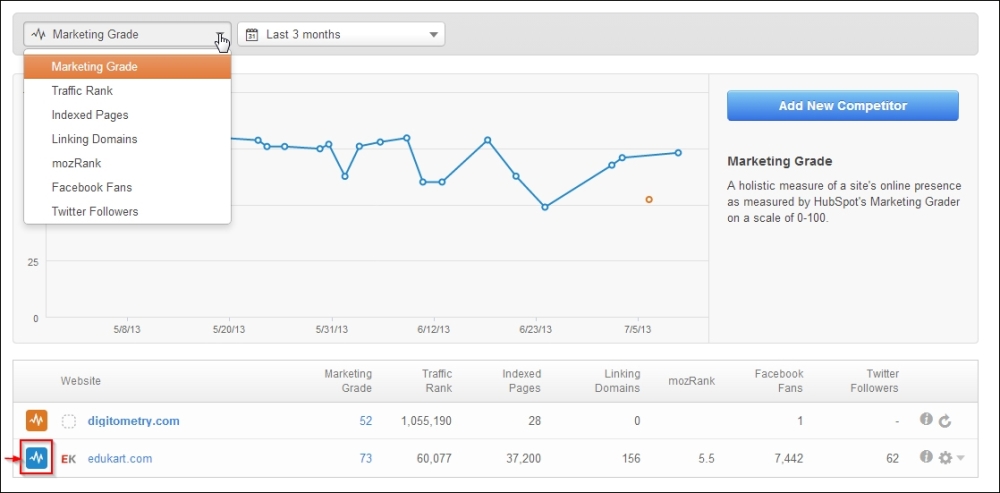
You can also hover over the dots in the graph to get detailed information of the changes as shown in the following screenshot:

An e-mail marketing campaign is not just about the click-through rates. These days, the majority of brands buy consumer lists and send annoying e-mails to their prospects. HubSpot provides you with a more effective way of automating your e-mail marketing campaigns, based on actions taken by your prospects, in order to build a strong and engaged pipeline. Let's take a look at how you can go about it.
A great feature that HubSpot provides is the ability to create and automate all your e-mail marketing and lead-nurturing campaigns with the help of the Workflows tool. Based on the action completed by your lead on your website, an automated e-mail with an appropriate call-to-action will be sent to him/her. Though you can create n number of workflows with your HubSpot account, take a look at the following example to understand how a workflow can be created.
Create an e-mail through HubSpot. Select the Email option from the Content tab as shown in the following screenshot:

If you want to configure a logo for your e-mails, click on Set up HubSpot Content Tools and follow the instructions. If not, click on the Set up email option next to it as shown in the following screenshot:

Next, upload your logo and click on Save Logo:

Next, choose the fonts and colors and click on Save.
In the next step, you will have to fill in the sender's information such as company name and address (U.S. and international laws require that all e-mails should have sender information) and then click on Save CAN-SPAM Information.
Next, click on the Create email option as shown in the following screenshot:

Follow the simple instructions provided and design your e-mail according to your requirements. Give it a name, select a template, and then click on Create Email. You can also check the preview of the e-mail on the right-hand side of the browser. Have a look at the following screenshot:

Now is the important step of deciding how your final e-mail (to be sent to your leads) will look. Fill out all the basic information such as the sender name and e-mail address, name of the campaign, subject of the message, and content of the e-mail body. If you want to personalize the sender details, click on the Personalize Sender option and select one of the options (based on how you want to personalize the details).

If you want to give the recipients an option of sharing a particular link on their social media profiles, make sure you turn on the relevant social media buttons under Social Sharing. The link could be your landing pages or your social media profiles. For example, we've given a sample Facebook page here:

Once you are done with how your e-mail should look, it's time to create a text-ready version. (This is for users with slow Internet connection who cannot open an HTML copy on a mobile device.) Click on Options in your Email dashboard and type the text version of your e-mail in the box titled Customize Plain Text Version as shown in the following screenshot:

Once you are done with defining all the other settings and design of the HTML and text versions of your e-mail, it's time to send your e-mail. Select the Sending option in your Email dashboard and you will be able to see three other options. You can send your e-mails immediately, at a scheduled date and time, or with automated workflows (this will be discussed in detail in the upcoming recipes):

"One size fits all" is an approach that should never be followed if you want to generate qualified leads for your business. If you want to generate decent responses to your e-mail campaign, you will have to follow the approach of sending highly targeted e-mails to your prospects. If you can automate this process, it's going to save you a lot of time.
As we discussed earlier, we should use the Workflows tool for lead-nurturing campaigns. With this tool, you can create a lead-nurturing campaign to generate leads, convert warm leads to hot leads, send an automated response through e-mail when a visitor fills a form on your website, and also segment the leads based on their actions.
In order to create a workflow, we need to follow the set of instructions given in the previous recipe, Managing e-mail marketing campaigns, to create an e-mail (the HTML and text versions). In the Email dashboard, click on the Sending tab, select the Send email with automated workflows option, and then click on Save, as shown in the following screenshot:

In the Contacts tab, click on Workflows as shown in the following screenshot:

As shown in the following screenshot, click on the Create new workflow button and give your workflow a name:

Select a condition for your workflow, a form (landing page), and the page on which you want the workflow based on your requirements, as shown in the following screenshot:

On the same page, right below the workflow activations, you will also have to define the workflow steps (how you want the workflow to happen). If you want an e-mail to be immediately sent to your prospect right after they fill in a form on your website, you might have to set the Delay this step for option to
0days,0hours, and0minutes, and then select the action Send an email (the different options are discussed in detail in the table in the How it works... section of this recipe). If you want the e-mail to be sent after a couple of days, set the option to2days,0hours, and0minutes. Click on Save Workflow to ensure the completion of this process.
The following table will explain the different options and their actions in creating workflows:
|
Workflow options |
Functions |
|---|---|
|
Send an email |
Send an e-mail to a contact based on their actions. |
|
Set a contact property value |
Assign a value to your contact for further actions to be taken. |
|
Add to/Remove from a list |
Segment your contacts under different buckets based on actions. |
|
Increment a numeric property value |
Add or subtract the value based on contact's position in the workflow. |
|
Copy a contact property value |
Copy a contact's property value to another contact based on the actions. |
|
Trigger a webhook |
This includes a wide range of options, such as triggering offers, sending SMS alerts, Facebook posting, following up, and so on. |
|
Send internal email |
This option will trigger an e-mail to your internal team for the appropriate actions to be taken. |
|
Send an internal SMS |
This option will trigger a text message to your internal team for the appropriate actions to be taken. |
Why is tracking so important? It helps us understand what has been successful, what hasn't, and the areas of improvement for a campaign. It also helps us understand the impact of different online marketing initiatives. The metrics will change from one campaign to another depending on the goals for each.
To measure the effectiveness of your marketing campaigns, you will have to use tracking URLs. Tracking URLs help us understand the different sources of traffic for our website (they might include organic, Pay Per Click (PPC), social media, e-mail, and so on). Let's go ahead and learn how to create a tracking URL for our landing pages.
In the Reports tab, click on Reports Home as shown in the following screenshot:

Click on Tracking URL Builder to the right-hand side of the page and then click on Create New Tracking URL on the next page. If you're running an e-mail marketing campaign through HubSpot, you don't have to do this, as HubSpot, by default, does this for you.

Fill in all the information, such as the URL (the one you want to track), campaign name, campaign sources (the different places where you will be using this link; for example, PPC, e-mail, social media, and so on), and marketing actions (internal use); then, click on Generate as shown in the following screenshot:

You will get a new window with the original link and the tracking URL. You can copy the shortened URL from there or access it under the Tracking URLs page. Use this URL in all your e-marketing channels, such as Google AdWords, Bing Ads, social media, e-mails, and so on.

To measure the results, click on Sources in the Reports tab and click on Other Campaigns to see how your tracking URLs are performing. You can also check the sources by scrolling down on the page.

Now it's time to do some inbound marketing. A company cannot rely on just its outbound marketing efforts in the long run. Key techniques and methodologies, such as SEO, whitepapers, and blogs, can create a lot of brand visibility and help the business in generating a huge number of qualified leads.
This section will show you how to use the different tools of HubSpot to generate content and optimize landing pages with the help of keyword searches and SEO techniques.
Click on Content and then select Keywords from the drop-down menu as shown in the following screenshot:

Click on Add Keywords as shown in the following screenshot:

Add two or three relevant keywords for your business in the textbox named Add new keywords (one per line) and then select the campaign to which you want to add the keywords. You can also click on Get suggestions (in case you don't have a set of keywords for your business) as shown in the following screenshot:

Type business-relevant keywords in the search box and HubSpot will churn out a number of relevant keywords with a number of search results. The following screenshot shows what the Keyword Suggestions window will look like:

It's advisable to select keywords with a high number of searches. In the previous example, the keywords online marketing and idm have a considerably higher number of searches compared to all the other keywords. However, it is also important to select the most relevant keywords. In the example, the keyword online marketing makes sense for a company which is into digital marketing training, whereas the keyword idm does not. Filter the appropriate keywords for your business in this step. Once you finalize which keywords to select, check the checkboxes for those keywords and click on the Use Selected button as shown in the following screenshot:

Now all the selected keywords that we were discussing in step 5 will be added to the Add new keywords (one per line) textbox. Click on Add keywords to finish the process, as shown in the following screenshot:

You can also go back to the Keywords page to check how the keywords in different campaigns are performing as shown in the following screenshot:

The objective of applying SEO to a website is to make it easy for search engines and users to understand what your website (or web page) is all about. It plays a very important role in users' buying cycle, depending upon the position of your web pages in Google search results for targeted keywords. You need not be an expert to apply basic tweaks to your SEO efforts when HubSpot is there to guide you through it.
Now that you've understood how to pick up relevant keywords for your business, it's time to incorporate those keywords in certain places on your web page to make it easier for Google and other search engines to rank your page accordingly. Do not confuse the search engines by using many different keywords in your page rather than one specific primary keyword.
To apply SEO, navigate to one of the pages you've created through HubSpot. In the Content tab, select Page Manager from the drop-down menu as shown in the following screenshot:

Right-click on one of the pages (to which you want to apply SEO) and select Page Properties as shown in the following screenshot:

Your page title must have your primary keyword (that must be relevant to your page and business), which should not be longer than 70 characters. You may also have your brand name in the page title, and it will appear on Google SERPs as underlined text. Make sure you don't repeat the page titles for any of your pages, as it might result in confusing Google to present your page in front of the user searching for a particular keyword.

The next thing to check is your page URL. Make sure the URL has your primary keyword. For example, the primary keyword for the sample page we used in the following screenshot is SEM Training; we've used it along with the region's name:

Another major SEO element of any page is its meta description. A meta description of your page appears right below your page title in the Google search results. Make sure that your meta description contains the primary keyword of your page
and that it is no longer than 150 characters. Avoid using multiple keywords and try to form a meaningful description in the Meta Description section. The following screenshot shows the Meta Description section:

Meta keywords were considered by Google to rank your pages a long time ago. Though it's not very important when your focus is on Google and Yahoo, it's good to keep them optimized for smaller search engines to find you. The following screenshot will give you an idea of how to write meta keywords:

Once you are done with the basic SEO elements of your page, it's time to optimize your content. Make sure your primary keyword appears a few times in your page content. You can also make the text stand out from the rest by making it bold. For example, in the following screenshot, we can make the text SEM Training Course bold:

Use anchor text in all the links that you use in the content of your page. The anchor text will help Google understand what the link is all about. In the following screenshot, the anchor text is SEM Training Course, and the link will lead to the SEM Training Course Details page on the website. To add a link, select the text and click on Link. Insert an internal/external link accordingly.

If you have an image in your content, you have to let Google know what it is. This can be done by changing the filename and alt text of the image. If you want to change the alt text of the image, click on Image in the tool bar, search for alt text using the search box to the right-hand side of the window, and change the name accordingly. You can also include your primary keyword here if the image is relevant to your business, page content, and the other basic SEO elements.

Building quality links for your website is one of the most important activities of SEO. It is the process that involves working with other websites to use links in appropriate places (that are relevant to your business) to bring in traffic for your website.
HubSpot's Link Grader tool lets you know of your own inbound links and also those of your competitors.
In the Reports tab, select Page Performance from the drop-down menu as shown in the following screenshot:

Click on Links to the right-hand side of your browser:

Select a competitor from the drop-down list and see the number of inbound links to your competitor's website. You can prepare a list and target the same websites to build quality inbound links for your website.

With the Link Grader tool, you can check the inbound links for any domain by clicking on the Find links for any domain option as shown in the following screenshot:

Enter the domain name in the Domain textbox and click on Find as shown in the following screenshot:

Now you will be able to see the websites linking back to the domain you just entered. Not all the inbound links are good. HubSpot also helps you with the authority rank to determine the quality of the inbound link. The authority rank is based on the online reputation of that website specifically. Make sure you target the websites with a decent authority rank and start building inbound links.

Targeted traffic is the lifeline of any website or blog. Most people rely on search engines for their traffic; but, when your social media channels are optimized properly, they can drive a huge amount of targeted traffic to your website or blog. This section will show you how to use the different social media tools provided by HubSpot to drive traffic to your website or blog.
Blogs came way before Facebook, Twitter, and Google+, and they're still going strong. Every time you blog, you get a chance to get another one of your pages indexed by Google. Let's have a look at how we can use the Blog tool provided by HubSpot.
Refer to the Generating more traffic recipe to identify keywords by difficulty and competition level. Make sure the title of your blog contains the relevant keywords.
Now, in the Content tab, select Blog from the drop-down list as shown in the following screenshot:

Now, select the Create Article option, which is located right under the Using the HubSpot Blog section, as shown in the following screenshot:

If you look at the right-hand side of your browser now, HubSpot will be trying to help you out by displaying the important elements that are missing from the blog. Start filling in all those elements one-by-one.

Enter your keyword-rich blog title in the textbox named Title and your content in the text area named Article Body. A blog should contain no fewer than 500 words. Use the options Bold, Italic, and Underline whenever required. Avoid writing a full-length essay. Try to use subheadings, numbers, and bullets.

An image can speak a thousand words. Make sure you insert a relevant image for your blog, as images have the ability to drive decent traffic to your blog or website. Don't forget to give a relevant name and alt text attribute for the image you attach along with the keywords you identified. You can also select the option Left, Right, or Center depending upon where you want the image to be displayed in your blog.

Make sure the tags you add are relevant to the blog. Tags are generally used in a blog to make it easier for the reader to identify the topic they are looking for. Once you are done with the tags, click on the Publish button to make your blog go live as shown in the following screenshot:

Now that you've created your first blog post, it's time to figure out how to market it. With HubSpot's social media publishing tool, you can promote your content on different social channels as well as post an update to all your social channels at once. You can also track the effectiveness of a particular post on different social channels.
The essence of social media success lies in trying out new methods, monitoring the performance for few days, and then taking a call on which method to go for, in a long run. Now let's understand how do we achieve it using HubSpot. The following steps will guide you to use the HubSpot's social media publishing tool:
Refer to the Setting up a social media and analytics tool recipe to learn how to integrate all your social media accounts with HubSpot.
Once you are done with step 1, in the Social tab, click on Publishing from the drop-down list as shown in the following screenshot:

Click on the Compose a message option located to the right-hand side of your browser as shown in the following screenshot:

In the message box, type the message (the one you want to publish on any of your social media channels). You can also attach a blog post, landing page, or image by clicking on the options located just above the message box as shown in the following screenshot:

The next step is to select the social media accounts on which you want to publish the message. You can post it on your Twitter account, personal Facebook account, Facebook pages (to which you have admin access), personal LinkedIn profiles, LinkedIn company profiles (to which you have admin access), and LinkedIn groups (to which you have membership access) as shown in the following screenshot:

If you want your post to be published immediately, you don't have to change any settings here on this page. If you want to schedule its publishing to a later time, click on Add Additional Time and select the appropriate date and time for your post, as shown in the following screenshot:

The next step is to select one of your campaigns in order to track the effectiveness of your campaign-related posts on different social media channels. Once you are done, click on the Schedule All option as shown in the following screenshot:

Now you will be able to see the list of scheduled posts and the social channels which have been assigned. In case you want to make any changes or delete the post or a schedule, click on the Settings icon located to the right-hand side of your posts and select the desired option:

If you want to track the effectiveness of your posts on different social media channels, look out for the Clicks column right next to your scheduled posts. The number of clicks received shows the effectiveness of your posts on different social media channels. If you want to monitor the effectiveness of a channel, click on the box that shows All Channels and select a channel.

Using social media has multiple benefits. It ends up not only promoting your blog posts and offers, but also helps you in building relationships with your existing and target customers, industry influencers, and so on. Monitoring and engaging with the conversations surrounding your brand, product, and service are two of the most important social media activities that a brand should perform. Let's explore how the social media prospects tool provided by HubSpot helps us achieve this.
The objective is not just to engage with positive conversations around your brand but also around the negative conversations which will have a deep impact on your business. One can also use this option to discover influencers talking about their brand/industry, to monitor the competition, to spot the crisis or to manage a crisis. The following steps will guide you to use the HubSpot's social media prospects tool:
In the Content tab, select Social Media from the drop-down list as shown in the following screenshot:

Click on the Monitoring option, which is located to the right-hand side of your browser, as shown in the following screenshot:

Now, with the Social Inbox screen in front of you, click on the Get started with Social Inbox button as shown in the following screenshot:

You will have to connect your Twitter account (personal/business) depending on your requirement for monitoring. You can also connect a different Twitter account by selecting the Connect another Twitter account option. Once you are done selecting your account for monitoring, click on the Enable monitoring for these accounts option as shown in the following screenshot:

You will see a screen with the message All done, which means your account is successfully connected to monitor the tweets and mentions, as shown in the following screenshot:

It's time to monitor for your business-relevant keywords and start engaging with them. You have the options for monitoring all of Twitter, a Twitter list, or a contact list. In the following example, we've selected the All of Twitter option and specified a few business-relevant keywords under the column Find ANY of these words to look out for relevant conversations. You can also specify an e-mail ID under the Notify these recipients column to get real-time alerts straight to your inbox. Based on the keywords you track, assign a name for the stream to avoid confusion. Once you are done with the basic settings, click on the Create button to ensure the completion of the process of creating a stream to monitor, as shown in the following screenshot:

Now you will be able to see the relevant Twitter conversations surrounding your business right on your screen, similar to the following screenshot. Pick up the most relevant tweets and start engaging with them. If it's an industry influencer mentioning your name, you could retweet them or reply, thanking them. If it's a business opportunity, try to give appropriate information or guide the user to your landing page where they can find relevant information. Make sure that you don't retweet or reply to any of your competitors' tweets.