


Welcome to Eclipse Application Testing How-to. This book will cover major aspects of testing using Eclipse Integrated Development Environment. Before we start, it is important to mention that testing plays a very important role in the application's development. We all know that nothing is perfect, and no matter how hard we try, we all are humans and we make mistakes. I am sure you can recall the last time when you were trying to find out why your program did not run, and in the end it was just a semicolon or a typo that spoiled your application. It happens to all of us. You cannot avoid the human factor, but what you can do is test your application and make sure it runs properly.
Application testing can imply anything from printing a single variable's value to running hundreds of tests to evaluate the application's performance, compatibility, usability, security, and other factors.
This book will show you some easy ways of how you can make your testing process much more enjoyable by using a rich set of tools provided by Eclipse. There are many reasons why you should consider using Eclipse for your development and testing. Not only is Eclipse free and easily customized, but also it is cross-platform; it has a huge community of developers, and hundreds of plugins.
Summarizing all of the above, testing plays a very important role in an application's development, and Eclipse makes this process more enjoyable for the developer. If you want to find out how to incorporate Eclipse in your testing process, this book is right for you.
In this recipe we will cover how to download and install Java Development Kit (JDK) and Eclipse; we will also create our sample project that we will use for our debugging purposes throughout the book, and at the end of this recipe I will give you a cheat sheet containing some of the most useful key shortcuts that will help you to navigate through your project.
Eclipse is written in Java, so one of the prerequisites for using Eclipse is JDK. There are a couple of JDKs available. I advise you to use OpenJDK for Linux as it is installable with a single command, and Oracle Java for Windows/Solaris.
If you are using OSX, you are lucky. OSX comes with JDK, so you don't need to install it. You can proceed directly to the part where you download and install Eclipse.
Installing JDK on Linux
First of all, let's ensure that Java is not already installed in your system. Open Terminal and type [aspektor@*]$ java –version.
If you see something like the following, it means that most probably Java is not installed in your system:
-bash: java: command not found
If you see an output like the following, it means that you already have Java installed, so you can proceed to install Eclipse:
java version "1.7.0_09-icedtea"
OpenJDK Runtime Environment (fedora-2.3.3.fc17.1-x86_64)
OpenJDK 64-Bit Server VM (build 23.2-b09, mixed mode)
To install the latest Java version of OpenJDK, perform the following steps:
Go to http://openjdk.java.net/install/index.html and find a command for JDK (not JRE) that corresponds to your version of Linux. For example, I am using Fedora 17, and currently the latest OpenJDK version is JDK 7. So I go to the OpenJDK website http://openjdk.java.net/install/index.html, and then copy and paste the following command to my Terminal (if you are using Ubuntu or Debian, make sure that you copy the right command):
[aspektor@*]$ su -c "yum install java-1.7.0-openjdk"After the installation is completed you need to make sure that Java is installed. Type
[aspektor@*]$ java -version. My output is as follows:java version "1.7.0_09-icedtea" OpenJDK Runtime Environment (fedora-2.3.3.fc17.1-x86_64) OpenJDK 64-Bit Server VM (build 23.2-b09, mixed mode)
If you have the same output, good job! You can now move to the part where you install Eclipse.
Installing JDK on Windows
First of all we need to make sure that JDK is not already installed on your Windows machine.
Open Command Prompt and type
C:\> java –version.If you get something similar to the following output, it means that Java is most probably not installed on your machine:
'java' is not recognized as an internal or external command operable program or batch file,If you see the output similar to the following, it means that Java is already installed on your machine and you can proceed directly to the Eclipse installation part:
Java version "1.7.0_09"
Java <TM> SE Runtime Environment Standard Edition .....
To install the latest JDK to your Windows machine you will need to go to the Oracle Java website http://www.oracle.com/technetwork/java/javase/downloads/index.html.
There you will see different Java configurations. You will need to download the latest version of Java Platform (JDK) (for now, the latest version is 7u9) as shown in the following screenshot:
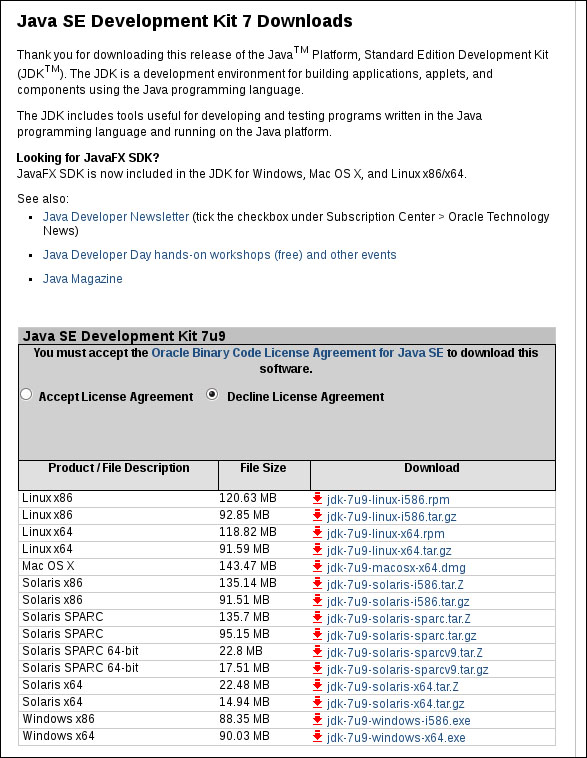
Click on Accept License Agreement, choose your architecture, and start downloading.
When the file finishes downloading, open it, click on Next, and you will see a window similar to the following screenshot:
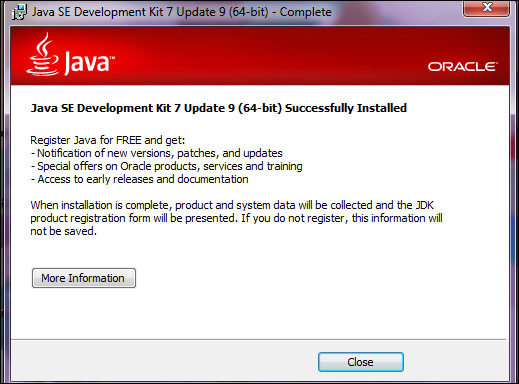
Click on Close, open Command Prompt, and check that you have Java installed, as shown in the following screenshot:

If you see an output similar to mine, good job! Let's proceed to install Eclipse.
Now we can proceed with the downloading and installation of Eclipse. The good news is that no matter what platform you are on, the downloading and installation process is almost the same.
With the following steps, let's see how to download and install Eclipse:
The first step is to download Eclipse from the official Eclipse website, http://www.eclipse.org/downloads.

There are a couple of options available, but as we are going to work with Java, we will need to download Eclipse IDE for Java Developers, which is the second option in the previous screenshot.
Choose your architecture (32 or 64 bit) and start downloading.
If you are installing Eclipse on Windows, please make sure that your Eclipse architecture corresponds to the architecture of JDK. (Installing JDK on Windows shows how to check your Java version.)
When the file finishes downloading, unzip it to the directory of your choice.
Go to the
eclipsedirectory (the one you have just unzipped) and run the Eclipse.exefile.After a couple of moments you will see a window offering to select a workspace. If you haven't used Eclipse in your machine before, leave the workspace as it is (for example, for me it is
/Users/anatolyspektor/Documents/workspace), whereas if you have installed Eclipse and the workspace already exists, rename the workspace toworkspace1or something similar. Click on Ok. It will load the workbench, and then you will be prompted to the Eclipse interface.
If your interface is similar to mine, congratulations! You have just downloaded and successfully installed Eclipse.
To start debugging we need to create our sample project first. Let's do that with the following steps:
Go to File | New | Java Project.
In the Create a Java Project window, name the project as
how-to-debugand click on Finish.Close the Welcome tab and you should see something similar to the following screenshot:

Now expand the how-to-debug project's tree (click on the gray arrow before the project's name) and you will see that there is an src folder. In this folder we will store our classes.
Right-click on the src folder and select New | Class. In the Java class window enter
how.to.eclipseas a package,Employeeas a name, and check the public static void main(String[] args) option. It will give us a template of themain()method so that we don't have to write it ourselves. Your Java class window should look like the following screenshot:
Click on Finish. You should see that a new class file has appeared in your Package Explorer area under the src folder. The class is populated with the
main()method. It should look like the following screenshot: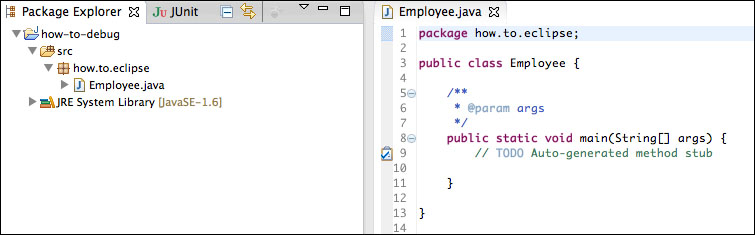
Now let's fill in the
Employeeclass with a couple of variables such as the position of the employee, employee number, and employee age. Let's also create methods that will set these variables and invoke this information if needed. Finally, let's override thetoString()method so that we can see the output of our program.
Our sample program will look like the following code:
1.   package how.to.eclipse;
2.
3.   import java.util.Arrays;
4.
5.
6.   public class Employee {
7.
8.   private String position; // Employee Position
9.   private int number; // Employee Number
10.  private int age; // Employee Age
11.
12.  // Declaring Constants
13.  private static final String[] validPositions  = {"engineer", "tester","executive"};
14.  public static final int MIN_AGE = 19;
15.  public static final int MAX_AGE = 84;
16.  public static final int MAX_EMPLOYEE_NUM = 9999;
17.  public static final int MIN_EMPLOYEE_NUM = 0;
18.
19.
20.  /**
21.  * Setter function that sets Employee position
22.  * <p>
23.  * This method checks if the position is in the validPositions array,
24.  * if it exists, it sets the Employee class variable to position provided by user.
25.  * <p>
26.  * @param _position employee position set by user
27.  * @param validPositions array of valid positions
28.  *
29.  */
30.  public void setPosition (String _position) {
31.     if (Arrays.asList(validPositions).contains(_position)){
32.       position = _position;
33.     }
34.  }
35.
36.
37.  /**
38.  * Setter function that sets Employee number
39.  * <p>
40.  * This method checks if the Employee number is in the valid range
41.  * and sets the class Employee number variable to Employee number provided by user.
42.  * <p>
43.  * @param _numer employee number set by user
44.  */
45.  public void setNumber (int _number) {
46.     if (_number >= MIN_EMPLOYEE_NUM && _number <= MAX_EMPLOYEE_NUM ){
47.       number = _number;
48.     }
49.  }
50.
51.  /**
52.  * Setter function that sets Employee age
53.  * <p>
54.  * This method checks if the Employee age is in the valid range
55.  * and sets the Employee age to Employee age provided by user.
56.  * <p>
57.  * @param _age employee number set by user
58.  *
59.  */
60.  public void setAge (int _age) {
61.     if ( _age >= MIN_AGE && _age <= MAX_AGE){
62.       age = _age;
63.     }
64.  }
65.
66.  /**
67.  * Getter functions that returns employee position
68.  *
69.  * @return employee position
70.  */
71.  public String getPosition () {
72.     return position;
73.  }
74.
75.  /**
76.  * Getter functions that returns employee age
77.  *
78.  * @return employee number
79.  */
80.  public int getAge () {
81.     return age;
82.  }
83.
84.  /**
85.  * Getter functions that returns employee number
86.  * <p>
87.  * @return employee number
88.  */
89.  public int getNumber () {
90.     return number;
91.  }
92.
93.  @Override
94.  public String toString () {
95.     return "\nEmployee No: "+this.getNumber()+
96.     "\nEmployee Position: "+this.getPosition()+
97.     "\nEmployee Age: "+this.getAge()+"\n";
98.
99.  }
100.
101. /**
102. * main method
103. */
104. public static void main (String[] args) {
105. /*
106. Creating new object called andrew,
107. setting all three parameters and printing them out.
108. */
109. Employee andrew = new Employee ();
110. andrew.setNumber(123);
111. andrew.setAge(28);
112. andrew.setPosition("tester");
113. System.out.println("-=Employee Andrew=-"+andrew.toString());
114. }
115. }
Tip
Downloading the example code
You can download the example code files for all Packt books you have purchased from your account at http://www.packtpub.com. If you purchased this book elsewhere, you can visit http://www.packtpub.com/support and register to have the files e-mailed directly to you.
This will be our sample program that we will upgrade throughout the book. To run it, just click on the  icon located on the upper panel.
The output should look like the following screenshot:

Now, as we have just created our first sample project, it would be a good idea to learn how to navigate through the code.
Eclipse provides a series of useful shortcuts that will allow you to be much more efficient when coding and debugging your Java project.
Useful Eclipse shortcuts
Before we move to the default Eclipse shortcuts, I want to let you know that you can change any shortcut by going to Window | Preferences | General | Keys. However, I advise you to use the default shortcuts, because when you change one shortcut, it can affect other shortcuts, or in some cases override the default key functionality. For example, if you set the run command to Shift + R, you won't be able to use capital R anymore, as every time you type Shift + R, the run command will be invoked. This is something you should keep in mind.
Let's take a look at the table showing some of the most used Eclipse shortcuts:
|
Navigation |
Description |
|---|---|
|
Ctrl + L |
Go to line |
|
F3 |
Open declaration |
|
Ctrl + O |
Go to a method or variable (start typing when a list of method and variables is populated to narrow the search) |
|
Ctrl + E |
Quickly switch between the opened files |
|
Alt + →/Alt + ← |
Navigate through the places you have recently visited |
|
Ctrl + Shift + P |
Go to the matching bracket |
|
Ctrl + Q |
Go to the last modification |
|
Ctrl + T |
Go to the super class |
|
Search |
Description |
|
Ctrl + F |
Find and replace |
|
Ctrl + H |
Smart search |
|
Ctrl + Shift + R |
Search for the filename within the project (start typing when the window with the filenames is populated to narrow the search) |
|
Ctrl + Shift + T |
Search for Java types |
|
Select method/variable + Ctrl + Shift + G |
Search where the method/variable was used in the whole project |
|
Code editing |
Description |
|
Ctrl + Space |
Populate the Auto-Completion dialog (use when typing in the text editor) |
|
Ctrl + Z |
Undo |
|
Ctrl + Shift + Z |
Redo |
|
Ctrl + C |
Copy |
|
Ctrl + V |
Paste |
|
Alt + Shift + R |
Refactoring (globally renames your method/variable) |
|
Debug |
Description |
|
Ctrl + Shift + B |
Add/Remove a breakpoint |
|
F5 |
Step Into |
|
F6 |
Step Over |
|
F7 |
Step Return |
|
Code formatting |
Description |
|
Select Code + Tab |
Indent multiple lines to the right-hand side |
|
Select Code + Shift + Tab |
Indent multiple lines to the left-hand side |
Try these shortcuts yourself to see how they work. Knowing these shortcuts and using them in your coding with Eclipse will save you a lot of time. Also, if you want to find more key combinations, you can go to Window | Preferences | General | Keys for the entire list.
On this wonderful note, I think we are ready to start exploring Eclipse Debug Perspective.
In this recipe we will take a look at the main Eclipse debugging component—Eclipse Debug Perspective. By exploring Eclipse Debug Perspective you will be able to understand the main tools used in the debugging process.
To open Eclipse Debug Perspective go to Window | Open Perspective | Debug (if Debug is not shown in Open Perspective, go to Other… and you will find it there). Eclipse Debug Perspective looks like the following screenshot:
Let's explore the Debug Perspective views one by one.
To show your current position in the debug process, use the Debug view.
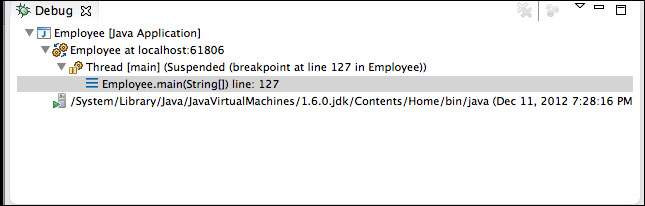
In the Debug view, the information is presented as a stack, which starts from the suspended thread and goes down in the format Class.method(params) line: line number, where every upper entry is the more recent position. By double-clicking on the entries, you can navigate back and forth through the debugging steps. Also, if a debugger is terminated, you will see the terminated message in the Debug view right away.
To avoid printing out variable values every time, Eclipse Debug Perspective gives us a wonderful tool called the Variables view.

With the Variables view you can actually follow local and global variables in real time. Moreover, you can change how these values are presented. We will look closer at the Variables view further in the book.
To see a list of all your breakpoints use the Breakpoints view.
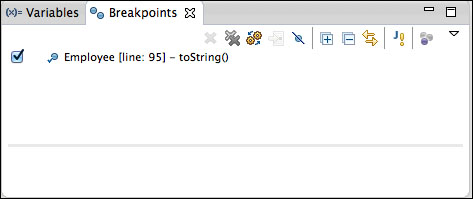
The Breakpoint view lists all your breakpoints in the format class [line: line number] – method(types). It also allows you to set up the breakpoint properties, choose which breakpoints should be skipped, remove breakpoints, import/export breakpoints, and navigate directly to the breakpoint in the code. In the next recipes, we will cover how to set up breakpoints with different properties. So if you haven't used breakpoints before, don't worry as we will cover how to use them in detail.
The main area of interaction between your code and the debugger is located inside the class view.
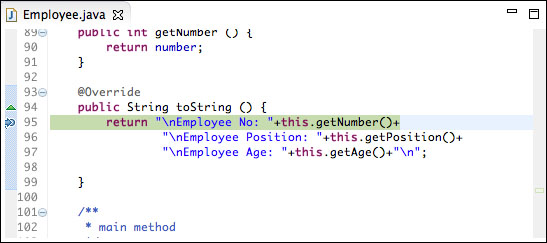
The class view shows the breakpoints and highlights the line you are about to execute. Also, it automatically switches between files when you want to Step Into/Step Over to the other classes.
To see the structure of the class that is currently under inspection of the debugger, take a look at the Outline view.

In the Outline view for Java, you are presented with a tree of variable and method names. The menu above this tree allows you to sort the tree and hide/show different parts of it. Also, by clicking on the variable or method name in the Outline view, you are navigated directly to the definition of this variable or method.
To see the output of your application, use the Console view.

If you look at the top right-hand side of the Console view, you will see a small menu, which gives some extra functionality to the console. The red square button is an option to terminate the thread. For example, it helps when you get into an infinite loop. Some other options in the top menu allow you to clear the console, put a scroll lock, change when to show the console, and open the special Console view (for example, the Maven console or CVS console).
The top toolbar menu of Eclipse Debug Perspective also has some buttons that will help you to control the Debug Perspective's activity.

The first four buttons control the thread. They allow you to resume a thread, suspend a thread, terminate a thread, or disconnect from a remote thread. The other buttons will help you to navigate through the code while debugging. They allow you to Step Into/Step Over to the method, return to the previous step, drop a frame, use step filters, and skip all the breakpoints. We will use each of these options very often throughout the book. Hence, I won't spend much time explaining their functionality at this point.
In this recipe we will learn why breakpoints are important, how to set them up, and how to navigate through the code using the Step Into, Step Over, and Step Return breakpoint manipulation options.
Let's practice setting up a breakpoint on our sample program.
I am sure you are aware that in Java, the first method that is executed is the main() method. Our Employee class has its own main() method, so let's set up a breakpoint in it.
Tip
If your project has more than one class, and the main() method is located in a different class from the one you are about to debug, go to the  icon and select Debug | Debug Configurations…. Select the class you are about to debug in the left menu and set the Main class option to the class that has the
 main() method.
To set up a breakpoint
Go to the
main()method of theEmployeeclass.Find
andrew.setNumber(123)(on line 110).Right-click on the line number (if you don't see the line number, click on the left margin of the Employee tab and choose Show Line Numbers as shown in the following screenshot).
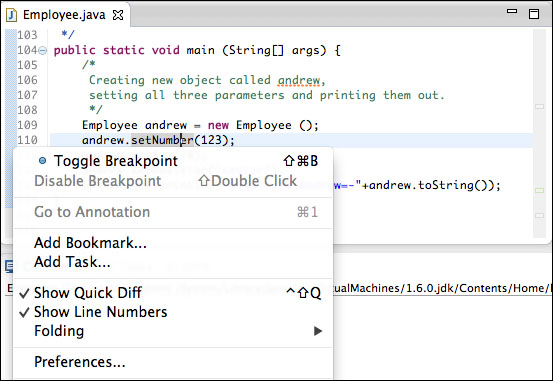
Got to line 110, right-click on the margin again, and click on Toggle Breakpoint.
If your breakpoint is successfully set up, you will see the
 icon right near the line number of the method you wanted to set the breakpoint to. (In our case right near line number 110.)
Now let's run the debugger by clicking on the
 icon.
icon.
If you are asked to switch to Debug Perspective, click Yes.
After running the debugger you should see that your program has highlighted the line with the breakpoint, as shown in the following screenshot:
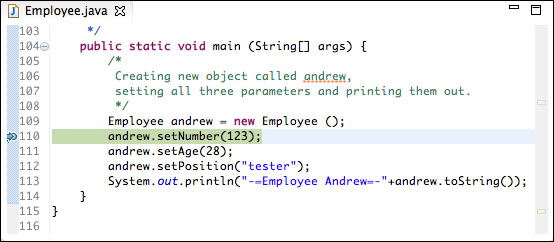
This means that the program has stopped executing before line 110 and is waiting for your actions.
Before we proceed with exploring how Step Into/ Step Over works, let's take a look at the Variables view. Right now there are two lines: args that represents arguments passed to the main() method and andrew. Expand andrew and you will see the current state of all the class variables as shown in the following screenshot:
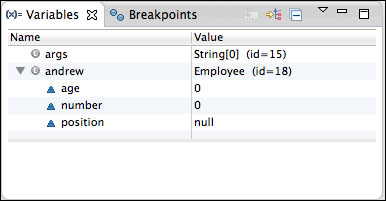
We will keep on watching this view as it will change when we go through our class.
Let's learn how to navigate through the debugger.
We navigate with the help of the Step Into/Step Over buttons. Let's see how it works.
At this point we are standing at line 110 and there are four options that we can choose. We can Step Into, Step Over, Go to Next breakpoint, or Go Back.
Step Into means that we go inside the method and explore its functionality. Let's try it right now. In the top menu there are two buttons:  . The first button is responsible for Step Into (F5) and the second one for Step Over (F6).
Click on the Step Into (F5) icon.
Now you are taken to the
setNumber()method. If you take a look at the Variables view, there are two lines now:this, which relates to the class variables, and_number, which is a variable of the local method.Your position is at the
ifstatement evaluating if the number is between certain limits (at line 46).Click on the Step Into (F5) icon again.
As there is no method to Step Into, the pointer moves one line down; now it's on
number = _number.This line assigns local variables to the class variable.
Click on the Step Into (F5) icon again.
Right now the pointer should be at line 49.
Now let's look at the Variables view again. If you expand this, you will see that the number is highlighted in yellow. This is because the variables have changed their values. See the following screenshot:
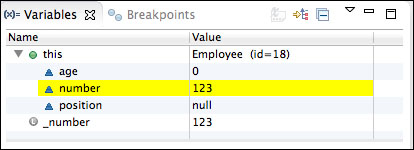
This highlighting is very useful, as it allows you to see what variables have changed their values right after it has happened.
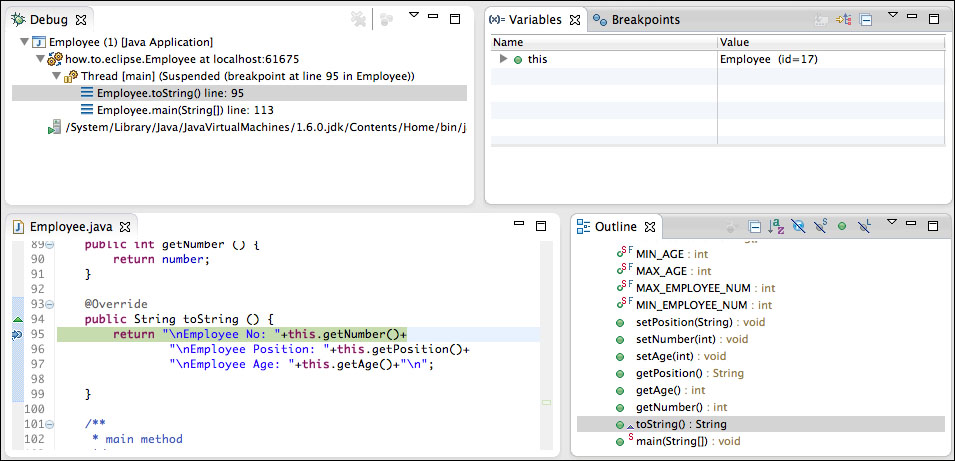
Before we use Step Into one last time in this exercise, let's also take a look at the Debug view. Sometimes, when the project is big, it is very hard to determine what is the hierarchical structure of the classes and methods, which you are in at the moment. In our case the Debug view shows that we are in the
setNumber(int)method on line 49, and if we look below this line, we see that we came here from themain()method on line 110. See the following screenshot:
Click on the Step Into (F5) icon.
As we have reached the end of the
setNumber()method, Step Into makes it return back to themain()method, and the pointer points to the next line (line 111 in our case). Also, the Debug view no longer showssetNumber()in its hierarchy.

Now, let's consider the situation when you don't want to step into the method but you want to go directly to the next method. In this situation we use Step Over (F6). Note that when you use Step Over, the method is still called but the debugger does not walk you through it.
Let's step over the setAge() method.
Clicking on Step Over (F6), you might see that you were not prompted inside the setAge() method, but directly to line 112. Take a look at the Variables view. You will see that age is set to 28 (that is what the setAge() method does), despite you not walking through this method.
The last two controls that I want to mention in this recipe are Resume (F8)  , which allows you to continue running your application until it next faces the breakpoint or the end of the program, and
  Terminate (Ctrl + F2), which stops the debugging process.
Sometimes we want our breakpoints to be triggered only under certain conditions. For example, you have a big application with plenty of classes, and when you run it, it gives you unexpected results. If you want to debug such a case, one of the options is to set a breakpoint and track every time certain variables are used, and check the Variables view for the values of these variables. It can take a lot of time, as one method can be called thousands of times. It would be much easier if you could determine the nature of these unexpected results, and trigger a breakpoint only if these results occur. Thus, you should use a conditional breakpoint.
To set up a conditional breakpoint, we will need to make some modifications to our sample program, but first you have to unset the breakpoint from the previous example.
When the breakpoint from the previous example is unset, we will modify our code by performing the following steps:
We will be using the
setPosition()function (on line 30). Let's comment out theifstatement in this method. Thus we can set any position we like. ThesetPosition()function will look like the following:30. public void setPosition (String _position) { 31. // if ( Arrays.asList(validPositions).contains(_position)){ 32. position = _position; 33. //} 34. }Go to the
main()method and change line 112 to the following:andrew.setPosition("");It means that we are providing an empty string as a position.
Set a regular breakpoint to the line 32 (
position = _position).Right-click on the breakpoint and select Breakpoint Properties…. (The last option as shown in the following screenshot.)

In Breakpoint Properties… check the Enable Condition box and in the textbox below type
_position.isEmpty().This means that the breakpoint will be triggered only if
_positionis an empty string. Note that, we assign__position, but not the class variableposition, because at the time the conditional breakpoint is triggered, the position will not be assigned yet.Click on Ok.
Your breakpoint should now look like this  icon. It means that the breakpoint is only triggered when the condition applies.
Now, as we have set up our conditional breakpoint, let's run the application.
Run the debugger by clicking on the
 icon.
icon.
If you did everything correctly, you should see that the application has stopped on line 32 and is waiting for your actions. It stopped because
_positionis empty. If_positionwere not empty, it would skip this breakpoint and proceed with executing the application. Thus, a conditional breakpoint allows us to trigger the breakpoints only for the cases when we really want the program to stop executing.Now to make the final change to our application so that we can see the difference, first please terminate by clicking on the
 icon.
icon.
Go to line 112 and pass the word
testertosetPosition(String). Type the following:andrew.setPosition("tester");Click on the
 Debug button again.
This was done to show you that when the position is not empty, the conditional breakpoint is simply skipped.
Now you know how to set up the conditional breakpoint. The condition could be anything you want. It all depends on a particular problem that you are trying to solve.
An exception breakpoint is triggered when an exception gets caught and/or uncaught. When you have a big project, sometimes it is very annoying to go through the whole exception stack trace trying to figure out what line caused an exception to be thrown. With an exception breakpoint, you can specify what exception you want to set on the breakpoint, and whenever this particular exception is about to be thrown, the application will stop at the line that caused the exception.
Let's revert the changes we made in the previous steps.
Uncomment the if statement in setPosition(String) (on line 31 and 33), unset the conditional breakpoint (double-click on the breakpoint to unset it), and terminate the debugger.
We will modify line 112 again, but this time we will pass null as an argument. So your line 112 should look like the following line of code:
andrew.setPosition(null);
We will also add one extra line after line 112. Type andrew.getPosition().length().
In this line we have intentionally created NullPointerException, as we are trying to find the length of a string, which is equal to null. This is done to show how exception breakpoint works.
Go to the Debug Perspective, then to the Breakpoints view, and click on the
 icon. (Add Java Exceptions.)
We will be dealing with
NullPointerException. Thus, you need to find it in the list. See the following screenshot:
Click on Ok. Now you should see the
NullPointerExceptionbreakpoint added in the breakpoint list. If there is any other breakpoint checked, please uncheck it.Run the debugger.
If you did everything correctly, you should see that the application stopped at line 113, right before throwing an exception.
Click on the Resume
 icon.
icon.
After the application has finished executing, you should see an exception stack in your console as shown in the following screenshot:
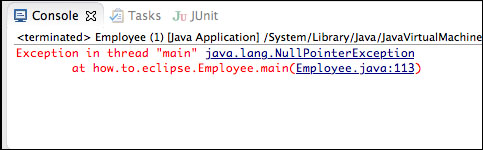
As you can see, the Eclipse debugger has stopped right before an exception has been thrown, thus allowing you to look around and possibly find a reason for the exception. This makes the exception breakpoint very useful when dealing with debugging applications that throw unexpected exceptions.
This breakpoint is very useful when you are dealing with large methods, or if you are concerned about what values enter the method and what values exit from the method.
Before we start, I want you to remove line 113, which throws NullPointerException (used in the previous example) and change line 112 to its normal state:
andrew.setPosition("tester");Go to the
setAge(int)method definition (on line 60) and set a breakpoint as you usually do it.Your breakpoint icon should look like this
 . As you see, this icon is different from the regular breakpoint icon that you have seen before. This is because you have set a method breakpoint.
Run the debugger.
The application has stopped at the first line after the
setAge()method definition (on line 61). The breakpoint has been triggered because the method was called by themain()method (as shown on line 111; you can see all this in the Debug view). So every time this method is called, your application will break at the start of the method. This allows you to see what values were passed to the method. This is very useful, but what I find even more useful is setting the breakpoint when the application leaves the method. This will allow you to see how values have changed when the method finished running. Let's try it right now.Terminate the debugger, go to line 60, and open Breakpoint Properties….
In Breakpoint Properties…, uncheck Method Entry and check Method Exit and click on Ok.
If you did this correctly, you will see that the breakpoint icon has changed again. Now it looks like this:
 . The arrow in the breakpoint icon shows when the breakpoint should be triggered, at the start or at the end of the method.
Run the debugger.
If you remember, when we ran the debugger for the first time in this example, it stopped at line 61, but now it stopped right before leaving the method (on line 64). Also, if the method has a return statement, the debugger will break right before the return. Use a method breakpoint when you know for sure that the issue you are facing is caused by the particular method, or when you want to see how many times a method was called, in what circumstances, and what values it received and/or returned. Moreover, if both entry and exit breakpoints are set, we can easily follow what variables have been changed by looking at the Variables view.
Watchpoint is a very useful tool that is used to track access and/or modification of the variables. The Watchpoint is a type of breakpoint that stops whenever a variable is either accessed, modified, or both.
Please make sure that you don't have any breakpoints checked in the Breakpoints view list and the debugger is terminated.
Go to the Outline view and find the
numbervariable.Right-click on
numberand select Toggle Watchpoint. See the following screenshot: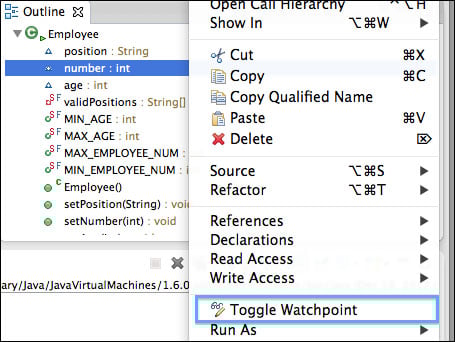
If you go to line 9, you will see that there is a
 Watchpoint icon instead of a breakpoint. This means that the current variable is being watched. Also, if you want to unset Watchpoint, just double-click on the icon. If you want to set it back, double-click again.
Run the debugger.
The first time when Watchpoint is triggered, the application stops at line 47; that is because
the main()method at line 110 called thesetNumber()method that assigned a number to the value set by the user.Click on the Resume icon.
This time the application stops at line 90; that is because the
toString()method requested access to the number variable. Note thatnumberwas modified the previous time, but this timenumberwas accessed without modification.Terminate the debugger.
Now let's assume that we are not interested in watching the access of the variable, we just want to know where it is modified.
Go to line 9, right-click on the
icon, and select Breakpoint Properties….
Uncheck Access and click on Ok.
Now your breakpoint icon looks like this:
 , which means that Watchpoint will be triggered only when a variable is modified.
Run the debugger.
Once again the application stopped at line 47 because we are modifying the variable.
Click on the Resume icon.
Now we can see the difference between this execution and the previous one. This time without stopping on line 90, the application just finished execution and terminated. This is because we are not tracking access of the variable, just its modification. The Watchpoint is a very useful tool if you want to track how your variable changes and when it gets accessed, but sometimes you want to simply run the application and just see the output in the console. For this purpose, you should use a conditional breakpoint and print its output to the user or simply use a breakpoint type called Printpoint.
Many IDEs use a tool called Printpoint to output the value of a variable to the console. It is the same as putting a print statement in the code. Unfortunately, Eclipse does not support Printpoint as a separate breakpoint type, but we will use a conditional breakpoint, which will give us the same result.
Please unset Watchpoint and make sure that the debugger is terminated. We will also need to comment out line 113, otherwise we won't be able to see Printpoint. So your line 113 should look like the following:
System.out.println("-=Employee Andrew=-"+andrew.toString());When line 113 is commented out, go to line 47 (
number = _number), set a breakpoint, right-click on it, and go to Breakpoint Properties….Check the condition option.
Focus on the textbox and type the following lines of code:
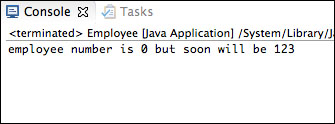
System.out.println("employee number is "+number+ " but soon will be " + _number);
return false;
In these two lines we are doing two things. We are printing the value of
numberand_number, and also asking the application to not stop on the breakpoint by returning false.Click on Ok and run the debugger.
After running the debugger you should see the following output:
With Printpoints, you don't need to put your print statements in the code, which saves you time on looking for the print statements and removing them after you are done with debugging.
Sometimes you want your breakpoint to be triggered when the line is triggered n times. For example, you have a loop and you are interested in inspecting your application only when the counter hits 50, then you use the Hit Count option of the breakpoint. Also sometimes, as I have already mentioned, one line can be called hundreds of times, and if you want to explore a particular situation, you just set your Hit Count to the number at which the breakpoint should be triggered. Thus, the debugger will skip the breakpoint n times and trigger on the count you specified.
Please terminate the debugger if it is still running, remove Printpoint that we have set up in the previous example, and uncomment line 113.
After line 112, please add two more lines:
andrew.setPosition("programmer");
andrew.setPosition("employee");
We need it so that we can call one function several times.
Go to line 31 (
ifstatement ofsetPosition()) and set a breakpoint.Right-click on this breakpoint and select Breakpoint Properties….
Check the Hit count option and enter
3as shown in the following screenshot: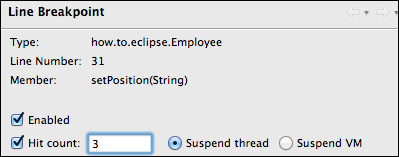
Click on Ok and run the debugger.
If you did everything correctly, your program should stop at line 31. Take a look at the Debug view. Your stack shows that
setPosition()was called by themain()method on line 114. Line 114 is the third occurrence of thesetPosition()function, which means that the two previous occurrences were skipped.Click on the Resume icon.
Imagine if we do not put the Hit Count breakpoint, then the breakpoint would be triggered for the second and third time. But because we have set Hit count to 3, the breakpoint was triggered only on the third occurrence and simply finished execution.
Now you know how the Hit Count breakpoint works. Please delete lines 113 and 114 that we have added specifically for this example. Also unset the Hit Count breakpoint and terminate the debugger before we move to the next recipe.
JUnit is a testing framework written specifically for Java. It allows the user to test each method one by one and makes sure that code refactoring or improvements to your project does not break the other classes, dependent methods, or subsystems. For example, you have several classes dependent on each other and you need to ensure that any changes that you are making to one class won't break the other classes. JUnit tests provide this functionality, allowing you to make sure that your changes do not break the system. Often, projects include JUnit tests in their build process and do not approve the built result unless all JUnit tests pass. Moreover, JUnit tests not only make your programs more stable, but also save you a lot of time.
There is one more big advantage of being an Eclipse user in terms of JUnit tests. In all the new versions of Eclipse with JDT, the JUnit framework comes prepackaged, so you don't need to download and install it.
To create a JUnit test case, execute the following steps:
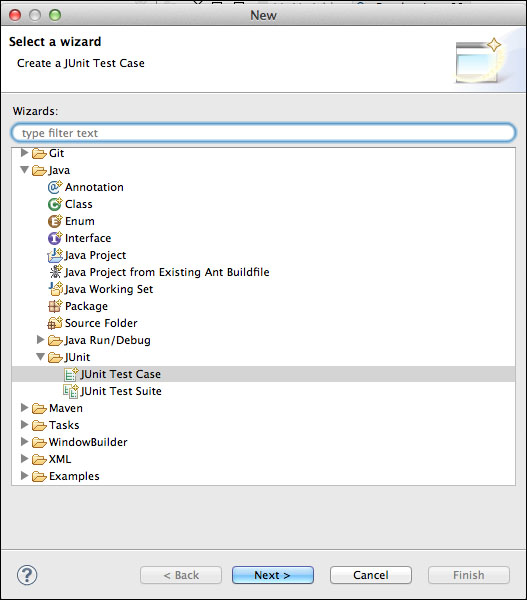
Go to File | New | Other… | Java | JUnit | JUnitTest Case as shown in the following screenshot:
Click on Next>.
In the Package field enter
how.to.eclipse.tests.In the Name field enter
EmployeeTests.Click on Finish. (If you are asked to add JUnit 4 to build a path, click on Ok.)
If you have done everything correctly, you should see a couple of new things in your Package Explorer.
Go to Java Perspective if you are not already there. See the following screenshot if you forgot how to switch perspectives:

In Package Explorer expand our how-to-debug project.
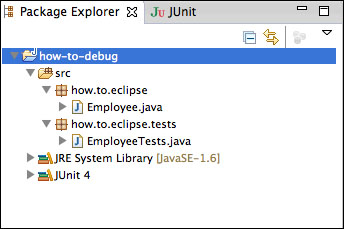
You should see a couple of new things. First of all, under src | how.to.eclipse.tests there is a new
ExmployeeTestsclass. This is our test class, which we will be using to put our tests for theEmployeeclass. Secondly, there is a JUnit 4 library added to our build path, so that we are able to run JUnit tests.If we open the
EmployeeTestsclass, we will see that there is onetest()method with a method callfail()in it.Click the
 icon (Run).
After running the EmployeeTests method you should see the JUnit tests' interface that looks like the following screenshot:
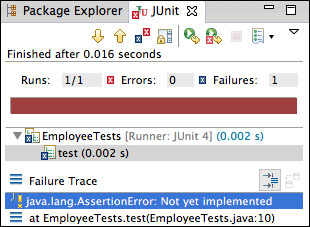
The JUnit interface is straightforward. On the top of the JUnit view is a menu that helps to navigate through the test classes. Below the menu is a time indicator, which shows how much time it took to run the test. Under the time indicator there is a test statistics and an indicator of whether the tests have passed (green) or failed (red). Finally, below the red/green indicator there is a hierarchy of tests and Failure Trace. We will see how all these tools work when we start creating JUnit tests for our Employee class.
Meanwhile, if you get through all these steps, congratulations. You know how to set up JUnit tests, which, as I have already mentioned, is a very straightforward process.
In the previous recipe we have covered how to create a JUnit test case. Now we will code tests for the Employee class methods.
First of all you need to open the EmployeeTests class, which we have created in the previous recipe.
As you can see, the EmployeeTests class has a test() method with @Test above it. @Test is an annotation, which specifies that the current method is a single test. Before we start coding, let's find out what other annotations are available.
Besides @Test, there are:
@Before: Putting this annotation before the method means that this method will be executed before every test.
@After: Putting this annotation before the method means that this method will be executed after every test.
@Ignore: Putting this annotation before the method means that this method will be ignored. (This can be used when you want to temporarily exclude a test or if the class functionality that is tested is not used anymore.)
@BeforeClass: Putting this annotation before the method means that this method will be executed only once, before all the tests.
@AfterClass: Putting this annotation before the method means that this method will be executed only once, after all the tests finish executing.
These are the major annotation types for JUnit testing. Let's find out how to use them.
Our Employee class has several places that need to be tested. We have three class variables (position, number, and age), which must hold valid values or otherwise our application will fail. Thus, we will test the Employee class by passing different values to the setter function, and making sure that only valid values are accepted. Sounds good?
So let's start.
First of all I need to create the
Employeeobject that we will be using throughout all the tests. So in myEmployeeTestsclass I put:Employee emp = new Employee();
My next step is to create a test for one of the class variables. I have decided to start with
position. As position is set by thesetPosition(String)method, this will be the method that I will be passing values to. After setting the position, I will be checking if the tests have been passed by comparing the expected position value withemp.getPosition(). In my comparison I will be using some of the JUnit assert methods.
Let's take a look at them and see what they do:
assertNull(object)/assertNoNull(object): When this method is called, the test will pass only if the object is null (assertNull) or not null (assertNotNull)assertEquals(value1, value2): When this method is called, the test will pass ifvalue1equals tovalue2assertTrue(condition)/assertFalse(condition): When these methods are called, the test will pass when the condition either returns true (assertTrue) or false (assertFalse)
There are more assert methods, but in our example we will use only those listed previously.
I do the following using these assert methods:
I created a
@Beforemethod that assigns a position to the tester before every test is executed.I created five tests to check the following:
The
Employeeobject is not nullThe
positionvariable accepts the valid positionThe
positionvariable cannot be assigned tonullThe
positionvariable cannot be assigned to an empty stringThe
positionvariable accepts only valid strings (which is in thevalidPositionsarray)
My
EmployeeTests class looks like the following:1. package how.to.eclipse.tests; 2. 3. import static org.junit.Assert.*; 4. import how.to.eclipse.Employee; 5. import org.junit.*; 6. 7. public class EmployeeTests { 8. Employee emp = new Employee(); 9. 10. /** 11. * Before every test this method sets position to "tester" 12. */ 13. @Before 14. public void setUp() { 15. emp.setPosition("tester"); 16. } 17. 18. @Test 19. public void testEmployeeNotNull(){ 20. assertNotNull(emp); 21. } 22. 23. @Test 24. public void testPositionValid(){ 25. emp.setPosition("engineer"); 26. assertEquals("engineer", emp.getPosition()); 27. } 28. 29. @Test 30. public void testPositionNull(){ 31. emp.setPosition(null); 32. assertFalse(emp.getPosition().equals(null)); 33. } 34. 35. @Test 36. public void testPositionEmptyString(){ 37. emp.setPosition(""); 38. assertTrue(emp.getPosition().equals("tester")); 39. } 40. 41. @Test 42. public void testPositionInvalidString(){ 43. emp.setPosition(" tester"); //extra space 44. assertFalse(emp.getPosition().equals(" tester")); 45. } 46. }As you can see, I have been using different variations of assert methods to check if the values that I have passed to
setPosition()are saved to the position. Ideally, you should put as much assert cases as you can think of. Try not to put cases that are identical, as it is just a waste of the resources.Now let's run the
EmployeeTestsclass. Click on the icon. You should see the following screenshot:
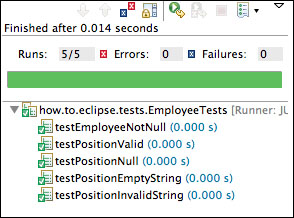
As you can see, all the five tests have passed successfully. Let's make some changes to our Employee class and see what will happen.
Go to the
Employeeclass, then to thesetPosition(String)function (on line 30), and comment out theifstatement (on lines numbers 31 and 33). YoursetPosition(String)function should look like the following:public void setPosition (String _position) { //if (Arrays.asList(validPositions).contains(_position)){ position = _position; //} }Save your changes, go to the
EmployeeTestsclass, and run it again.After running
EmployeeTestsyou should see the following output: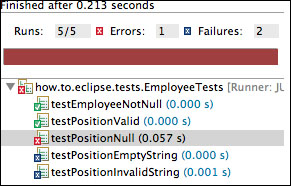
As you can see in the previous screenshot, two tests have successfully passed. The testPositionNull() test has a red cross on it, which means that it produced an error, and two tests have failed because the assert methods in these tests returned false.
This error stack is very informative as it shows directly what caused the problem. As we have commented out the if statement that does not allow invalid values to be assigned to position, when null was passed to setPosition() it was saved into position. As a result, when getPosition() was called, it threw NullPointerException that broke our application.
Also, testPositionEmptyString() and testPositionInvalidStrin() assigned an empty string and an invalid string to position. Hence, assert failed.
Now we know what test failures look like. Please uncomment the changes in setPosition(String) (on lines 31 and 33).
Now we know how to test methods that receive strings. Let's also create a couple of methods to test age.
I base my age tests on the following criteria:
The
agevariable accepts a valid ageThe
agevariable accepts a minimum valid ageThe
agevariable accepts a maximum valid ageThe
agevariable does not accept a value that is more than the maximum valid ageThe
agevariable does not accept a value that is less than the minimum valid ageThe
agevariable does not accept a negative value
My age tests look like the following (continue the EmployeeTests class):
47. @Test
48. public void testAgeValid(){
49.     emp.setAge(25);
50.     assertEquals(25, emp.getAge());
51. }
52.
53. @Test
54. public void testAgeMin(){
55.     emp.setAge(19);
56.     assertTrue(emp.getAge() == 19);
57. }
58.
59. @Test
60. public void testAgeMax(){
61.     emp.setAge(84);
62.     assertTrue(emp.getAge() == 84);
63. }
64.
65. @Test
66. public void testAgeMoreThanMax(){
67.     emp.setAge(90);
68.     assertFalse(emp.getAge() == 90);
69. }
70.
71. @Test
72. public void testAgeLessThanMin(){
73.     emp.setAge(10);
74.     assertFalse(emp.getAge() == 10);
75. }
76.
77. @Test
78. public void testAgeNegative(){
79.     emp.setAge(-84);
80.     assertFalse(emp.getAge() == -84);
81. }
82. }// end of the class
Now let's run the EmployeeTests class.
Your output should look like the following screenshot:
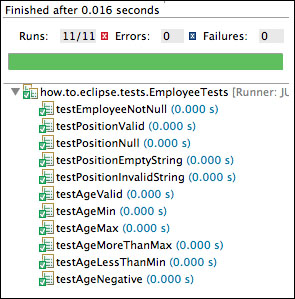
You can see that all tests are conveniently put into a tree; thus it is easy to follow the test hierarchy, and in case any of the tests fail, it is easy to find the problematic spot. Fortunately for us, all our tests have successfully passed, so we can say that the position and age variables are protected from getting junk values. Now you know how to create JUnit tests, so please create tests for number yourself and make sure that these tests pass when you run the EmployeeTests class.
In this recipe, we will learn how to execute multiple JUnit test cases at the same time by putting them into a JUnit Test Suite.
Imagine a situation when you are developing an application with lots of classes. If you want to test the whole application, you would need to run a JUnit test for every class one by one, which will take you forever. Also note that, often classes need to be called in a particular order. So, if by manually executing test cases you will mix the order, you will need to start manually running test cases from the beginning. This can be easily avoided if you put your JUnit test cases into a JUnit Test Suite. It allows you to not only put your JUnit test cases in one place, but also to specify the order of how test cases should be run and to put specific conditions for every test case. Note that, when you run the JUnit Test Suite class, it will run every JUnit test case one by one.
Before we create a JUnit Test Suite, we will need to create one more class, so that we can see how the tests for each class can be combined.
Create a
Personclass, the same way as we have created theEmployeeclass in the first recipe, and put it in thehow.to.eclipsepackage.Your
Personclass will hold only one variable—name. It will also have one getter and one setter function.Your
Personclass should look like the following code:1. package how.to.eclipse; 2. 3. public class Person { 4. 5. private String name; // private variable holding person's name 6. 7. /** 8. * This method sets name 9. */ 10. public void setName (String _name) { 11. if (_name != null && _name.isEmpty() == false){ 12. name = _name; 13. } 14. } 15. 16. /** 17. * @return name 18. */ 19. public String getName () { 20. return name; 21. } 22. }Create a JUnit test case called
PersonTestsin thehow.to.eclipse.testspackage the same way as we did in the previous recipe.Test your
namevariable of thePersonclass for the following:The
namevariable does not accept nullThe
namevariable accepts a valid stringThe
namevariable does not accept an empty string
I have also created a precondition for my Person class where I assign name as unknown.
My PersonTests class looks like the following:
1.  package how.to.eclipse.tests;
2.
3.  import static org.junit.Assert.*;
4.  import how.to.eclipse.Person;
5.  import org.junit.Before;
6.  import org.junit.Test;
7.
8.  public class PersonTests {
9.      Person person = new Person();

10. @Before
11. public void setUp() {
12.     person.setName("unknown");
13. }
14.
15. @Test
16. public void testNameNull() {
17.     person.setName(null);
18.     assertNotNull(person.getName());
19. }
20.
21. @Test
22. public void testNameValid() {
23.     person.setName("Bob");
24.     assertTrue(person.getName().equals("Bob"));
25. }
26.
27. @Test
28. public void testNameEmptyString() {
29.     person.setName("");
30.     assertFalse(person.getName().isEmpty());
31. }
32.
33. }
Thus, now we have two classes called Employee and Person, and two JUnit test cases called EmployeeTests and PersonTests. What we need to do now is to combine them together in a JUnit Test Suite.
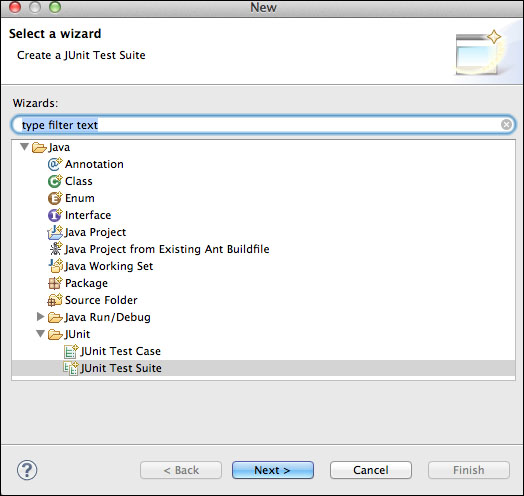
Right-click on the src directory and select New | Other… | JUnit | JUnit Test Suite. See the following screenshot:
Click on Next>.
In the next tab you will see that two of your tests are already checked, and the name is also provided as
AllTests(make sure that the package is set tohow.to.eclipse.tests). Eclipse is a very intuitive environment, and as I have already mentioned, some routine tasks are done by Eclipse automatically, thus saving us a lot of time.Click on the Finish button. As a result, you should see the
AllTestsclass created, and it should look like the following:1. package how.to.eclipse.tests; 2. 3. import org.junit.runner.RunWith; 4. import org.junit.runners.Suite; 5. import org.junit.runners.Suite.SuiteClasses; 6. 7. @RunWith(Suite.class) 8. @SuiteClasses({ EmployeeTests.class, PersonTests.class }) 9. public class AllTests { 10. 11. }As you can see, we have the @SuiteClasses annotation containing a list of the classes included in the JUnit Test Suite. If you want to add some more classes, just put them into the list separated by a comma.
Run the
AllTestsclass.
If you did everything correctly, you should see that 14/14 tests passed, which means that 11 tests from EmployeeTests and three tests from PersonTests were executed together. Go to the JUnit tree view and expand everything. You should see the whole list of your tests as shown in the following screenshot:
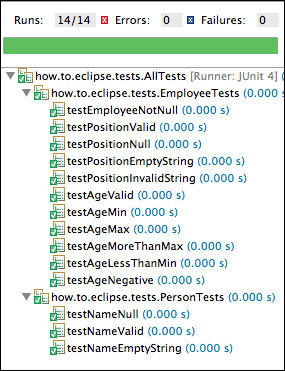
If one of the tests contained an error, you would see it exactly as it was in the list, and by double-clicking on the test, you would be navigated directly to the test that fails. Thus, with the JUnit Test Suite, you are able to see your whole project and debug any issues that occur effectively. Moreover, as you have learned in this recipe, creating a JUnit Test Suite is a very easy task as Eclipse does most of the job for you.