


Welcome to Instant E-commerce with OpenCart: Build a Shop! OpenCart is currently one of the most flexible and user-friendly, open source shopping carts and store management systems. Today, many professionals run their shops using OpenCart because it provides a wide range of features that are easily customizable, even for non-techies. Also, there is a very active and ever-increasing community of users for OpenCart.
In this guide, we will learn how to implement a fully-featured store in the shortest time using structured, step-by-step recipes.
We will learn how to install a default OpenCart shop correctly.
First of all, we will need a domain to run our online shop. GoDaddy.com is the most popular registrar to buy a domain name if you don't have one. To be able to install OpenCart, we will also need to find a web hosting service that needs to be fully supported by all of the components on the following technical checklist: Apache Server, PHP 5.2 (minimum), MySQL, cURL, Fsock, and the cPanel administration tool.
Let's download the latest OpenCart version on our computer using the following link (at the time of writing this book, the latest OpenCart version was v1.5.4.1):
Let's log in to the cPanel administration tool. It is usually located at
http://yourwebsite.com/cpanel.Let's open File manager under the File section and click on the Web Root option. We will click on the Upload button situated at the top and choose our installation ZIP file.

After the uploading process is completed, we will extract the contents to the folder shown in the following screenshot:

We will navigate to the
uploadfolder. The next step is to select all the files and move them to the root folder. Here is how this is done: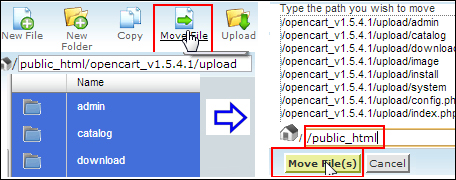
We will configure the database settings by creating a database and a user, and we will then connect the user to the database.
In cPanel, click on MySQL Database Wizard. It will ask you to provide a database name.

Now, we need to provide a database username with the password. Let's make sure we generate a strong password with the help of the password generator. Take note of the password. We will need it later. The final step is to provide all the privileges to our user for the database. For this, select the ALL PRIVILEGES checkbox and then click on the Make Changes button to complete the process.

Now let's browse to
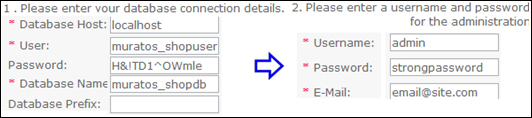
http://yourwebsite.com/install.We will accept the public license agreement and click on Continue. The next page deals with essential system checks. If there are no errors, we will go on to the database settings page. We will fill in the information that we had already provided during database creation:
The installation ends here. But now we will delete the
installfolder using cPanel, for security reasons.
We will look at the different ways to categorize a sample musical instruments shop and enter a sample category and subcategory under it.
OpenCart creates sample categories and products upon completion of the installation process. We will first need to delete them to start with a clean store structure. Let's browse to http://yourwebsite.com/admin, log in to the system, and click on the Catalog/Categories menu. Let's select all the categories and click on the Delete button.
Let's add our first category to our web store. Open the Catalog menu, click on Categories, and then click on the Insert button.
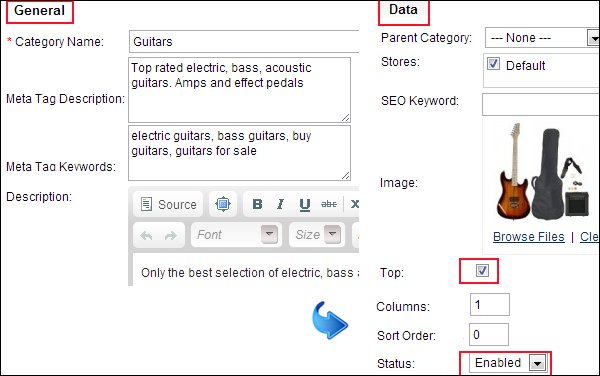
There are several tabs on this page. We will provide data for the General tab first.
For the Data tab, let's fill the textboxes, select the options according to the following screenshot, and click on the Save button:
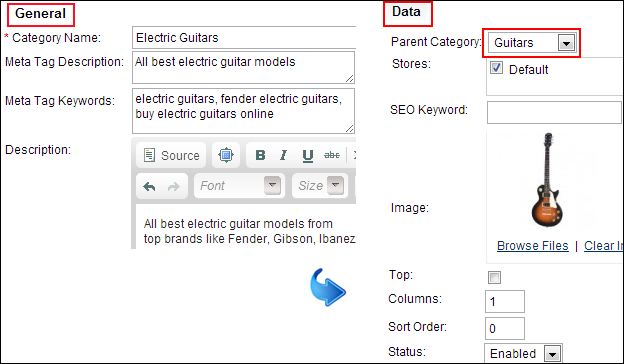
In a similar manner, let's add a subcategory under the category that we have just added. Here is the sample screenshot to achieve this:
Here is how the user interface will look when a visitor browses to the subcategory:

Here's an explanation of the fields under the General tab:
Category Name: This is shown as a link to the visitor on the left sidebar by default, and it can optionally be displayed at the top of the page as well. The subcategories and the products listed under a category are shown to the visitor when a category name is clicked.
Meta Tag Description: This is used by search engines to describe a web page. So enter this information wisely to get a better rank with regard to relevancy and attract more visitors to your shop from the search engines.
Meta Tag Keywords: This is also for the search engines. It is useful to fill this textbox even though some search engines now ignore it. The search engines will relate our web page to the keywords we provide here.
Description: This is for our shop visitors. It describes what the category does and some of the items visitors can find under it.
Here's an explanation of the fields under the Data tab.
Parent Category: It is used when we open a subcategory under another category.
Image: The image we provide here is shown on the website. It is useful to provide such images whenever possible. It will attract more attention and provide more views for the product.
Top: If you have lots of main categories, you can use this option to show the most important ones at the top.
Status: If the Disabled option is selected, a category is not shown in the store.
In the following section, we will add a guitar as a sample product and show how different settings will result in different effects.
We will clean our store by removing preinstalled products, similar to how we did for categories in the previous section. Let's open the administration panel. We will open the Catalog menu, click on Products, choose all the listed products, and then click on the Delete button.
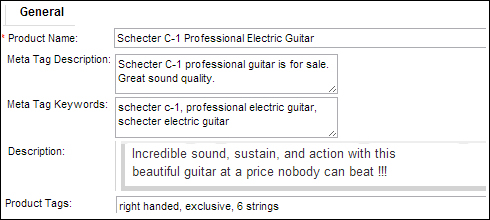
Let's open the Catalog menu, go to Products, and click on the Insert button. We'll start with adding our first product by filling the General tab according to the following screenshot:
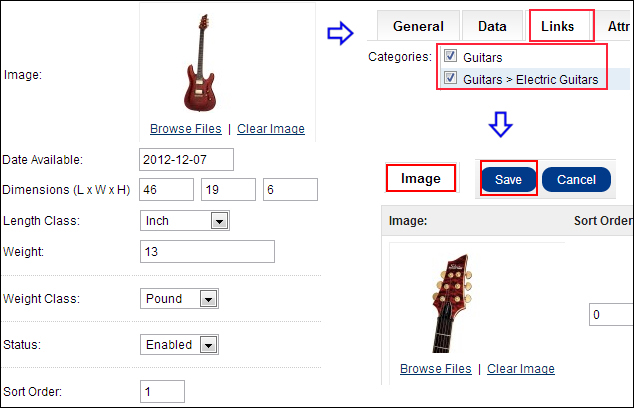
Now let's click on the Data tab and provide data for the remaining fields according to the following screenshot:

After filling the remaining fields on the Data tab, we will choose from the categories on the Links tab and jump to the Image tab directly to add more images for our product. We will be talking about the other tabs in the further sections, so we can just ignore them for now.
After we click on the Save button, we can browse to the product's page and see how it looks:

The following section explains what we have done for the creation of a basic product.
An explanation of the General tab is as follows:
Product Name: This name will constitute the heading text on the product information page. The name will be listed under its own category as well.
Meta Tag Description: This text will be displayed by the search engines to their visitors. So be descriptive and try to make it no lengthier than 125 words. Otherwise, it will be cut by the search engines.
Meta Tag Keywords: This is for the search engines. Here we can write related keywords for the product.
Description: This is the main description text that will appear on the product information page. The good thing is that we can even construct an advanced layout with the help of HTML.
Product Tags: Tags are the direct shortcuts for search phrases. They are shown under the product description. So, we can also group such searches and show different products under the same search tag.
In the Data tab, we provide the price of the product and its physical properties along with some stock-handling options.
Model: You need to provide the model number or code in this field.
Price: This is the price of the product, not inclusive of taxes.
Quantity: OpenCart supports stock tracking. We can take advantage of this feature by providing the current stock for the product. It will be deducted automatically after a sale if the Subtract Stock option is set to YES.
Subtract Stock: Set this to YES if you want to deduct from the stock whenever a new order has come in.
Out of stock status: If a product becomes out of stock (the Quantity becomes 0), the selected message is listed on the production information page.
Requires shipping: This option is only valid for physical products.
Location: Here we can enter information about the item's location.
Date Available: This can be used to show a product on the store on a future date.
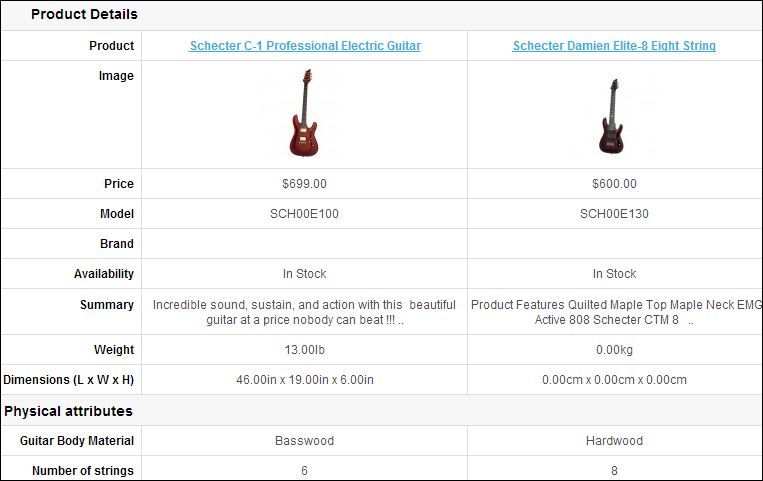
Product attributes generally define the categorized specifications or technical features of a product. If you provide the attributes, shop visitors can compare them side by side.
There are attributes and attribute groups that are created upon installation by default. We will need to delete them before entering our attribute information.
Let's open the list of attributes by clicking on the Catalog menu and then clicking on Attributes. After this, we will delete all the installed attributes.
Let's do the delete operation for the Attribute Groups list, which is located under Catalog | Attributes | Attribute Groups.
We will start by adding an attribute group. For our example, we have chosen
Physical attributesas the name for our attribute group.
Guitar Body MaterialandNumber of stringsare two sample attributes. We will assign them to a certain attribute group while creating them.
We will now edit our product using the Attribute tab under Catalog | Products. The available attributes are listed as soon as we begin filling in an attribute name. The following screenshot shows the two attribute values that are assigned for the product. This is a six string guitar with a basswood guitar body.

If a visitor browses the product and opens the Specification tab, all the information we have provided will be seen.

Options contains the purchase options for a product. For example, color is a common option for mobile phones. Customers can choose either a black phone or white phone. Sometimes, an option can increase or decrease the final price of a product as well. For example, you can either buy a tablet with a protective case or buy one without it.
Let's delete the preinstalled options by browsing to Catalog | Options, selecting all the options, and deleting them.
We will now enter a few purchase options for our products. Let's click on the Catalog menu, click on Options, and then click on the Insert button. According to the following screenshot, we offer Protective case, Guitar amp, and Guitar strap as Extra accessories.

Now let's edit our product information through the Products page under the Catalog menu by browsing to the Option tab. The available list of options will be seen as soon as we begin typing.

The following screenshot shows that we have provided optional Extra accessories for our guitar. For example, if the customer chooses to purchase the guitar, which costs $150 by itself, the final price will be $200 with the addition of $50 for the guitar amp.

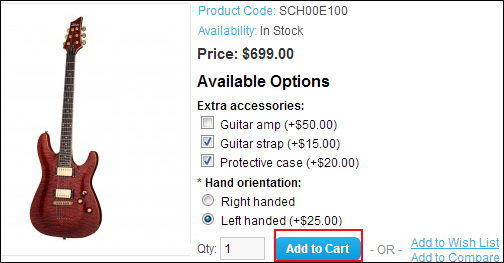
The following screenshot shows another set of options that is the required set of options. According to this, a customer must choose either the right- or left-handed guitar model. Choosing the left-handed guitar model will increase the price by 25 units. Choosing the right-handed guitar doesn't change the price.

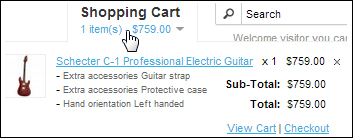
Here is what a customer will see on the product page. Note that we must choose an option for Hand orientation, while choosing any for Extra accessories is not obligatory:
This is the shopping cart after these options are added to the final price:
Generally, the tax rate for a product is calculated according to the geographical shipping location of a customer. We will now see how we can enable taxes for a product, and how we can enter the tax class, rates, and grouping information for it.
Let's apply the default tax class to the product under the Data tab. It is called Taxable Goods by default. The right-hand side of the page shows the result when the edited product is added to the shopping cart.

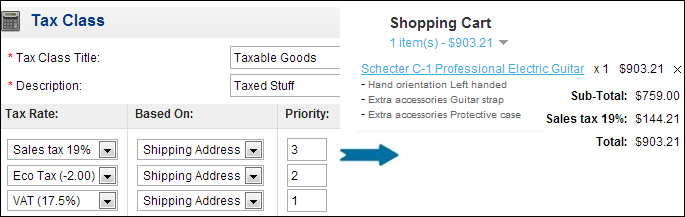
Assume that our store also ships to Germany. Now let's add the tax rate for customers who will order from Germany. We will need to define the tax zone. Let's go to System | Localisation | Geo Zones and then click on the Insert button. We have added all the geo zones of Germany. Let's go to System | Localisation | Taxes | Tax Rates and insert the following tax rate and connect it with the geo zone.

Go to System | Localisation | Taxes | Tax Classes, edit Taxable Goods, and insert
Sales tax 19%in the Tax Name field for the newly added tax rate.Now if we open a test customer account with a shipping address from Germany, log in to the system, and add a product to the shopping cart, we will see that the correct tax value is applied.
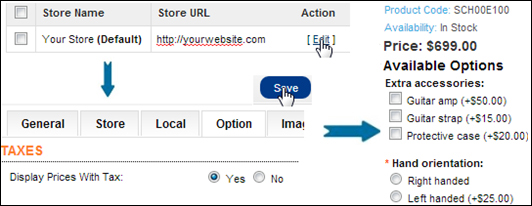
By default, the prices are shown inclusive of tax. It is possible to change this setting. Here is how to do it. Click on the System menu, click on Settings, and edit the Option tab. Now the front page shows the price without the tax included, as shown on the right-hand side of the following screenshot:
We will learn how to configure the look of our shop as well as its stock handling, local language, currency, checkout, and tax options.
Let's open the Settings menu from the System menu and then click on Edit to open the main settings screen for our store. Let's fill in the General tab according to our store information. Then, let's click on the Save button on the same page. After that, let's browse to the URL
http://yourwebsite.com/index.php?route=information/contactto see how this information will be shown on the Contact us page. The link to this page is also located at the bottom of every page of our website.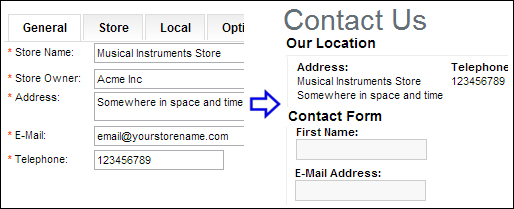
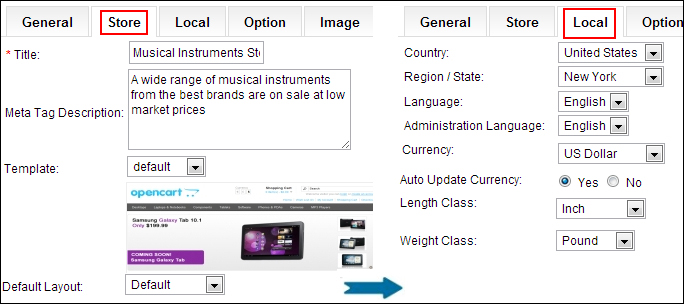
Let's continue with the Store and Local tabs and provide more information for our store.
Now let's fill the Option and Image fields as well.

Let's learn the details of the options we have just set.
Following is an explanation of some of the options under the Store tab:
Title: This is shown as the title of the store in the search engines as well as on a visitor's browser tab
Meta Description: This is for the search engines; it is shown as a description under the title
Following is an explanation of some of the options under the Local tab.
The Country and Region/State tabs: These are used to enter information for the "shipping from" address.
Auto Update Currency: We can automatically update the currency rates using this option. The rates will be updated using the Yahoo! Finance service working in the background.
The Length and Weight Class tabs: Measurement types are selected here. Typically, a store in the US will use inches and pounds instead of meters and kilograms that are used in the EU.
The following is an explanation of the options under the Option tab:
Default Items per page (part of the the Admin and Catalog tabs): This is for paging purposes and generally set to a high value for admin panels, for easier administration. A very large value for the customer catalog can make the site slower if it is getting a lot of page views.
Category Product Count: If set to Yes, all the subcategories will show the number of products under them. It can have a negative impact on the performance of large stores.
Allow Downloads: We set this to No for a store that sells physical products.
Taxes: We use this section to show prices either with or without the tax included, and define the address source for which the taxes need to be calculated. Typically, you will not need to change the settings here.
Customers Online: If set to Yes, online guests and customers are tracked in a special report, along with detailed information, such as their last visited page, IP address, and so on. The report is available under the Customers Online menu under Reports | Customers.
Login Display Prices: It is possible to show prices only when a customer logs in to the store. When it is set to Yes, guest users will not be able to see the sale prices of the items.
Account Terms: It is wise to force users to accept a privacy policy when they create an account. In this way, you can be on the safer side legally.
Guest Checkout: This is the fastest way to order from a store, without the customer having to sign up for the store at first. But, they will not be able to track the status of their orders online.
Checkout Terms: Again, it is safer to force users to accept the terms and conditions of use.
OpenCart supports a wide range of payment methods and services. We will learn how to integrate one of the most popular online payment services, that is, PayPal into our store. PayPal offers several solutions. Two popular ones are PayPal Website Payments Standard and PayPal Website Payments Pro.
Let's learn how to integrate PayPal Website Payments Standard into our store in test mode.
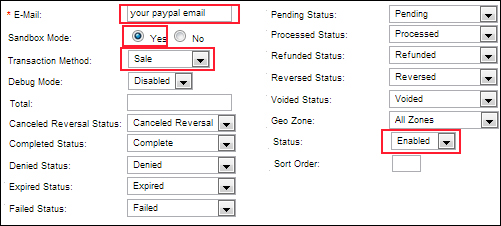
We will start by activating PayPal Payments Standard using the Payments section under the Extensions menu, and then we will edit the settings for it.

The next step is to fill in the needed information for testing the PayPal system. For test purposes, we will choose the option for Sandbox Mode as Yes.
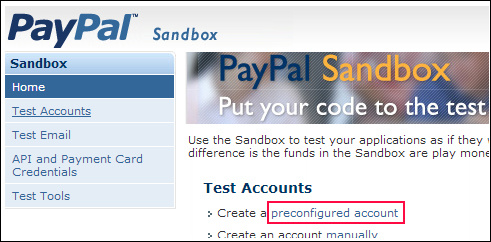
We will now open a developer account to create test accounts on PayPal. Let's browse to http://developer.paypal.com and sign up for a developer account. Following is a screenshot of the screen that is displayed after we sign up and log in to the account. Click on the Create a preconfigured account link.
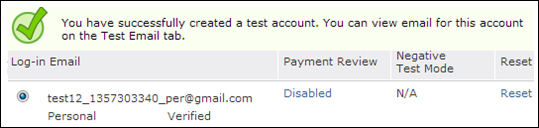
The next screen will propose an account name with which your account will be created. Now we only need to add funds to the Account Balance field to create the account. Remember that it is a test account, so we can give any virtual amount of funds we want.
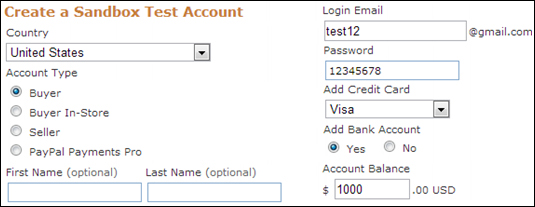
Now we have a test PayPal account that can be used for our test purchases:
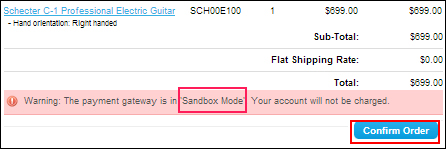
Let's go to our shop's user interface, add a product to the shopping cart, and proceed to the Checkout page:
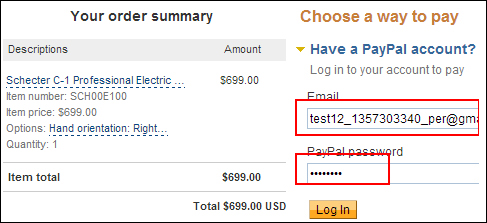
Let's log in with the test account we have just created:
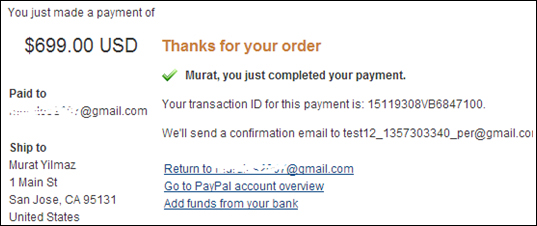
The following screenshot shows a successful test order:
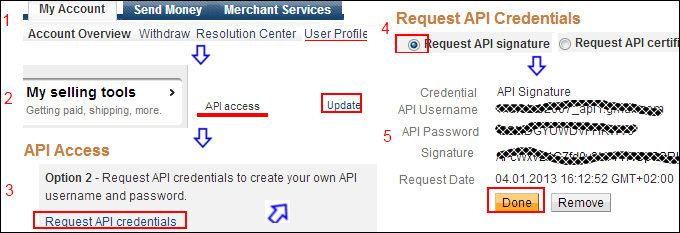
We need to get the API information first. Let's log in to our PayPal account. Click on the User Profile link, and then click on the Update link next to API access in the My selling tools section. The next step is to click on the Request API Credentials link. Choose the option that says Request API signature. This will help us get the API information.
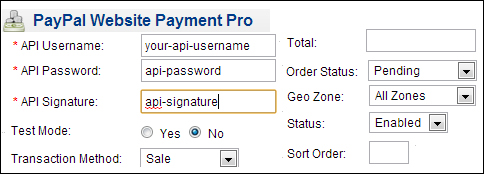
The next step is to activate Payment Pro on the OpenCart administration interface using the Payments section under the Extensions menu. We need to edit the details and enter the API information. Let's not forget to select No for Test Mode, which means that this will be a live system. Choose Enabled for the Status field.
Now let's learn how the PayPal Standard and Pro models work and how they differ from each other.
PayPal Standard is the easiest payment model to integrate into our store. All we need is a PayPal account, and a bank account to withdraw the money from. PayPal Standard has no monthly costs or setup fee. However, the company charges a small percentage from each transaction.
Note
Please go to https://www.paypal.com/webapps/mpp/merchant for merchant service details.
The activation of the Standard method is very straightforward. We only need to provide our e-mail address and then set Transaction Method to Sale, Sandbox Mode to No, and Status to Enabled on the administration panel.
There is a difference in the test payments that we have made. Customers can also pay with their credit cards instantly, even without a PayPal account. This makes PayPal a very powerful and popular solution.
This service can be used to charge credit cards using PayPal services in the background. The customers will not need to leave the store at all; the transaction will be completed at the shop itself. Many big e-commerce websites operate this way.
There are many shipping methods that OpenCart supports. In the following pages, we will learn how to implement the most popular ones.
Let's learn how to limit the purchases from our shop to specific countries.
We will now learn how to disable orders for the countries to which we don't want to ship items.
Go to System | Localisation | Countries. You will see a list of all the countries of the world on the Countries page. Choose any one of them, set the Country Status to Disabled, and click on the Save button.

We need to repeat this process for each country we don't want to ship to.
The methods we will cover in this recipe are free, per item, weight-based, UPS, and USPS shipping.
Let's go to the Extensions menu and click on Shipping. Then, click on the Install link next to the Free Shipping option. The following screen shows up after we enable it; here we will define that every UK Shipping geo zone order that exceeds
200in total (that is, every order for which the total price exceeds200in the default currency) will have no shipping costs. The other customers will not even be able to see the free shipping offer.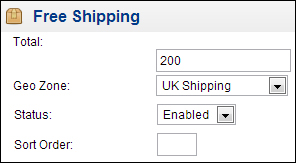
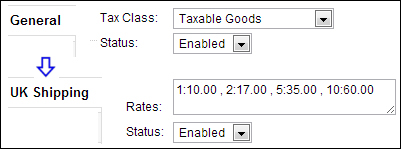
Let's go to the Extensions menu and click on Shipping. We need to install and edit the weight-based shipping method. Open the General tab. The Status field has to be set to Enabled here for the Tax Class we use for the definition of our items in the store. Then, we will need to define the shipping rates for the geo zone we want, for example, UK Shipping.
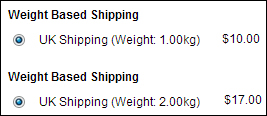
Let's fill in the Rates textbox with
1:10.00 , 2:17.00 , 5:35.00 , 10:60.00.Now change Status to Enabled.
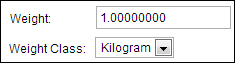
Now let's edit the weight of a product on the store. It is on the Data tab under Catalog | Products. The example shows a value of 1 kilogram:
Let's log in to the system with a test user account that has an address from the UK. Let's add this product with quantities of one and two units separately and check the shipping options for each. The following screenshot shows the different weight-based shipping rates according to the total weight proposed to the customer:
Let's visit the website https://www.ups.com/upsdeveloperkit.
We need to register on this page. Upon successful completion of the registration, we will log in to the system and request an access key.
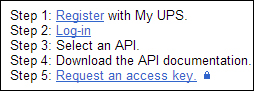
The request would require a real UPS account. You can open a new account or connect an existing account now. After all these steps, we will get an access key that we can use in OpenCart.
After this, we can go to Extensions | Shipping and activate the UPS method, and provide the access key along with our username and password on the developer system. Let's not forget to change the Status to Enabled and choose the mode correctly (test or live).
Before starting, we need to open an account on the WebTools service web page. It is located at https://secure.shippingapis.com/registration.
The account is opened on the test server by default. On completion of the tests, we will need to send an e-mail to USPS to activate production mode. After the change, we can offer this shipping method to the customers. Again, we provide the information for USPS using the Shipping section under the Extensions menu.
By default, an OpenCart shop allows ordering for all the countries of the world upon installation. Generally, online stores accept orders only from a certain set of countries or regions. We have learned how to limit the purchases to specific countries.
It is possible to give customers the advantage of free shipping if their shopping cart value exceeds some predefined value.
This is one of the most popular shipping methods for online stores. The final shipping cost is calculated according to the weight of the products in the cart.
UPS (United Parcel Service) is the world's largest package-delivery company. OpenCart has a built-in shipping module for when shipping with UPS. Before we integrate UPS into OpenCart, we need to get a username, password, and a special XML key from the UPS Developer website.
We can offer coupon codes to our customers so that they will be motivated to shop more.
There are two types of coupons in OpenCart: fixed amount and percentage based.
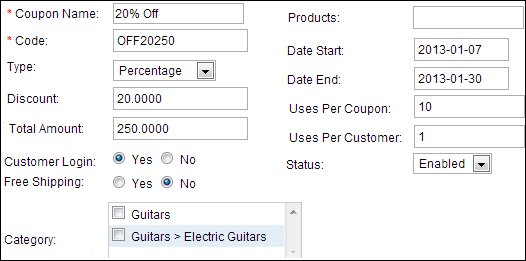
Let's open the Sales menu and click on Coupons, and then we will delete all the sample coupons that were set (by default) upon installation. We will insert a new coupon with the following values:
Let's add a product to the shopping cart using a test customer account and apply the just-added coupon code. The following screenshot shows that the coupon code has been successfully applied:
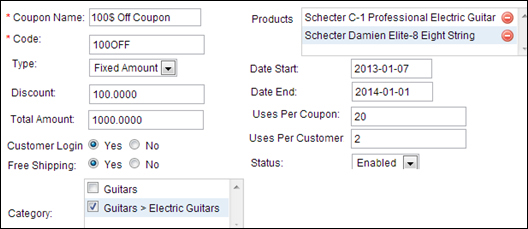
We will insert a new coupon with the following values:
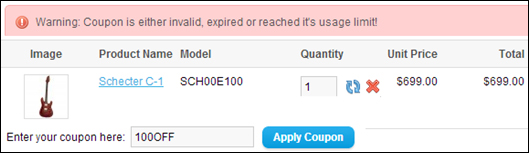
If we add a $699 product to the shopping cart using a test user account and try to apply the coupon code, we see that it fails.
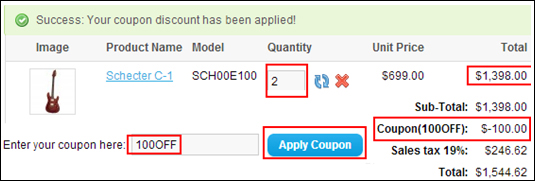
If we update the shopping cart with two items that together cost $1,398 and reapply the coupon code, it will be applied successfully.
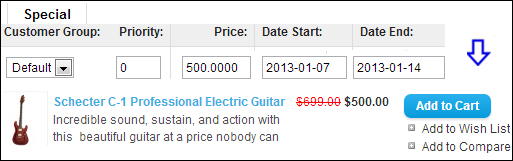
Let's edit a product, click on the Special tab, and add a new special discount as shown in the following screenshot. After that when we browse to this product, we see that the special discount has been applied:
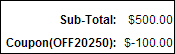
Customers can still apply a coupon code to the already-discounted special item:
We can apply special discounts on bulk purchases. Here is how this is done.
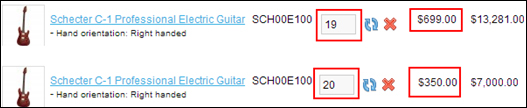
We edit a product and click on the Discount tab. Let's add the discount as shown in the following screenshot:

The following image shows how the unit price changes when the item is added in bulk and exceeds the Quantity value, which is what we have just defined on the Discount tab.
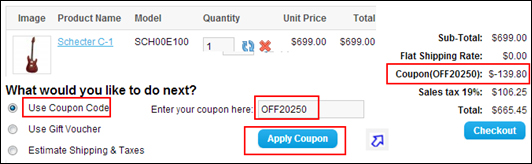
In the first example, we defined a coupon code that offers 20 percent discount on the price if the shopping cart value exceeds $250; we limited the total usage of this coupon to 10 times.
In the second example, we defined a coupon that gives a $100 discount on a purchase if the shopping cart value exceeds $1,000. We limited the usage of the coupon to include only selected products.
As a special promotion offer, we decreased the price of a product for a limited time in the next example.
Finally, we decreased the price of an item for bulk purchases.
Order management is very straightforward and easy in OpenCart.
Orders are tracked as a list using the Orders section under the Sales menu.

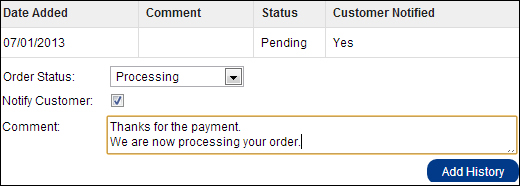
Let's click on the Order Details tab to see who made an order, along with the total amount and date. The order status is shown as Pending at first:

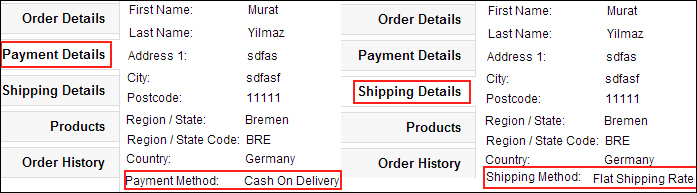
The Payment Details and Shipping Details tabs are the next ones we need to check. Although they are usually the same, they can also be different. In such a case, we send the invoice to the payment address and we ship the items to the shipping address.
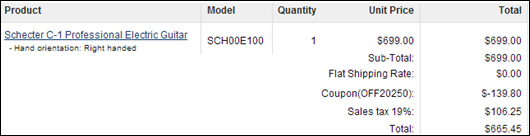
The next tab is Products, where we get to see all the ordered items along with their shipping information, coupons, and tax rates (if they exist).
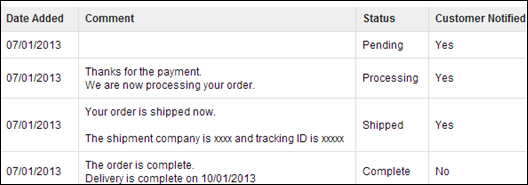
The last tab is the one we will always use. The Order History tab lists all the steps; this is where we start processing the orders and notify the customer.
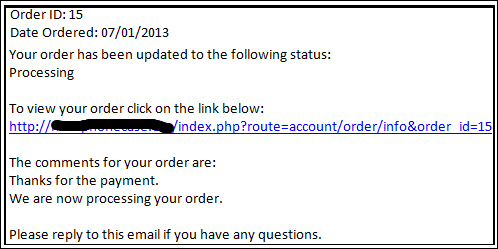
Here is a sample of an informative e-mail that the customer will get:
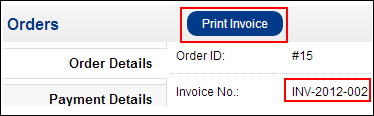
Suppose that we are ready to ship the order. We will generate an invoice now using the Generate link on the Order Details tab:
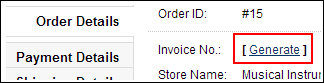
Now a new invoice number is generated in the Invoice No. field. Let's click on the Print Invoice button:
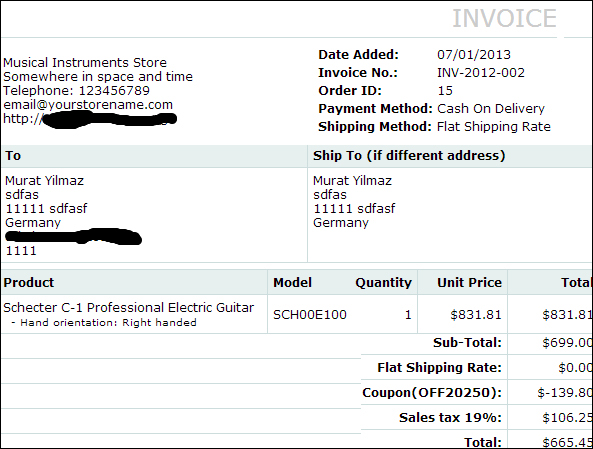
This is what a typical invoice looks like:
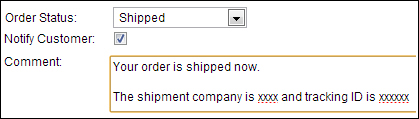
Let's ship the order and set the status as Shipped:
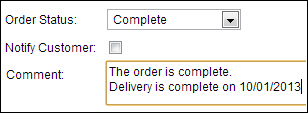
Finally, we can set the Status to Complete after the shipment is made. This time, we will not send a notification.
Although we can edit the details of an order, we typically view the details and then set the status of an order to inform the customer accordingly. The details of all the orders are listed in a table for easy administration.
Here is a screenshot showing all the changes to an order on the Order History tab:
We will be able to track customers better if we group them into segments.
Let's learn how to create new groups and assign customers to a group.
Customer groups are listed under Sales | Customers | Customer Groups. We will insert a new group and name it
VIP.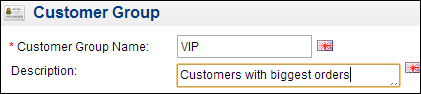
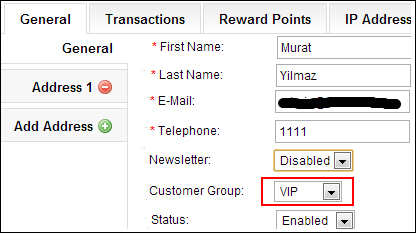
Let's open the details for a customer by going to Sales | Customers | Customer Groups and editing the General tab. We will now set Customer Group to VIP.
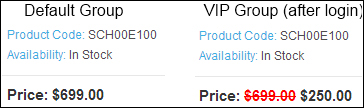
Now we can offer a special price for a product to the VIP group of customers using the Special tab under Catalog | Products.

A visitor to the store who is part of the Default group will see the original price. On the other hand, a logged-in VIP user will see the special price.
Let's go to System | Users | User Groups and click on the insert button. Now let's add a group with the name
Product Entrythat will have only product administration rights. After this, let's go to System | Users, add a new user, and assign this user to the newly created group.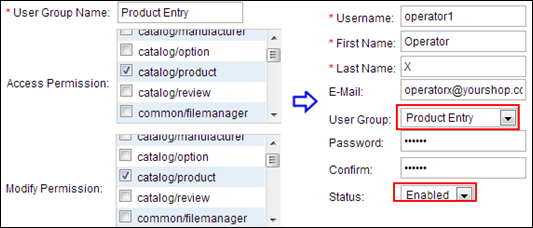
Let's log in with the username
operator1and try to browse through the orders page listed on the page under Sales | Orders. We will not be able to see the list because of insufficient permissions:
We could assign the VIP group to the most active customers with the biggest orders. The group Default is automatically created during installation, and all new customer registrations are assigned to this group.
OpenCart allows defining different roles for administrative users. It is especially useful for large stores where some users are only allowed to add/edit products while some others are allowed to process the orders.
OpenCart is a very flexible system and allows running online stores in multiple languages and currencies.
In this recipe, we will learn how to install new languages and currencies for our store.
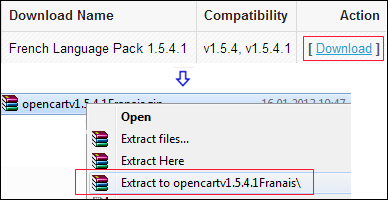
We will download and install the French language pack as an example:
Let's browse to http://www.opencart.com and click on the Extensions tab from the menu at the top, and search for
frenchin the languages category:
We have found a free language pack. Let's download it to our computer and extract the contents.
There are two folders named
adminandcatalog. Theadminfolder holds the translations of the administration screens while thecatalogfolder provides them for the shop interface.Let's browse to the
languagefolder under thecatalogfolder and find the compressed french folder (french.zip). We will upload it to/catalog/languageon the server and extract the contents.Finally, we will open System | Localization | Languages and add a new language with settings as shown in the following screenshot:
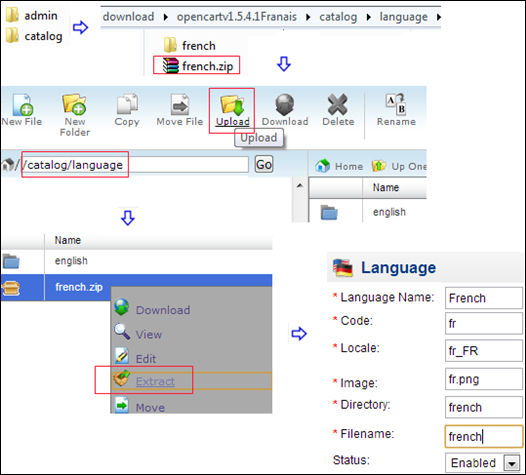
We can see that the French flag is displayed at the top of the store along with the English flag so that it is easy to change between the languages.

In this example, we will add Canadian Dollars (CAD) as additional currency for our store.
Let's open System | Localization | Currencies and insert a new currency. The following screenshot shows that it has been activated on the shop interface after the addition.
We have provided an initial value for the CAD, but it is also possible to update the currency automatically using the information from the Yahoo! Finance website. This setting is located on the Local tab under System | Settings.

Affiliate marketing is a very effective online marketing strategy. Simply put, people who have blogs or e-mail lists will advertise our products with their special tracking IDs and earn commissions whenever a sale is made through their links. Let's learn how to manage affiliates, commission rates, and sales.
Let's learn how to manage the affiliate system for our shop and disable it when we don't need it.
People who are interested in joining our affiliate program will use the special link
http://yourwebsite.com/index.php?route=affiliate/loginmentioned at the base of the page.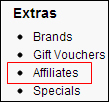
After they register for our affiliate program, we will need to approve them. For this purpose, we will use the page under Sales | Affiliates.

After approval, the affiliate will get a notification e-mail. The person can now log in to the system and generate the links for products using his/her account menu located at
http://yourwebsite.com/index.php?route=affiliate/tracking.
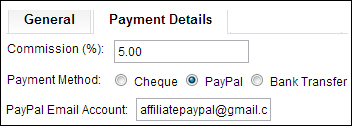
We need to be sure that the commission rate and payment type for each affiliate is accurate. We can edit the affiliates using the Payment Details tab under Sales | Affiliates:
It is quite possible that an online shop owner won't use the affiliate system. By default, the affiliate system is enabled on OpenCart. In the current version, there is no administrative setting to deactivate/activate it. Still, we can disable it by removing the affiliate link from the base of the page and redirecting the affiliate login page to the main page. Here is how it is done.
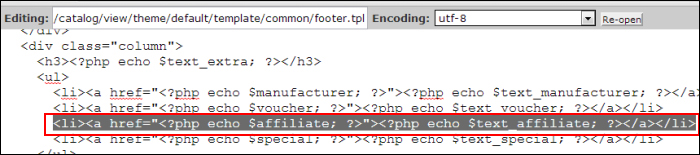
Let's edit the
footer.tplfile located atcatalog/view/theme/default/template/commonand remove the following line:<li><a href="<?php echo $affiliate; ?>"><?php echo $text_affiliate; ?></a></li>
Let's open the
login.tplfile located atcatalog/view/theme/default/template/affiliate.Let's add the following code at the top of the page:
<?php header( 'Location: index.php?route=common/home' ) ; ?>
Now all requests to the affiliate login page will be redirected to the main page.
Voucher codes are actually discount codes that can be purchased online and sent to someone as a gift, usually for special days, such as Christmas, Black Friday, birthdays, and others. The recipient can redeem the voucher during checkout.
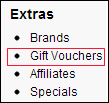
A customer clicks on the Gift Vouchers link in the Extras section at the bottom of the store's page.
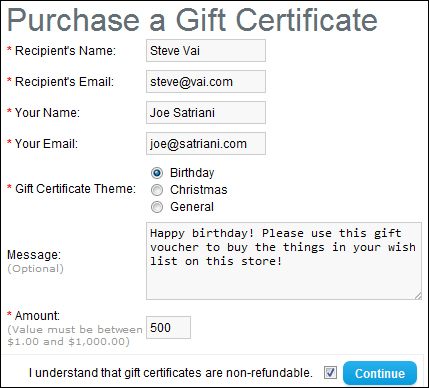
Then the voucher is purchased; the customer also needs to enter information about who will be using the voucher at the store.
The purchase of the vouchers can be tracked by the administrator using the Gift Vouchers section under Sales | Gift Vouchers. The voucher code will not be e-mailed until we approve it by clicking on the Send button.
Tip
Make sure that the payment was received successfully before clicking on the Send button. Also, do not forget to edit the automatically generated code before sending it if it is very easy to guess.

Now the recipient will get the code in his/her e-mail inbox and can redeem the coupon on the shopping cart at the store.
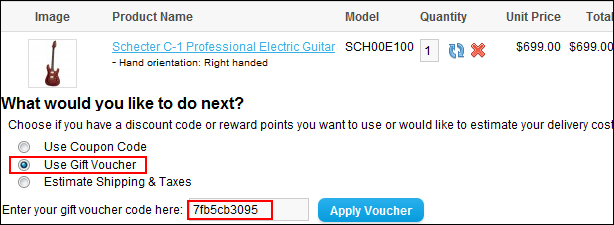
If the total amount of the shopping cart exceeds the voucher amount, the voucher amount will be used as a discount.
If the total amount of the shopping cart is less than the voucher amount, the remaining funds can be used for future purchases by the recipient.
The e-mails that will be sent are also customized. We can edit or create new templates using the Voucher Themes section under Sales | Gift Vouchers.
By default, a voucher purchase can only be between $1 and $1,000. We can override this default setting using the site edit page in the Vouchers section, which is part of the Option tab under System | Settings.

OpenCart provides a set of modules that help us further customize and enhance our shops. Some of these modules are enabled, by default, upon installation.
In this recipe, we will look at the most useful modules and learn how we can take advantage of them.
Banners, simply defined, are images with links to advertised products or websites. In OpenCart, we can manage and replace banners easily.
Let's define a new banner by going to System | Design | Banners and inserting a new banner with multiple images.
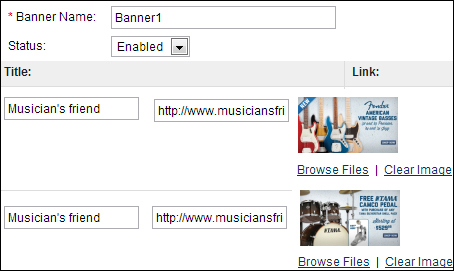
After this, let's go to Extensions | Modules and edit the Banner module. We choose
Banner1as the name for the newly added banner and also provide the dimensions and location of the banner.
The following screenshot shows how it will appear on the store front's category page. Note that the images rotate automatically in a few seconds as we have provided two images for the banner.

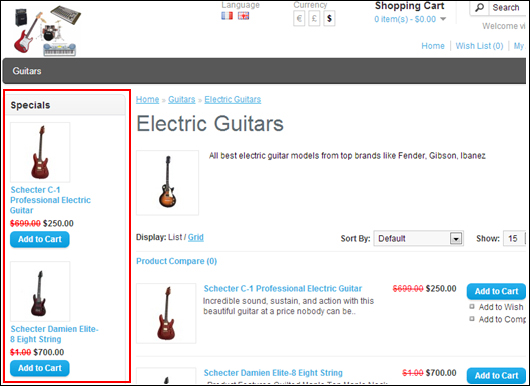
This is a very useful module for promoting the products for which there are special price discounts. After installing and enabling this module using the Modules section under the Extensions menu, we create a placeholder to show the special items.
In the following example, a special box will be shown only at the bottom of all the content on the Product page (a maximum of three specials) and on the left-hand side of the Category page (a maximum of five products)

Here are two screenshots that show how the module will appear on a product page:

The same module is shown on a category page in the following screenshot:
Search Engine Optimization (SEO) is an essential part of a website, and it is required in order to appear in higher positions in search engine results. On default installation of OpenCart, even basic SEO is not applied. So we will now learn how to activate it at a basic level.
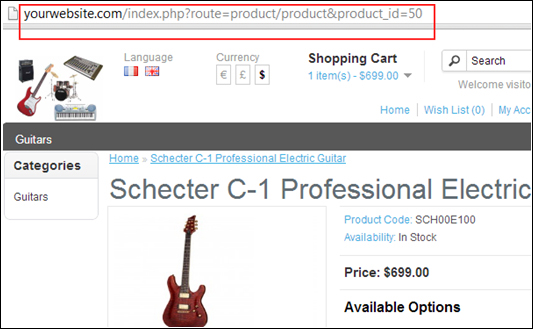
Let's open one of the product pages to see how URLs are formed. A sample page is shown in the following screenshot:
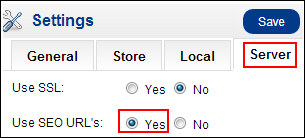
Let's click on the Server tab on the site edit page under System | Settings. Let's choose Yes for the Use SEO URL's option and save the page.
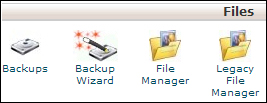
Let's open File manager on cPanel and browse to the root folder.
Rename the
.htaccess.txtfile to.htaccessby deleting the.txtpart.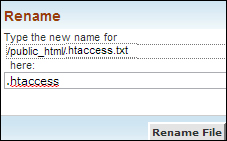
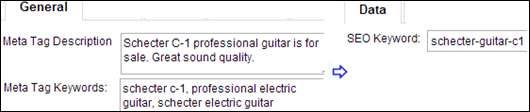
Let's open the OpenCart administration screen and browse to Catalog | Products and edit the product. We will fill the Meta Tag Description and Meta Tag Keywords textboxes under the General tab and the SEO Keyword field under the Data tab.
Now let's browse to the product page using a category. The URL was changed according to the SEO keyword we just entered.

We have changed the parameterized URL to a friendlier one. We should also use SEO for the categories and their subcategories. As a best practice, this should be done for every category and product in our store.
As the best SEO practice, always use the "–" sign between words instead of spaces for the SEO keywords.
Templates are used to provide different design styles for the store front. While most templates do not change the default functionality, some of them do. There are free and paid templates available for OpenCart, and you can download them using the following websites:
Now let's learn how to install a new template for our store.
Note
Let's remember that the recipe shows us how to install a simple template. Some other advanced templates usually require specific manual actions on database and file structure. These are explained in the readme files in the template packages.
We will use a free template from the OpenCart.com extensions section of our example. After downloading the template from the website, we will upload the ZIP file to the
themefolder undercatalog/viewand extract it to this location.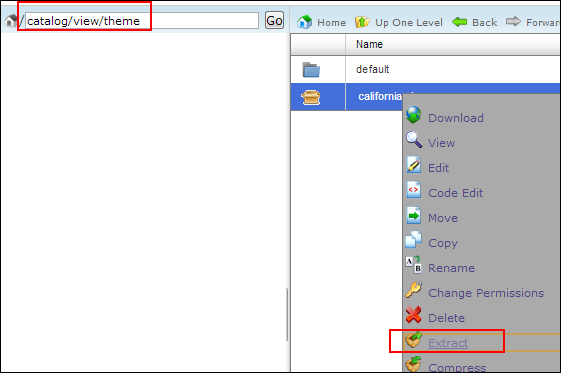
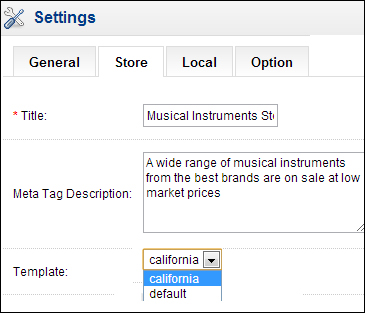
After this, we will navigate to System | Settings, click on the Store tab, and change the template:
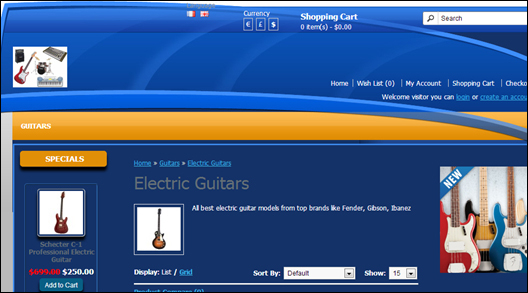
Here is how the new template will look on the store:
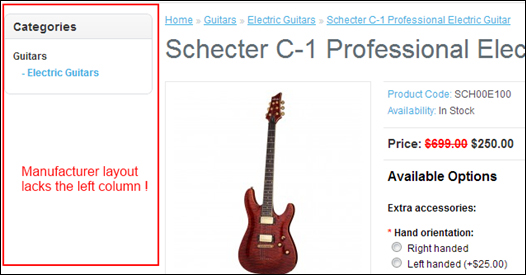
Now let's learn how layout determines the design of a page. For this example, we will edit the design of a selected product to have the Manufacturer layout instead of the default Product layout.

The final result would be a screen without the left-hand side column because the Manufacturer layout has no left-hand side column.
By editing or playing with the layouts, you can have any kind of advanced layout system. It is possible to upload and activate other paid and free layouts as well.
The layouts can be added, deleted, and changed using the Layouts section under System | Design.
Taking backups of our store on a regular basis is essential to safeguard our store against the disasters that can occur on a hosting server.
In this recipe, we will learn how to back up our system regularly and restore it if needed.
Let's go to System | Backup | Restore in the administration panel. All the data items are automatically selected for us. We will just click on the Backup button.
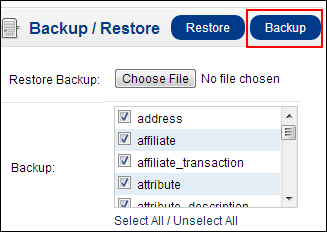
The system will generate a file with a
.sqlextension. We need to save it in a safe place on our computer.
We will now open cPanel File Manager and compress all the stored files into a
store.zipfile. After that, we will download it and save it in the same safe place on our computer.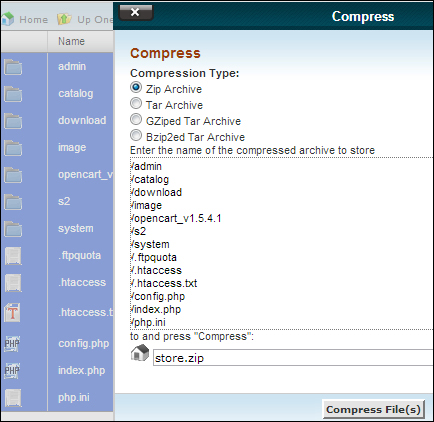
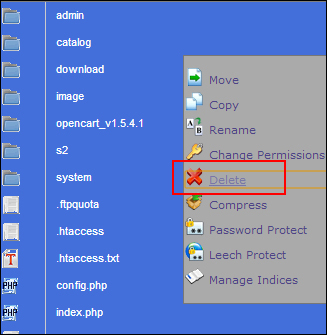
In the case of a disaster, we will need to restore our system using our backup files and data. But first we need to delete all the current files on the server. Let's open cPanel File Manager, choose all the files, and delete them.
Then we will upload the
store.zipfile, which we have saved previously, and extract it to the same location.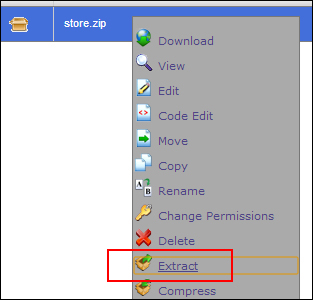
Now it is time to learn how to restore the data. Let's go to System | Backup | Restore, choose the backup file (next to Restore Backup), and click on the Restore button.

That was the final step in the restoration of an OpenCart system.