


Cucumber is a very fun and cool tool for writing automated acceptance tests to support software development in the behavior-driven development (BDD) style. This Instant book will cover the basis of TDD/BDD and explain the essence of Cucumber, describe how to write Cucumber features to drive development in a real project, and also describe many pro tips for writing good Cucumber features and steps. We will finally introduce some famous third-party libraries used in line with Cucumber.
Test-driven development (TDD) is a software development process originated from Extreme Programming (XP) invented by Kent Beck, which relies on the repetition of a number of short and continuous development cycles.
TDD can lead to more modularized, flexible, and extensible code; the early and frequent nature of the testing helps to catch defects early in the development cycle, preventing them from becoming endemic and expensive problems. In addition to this, its principle completely practices "keep it simple, stupid" (KISS) and "You ain't gonna need it" (YAGNI). The workflow for TDD is as follows:

BDD is based on TDD; it inherits all the benefits and many of the principles/practices from TDD, but moves one step forward—BDD combines TDD with ideas from domain-driven design (DDD) and object-oriented analysis and design which provide software development teams and business people with shared tools and a shared process to collaborate on software development. The inventor of BDD, Dan North, defined it as follows:
"BDD is a second-generation, outside-in, pull-based, multiple-stakeholder, multiple-scale, high-automation, agile methodology. It describes a cycle of interactions with well-defined outputs, resulting in the delivery of working, tested software that matters."
BDD focuses on implementing the minimum marketable feature (MMF) that will yield the most value. The business team and the development team can cooperate on a common language; this significantly reduces misunderstanding and eliminates waste, unnecessary code, and functionality.
In the BDD style, when a developer starts writing a test case, unlike writing a test method in TDD, he/she writes a "feature" belonging to a "story" which describes the feature's expected behavior. The feature is a business-readable, domain-specific language. Then the developer runs and watches it fail; after that he/she implements the "feature" and makes the test pass just like the same process in TDD. So at its core, BDD is a specialized version of TDD that focuses on the behavioral specification of software units.
The typical process can be described in the following steps:
Add a feature test.
Run all tests and see if the new one fails.
Write some code.
Run the automated tests and see them succeed.
Refactorize the code.
Repeat steps 1 to 5.
There are many great resources online for learning BDD:
Official page of behavior-driven development: http://behavior-driven.org/
The behavior-driven development entry on Wikipedia: http://en.wikipedia.org/wiki/Behavior-driven_development
10 Reasons Why BDD Changes Everything: http://www.agile-doctor.com/2012/03/06/10-reasons-why-bdd-changes-everything/
Behavior Driven Development Content on InfoQ: http://www.infoq.com/BDD
Introducing BDD: http://dannorth.net/introducing-bdd/
Cucumber is a tool for BDD-style development widely used in the Ruby on Rails platform. It introduced a domain-specific language (DSL) named Gherkin to allow the execution of feature documentation written in business-facing text, and implement acceptance test code in other languages (for example Ruby).
Cucumber sets up a great bridge between business people and development teams. Its natural and human readable language ultimately eliminates misunderstanding, and the regular expression "translation" layer provides the ability for developers to do anything magical and powerful!
This book will focus on how to use Cucumber in daily BDD development on the Ruby on Rails platform. Please install the following software to get started:
Ruby Version Manager
Version 1.9.3 of Ruby
Version 3.2 of Rails
The latest version of Cucumber
A handy text editor; Vim or Sublime Text
To install RVM, bundler, and Rails we need to complete the following steps:
Install RVM (read the latest installation guide from http://rvm.io).
$ \curl -L https://get.rvm.io | bash -s stable --rubyInstall the latest version of Ruby as follows:
$ rvm install ruby-1.9.3Install bundler as follows:
$ gem install bundlerInstall the latest version of Rails as follows:
$ gem install rails
Cucumber is a Ruby gem. To install it we can run the following command in the terminal:
Cucumber contains two parts: features and step definitions. They are explained in the following section:
$ gem install cucumberIf you are using bundler in your project, you need to add the following lines into your
Gemfile:gem 'cucumber'
We will have to go through the following files to see how this recipe works:
Feature files (their extension is
.feature): Each feature is captured as a "story", which defines the scope of the feature along with its acceptance criteria. A feature contains a feature title and a description of one or more scenarios. One scenario contains describing steps.Feature: A unique feature title within the project scope with a description. Its format is as follows:
Feature:  <feature title>
<feature description>
Scenario: This elaborates how the feature ought to behave. Its format is as follows:
Scenario: <Scenario short description>
Given <some initial context>

When <an event occurs>

Then <ensure some outcomes>
Step definition files: A step definition is essentially a block of code associated with one or more steps by a regular expression (or, in simple cases, an exact equivalent string).
Given "I log into system through login page" do
  visit login_page
  fill_in "User name", :with => "wayne"
  fill_in "Password", :with => "123456"
  click_button "Login"
end
When running a Cucumber feature, each step in the feature file is like a method invocation targeting the related step definition. Each step definition is like a Ruby method which takes one or more arguments (the arguments are interpreted and captured by the Cucumber engine and passed to the step method; this is essentially done by regular expression). The engine reads the feature steps and tries to find the step definition one by one. If all the steps match and are executed without any exceptions thrown, then the result will be passed; otherwise, if one or more exceptions are thrown during the run, the exception can be one of the following:
Cucumber::Undefined: Step was an undefined exceptionCucumber::Pending:Step was defined but is pending implementationRuby runtime exception:Any kind of exception thrown during step execution
Similar with other unit-testing frameworks, Cucumber runs will either pass or fail depending on whether or not exception(s) are thrown, whereas the difference is that according to different types of exceptions, running a Cucumber could result in the following four kinds:
Passed
Pending
Undefined
Failed
The following figure demonstrates the flow chart of running a Cucumber feature:

Cucumber is not only for Rails, and the Cucumber feature can be written in many other languages other than English.
Cucumber is now available on many platforms. The following is a list of a number of popular ones:
JVM: Cucumber-JVM
.NET: SpecFlow
Python: RubyPython, Lettuce
PHP: Behat
Erlang: Cucumberl
We can actually write Gherkin in languages other than English too, which is very important because domain experts might not speak English. Cucumber now supports 37 different languages.
There are many great resources online for learning Cucumber:
The Cucumber home page: http://cukes.info/
The Cucumber project on Github: https://github.com/cucumber/cucumber
The Cucumber entry on Wikipedia: http://en.wikipedia.org/wiki/Cucumber_(software)
The Cucumber backgrounder: https://github.com/cucumber/cucumber/wiki/Cucumber-Backgrounder
During the first two recipes we learnt the concept of BDD and the basics of Cucumber; now we know that we can benefit from BDD using Cucumber, so it is time to write the first Hello World Cucumber feature.
In the first recipe we've already successfully installed Ruby, RubyGems, bundle, and Rails. To write our first Cucumber feature, we need a Rails application with Cucumber installed.
Now we create a Rails project and install Cucumber in the project. Follow the given steps:
Create a new Rails app,
cucumber_bdd_how_to, by running the following Rails command in the terminal:$ rails new cucumber_bdd_how_toAdd
gem 'cucumber-rails'into the project's Gemfile; it should be similar to the following code snippet:source 'https://rubygems.org' gem 'rails', '3.2.9' # Bundle edge Rails instead: # gem 'rails', :git => 'git://github.com/rails/rails.git' gem 'sqlite3' # Gems used only for assets and not required# in production environments by default.group :assets do gem 'sass-rails', '~> 3.2.3' gem 'coffee-rails', '~> 3.2.1' # See https://github.com/sstephenson/execjs#readme for # more supported runtimes# gem 'therubyracer', :platforms => :ruby gem 'uglifier', '>= 1.0.3' end gem 'jquery-rails' group :test do gem 'cucumber-rails' end # To use ActiveModelhas_secure_password # gem 'bcrypt-ruby', '~> 3.0.0' # To use Jbuilder templates for JSON # gem 'jbuilder' # Use unicorn as the app server # gem 'unicorn' # Deploy with Capistrano # gem 'capistrano' # To use debugger # gem 'debugger'
Tip
Downloading the example code
You can download the example code files for all Packt books you have purchased from your account at http://www.packtpub.com. If you purchased this book elsewhere, you can visit http://www.packtpub.com/support and register to have the files e-mailed directly to you.
Run the bundle install in the terminal:
$ bundler installAfter the installation is completed, cd into your RoR project directory and run:
$ rails generate cucumber:installBy running this, Cucumber will initialize a folder called
featuresin your Rails project:
Now we create a file under the
featuresfolder calledhello_world.feature, and write down our first Cucumber test:Feature: Learn Cucumber As a Software Developer I want to learn Cucumber So that I can developer in BDD style! Scenario: Write Hello World Cucumber Given I have a Rails project When I write a Hello World Cucumber test Then I should be able to run it and see "Hello World" printed on screenAnd we go to the terminal and run the following Cucumber command:
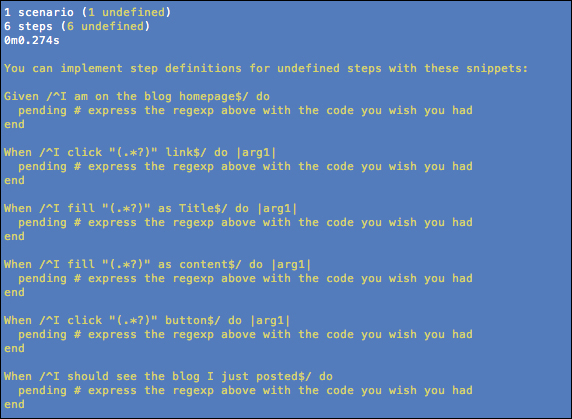
$ bundle exec cucumber features/hello_world.featureNow we should see that it fails since we haven't implemented the steps yet. The message should be similar to the following screenshot:

Create a
hello_world_steps.rbunder thestep_definitionsdirectory.Copy the code shown on the console and paste it to
hello_world_steps.rb.Modify the step code as follows:
Given /^I have a Rails project$/ do
 puts "Yes, I am at my RoR project."
end

When /^I write a Hello World Cucumber test$/ do
 puts "Yeah! I just wrote my test"
end

Then /^I should be able to run it and see "(.*?)" printed on screen$/ do |arg|
 puts arg
end
Now we run it again and we see it successfully passed:

In this simple example, we wrote our first Cucumber feature named "Hello World", it has one scenario, "Write Hello World Cucumber", with three steps. We also implemented three step definitions and successfully made it pass.
In the Cucumber feature, one step is usually started with a preposition or an adverb (Given, When, Then, And, and But), each step is parsed and corresponding to a step definition, in our previous example the last step accepts one argument to be passed in, which means you can put any word in the step, and we passed the string Hello World, so that it is printed on the screen.
From the Setting up an environment for Cucumber BDD on Rails (Intermediate) recipe we know Cucumber contains two parts: Gherkin and Step definitions, and from the Writing your first Hello World Feature (Simple) recipe we got our first Cucumber feature to run successfully. We are now ready to walk into Cucumber world!
In this recipe, we will learn the foundation knowledge and skills for achieving our goal, which is developing features in the BDD style using Cucumber. Let's take a deep look into the Cucumber Gherkin and Step separately.
Gherkin is the language that Cucumber understands; it is a DSL. Gherkin has two major missions: it should have a maintainable documentation that is stakeholder-readable/understandable and it should be programmatically testable.
A feature written in Gherkin is as follows:
Feature: Credit card payment
  As a online shopper
  I want to pay through my Credit card
  So that I can buy stuff online instead of visiting the super market

  Scenario: transaction completed successfully
    Given ...
    When ...
    Then ...
  Scenario: Credit card is invalid
    Given ...
    When ...
    Then ...
  Scenario: Third party payment system refused the transaction
    Given ...
    When ...
    Then ...
A scenario consist of steps beginning with Given, When, Then, or And/But:
Given: This puts the system in a known state before the user (or external system) starts interacting with the system (in theWhensteps). Examples are as follows:Given I logged in as a system administrator Given the user has been authorized to do operation Given I have two items in my shop cart
When: AWhenstep represents the key action the user performs. The action usually has an observable effect somewhere else. Examples are as follows:When I press "Submit" on the Contact us area When I am on the "Shopping Cart" page When the progress bar is running When I wait for the Ajax request to finish
Then: TheThenstep observes and validates the outcome(s), it is an assertion sentence just like the assert statement in common unit testing frameworks. TheThensentence should be related to the business value/benefit in your feature description. Examples are as follows:Then the login popup form should be shown Then user should be redirected to item list page Then I should receive $800
And,But: This is used when we have multipleGiven/When/Thensteps. Examples are as follows:Given I have a dummy repository on github And this project is written in Ruby on Rails Then I should be able to clone this project And I should be able to add more developers to folk this project But I cannot make this project private
Once we write a feature with steps in Gherkin, we need to implement each step. Step definition files are, by convention, under the features/step_definitions directory, just like the hello_world_steps.rb file we created in the Writing your first Hello World feature (Simple) recipe.
Cucumber is widely used in automation testing web applications. In most cases, Cucumber is simulating the behavior of the end user who will be using the developed application, thus verifying whether it passes the acceptance tests. So under the step definition, we will usually do the following things:
Environment preparation: Examples include simulating user login, and preparing test data in the database
URL navigation: Examples include opening initial pages and redirecting the user to a predefined URL after a specific action
DOM manipulation: Examples include filling text in a form, selecting items from drop-down lists, clicking on a link, or pressing a button
Waiting: Examples include waiting for a specific operation to be finished, waiting for animations to be completed, and simply waiting for a few seconds
Assertion: Examples include verifying whether a page contains expected content and checking whether the user was redirected to the right page
To achieve the preceding things, we need to use a famous Ruby gem: Capybara. It exposes a DSL to simulate and uniform a real user's interaction with a web application. The DSL is designed to be natural. The following code snippets are some examples of the Capybara DSL syntax:
To find a DOM element:
find_field('blog_title').should be_visible
find_field('blog_content').value.should eq(@content)
find_link('back').click
find("section#main").text.should eq("Foo section")
find("div.main-pillar").find("section#main").text.should eq("Foo section")
all("a").each { |a| puts a[:href] }
all("input[type='text']").each { |textbox| p textbox[:value] }
To fill text in a textbox:
fill_in 'Login', :with => 'user@example.com'
To select an item in the drop-down list:
select("California", :from => 'Choose State')To choose the Male ratio button:
choose 'Male'
To check the Food checkbox:
check 'Food'
To click on the Edit Profile link:
click_link 'Edit Profile'
To click on the Submit button:
Click_button 'Submit'
To attach a file:
attach_file('Image', '/path/to/image.png')To make assertions:
page.has_selector?('div.main-pillar section#main').should be_true
page.has_selector?(:xpath, '//div/article').should be_true
page.has_xpath?('//div/article').should be_true
page.has_css?('div.main-pillar section#main').should be_true
page.has_content?('Foo section').should be_true
Other than utilizing Capybara, we also need a number of other Ruby gems, which are widely used in the real BDD project:
rspec-rails: This is a BDD test framework for Rails. In our Cucumber step implementation, we rely on it to write human-readable test assertions.
Launchy: The Launchy application inside the Rails application is required when we debug our Cucumber steps.
database-cleaner: This introduced a set of strategies to ensure a clean state when running Cucumber tests.
Add Capybara into our Gemfile, as well as Launchy, which is required when we debug our Cucumber step.
group :test do
 gem 'rspec-rails'   # library of Rails assertions
 gem 'cucumber-rails', :require => false
 gem 'launchy'
 gem 'database_cleaner'
end
Then we need to run
bundle installin the terminal to install the added gems.Finally, make sure you have the latest version of Firefox installed, since Capybara's default web driver is Selenium with Firefox driver.
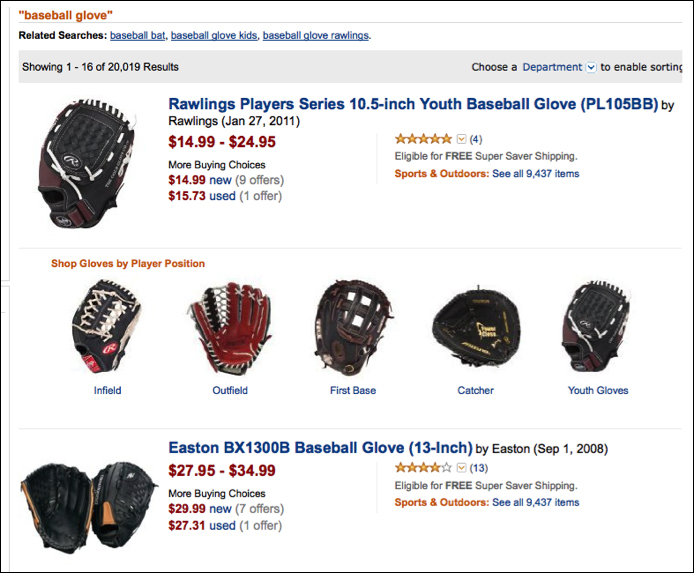
Ok, it's time to run a good sample case to demonstrate the magic of Capybara. Assume we would like to buy baseball gloves on Amazon. We write out a feature in
amazon_search.feature:Feature: Shopping in Amazon As an internet user I want to search stuff on Amazon So that I can choose and buy items I like @javascript Scenario: Search for baseball gloves Given I am on Amazon homepage When I enter "baseball glove" in the search box And I click "Go" button Then I should see a list of results related with Baseball Gloves
We run the feature in the terminal and watch it fail, and then create the step file
amazon_search_steps.rbwith the following code:Given /^I am on Amazon homepage$/ do visit "http://www.amazon.com" end When /^I enter "(.*?)" in the search box$/ do |keywords| fill_in "Search", :with => keywords end When /^I click "Go" button$/ do click_button "Go" end Then /^I should see a list of results related with Baseball Gloves/ do page.should have_content("#centerBelow") end
We run the feature again and we see how it works. We specified a @javascript tag for the scenario. It is a Capybara built-in tag, which runs a feature marked as @javascript, and Capybara switches the web driver from the default (RackTest) to Capybara.javascript_driver. A Firefox browser will open and automatically perform the actions we defined in the step file.
Note
To make this clearer, by default, Capybara uses the rack_test driver to drive browsers, which is fast but doesn't support JavaScript. Selenium is the default driver for JavaScript-required scenarios. You can change the value of the Capybara.javascript_driver setting to use another JavaScript-capable driver.
The previous Amazon search example requires JavaScript, so we specify a @javascript tag prior to Scenario.
The following screenshots demonstrate how our Cucumber feature runs, opens up Amazon's home page, and inputs the keyword baseball glove:

And then after clicking on the Go button, we will see the search result as follows:
Note
The preceding screenshots were not captured manually; Capybara provides a convenient API called save_screenshot, which can be invoked inside any Cucumber step, and then we can use Launchy to open it ASAP or open the screenshot later manually.
When /^I enter "(.*?)" in the search box$/ do |keywords|
page.save_screenshot('input_keyword.png')
  Launchy.open 'input_keyword.png'
end
Under the hood, Capybara invokes a web driver to communicate with a real browser. It supports the following web drivers:
RackTest: This is the default driver which is fast but cannot execute JavaScript
Selenium: This is fully functional and ready to use, just a little bit slower
Capybara-webkit: It uses QtWebKit to start a rendering engine and is the fastest. It is used for true headless testing and has full JavaScript support
Poltergeist: It runs Capybara tests on a headless WebKit browser, unlike Capybara-webkit, and uses PhantomJS as its rendering engine
Note
We can switch Capybara's web driver by executing the following code:
Capybara.javascript_driver= :webkit #or :rack_test,:selenium, etc.
Capybara encapsulates these web driver libraries and exposes a uniformed façade for the higher level, so developers benefit from it by learning uniformed syntax while dealing with various kinds of situations/purposes by switching between different web drivers.
In this Amazon search example, we learnt how to drive an automated web test case using Cucumber and Capybara. In the next recipe we will develop a real project based on this technology combination!
In this recipe we are going to build a real web application with a BDD style and process. You will learn how to work with behavior-driven software development using Cucumber.
Assume we are in a web development team and are cooperating with a product manager. Our goal is to develop a simple web blog system, and we have already had a meeting and summarized several user stories as follows:
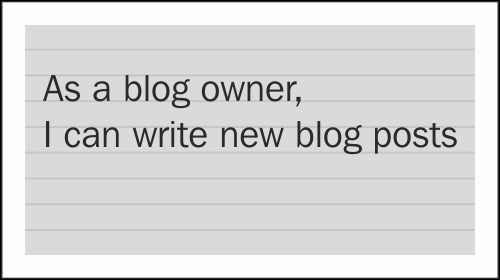
Story #1: As a blog owner, I can write new blog posts.
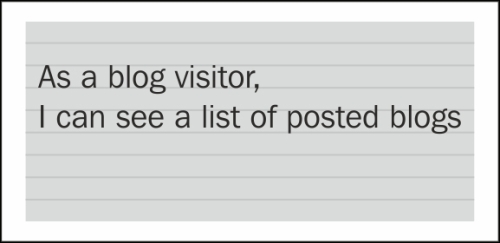
Story #2: As a blog visitor, I can see a list of posted blogs.
Story #3: As a blog owner, I can edit my blog posts.

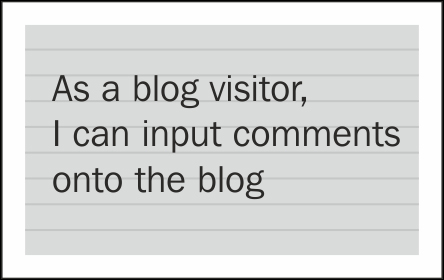
Story #4: As a blog visitor, I can input comments onto the blog.
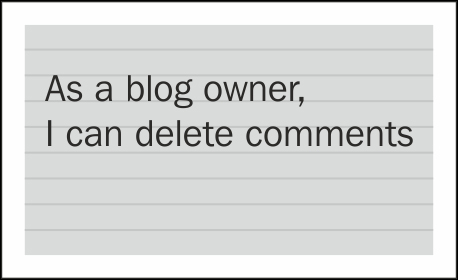
Story #5: As a blog owner, I can delete comments.
Out first step is to let Rails generate a new application called
blog:$ rails new blog --skip-test-unitAnd we need the following Ruby gems in Gemfile:
group :test do
gem 'rspec-rails'
gem 'cucumber-rails'
gem 'capybara'
gem 'launchy'
gem 'database_cleaner'
end
After
bundle install, we install Cucumber into the blog project:$ rails generate cucumber:install
We wait until Rails has finished generating Cucumber files. Then we can start writing the first Cucumber scenario for this story. We add a feature file under the
featuresdirectory namedwrite_post.feature:Feature: Write blog As a blog owner I can write new blog post Scenario: Write blog Given I am on the blog homepage When I click "New Post" link And I fill "My first blog" as Title And I fill "Test content" as content And I click "Post" button Then I should see the blog I just posted
Let's run the
write_post.featureand watch it fail:cucumber features/write_post.feature:
Yes it fails, which is good and as expected; now we have work to do, that is to implement this feature (also a real story)!
So we go to our favorite terminal and have Rails help us generate a Post scaffold:
$ rails generate scaffold Post title content:textpost_time:datetimeWe perform a database migration for both development and test environments:
$ rakedb:migrate $ RAILS_ENV=test rake db:migrate
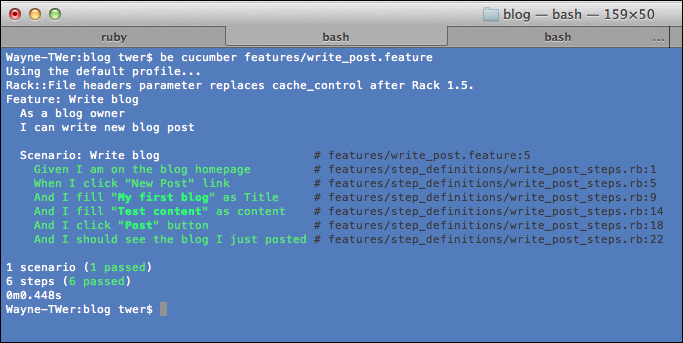
We now start implementing the Cucumber step for
write_post. A little noticeable point is using@titleto record the entered title for future expected use. The code is shown as follows:Given /^I am on the blog homepage$/ do visit("/posts") end When /^I click "New Post" link$/ do click_on "New Post" end When /^I fill "(.*?)" as Title$/ do |title| @title = title fill_in "Title", :with => title end When /^I fill "(.*?)" as content$/ do |content| fill_in "Content", :with => content end When /^I click "(.*?)" button$/ do |btn| click_button btn end Then /^I should see the blog I just posted$/ do page.should have_content(@title) endOk, now we rerun the test and it should pass:
And if we open the browser to do a manual test on
http://localhost:3000/posts, we can see it works as expected. The following is a screenshot of the blog home page: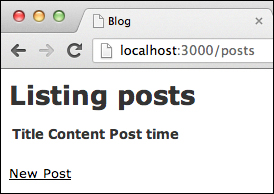
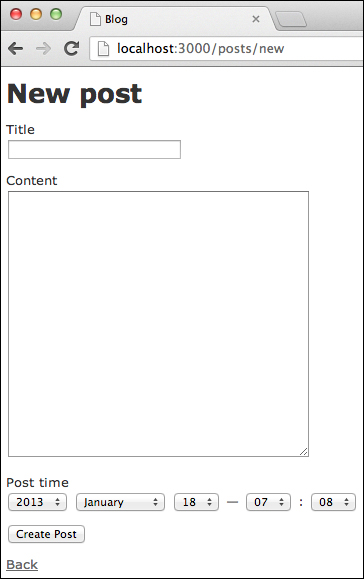
The screenshot of the write blog page is as follows:
We create a new feature named
show_blog_list.feature, and we assume there already exists four blog posts:Feature: Show blog list As a blog visitor I can see list of posted blogs Scenario: Show blog list Given there are already 4 posts And I am on the blog homepage Then I can see list of 4 posted blogs
The
Givenstep is exactly the same with the "write blog" feature. We definitely shouldn't repeat ourselves. The "posts preparation" step seems very common, so we can create acommon_steps.rbunder thestep_definitionsdirectory. After that we move the stepGiven I am on the blog homepagefromwrite_blog_stepstocommon_stepsand create a shared step for preparing blog posts:Given /^I am on the blog homepage$/ do visit("/posts") end And /^there are already (\d) posts$/ do |count| count.to_i.times do |n| Post.create!({ :title => "Title #{n}", :content => "Content #{n}", :post_time => Time.now }) end endOk, now we run
show_blog_list.featureand watch that it fails. We will see that the twoGivensteps have already been implemented withincommon_steps: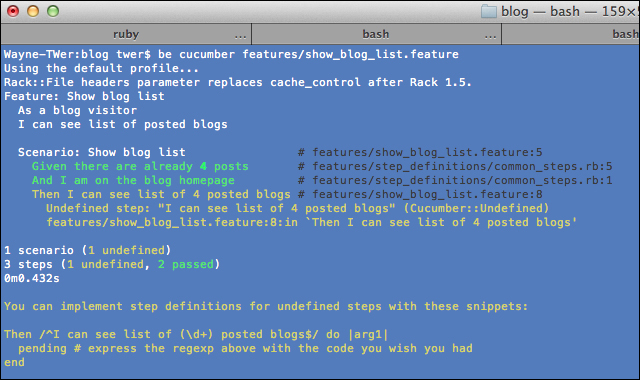
Following the guide we create
show_blog_list_steps.rb. In the step we expect there to be a list of blogs wrapped within an HTML table with an ID ofposts-list, and since we prepared four blog posts we expect there to be five rows in the table, so we firstly write our testing code as follows:Then /^I can see list of (\d) posted blogs$/ do |count|page.should have_selector("table#posts-list>tr:eq(#{count})")endNow it is time to write real code which is driven by the preceding described behavior code. We modify
app/views/posts/index.html.erbas follows:<h1>Listing posts</h1> <table id="posts-list"> <tr> <th>Title</th> <th>Content</th> <th>Post time</th> <th></th> <th></th> <th></th> </tr> <% @posts.each do |post| %> <tr> <td><%= post.title %></td> <td><%= post.content %></td> <td><%= post.post_time %></td> <td><%= link_to 'Show', post %></td> <td><%= link_to 'Edit', edit_post_path(post) %></td> <td><%= link_to 'Destroy', post, method: :delete, data: { confirm: 'Are you sure?' } %></td> </tr> <% end %> </table> <br /> <%= link_to 'New Post', new_post_path %>Now we rerun
show_blog_list.feature. It passed, yeah!
We add a new feature named
edit_blog.feature:Feature: Edit blog As a blog owner I can edit my blog posts Scenario: Edit blog Given there is a post with title "Dummy post" and content "Dummy content" And I am on the blog homepage When I edit this post And I update title to "Updated title" and content to "Updated content" Then I can see it has been updated
As usual, we first run it and watch it fail, and then create
edit_blog_steps.rbwith test code as follows:Given /^there is a post with title "(.*?)" and content "(.*?)"$/ do |title, content| @post = Post.create!({ :title => title, :content => content, :post_time => Time.now }) end When /^I edit this post$/ do visit(edit_post_url @post) end When /^I update title to "(.*?)" and content to "(.*?)"$/ do |title, content| @updated_title = title @updated_content = content @post.update_attributes!({ :title => @updated_title, :content => @updated_content }) end Then /^I can see it has been updated$/ do step %{I am on the blog homepage} find("table#posts-list>tr:eq(2) >td:eq(1)").should have_content(@updated_title) find("table#posts-list>tr:eq(2) >td:eq(2)").should have_content(@updated_content) endWhen we go back to the terminal and rerun the
edit_blog.feature, it should now pass. The following screenshot showsedit_blog.featurehas run successfully:
Hooray! We've finished three stories so far. They are all around posts creating, editing, and viewing. There are two more stories related with comments. Let's starting developing them with the behavior-driven development style!
We first create an
input_comment.featurefor this story:Feature: Input comment As a blog visitor I can input comment onto blog Scenario: Input comment Given there is a post titled with "Dummy post" and content with "Dummy content" And I am on the post page When I add a comment with the following information | Name | Email | Content | | Wayne | admin@wayneye.com | Test comment | Then I can see the comment has been added onto the postWe run the feature and watch it fail:
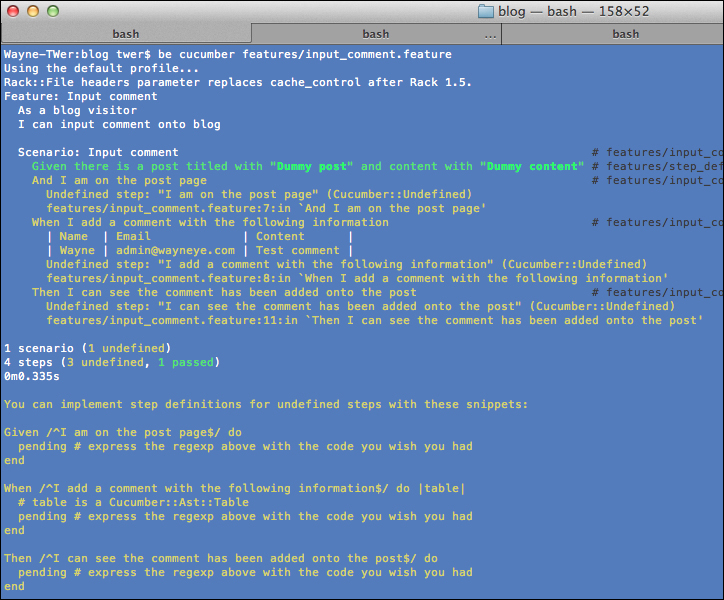
We create
input_comment_steps.rband write the test code as follows:Given /^I am on the post page$/ do visit(post_path @post) end When /^I add a comment with the following information$/ do |table| # table is a Cucumber::Ast::Table table.hashes.each do |comment_data| @commenter = comment_data[:name] @email = comment_data[:email] @content = comment_data[:content] @post.comments.create!({ :name => @commenter, :email => @email, :content => @content }) end end Then /^I can see the comment has been added onto the post$/ do comments_list = find("div#comments-list") comments_list.should have_content(@commenter) comments_list.should have_content(@email) comments_list.should have_content(@content) endTo make our test pass, we let Rails help us to generate a Comment scaffold:
$ rails generate scaffold Comment post:references name email contentDatabase migration is as follows:
$ rakedb:migrate && RAILS_ENV=test bundle exec rake db:migrateAfter the migration is done, we update several places in the Rails-generated code. First is
routes.rb. We specify comments as nested resources under blogs:resources :blogs do resources :comments end
We've specified that
Commentbelongs toPost; we need to updatePostto contain many comments as well, inpost.rb:has_many :comments
In
CommentsController, we update thecreateaction to load thepostobject that the created comment belongs to:def create @comment = Comment.new(params[:comment]) @comment.post = Post.find_by_id(params[:post_id]) respond_to do |format| if @comment.save format.html { redirect_to @comment.post, notice: 'Comment was successfully created.' }else format.html { render action: "new" } format.json { render json: @comment.errors, status: :unprocessable_entity } end end endAnd finally we update the view template
app/views/posts/show.html.erbfor showing a post:<h2>↓Comments↓</h2> <div id="comments-list"> <% @post.comments.each_with_index do |c,idx| %> <p><span>#<%= idx + 1 %>: <%= c.name %></span>: <%= c.content %></p> <% end %> <hr /> <%= form_for([@post, @post.comments.build]) do |f| %> <div class="field"> <%= f.label :name %><br /> <%= f.text_field :name %> </div> <div class="field"> <%= f.label :email %><br /> <%= f.text_field :email %> </div> <div class="field"> <%= f.label :content %><br /> <%= f.text_area :content %> </div> <div class="actions"> <%= f.submit %> </div> <% end %> </div>At this time, we should be able to pass the input comment feature. The following screenshot shows that
input_comment.featurehas run successfully: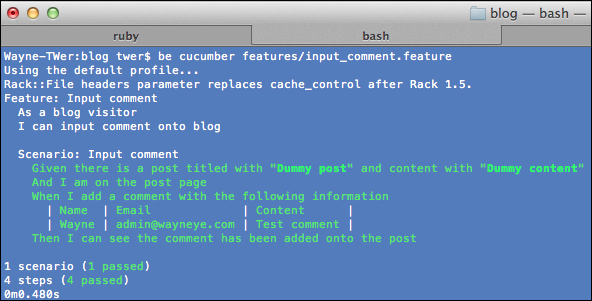
As usual we create a
delete_comment.feature:Feature: Delete comment As a blog owner I can delete comment Scenario: Delete comment Given there is a post titled with "Dummy post" and content with "Dummy content" And there is a comment on this post When I am on the post page And I click "Delete Comment" Then the comment should be deleted
Run it and watch it fail, and then implement the steps inside
delete_comment_steps.rbas follows:Given /^there is a comment on this post$/ do @post.comments.create!({ :name => "Wayne", :email => "admin@wayneye.com", :content => "Test deleting comment" }) end When /^I click "Delete Comment"$/ do click_on "Delete Comment" end Then /^the comment should be deleted$/ do find("#comments-list").should have_no_content("Wayne") endTo make the test pass, we need to update
show.html.erbto add the Delete Comment link to each comment:<% @post.comments.each_with_index do |c,idx| %> <p> <span>#<%= idx + 1 %>: <%= c.name %></span>: <%= c.content %> <%= link_to "Delete Comment", post_comment_path(@post, c), :method => :delete, :confirm => "Are you sure you want to delete this comment?" %> </p> <% end %>
Now we rerun
delete_comment.feature. It passed successfully: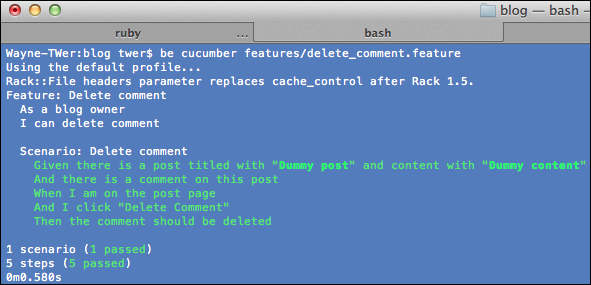
In this recipe we developed a very simple blog application with BDD using Cucumber. We split the requirement into five user stories, and then transformed them into Cucumber features. Next we implemented each story one by one, strictly following the BDD process.
Most of the code was generated by Rails, so we actually wrote very few lines of product code, because our goal is to learn how to use Cucumber to drive a real user story development, so that we are getting used to BDD with one story by another, and one iteration by another, eventually delivering the software.
The essence of BDD using Cucumber is that it describes a feature and its expected behavior. So that drives the development under the definiteness (ideally no misunderstanding); on the other hand, each Cucumber feature is just like an acceptance test case, which can be easily integrated with continuous integration.
In the Building a real web application with Cucumber (Intermediate) recipe, we completed five simple user stories driven by Cucumber, and we learnt how to drive a Rails web application development using Cucumber in a BDD style.
Gherkin provides various kinds of expressive syntax. In this recipe, we are going to learn various kinds of skills and tips with Cucumber Gherkin DSL, and how to write readable, organized, and reusable Gherkin to help us solve real-world problems.
We will reuse the Rails application, cucumber_bdd_how_to, which we created in the Writing your first Hello World feature (Simple) recipe, so please cd into that directory to get prepared.
In the following sections, a number of useful Gherkin tips are introduced and covered exhaustively.
When we write Cucumber tests, we usually encounter this situation: a number of scenarios rely on the same step(s). For example, as a registered developer on GitHub, I can manage my profile, my repositories, or my SSH keys, then our feature can be written as follows:
Feature: Github account management In order to manage my profile, repositories and my SSH Keys As a registered developer I Should be able to log into system and manage my account Scenario: Change my avatar Given I logged into Github with account "Wayne Ye" When I click my avatar to go to the "Your Profile" page Then I can change my avatar with "Wayne.png" Scenario: View my repositories Given I logged into Github with account "Wayne Ye" When I click my avatar to go to the "Your Profile" page And I click on "Repositories" hyperlink Then I should be able to see all my repositories Scenario: Add a SSH KeyGiven I logged into Github with account "Wayne Ye" When I click my avatar to go to the "Your Profile" page And I click on "SSH Keys" hyperlink Then I add a new SSH key
You will notice that all the scenarios require you to log into GitHub, and in more complex cases the share steps can be more. This could be quite tedious, so in this situation we can use
Background:Feature: Github account management In order to manage my profile, repositories and my SSH Keys As a registered developerI Should be able to log into system and manage my account Background: Given I logged into Github with account "Wayne Ye" When I click my avatar goto the "Your Profile" page Scenario: Change my avatar Then I can change my avatar with "Wayne.png" Scenario: View my repositories And I click on "Repositories" hyperlink Then I should be able to see all my repositories Scenario: Add a SSH Key And I click on "SSH Keys" hyperlink Then I add a new SSH key
Whenever possible, use Gherkin Background to centralize the scenario shared steps, be DRY (don't repeat yourself), and get better maintainability!
Sometimes we need to describe the data in steps. When the data is in pieces, our step could be verbose, for example, a user registration feature:
Feature: User registration In order to shop in ABC online shop As a userI should be able to register an account through registration page Scenario: register with valid information When I am on the registration page of ABC online shop And I fill the "Full Name" form with "Wayne Ye" And I fill the "Address" form with "123 Main Street" And I fill the "Email" form with "admin@wayenye.com" And I fill the "Password" form with "asdf" Then I should be redirected to registration success page
Luckily, Gherkin provides a data table to deal with these kinds of scenarios. The data table gives you a way to extend a Gherkin step beyond a single line to include a larger piece of data. The preceding example can be easily and gracefully described as follows:
Feature: User registration In order to shop in ABC online shop As a userI should be able to register an account through registration page Scenario: register with valid information When I am on the registration page of ABC online shop And I fill the form with the following value | Full Name| Address | Email | Password | | Wayne Ye | No 12 Pt Street| admin@wayenye.com |asdf| Then I should be redirected to registration success pageMuch greater readability and maintainability! The preceding data table contains column headers to specify each field, and sometimes it can also be used without headers, for example, when it represents a list of data.
Scenario: instance messenger online When I log into ABC social website And I open up the IM tab Then I should see my online friends | Mark | | Sean | | Shelly | | Wendy |
Consider a number of scenarios. They require similar steps as a part of them; the difference is different input values. Typically, a registration validation scenario is a good example:
Background: When I am on the registration page Scenario: user registration When I fill "email" field with "" And I press "Register" button Then I should see error message "Email cannot be blank" When I fill "email" field with "wayne" And I press "Register" button Then I should see error message "Please input valid Email address" And I fill "password" field with "" And I press "Register" button Then I should see error message "Password cannot be blank" And I fill "password" field with "asdf" And I press "Register" button Then I should see error message "Password is too short"
Ouch! A registration in the real world is definitely more complex than this one! The preceding scenario looks so ugly; the right way is to adopt Gherkin's
Scenario Outline:Scenario Outline: user registration When I fill "<field_name>" field with "<value>" And I press "Register" button Then I should see error message "<error_message>" Examples: |field_name| value | error_message | | Email | | Email cannot be blank | | Email | wayne | Please input valid Email address | | Email |admin@wayne.com| Email has already been taken | | Password | | Password cannot be blank | | Password | asdf | Password is too short |
By utilizing Scenario Outline, the feature looks clean and easy, and it refrains from writing duplicate steps. Additionally, we can quickly find out missed cases because of its tidy text. For example, in the previous case, we can easily point out that we lack the maximum length check for both the e-mail and password.
Sometimes we have a string with a new line in the step; in this scenario we can use Gherkin Dot Strings to represent the long string. Typically a step with account activation e-mail content is as follows:
Scenario: User registration When the user clicks "Register" Then an Email should be sent out with content: """ Dear customer, Thank you for registering at ABC website! Please click the following link to activate your account! http://foo-web.com/user/wayne/activation """
In the implementation step, the string content will be passed in as
Cucumber::Ast::Docstring:Then /^an Email should be sent out with content:$/ do |string|p string.class # Cucumber::Ast::DocString p string # "Dear customer,\nThank you for registering at ABC website!\nPlease click the following link to activate your account!\nhttp://foo-web.com/user/wayne/activation" end
There are two extra tips for organizing Cucumber features and writing better features.
Gherkin allows you to add meaningful tags, for example:
Mark important, minimum marketable features as
@importantor@MMVMark features that require logging into the system as
@require_loginMark work in progress features as
@todoor@wip
Tag(s) can be applied to features or scenarios; scenarios, scenario outlines, or examples will inherit any tags that exist on the containing feature.
Tag(s) are pretty useful and provide many benefits. For example, they can help in organizing and filtering features:
We can specify Cucumber to run all features marked as
@mandatory:$ cucumber --tags @mandatoryWe can specify Cucumber to run all features except
@todoones:$ cucumber --tags ~@todoWe can specify Cucumber to run all
@finishedand@integrationfeatures:$ cucumber --tags @finished --tags @integrationWe can specify Cucumber to run features with a maximum number limit. The preceding command demonstrates both the ORing tags and the tag limits:
$ cucumber --tags @dev:4,@qa:6
Cucumber will fail if there are more than four @dev features or more than six @qa features, even if all the features passed. This tip will be pretty useful in the Kanban development methodology (a scheduling system invented by Toyota for the Lean and Just-in-Time productions) because we want to limit the number of Working in Progress features.
Apply tag logic by using hooks. We can add a block of Ruby code before/around/after a specific tag. This is massively useful, for example, because we can implement login logic before all features/scenarios marked with a @require_login tag:
Before('@require_login') do
# Put login logic here
end
After('@require_login') do
# Perform logout logic
endWhen we run the @require_login tag, the login logic hook will be executed automatically. Here it just demonstrates the tagged hooks. There are also scenario hooks, step hooks, and global hooks.
Do you remember in the beginning of the previous recipe, we wrote a Gherkin feature for the first story:
Feature: Write blog
As a blog owner
I can write new blog post
 Scenario: Write blog
   Given I am on the blog homepage
   When I click "New Post" link
   And I fill "My first blog" as Title
   And I fill "Test content" as content
   And I click "Post" button
   Then I should see the blog I just posted
Every step in this feature is granular; it describes each action used. Steps like these are called imperative steps (or communicative); as a comparison, another pattern of writing Gherkin is declarative (or informative), which suggests describing the user story over recording the user's actions.
For example, writing the previous feature in the declarative style will be as follows:
Feature: Write blog
As a blog owner
I can write new blog post

 Scenario: Write blog
   Given I am on the blog homepage
   When I write a new blog post
   Then I should see the blog I just posted
A declarative step usually hides more details and provides better readability for business people. Many people prefer declarative steps over imperative steps since imperative steps could be brittle because they are usually tightly coupled with UI or a serial of business logic, whereas both of them could be changed as per the requirement.
Note
In the older version of Cucumber, there used to be a web_steps.rb generated under the step_definitions directory every time Cucumber got installed. However, to avoid people writing imperative steps, Aslak Hellesøy (the co-author of Cucumber) removed it. His original statement is as follows:
"The reason behind this is that the steps defined in web_steps.rb leads people to write scenarios of a very imperative nature that are hard to read and hard to maintain. Cucumber scenarios should not be a series of steps that describe what a user clicks. Instead, they should express what a user does."
However, an imperative step is not always bad. Using imperative steps in some cases is more appropriate and natural than declarative steps. It is usually simple to read and understand, so the suggestion here is trying to write declarative steps but using imperative steps whenever the need arises.
In this recipe, will cover various kinds of tips for writing good, maintainable, and DRY Cucumber steps.
We will reuse the Rails application cucumber_bdd_how_to that we've created in the Writing your first Hello World feature (Simple) recipe, so please cd into that directory to get prepared.
In the following sections, a number of useful step tips will be introduced and covered exhaustively.
Let's imagine that we need to write a step that contains a singular or plural noun depending on its count:
When the user has 1 gift
...
When the user has 5 gifts
...
Instead of implementing two similar step definitions, we can adopt a tip in Cucumber called Flexible Pluralization; the step to match the preceding steps is as follows:
When /^the user has (\d+) gifts?$/ do |num|
 p num.to_i
end
Notice the
?(question mark) appended togifts; it means match zero or more of the proceeding character, and so the step definition will match bothgiftandgifts.
Sometimes the plural of a noun is irregular, such as person/people, knife/knives. We cannot match them through flexible pluralization, and for these scenarios we need to adopt non-capturing groups, because Cucumber's step statements are eventually treated as regular expressions:
When there is 1 person in the meeting room
When there are 8 people in the meeting room
We can define our step as follows:
When /^there (?:is|are) (\d+) (?:person|people) in the meeting room$/ do |num|
 p num.to_i
end
By adding a
?:before a normal group, the step will try to match one occurrence of the given word and will not pass the matched value into arguments. Non-capturing groups ensure Gherkin's good readability when dealing with singulars and plurals, and in a DRY manner since one generic step matches various kinds of styles.
Manually converting a parameter to an integer all the time would be really annoying! We are able to define a step argument transform rule within a step definition file that can be used by other steps:
Transform /^(-?\d+)$/ do |num|
 num.to_i
end
The argument transform also supports tables! For example, we have a feature with table input as follows:
Given this Qatar billionaire has 39 billion
And his wealth consists of the following major parts
 | Domain      | Worth |
 | Oil         | 21    |
 | Real Estate | 8     |
 | Financial   | 6     |
 | Cargo       | 4     |
We can then define a transform step to convert the table input into any data we want:
Transform /^table:domain,worth/ do |table|
  table.map_headers! { |header| header.downcase.to_sym }
  table.map_column!(:domain) { |domain| Domain.parse(domain) }
  table.map_column!(:worth) { |worth| "$#{worth}" }
 table
end
We can define a number of common use methods under the
features/supportdirectory, for example creating acurrent_usermethod and putting it underfeatures/support/current_user.rb:def current_user # Code to mock a current user object end
We can also utilize Cucumber's
Worldinterface to mix in customized modules, for example, we can define anadd_headersmethod:module CapybaraHeadersHelper def add_headers(headers) headers.each do |name, value| page.driver.browser.header(name, value) end end end World(CapybaraHeadersHelper)This means that in our step definition we can invoke the
add_headersmethod from theCapybaraHeadersHelpermodule to add a customized HTTP header when requesting web pages during a test.
Methods can be reused, and so can steps! This is a widely used tip for writing good and DRY Cucumber steps, known as compound steps.
Considering a website provider's ability to log in with third-party accounts such as Facebook, Google, or OpenID, the feature can be described as follows:
Feature: Login with 3rd party account
As a website user
I can login with 3rd party account
So that I don't have to register a new account

 Scenario: Login with Facebook account
   Given user landed at login page
   And he choose login with FacebookThen he should see the Facebook authorization window

 Scenario: Login with Google account
   Given user landed at login page
   And he choose login with Google
   Then he should see the Google authorization window

 Scenario: Login with OpenID account
   Given user landed at login page
   And he choose login with OpenID
   Then he should see the OpenID login window
The step
user choose login with **can be implemented using the DRY principle as follows:Given /^he choose login with (.*)$/ do |account_provider| step %{user clicks on the #{account_provider} logo} step %{login with #{account_provider}} end Given /^user clicks on the (.*) logo$/ do |account_provider| # DOM operation to trigger clicking on the related logo end Given /^login with (.*)$/ do |account_provider| # Implement OAuth login per given 3rd party account end
In each step's definition, most of the time, the step starts with
^and ends with$. It looks as follows:Given /^user landed at login page$/ do end
Both
^and$are called "anchors". The preceding step uses^and$to match the stringuser landed at login pageexactly; then we could probably employ "unanchored steps" as follows:Then /^wait (\d+) seconds?/ do |seconds| sleep(seconds.to_i) end
Note at the end of the match we use a question mark,
?, to match the flexible pluralization instead of$, which means all steps containing "wait for x second(s)" will be matched by the preceding step definition, for example:When I wait 5 seconds after the certificate has been downloaded When I wait 4 seconds until the loading animation finished
Other than the preceding technical tips, the last one, and also the most important tip, is to keep your steps organized!
All the preceding tips are targeted at writing maintainable and DRY Cucumber steps. The last tip is to keep Cucumber steps organized, which is kind of a "soft" skill, even though it might be the most important! Categorizing features and step definition files, using tags or hooks, using Rake tasks to encapsulate common running features, and so on; these "rules" are unobtrusive but really important to keep the Cucumber tests maintainable and make daily BDD development life easier.
This recipe will introduce a number of awesome third-party libraries used in line with Cucumber; each of them dominates a specific field, and all of them are widely used.
We will be re-using the example project that we created in the Building a real web application with Cucumber (Intermediate) recipe, and do some refactoring based on it, so that it is clear to see the differences.
Before we get started, please
cdto the blog directory and open the Gemfile.Make sure the following Ruby gems exist and are installed:
gem 'cucumber'
group :development do
  gem 'guard-spork'
  gem 'guard-cucumber'
end

group :test do
 gem 'rspec-rails'
 gem 'cucumber-rails', require => false
 gem 'capybara'
 gem 'launchy'
 gem 'database_cleaner'
 gem 'factory_girl_rails', "~> 4.0"
 gem 'webmock'
 gem 'pickle'
 gem 'spork-rails'
end
In the following sections, a number of useful Ruby gems will be introduced and covered in detail.
Factory_Girl is a fabulous tool that helps you create and build Ruby objects/data for tests. It provides a simple and straightforward syntax to create objects, and it also supports a number of build mechanisms (saved instances, unsaved instances, attribute hashes, and stubbed objects), and it can gracefully build associate objects.
Remember in the Building a real web application with Cucumber (Intermediate) recipe we wrote a step to prepare a Post object? Using Factory_Girl, we can do it in a better way:
Create a
factories.rbunder thespecdirectory with the following content:FactoryGirl.define do factory :post do title 'Test title' content 'Test content' post_time Time.now end end
And in the step definition we can write:
Given /^there is a post titled with "(.*?)" and content with "(.*?)"$/ do |title, content|
  FactoryGirl.create(:post, title: title, content: content)
end
Factory_Girl is good at building associated objects. In the Building a real web application with Cucumber (Intermediate) recipe, we wrote two steps to prepare one blog post containing comment(s). If we were using
Factory_Girl, it would be easier.We can update our
factories.rbas follows:FactoryGirl.define do factory :post do title 'Test title' content 'Test content' post_time Time.now factory :post_with_comments do ignore do comments_count 5 end after(:create) do |post, evaluator| FactoryGirl.create_list(:comment, evaluator.comments_count, post: post) end end end factory :comment do name "Wayne" email "admin@wayneye.com" content "Test comment content" end endWe can revise our Gherkin as follows:
Given there is a post with 1 comment
We can revise our step definition as follows:
Given /^there is a post with (\d) comment$/ do |comments_count|
  @post = FactoryGirl .create(:post_with_comments, comments_count: comments_count.to_i)
end
The functionalities of Factory_Girl are far more than we demonstrated previously. You can take a look at a brief Getting Started tutorial for Factory_Girl on the GitHub page (https://github.com/thoughtbot/factory_girl/blob/master/GETTING_STARTED.md).Whenever we need prepare data for testing, Factory_Girl is our friend!
Alternatives to Factory_Girl are Machinist, Fabrication, and so on.
Pickle collaborates with the object created/built from Factory_Girl (or Machinist, Fabrication, or ActiveRecord objects) and generates many useful steps to help us write Cucumber easily and efficiently as follows:
Firstly we bootstrap Pickle to our project:
$ rails generate pickle --pathThis will generate step definition files and
paths.rb. The following screenshot shows the generation of pickle steps:
Remember in the Building a real web application with Cucumber (Intermediate) recipe when we prepared a post object, we wrote a Gherkin step and implemented it ourselves:
Given there is a post titled with "Dummy post" and content with "Dummy content"
Now if we use Pickle, the step definition is already there! We can write our Gherkin step in the following style:
Given a post exists with title: "Dummy post", content: "Dummy content"
And we visit a URL inside the step definition, which is hard to maintain as the project gets larger. A recommended way to do this is to centralize all URLs/paths in
features/support/paths.rb, with Pickle's support, so we can rewrite the Gherkin step as follows:When I am on the post's page
We update
edit_blog_steps.rbandpaths.rbrespectively:edit_blog_steps.rb: When /^I am on the post's page$/ do visit(path_to "the edit page for post") end paths.rb: when /^the edit page for #{capture_model}$/ polymorphic_path(model!($1), :action => "edit")
As you can see, by using Pickle we can improve our productivity to a new level, and its predefined steps can satisfy the significant scenarios we need when writing Cucumber tests. This saves a huge amount of time for us!
When we write functional tests, it is common we don't really want a real network transaction, we do want to isolate the network requests so that we can focus more on testing the business logic of the module we are testing; in the meantime, some web APIs have invocation limits; we don't want to burn the limits out by our tests.
WebMock is the tool to help! It stubs at a low HTTP client lib level, and it supports many popular Ruby HTTP libraries such as Net::HTTP, Patron, and Typhoeus.
For using WebMock with Cucumber, we need require in the features/support/env.rb:
require 'webmock/cucumber'
For example, we expect our code to navigate a website,
www.abc.com, and we expect it to return the content we want. We can stub the request as follows:stub_request(:get, "www.abc.com").to_return(:body => "My expected content")
For another example, we expect our code to submit an HTTP POST request with the expected body to a third-party website. As long as the POST request is submitted with the correct content, the rest of the stuff belongs to a third party. Thus we can stub this request:
stub_request(:post, "www.abc.com").with(:body => "My expected content", :header => "Content-Type: application/json")
Another example is that we expect our code to communicate with the GitHubOAuth API and acquire the user's authorization. We need to behave differently according to the user's choice. Using WebMock, we can simulate the OAuth process as follows:
Assume we've written the OAuth feature as follows:
Feature: OAuth with Github
In order to provide easy registration and login
As a web application
I want submit OAuth request to Github and acquire user's authorization

 Scenario: User accept to authorize
   Given the user landing on homepage
   When the user clicks "Github" icon within "Registration" area
   Then the user should see GithubOAuth page
   When the user enter user email and password correctly
   And the user clicks "Authorize App"
   Then the user should be on registration success pageAnd I can get user's name on Github
   And I can get the user's repositories on Github
We can simulate the OAuth process by writing a code similar to the following code snippet:
stub_request(:POST, "https://github.com/login/oauth/access_token").with("client_id={client_id}&client_secret={secret}&code={code}").to_return("access_token={token}&token_type=bearer")stub_request(:GET, "https://api.github.com/users/wayneye").with(:headers => 'Authorization: token {fake_token}').and_return('"name": "Wayne Ye", "public_repos": 9, "company": "ThoughtWorks"')What the preceding code does is simulate GitHub to return a valid
access_token, so that we can use this fake token to invoke GitHub's API, and the data from the API is also mocked!
Using WebMock, we can stub any real network connection to ensure our code behaves as expected without relying on an active connection. If we do want to test a real network transaction, we can temporarily enable a real network connection by WebMock.allow_net_connect!
Alternatives to WebMock are Fake Web, Stale Fish, and so on.
Spork is a very cool and handy gem, which has two major advantages:
It hosts a Distributed Ruby (DRb) server and pre-loads the Rails environment into the server instance. After that, all further running tests can communicate with the DRb server. Thus there is no need to reload the Rails environment every time! Much faster than the common way!
It forks (using
Kernel.fork) a copy of the server each time we run our tests, thus ensuring a clean state between each other.We can run
spork cucumber –bootstrapin the terminal to enable Spork for our project.
The first step in running spork cucumber –bootstrap in the terminal is as follows:
$ spork cucumber --bootstrap
Spork will update the features/support/env.rb file with guidance for us to modify. Usually one thing we need to do is move the existing code inside env.rb to the Spork.prefork block. After that we can run spork in the terminal to start the DRb server. The following screenshot shows the starting of Spork:
With Spork running, we can now run our Cucumber features by passing a --drb option:
$ bundle exec cucumber --drb features/*.features
Cucumber will try to communicate with the local DRb server. It can be imagined as running against a copy of the pre-loaded server and won't load the Rails environment any more, so it would run much faster!
Guard is another very cool gem. It monitors the file you are editing, and as soon as you save the file, the related events will be triggered based on the configuration in Guardfile, and then Cucumber tests will respond and run! For example, if it sees that Gemfile has been changed, it will trigger the bundle install command immediately; if you modify a Cucumber feature, it will automatically run (rerun) this feature. Using Guard in line with Spork will give you an awesome BDD experience!
We can run the following command in a terminal to initialize the guard file with Spork and Cucumber supported:
$ guard init spork&& guard init cucumber
Guardfile basically defines two event handlers to handle the change event of the files passed to the watch method as follows:
When we open up the Guardfile, we should see the content similar to the one that follows. One important point is that we need to ensure we pass
--drbfor running Cucumber.# A sample Guardfile # More info at https://github.com/guard/guard#readme guard 'spork', :cucumber_env => { 'RAILS_ENV' => 'test' }, :rspec_env => { 'RAILS_ENV' => 'test' }, :rspec => false,:cucumber => true, :test_unit => false do watch('config/application.rb') watch('config/environment.rb') watch('config/environments/test.rb') watch(%r{^config/initializers/.+\.rb$}) watch('Gemfile') watch('Gemfile.lock') watch('spec/spec_helper.rb') { :rspec } watch('test/test_helper.rb') { :test_unit } watch(%r{features/support/}) { :cucumber } end guard 'cucumber', :cli => '-c --drb' do watch(%r{^features/.+\.feature$}) watch(%r{^features/support/.+$}) { 'features' } watch(%r{^features/step_definitions/(.+)_steps\.rb$}) { |m| Dir[File.join("**/#{m[1]}.feature")][0] || 'features' } endNow we can start Guard in the terminal as follows:

Any further changes on the files that are monitored by Guard will trigger a related response by Guard. The following screenshot is of Guard monitoring:


