


Welcome to the Instant Chef Starter. This book has been written to provide you, the reader, with all the information needed to install and operate your own Chef Server to use for maintaining system infrastructure. You will learn what Chef is, how to install it yourself, provision some common server configurations, and write your own recipes as well as work with some advanced Chef concepts.
This book contains the following sections:
So, what is Chef? – find out what Chef is, what you can do with it, and why it's indispensable for anyone who manages more than one server. We will discuss the major components of Chef, the services that it runs, the terminologies and concepts, why it exists, and how it works.
Installation – learn how to get started with your own Chef Server, free from Opscode. Discusses the components of Chef and how they work together, setting up a basic Chef web service and frontend application.
Quick start – once we have all our tools in place, we can begin to use Chef. This section of the book will cover: bootstrapping a server and getting it to talk to your Chef installation, downloading and installing some basic recipes into your Chef system, creating and configuring roles, and finally applying those roles to your new server.
Top features you need to know about – here you will learn how to perform four tasks with the most important features of Chef. By the end of this section you will be able to: develop your own recipes using Ruby, utilize knife (every chef's most important tool) to interact with the Chef system and multiple servers simultaneously, use advanced data configuration using Chef's data bags, and write your own bootstrap configuration for getting new servers up and talking to Chef with any initial customization or configuration they need.
People and places that you should know – introduces you to a list of resources that are publicly available for you to learn more about Chef and Ruby, as well as connect with other people using Chef and find pre-existing recipes and configurations for you to use or expand upon.
This section covers what Chef is, what you can do with it, and why it's indispensable for anyone who manages more than one server. We will discuss the major components of Chef, the services that it runs, the terminology and concepts, why it exists, and how it works.
Managing even just a few servers can be a daunting task. Keeping a handful of servers provisioned, updated, and patched can be a full-time job for one person. As an application or organization grows, deploying and configuring servers may sometimes occur on a daily basis. One of the most important roles of a system administrator is being able to keep systems up and running and to consistently make changes across a group of systems. Historically, this requires either lots of manual labor or some very clever shell scripting to automate as much of the process as possible. This is where the concept of a "development-operations" (sometimes shortened as "devops") specialist arose.
By modeling infrastructure, Chef makes it much easier to manage those systems in a central location using a combination of recipes and configuration settings that are applied in a consistent manner.
A common task for a modern system administrator involves maintaining infrastructure for a multi-tiered web application. Assuming a fairly typical web application stack, we can very easily find ourselves providing infrastructure for the following set of services:
Apache Web application server
MySQL Database server
Job processing server
Each role is composed of a collection of specific packages, configuration settings, network settings, firewall rules, user accounts, services, and so on that are required to provide its service within the infrastructure.
These packages and their configurations need to be installed on to one or more servers in order for them to run. Due to budget constraints (everyone works in a startup, right?) the application is being deployed to only one or two servers in the initial stage of production deployment. This is not a large undertaking for a system administrator to manage by hand. However, as the customer base grows, that administrator needs to be able to provision new servers to play one or more particular roles within the environment in order to keep up with growth.
Add to this the fact that each service will be configured differently for a given deployment environment (that is, staging, production, performance testing, and so on) and suddenly you have more than a handful of configurations to juggle. Managing this type of infrastructure is exactly the kind of problem we can solve with Chef.
Before we can tackle this problem, we need to learn some more about the basics of Chef in order to see how all the parts fit together and be able to understand what each component does. Let's learn a little about the concepts and terminology and then take a look at how Chef can help us to solve this scenario.
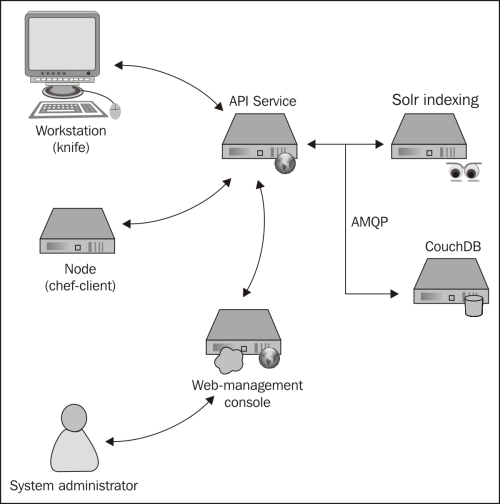
The Chef environment is comprised of a number of different components working together to provide you the tools to manage your infrastructure. This section discusses the various components and concepts that work together to make up Chef.

Chef is composed of two primary components, the client that is requesting configuration data to be applied, and the service that provides the configuration. In addition, any client that is used by an administrator to manage data (upload cookbooks, edit data bags, and so on), is referred to as a workstation but is just a client that runs tools, such as shef and knife.
Node: A node is a client that applies roles and recipes, as described by the administrator in the chef service. These are the consumers of the configuration, the elements of your infrastructure such as a server that you are setting up. They can be physical or virtual machines and can run Linux, Windows, or technically any other system that is capable of running Ruby (some systems may not be supported out of the box by Chef). Nodes primarily interact with the Chef service using the
chef-clientcommand-line tool which is responsible for fetching the node's run list and executing it to configure the system.Chef Service: The chef service is composed of several components: a web interface, an API server, Solr for searching configurations, CouchDB for storing data, and RabbitMQ to provide a communications bus between the different processes. This is where the clients (nodes) connect to determine what roles and recipes to apply, and an administrator logs in to build configurations.
As with any other tool or system, there are new concepts and terminologies to be learned when discussing the technology. Chef is no different and for now we will start with a handful of useful terms to get started quickly:
Recipe: A recipe is, as the name implies, a collection of instructions (written in Ruby) and configuration data that achieves a goal. This goal may be to install a particular package, configure a firewall, provision users, and so on. Recipes rely on their custom logic written by the author combined with node-specific and role-specific attributes, data bags and Chef's built-in data searching abilities to be flexible, and generate reproducible results.
Cookbook: A cookbook is a container that holds one or more recipes, templates, configuration settings, and metadata that work together to provide a package or perform an actionable item such as installing PostgreSQL or managing an internal server's connectivity.
Attributes: Attributes are configuration data that is used by recipes either to provide some default settings for a recipe or to override default settings. Attributes can be associated with a specific node or role in the system.
Role: A role is a user-defined collection of recipes and configuration values that describe some sort of common configuration. For example, you might declare a basic "MySQL Server" role that declares that the MySQL server recipe should be run and should have some specific configuration such as which password to use for the root user and what IP addresses to bind to.
Run list: A run list is a combined list of recipes to be applied to a given node in a certain order. A run list can comprise of zero or more roles or recipes, and order is important as the run list's items are executed in the order specified. Therefore, if one recipe is dependent upon the execution of another, you need to ensure that they run in the correct order.
Resource: A resource is, at its core, a unit of work. There are numerous types of resources to be used in a recipe but some of the more commonly used ones would be
packageandservice. Chef tries to be as cross-platform friendly as possible and keeps the implementation details of a resource separate in a provider.Provider: A provider is a concrete implementation of a resource. For example, package is a resource that has an implementation for RPM-based systems that use
yumwhich is different from Debian-based systems that useapt. Even though they have different implementations, they still provide the same type of service, installing a package. Most providers offer implementation-specific resources as well as generic resources. If you use the generic resource provider (that is, package), Chef will use node-specific information, such as the distribution name, to determine which provider to execute. Optionally, you can explicitly use an implementation-specific resource such asredhat_packageif you need to.Data bags: In addition to storing configuration data with a node or a role, Chef has the notion of infrastructure-wide data storage. This data is accessible to any recipe through the data bags interface. Information about users, groups, firewall rules, internal IP address lists, software versions, and other data can be stored here. Data bags contain data about your infrastructure as a whole and are a good way to store any information your recipes need about system-wide configuration.
Environments: Environments allow you to control groups of systems with different configurations. A very common use for environments is to manage multiple instances of the same infrastructure for an application's life-cycle where a development team needs to have a staging and a production environment in which the nodes have the same roles applied to them (database server, application server, job queue server) but unique configuration data such as firewalls, IP addresses, or other environment-specific data.
Now that we're more familiar with some of the terms that Chef uses, let's take a look at how we would organize and model the infrastructure from our case study using Chef.
For this high-level overview, we will assume that that we have an account with a popular Cloud Server hosting company, that the network and operating systems are installed and operational, that we have a functional and configured Chef service and clients (these last two points will be described in detail in the Installation section), and that we have two servers where our configuration looks something like the setup in the following diagram:
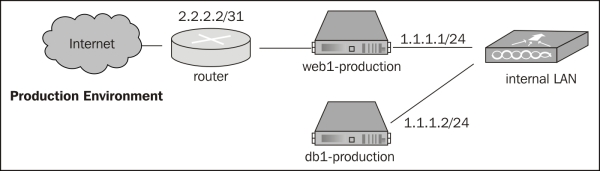
In our hypothetical system, each service can be mapped to a specific role in Chef. To model the infrastructure described, we will have a minimum of two nodes—web1 and db1—and three roles—Apache web server, MySQL database server, and job processing server.
When using Chef to configure infrastructure, we need to analyze our infrastructure and determine how to decompose it into the various building blocks that Chef provides us with in order to provision and configure systems using Chef.
Roles know nothing about the servers we have, they should only know about the software and configuration that is required of them. Roles are, at their core, a run list and a set of attributes that, when combined, work together to model a specific set of functionality (that is, database server or web server). The system administrator, via the Chef console, then assigns a role to the node(s) that it is to be applied to.
A typical web application stack might look something like this:
Apache web server role
Apache HTTP server
PHP 5.x
Memcached and corresponding PHP extension
MySQL client libraries and corresponding PHP extension
Open TCP ports: 80 for HTTP, 443 for HTTPS and 22 for SSH
Open access to internal LAN
MySQL database server role
MySQL 5.x server
Open access to internal LAN
Database backup software to backup data to Amazon Glacier
Job processing server role
Gearman server daemon
PHP Gearman library
Supervisord to manage worker processes
Again, notice that these roles have no specific system configuration. Instead, they are blueprints of what packages we need to install and what ports need to be open. In order for these role definitions to be as reusable as possible, we write our recipes to be flexible and to use node-specific and role-specific attributes or data from our data bags to provide the information about which physical interfaces or IP ranges to open up or interact with.
In order to define these roles, however, Chef needs to have recipes available that these roles are composed of. These recipes define a set of instructions that tell the client how to make sure that the correct packages are installed, what commands to execute in order to open up the firewall, which ports to open, and so on. Like any good cook, Chef has a wide array of cookbooks at its disposal each of which contains recipes relevant to that particular set of functionality. These cookbooks can either be developed by the system administrator or downloaded from a variety of places such as GitHub, Bitbucket, or from a collection of cookbooks maintained by Opscode. We will discuss in later sections how to download and get started with some simple recipes and then further discuss how to develop and distribute our own recipes.
In order to apply a configuration to a node it must be configured to use with Chef, which we will cover in detail in the Installation section. However, once a node is registered with the Chef service, we can set node-specific attributes, assign roles, and then apply our run lists to it. Given our example, we might want to bootstrap and register two servers:
Web1: Ubuntu Linux 12.04
DB1: Ubuntu Linux 11.10
Once they are bootstrapped and registered with the Chef service, we can then configure which roles are to be applied to which nodes, giving us a configuration that might look like the following:
Web1
Apache web server role
Background job server role
DB1
MySQL database server role
As we have learned, Chef also supports applying roles to servers in different environments. Taking our current example one step further, we can apply the same general setup to both a production and a staging environment:
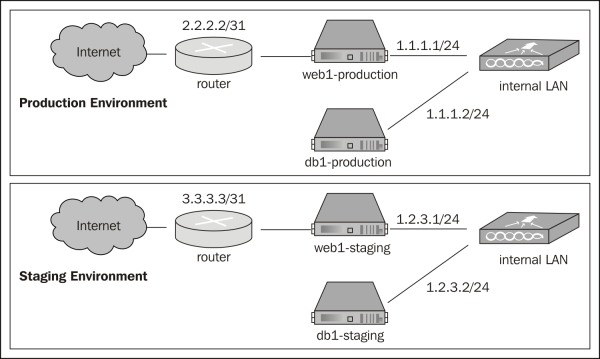
Each environment has a very similar setup but a different set of IP addresses. Using Chef, we can take our system one step further by setting up environments and applying our roles to four nodes now (web1-production, db1-production, web1-staging, db1-staging) and if we update our roles or any recipes for those roles, they will be applied to all our systems in a consistent manner.
Now that we've learned about the basic components and terminologies that Chef uses and dissected our infrastructure a bit, we can conclude the following:
An infrastructure can be decomposed into the various roles that systems play within that infrastructure
Roles are composed of recipes that describe action items such as installing packages or configuring system resources (firewalls, user accounts, and so on)
Roles, when applied to a node, add to the run list that is specific to the node that they are being applied to
That run list is compiled by the Chef service and executed on the node when the Chef Client is run
Next, we will take a look at how to get the Chef service installed and get a new node provisioned and configured using some commonly used system roles and recipes.
This section outlines the steps to getting your own fully functional Chef Server installed and configured. There are two other primary ways to use Chef, which we will not discuss: Chef solo (local installation missing some features), or using a hosted Chef environment from Opscode. This section assumes that you will be installing the Chef Server on a Linux-based system. With some work it can be installed on other operating systems (notably systems like Unix) and possibly even on Microsoft Windows (assuming all the dependencies were available), but these are not officially supported platforms for the Chef Server.
Before we start installing software it would be good to know what components are going to be installed and see how they work together. Chef is, as has been touched on, a multi-component service that works together to provide a full set of functionality for managing system infrastructure. At the core of the system lies the Chef API service, which is responsible for delivering run lists to and receiving information from nodes as well as providing a way for a system administrator to configure recipes, run lists, data bags, and the like.
The components that make up a Chef service are:
Chef API service
Message queue (AMQP)
Data storage
Search service
Management console (optional but useful)
Together, these services provide a cohesive system for distributing, storing, indexing, and managing the information to manage your infrastructure's configuration.
Depending on your platform of choice, there may be binary packages available for quick installation. Specifically, Debian-based and RedHat-based distributions are supported and will have their own installation instructions outlined in this section. For those who are not using such a distribution, we will cover manually installing Chef and configuring the components needed to get started.
Tip
To get started quickly, using a Debian-based system will provide the path of least resistance. All the dependencies for Chef Server and Chef Server itself are easily available using Advanced Packaging Tool (APT).
If you will be running the server on a Debian-based Linux distribution, then you are in luck. Most modern Ubuntu and Debian releases are supported using this method and it is very simple and straightforward. The steps involved in setting up a Chef Server using a supported Debian-based distribution are as follows:
Adding the Opscode repository to your APT sources
Adding the GnuPG key to your keyring
Updating your APT repositories
Installing the Chef Server
Opscode maintains an APT repository for 0.9.x and 0.10.x releases of the Chef system. The base URL for this repository is http://apt.opscode.com/ and contains support for Ubuntu 8.04 (Hardy Heron) through the most current release of 12.10 (Quantal Quetzal) and Debian 5.0 (lenny) through the current release, wheezy.
To use the repository, you need to add the following to your sources (either directly to /etc/apt/sources.list or /etc/apt/sources.list.d/opscode.com.list, depending on your distribution):
deb http://apt.opscode.com/<distribution_codename>-0.10 main
Where distribution_codename indicates which release of the distribution you are using. If you don't already know it, you can find the distribution code name using the lsb_release utility provided by the lsb release package on Debian and Ubuntu. You can automate creating the sources.list entry using the following command:
echo "deb 'lsb_release –cs'-0.10 main" >> /etc/apt/sources.list
An example entry for Debian 6.0 (squeeze) would look like the following URL:
deb http://apt.opscode.com/ squeeze-0.10 main
In order to use the packages provided by Opscode without APT complaining about unsigned packages, you will want to add the GnuPG key (0x83EF826A) that was used to sign the packages from gnupg.net. You will need to have the gnupg package installed in order for this to work.
sudo mkdir -p /etc/apt/trusted.gpg.d
gpg --keyserver keys.gnupg.net --recv-keys 83EF826A
gpg --export packages@opscode.com > /tmp/opscode.gpg
sudo cp /tmp/opscode.gpg /etc/apt/trusted.gpg.d/opscode-keyring.gpg
Once you have added the GnuPG key to your list of trusted keys for APT, you can update the package list for APT with the following command:
sudo apt-get update
After updating your APT repositories, you can install Chef, Chef Server, and the Opscode keyring packages (the last will keep the Opscode package key up to date):
sudo apt-get install opscode-keyring chef chef-server
During the process, a script will prompt you for three pieces of information: the Chef Server API URL (this would be the public URL that nodes and workstations would connect to, such as http://chefserver.yourcompany.com:4000/), a password for the RabbitMQ message bus, and the web management interface administrator's password.
Tip
Do not leave any of the passwords blank, doing so will likely cause you to have to re-install the Chef Server. Also note that the Chef web UI requires a password of at least six characters in length.
After you have inputted the requested information, the Chef Server will have installed and configured all the components required to run the Chef Server including the configuration files, dependencies, and init.d scripts so that the services run at boot.
After your system is up and running, you can easily proxy requests for the web interface and the API through Apache, nginx, or any other HTTP proxy frontend. Doing so will require you to update this URL but will allow you to use SSL certificates to encrypt communication to and from the API.
If you are not using a distribution that has a package-based installation method available, then you will have to install and configure Chef Server by hand. For manual installation from source code alone (including Ruby), you will need to install GCC (with C and C++), autotools (automake, autoconf, libtool), GNU make, and the OpenSSL libraries. You will also need to install some software packages that Chef Server relies on. As of this writing, those pieces, and their versions are as follows:
|
Package |
Purpose |
Version |
|---|---|---|
|
|
Chef API is written using Ruby + Merb |
1.8.7 + |
|
|
Install chef and Ruby library dependencies |
1.8.10 + |
|
|
Data storage server |
0.9.1 + |
|
|
AMQP message server |
1.6 + |
|
|
Chef Server dependency |
3.5 + |
|
|
Chef-solr search engine dependency | |
|
|
Chef-solr search engine dependency |
Most distributions have some sort of mechanism for installing Ruby, but if you are installing Ruby by hand, please make sure to enable SSL as Chef will not be able to sign requests without SSL support. For more information on how to install Ruby, either see the official Ruby website, or try installation via rbenv or rvm.
Installing Rubygems, once Ruby is installed, is straightforward, and will yield a binary named gem that you can use to install Ruby packages:
$> mkdir –p ~/src
$>cd ~/src
$>wget http://production.cf.rubygems.org/rubygems/rubygems-1.8.24.tgz
$>tar xvfz rubygems-1.8.24.tgz
$>cd rubygems-1.8.24
$>sudo ruby setup.rb
For more information on installing Rubygems, see the Rubygems website at http://rubygems.org
For those unfamiliar with the Ruby world, gems are Ruby's way of distributing libraries and modules that have been developed and packaged for distribution. Chef is no different, as it is written in Ruby and open source.
Assuming that you have installed Ruby and Rubygems as a system-wide installation, you will need to run the following command (as an administrator):
$>sudo gem install chef
This will query rubygems.org for the latest version of Chef (10.16.2 as of this writing) and any dependencies that Chef needs (which may, in turn require that you install some auxiliary libraries or packages on your system, depending on your configuration). Some of these libraries are written and maintained by Opscode, others are publicly available open source gems. For a complete and current list of what it is dependent upon, see the Rubygems database entry for Chef at http://rubygems.org/gems/chef.
CouchDB and RabbitMQ are both developed using Erlang. If there are no packages available for these two pieces of software, and no way to install Erlang via package, you may have to install it from source, along with RabbitMQ and CouchDB. For information about these, see the following resources:
Once they are installed, CouchDB requires no special configuration beyond setting it up to run at boot; Chef Server will create its own database when it first starts up if the database does not exist yet.
RabbitMQ requires a little bit of configuration to make things work—you need to set up a message bus for Chef Server to use. This message bus is used to send data to Solr for indexing at the same time as sending it to CouchDB. By default, Chef expects an Advanced Message Queuing Protocol (AMQP) service to be available and provide an endpoint of /chef with the user chef having permission to read from and write to the queue. To do that, use the following commands:
sudo rabbitmqctl add_vhost /chef
sudo rabbitmqctl add_user chef <password>
sudo rabbitmqctl set_permissions -p /chef chef ".*" ".*" ".*"
This will construct the endpoint, create a Chef user with the password specified, and then grant permissions to Chef on /chef to configure, write, and read all resources matching the regular expression .* (that is, everything). For more information on configuring RabbitMQ, see http://www.rabbitmq.com/man/rabbitmqctl.1.man.html.
If you are this far, installing the server itself is quite simple. The server and the services it depends on are available via Rubygems:
sudo gem install chef-server chef-server-api \
                 chef-server chef-solr chef-server-webui
This will install any dependencies that these gems have that are not yet installed on the system.
Installation via APT takes care of this for you, but if you are installing manually, you will need to come up with a server.rb configuration file to tell the services where to find things and how to connect to AMQP and each other. An example server.rb file would look like the following example:
# Common log settings / URL
log_level          :info
log_location       STDOUT
ssl_verify_mode    :verify_none
chef_server_url    "http://chefserver.yourdomain.com:4000"
# Server settings
cookbook_path      [ "/var/chef/cookbooks" ]
sandbox_path       "/var/cache/chef/sandboxes"
checksum_path      "/var/chef/cookbook_index"
file_cache_path    "/var/chef/cache"
node_path          "/var/chef/nodes"
openid_store_path  "/var/chef/openid/store"
openid_cstore_path "/var/chef/openid/cstore"
role_path          "/var/chef/roles"
cache_options({ :path => "/var/cache/chef/checksums",
                :skip_expires => true})
# Client config
validation_client_name "chef-validator"
validation_key         "/etc/chef/validation.pem"
client_key             "/etc/chef/client.pem"

# Web UI configuration
web_ui_client_name     "chef-webui"
web_ui_key             "/etc/chef/webui.pem"
web_ui_admin_user_name "admin"
web_ui_admin_default_password "somerandompasswordhere"
# Chef Solr settings
search_index_path  "/var/chef/search_index"
solr_jetty_path "/var/lib/chef/solr/solr-jetty"
solr_home_path  "/var/lib/chef/solr"
solr_data_path  "/var/cache/chef/solr/data"
solr_heap_size  "256M"
# AMQP password for /chef vhost as configured above
amqp_pass          "<password>"
# Timestamp logs
Mixlib::Log::Formatter.show_time = true
You will want to review this and change any paths to match your system, make sure you create directories that are in this configuration file that do not yet exist, and check for any configuration-specific changes you would like to make. Again this is a Ruby script that configures the services so any valid Ruby can be used (such as File.join to make things simpler).
After you have the configuration file tailored to your system, you will need to start the services. Those can be started with the following commands:
sudo chef-solr
sudo chef-server -N -e production
sudo chef-server-webui -p 4040 -e production
You will likely want to figure out a way to get these to run at bootup, via init scripts, supervisord or some other method.
Once you have things installed, we should verify that things are up and running and talking to one another. The installation of Chef Server yields a number of system-services that will need to be up and running in order to successfully use the system. You should have the following components running and (optionally) listening on the following network ports:
|
Component |
What to look for |
Port |
Public? |
|---|---|---|---|
|
Chef API server |
chef-server |
4000 |
Yes |
|
Web management console |
chef-server-webui |
4040 |
Yes |
|
Data indexer |
chef-expander |
N/A |
N/A |
|
Solr |
java (running |
8983 |
No |
|
CouchDb |
|
5984 |
No |
|
RabbitMQ |
|
5672 |
No |
Public services need to be made open to any clients, nodes, or end users that expect to be using the Chef service. If any of these services are not running, you will need to consult the log files generated by the service to determine what might be preventing them from starting up.
Once we have set up the server, we need a way to interact with it. Chef provides a command-line utility, knife, that an administrator uses to interact with the service. It is run from a workstation and provides many commands for viewing, searching, interacting with, and editing data provided by the Chef service. Once you have installed and verified that all the mandatory services are running, we can move on to setting up knife.
Tip
You will see that the "standard" place to store your Chef configuration data is in $HOME/.chef (on a Unix-like system.) This is not mandatory and these files can be stored anywhere you would like.
Knife communicates with the Chef Server via HTTP and uses certificates for authentication between the client or node and the server. Once you have installed the components, create a location for your configuration, and copy over the certificates that were generated by the server during the installation, and then change their owner to your user:
mkdir $HOME/.chef
sudo cp /etc/chef/validation.pem $HOME/.chef
sudo cp /etc/chef/webui.pem $HOME/.chef
sudo chown –R $UID $HOME/.chef
Note
Chef uses signed header authentication for requests to the API, which means there must be an initial shared key for signing requests. Chef Server will generate the validation.pem file when it is first run. New nodes or clients use the validation.pem file to sign the requests used to self register.
Once you have these files copied into your working directory, it is time to configure knife itself. Fortunately, knife has an interactive configuration mode, which you can invoke using knife configure -i. Running this command will walk you through generating an initial configuration file. You will be prompted by the following questions, which you can answer with the defaults for mostly everything (non-default answers in bold):
user@chefserver:~% knife configure -i
WARNING: No knife configuration file found
Where should I put the config file? [~/.chef/knife.rb]
Please enter the chef server URL: [http://localhost:4000]
Please enter a clientname for the new client: [user]
Please enter the existing admin clientname: [chef-webui]
Please enter the location of the existing admin client's private key: [/etc/chef/webui.pem] ~/.chef/webui.pem
Please enter the validation clientname: [chef-validator]
Please enter the location of the validation key: [/etc/chef/validation.pem] ~/.chef/validation.pem
Please enter the path to a chef repository (or leave blank):
Creating initial API user...
Created (or updated) client[user]
Configuration file written to /home/user/.chef/knife.rb
Running this has two effects: first, it uses the validation key and client name specified at the prompts to contact the API service and register a new client (user) with the service and, secondly, it generates a configuration file for knife.
Because Chef and its components are written in Ruby, the resulting configuration file is (perhaps unsurprisingly) a Ruby script which contains some code that configures knife so that it knows which API server to connect to, which key files to use, what client name to use, and so on.
An inspection of the configuration file that was generated by the previous command would look like the following:
log_level                :info
log_location             STDOUT
node_name                'user'
client_key               '/home/user/.chef/user.pem'
validation_client_name   'chef-validator'
validation_key           '/home/user/.chef/chef-validator.pem'
chef_server_url          'http://localhost:4000'
After setting up knife, we can use it to validate that it was configured correctly by querying the Chef Server by using some simple commands. Knife commands follow the format knife <command><subcommand> where command is one of: client, configure, cookbook, cookbook site, data bag, environment, exec, help, index, node, recipe, role, search, ssh, status, or tag. Subcommands will vary with the command but typically include things such as show, create, list, delete, and so on.
As there will initially be no nodes, cookbooks, recipes, roles, data bags, or other pieces of information, we will query the list of clients that the server knows about. Initially, this should be a list of three users: the webui (as it is a consumer of the API itself), the chef-validator (or else nobody could register a new client), and the username you just created (in our case user).
To perform this, you would use the command client with the subcommand list to generate a list of clients that the server has in its database. An example of this, given our setup so far, would look like this:
user@chefserver:~% knife client list
  chef-validator
  chef-webui
  user
If you do not get that output, but instead get an error, you will need to go back and make sure that all the previous steps are completed and verified. Once you know that it works, you can use knife to interact with the API. Unfortunately, we do not have much data in the system just yet, but we can at least use the show subcommand in conjunction with the client command and a client name to display more detailed information about a client:
user@chefserver:~% knife client show chef-webui
_rev:        1-3f5c4e183c5ea4e96c1a26c17c991a97
admin:       true
chef_type:   client
json_class:  Chef::ApiClient
name:        chef-webui
public_key:  -----BEGIN RSA PUBLIC KEY-----
             ... omitted ...
             -----END RSA PUBLIC KEY-----
Now that you have successfully connected to the server with knife, let's move on to the next section and do some cooking!
Now that you have a functioning Chef Server running and the tools needed to interact with it, we will discuss the steps involved in setting up nodes that talk to the Chef service and will use the information provided to install software and set up the server.
This section will take you through the process of using Chef to provision a new Ubuntu 12.10 server and set it up as a LAMP (Linux, Apache, MySQL, and PHP) server as this is a very simple and quite common server configuration at the moment. The basic steps will be as follows:
Setting up the server.
Downloading and examining cookbooks.
Uploading cookbooks into your Chef Server.
Creating and assigning roles to the node.
Completing the process by applying changes to the node.
Note
In order to provide the instructions for this section to work without modification, you will need administrative access to a system running Ubuntu 12.04 LTS with SSH service running and accessible via a network. Additionally, the system will need to be able to access the Chef Server and the public Internet for package updates and gem installation.
Bootstrapping is the process of setting up something without external intervention. Chef uses bootstrap scripts that are executed (over SSH) on a remote server to perform any initial configuration that you desire. These scripts are written using ERB (a Ruby template language) and serve as a launching pad to setting up a new server. Typically these scripts would be run on a brand new server, but can be applied to any server that you can SSH into.
Additionally, bootstrap files are Linux-distribution and Ruby-distribution dependent because they have commands that are specific to particular distributions. For example, an Ubuntu Linux server with Ruby 1.9 installed from source, or a RedHat Enterprise Linux server with Ruby 1.8.7 installed from EPEL.
In addition to any initial configuration, bootstrapping registers the node with the Chef Server so that it becomes a member of the infrastructure and can have configurations and roles applied to it.
The bootstrapping begins with developing a bootstrap script that targets the distribution and version of that distribution that is running on the server you are looking to provision. Once the script is written, the knife tool is used to remotely log into the new system and run the script to perform the initial configuration.
Knife does some interpolation locally of the bootstrap script before it is run on the server. This means that you can leverage Chef's data and configuration during the bootstrap process. Common uses here would include setting up initial firewall rules, routes, users, or other mandatory initial provisioning.
Chef provides some pre-written bootstrap scripts for the following platforms, making it easy to get started:
centos5-gems
fedora13-gems
ubuntu10.04-gems
ubuntu10.04-apt
ubuntu12.04-gems
If you are looking for an example of what a bootstrap file contains, you can find the ones provided with chef in lib/chef/knife/bootstrap inside the directory containing your Chef gem (which, if you used the Opscode packages on a Debian system, would reside in /usr/lib/ruby/vendor_ruby/chef).
I strongly suggest reading over the bootstrap script you will be using so that you have a good idea of what you're running on your system as root before doing so.
Bootstrapping a server is quite simple and involves a single invocation of knife (once your bootstrap script is complete). Knife looks for bootstrap files in a directory called bootstrap in your local Chef directory. Good names for bootstrap files would include the distribution name as well as the version and type of Ruby installation you are performing (that is, centos5-ruby19, ubuntu11.10-rvm-ruby19, and so on).
In our case, we will be using the pre-supplied bootstrap script that configures Ubuntu 12.04 with gems to bootstrap our new system. For example:
export SERVER_IP="11.22.33.44"
export USER="ubuntu_user"
knife bootstrap -x $USER --sudo $SERVER_IP -d ubuntu12.04-gems
This is where the environment variable, $SERVER_IP, is set to the IP address of your newly setup server and $USER is set to the user you created on your Ubuntu server that can execute sudo.
When executed, this command tells knife to execute the bootstrap command, which is responsible for loading the bootstrap script specified by the -d flag (-d is for distribution) over SSH logging into the remote server specified by the environment variable, $SERVER_IP using the remote user specified by the -x flag. In this case, it would run the following steps:
SSH as ubuntu_user to 11.22.33.44
Execute the contents of
ubuntu12.04-gems.erbon the remote server usingsudo
Once that is complete, the server will be bootstrapped according to the steps in the bootstrap file, which, if you were to look at the provided bootstrap script, you would see the following:
Update the APT repository
Install Ruby 1.8 and some development dependencies from APT
Install the latest version of RubyGems
Update the local Ruby gems
Use gem to install ohai, the system-reporting agent
Use gem to install Chef
Copy the validation certificate file to the server
Copy the encrypted data bag secret (if applicable)
Generate any ohai hints needed
Copy the Chef Client configuration to the server
Copy the first-run JSON data to the server
Execute the Chef Client in order to:
Register the node
Run any initially configured run list data
Once this has been completed, we can verify that the node has been registered with the Chef Server in either of two ways: using knife, or using the web console.
To verify the node was registered with the Chef Server, we will be using the client command provided by knife. This can be accomplished with the list subtask like this:
user@server:$> knife client list
host1
host2
new-host-name
Where new-host-name would be the hostname of the node you just bootstrapped (Chef Client will automatically determine the hostname when it registers itself using the bootstrapped machine's FQDN as you set it up).
To verify that the node was registered using the web console, we must first log into our Chef Server using the administrative credentials that were configured during setup. Once logged in, there will be a set of tabs along the top where you can switch between the different data collections you can manage. The URL of the web console will vary between installations, but if you followed the instructions earlier, it would be accessible at http://chefserver.yourdomain.com:4040.

As you can see, there are tabs for managing environments, roles, nodes, cookbooks, data bags, clients, and users. Additionally, there is a tab for performing searches, which is useful for validating search queries to be used in recipes.
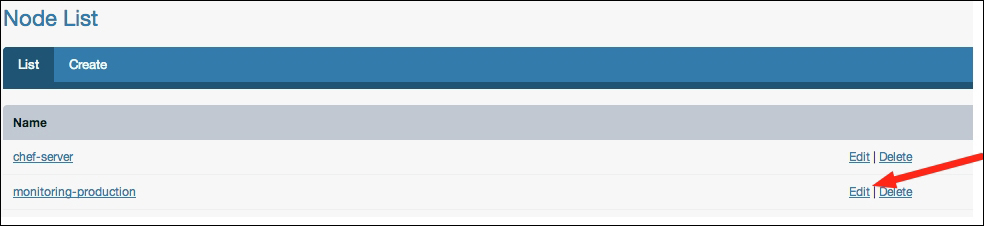
Once you are on the Nodes tab, you will see a list of nodes that Chef knows about, which will look like the following screenshot:
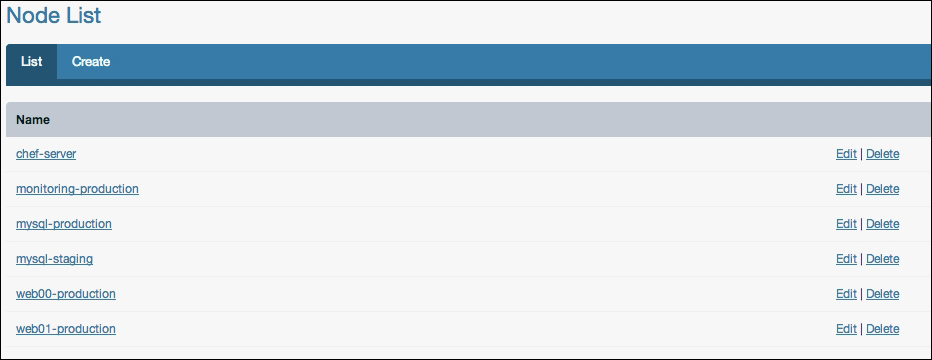
In our case, chef-server is the Chef Server itself that we registered during the installation phase, and monitoring-production is the hostname of the newly registered server.
Once we have some nodes to manage, we need to provide Chef with some cookbooks that we can use. Cookbooks are one of the most important parts of the Chef ecosystem—they contain all the steps required to actually manage our systems. Without cookbooks, there isn't a whole lot that can be done.
Fortunately, there are lots of places to find cookbooks that are freely available and already written by fellow Chef users. Two of the most common places to find cookbooks are directly from Opscode's collection of cookbooks, and on GitHub. We will cover downloading cookbooks from Opscode using knife, and later discuss how to fetch them from GitHub as well as write our own.
Knife, among all its other uses, has a command for downloading cookbooks from the Opscode repository. You can find a searchable interface that you can browse through on Opscode's community website at http://community.opscode.com/cookbooks.
There, you will find recipes for a lot of common software packages and configurations, each one has been versioned, tagged, and (hopefully) documented.
Once you have found a cookbook that you are interested in, you will need to use knife to download the cookbook using the cookbook command in combination with the site download subcommand followed by the recipe name.
As an example, we will start with downloading a cookbook for MySQL. To download it you would use the following command:
knife cookbook site download mysql
This would then fetch the latest version of the mysql cookbook for the user. For this exercise, we will be installing a typical LAMP stack, which means that in addition to the MySQL cookbook, we will also want Apache and PHP. A good place to keep your cookbooks is in the hidden Chef directory inside your home, so to fetch all the cookbooks we will need to get started, we would perform the following:
mkdir -p $HOME/.chef/cookbooks
cd $HOME/.chef/cookbooks
knife cookbook site download apache2
knife cookbook site download mysql
knife cookbook site download php
Each knife command will download an archive containing the cookbook and its files. For example, as of this writing, the latest version of the PHP cookbook is 1.1.0, which downloads an archive file named php-1.1.0.tar.gz. (Note that the cookbook version is not related to the software version, as it is the version of the cookbook's recipes, metadata, and scripts.)
Once the downloads have completed, you can decompress them and remove the archive file. You should now have a set of directories matching the names of the packages downloaded:
 [user:~/.chef/cookbooks]% ls -al
total 0
drwxr-xr-x   5 user  staff  170 Dec  6 23:24 .
drwxr-xr-x   4 user  staff  136 Dec  6 23:23 ..
drwxr-xr-x  16 user  staff  544 Nov 29 11:36 apache2
drwxr-xr-x  15 user  staff  510 Nov 28 10:02 mysql
drwxr-xr-x  16 user  staff  544 Aug 30 20:38 php
Inside each of these directories is a specific structure containing the attributes, providers, recipes, resources, and templates associated with that particular cookbook. For example, the apache2 cookbook contains the following files:
 [user:~/.chef/cookbooks]% ls -al apache2
total 224
drwxr-xr-x  16 user staff    544 Nov 29 11:36 .
drwxr-xr-x   5 user staff    170 Dec  6 23:24 ..
-rw-r--r--   1 user staff     23 Nov 29 11:36 .gitignore
-rw-r--r--   1 user staff   3482 Nov 29 11:36 CHANGELOG.md
-rw-r--r--   1 user staff  10811 Nov 29 11:36 CONTRIBUTING.md
-rw-r--r--   1 user staff    171 Nov 29 11:36 Gemfile
-rw-r--r--   1 user staff   3216 Nov 29 11:36 Gemfile.lock
-rw-r--r--   1 user staff  10850 Nov 29 11:36 LICENSE
-rw-r--r--   1 user staff  22228 Nov 29 11:36 README.md
drwxr-xr-x   6 user staff    204 Nov 29 11:36 attributes
drwxr-xr-x   6 user staff    204 Nov 29 11:36 definitions
drwxr-xr-x   3 user staff    102 Nov 29 11:36 files
-rw-r--r--   1 user staff  36346 Nov 29 11:36 metadata.json
-rw-r--r--   1 user staff   8996 Nov 29 11:36 metadata.rb
drwxr-xr-x  49 user staff   1666 Nov 29 11:36 recipes
drwxr-xr-x   3 user staff    102 Nov 29 11:36 templates
Now that we have downloaded some cookbooks, we can upload them into our Chef Server so that we can use them to install software on our newly provisioned node!
Installing cookbooks is as simple as downloading them from Opscode, if not even easier. Once again, we turn to our trusty friend, knife to get us going. Here we will leverage the cookbook command with the upload subcommand to push the newly downloaded and unpacked cookbooks up to our Chef installation.
First, we will upload our Apache2 cookbook:
 [user:~/.chef/cookbooks]% knife cookbook upload -o . apache2
Uploading apache2             [1.3.2]
upload complete
You can see that knife has uploaded the version of the apache2 cookbook we just downloaded to the server. The version that is being uploaded is specified in the square brackets. Because we did not set a cookbook path when we set up our knife client in the previous section, we need to tell knife where to look for the cookbook we want to upload. This is done using the -o [cookbook path] command-line flag (in our case, the current directory is where we wanted knife to search).
You can verify that it was successful by again using the cookbook list command:
 [user:~/.chef/cookbooks]% knife cookbook list
apache2           1.3.2
At present, we only have the one cookbook that we uploaded, but over time this list will grow. Let's upload the others now so that we have enough to set up our LAMP stack, starting with the MySQL cookbook:
 [user:~/.chef/cookbooks]% knife cookbook upload -o . mysql
Uploading mysql             [2.0.2]
ERROR: Cookbook mysql depends on cookbook build-essential version >= 0.0.0,
ERROR: which is not currently being uploaded and cannot be found on the server.
Oops! Looks like we are missing a cookbook that the MySQL cookbook is dependent upon (in this case a cookbook called build-essentials). To solve this, we can simply download the dependency the same way we fetched apache2, msyql, and php. If you do this, even after uploading the build-essentials cookbook, mysql will have another dependency issue, openssl. Because we are downloading our packages from the community repository, you can check the Requirements section on the package's Opscode community page so you know what other packages you need to download.
To save you from hunting down the dependencies manually, the complete list of cookbooks you will need to download is as follows:
apache2
mysql
php
xml
build-essential
openssl
To quickly download and install them, place the following bash script into a file called fetch_packages.sh and execute it:
#!/bin/bash
for pkg in apache2 mysql php xml build-essential openssl;
do;
  knife cookbook site download ${pkg};
  tar zxvf ${pkg}*.tar.gz
done
rm *.tar.gz
knife cookbook upload -o . apache2 php \
     mysql xml build-essential openssl
Executing this script will download the packages, decompress them, and install them. To verify, a quick application of knife cookbook list or a quick look at the web management console will verify that these cookbooks have been installed in the Chef Server for you to use. Now that we have the required cookbooks, let's start setting up some roles!
Roles are Chef's way of organizing a group of recipes and settings into a set of things that can be applied to a node. The simplest way to manage these at first is through the web management console, but knife provides you command-line tools to manage these as well, which we will talk about in the next section.
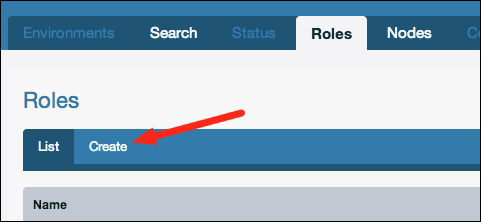
In the web management console, choose the Roles tab, this will provide you with a view of all the roles currently in the system. Initially, we will not have any, so we are going to create some. The first one will be our LAMP server role—click on Create under the Roles tab as shown in the following screenshot:
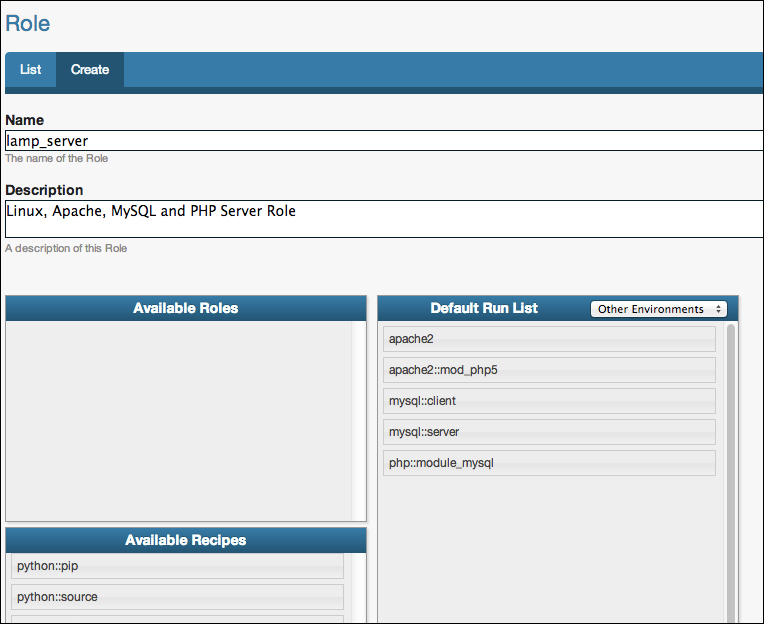
This will bring you to the page to edit the new role. Here, we will name our new role lamp_server, and add some recipes to the role. You will notice that in the recipes section there are more recipes than there are cookbooks, this is because each cookbook can contain multiple recipes. Here we will want to choose the following recipes by dragging them from the section titled Available Recipes into the section titled Default Run List:
apache2
apache2::mod_php5
mysql::client
mysql::server
php::module_mysql
Tip
Order is important here, the run list is executed in the order specified. Therefore, the php::module_mysql should come after the mysql::client recipe as it requires having the MySQL client libraries available. Similarly, the apache2::mod_php5 recipe is placed after the apache2 recipe.
When you are finished, the console will resemble the following screenshot:
At the bottom of the page is a button labeled Create Role—be sure to click this in order to save your newly created role. After saving the new role, you will be returned to the list of roles and see that it contains your newly created lamp_server role.
The next step is applying our new role to the server we just bootstrapped. To do this, we return to the Nodes tab in the administrative console and click on the Edit action for our server:
This will bring you to the edit screen for the node you have chosen, which is where we can select roles, edit attributes, and view the run list for that node. At this point, we are concerned only with assigning roles to the server, so we will drag our newly created lamp_server role from the Available Roles section into the Run List section as shown in the following screenshot:
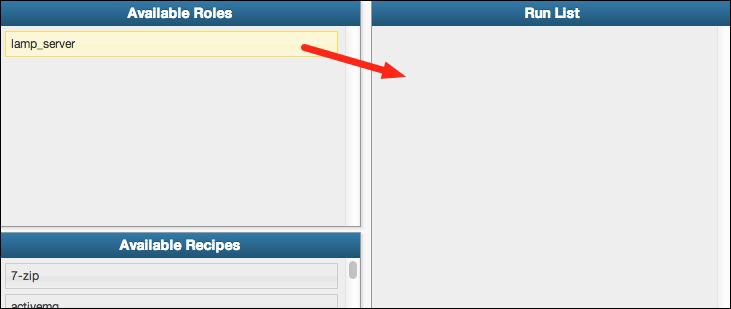
As with the role creation, be sure to click the Save Node button at the bottom of the console before you leave the page, otherwise your new run list will not be saved.
The run list for a node can be seen from the node details page (http://chefserver.yourdomain.com:4000/nodes/<node_name>) or by using knife node show -r node_name from the command line.
Once our roles are set up and applied to our node, it's time to start cooking! To apply our new infrastructure configuration to our server, we need to log in to our node and run the chef-client command as an administrative user, which will download the run list for that node and apply them in order.
This can either be done directly by logging into our server via SSH, or can be accomplished using knife (a big surprise, right?). In order to do this, we will be using the ssh command within knife.
The ssh command has the following signature:
knife ssh QUERY COMMAND (options)
So, for example, we can issue the following command:
knife ssh "roles:lamp_server" "sudo chef-client"
This tells the ssh command that the query is for all nodes containing our newly created role, lamp_server, and connecting to each of them and issuing the command sudo chef-client which is much better than logging into potentially hundreds of servers to run a command.
When you issue the chef-client command, you will see pages of text scroll by describing the actions that are being taken on the node. At this point, all should go well, if it does not, the output contains log entries with the FATAL log level such as the following output:
[Fri, 02 Dec 2012 10:10:12 -0700] FATAL: Stacktrace dumped to /var/cache/chef/chef-stacktrace.out
This will allow you to view what Chef was doing at the time it failed. Common errors include things such as permissions errors, HTTP permission problems (if you haven't registered the node), clock synchronization errors, invalid certificates, or logical issues arising from the order in which you specified your run list.
At this point, assuming that everything has been done as outlined, your new node should have the following software packages installed:
Apache 2 HTTP server with mod_php5
PHP5 with MySQL extensions
MySQL 5.x Database server
On the new server, you should be able to visit the newly installed Apache server and view the default web page by visiting http://yournewserver.yourdomain.com/ and being greeted by the Apache initial welcome page.
Now that you have the basics down, let's move on to some more advanced topics such as writing our own recipes and cookbooks, more advanced usage of knife, queries, data bags, and developing our own bootstrap configurations.
Chef is a very feature-rich system for managing your infrastructure. The goal of this section is to introduce you to some of the advanced features of Chef. We will cover understanding and developing our own cookbooks, using knife in more advanced ways, bootstrapping our own servers and using JSON data bags to store complex pieces of information about our infrastructure.
A small note before beginning this section: As the majority of the work that you will do with Chef involves Ruby programming, this section assumes that you have a reasonably firm grasp of Ruby programming concepts. The section aims to be readable by anyone with a sufficient technical background but some of the Ruby-specific portions may require some knowledge that is outside the scope of this book.
Now that we have gotten our server running and have applied some basic recipes, it's time to venture into the details of writing our own cookbooks and recipes. Here we will discuss how a cookbook is structured, what tools are available to you when writing recipes, and see some examples of how we might approach developing our own.
Cookbooks are one of the core components of the Chef ecosystem. They are, as their name suggests, a collection of recipes and other data that, when combined, provides a specific set of functionality to a System Administrator. In each cookbook, you will find a collection of directories and files describing the cookbook and its recipes and functionality. Core components that a cookbook contains are as follows:
Attributes: These are attributes that the cookbook's recipes rely on. A well-defined cookbook should contain some sane defaults for the recipes such as installation directories, usernames, download URLs, version numbers, and so on. Anything a recipe expects the node to have defined should be given a default value so that the recipe will behave as expected.
Recipes: Ruby scripts define the recipes in the cookbook. A cookbook can contain as few as one, or as many recipes as its author would like to put into it. Most package-specific cookbooks only contain a few recipes, while some cookbooks, such as your organization's private cookbook, may have dozens of recipes for internal use.
Templates: These are Ruby ERB files that are used to describe any file that needs to have some dynamic data in it; often these are used for startup scripts or configuration files.
Resources: This describes a resource that can be used in a recipe, for example the supervisord cookbook defines a service resource that can be used. Resources are ruby scripts that use Chef's resource DSL (Domain-Specific Language) to describe various actions, attributes, and other properties of the resource.
Providers: This describes an implementation of a resource, in the case of the supervisord cookbook, the service provider file outlines the actual implementation-specific logic of the actions that a resource can perform. There are many different types of services that you could have—supervisord, runit, monit, bluepill, and so on.
Additionally, cookbooks may include a variety of support files that are not directly a part of the recipes, such as:
Definitions: This defines various structures and run-time components. Perhaps you want to define the structure of a user account, a background worker, or a runnable process. Definitions provide a way to programmatically describe what these components look like, and implement any logic that they might need.
Ruby libraries: This includes any re-usable code that your recipes need and can be included in the cookbook. Things that go in here are accessible by your recipes and automatically loaded for you.
Support Files: These are arbitrary data files that don't fall into any of the other categories.
Tests: Recipes, being composed of Ruby code, can include unit tests or cucumber tests to verify that the logic works. Note that these tests are unit tests, not integration tests—they are not designed to ensure that you have configured your nodes properly or that there are no conflicts or other issues when applying these recipes.
These files have their own homes in the hierarchy of files and directories contained within a cookbook. The names of the directories and files are fairly transparent, as we will see here.
As an example, let's take a look at a fairly simple cookbook that we downloaded earlier, the MySQL cookbook. If we were to look at the file contents of that cookbook, we would see directories containing the various components of a cookbook: attributes, auxiliary libraries, recipes, file templates, and resource files.
If you look inside the MySQL cookbook you can see that the directory structure maps closely to the names of the various components of our cookbook. Each component has its own directory structure and expectation of files contained within, which we will discuss in the corresponding sections.
Note that not every cookbook contains all of these components, and there are other components a cookbook may have that the MySQL cookbook does not.
Some of these files are purely informational such as the README.md, CONTRIBUTING, LICENSE, and CHANGELOG files. These files are here to convey information to you about how to participate, license, or otherwise use the cookbook.
Recipes, housed in the recipes directory inside the cookbook, are a set of Ruby scripts each of which achieves a specific purpose. Think of a recipe for making chocolate chip cookies; following the recipe yields a very specific result: chocolate chip cookies. It doesn't produce oatmeal raisin cookies.
Similarly, your Chef recipes should by very clear about what objective they will achieve and perform only that task. If you look at the list of files in the MySQL cookbook, you will see that it contains five recipes: client, default, server, ruby, and server_ec2. Each recipe achieves one specific goal, to install the MySQL client, Ruby library, server, or server on an EC2 node. There is also a default recipe in the cookbook, which in this case installs the client.
Each recipe is a script that is run from beginning to finish (assuming that nothing causes it to abort), and can access the node's attribute data, compile templates, create directories, install packages, execute commands, download files, and do just about anything that you can do from a shell as an administrator. And, if you can't accomplish what you need to do using the existing Chef resources, you can always execute a user-defined shell script.
Let's learn about the other components of the cookbook and then re-visit the recipes themselves once we've learned more about what's in the cookbook.
Each cookbook contains a metadata.rb file in the root directory of the cookbook that is responsible for declaring information about the cookbook itself. The contents of this script are then used to generate a JSON file that describes the cookbook that is used by the Chef Server for dependency resolution, searching, and importing into run lists.
This is a required file for your cookbook to be uploaded into the Chef Server so it knows what recipes are being provided and what other cookbooks need to be installed in order for your cookbook to be fully operational.
A bare-minimum metadata.rb file in a cookbook for the open source Gearman daemon might look like the following code:
maintainer       "John Ewart"
maintainer_email "john@johnewart.net"
license          "Apache 2.0"
description      "Install the Gearman daemon"
long_description "The gearman daemon is a job-processing queue"
version          "0.1.0"
# Recipes contained, one per recipe method
recipe           "gearman", "Empty recipe, use one of the others"
recipe           "gearman::java_daemon", "Install the Java daemon"
# Platforms it supports
supports         "ubuntu"
# Cookbooks it depends on
depends          "java"
Because these are Ruby scripts you can also do anything Ruby-like inside of them, allowing for you to automate some of the portions of the metadata file. For example, you might choose to replace the long_description entry with something programmatic such as reading in the contents of your README.md file rather than duplicating all or some of the content:
long_description IO.read(File.join(File.dirname(__FILE__), 'README.md'))
Or, if your cookbook supports a handful of platforms, instead of writing out each platform that is supported on a line of its own, you could produce a list automatically using something similar to the following code snippet:
%W{ ubuntu debian freebsd }.each do |os|
  supports os
end
As long as your Ruby code produces something that is an acceptable argument or block for the configuration method, you can be as clever as you want (just don't be so clever that it doesn't make sense next week!)
Every node has attributes associated with it. Data from various locations are combined to produce the final hash of attributes, which is computed when a client requests its run list from the server. One of those locations is the cookbook itself, which provides a baseline set of attributes that the recipes inside rely on. Other sources, including the environment, role, and node itself may override these attributes. When writing your recipes these attributes are accessed through the node hash, and are computed for you by Chef ahead of time. The order of precedence used when computing this hash are the following (lowest to highest) levels:
default
normal (also set)
override
Within each level, the sources of attribute data, in order of increasing precedence, are as follows:
attributes file inside of a cookbook
environment
role
node
This means that a node-specific override attribute takes precedence over all others, which in turn is more important than the role, environment and cookbook override attributes, and so down the chain of precedence. As a result, you will see that any default attribute set by your cookbook will be the lowest priority, meaning that you can safely set some sane defaults in your cookbook knowing that they will be only used as a fallback.
Chef loads attributes files in alphabetical order, and cookbooks tend to contain only one attributes file named attributes/default.rb. If you have a cookbook that has more complex attributes definition files, it might be wise to separate them into recipe-specific attributes files. For example, the MySQL cookbook from the Opscode site has two attribute files: server.rb and client.rb, each of which contains anywhere between fifty and one hundred and fifty lines of Ruby code. Again, like most other configuration files in Chef, these are Ruby scripts and can range from simple attribute-setting statements to complex logic used to determine an appropriate set of default attributes.
For example, a simple default attributes file for HAProxy might look like the following code snippet:
default['haproxy']['incoming_port'] = "80"
default['haproxy']['member_port'] = "8080"
default['haproxy']['enable_admin'] = true
default['haproxy']['app_server_role'] = "webserver"
Notice that the attributes for a cookbook are name-spaced inside of a key, typically the same name as the cookbook (in this case haproxy). If you have multiple recipes inside a cookbook, you would likely have default configurations in every recipe. Consider a simplified MySQL default attributes file:
default['mysql']['client']['use_ssl'] = true
default['mysql']['server']['listen_port'] = "3306"
default['mysql']['server']['log_dir'] = "/var/log/mysql"
However, there are times when just a simple attributes file doesn't make sense, again being able to script these comes in handy. Consider a recipe where the default group for the root user depends on the platform you are using (wheel on BSD, admin on Ubuntu Linux, root anywhere else). We can use plain-old Ruby code, or an optional Chef-provided convenience method such as value_for_platform:
default[:users]['root'][:primary_group] = value_for_platform(
  "openbsd"   => { "default" => "wheel" },
  "freebsd"   => { "default" => "wheel" },
  "ubuntu"    => { "default" => "admin" },
  "default"   => "root"
)
Additionally, you can load attributes from another cookbook using the include_attribute method. Let's say, for example, you need to load the apache port attribute. You can just use node['apache']['port'] but it is not guaranteed that it has been over-ridden or that the recipe has been loaded yet. To address that, we can do the following to load the settings from attributes/default.rb inside our apache cookbook:
include_attribute "apache"
default['mywebapp']['port'] = node['apache']['port']
If you need to load an attributes file other than default.rb, say attributes/client.rb inside the mysql cookbook, you can specify it as follows:
include_attribute "mysql::client"
But make sure that you add cookbooks that you load defaults from as a dependency in your cookbook's metadata.
As you can see, depending on our needs, we can generate attributes for our recipes ranging from simple, straightforward static configuration defaults, to complex platform-dependent defaults.
Once you have defined your attributes, they are accessible in our recipes using the node hash. Chef will compute the attributes in the order discussed and produce one large hash, (also called a "mash" in Chef as it is a hash with indifferent access—string keys or symbol keys are treated as the same, so node[:key] is the same as node["key"]) which you have access to.
If our node had loaded our mysql and our root group defaults as specified earlier, and did not have any environment, role, or node-level overrides defined, the node hash would contain (among other things):
node = {
'mysql' => {
  'client' => {
           'use_ssl' => true,
         },
         'server' => {
           'listen_port' => "3306",
        'log_dir'     => "/var/log/mysql",
      }
   },
   'users' => {
     'root' => { 'primary_group' => 'wheel' },
   }
}
This can then be accessed anywhere in our recipe or templates through variables such as node[:mysql][:server][:listen_port],or node[:users][:root][:primary_group].
Often times, if you are installing a specific piece of software, or writing out any sort of customizable data file to the filesystem, you will need to generate a file with some data inside of it. To do this, you have some options; you could simply take the approach of programmatically writing the contents of your file line-by-line, just like the following code:
File.open(local_filename, 'w') do |f|
  f.write("<VirtualHost *:#{node['app]['port']}")
#...
  f.write("</VirtualHost>")
end
And, technically, this is a perfectly acceptable approach. But as far as maintainability is concerned (and readability), this is one of those things to avoid. The other choice would be to implement some sort of template language and store the configuration files as templates with placeholders built-in for dynamic data (since most configuration files are boilerplate, most of the file is just plain text).
Chef uses ERB, a template language that is provided by the core Ruby library (which makes it incredibly accessible). It would be possible to write your own template provided that used something else if you were so inclined, but it would likely be more effort than it was worth.
As ERB is a Ruby template language, it supports arbitrary Ruby code within it, as well as some ERB specific markup.
As ERB is very well documented and widely used, this section serves only as a quick reference to some of the most commonly used ERB mechanisms. For more information, see the official Ruby documentation at http://ruby-doc.org/stdlib-1.9.3/libdoc/erb/rdoc/ERB.html.
Executing Ruby: To execute some arbitrary Ruby code, you use the
<% %>container. The<%tag indicates the beginning of the Ruby code, and%>tag indicates the end of the block. The block can span multiple lines or just one single line. For example, the following code:<% [1,2,3].each do |index| puts index end %> <% users.collect{|u| u.full_name }%>You can mix Ruby and non-Ruby code (useful for repeating blocks of non-Ruby text) like such:
<% [1,2,3].each do |value| %>
Non-ruby text...
<% end %>
The preceding code would yield the following output:
Non-ruby text...
Non-ruby text...
Non-ruby text...
Variable replacement: ERB has syntax for replacing the block with the results of the block, and that container is similar to the last one, with the addition of the equal sign inside the opening tag. This looks like this,
<%= %>. Any valid Ruby code is acceptable inside this block, and the result of this code is put into the template in place of the block. For example, the following code:<%= @somevariable %> <%= hash[:key] + otherhash[:other_key] %> <%= array.join(", ") %>This can be combined with the preceding example to produce complex output:
<% [1,2,3].each do |value| %>
The value currently is <%= value %>
<% end %>
The preceding code would yield the following output:
The value currently is 1
The value currently is 2
The value currently is 3
Fortunately, Chef provides you with a template resource at your disposal. The template resource looks for a file in the templates directory contained inside of your cookbook that you specify. The template resource requires one argument, the name of the file on the filesystem to write to, and then a block containing the description of what's to go into that file and any other option such as owner, group, permissions, and so on.
For example, let's say you wanted to write out a file, /etc/apache2/ports.conf, which would contain a listing of all the ports that Apache is supposed to be listening on. That file is supposed to be owned by the same user Apache runs as, with the permission mask of 0600. The template resource description would look like the following code snippet:
template "/etc/apache2/ports.conf" do
  source "ports.conf.erb"
  owner "apache2"
  mode "0600"
end
In this example, we are defining a template, and indicating that Chef is to process the template file, ports.conf.erb, contained within the cookbook's template directory and write it out to /etc/apache2/ports.conf on the server when the recipe is run, then change the owner of the file to the apache2 user and then change the mode of the file to 0600.
A very simple ports.conf.erb file as outlined previously might look like this:
<% node['apache']['ports'].each do |port| %>
Listen <%= port %>
<% end %>
Now combine it with the following node attribute JSON data computed by Chef:
{
   'apache': {
        'ports': [80, 81, 82, 83]
    }
}
This will produce the following contents in the file /etc/apache2/ports.conf:
Listen 80
Listen 81
Listen 82
Listen 83
Templates automatically have access to the compiled attributes of the node they are being run on via the node hash. Additionally, you may pass variables into the template resource using the variables attribute inside the resource block. An example of this looks like the following code snippet:
template "/etc/apache2/errbits_vhost.conf" do
  source "app_vhost.conf.erb"
  mode "0600"
  variables(
    :application_name => "errbits",
    :params => params_hash
  )
end
This now becomes accessible in the template, as class variables with the same name as declared in the resource, prefixed by the @ character:
<VirtualHost <%= node[:ipaddr] %>:*>
    ServerName <%= @application_name %>.yourcorp.com
    DocumentRoot <%= @params[:document_root] %>
</VirtualHost>The templates directory has its own directory hierarchy inside of it, a mandatory one named default and then any platform-specific or host-specific directories alongside it. Chef has a specific order in which it will search the directories for a template:
Hostname
Distribution-version
Distribution
Default location
Most cookbooks strive to be reusable, but this is not always the case. If you have only internal cookbooks, or a modified version of a public cookbook, it would be perfectly acceptable to have host-specific templates.
As an example, let's consider a scenario in which we applied the recipe with the ports.conf.erb template resource to a node, db1.production.mycorp.com, which is running Debian 6.0. Chef would then look for the following files inside of templates:
host-db1.production.mycorp.com/ports.conf.erbdebian-6.0/ports.conf.erbdebian/ports.conf.erbdefault/ports.conf.erb
Again, the search is performed in that order, and the first match wins. If the file requested does not exist in any of those directories, then the template resource will fail.
This differentiation of configuration files by host, platform, and even version is very useful. Some cookbooks can be installed on a multitude of platforms and distributions, and those likely have platform-specific configuration settings. In this manner, common configuration data can be stored in the default directory while platform-specific or host- specific configurations can be kept organized and kept away from the common files.
Chef provides a fairly extensive set of resources that are available to you, among which some of them include:
Cron jobs
Deployments
Filesystem components (mount points, files and directories, and so on)
Source code repositories (git, svn)
Logs
PowerShell scripts (Windows targets)
Shell scripts
Templates
Packages
Users and groups
And, if you haven't noticed the trend by now, Chef allows you to easily define new resources if there isn't one available that matches what you need. We will learn how resources work and discuss a few of the more commonly used ones that Chef provides.
Resources are composed of a resource name (package name, file path, service name, and so on), an action, and some attributes that describe that resource. In the following list, there are three of the available resources—package, directory, and script; together these three resources can accomplish a lot.
Resources, when used in a recipe take the following form:
resource_name "name attribute" do
   attribute "value"
   attribute "value"
end
Where the block being passed to the resource is optional and contains zero or more attribute descriptions, resource_name is replaced with the resource you are describing, and the string value being provided to the resource is also known as the name attribute.
A concrete example might be installing the package tcpdump on your system. To install the default version with no customization, you could use a resource description such as, package "tcpdump".
However, if you wanted to be more verbose with your resource description and install a specific version of the tcpdump package, you could use the following code:
package "tcpdump" do
   action :install
   version "X.Y.Z"
end
In the preceding code, the block passed to the package resource defines some additional attributes; in this case the version, and the action (install, which is the default action for the package resource).
The following tables are for three resources available to you in Chef that we will be using in our examples. Each table lists the resource name at the top, followed by the list of actions (default is bold), and some of the attributes that you can apply to that resource (not a comprehensive list). The first attribute in the list is italicized and is the "name" attribute of the resource (in the case of package, it's the name of the package).
One of the most frequently used resources in recipes is the package resource, which provides us with the ability to install software via the local packaging system (apt, yum, and so on).
|
Package | ||
|---|---|---|
|
Actions |
install, upgrade, remove, purge | |
|
Attributes |
package_name |
The name of the package to install |
|
version |
Version of package to install | |
|
source |
Local file to install (as opposed to downloading via APT or yum) | |
Another useful resource is the directory resource. This resource allows us to manipulate directories on the local system (create or delete them). It is very useful for making sure certain directories exist, or cleaning up after a script runs.
|
Directory | ||
|---|---|---|
|
Actions |
create, delete | |
|
Attributes |
path |
Path to the directory to create/delete |
|
group |
Group to assign ownership (string or numeric ID) | |
|
user |
User account to assign ownership to (string or numeric ID) | |
|
mode |
Octal file mode | |
|
recursive |
Delete/create recursively (ownership applies only to the actual directory being created, not intermediate ones) | |
Being able to run arbitrary shell scripts makes Chef recipes very flexible. If a piece of software doesn't have a package for the system or needs to be compiled, or if you need to perform some complex initialization or configuration, the run resource provides you with that ability.
|
Script | ||
|---|---|---|
|
Actions |
run | |
|
Attributes |
command |
Name of the script that you are running |
|
code |
The actual (quoted) script to run. This can be a single-line or a multiline script using heredoc syntax | |
|
user |
Username to run the script as | |
|
interpreter |
The script interpreter to use | |
|
cwd |
Directory to change to before executing the script | |
At their core, recipes put together resources in a certain order to produce an outcome. These resources are either pre-defined by Chef for you, or are developed by you to provide custom functionality that suits your needs.
Putting it all together, we can build our own recipes that range from very simple single-step recipes to multi-step, multi-platform recipes.
Let's take a look at a simple recipe that leverages the script resource to perform the following steps:
Check to see if the script has successfully been executed before (no sense in re-building the same thing a second time).
Use bash as the interpreter.
Assume the role of the root user.
Change the working directory to
/tmp.Execute a bash script that will fetch a file, decompress it, and then build the source.
script "install_mrsid" do
  not_if {File.exists?('/opt/mrsid-7.0.0.2167/VERSION.txt')}
  interpreter "bash"
  user "root"
  cwd "/tmp"
  code <<-EOH
    wget http://dl.dropbox.com/u/282613/mrsid-7.0.tar
    tar xvf mrsid-7.0.tar -C /opt
    gdal-mrsid-build /opt/mrsid-7.0.0.2167
  EOH
end
Notice that here we use a multiline script (anything non-trivial will likely be multiple lines long) by using the <<- heredoc syntax. This allows us to write a multiline string without having to use quotes. The syntax <<-EOH tells Ruby to read until it sees the specified characters EOH (EOH has been chosen to represent "end of heredocs" but you can use any text you want as long as it doesn't show up in your script).
One thing we haven't seen yet is the use of the not_if qualifier. This is exactly what it looks like; if the block supplied to not_if returns a true value, then the resource is not processed. This is very useful for ensuring that you don't clobber important files or repeat expensive operations such as recompiling a software package.
Chef comes with a set of command-line tools that perform a variety of tasks. Among these the most often-used one is knife, which provides you with the ability to manage your infrastructure the same way as you would use the web interface.
Knife is the command-line interface for the Chef Server, and provides the same level of functionality as the web-based interface does. It allows you to interact with your Chef Server from anywhere that you have access to your shell, it also allows you to automate actions on Chef Servers using scripts (automating automation—what will we think of next?).
There are a dozen or so commands that knife knows about, each of which allows you to interact with a specific facet of the Chef Server or your servers. Depending on what you want to accomplish you will use a different knife command. The ones we will discuss in this book are as follows:
bootstrap: This command executes a bootstrap script on a servernode,role: These commands manipulate the node or role data, respectivelycookbook: This command provides tools for downloading, uploading, listing, and testing cookbooksdata bag: This command provides tools for uploading and managing the JSON data bags stored in the serverssh: This runs commands on any number of nodes or servers
The bootstrap command is the first one that you will run to bring up a new server and register it with your Chef Server. The bootstrap command has a number of options available, but the ones that are more commonly used are:
-d distribution_name: This is the distribution name (the name of the template to look for) such asubuntu-12.10-ruby19which would look forubuntu-12.10-ruby19.erbin the distribution directory-N node name: This is the name of the node to register with Chef (if not provided, the hostname of the node will be used as the default)-x username: This is the SSH username to use when connecting to the server--sudo: Thesudois used to bootstrap the server (as opposed to logging in as root)-i identity_file: This is the SSH key file to use for your identity (useful when bootstrapping EC2 instances)
The bootstrap command has one argument, the hostname or IP of the server to bootstrap. A typical bootstrap command would look something like the following:
knife bootstrap myserver.mycorp.com -x root -d debian-6.0-ruby19
Whereas bootstrapping an EC2 server (which requires you use an SSH key and typically does not allow root logins) might look like this instead:
knife bootstrap ec2hostname -i ~/.ssh/id_ec2 -d ubuntu12.10 --sudo
By using the bootstrap command, we can set up new servers with a single command, which could in turn be folded into a higher-level automation system that leverages knife to automate bringing up new servers.
All the data in Chef is stored as JSON. This makes it incredibly convenient to edit, view, and manipulate any information in the system using your favorite text editor. Knife will execute whatever editor is specified by the $EDITOR environment variable and load the data requested into it, writing data back to the Chef Server when the buffer is written out.
The knife tool easily manages nodes and roles; you can: list, edit, remove, show, and create them. In addition to creating them by hand, you can also import them from an existing JSON file (very handy if you are creating multiple roles and you have a template to start from).
You can easily edit most data stored in Chef, but let's say you wanted to edit an existing node, web01-production. You can simply issue the command knife node edit web01-production and it will fire up vim (or your selected editor) with the JSON data stored for that node, this shows you the editable per-node attributes and configuration, as follows:
{
  "name": "web01-production",
  "chef_environment": "_default",
  "normal": {
    "firewall": {
      "state": "[{\"SSH\"=>{\"protocol\"=>\"tcp\", \"dest_port\"=>\"22\"}}]"
    },
    "tags": [

    ]
  },
  "run_list": [
    "role[base_server]",
    "role[web_server]"
  ]
}
If you compare the preceding list of data to the attributes listed in the web interface the results will differ. The edit command does not, by default, edit automatic, default, or override attributes, in order to do this you must pass the -a or --all flag to the edit command, which will allow you to edit all of the attributes that are currently set on the node.
Once you save the file you are editing, the contents are uploaded to Chef and validated. Assuming that your JSON validates, the changes are applied to the data stored in Chef—they are not automatically pushed to the nodes, you will have to run chef-client on them (manually or using the knife ssh command) in order to update their state.
To create new records, the node and role commands have the create subcommand. For example, to create a new role called worker_node, you would use the following command:
knife role create worker_node
The preceding command will bring up your editor with the basic skeleton of a role represented using JSON:
{
  "name": "example_server",
  "description": "",
  "json_class": "Chef::Role",
  "default_attributes": {
  },
  "override_attributes": {
  },
  "chef_type": "role",
  "run_list": [

  ],
  "env_run_lists": {
  }
}
Here you can create a new role and assign it metadata including: default attributes, overrides, run list, and so on. Let's assume that you want this worker node to be able to use the Resque job processing system (which you have recipes for), you could then edit the run_list section to contain a list of recipes to run (remember: order matters). To accomplish this, your run_list might look like the following code:
"run_list": [
   "recipe[redis::server]",
   "recipe[ruby]",
   "recipe[corp::worker_scripts]"
 ],
Let's also assume that you want to install Ruby 1.9.3 and Redis 2.6.7 as a part of this role. Assuming that the recipes expected attributes are structured like this, your override_attributes might look like the following code snippet:
"override_attributes": {
   "ruby": {
       "version": "1.9.3"
   },
   "redis": {
       "server": { "version": "2.6.7" }
   }
],
Thus it allows you to update the run list at the same time as the attributes for the node. Compare this to the web interface, which would require visiting a few different screens to accomplish the same task. As you become more comfortable with knife, you may never even visit the web management console again.
Note
If you edit the data and the JSON fails to validate, you will likely lose your changes. As a result, it may be wiser to use from file in place of create. This allows you to edit the file ahead of time and upload it. An easy way to do this is to create a new node, and save the skeleton JSON somewhere locally and then edit that, uploading it once you have made your changes.
Knife is a very powerful tool, one that can make any system administrator seem like they have super powers. One such feature of knife is the ability to execute commands on multiple servers with only a single command. It accomplishes this by leveraging the built-in search infrastructure of Chef (you will recall that when we had set up the Chef Server, we made sure that the chef-solr component was running, here is where it comes in handy).
To perform a task across multiple servers, the ssh command takes a query, which is a search query that specifies one or more attributes and the values that you are looking for. These queries can be as simple as searching for nodes whose name is web00-production:
user@host% knife search node "name:web00-production"
1 items found

Node Name:   web00-production
Environment: _default
FQDN:        web00-production.mycorp.com
IP:          192.168.1.1
Run List:    role[web_server]
Roles:       web_server
Recipes:     users::shell_users, users::sysadmins, sudo, zsh
Platform:    ubuntu 12.04
You can use wildcard symbols "?" and "*" to match multiple records, such as the following:
knife search node "name:web??-production"
knife search node "name:*-production"
You can also search on any data field that Chef knows about, such as platform, roles, recipes, IP addresses, FQDN, environment, and so on. You can also use logical expressions combining search queries with AND and OR, and perform range searches using Solr-compatible search queries. Some more examples for completeness are as follows:
knife search node "platform:ubuntu"
knife search node "fqdn:*production*"
knife search node "recipes:apache2 OR recipes:nginx"
knife search node "recipes:gearman AND fqdn:*production*"
knife search firewall "id[mysql_server TO web_server]"
knife search user_databag "id{alex TO john}"
As you can see, we can search based on a variety of attributes using several different search techniques. Again, since Chef uses Solr-compatible search syntax, you can find a lot of good resources out there on more advanced search queries. Also note that you don't only have to search nodes (though the SSH command implicitly searches nodes); you can search any index—nodes, roles, environments, clients, and data bags.
Let's consider a scenario where we want to deploy an application to a large number of different servers in a batch, but we only want to deploy it to the servers that are located on the east coast, as denoted by their FQDN of servername.east.mycorp.com. Thanks to Chef, we can do that easily with a command like the following one:
knife ssh "fqdn:*.east.mycorp.com" "chef-client" -x app_user
This will run the command chef-client on each machine whose FQDN matches the wildcard expression "*.east.mycorp.com" and download and execute that node's run list from the Chef Server automatically. Again, using more advanced queries, we could restrict (or expand) the server list by using more specific query filter logic.
Once you have mastered this aspect of using knife, you can learn more about knife's support for executing multiple connections concurrently and even interact with terminal multiplexers such as screen and tmux.
Thus far, we have seen storing data about our configuration in the attributes of nodes, roles, and recipes. But what if we have information that is global to our infrastructure such as user accounts, internal firewall rules, or other information that could possibly be used in a variety of different recipes? This is where data bags come in, they are a place where we can store arbitrary data about our configuration that can be searched for, read from, and written to by recipes.
Data bags are recipe-independent and cookbook-independent, globally available JSON data. They can be searched, accessed, modified, and created from recipes or via knife. Think of them as a place to store your infrastructure configuration. Examples of data that would be placed into data bags might include the following:
User accounts
SSH keys/deployment keys
Firewall rules
Internal/external IP addresses
Site-wide configuration data
API keys for various services
Configuration settings for servers/services
Anything else you can think of that you need to access from multiple nodes, recipes, roles, or knife
Data bags allow us to write recipes that are more generic in nature. Instead of writing a firewall recipe that loads a rigid set of rules, or requires that you place your settings inside of nodes and roles as override or default attributes, you could build a set of firewall rules inside a data bag for just this purpose. This way your infrastructure-wide firewall configurations are contained in one location and in a hierarchical, structured manner.
Data bags are containers, and inside each data bag are zero or more items each of which has name and some arbitrary JSON data. As such there are no enforcements on how you structure your item's data, so long as it is can be represented using JSON.
To take the example of centralized firewall data a little further, we can look at the way the ufw::databag recipe (ufw stands for "uncomplicated firewall", a popular iptables-based firewall rule generation package) makes use of data bags to make the recipe as flexible as possible.
ufw::databag expects that there is a data bag named "firewall" and inside of it are items that share names with two roles or nodes. For example, if we had two roles, web_server, and database_server, then our firewall data bag could contain two items named accordingly, each looking something like the following code:
{
  "name": "data_bag_item_firewall_web_server",
  "json_class": "Chef::DataBagItem",
  "chef_type": "data_bag_item",
  "data_bag": "firewall",
  "raw_data": {
    "rules": [
      {
        "HTTP": {
          "dest_port": "80",
          "protocol": "tcp"
        },
        "HTTPS": {
          "dest_port": "443",
          "protocol": "tcp"
        }
      }
    ],
    "id": "web_server"
  }
}
In the previous example the id of the item maps to the name of the role, so that the ufw::databag recipe knows where to fetch the data it needs to build its internal firewall rules.
Data bags can be accessed directly from a recipe using a few of Chef's built-in data bag methods. There are two primary methods for fetching data from data bags: data_bag and data_bag_item. The former fetches the list of items stored in the data bag itself, the latter fetches a specific item from the data bag. Note that each of these makes an HTTP request to the Chef API at run-time so try to be conservative with how often you make these calls.
Let's say that you have a collection of web applications that you maintain in your infrastructure. Each of which has a name, a port that it listens on, and some database configuration settings. These items are stored in a data bag named "webapps."
Fetching the list of items from our "webapps" data bag would look like this:
data_bag("webapps") which could yield a list of items, such as errbit, phpmysql, wordpress.
To fetch a specific one, say Wordpress, we would use the data_bag_item method which takes two arguments: the name of the data bag, and the item to fetch. The call would look like:
data_bag_item("webapps", "wordpress")It might, in turn, yield a Ruby hash like this:
{ "id" => "wordpress",
 "db_config" =>
{ "server": "db00", "user": "dbuser", "password": "dbpassword" },
 "port" => 8000,
 "enabled" => true
}
We can then use this data in the same way we would use any other variable in our recipe. It can be passed into a template, picked apart, and used in any other resource, or used as a conditional test or in a loop.
Using our previous example of some web applications, we could possibly have a recipe, called mycorp::webapplications that is responsible for deploying our web applications to their respective servers. The contents of which might look like the following code:
webapps = data_bag("webapps")
webapps.each do |webapp_name|
  webapp = data_bag_item("webapps", webappname)

  template "/etc/apache2/sites-available/#{webapp_name}.conf" do
   source "webapp.conf.erb"
   owner "apache2"
   mode "0600"
   variables (:webapp => webapp)
  end

  if webapp[:enabled]
   execute "a2ensite #{webapp_name}" do
     command "/usr/sbin/a2ensite #{webapp_name}"
     notifies :restart, resources(:service => "apache2")
   end
  end
end
As you can see from the preceding recipe, it accesses the "webapps" data bag and, for every item in there, generates an Apache virtual host file using the webapp.conf.erb template. It passes the data bag item to the template and then, if the webapp in question is enabled, enables the site and notifies the Apache2 service of an impending restart being required.
Anywhere that we would use the data_bag method to get a list of all items, we can replace that with a search instead. This allows us to use the search service to filter which items we get back rather than scanning them ourselves. This is advantageous for several reasons:
Solr is designed for searching, so let it do what it's good at.
Solr has a very flexible search criteria, it will save you time to write a query rather than inspect the contents of the nodes.
Each time you fetch an item, you incur the overhead of making an HTTP request to the API. This may not matter for a few items, but if you have hundreds or thousands of items, it adds up.
The method for searching data bags is called search and it takes two arguments: the name of the data bag, and the query to execute. In fact, the method call data_bag('webapps') is synonymous with the call search('webapps', '*:*')—the results are exactly the same, and could be used interchangeably.
In our previous example, if we wanted only the web apps that were enabled, we could modify the recipe to begin with the following:
webapps = search("webapps", "enabled:true")
This would result in the set of web app items that have their key enabled set to true.
As you can see, Chef has the ability to combine complex system resource management such as file templates, services, user accounts, packages, and more, with an incredibly feature-rich language for building recipes as well as first-class tools for interacting with your data. By learning to write recipes for tasks, we can automate setup and deployment of servers and make our infrastructure more cohesive and better organized.
There is a plethora of online resources regarding working with Chef; here are some key sources to get you started.
These are resources that are made available by Opscode and focus specifically on Chef itself.
Opscode maintains a wiki that serves as an official resource for documentation; as new features are released you can find current information here: http://wiki.opscode.com/display/chef/Home
You can download the source code of Chef from GitHub at https://github.com/opscode/chef.
The community portal available at http://community.opscode.com/ is a good starting point for finding community-provided resources, events, and updates.
If you want information on events, workshops, conferences, upcoming releases, or other news regarding Chef, the Opscode blog available at http://www.opscode.com/blog/ is a good place to look.
The official Chef mailing list is active and contains lots of good information and resources for getting questions answered. You can view the archives or sign-up for the list here:
There are many resources on the Internet for pre-existing cookbooks that you can download to use or modify for your own use. Two of the best resources are operated by Opscode themselves.
The community cookbooks site at http://community.opscode.com/cookbooks has an excellent collection of cookbooks provided by Opscode. This site provides a tool for browsing and searching the cookbooks and their metadata.
Opscode also makes a wide collection of cookbooks available through their GitHub account at https://github.com/opscode-cookbooks.
Vagrant is a great way to bring up virtual machines for testing and working with Chef recipes. There are even projects which are specifically designed to bring the two together.
This is designed to provide a simple way to spin up virtual machines programmatically. Vagrant makes it possible to easily start up virtual machines with which to test recipes locally in a clean environment, and can be found at http://vagrantup.com/.
This helps facilitate cleaning up after clients so that they don't pollute your Chef Server. You can find the source for this projects at https://github.com/cassianoleal/vagrant-butcher.
As Chef, and recipes, providers, resources, and other components are all written using Ruby, you may find that you need to learn a little more about Ruby, here are some excellent resources for that.
This quick-start guide provides a great way to get started with Ruby. More information is available at http://www.ruby-lang.org/en/documentation/quickstart/.
The authoritative source for Ruby documentation can be found at:
Code Academy has a great selection of Ruby lessons targeting a range of developers from beginner to advanced user. You can learn more on their website at http://www.codecademy.com/tracks/ruby.