


Welcome to Instant AutoIt Scripting. In this book, you will be surprised to see how easy and funny coding could be. You can automate your digital life from the inner side bolts of your PC. AutoIt v3, which is small and self-contained, is a freeware BASIC-like scripting language, and enhances features found in Visual Basic, VBScript, SendKeys, and others.
You can learn to automate tasks, which would otherwise require to be executed one-by-one by a user. You can automate software applications, web pages within a web browser, the shells of operating systems (OS), and each day's repetitive tasks using tiny, compiled, and standalone programs (1 MB), which do not need installers. You can also run interpreted source code files directly. You can read more about AutoIt on Wikipedia at the following link: http://en.wikipedia.org/wiki/AutoIt.
Let us get AutoIt installed, and look at some related scripting tools. AutoIt programs are called scripts. The source files for AutoIt have a .au3 extension.
We need to have the following before we get started:
A computer with Windows XP or higher
Any kind of Internet connection to download free applications (or downloaded offline files. Only less than 14 Mb zipped files)
Perform the following steps for installing AutoIt:
Visit the following site:
Click on Download AutoIt. Run the installer and keep on clicking the Next buttons. You may choose Edit (recommended) or Run for default running or editing associated source files (
.au3).You get a new Program Group for AutoIt files installed in
C:\Program Files\AutoIT3.Click on Download Editor. Then click on
SciTE4AutoIt3.exe. Run the installer and keep on clicking on the Next buttons in the installer dialog. It is a 2-minute straightforward clean installation process.Tip
Choose the same version (64 bit or 32 bit) of AutoIt to match your Windows system. If you want, you can work in a 32-bit AutoIt portable environment with different Microsoft Windows versions (32 bit or 64 bit), no problem. You can even take a backup of AutoIt from the application directory to any storage or Dropbox, and re-use it somewhere else. (Associated file extensions and registry values will not work).
If asked about Edit or Run, I recommend Edit to be associated with the
.au3extension on double-clicking source files.You have to install an upgrade to AutoIt SciTE editor as well as extra tools for AutoIt for a full version editor. Files get installed in
C:\Program Files\AutoIT3\SciTE.
Using Scite Editor you can now edit and create scripts, run them by using the F5 key, or you can even compile it using the F7 key for later use on the same or a different computer. You can use the following SciTE keyboard shortcuts:
F1: Help
F5: Run (will run
Au3CheckandAutoIt3)Ctrl + F5: Run
Au3CheckF7: Compile (will run
AU3Check, and thenAut2Exe)
The Tools menu is a list of useful extra apps such as Tidy to clean your code, Koda to create forms (GUIs), and AU3Recorder/AutoItMacroGenerator to record macros.
Alternatively, you can also use the following link to learn how to download and install AutoIt:
http://www.youtube.com/watch?v=X2Nc1e1elio
AutoIt has been designed to work on Microsoft Windows 2000/XP/2003, Microsoft Windows Vista, Microsoft Windows Server 2008/2008 R2, and Microsoft Windows 7/8, with no runtime libraries required! AutoIt executables and setup programs have been digitally signed by AutoIt Consulting Ltd.
There is a great software community and several friendly forums with support for most languages such as English, German, French, Spanish, Russian, Portuguese, Italian, and so on
You can also refer to the AutoIt documentation online for more help at http://www.autoitscript.com/autoit3/docs/. It gives the same result as pressing F1 in SciTE editor.
You can refer to the freeware license at http://www.autoitscript.com/autoit3/docs/license.htm.
The following line has been taken from the preceding link provided by the AutoIt author, Jonathan Bennett and the AutoIt team:
Commercial Use. You may use the software product for commercial purposes. You may sell for profit and freely distribute scripts and/or compiled scripts that were created with the software product.
You can also refer to the following link:
Create your first program (script) or function. Note that most functions belong to the functions' family for easier coding as Winxxx (Windows-related functions), Filexxx (file management related), and Inixxx (INI files related).
Perform the following steps to compile and run your script:
Write any function or command as:
Msgbox(0,'Title','Hello')
Press F5 to run.
Press F7 to get an executable (
.exe) file.Double-click or select Msgbox, and then press F1 for function help.
If you type ( after Msgbox, you will get an IntelliSense help tooltip for the active command/function.
I recommend you use and copy the samples of the provided help file (.chm) as templates.
The keyboard keys used for compiling and running can be explained as follows:
F5: You get the output/input of this working app, for example, a message box
F7: You get a
yourapp.exefile that you can run standalone anywhere
You can copy this file to other computers where you have no Autolt. Libraries are included inside the executable, which will use Windows' default libraries. If you want to share your source code, you may use the fileinstall() function and include the AU3 source file inside your executable so that you only distribute one app. Also, you may distribute using a ZIP (or SXF compressed) file as usual exe, source, and others, and decompress it into a portable application folder; you may also create shortcuts and icons when running it for the first time.
From here you can write commands/functions and use script flow control:
If...ThenFor...NextWhile...WEnd
Conditional statements available in AutoIt can be found at http://www.autoitscript.com/autoit3/docs/intro/lang_conditional.htm.
You will learn how to get most AutoIt Windows scripts running in the Linux environment. They run inside their own Windows sandbox, so you can interact with controls and apps running from this live sandbox. You cannot directly interact with external Linux programs in the same way you do in Windows, but you can do it with any Windows-Linux compatible application.
Download and install Zorin OS Linux Distro from http://zorin-os.com/ as it gets the preinstalled Wine libraries for Windows apps. It will keep your previous Windows system intact and it creates a multiboot loader (an operating system menu at boot time).
Follow Zorin OS Linux's standard installation procedure:
Download the Zorin OS core, which is the standard desktop version of Zorin OS's free version packaged in the ISO file format from http://zorin-os.com/free.html.
Before you install, you need to get installation files copied to a DVD or USB:
To burn the ISO files to a blank DVD, you need a burning program. You can use ImgBurn (http://www.imgburn.com/), which is a free program.
You can burn the ISO file to a USB stick by using UnetBootin, which is a live bootable USB creator (http://unetbootin.sourceforge.net/), by selecting the previously downloaded Zorin OS ISO file in step 1.
Once you have installed Zorin OS, you can install an AutoIt environment (see the Installing AutoIt and extras (Simple) recipe for more information), or you can copy any previously compiled standalone AutoIt executable into any folder and run it.
Note that not all commands and functions are supported. If you have a different OS and a different background, Wine keeps the same Windows libraries, but you may have to modify some programming strategies.
Install some apps for Microsoft Windows in Zorin OS to create Windows interaction with AutoIt scripts, for example, Mozilla Firefox, Open Office, MS Office, and so on. For more information about Wine, visit the Wine website at http://appdb.winehq.org/.
AutoIt runs under Linux but in a Windows environment created by Wine. It works as it would in any typical Windows system.
If you ask within Autolt what OS is running, you get Windows XP OS.
Use the following AutoIt environment variables:
@OSVesion@OsType@OsSErvicePack
You'll get, for example, WIN_XP, WIN32_NT, and Service Pack 3 as the result, specifying the version, type, and service pack of the OS under which it is running.
You can control and force external Windows apps behavior, and also tweak, modify, and personalize other programs' user interface.
We will start off by installing any program whose user interface we want to control or modify, for example, Notepad. Open SciTE from the AutoIt Program Group, and select Tools | AU3Info (see the Getting information from Windows app's AU3Info (Simple) recipe for more information). Use Notepad to get familiar with the AU3Info tool. You can also read the ControlCommand syntax help page from the AutoIt website at http://www.autoitscript.com/autoit3/docs/functions/ControlCommand.htm.
Copy and paste the sample code to SciTE Editor to manage Notepad controls.
The following list shows the Notepad controls and their purpose:
MsgBox(0,"ControlCommand test","Change text 1"): Shows a message.ControlCommand ( "notepad", "", 15, "EditPaste", 'this will be pasted on Notepad'): It adds text into Notepad in the Edit mode. It notes the "notepad" window's title and the control number to modify.MsgBox(0,"ControlCommand test","Change text 2"): Shows a message.ControlSetText ("notepad","", 15, "my new text in notepad"): It replaces the previous Notepad's text.
Follow these hints to create the new control command's code:
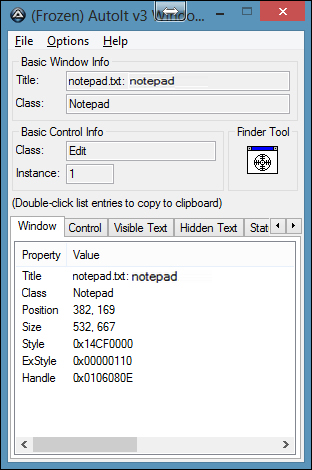
Collect every window's control information to which you want to apply behavior control; the AU3Info finder tool shows control IDs and accurate information about them. You get details of everything that is inside windows, including free or hidden text, so that you can capture or identify any window, or control for later programming.
You need to collect the following details of every target window/control:
Title and text: This identifies a Target Active Program window. Usually, you only need a few letters of the window caption/title as you will not have many windows with the same name characters. Text is optional in case you have to repeat titles in some windows.
ControlID: This identifies the Target Control Number inside the selected window. The following screenshot shows different tabs on the window:
Run any command on the selected target as follows:
ControlCommand ( "My Title", "", controlID, "command" [, "option"]):For example, we can use the
commandparameter for ControlCommand function behavior:The following list shows the control commands of
"command" [, "option Parameter"]type:"Check", "": Checks the radio or check button of external Windows applications"UnCheck", "": Unchecks the radio or check button"GetSelected", "": Returns the selected text of an edit"EditPaste", 'string': Pastes thestringobject at the edit's caret position"TabRight", "": Moves the control to the next tab to the right of a SysTabControl32
See the related Controlxxx function's syntax and other useful functions to tweak the external apps' behavior and interface (see the Help page for
ControlCommandfor more Controlxxx-related functions):ControlClick ( "title", "text", controlID): This is a click-operation command to a given control (for example, a button or a checkbox)ControlSetText ( "title", "text", controlID, "new text"): Sets text for a control (for example, a label or text control)ControlGetText ( "title", "text", controlID ): Retrieves text from a controlControlEnable/ControlDisable/ControlHide/ControlShow ( "title", "text", controlID ): Enables/disables or hides/shows/grays out a controlControlMove ( "title", "text", controlID, x, y [, width [, height]] ): Moves a control within a window
See Winxxx-related functions. For example:
WinSetState ( "title", "text", flag ): Shows, hides, minimizes, maximizes, or restores a windowWinSetTitle ( "title", "text", "newtitle" ): Changes the title of the window
These commands help us get into the depth of a target application and "parasites" inside the target application's user interface, so that you can enslave and reprogram it. Your AutoIt script modifies the outside of many legacy apps without touching their source code, thereby creating a personalized new version.
You can create and add missing features or automation; for example, for a security process, you may hide/disable some controls that should not be used by unauthorized users, and so on. You can reprogram the interface and create your own skin or personalized app.
You get some great extra utilities from AutoIt IDE (SciTE) for more powerful and easier programming.
Open the Tools menu and click on every main menu tool. Each tool has various functions as listed in the following list:
Compile: Compiles the source code into an executable standalone target EXE file. Select Target x86 for 32 bits or Target 64 for 64 bits. Add a favorite script icon and an obfuscator to protect and make it difficult to read your source code, thereby preventing hacking when you create a non open source software.
SyntaxCheck Prod: Checks for proper syntax.
AU3Info: This tool provides information of external Windows apps to identify windows/controls. Click on the finder tool and drag-and-drop on the target window/control. See the output (the Getting information from Windows app's AU3Info (Simple) recipe).
AU3Recorder: This tool generates the macro of the user interaction. Click on Record and Save Code (the Recording a macro and generating code recipe).
AutoitMacroGenerator: This is another user interaction macro generator. Click on Record and Save Code (the Recording a macro and generating code recipe).
Tidy AutoIt Source: It keeps your script or source code clean, tabbed, nice, and organized.
CodeWizard: It generates code for
Msgboxand other similar functions.Koda (FormDesigner): It is a form (GUI) designer similar to Visual Basic Form Creator.
The Tools menu is a wrapper for many external utilities installed in the same AutoIt group folder. You can run them standalone. Executables are located at C:\Program Files\AutoIt3.
You can download more programming tools for free from AutoIt forums, which are not in the default install. You may also use other editors, such as Notepad++, AutoIt Form Builder (http://www.autoitscript.com/forum/topic/146283-gui-builder-beta/), ISN studio (http://isnetwork.isi-webportal.at), and many more extra tools as open source apps created by AutoIt programmers.
You have to create two easy Hello World scripts: one that is easy and another one that is more complex (using flow control).
You can either write, or copy and paste the following two source code snippets into SciTE editor:
The following is a simple example using a Windows messagebox:
Msgbox(0,"Choose","Hello World or exit")
Press F5 to run the script.
The following is a complex Hello World program using flow control:
; add a line comment by;
; Parameters explained: 4 works for msgbox user interface: ;Yes and No
 ; 6 Return Value works for Yes.
If Msgbox(4,"Choose","Hello World or exit") = 6 Then ; You pressed Yes 6
Msgbox(0,"Title Hello World","Sample Hello World")
Else ; you pressed No or something else
MsgBox(0,"Hello World Exit","Thanks for using Autoit"&@CRLF&" your name ")
EndIf
Press F5 to run the script.
Here, we have used the If...Else...EndIf flow control.
Msgbox() will give you the user interface to choose your program flow. It is a good example of how to use AutoIt as you get feedback by using this function (a box with a message), and you can get this feedback in seconds in the interpreted mode (by pressing F5). You can see the app working as you change text strings in the parameters of the Msgbox() function. I have also included a Msgbox() fork to introduce you to the loop or the If...Then command's world, so that you can interact with different environments and variables easily This gives some intelligence to your apps by modifying the If...Then clauses.
You can read more about conditional statements (If...Then...Else) at http://www.autoitscript.com/autoit3/docs/intro/lang_conditional.htm.
For help on Msgbox function parameters, visit the following link:
http://www.autoitscript.com/autoit3/docs/functions/MsgBox.htm
You can create any interactive form by writing code and functions, or by setting some controls over an empty form layer design.
Open SciTE from the AutoIt Program Group and start writing the source code. Alternatively, select Tools | Koda (FormDesigner) for a Visual Designer.
The following are the steps for creating a user interface and its related AutoIt code:
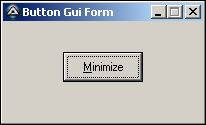
Use Koda IDE to create Form1. Select controls to create a form layout.

Koda will generate the following source code. You may modify or write extra source code in the SciTE code editor as shown in the following code:
#include <GUIConstantsEx.au3>
; Create form:
GUICreate("Button Gui Form", 200, 100)
; Create Button:
$btnMini = GUICtrlCreateButton("&Minimize", 60,30, 80,30)
GUISetState(@SW_SHOW)
; You get a loop waiting for button pressed or close.
While 1
Switch GUIGetMsg() ; Select Switch. GUIGetMsg() reads Gui Events. e.g. pushing a button.
Case $btnMini ; pressing button
 GUISetState(@SW_MINIMIZE)
Case $GUI_EVENT_CLOSE ; closing form and Exit
ExitLoop
EndSwitch
WEnd
Tip
Downloading the example code
You can download the example code files for all Packt books you have purchased from your account at http://www.packtpub.com. If you purchased this book elsewhere, you can visit http://www.packtpub.com/support and register to have the files e-mailed directly to you.
GUIGetMsg() is waiting for some changes to be made in the AutoIt GUI as you get a button pressed, checkbox checked, and so on. Then, you can intercept the value of the control ID that just changed, and depending on this value, go on with the application flow, processing data, user feedback, creating new dialog boxes, or you can exit.
GUISetState forces the GUI form's window state into a new state. It changes how the complete user interface will be seen as one window. It is a GUI function that is similar to other Window xxx functions, which manages this window for other external windows belonging to non-AutoIt programs, for example, maximize, hide, show, lock, disable, and so on.
You create your form and controls as you would in any other development environments. Then, you have a While...WEnd endless loop waiting for user interaction.
You can generate the same form code by navigating to SciTE | Tools | Koda (FormDesigner), or from other design tools such as the AutoIt Form Builder or ISN studio (see the SciTE editor main tools (Simple) recipe).
You can throw any desired bar control over the empty design form in a similar way as you would in most programming environments' IDE such as Visual Basic, .NET, Delphi, and others.
You can press F9 to generate your form's source code, and you can copy and paste this code somewhere else.
AutoIt v3 comes with a standalone tool called the AutoIt Window Info Tool (Program Files | AutoIt3 | Au3Info.exe). AU3Info allows you to get information from a specified window or control that can be used to effectively automate it, including color codes and a lot of other current information.
Open the Tools menu and click on AU3Info, and follow these steps:
Click on Finder Tool.

Drag-and-drop Finder Tool over any window or program you want information from.
Copy text data directly from the AU3Info data using CTRL + C, and then paste it into your script; for example, you can copy the title.
Information that can be obtained includes:
The window's title: It is the name on top of every window.
Text on the window (visible and hidden): It is the text inside the previously selected window.
Window size and position: It has details about the window's height and width (x, y coordinates).
Contents of the status bar: It shows the status bar's text or message.
Position of the mouse pointer: It shows the details of the mouse coordinates (x, y).
Color of the pixels underneath the mouse pointer: It shows the hex color codes below the mouse pointer.
Details of the control underneath the mouse pointer (for example, button, checkbox, and edit): It has information about the control ID underneath the mouse, that is, the control number you will use for later control management.
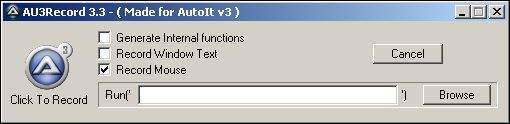
The AU3Record app is used to capture user interaction, which is to be converted to a script source code for later use (run, compile, or replay), and is also useful for repetitive actions, or for helping low-profile users to achieve complex tasks.
You can use the AU3Recorder menu to launch the macro recorder's main screen. Also, you can start AU3Record by using the Alt + F6 keys, and perform the following steps:
Click on Click to Record.
Interact with any program, for example, Notepad.
Click on Click to Stop.
Get your source code.
In this recipe, you automated repetitive tasks and increased productivity by using several macro-recording software programs. AU3Record can follow your movements on the fly as you perform a computer task (easy or complex) and save this task to the source code.
You may replay the saved task code any time again, or distribute any executable file.
There is a similar recorder called AutoItMacroRecorder, which can be found by navigating to Menu | Tools. Use this if you do not get the desired results from AU3Record.
Some windows or controls may be difficult to be captured from these recorders, so you may have to code part of the program tasks, or you may even have to modify generated source code to change features or to give user feedback.
A batch process is a series of commands or executable processes from the command-line CMD (DOS shell) and is typically stored in a .bat extension plain text file (there are more extensions and more shell script languages that may be logically imported). This is widely used by Windows system administrators because it allows the automation of many maintenance tasks, such as performing backups, searching for files, renaming multiple files in bulk, user management and permissions, user feedback, and so on.
Using AutoIt, you can extend or replace these BAT files, improving them in many ways, and add unexpected new features, for example, getting a graphical mode with a nice user interface (GUI) for a .bat file or a corporate identity. You can run uncompiled .au3 files (same as batch files), so it is a nice and extended replacement for the previous .bat approach, improving the experience and adding friendly graphical interfaces. Later, you can convert (compile) these source code text files into executables.
Open SciTE from the AutoIt Program Group and start writing code.
Open your batch file in Notepad or your favorite text processor to copy and paste the following codes into SciTE.
We have to translate the DOS CMD sources into AutoIt code:
The following lines show the DOS batch source code script (see the How it works section for details on this):
echo off
cls
cd c: \
:checkdir
if "backup" == "" goto createdir
copy c: \ data \ *. * c: \ backup \ / s
echo "Successful Backup "
pause
goto end
: createdir
md c: \ backup
goto: checkdir
: End
Now, we will translate the previous CMD batch logic to an AutoIt script:
; "folder does not exist" If/then flow control check.
If Not FileExists ("C:\BACKUP") Then
RunWait (@COMSPEC & "MD C:\BACKUP")
; "backup" folder created. Autoit native function: DirCreate("path").
EndIf
RunWait (@COMSPEC & "COPY C:\DATA\*.* C:\BACKUP\ / s") ; Run wait till copy ends
; you may also use Autoit native function: Filecopy("source","dest")
MsgBox (0, "Process finished", "Copy Successful")
You can improve this script in many ways, for example, by checking the integrity of copied files, by asking users if they want files to be overwritten, and so on.
A batch template and examples create a Backup folder. It will copy the source folder's data files, thereby overwriting files in the destination backup folder called Backup.
The easiest way to convert a BAT file to AutoIt is by using the RunWait() function. It executes the command parameter and continues with the next script instruction, waiting until it has completed the previous process. You may also use Run() (it does not wait for the application to terminate), so that you can create asynchronous tasks.
The @COMSPEC parameter tells AutoIt where the right location of the operating system's DOS shell is.
You may also replace DOS commands with AutoIt's native functions or external apps in the batch command mode.
As noted in the Recording a macro and generating code (Simple) recipe, AutoIt allows you to perform a series of actions and also to record them. Now, we use this for automating repetitive application setups, for example, an antivirus installation or corporate custom applications.
You can refer to the Recording a macro and generating code (Simple) recipe. It is based on macro recording, but you may also tweak it manually to improve it.
Open SciTE and navigate to Tools | AU3Recorder.
We will now see how to generate a macro program script:
In AU3Record menu, select Browse and choose your installer's executable.
Click on Click to record and perform a custom series of actions for this install process till the end, and save the source code.
Run (replay) the source code to check if all worked fine. You will have to uninstall the previously installed application, as they may behave differently on a second install (in case the target application has not been completely removed).
It starts the installer and records your interactions. It saves all pushed buttons and keyboard interactions.
You can go to the next step of the install process in many different ways, either by clicking on the Next button or by pressing the Alt + N shortcut for the same button press action command send().
You can also create some forks depending on the host OS using if @OsVersion ="xxxx" then. Or, you can create your own forks depending on user interactions.
Many application installers support CMD or the batch silent option, or quick install options, for example, the /silent option. Usually, you can see more options using the CMD prompt, for example, myinstaller.exe /? /h /help.
Use help files and search for any batch or CMD command prompt chapter for more information, for example, myinstaller.exe /silent /option1 /option2 /option3.
After testing that it works well, copy and paste it into the run() function, for example, run("myinstaller.exe /silent /option1 /option2 /option3").
Paths may not work properly if some characters or spaces are missing. So, check the previously existing short or long working path.
Universal Silent Switch Finder is a small and easy-to-use application that will find and activate the silent installer command on various applications.
Note that this may not work for all applications as some applications cannot be installed silently. You can download Universal Silent Switch Finder using the following link:
http://www.softpedia.com/get/System/Launchers-Shutdown-Tools/Universal-Silent-Switch-Finder.shtml
This application has a simple interface that will easily guide you through the entire process.
Now, you will learn the use of regular expressions in AutoIt. You get string filters to collect or store filtered data from long text strings as Internet pages, documents, or databases.
Open SciTE from the AutoIt Program Group and start writing source code.
You have to learn about Regular Expression Syntax. It is a very common subject in other programming languages, such as PHP, Python, and others. See more at SciTE Function Help: String Reg Exp Syntax (http://www.autoitscript.com/autoit3/docs/functions/StringRegExp.htm).
The general RegExp function syntax is:
StringRegExp ("test", "pattern" [, flag [, offset]])
You can either write, or copy and paste to SciTE editor the following codes:
The following code is used for searching string occurrences inside another string:
;Example 1 (Basic) Search String Occurrences inside another string.
$target = "Cat is lying on the floor."
$myString = "o"
$ResultsArray = StringRegExp ($target, $myString, 3)
Msgbox (0, "Count", "String" & $myString & "': " & Ubound ($ResultsArray) & " Occurrences inside " & $target & "' target String.")
The following code is used for searching URLs:
;Example 2 (Advanced) Search urls
; $st2 Target String with some Urls
; _ join several lines together
$st2='<a href="http://www.google.com">' & _
'<a href="http://www.link1.com"> http://www.link2.com ' & _
'link http://www.link3.com'
$pattern1="(?si)(?:.*?)?(https?:\/\/[\w.:]+\/?(?:[\w\/?&=.~;\-+!*_#%])*)"
$array = StringRegExp($st2,$pattern1,3)
;we get an array with Results
$links=""
for $a=0 to Ubound($array)-1
$links=$links & $array[$a] & @CRLF
Next
; Links Result String.
Msgbox(0,"Links","Results: " & @CRLF & $links )
Press F5 to run the script.
In the first example code, we defined a text string to be searched for, $target, and a pattern called $mystring.
StringRegExp function's parameter 3 will get an array back, that is, $ResultsArray.
The Msgbox function displays a number of occurrences for this pattern inside the target string, and Ubound ($ResultsArray) returns the size of the results array.
In the second example code, we defined a text string to be searched for called $st2, and a pattern called $pattern1.
StringRegExp function's parameter 3 will return an array, that is, $array.
The For...Next function loops through all values inside the results array, and it creates a new result string: Results found.
The Msgbox function displays the number of occurrences of this pattern inside the search string obtained from Ubound ($array).
We'll now manage MySQL databases and queries within AutoIt.
Let's start by downloading the ProgAndy MySQL Library (http://progandy.de/downloads/summary/3-autoit-udfs) files, and copying them into our script directory. Then, get your MySQL information such as host, database, user, and password. You can create a new database using XAMPP.
You can also download a portable MySQL database from XAMPP. Select any version ofXAMPP Portable Lite by visiting http://www.apachefriends.org/en/xampp-windows.html#646.
If you installed XAMPP on your own PC, you can check a host for MySQL at http://127.0.0.1/. Or you can reach from your local network (LAN) based on your host IP address, for example, 192.168.0.5, or Internet (WAN), for example, www.mysqlhost.com, or public server IP address, for example, 135.34.2.20.
Open and modify the test.au3 source code file from ProgAndy MySQL Libraries. Feel free to use it as a template, rename, or change it for your own projects. You do not need to modify other files. Keep all files (including .dll files) in the same folder. You may also copy using fileinstall(). Changes that need to be made to test.au3 including:
Update this connection data command with your own database information:
"localhostdfdf","droot","","cdcol" ===>
"your_host","your_user","your_password","Your_database"
$connected = _MySQL_Real_Connect($MysqlConn,"localhostdfdf","droot","","cdcol")
Update your query command string for your own MySQL query (See Mysql Syntax):
$query = "SELECT * FROM cds"
$mysql_bool = _MySQL_Real_Query($MysqlConn, $query)

Manage query results accordingly, displaying data in your application. Some of the examples are as follows:
$res = _MySQL_Store_Result($MysqlConn): Get$respointer to active results.$fields = _MySQL_Num_Fields($res): Number of fields.$rows = _MySQL_Num_Rows($res): Number of rows.
Manage rows of data using any alternate access method (see
test.au3):Access method 2 – Read data row by row (Recommended):
; Access 2
_MySQL_Data_Seek($res, 0);just reset the pointer to the beginning of the result set
Do
$row1 = _MySQL_Fetch_Row_StringArray($res)
If @error Then ExitLoop _ArrayDisplay($row1)
Until @error
Access method 3 - Read whole result in 2D-Array
Access 3
$array = _MySQL_Fetch_Result_StringArray($res)
 _ArrayDisplay($array
AutoIt uses a friendly standard method to work with MySQL:
You get a safe connection to your host.
You get a standard MySQL language query.
You manage tables and information rows to process information and user input/output.
In AutoIt you can create any connection in two ways:
Via ODBC install from mysql main page
ProgAndy's external DLL file
The DLL approach is more portable (you can carry your DLL inside your script by using fileinstall() function) to keep AutoIt Apps free of manual setups, or to eliminate extra steps. You do not need to install any MySQL ODBC if you use mysql.dll.
SQLite is a self-contained, serverless, zero-configuration, transactional SQL database engine, widely deployed, used in the public domain, easily accessible, and cross-platform, and your updates will be transactional (see http://www.sqlite.org/ for more details).
You may use the SQLite database with your automation or AutoIt scripts. It implements most of SQL92. There are also many interface clients that can be used to administer SQLite.
You can get the SQLite3.dll file from the following link by choosing sqlite-dll-win32-x86 from the Precompiled Binaries for Windows list:
You can add Msgbox(0,"Pause","Next step") anywhere to stop program flow and follow every step:
Paste this heading:
#include <SQLite.au3>
 #include <SQLite.dll.au3>
Global $dbName = "mydatabase.sqlite"  ;Database name
_SQLite_Startup() ;Loads SQLite3.dll
_SQLite_Open($dbName) ;Opens/creates a disk SQLite database
;Syntax: CREATE TABLE [IF NOT EXISTS] TABLE_NAME (row data_type,row2 data_type...); ;[Optional]
Paste the selected command to execute SQL (
_SQLite_Exec()):SQLite_Exec(-1, "Create table tblTest (a,b int,c single not null);" & "Insert into tblTest values ('1',2,3);" & _ "Insert into tblTest values (Null,5,6);") ;Several Sql statements in a single line _SQLite_Exec(-1, "CREATE TABLE IF NOT EXISTS Users (phone int UNIQUE,age int,name TEXT);") ;**Syntax: INSERT INTO TABLE_NAME[(row_name,row2_name)] VALUES(value1,value2) _SQLite_Exec(-1, "INSERT INTO Users VALUES (0011958745620,20,'Albert');") _SQLite_Exec(-1, "INSERT INTO Users VALUES (0034654363456,20,'Emi');") ;**Syntax: UPDATE TABLE_NAME SET row1=value,row2=value WHERE row=known_value _SQLite_Exec(-1, "UPDATE Users SET name='Jhon',age=23 WHERE phone=0011958745620;") ;**Delete Syntax: DELETE FROM TABLE_NAME WHERE row=known_value _SQLite_Exec(-1, "DELETE FROM Users WHERE phone=0011958745620;") ; Without _CallBackFunc function. No Row values _SQLite_Exec(-1, "DROP TABLE Users;") ; Remove the table ; Query Syntax and CallBackfunc for every row: ==================================== ;SELECT row1,row2 (note: use * to show all rows) FROM TABLE_NAME [WHERE row=value OR row=value AND row2=value2 LIMIT 10 (LIMIT: results) ORDER BY row ASC or DESC] _SQLite_Exec(-1, "SELECT * From Users", "_CallBackfunc") ; _CallBackfunc function will be called for each row, $s for every row & field. Func _CallBackfunc($aRow) Local $s For $s In $aRow ConsoleWrite($s & @TAB) Next ConsoleWrite(@CRLF) EndFunc ;==>_CallBackfuncPaste this ending for closing:
_SQLite_Close()
_SQLite_Shutdown()
You use SQL Syntax for database management in a very easy and transparent way like MySQL. You get to know a small database file with rows (registers) and columns (fields) information.
The SQLite_Exec parameters are as follows:
$hDB: An open database, use -1 for using last opened database.$sSQL: SQL statement(s) to be executed.$sCallback: [optional] if specified, the callback function will be called for each row.
You can also use more _SQLite functions, such as the following:
_SQLite_GetTable2d: Passes out a 2-dimensional array._SQLite_QuerySingleRow: Reads out the first row of the result.
You can read more about SQLite by visiting the following link:
http://www.autoitscript.com/forum/topic/17099-sqlite-semi-embedded-database-functionality-in-autoit/
We'll now scan screen changes to perform any task. Nowadays it is very popular to see "Air Gestures" execute tasks. You can create it using a webcam and an AutoIt program with the Pixelxxx family of functions. You can create your own triggered actions.
This is similar to Samsung's new features which let you page up or down by moving your hand in front of the webcam. You can create a Smart Pause which will detect your eye movements to intelligently stop video when you are not looking at the screen. You can find more information about "Air Gestures" by searching for it on the Internet.
You can also use screen pixel changes for similar if/then computer behaviors, in case some object changes on your screen, for example, icon, windows, shape, popup pixel changes, and so on.
Open SciTE from the AutoIt Program Group and start writing source code. Open a program that will change the screen information you will use to perform any task, for example, webcam, game, chat, web page, popup, and process bar.
Some examples as we monitor screen region changes:
Later, we can narrow our search to identify what kind of changes we got, activities, behavior, or other changing information. Then, we may trigger an action like sending an email, or getting an alarm sound (for example, in the case of webcam surveillance):
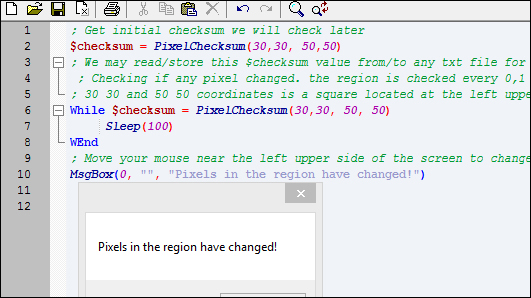
; Get initial checksum we will check later
$checksum = PixelChecksum(30,30, 50,50)
; We may read/store this $checksum value from/to any txt file for later use
 ; Checking if any pixel changed. the region is checked every 0,1 second to reduce CPU load
; 30 30 and 50 50 coordinates is a square located at the left upper corner.
While $checksum = PixelChecksum(30,30, 50, 50)
	 Sleep(100)
WEnd
; Move your mouse near the left upper side of the screen to change region pixels to leave While/Wend
MsgBox(0, "", "Pixels in the region have changed!")
Another example, as we search a pure red pixel or a red pixel within 10 shade variations of pure red and mouse click at the found coordinates:
$coord = PixelSearch( 0, 0, 600, 600, 0xFF0000, 60 ) ; Search for red color
If Not @error Then
  MsgBox(0, "Pixel Color found at :", $coord[0] & "," & $coord[1])
  mouseclick("left",$coord[0],$coord[1])
EndIf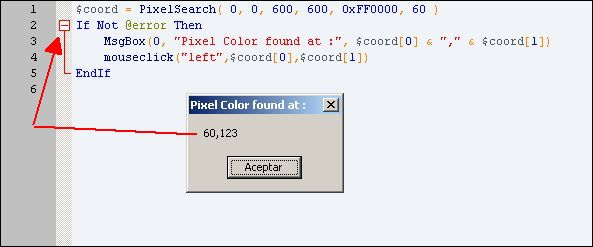
PixelSearch analyses each of the pixels of the first vertical line and checks if every pixel is a color that contrasts with the background color (colors in shades are considered background).
The following is a list of pixel functions:
PixelGetColor: Returns a pixel color according to x, y pixel coordinates.PixelChecksum: Generates a checksum value for a region of pixels.PixelSearch: Searches a rectangle of pixels for the pixel color provided.PixelCoordMode (Option): Screens absolute coordinates or coordinates relative to any window
You can use PixelChecksum to check if something has changed, and then use PixelSearch or PixelGetColor to check if it is a shape or a standard color that identifies any object, even reading a few key structural pixels. The Pixel functions work with the screenshot output (that means visible windows only). You cannot get information from minimized or covered windows.
There are extra functions—user defined functions (UDF). You can copy and paste source code into your program to extend these Pixelxxx functions.
Code examples can be found in AutoIt help forums at http://www.autoitscript.com/forum/topic/65748-image-search-library/.
You can also visit this link:
http://www.youtube.com/watch?v=lrc54kmVqjI
Consider the following code for example:
_ImageSearch()for searching images:$findImage = "Untitled.bmp" $resultPosition = 1 $tolerance = 255 $x = 0 $y = 0 _ImageSearchArea($findImage,$resultPosition,0,0,@DesktopWidth,@DesktopHeight,$x,$y,$tolerance)
_FindBmp()for finding a BMP image in another BMP image:You can refer to the following link for this:
http://www.autoitscript.com/forum/topic/66545-find-bmp-in-another-bmp-imagesearch/
_Wait_For()waits for images, symbols, or other graphics to be or not to be displayed on the screen.
You can also refer to the fast find library, improving PixelSearch, and optimized DLL in C++ for searching pixels on the screen at http://www.autoitscript.com/forum/topic/126430-advanced-pixel-search-library/.
You may connect AutoIt with external apps to improve the screen's optical recognition.
For example, GOCR (http://jocr.sourceforge.net/index.html) converts scanned images of text back to text files.
You can get a screenshot scanned file with _Screenxxx functions as _ScreenCapture_Capture(@MyDocumentsDir & "\Image1.jpg").
We'll now have a look at the collection of functions for creating, attaching to, reading from, and manipulating Internet Explorer. Internet Explorer automation functions start as _IExxx.
Open SciTE from the AutoIt Program Group and start writing source code.
We can optionally update a few features to improve results:
Install AutoIt's latest beta here:
Download the
IE3.au3beta library from http://www.autoitscript.com/forum/files/file/227-ieau3/, and then copy and paste it to your script folder.
The following are two examples of interaction with Internet Explorer:
Navigate and click on links:
#include <IE.au3>
$o_IE = _IECreate ()
_IENavigate ($o_IE, "http://autoitscript.com")
MsgBox(0,"IE.au3 Test","Enter for next Internet Explorer command: Click text Forum ")
_IELinkClickByText ($o_IE, "Forum")
MsgBox(0,"IE.au3 Test","Enter for next Internet Explorer command: Click text Wiki")
_IELinkClickByText ($o_IE, "Wiki")
Search a text string and modify a web page on-the-fly:
#include <IE.au3>
$oIE = _IECreate()
_IENavigate($oIE, "http://www.autoitscript.com/")
$body = _IEBodyReadHTML($oIE)
If StringInStr($body, "autoit") Then
MsgBox(0, "Success", "The string was found. Press enter to modify web page")
$newbody = StringReplace($body, "autoit", "AUTOMATION: YOUR NAME HERE, XXX!")
 _IEBodyWriteHTML($oIE, $newbody)
Else
MsgBox(0, "Fail", "The string was NOT found")
EndIf

_IExxx functions work for Internet Explorer (IE) automation. You create a navigation object with _IENavigate for a web page, and then send commands, for example, click on links. You can also try using _IEAction($object, "many actions E.G. click").
_IEbodyWriteHTML() writes HTML into an active page object.
For more on this, visit http://www.youtube.com/watch?v=1TVf2xZDdfE.
Let us look at two more subjects. The first one is about getting Internet Explorer values and IDs to manage them later in any AutoIt script. The second one is about how to automate Firefox using an external Firefox automation tool (iMacros), and how to get this working inside our AutoIt applications.
Extra tools, _IExxx functions parameters, and debug Scripts can be obtained from the following links:
Firefox Portable automation is possible by creating an iMacros script, and running it within AutoIt.
You can download Firefox Portable from http://portableapps.com/apps/internet/firefox_portable and iMacros from https://addons.mozilla.org/es/firefox/addon/imacros-for-firefox/, and then install them.
Then, you can create an AutoIt script to run any previously stored iMacros as:
Run("FirefoxPortable.exe imacros://run/?m=WP-backup.iim")
Wp-backup.iim imacro should be created using the iMacros interface. You can modify iMacros behavior on-the-fly (reading, writing, and running this template iMacros script file).
A working AutoIt iMacros template can be downloaded here:
Now, we learn about an open source electronic prototyping platform that allows us to create interactive electronic objects.
There are several Arduino versions available that can be purchased, preassembled, or do-it-yourself kits. Arduino can interact with the environment by receiving input from a variety of digital and analog sensors, and can produce and trigger actions to affect its surroundings by controlling lights, motors, and other actuators using its analog and digital outputs.
You need the basic knowledge in electronics. For more information, visit http://www.arduino.cc.
Then, you will need the following:
Hardware (electronic parts):
Arduino and cable: Duemilanove 2009 Atmega 328P SCM board with USB cable (http://dx.com/p/arduino-duemilanove-2009-atmega-328p-scm-board-with-usb-cable-133258)
1/4W resistance metal film resistors (for example, http://dx.com/p/1-4w-resistance-metal-film-resistors-400-piece-pack-121339)
Resistors: 3 x 220 ohm, 1 x 10K ohm , 2 x 1K ohm
Breadboard jumper wires for electronic DIY (for example, http://dx.com/p/breadboard-jumper-wires-for-electronic-diy-65-cable-pack-118826?rt=1&p=6&m=1&r=4&k=1&t=1&s=&u=118826)
830 point solderless breadboard (for example, http://dx.com/p/830-point-solderless-breadboard-118354?rt=1&p=6&m=1&r=4&k=1&t=1&s=&u=118354)
10.5mm LED emitter (for example, http://dx.com/p/10-5mm-led-emitter-10-pack-3190)
Buttons: PA66 DC 12V 50mA Tact switch—black (100-piece pack / 6 x 6 x 7.5 mm) (http://dx.com/p/pa66-dc-12v-50ma-tact-switch-black-100-piece-pack-6-x-6-x-7-5mm-123659)
Meeeno MN-EB-PTCMN photosensitive sensor module—orange (http://dx.com/p/meeeno-mn-eb-ptcmn-photosensitive-sensor-module-orange-202511)
Software (library):
Download the AutoIt library ZIP file from the following link and extract its contents to any folder:
Download the Arduino development interface (IDE) from http://arduino.cc/en/Main/Software (the Windows ZIP file is approximately 92 MB) to save AutoIt sketch into ROM.
Let's now see the steps involved in preparing an Arduino board.
Preparing the Arduino board:
Load included
sketch.pde(downloaded ZIP file) into Arduino ROM using Arduino IDE application.Create your hardware (circuit) on the breadboard and Arduino board.
Connect Arduino to your PC via a USB cable.
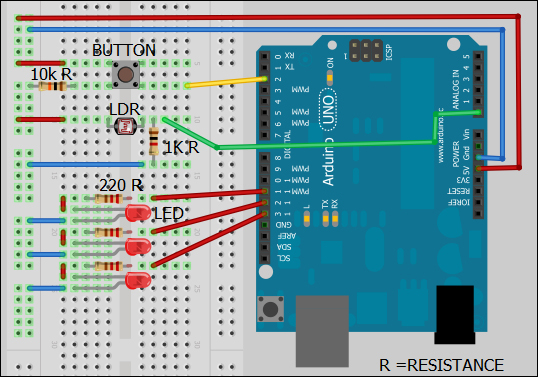
Arduino installation's live image following the previous schema:

Copy
comMG.au3,arduino.au3, andcommg.dll, and paste them into your script folder.Open SciTE from the AutoIt Program Group, and start writing one of the example scripts. Note that we have to change number 3 parameter at
conecta(3,9600)to match your Arduino port in case you get a different port on connection.Now, run the following scripts by pressing F5:
The following code is for digital input:
;Example 1 digital input (Press button):
#include <arduino.au3>
conecta(3,9600)
While 1
$sbutton = digitalread(2)
If $sbutton = 1 Then MsgBox(0,"","button pressed")
Sleep(50)
WEnd
The following code is for analog input:
;Example 2 analogic input (Light Sensor):
#include <arduino.au3>
conecta(3,9600)
$initial = analogread(7)
$initial -= 50
While 1
$ldr = analogread(7)
If $ldr < $initial Then MsgBox(0,"","Less light")
Sleep(50)
WEnd
The following code is for digital output:
;Example 3 digital output (Switch lights on/of):
#include <arduino.au3>
MsgBox(0,"Light Output Autoit", "Enter to blink")
conecta(3,9600)
While 1
digitalwrite(11,1)  ; On
Sleep(1000)
digitalwrite(11,0)  ; Off
Sleep(1000)
WEnd
The following code is for analog output:
;Example 4 analogic output (Color Lights):
#include <arduino.au3>
conecta(3,9600)
While 1
$r = InputBox("Red Light","Value between 0-255")
$g = InputBox("Green Light","Value between 0-255")
$b = InputBox("Blue Light","Value between 0-255")
analogwrite(11,$r)
analogwrite(12,$g)
analogwrite(13,$b)
WEnd
The arduino.au3 library includes some basic functions to enable Arduino analog read/write, digital read/write in a simple way. AutoIt codes have not been compiled with cross-compiler, but it works interactively using an Arduino to Autolt port for electronic management. You write the program in your Windows computer, and you run it from Windows. Then, the Autolt port sends/receives messages from Arduino. So, you must be connected to a Windows PC for establishing a connection. See photos.
arduino.au3 functions read button press, temperature, read digital sensors, or maybe even read a GPS signal. You can create your own Arduino sketches.
You can use it for outputs, to move servos, motors, lights, and switches.
Arduino has several connectors as analog/digital outputs/inputs:
Digital: Shows on/off) status, 0V for on and 5V for off. Button digital signals have open/close.
Analog: Includes any intermediate voltage.
For example, consider an LDR (Light Depending Resistor). We generated a resistance that decreases voltage as a function of the surrounding light, it measures light voltage variation. Arduino will get/return a value between 0 and 1024. 0 is 0V and 1024 is 5V.
Skype sends messages to a selected user. Consider two similar SendChat functions as an example. Echo123 is Skype's default sound test user. Change it to another user name you want from user properties (space not allowed).
We will start by opening SciTE from the AutoIt Program Group and start writing source code. Open the Skype app (Version 3.0 and above must be installed). Download it from http://www.autoitscript.com/forum/topic/121767-skype-udf-v0-7-april-13-2013/, and copy and paste the Skype.au3 library file to the same folder as Skypetemplate.au3.
Copy and paste the source code into a new script called the Skypetemplate.au3 file, and run the script by pressing F5.
#include "Skype.au3"
;Credits Basicos ; And to Firefox Skype.au3,SendChat UDF
SendChat1("I will be at home in 10 minutes","echo123")
SendChat2("I will be at home in 15 minutes","echo123")
Func SendChat1($message,$destination)
Local $iChatId, $oChat ;using chat id:
$iChatId = _Skype_ChatCreate("echo123") ;Skype test Service
_Skype_ChatMessage($iChatId, "test")
EndFunc
Func SendChat2($message,$destination)
Local $iChatId, $oChat ;using chat object:
$oChat = _Skype_ChatCreateWith("maribelnv") ; your friend
_Skype_ChatSendMessage($oChat, "test3")
EndFunc In Skype.au3 functions, Skype4COM provides an ActiveX interface to the Skype API such as Visual Studio or Delphi. It is an external user defined function (UDF), created and provided free for a Firefox user.
COM stands for Component Object Model. It is the Microsoft way to interconnect software using a common interface defined in a COM object.
You can do most of your programming with AutoIt's built-in functions, use this only for special interfacing to some applications. Objects depend heavily on the operating system and the installed software.
Skype.zip downloaded files include an example for auto call answer to answer calls automatically (and it joins calls if you're already in a call):
Using an event call:
_Skype_OnEventCallStatus("_CallIncomming", $cClsRinging) ;if someone is calling you _Skype_OnEventCallStatus("_CallFinished", $cClsFinished) ;if a call has finished
While 1
Sleep(60000)
 WEnd
Using call answer and call join functions:
If IsObj($oMainCall) Then ;if a call is running then join the incomming call to the main    _Skype_CallJoin($oMainCall, $oCall)
Else ;else answer
  _Skype_CallAnswer($oCall)
EndIf
We will now use an Excel SpreadSheet from AutoIt macros, so we replace Visual Basic for applications (VBA) as it is buggy switching macros between different Office versions.
You must have MS Excel and AutoIt.
Open the SciTE code editor and start writing the Excel automation code (called macros).
Follow these steps to automate Excel:
Copy and paste the source code, and press F5 to run the following script:
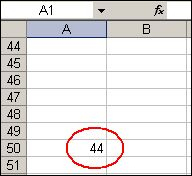
$oExcel = ObjCreate("Excel.Application")
; Create an Excel Object
$oExcel .Visible = 1
With $oExcel ; Let Excel show itself
.WorkBooks.Add ; Add a new workbook
.Worksheets(1).ScrollArea = "A50" ; got to A50
.Activewindow.ScrollColumn = 50 ; Go to column
.Activewindow.ScrollRow = 50 ;Go to row
.cells(50,1).value=44 ; writting values
EndWith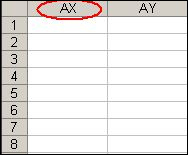
You can use Office objects this way to automate Word, Excel, and others same as given in the previous recipe about AutoIt and batch files replacement; you can replace Visual Basic for Applications (VBA) using AutoIt macros. You can even use a Microsoft object for these macros. Further information about Excel automation and VBA can be found at http://www.autoitscript.com/forum/topic/144031-update-the-excel-udf-that-comes-with-autoit/.
There is another approach. It is by simulating keyboard strokes (send()) and mouse clicks (MouseClick()) for very simple macros. You simulate a human user by repeating the same keystrokes and mouse movements he would do when sitting in front of his/her computer.
Of course, these macros are not human beings; they do not think yet, but you can use some if...then clauses to identify possible or typical problems that may arise when you computers are working, and solve these forks with new macros, or by reusing previous ones. So, you will make your macro a little more intelligent than the typical word processor computer.

