


Welcome to Instant Audio Processing with Web Audio. In this book, we'll explore Web Audio's capabilities through a series of step-by-step recipes. As we progress through the recipes, we'll construct a reusable audio layer which can be reused in other Web Audio applications.
We'll need to set up a web server to host our Web Audio recipes, because we will be exploring Web Audio's audio file manipulation capabilities. Loading of the audio files rely on AJAX and AJAX-only functions reliably when the said audio files are served by a web host. Ergo, we'll need a web host for the recipes.
If we don't yet have a web server set up, this recipe will help us do just that.
We'll set up an Apache Server to host our recipes at http://localhost/mywebaudio, which will be the recipe application URL. As we don't have a Web Audio recipe yet, we'll set it up to host our recipe base framework instead. The recipe base framework implements all the necessary plumbing so that we can focus on using Web Audio. I've included an overview of the framework at the end of this recipe.
Note
Already have a web server set up? Go ahead and create a new subdirectory for the recipes and host it at http://localhost/mywebaudio.
If you don't yet have Apache Web Server installed on your machine, now is the time to do that. The easiest way to install it is through installers such as XAMPP (http://www.apachefriends.org).
In addition, please create a subdirectory to act as the recipe application root for the recipes in this book. The recipes in this book assume that the recipe application root is the webaudio subdirectory that is placed just off the root of the drive. However, feel free to select a different path for the recipe application root.
The configuration changes that we'll be applying to Apache are available in tools/ApacheConfiguration/apache.conf.
Copy the recipe framework from
tools/RecipeFrameworkto the recipe application root.Navigate to the web server's
confdirectory, and add the following tohttp.conf—the snippet links of the recipe application root to the recipe application URL:Alias /mywebaudio /webaudio <Directory "/webaudio"> Order allow,deny Allow from all </Directory>Replace all the snippet references to
/webaudiowith the absolute path to the recipe application root.Restart Apache Web Server.
Tip
Downloading the example code
You can download the example code files for all Packt books you have purchased from your account at http://www.packtpub.com. If you purchased this book elsewhere, you can visit http://www. packtpub.com/support and register to have the files e-mailed directly to you.
Open the recipe application URL (http://localhost/mywebaudio) in a web browser. You should see the following output on the browser screen:

The configuration snippet maps the recipe application root to mywebaudio—a virtual directory on the web server:
Alias /mywebaudio /webaudio
We set up the access permissions of the directory so that it's publicly available as shown in the following code. Note that the directory access permissions are always linked to the physical directory path:
<Directory "/webaudio">
  Options Indexes
  Order allow,deny
  Allow from all
</Directory>
Now that we have our web hosting set up, we can start writing recipes.
A copy of the base framework template is stored at tools/RecipeFramework in the code bundle.
The recipes in this book are built on top of a base framework. This framework provides the application plumbing that is required to allow us to focus on exploring Web Audio. The framework's core functionalities are:
jQuery for handling all the DOM manipulations
jQuery UI for building the user interface of the recipes
The
consoleout()helper function to output messages to the output window of the frameworkThe
assert()helper function to test for runtime conditions and to report the failures to the output window of the frameworkThe
later()helper function for deferring function execution outside of the calling execution scope
The following table summarizes the base file organization of the framework:
|
Directory/File |
Description |
|---|---|
|
|
This directory contains all the audio assets which we may be used in the recipes. |
|
|
This contains the jQuery open source library (MIT license). |
|
|
This contains the jQuery UI open source library with the pepper grinder theme (MIT license). |
|
|
This file contains all the CSS styles utilized by the recipes. |
|
|
This file contains the |
|
|
This file is the framework launch page. Recipe implementations are added to this file. |
The base framework splits the application implementation into two sections. These two sections are found in index.html:
The JavaScript section contains the JavaScript implementation of the application. The section is the
<script>element in the header of the page containing theWebAudioAppclass implementation.The HTML section contains the application's HTML implementation. This section is the
appwindow<div>element in the body of the page.
Now that we can play sounds using an audio buffer, let's take a look at playing them in a loop. In this recipe, we'll create an application with a toggle button which toggles the playback of a choir loop.
The complete source code for this recipe is available in the code bundle at recipes/Recipe3_1.
Start with a clean copy of the base framework template. The template bundle is located at
tools/RecipeFrameworkin the code bundle.Open
index.htmlwith a text editor.In the HTML section, declare the HTML toggle control:
<div id="appwindow">
    <h2>Playing Audio In A Loop</h2>
    <form>
        <input type="checkbox" id="choir" />
        <label for="choir">Choir Loop</label>
    </form>
</div>
We'll need the Web Audio initialization and the audio file loading routines covered in previous recipes—we'll add these to the JavaScript section:
function loadAudioFromUrl( url, loadedCallbackFn,
                           callbackContext ) {
    var request = new XMLHttpRequest();
    request.open("GET", url, true);
    request.responseType = "arraybuffer";

    request.onload = function() {
        consoleout( "Loaded audio '" + url + "'" );
        later( 0, loadedCallbackFn, callbackContext,
               request.response );
    };

    request.onerror = function() {
        consoleout( "ERROR: Failed to load audio from "
                    + url );
    };

    request.send();
}

WebAudioApp.prototype.initWebAudio = function() {
    var audioContextClass = window.webkitAudioContext
                            || window.AudioContext;

    if( audioContextClass == null )
        return false;

    this.audioContext = new audioContextClass();
    return true;
};
We'll implement the HTML toggle control initialization and loop playback logic in
WebAudioApp.initBufferedAudioLoopToggle():WebAudioApp.prototype.initBufferedAudioLoopToggle = function( elemId, audioSrc ) { // Initialize the button and disable it by default var jqButton = $( elemId ).button({ disabled: true }); // Load the audio var audioBuffer; loadAudioFromUrl( audioSrc, function(audioData){ // Decode the audio data into an audio buffer this.audioContext.decodeAudioData( audioData, function( audioBufferIn ) { consoleout( "Decoded audio for '" + audioSrc + "'" ); // Cache the audio buffer audioBuffer = audioBufferIn; // Audio ready? Enable the button jqButton.button( "option", "disabled", false ); } ); }, this ); // Register a click event listener to trigger playback var me = this; var activeNode; jqButton.click(function( event ) { // Stop the active source node... if( activeNode != null ) { if( activeNode.stop instanceof Function ) activeNode.stop( 0 ); if( activeNode.noteOff instanceof Function ) activeNode.noteOff( 0 ); activeNode = null; consoleout( "Stopped audio loop '" + audioSrc + "'" ); } // Start new playback if the button is checked if($(this).is(':checked')) { var sourceNode = me.audioContext .createBufferSource(); sourceNode.buffer = audioBuffer; // Connect it to the speakers sourceNode.connect( me.audioContext.destination ); // Start the audio playback if( sourceNode.start instanceof Function ) sourceNode.start( 0 ); if( sourceNode.noteOn instanceof Function ) sourceNode.noteOn( 0 ); // Turn on looping sourceNode.loop = true; // Keep track of the active sound loop activeNode = sourceNode; consoleout( "Played audio loop '" + audioSrc + "'" ); } }); };Finally, we'll initialize Web Audio to set up the loop playback logic in
WebAudioApp.start():WebAudioApp.prototype.start = function() { if( !this.initWebAudio() ) { consoleout( "Browser does not support WebAudio" ); return; } this. initBufferedAudioLoopToggle( "#choir", "assets/looperman-morpheusd-amazing-pt2-choir-120-bpm.wav" ); };
Launch the application test URL in a web browser (http://localhost/myaudiomixer) and click on the Choir Loop button to toggle the loop playback. The following is a screenshot of what we should see in the web browser:

Let's take a closer look at the toggle control's click event handler in WebAudioApp.initBufferedAudioLoopToggle():
When the user deactivates playback, we use the method
stop()ornoteOff()of theAudioBufferSourceNodeinstance to explicitly stop the activeAudioNodeclass:jqButton.click(function( event ) { // Stop the active source node... if( activeNode != null ) { if( activeNode.stop instanceof Function ) activeNode.stop( 0 ); if( activeNode.noteOff instanceof Function ) activeNode.noteOff( 0 ); activeNode = null; ... }When a user activates playback, we trigger sound playback as per the previous recipe:
    if($(this).is(':checked')) {
        // Decode the audio data into an audio buffer
        var sourceNode = me.audioContext.createBufferSource();
        sourceNode.buffer = audioBuffer;

        // Connect it to the AudioContext destination node
        sourceNode.connect( me.audioContext.destination );

        // Start the audio playback
        if( sourceNode.start instanceof Function )
            sourceNode.start( 0 );
        if( sourceNode.noteOn instanceof Function )
            sourceNode.noteOn( 0 );
Then, we turn on the looping behavior by setting the
AudioBufferSourceNodeinstance'sloopattribute totrue:// Turn on looping sourceNode.loop = true;
The following are the new Web Audio API members covered in this recipe:
Set the
loopattribute ofAudioBufferSourceNodetotrueto enable looping; by default, the playback will loop from start to end:interface AudioBufferSourceNode : AudioSourceNode { var loop:Boolean;The
loopStartandloopEndattributes ofAudioBufferSourceNodeallow the application to customize the audio section to play in a loop. When specified, playback will loop infinitely once inside the loop time frame:var loopStart:Number; var loopEnd:Number; };
The ability to limit looping to a subsection within a larger playing segment is a powerful mojo—it lets developers implement some pretty complicated playback behavior with just a few lines of code. Let's use this functionality to improve our choir loop quality.
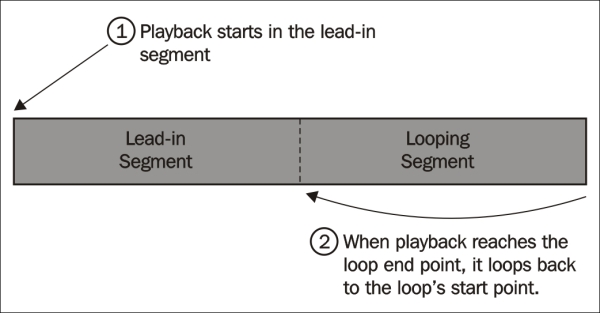
The choir loop audio sample is actually composed of two audio segments of equal lengths:
A lead-in segment with a soft start
A looping segment
As a result, the choir loop is disjointed whenever the sound loops from start to end. Using the loopStart and loopEnd attributes of AudioBufferSourceNode, we can modify the looping behavior so that looping only occurs in the looping segment. The following diagram describes what we're trying to accomplish:
Let's modify the toggle's click event handler to fix the loop; add the following highlighted code snippet to the handler:
jqButton.click(function( event ) {
...
        // Turn on looping
        sourceNode.loop = true;
// Specify a custom loop segment
sourceNode.loopStart = audioBuffer.duration * 0.5;
sourceNode.loopEnd = audioBuffer.duration;
// Keep track of the active sound loop
activeNode = sourceNode;
...
});We retrieve the sample's duration from the duration attribute of AudioBuffer and use it to calculate the start and end points for the loop segments. Then, we fill the loopStart and loopEnd attributes of AudioBufferSourceNode with the loop start and end times, respectively.
Tip
The loopEnd attribute must be set if the loopStart attribute is set. Otherwise, the loop segment settings will have no effect.
Now, the choir loop playback starts with a gentle lead-in before entering a seamless infinite loop.
The AudioBuffer class is much more than a container for audio data. Applications can gather metrics about the audio sample from an AudioBuffer instance. Applications can even retrieve and modify the waveform data!
The following is the AudioBuffer class definition:
interface AudioBuffer {

    var duration:Number;          // readonly
    var numberOfChannels:Number;  // readonly
The duration attribute contains the audio sample's duration measured in seconds and the numberOfChannels attributes contain the number of audio channels in the sample:
    var sampleRate:Number;        // readonly
    var length:Number;            // readonly

    function getChannelData(channel:Number):Float32Array;
};
The sampleRate attribute contains the sample rate of the audio data measured in Hz.
The length attribute contains the length of the audio data measured in sample frames.
The function getChannelData() retrieves the channel waveform for the target channel. It returns the waveform as an array of the size length containing all the frame samples. Each sample is the waveform's PCM float value normalized to the [-1, +1] range.
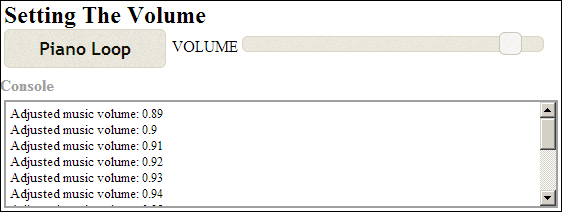
Now that we've wrapped our heads around playing audio, it's time to look at controlling the sound volume. In this recipe, we'll build an audio player with real-time volume controls. We'll use a piano sound loop instead of the choir loop this time around to keep things fresh.
The complete source code for this recipe is available in the code bundle at recipes/Recipe4_1a.
Start with a clean copy of the base framework template. The template bundle is located at
tools/RecipeFrameworkin the code bundle.Open
index.htmlwith a text editor.In the HTML section, we'll add the piano loop toggle and the volume control widget:
<div id="appwindow">

<h2>Setting The Volume</h2>
<form>
    <input type="checkbox" id="piano" />
    <label for="piano">Piano Loop</label>
    <span>VOLUME</span>
    <span id="pianovol" style="display: inline-block;
          width: 300px;"></span>
</form>

</div>
Like the previous recipes, we'll need the Web Audio initialization and audio file loading routines; we'll add these to the JavaScript section:
function loadAudioFromUrl( url, loadedCallbackFn,
                           callbackContext ) {
    var request = new XMLHttpRequest();
    request.open("GET", url, true);
    request.responseType = "arraybuffer";

    request.onload = function() {
        consoleout( "Loaded audio '" + url + "'" );
        later( 0, loadedCallbackFn, callbackContext,
               request.response );
    };

    request.onerror = function() {
        consoleout( "ERROR: Failed to load audio from "
                    + url );
    };

    request.send();
}

WebAudioApp.prototype.initWebAudio = function() {
    var audioContextClass = window.webkitAudioContext
                            || window.AudioContext;

    if( audioContextClass == null )
        return false;

    this.audioContext = new audioContextClass();
    return true;
};
Let's take a first stab at tidying up the boilerplate code for controlling node playback; we'll wrap the
startandstopaudio playback functionalities into the functionsstopNode()andstartNode(), respectively. It's a marginal improvement, but an improvement nonetheless:function stopNode( node, stopSecs ) { if( node.stop instanceof Function ) node.stop( stopSecs ); else if( node.noteOff instanceof Function ) node.noteOff( stopSecs ); } function startNode( node, startSecs,loop ) { // Turn on looping if necessary if( loop ) node.loop = true; // Start playback at a predefined time if( node.start instanceof Function ) node.start( startSecs ); else if( node.noteOn instanceof Function ) node.noteOn( startSecs ); return node; }We'll create the function
WebAudioApp.initMusicControls()to wrap all the sound manipulation logic:WebAudioApp.prototype.initMusicControls = function( elemId, audioSrc, elemVolId ) { }We'll start by adding the logic for loading the audio data into
WebAudioApp.initMusicControls()and initializing the sound toggle:// Initialize the button and disable it by default var jqButton = $( elemId ).button({ disabled: true }); // Load the audio var audioBuffer; loadAudioFromUrl( audioSrc, function(audioData){ // Decode the audio data into an audio buffer this.audioContext.decodeAudioData( audioData, function( audioBufferIn ) { consoleout( "Decoded audio for '" + audioSrc + "'" ); // Cache the audio buffer audioBuffer = audioBufferIn; // Enable the button once the audio is ready jqButton.button( "option","disabled",false ); } ); }, this );It's time to enhance our node graph with a volume controller. In Web Audio, volume is controlled using a separate
GainNodenode instance. We'll instantiate aGainNodeinstance and attach it to our node graph; the instance will serve as our application's volume controller:// Create the volume control gain node var context = this.audioContext, volNode; if( context.createGain instanceof Function ) volNode = context.createGain(); else if( context.createGainNode instanceof Function ) volNode = context.createGainNode(); // Connect the volume control the the speaker volNode.connect( context.destination );Next, we'll initialize our HTML slider widget and link the slider changes to the
GainNodeinstance, of our volume controller:// Create the volume control $( elemVolId ).slider({ min: volNode.gain.minValue, max: volNode.gain.maxValue, step: 0.01, value: volNode.gain.value, // Add a callback function when the user // moves the slider slide: function( event, ui ) { // Set the volume directly volNode.gain.value = ui.value; consoleout( "Adjusted music volume: " + ui.value ); } });We complete the
WebAudioApp.initMusicControls()function by implementing the sound toggle event handler for starting and stopping the audio loop:var me = this; var activeNode; jqButton.click(function( event ) { // Stop the active source node if( activeNode != null ) { stopNode( activeNode, 0 ); activeNode = null; consoleout( "Stopped music loop '" + audioSrc + "'" ); } // Start a new sound on button activation if($(this).is(':checked')) { // Start the loop playback activeNode = me.audioContext.createBufferSource(); activeNode.buffer = audioBuffer; startNode( activeNode, 0, true ); // Connect it to the volume control activeNode.connect( volNode ); consoleout( "Played music loop '" + audioSrc + "'" ); } });Finally, in
WebAudioApp.start(), we initialize Web Audio and the music controls:WebAudioApp.prototype.start = function() { if( !this.initWebAudio() ) { consoleout( "Browser does not support WebAudio" ); return; } this.initMusicControls( "#piano", "assets/looperman-morpheusd-dreamworld-fullpiano-120-bpm.wav", "#pianovol" ); };
Launch the application test URL in a web browser (http://localhost/myaudiomixer) to see the end result. The following is a screenshot of what we should see in the browser:
We add in volume control support by inserting a GainNode instance between the audio source node and the speaker output node, as shown in the following diagram:

We control the output volume from a GainNode instance by adjusting its gain audio parameter. The gain audio parameter specifies the multiplier applied to the GainNode input signal when producing its output signal.
Let's take a deeper look at WebAudioApp.initLoopToggle() and its implementation to support volume control:
We create
GainNodeusing the methodcreateGain()orcreateGainNode()ofAudioContextand cache the instancevolNode:var context = this.audioContext; var volNode; if( context.createGain instanceof Function ) volNode = context.createGain(); else if( context.createGainNode instanceof Function ) volNode = context.createGainNode();New
GainNodeinstances have theirgainaudio parameter automatically set to1.We connect the
GainNodeinstance to the context'sAudioDestinationNodeinstance:volNode.connect( context.destination );
Whenever we start playing sounds, we instantiate and activate a new
AudioBufferSourceNodeinstance as before, except that we connect its output to the volume controller,volNode, instead of directly connecting it to the speaker node. Notice how we're reusing the sameGainNodeinstance for all sounds played:var me = this; var activeNode; jqButton.click(function( event ) { // Stop the active source node if( activeNode != null ) { me.stopNode( activeNode, 0 ); activeNode = null; ... } // Start a new sound on button activation if($(this).is(':checked')) { // Start the loop playback activeNode = me.startNode( audioBuffer, 0, true ); // Connect it to the volume control activeNode.connect( volNode ); ... } });The
GainNodeinstances are reusable unlike theAudioBufferSourceNodeinstances. TheGainNodeinstance will remain alive so long as we maintain an active JavaScript reference throughvolNode.We initialize the volume control element and configure the range and starting values using the
GainNodeinstance'sgainaudio parameter settings:$( elemVolId ).slider({ min: volNode.gain.minValue, max: volNode.gain.maxValue, step: 0.01, value: volNode.gain.value,When the slider is moved, we set the
GainNodeinstance'sgain.valueattribute to the slider value:slide: function( event, ui ) { volNode.gain.value = ui.value; ... } });
Let's take a look at the Web Audio API methods/attributes introduced in this recipe:
AudioContext.createGain()instantiates and returns aGainNodeinstance:interface AudioContext { function createGain():GainNode; };The
GainNodeinstance multiplies its input signal values by a gain multiplier. TheGainNodeinstance stores the gain multiplier in anAudioParaminstance accessible through thegainattribute:interface GainNode : AudioNode { var gain:AudioParam; };AudioParamis Web Audio's standard audio parameter interface. It allows applications to retrieve the parameter configuration and to tweak its value. The interface also allows applications to script the parameter behavior.
We'll look at its basic attributes for the moment and explore the scripting functionality in the next recipe:
The
AudioParam.valueattribute stores the applied parameter value of the instance. Applications write to this attribute to change the parameter value directly:interface AudioParam { var value:Number;The
minValueandmaxValueattributes store the parameter's minimum and maximum values, respectively.var minValue:Number; // readonly var maxValue:Number; // readonlyThe
AudioParaminstance's default value is stored indefaultValue:var defaultValue:Number; // readonly };
Encapsulating the audio playback logic into the functions startNode() and stopNode() improved the code's readability, but only marginally. In addition, it's tiring having to reimplement the same boilerplate code for initializing Web Audio and for handling audio file loads. It's time to take the next step—we'll integrate the Web Audio boilerplate functionality into the framework template:
We'll make the Web Audio initialization and sound loading logic a permanent part of the framework.
We'll wrap the node graph construction and sound playback logic into an
AudioLayerclass.
This is the framework template we'll be using for the rest of the recipes.
The following are the class definitions for the new AudioLayer class and the updated WebAudioApp class:
The
AudioLayerconstructor constructs the basic Node Graph:class AudioLayer { function AudioLayer( context:AudioContext );AudioLayerexposes the volume gain audio parameter through itsgainattribute:var gain:AudioParam;
AudioLayer.playAudioBuffer()implements the audio buffer playback logic:function playAudioBuffer( audioBuffer:AudioBuffer, startSecs:Number, loop:Boolean ):AudioBufferSourceNode };WebAudioApp.initWebAudio()contains the WebAudio initialization logic:class WebAudioApp { function start(); function initWebAudio();WebAudioApp.loadAudio()contains the audio buffer loading logic:function loadAudio( audioSrc:String, callbackFn:function(buffer:AudioBuffer), context:*? ); };
We'll also clean up the logic for handling backwards compatibility.
Previously, we searched for the appropriate method name at the time of execution:
    // Start playback at a predefined time
    // Call the appropriate playback start function
    // on the AudioBufferSourceNode
    if( sourceNode.start instanceof Function )
        sourceNode.start( startSecs );
    if( sourceNode.noteOn instanceof Function )
        sourceNode.noteOn( startSecs );
This approach is tedious and error prone.
A better approach is to ensure that the new method name always exists. If it does not exist, we'll map the old method to its new name as shown in the following code:
    // Make sure that an AudioBufferSourceNode instance
    // always has the new method name. This code occurs after
    // the AudioBufferSourceNode is constructed
    if( sourceNode.start == null )
        sourceNode.start = sourceNode.noteOn;

    // The rest of the code can now assume that the start()
    // function always exists...
The updated template framework is found in the tools/RecipeFrameworkV2 subdirectory in the code bundle.
The directory recipe/Recipe4_1b contains this recipe's source code after it's adapted to the new template framework.
In previous recipes, we acknowledged that JavaScript timers do not have the fidelity required for scripting audio. Web Audio circumvents this limitation by adding the automation support. Automation allows applications to schedule the predefined audio behaviors ahead of time, thereby allowing applications to schedule audio events independent of the code execution timing.
Most AudioNode member attributes are the AudioParam instances which support automation. Using this automation support, it's easy to implement sophisticated audio effects such as ducking, where the sound level of an audio signal is reduced by the presence of another audio signal. In this recipe, we'll use automation to duck the music whenever the applause sound effect plays.
The complete source code for this recipe is available in the code bundle at recipes/Recipe5_2.
Start with a clean copy of the base framework template Version 2. The template bundle is located at
tools/RecipeFrameworkV2in the code bundle.Open
index.htmlwith a text editor.We'll start by declaring our application controls in the HTML section:
<div id="appwindow">
    <h2>Automating Audio Parameters</h2>
    <form>
        <div>
            <h3>Music</h3>
            <input type="checkbox" id="piano" />
            <label for="piano">Piano Loop</label>
            <span>VOLUME</span>
            <span id="pianovol" style="display: inline-block; width: 300px;"></span>
        </div>
        <div>
            <h3>Sound Effects</h3>
            <a id="applause" href="javascript:void(0);">Applause</a>
        </div>
    </form>
</div>
To implement the ducking support, we'll need to modify the
AudioLayerclass. In theAudioLayerconstructor, we'll instantiate anotherGainNodeinstance to act as the ducker volume control:function AudioLayer( audioContext ) { this.audioContext = audioContext; // Create the ducker GainNode this.duckNode = audioContext.createGain(); // Create the volume GainNode this.volNode = audioContext.createGain(); // Expose the gain control this.gain = this.volNode.gain; // Connect the volume control to the ducker this.volNode.connect( this.duckNode ); // Connect the ducker to the speakers this.duckNode.connect( this.audioContext.destination ); }We'll add a new function
setDuck()toAudioLayerto activate the ducking behavior:AudioLayer.prototype.setDuck = function( duration ) { var TRANSITIONIN_SECS = 1; var TRANSITIONOUT_SECS = 2; var DUCK_VOLUME = 0.3; var duckGain = this.duckNode.gain; var eventSecs = this.audioContext.currentTime; // Cancel all future events duckGain.cancelScheduledValues( eventSecs ); // Schedule the volume ramp down duckGain.linearRampToValueAtTime( DUCK_VOLUME, eventSecs + TRANSITIONIN_SECS ); // Add a set value event to mark ramp up start duckGain.setValueAtTime( DUCK_VOLUME, eventSecs + duration ); // Schedule the volume ramp up duckGain.linearRampToValueAtTime( 1, eventSecs + duration + TRANSITIONOUT_SECS ); };Next, we'll add the function
WebAudioApp.initMusic()for initializing and controlling the music playback:WebAudioApp.prototype.initMusic = function( elemId, audioSrc, elemVolId ) { // Initialize the button and disable it by default var jqButton = $( elemId ).button({ disabled: true }); // Load the audio var audioBuffer; this.loadAudio( audioSrc, function( audioBufferIn ) { // Cache the audio buffer audioBuffer = audioBufferIn; // Enable the button once the audio is ready to go jqButton.button( "option", "disabled", false ); }, this ); var musicLayer = this.musicLayer; // Register a click event listener to trigger playback var activeNode; jqButton.click(function( event ) { // Stop the active source node if( activeNode != null ) { activeNode.stop( 0 ); activeNode = null; consoleout( "Stopped music loop '" + audioSrc + "'" ); } // Start a new sound on button activation if($(this).is(':checked')) { // Start the loop playback activeNode = musicLayer.playAudioBuffer( audioBuffer, 0, true ); consoleout( "Played music loop '" + audioSrc + "'" ); } }); // Create the volume control $( elemVolId ).slider({ min: musicLayer.gain.minValue, max: musicLayer.gain.maxValue, step: 0.01, value: musicLayer.gain.value, // Add a callback function when the user // moves the slider slide: function( event, ui ) { // Set the volume directly musicLayer.gain.value = ui.value; consoleout( "Adjusted music volume: " + ui.value ); } }); };We'll add the function
WebAudioApp.initSfx()for initializing and controlling the sound effects playback. The sound effects controls use theAudioLayerducking functionality to duck the music every time sound effects are active:WebAudioApp.prototype.initSfx = function( elemId, audioSrc ) { // Initialize the button and disable it by default var jqButton = $( elemId ).button({ disabled: true }); // Load the audio var audioBuffer; this.loadAudio( audioSrc, function( audioBufferIn ) { // Cache the audio buffer audioBuffer = audioBufferIn; // Enable the button once the audio is ready to go jqButton.button( "option", "disabled", false ); }, this ); // Register a click event listener to trigger playback var me = this; var activeNode; jqButton.click(function( event ) { me.sfxLayer.playAudioBuffer( audioBuffer, 0 ); // Duck the music layer for the duration of the // sound effect me.musicLayer.setDuck( audioBuffer.duration ); consoleout( "Ducking music for SFX '" + audioSrc + "'" ); }); };In
WebAudioApp.start(), we initialize Web Audio, the audio layers, and the application controls:WebAudioApp.prototype.start = function() { if( !this.initWebAudio() ) { consoleout( "Browser does not support WebAudio" ); return; } // Create the audio layers this.musicLayer = new AudioLayer( this.audioContext ); this.sfxLayer = new AudioLayer( this.audioContext ); // Set up the UI this.initMusic( "#piano", "assets/looperman-morpheusd-dreamworld-fullpiano-120-bpm.wav", "#pianovol" ); this.initSfx ( "#applause", "assets/applause.mp3" ); };
Launch the application test URL in a web browser (http://localhost/myaudiomixer) to see the end result. The following is a screenshot of what we should see in the browser:

As previously mentioned, the AudioParam interface has automation support which allows applications to build pretty sophisticated automated behaviors. Let's take a look at the AudioParam automation methods:
The
setValueAtTime()method sets the audio parameter value tovalueat the timestartTime:function setValueAtTime( value:Number, startTime:Number);The following is a diagram illustrating its behavior:

The
linearRampToValueAtTime()method linearly ramps the audio parameter value from the previously set value to the given value,value, at the timeendTime:function linearRampToValueAtTime( value:Number, endTime:Number);The following diagrams illustrate the behavior when ramping up or down to the target value respectively:

The
exponentialRampToValueAtTime()method exponentially ramps the audio parameter value from the previously set value to the given value,value, at the timeendTime:function exponentialRampToValueAtTime( value:Number, endTime:Number);The following are the diagrams illustrating its behavior:

The
setTargetAtTime()method ramps the audio parameter so that it approaches the target value,value, starting at the timestartTime. ThetimeConstantparameter controls the approach rate of the value:function setTargetAtTime( target:Number, startTime:Number, timeConstant:Number);The following are the diagrams illustrating its behavior:

The
setValueCurveAtTime()method applies an array of arbitrary values to the audio parameter. The array values are distributed evenly throughout the automation duration, and the applied value is calculated using linear interpolation:function setValueCurveAtTime( values:Array.<Number>, startTime:Number duration:Number );The following is the diagram illustrating its behavior:

The
cancelScheduledValues()method cancels all the scheduled parameter changes starting at the timestartTimeor later:function cancelScheduledValues( startTime:Number );
Like the playback automation methods we discussed in the previous recipe, all time parameters are in seconds and are relative to the audio context's time coordinate system.
Note
Wondering how to specify the start time for some automation methods such as linearRampToValueAtTime() and exponentialRampToValueAtTime()?
When an automation method does not have a start time parameter, its behavior starts at the nearest previous automation event or the audio context current time, whichever is later.
There are several key rules in regards to scheduling the automation events:
If an event is added at a time when there is already an event of the exact same type, the new event replaces the old one.
If an event is added at a time when there is already an event of a different type, it is scheduled to occur immediately after it.
Events may not overlap – some events occur over time, such as the
linearRampToValueAtTime()automation behavior. No events may be scheduled in the time when such events are active, otherwise Web Audio will throw a runtime exception.
We leverage the AudioParam automation support to implement ducking. The following is the overview of the ducking logic implemented in the AudioLayer class:
We add a
GainNodeinstance into the node graph as the duck controller.When a sound effect is played, we script the duck controller's
gainaudio parameter to reduce the audio output gain level for the duration of the sound effect.If ducking is reactivated while it is still active, we revise the scheduled ducking events so that they end at the appropriate time.
The following is the node graph diagram produced by the code:

Tip
Why use two GainNode instances instead of one?
It's a good idea to split up the independent scripted audio gain behaviors into separate GainNode instances. This ensures that the scripted behaviors will interact properly.
Now, let's take a look at AudioLayer.setDuck() which implements the ducking behavior:
The
AudioLayer.setDuck()method takes a duration (in seconds) indicating how long the duck behavior should be applied:AudioLayer.prototype.setDuck = function( duration ) {We cache the duck controller's
gainaudio parameter induckGain:var TRANSITIONIN_SECS = 1; var TRANSITIONOUT_SECS = 2; var DUCK_VOLUME = 0.3; var duckGain = this.duckNode.gain;We cancel any existing leftover scheduled duck behaviors, thereby allowing us to start with a clean slate:
    var eventSecs = this.audioContext.currentTime;

    duckGain.cancelScheduledValues( eventSecs );
We employ the
linearRampToValueAtTime()automation behavior to schedule the transition in—the audio parameter is scripted to linearly ramp from the existing volume to the duck volume,DUCK_VOLUME, over the time,TRANSITIONIN_SECS. Because there are no future events scheduled, the behavior starts at the current audio context time:duckGain.linearRampToValueAtTime( DUCK_VOLUME, eventSecs + TRANSITIONIN_SECS );We add an automation event to mark the start of the
TRANSITIONOUTsection. We do this by scheduling asetValueAtTime()automation behavior:duckGain.setValueAtTime( DUCK_VOLUME, eventSecs + duration );Finally, we set up the
TRANSITIONOUTsection using alinearRampToValueAtTime()automation behavior. We arrange the transition to occur overTRANSITIONOUT_SECSby scheduling its end time to occur after theTRANSITIONOUT_SECSduration of the previoussetValueAtTime()automation behavior:// Schedule the volume ramp up duckGain.linearRampToValueAtTime( 1, eventSecs + duration + TRANSITIONOUT_SECS ); };
The following is a graph illustrating the automation we've applied to duckGain, the duck controller's gain audio parameter:

In order to have the sound effects activation duck the music volume, the sound effects and music have to be played on separate audio layers. That's why this recipe instantiates two AudioLayer instances—one for music playback and the other for sound effect playback.
The dedicated music AudioLayer instance is cached in the WebAudioApp attribute, musicLayer, and the dedicated sound effects AudioLayer instance is cached in WebAudioApp attribute sfxLayer:
WebAudioApp.prototype.start = function() {
    ...

    this.musicLayer = new AudioLayer( this.audioContext );
    this.sfxLayer = new AudioLayer( this.audioContext );

    ...
};
Whenever a sound effects button is clicked, we play the sound and simultaneously activate the duck behavior on the music layer. This logic is implemented as part of the behavior of the sound effect's click event handler in WebAudioApp.initSfx():
jqButton.click(function( event ) {
    me.sfxLayer.playAudioBuffer( audioBuffer, 0 );
    me.musicLayer.setDuck( audioBuffer.duration );
We activate ducking on webAudioApp.musicLayer, the music's AudioLayer instance. The ducking duration is set to the sound effects duration (we read the sound effects sample duration from its AudioBuffer instance).
The ducking behavior is just one demonstration of the power of automation. The possibilities are endless given the breadth of automation-friendly audio parameters available in Web Audio. Other possible effects that are achievable through automation include fades, tempo matching, and cyclic panning effects.
Please refer to the latest online W3C Web Audio documentation at http://www.w3.org/TR/webaudio/ for a complete list of available audio parameters.
Web Audio allows the output from an AudioNode instance to drive an audio parameter. This is accomplished by connecting an AudioNode instance to an AudioParam instance:
interface AudioNode {
    function connect( destinationNode:AudioParam,
             outputIndex:Number? );
};
The previous code connects an AudioNode instance to a target AudioParam instance. destinationNode is the target AudioParam instance, and outputIndex is the AudioNode output to connect to it.
This functionality allows applications to automate audio parameters using controller data from data files—the controller data is loaded into an AudioBuffer instance, and is injected into the node graph using an AudioBufferSourceNode instance.
The following node graph illustrates this approach for controlling the output volume using controller data from a file:

The automation data can be generated even at runtime using JavaScript. The following node graph employs this method to automate a sound sample's output volume:

Unfortunately, the implementation details for accomplishing these effects are beyond the scope of this book. Therefore, I leave the task of producing working examples of these cases to you, the readers.
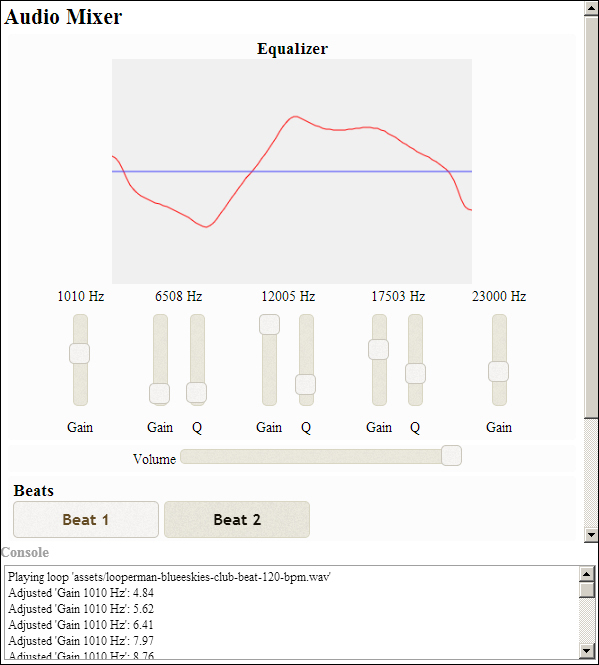
One of the big advantages of using Web Audio is its built-in supporting for constructing sophisticated audio effects in real time. In this recipe, we'll use Web Audio's BiquadFilterNode functionality to build a 5-band equalizer. The implementation includes a real-time equalizer frequency response chart display so that we can visualize the equalizer's impact on the sound output.
This time, we're building our recipe from an audio mixer template so that we can focus specifically on the equalizer implementation (you'll find the template source code in the code bundle at tools/
AudioMixerTemplate). I recommend familiarizing yourself with its implementation—the implementation uses the Web Audio techniques and features we've covered so far.
The complete source code for this recipe is available in the code bundle at recipes/Recipe6_1.
Start with a clean copy of the audio mixer template. The template bundle is located at
tools/AudioMixerTemplatein the code bundle.Open
index.htmlin a text editor.We'll add our equalizer controls to the HTML section:
<div id="appwindow">
<h2>Audio Mixer</h2>
<form>
    <div class="audiopanel" style="text-align: center;">
        <h3>Equalizer</h3>
        <canvas id="eqcanvas" width="400" height="250">
        </canvas><br>
        <div style="display: inline-block; margin: 0 20px;">
            <span id="eq_label_0"></span><br>
            <div style="display: inline-block;">
                <span id="eq_gain_0" style="display: inline-block; height: 100px; margin: 10px;"></span><br>
                <span>Gain</span>
            </div>
        </div>
        <div style="display: inline-block; margin: 0 20px;">
            <span id="eq_label_1"></span><br>
            <div style="display: inline-block;">
                <span id="eq_gain_1" style="display: inline-block; height: 100px; margin: 10px;"></span><br>
                <span>Gain</span>
            </div>
            <div style="display: inline-block;">
                <span id="eq_q_1" style="display: inline-block; height: 100px; margin: 10px;"></span><br>
                <span>Q</span>
            </div>
        </div>
        <div style="display: inline-block; margin: 0 20px;">
            <span id="eq_label_2"></span><br>
            <div style="display: inline-block;">
                <span id="eq_gain_2" style="display: inline-block; height: 100px; margin: 10px;"></span><br>
                <span>Gain</span>
            </div>
            <div style="display: inline-block;">
                <span id="eq_q_2" style="display: inline-block; height: 100px; margin: 10px;"></span><br>
                <span>Q</span>
            </div>
        </div>
        <div style="display: inline-block; margin: 0 20px;">
            <span id="eq_label_3"></span><br>
            <div style="display: inline-block;">
                <span id="eq_gain_3" style="display: inline-block; height: 100px; margin: 10px;"></span><br>
                <span>Gain</span>
            </div>
            <div style="display: inline-block;">
                <span id="eq_q_3" style="display: inline-block; height: 100px; margin: 10px;"></span><br>
                <span>Q</span>
            </div>
        </div>
        <div style="display: inline-block; margin: 0 20px;">
            <span id="eq_label_4"></span><br>
            <div style="display: inline-block;">
                <span id="eq_gain_4" style="display: inline-block; height: 100px; margin: 10px;"></span><br>
                <span>Gain</span>
            </div>
        </div>
    </div>

    ...

</form>
</div>
We'll add the equalizer functionality to
AudioLayer. In its class constructor, we integrate the equalizer node instances into the audio layer node graph:function AudioLayer( audioContext ) { this.audioContext = audioContext; // Create the volume GainNode this.volNode = audioContext.createGain(); // Expose the gain control this.gain = this.volNode.gain; // Calculate the frequency metrics var EQ_FREQ_MARGIN = 1000; // margin for equalizer range var NODES_NUM = 5; // number of equalizer nodes var tempFilter = audioContext.createBiquadFilter(); var freqMin = tempFilter.frequency.minValue + EQ_FREQ_MARGIN; var freqMax = tempFilter.frequency.maxValue - EQ_FREQ_MARGIN; var freqStep = (freqMax - freqMin) / (NODES_NUM - 1); // Create the equalizer nodes to cover the // frequency spectrum evenly var headNode = audioContext.destination; this.eqNodes = []; this.eqParms = []; for( var nodeIndex = 0; nodeIndex < NODES_NUM; nodeIndex++ ) { // Set up the filter var eqNode = audioContext.createBiquadFilter(); eqNode.frequency.value = Math.round(freqMin + (nodeIndex * freqStep)); if( nodeIndex == 0 ) { // Use a low shelf filter for the lowest filter eqNode.type = "lowshelf"; } else if( nodeIndex == NODES_NUM - 1 ) { // Use a high shelf filter for the lowest filter eqNode.type = "highshelf"; } else { eqNode.type = "peaking"; } // Connect to the previous node eqNode.connect( headNode ); // Keep track of the node this.eqNodes.push( eqNode ); // Add the tweakable audio parameters to the // equalizer parameter array this.eqParms.push({ frequency: eqNode.frequency, Q: eqNode.Q, gain: eqNode.gain } ); // Keep track of the head node headNode = eqNode; } // Connect the volume control to the last head node this.volNode.connect( headNode ); }We'll add the function
AudioLayer.getEqResponse()to return the equalizer's frequency response graph:AudioLayer.prototype.getEqResponse = function( freqs ) { var magCombined = new Float32Array( freqs.length ); // Get the frequency response from all the eq nodes var eqNodes = this.eqNodes; var magCurr = new Float32Array( freqs.length ); var phaseCurr = new Float32Array( freqs.length ); for(var eqIndex=0; eqIndex<eqNodes.length; eqIndex++ ) { eqNodes[ eqIndex ].getFrequencyResponse( freqs, magCurr, phaseCurr ); // Combine the node magnitudes for( var freqIndex = 0; freqIndex < freqs.length; freqIndex++ ) { var magDb = Math.log(magCurr[ freqIndex ]) * 20; magCombined[ freqIndex ] += magDb; } } return magCombined; };In
WebAudioApp, we add the member functionupdateEqGraphic()for rendering the equalizer's response graph:WebAudioApp.prototype.updateEqGraphic = function() { var FREQ_MIN = 10; // Hz var FREQ_MAX = Math.round( this.audioContext.sampleRate * 0.5 ); var MAG_MIN = -80; var MAG_MAX = 80; // Build the frequency response sampler list if( this.eqFreqs == null ) { var FREQS_NUM = 100; var FREQ_STEP = (FREQ_MAX - FREQ_MIN) / (FREQS_NUM - 1); this.eqFreqs = new Float32Array( FREQS_NUM ); for( var freqIndex = 0; freqIndex < FREQS_NUM; freqIndex++ ) { this.eqFreqs[freqIndex] = Math.round( FREQ_MIN + (freqIndex * FREQ_STEP) ); } } // If we have an update scheduled, don't do anything if( this.eqUpdateHandle != null ) return; // Schedule the graphic update this.eqUpdateHandle = later( 0, function(){ this.eqUpdateHandle = null; var canvasCtx = $("#eqcanvas")[0] .getContext( "2d" ); var canvasWidth = canvasCtx.canvas.width; var canvasHeight = canvasCtx.canvas.height; // Calculate the draw steps var stepX = canvasWidth / (FREQ_MAX - FREQ_MIN); var stepY = canvasHeight / (MAG_MAX - MAG_MIN ); // Clear the canvas canvasCtx.fillStyle = "#f0f0f0"; canvasCtx.fillRect( 0, 0, canvasWidth, canvasHeight ); // Draw the frequency response var eqFreqs = this.eqFreqs; var eqMag = this.musicLayer.getEqResponse(eqFreqs); var firstPt = true; canvasCtx.beginPath(); for(var index = 0; index < eqFreqs.length; index++ ) { var x = Math.round( (eqFreqs[index] - FREQ_MIN) * stepX ); var y = canvasHeight - Math.round( (eqMag[index] - MAG_MIN) * stepY ); if( firstPt ) { firstPt = false; canvasCtx.moveTo( x, y ); } else { canvasCtx.lineTo( x, y ); } } canvasCtx.strokeStyle = "#ff0000"; // red line canvasCtx.stroke(); // Draw the neutral response line var neutralY = canvasHeight - Math.round( (0 - MAG_MIN) * stepY ); canvasCtx.beginPath(); canvasCtx.moveTo( 0, neutralY ); canvasCtx.lineTo( canvasWidth, neutralY ); canvasCtx.strokeStyle = "#3030ff"; // blue line canvasCtx.stroke(); }, this ); };Finally, we link the equalizer's HTML control widgets to its corresponding equalizer node and set up the equalizer response graph rendering in
WebAudioApp.start():WebAudioApp.prototype.start = function() { .. // Initialize the volume slider this.initSlider( "#musicvol", this.musicLayer.gain, 0.01, "music volume" ); // Initialize the equalizer sliders var eqParms = this.musicLayer.eqParms; for( var nodeIndex = 0; nodeIndex < eqParms.length; nodeIndex++ ) { var parms = eqParms[ nodeIndex ]; var freqValue = String( parms.frequency.value ); this.initSlider( "#eq_gain_" + nodeIndex, parms.gain, 0.01, "Gain " + freqValue + " Hz", { orientation: "vertical" } ); this.initSlider( "#eq_q_" + nodeIndex, parms.Q, 0.01, "Q " + freqValue + " Hz", { orientation: "vertical", min: 0.25, max: 2.5 } ); // Set up the label $("#eq_label_" + nodeIndex).text( freqValue + " Hz" ); } // Set up equalizer graphics update on slider change var me = this; $( "[id^=eq_]" ).on( "slide", function() { me.updateEqGraphic(); } ); // Refresh the equalizer graphics this.updateEqGraphic(); };
Launch the application test URL in a web browser (http://localhost/myaudiomixer) to see the end result. Have fun playing with the mixer!
Web Audio offers a variety of built-in audio processing nodes which can be combined to build sophisticated audio effects. One of these audio processor node types is BiquadFilterNode.
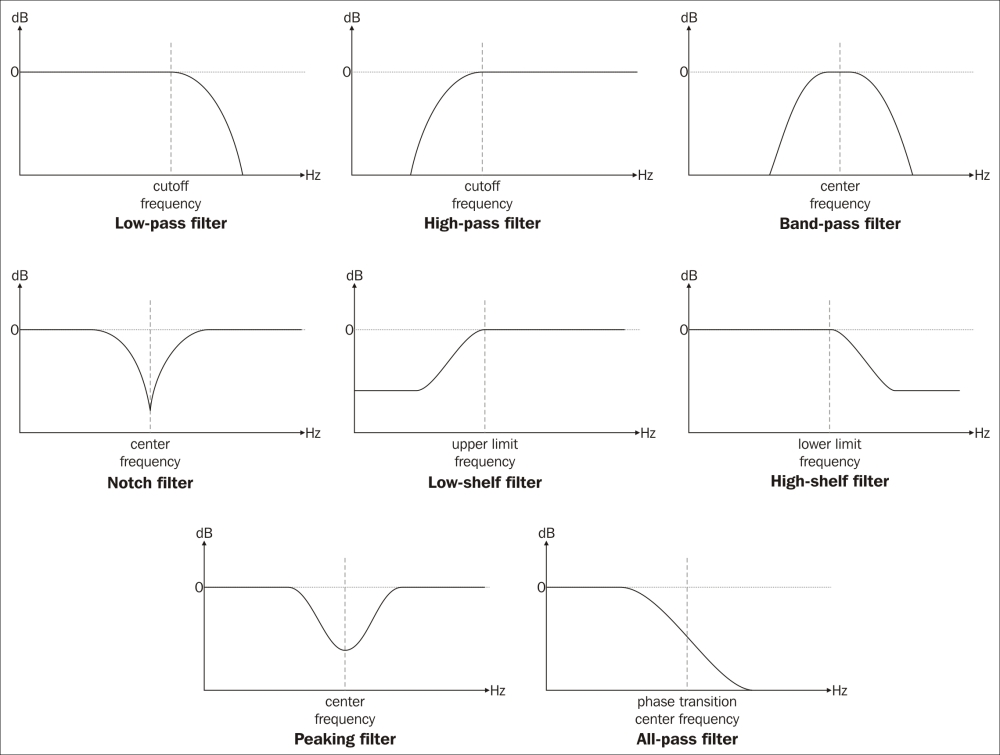
BiquadFilterNode is actually a collection of common low order filters. These low order filters form the building blocks for tonal control and more advanced filters. The following is its class definition:
The
typeattribute indicates the filter type represented by the instance as shown in the following code. Filter types support low-pass, high-pass, low-shelf, high-shelf, and notch filters. We'll discuss this in detail later:interface BiquadFilterNode : AudioNode { var type:String;The
frequency,detune,Q, andgainaudio parameters affect how the filter processes its input signal. The units forfrequency,detune, andgainare Hz, cents (1/100th of a semitone), and dB (decibels—a logarithmic scale for measuring gain), respectively. The units forQvary depending on the type of filter. In fact, the audio parameters are interpreted differently depending on the type of filter:var frequency:AudioParam; // in Hz var detune:AudioParam; // in Cents var Q:AudioParam; // Quality factor var gain:AudioParam // in dBThe
getFrequencyResponse()method returns the frequency response for a list of frequencies as shown in the following code. Applications specify the list of frequencies (in Hz) to sample through thefrequencyparameter. The function then returns the magnitude and phase values associated with the frequencies through the array parametersmagResponseandphaseResponse. Therefore, it is important that thefrequency,magResponse, andphaseResponsearrays are of the same size:function getFrequencyResponse( frequency:Float32Array, // in magResponse:Float32Array, // out phaseResponse:Float32Array ); // out };The magnitude values are returned as a gain multiplier while the phase values are returned in radians.
Tip
Make sure that the
getFrequencyResponse()parameters are theFloat32Arrayobjects instead ofArrayobjects! When the function parameters are not theFloat32Arrayobjects, the function seems to operate normally, except that the method will exit without fillingmagResponseandphaseResponsewith the desired information.
The following table summarizes the BiquadFilterNode filters and how their audio parameters are interpreted:
|
Description |
|
Interpretation | ||
|---|---|---|---|---|
|
|
|
| ||
|
Low-pass filter |
|
The cutoff frequency |
Unused |
The frequency drop-off steepness at the cutoff frequency |
|
High-pass filter |
|
The cutoff frequency |
Unused |
The frequency drop-off steepness at the cutoff frequency |
|
Band-pass filter |
|
Center of the frequency band |
Unused |
The width of the frequency band |
|
Notch filter |
|
Center of the frequency band |
Unused |
The width of the frequency band |
|
Low-shelf filter |
|
The upper limit of the frequencies boosted/attenuated |
The boost or attenuation level |
Unused |
|
High-shelf filter |
|
The lower limit of the frequencies boosted/attenuated |
The boost or attenuation level |
Unused |
|
Peaking filter |
|
Center of the frequency band which is boosted/attenuated |
The boost or attenuation level |
The width of the frequency band |
|
All-pass filter |
|
Center frequency where the phase transition occurs |
Unused |
The transition steepness |
The following is the graphical representation of the filter types:
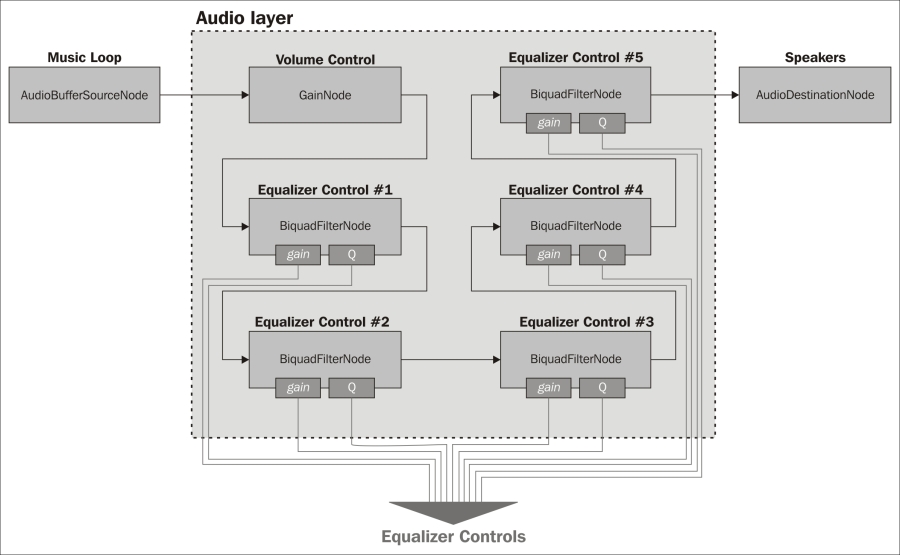
In our recipe, we build a 5-band equalizer by:
Inserting five
BiquadFilterNodeinstances into the node graph—one for each equalizer band. These instances must be inserted in a series so that the output signal is a product of all theBiquadFilterNodeinstances.Exposing each
BiquadFilterNodeinstance'sgainandQaudio parameters so that users can tune the equalizer behavior.
The following is the resulting node graph:
Let's take a look at the equalizer set up code in the AudioLayer class constructor:
First, we'll need to determine the default frequencies for all the equalizer bands. In order to determine this, we'll need to know the supported frequency range. We create a temporary
BiquadFilterNodeinstance and sample itsfrequencyaudio parameter to get the frequency range. This range is reduced byEQ_FREQ_MARGINat both ends yielding the cutoff frequencies for the lowest and highest equalizer bands,freqMinandfreqMax. It's important that the equalizer frequency range has margins on both ends to ensure that the band filters at the ends have enough frequency range to operate properly. Finally, we calculate the default frequency step size between bands and store it infreqStep:function AudioLayer( audioContext ) { ... // Calculate the frequency metrics var EQ_FREQ_MARGIN = 1000; // margin for equalizer range var NODES_NUM = 5; // number of equalizer nodes var tempFilter = audioContext.createBiquadFilter(); var freqMin = tempFilter.frequency.minValue + EQ_FREQ_MARGIN; var freqMax = tempFilter.frequency.maxValue - EQ_FREQ_MARGIN; var freqStep = (freqMax - freqMin) / (NODES_NUM - 1);We instantiate
BiquadFilterNodefor each equalizer band and set itsfrequencyaudio parameter to its default band frequency:// Create the equalizer nodes to cover the // frequency spectrum evenly var headNode = audioContext.destination; this.eqNodes = []; this.eqParms = []; for( var nodeIndex = 0; nodeIndex < NODES_NUM; nodeIndex++ ) { // Set up the filter var eqNode = audioContext.createBiquadFilter(); eqNode.frequency.value = Math.round( freqMin + (nodeIndex * freqStep) );We use a combination of peaking filters, low-shelf filters, and high-shelf filters to model the equalizer's frequency response as shown in the following code. We use a low-shelf filter and a high-shelf filter for the lowest frequency and the highest frequency equalization bands, respectively. We use peaking filters for all the other bands:
        if( nodeIndex == 0 ) {
            // Use a low shelf filter for the lowest filter
            eqNode.type = "lowshelf";
        } else if( nodeIndex == NODES_NUM - 1 ) {
            // Use a high shelf filter for the lowest filter
            eqNode.type = "highshelf";
        } else {
            eqNode.type = "peaking";
        }
Tip
Low-shelf/high-shelf versus peaking filters
It's good practice to use low-shelf/high-shelf filters over peaking filters when dealing with filtering at the frequency extremes. In theory, peaking filters should behave like low-shelf/high-shelf filters when used at the frequency extremes. In practice, the peaking filter frequency response deteriorates rapidly as it approaches the extremes. On the other hand, the low-shelf/high-shelf frequency response remains consistent.
We connect the
BiquadFilterNodeinstances in a series to the audio context'sAudioDestinationNodeinstance. Then, we cache each instance'sfrequency,Q, andgainaudio parameters inAudioLayer.eqParmsso that the applications can access the equalizer controllers directly:// Connect to the previous node eqNode.connect( headNode ); // Keep track of the node this.eqNodes.push( eqNode ); // Add the tweakable audio parameters to the // equalizer parameter array this.eqParms.push({ frequency: eqNode.frequency, Q: eqNode.Q, gain: eqNode.gain } ); // Keep track of the head node headNode = eqNode;Finally, we connect the layer's volume control,
AudioLayer.volNode, to theBiquadFilterNodechain. The volume control is treated as the audio layer's "terminal"AudioNodeinstance—all sourceAudioNodeinstances must be connected to the volume control node in order to be considered as a part of theAudioLayerinstance's node graph:} // Connect the volume control to the last head node this.volNode.connect( headNode ); }
AudioLayer.getEqResponse() implements the logic for calculating the equalizer's frequency response:
Using
biquadFilterNode.getFreqResponse(), we retrieve each equalizer band's frequency response for the target frequency list,freqs. The method fillsmagCurrwith the response magnitude information:AudioLayer.prototype.getEqResponse = function( freqs ) { var magCombined = new Float32Array( freqs.length ); // Get the frequency response from all the eq nodes var eqNodes = this.eqNodes; var magCurr = new Float32Array( freqs.length ); var phaseCurr = new Float32Array( freqs.length ); for( var eqIndex = 0; eqIndex < eqNodes.length; eqIndex++ ) { eqNodes[ eqIndex ].getFrequencyResponse( freqs, magCurr, phaseCurr );We convert each magnitude value from its original gain multiplier value to its dB equivalent:
        // Combine the node magnitudes
        for( var freqIndex = 0;
             freqIndex < freqs.length;
             freqIndex++ ) {
            var magDb = Math.log(magCurr[ freqIndex ]) * 20;
The formula for converting a gain multiplier to dB is as follows:

Then, we sum the magnitude on a per frequency basis. The accumulated magnitude is cached in
magCombined:magCombined[ freqIndex ] += magDb;
We return
magCombinedonce all thebiquadFilterNodefrequency responses have been summed:} } return magCombined; };
Finally, WebAudioApp.updateEqGraphic() renders the equalizer frequency response to an HTML canvas:
FREQ_MINandFREQ_MAXspecify the graph's rendered frequency range as shown in the following code.FREQ_MAXis set to the highest supported frequency so that we get a complete frequency response graph. The highest sample frequency that is supported by anAudioContextinstance is its Nyquist frequency:WebAudioApp.prototype.updateEqGraphic = function() { var FREQ_MIN = 10; // Hz var FREQ_MAX = Math.round( this.audioContext.sampleRate * 0.5 );The graph renders the frequency response in dB units between the range of
MAG_MINandMAG_MAX:var MAG_MIN = -80; var MAG_MAX = 80;The first time we try to render the response graph, we generate the sample frequency list and store it in
WebAudioApp.eqFreqsas aFloat32Arrayobject:// Build the frequency response sampler list if( this.eqFreqs == null ) { var FREQS_NUM = 100; var FREQ_STEP = (FREQ_MAX - FREQ_MIN) / (FREQS_NUM - 1); this.eqFreqs = new Float32Array( FREQS_NUM ); for( var freqIndex = 0; freqIndex < FREQS_NUM; freqIndex++ ) this.eqFreqs[freqIndex] = Math.round( FREQ_MIN + (freqIndex * FREQ_STEP) ); }Because the frequency response retrieval and rendering is a fairly expensive operation, we limit the operation to occur once per update. We enforce this limit by queuing the render operation for the next update and monitoring
WebAudioApp.eqUpdateHandleto determine when the operation has executed:// If we have an update scheduled, don't do anything if( this.eqUpdateHandle != null ) return; // Schedule the graphic update this.eqUpdateHandle = later( 0, function(){ this.eqUpdateHandle = null;We start the frequency response graph rendering by clearing the canvas:
        var canvasCtx = $("#eqcanvas")[0].getContext( "2d" );
        var canvasWidth  = canvasCtx.canvas.width;
        var canvasHeight = canvasCtx.canvas.height;

        // Calculate the draw steps
        var stepX = canvasWidth / (FREQ_MAX - FREQ_MIN);
        var stepY = canvasHeight / (MAG_MAX - MAG_MIN );

        // Clear the canvas
        canvasCtx.fillStyle = "#f0f0f0";
        canvasCtx.fillRect( 0, 0, canvasWidth, canvasHeight );
We retrieve the equalizer's frequency response by calling
AudioLayer.getEqResponse()with the sample frequency list cached inWebAudioApp.eqFreqs:// Draw the frequency response var eqFreqs = this.eqFreqs; var eqMag = this.musicLayer.getEqResponse( eqFreqs );We render the response graph as a red line strip:
        var firstPt = true;
        canvasCtx.beginPath();
        for(var index = 0; index < eqFreqs.length; index++) {
            var x = Math.round(
                       (eqFreqs[index] - FREQ_MIN) * stepX );
            var y = canvasHeight - Math.round(
                       (eqMag[index] - MAG_MIN) * stepY );
            if( firstPt ) {
                firstPt = false;
                canvasCtx.moveTo( x, y );
            } else {
                canvasCtx.lineTo( x, y );
            }
        }

        canvasCtx.strokeStyle = "#ff0000";  // red line
        canvasCtx.stroke();
Finally, we overlay a blue line indicating the
0dB position.// Draw the neutral response line var neutralY = canvasHeight - Math.round( (0 - MAG_MIN) * stepY ); canvasCtx.beginPath(); canvasCtx.moveTo( 0, neutralY ); canvasCtx.lineTo( canvasWidth, neutralY ); canvasCtx.strokeStyle = "#3030ff"; // blue line canvasCtx.stroke(); }, this ); };
Finally we talk about the two most popularly used audio processors in Web Audio.
The biquadFilterNode and GainNode instances are just two of the many built-in audio processing nodes available in Web Audio (volume manipulation is considered a form of audio processing).
The following table highlights some of the more popular audio processor classes:
|
Class |
Description |
|---|---|
|
|
Spatializes an incoming audio signal in 3D space. |
|
|
Compresses the volume range of an incoming audio signal. It accomplishes this by lowering the volume of loud segments and raising the volume of soft segments. |
|
|
Delays the incoming audio signal by a specified time delay. |
|
|
Mixes an incoming audio signal with an impulse response waveform. This audio processor is a fundamental building block for reverberation effects. |
The following node graph illustrates a reverberation effect constructed using Web Audio's built-in audio processing nodes:
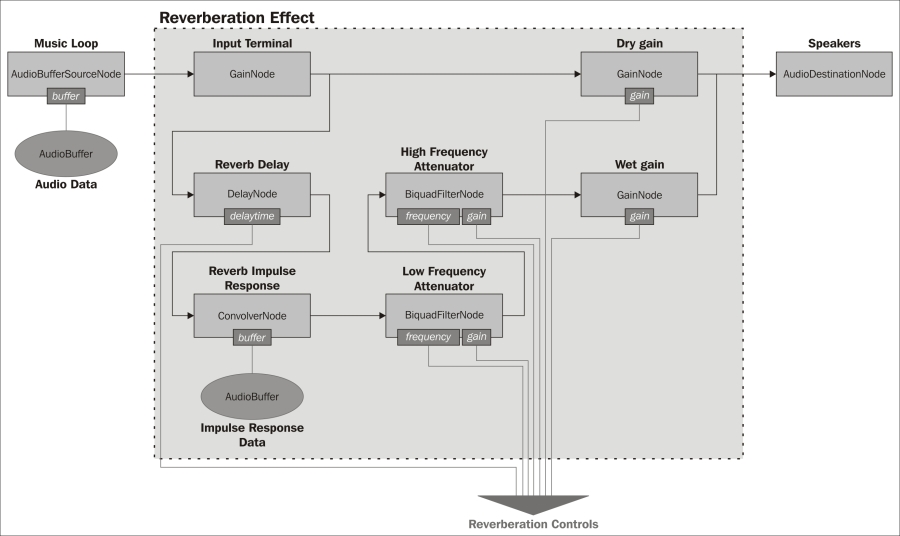
The example exposes the most common reverberation control parameters, which are:
Reverberation delay
Impulse response
Reverberation high cut-off frequency
Reverberation low cut-off frequency
Dry/wet mix
Unfortunately, a technical implementation of the reverberation audio processor is beyond the scope of this book. Hopefully, the example will serve as an inspiration and jump point to greater and more exciting real-time audio processors on the Web.
This concludes our exploration of the Web Audio API.
