


The iBooks application is not pre-loaded on the iPhone and iPad, so users that want to read books on their iOS device need to download the iBooks app from iTunes.
To download and install apps from the iTunes store, you need to have an Apple ID registered and/or iTunes. An Apple ID is free to create, so don't hesitate to get one.
The iBooks App is available for download on https://itunes.apple.com/us/app/ibooks/id364709193?mt=8 (current version being 3.0.2).

Visiting the mentioned link from your iOS device will open the iTunes App Store on your device. You can download the iBooks app like any other app. Alternately, users can also type in iBooks on their iPhone App Store to download the iBooks app.
The iBooks app is an application developed by Apple to work on iPhone, iPad, and iPod devices for e-book reading, annotation, Multi-Touch books, and textbooks. It supports the industry standard .epub, .pdf, and .ibook (Apple proprietary) formats for the books.

iBookstore is an in-app store within the iBooks app that allows consumers to browse and download over 1.5 million books.
Open the iBooks App and hit the Store button on the top-left corner of the screen (on the iPad, on the iPhone it is on the top-right corner), to open the iBookstore, as shown in the following screenshot (iPad version):

You can switch back to your book library by tapping on the Library button on the top-left corner of the iBookstore window.
The iBookstore lists books by all categories by default. Various books on categories such as biography, fiction, history, travel, and adventure are available to download.
Let us look at downloading a few books on London from the iBookstore. Open the iBookstore and search for London; you will get a plethora of books on London—from history of London to a book on London's underworld!

Tap on the Free button next to the book listings to download and add the book to your iBooks library.
Books can also be downloaded from the iTunes app on your Mac or Windows desktop. To do so, open iTunes and navigate to the iTunes store section, select Books from the navigation bar on the top.

The books available via iBookstore vary from country to country. Some titles may not be available in your region.
Free and paid books are downloaded just as free and paid apps are downloaded for iPhone or iPad, from iTunes. If you have downloaded apps for your iOS devices via iTunes, you shouldn't have any problems downloading books as well.
iBooks allows us to select text, underline it, make a note on the selected text, search a word in the dictionary or the Internet, or even search within the book. Some interactive books can also play audio/video or even audio navigation using the read-aloud feature, for general books. The VoiceOver utility on your iOS device can read out a book to the user.
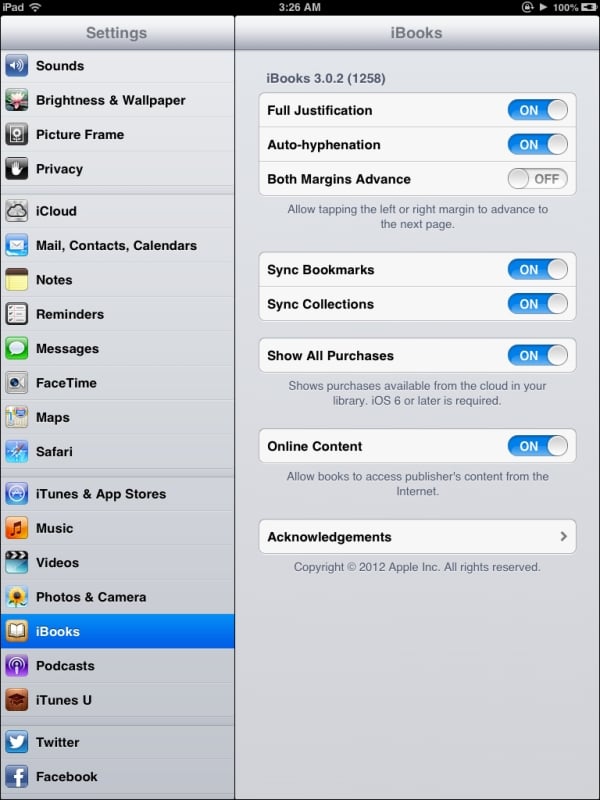
For VoiceOver, on your iPhone, navigate to Settings | General | Accessibility and slide VoiceOver to On. Remember that VoiceOver will change the iOS device's behavior depending on the following actions:
Tapping once will select an item
Double-tapping will activate the selected item
Swiping three fingers will scroll the page
To copy, highlight, take a note, search, or share, double-tap the start of the text area and drag-select the required text; a pop up will appear on the page with the desired actions as seen in the following screenshot:

To highlight a text with different colors and underline it, just select the text with the highlighter and it will highlight the text (the default color is yellow).

Tapping the highlighted text shows a pop-up menu to change to different colors or underline the text, as well as the option to remove the formatting completely.

Besides, the sharing option (e-mail, Facebook, Message, Twitter) becomes available with both, the regular double-tap-to-select-text and single-drag-to-select-text methods.
Another great feature for reading is Fonts and Themes that allows a reader to increase/decrease font size and font family, as well as change the background between white, sepia, and black—allowing for great customization of the reading experience.

Here is the same page in night mode! Note that reading in night mode causes less strain to your eyes in the dark.

iBooks has a great in-built functionality to make the reading experience as simple, elegant, and helpful as possible for a reader. No wonder sales of iBooks and iPads in the education sector are growing rapidly, so much so that some universities dole out iPads to students joining their courses.
If you are an avid reader of e-books and have hundreds of e-books and PDF files in your library, then you would know that managing, sorting, and organizing them in an efficient way is a tireless thing. With iBooks, you have an excellent way to organize and tag your books via Collections, something akin to creating folders and storing files therein.
We'll consider our previous example; we could download all books returned via the search for the keyword "London" and store them in a collection called "London" on our iOS device.
By default, iBooks has two collections: Books and PDFs, and as you buy books from the iBookstore, another collection gets added: Purchased Books.
Creating a collection:
To store all books related to "London" that we downloaded from the iBookstore, we create a collection called
Londonby tapping the Collections button on the iBooks app.
Then we'll tap on New to create a new collection and will name it
London, as shown in the following screenshot:
Adding books to Collections:
Once we have downloaded the books and they are visible on the iBooks' bookshelf, we can add the books to a collection by tapping the Edit button on the top-right corner of the screen.

Tap on the books we want to move to our collection and tap the Move option from the top-left corner of the screen and select London as shown in the following screenshot:

Moving, deleting, and re-arranging books in your collections:
Within our collection, we can move books to other collections as well as delete books by using the Edit button on the top-right corner within iBooks. You can re-arrange the books on the bookshelf by a simple drag-and-drop action.
By default, the bookshelf displays books in a grid view, but we can change the view by selecting the List View icon on iBooks, which displays the books in a neat list that can be sorted by title, author, and category.

The most popular format for e-books is still PDF, since it makes a strong case for easy distribution and wide acceptance with multiple readers; desktop, web, and mobile all support PDF documents almost natively.
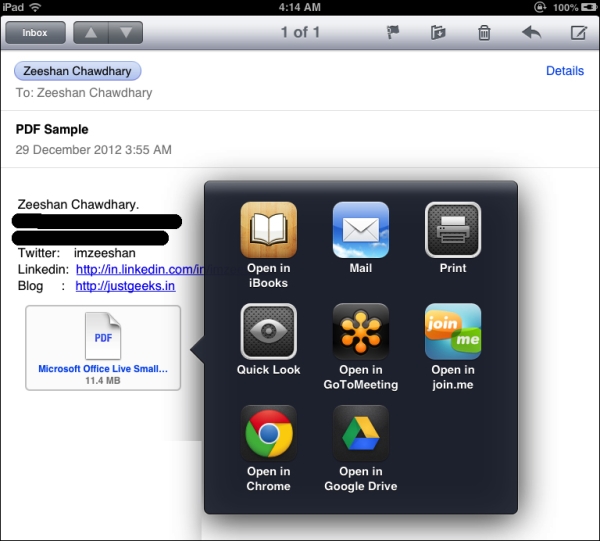
iOS devices detect PDF from e-mails, web pages, and so on and show an Open in iBooks button to open the PDF directly in iBooks.
I have some free PDF books from Packt Publishing J in my account at https://www.packtpub.com/. I will download one of them and add it to iBooks via e-mail. Here is how a PDF can be added to iBooks from within an e-mail:
Apple provides an excellent e-book publishing tool—iBooks Author, available free via the Mac App Store, a tool that makes writing interactive e-books for iPad a breeze.
The current Version 2.0 of iBooks Author supports the following features:
Multi-Touch books
Interactive images and video support
3D support
Custom HTML widgets
Export to PDF
Custom fonts support
Mathematical expressions support
Retina display support
Drag-and-drop content support
Templates for common book formats—cookbooks, photo books, and so on
Publishing books to iBookstore from within iBooks Author
You need an iPad to test/preview your books on the iPad, so make sure you accessorize yourself with one.

iBooks Author comes loaded with some default templates to get you started with your book-writing adventure; from simple textbook templates to cookbooks and photo books. When you load iBooks Author, the first window that loads prompts you to select a default template from the available library.
Note
With Version 2.0 of iBooks Author, there is an option to select a Portrait Only mode that does not take the iPad orientation into consideration. This provides for better control of the layout.
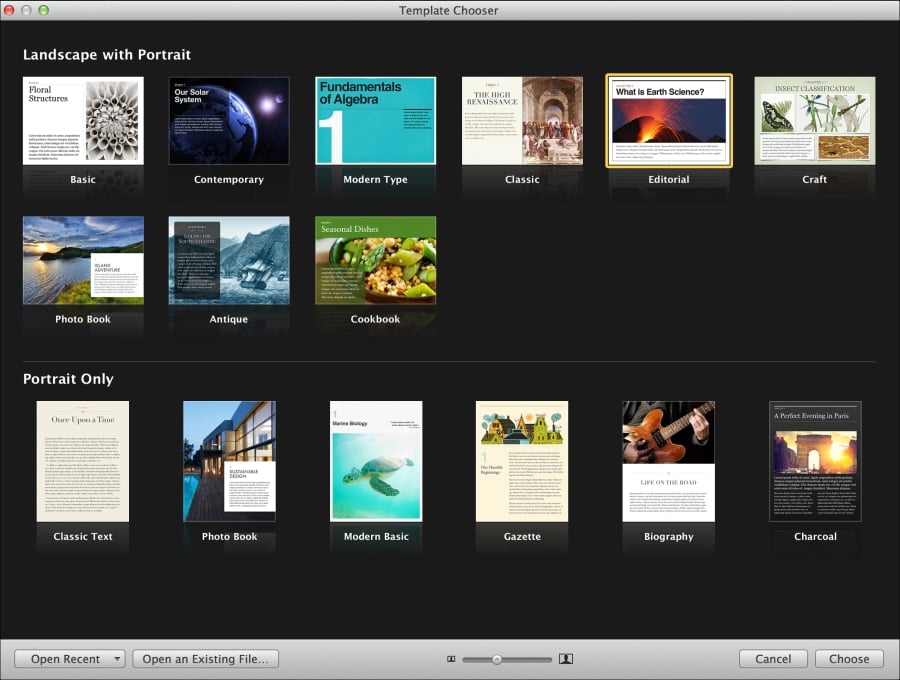
Open iBooks Author and select the Basic template from the Landscape with Portrait page. This is a sample book with the following pages:
Book Title page
Table of Contents page
Glossary page
Intro Media page—think of this as a splash screen for your book
A few pages of dummy content
We can customize this book by adding or replacing text, widgets, and other media, as can be seen in the following screenshot:

Similarly, to preview the book on your iPad, connect your iPad to your Mac and click on the Preview button to open your book on your iPad. Note that the iBooks app should be open on your iPad, otherwise you will see an error message such as the following:
To preview your book, make sure iBooks is open on your iPad
The other templates provide a similar interface to your book, just with a different look and feel and layout based on the template's theme. Besides the default templates available in iBooks Author, the Internet is full of templates for various types of books—some free templates, others need to be paid for.
A good set of free templates is Templates for iBooks Author Free available on the Mac App Store, https://itunes.apple.com/us/app/templates-for-ibooks-author/id527161787?mt=12, while there is a great number of paid templates, the most notable being iBooks Author Templates available at http://www.ibooksauthortemplates.com/templates/all and Book Palette from http://www.jumsoft.com/book-palette/.
So far, we have seen how to add books and PDFs to iBooks, also, we played a bit with iBooks Author. Now let us create a full working book with iBooks Author titled London CityGuide. This will incorporate all the widgets and functions available within iBooks Author as well as a case study for layout/design.
The content will be travel-specific for London, sourced from www.WikiTravel.org, Wikipedia, and other open sources. Images will be from Creative Commons wherever possible, or free to use, depending on licenses from original owners.
The finished book is available for download via the iTunes store at https://itunes.apple.com/us/book/london/id593298852?ls=1.
Building the front page:
Open iBooks Author and select the Editorial template. We will replace the placeholder image on the first page with an image of Tower Bridge from http://wikitravel.org/en/File:Tower_bridge_London_Twilight_-_November_2006.jpg.

Add the Tower Bridge image to your iPhoto library and then the image will be available for use within iBooks Author.

Within iBooks Author, now you can drag this image to the placeholder image on the first page to make your page look like the following:

Replace the dummy text on the introduction page with a generic description of London from WikiTravel. You may need to remove/edit some text to accommodate the spacing and layout; we have used the text "
Noisy, vibrant and truly multicultural, London is a megalopolis of people, ideas and frenetic energy. The capital and largest city of both the United Kingdom and of England, it is also the largest city in Western Europe and the European Union. Situated on the River Thames, London remains an international capital of culture, music, education, fashion, politics, finance and trade."Now for the book's cover page, let us use the Clock Tower photo from http://wikitravel.org/en/File:Clock_Tower.jpg. Now your book cover should look like the following; note that this is how the book will be displayed on the iBooks Bookshelf as well:

Building the History page:
The next page in our London CityGuide book will be a page that describes the history of the city of London. Click on page 2 of your book in iBooks; based on our template chosen earlier, page 2 of our book should look like the following screenshot:

We will now use information from Wikipedia (http://en.wikipedia.org/wiki/London) to build our History page. We copy the historical facts about London from Wikipedia, format it, and copy it to our page 2. As we keep adding content to our page, iBooks Author automatically adds new pages, depending upon the text.
Don't forget to rename the title of page 2 from Untitled to
History; you can do so by right-clicking on page 2 and selecting the Rename option.
After adding our history information from Wikipedia, our History page should now look like the following:

Building the Transportation page:
We will create another section in our book to accommodate the transportation information for London; we do so by copying the Section 1 (History) page and renaming it to
Transportation:

Previewing the books on your iPad:
Now would be a good time to have a quick look at the book and how it works on the iPad. The new iPad mini was used during the writing of this book. Now, we will move on to discussing how to preview books on your iPad (without submitting books to iBookstore).
From within iBooks Author, click on the Preview button on the toolbar in the header.

Here is how our London CityGuide book looks on an actual iPad, starting with the index page:

Clicking on Introduction or swiping right-to-left (page-turn effect), shows us the Introduction page:

Similarly the History page (in landscape mode) looks stunning with the Thames river backdrop!

While the Transportation page looks like the following:

Building the Culture page:
In the previous section, we added a new section to our book, using the copy-and-paste method. iBooks Author also provides another way to add pages, sections, or even chapters to our book via the Add Pages button in the header toolbar. We use the same method to add a new section to our book and name it
Culture.
We can also select the different layouts that we want for our section, as shown in the preceding image. We choose the Section Text layout for our Culture section. We then copy over the cultural information about London from Wikipedia onto our iBooks Author (after some formatting, by removing citations from the Wikipedia text). Note that on all the pages where we have used images to make our London CityGuide elegant, these images are sourced from Wikipedia and due attribution needs to be provided to the authors.
Our Culture page now looks like the following:

Having added a few background and general information about London, let's move forward to adding new chapters for attractions, restaurants, and shopping.
Adding chapters for attractions and restaurants:
We start by adding a new chapter using the Add Pages button from the header toolbar within iBooks Author and naming it as
Attractions. The content for this chapter will be sourced from the WikiTravel page for London—http://wikitravel.org/en/London#See.Similarly, we will add chapters for restaurants and add content from open source travel guide websites such as www.Wikitravel.org and www.Wikipedia.org. We will not go into the details of adding all the pages, since it is redundant, and by now you, the reader, should have a good idea of how things work with iBooks Author!
Here is how the Attractions page should look like; for the benefit of the readers, we are including the full source code and text for this book; the name of the file is
London_CityGuide.ibaand it is available for download via the book's page on www.packtpub.com.

Note
Downloading the example code
You can download the example code files for all Packt books you have purchased from your account at http://www.packtpub.com. If you purchased this book elsewhere, you can visit http://www.packtpub.com/support and register to have the files e-mailed directly to you.
There is more to an iBooks' book than text and images. With iBooks Author, you can add more interactivity to your books by adding HTML widgets and 3D models. Let's look at how iBooks Author helps us implement some of these exciting technologies in our books.
For our Attractions chapter we will add a few 3D models from Google Warehouse—http://sketchup.google.com/3dwarehouse/.
iBooks Author supports importing HTML5 widgets in the form of the .wdgt extension, which is basically a folder containing our HTML5 code, images, and an Info.plist file, which provides the iBooks app with information on how to run the HTML5 widget. We will create a simple Twitter widget that will pull information for the keyword "London" from Twitter.
Create a folder and name it
twitter-widget-ibooks, and within the folder create anindex.htmlfile using your favorite text editor. Using a simple Twitter Mashup from http://www.designchemical.com/blog/index.php/jquery/jquery-tutorial-create-a-jquery-twitter-feed-plugin/, we modify the code to search for the keyword "London".Here is how the HTML page should look now:

Rename the
twitter-widget-ibooks foldertotwitter-widget-ibooks.wdgt; the folder icon should now look like a widget icon.Once the widget is ready, open iBooks Author and reload our London CityGuide book. Within the History section of the first chapter, insert an HTML widget using the Widgets button the toolbar, as shown in the following screenshot:

Drag the HTML widget under the At a Glance section, and keeping the HTML widget selected, under the Interaction tab in Inspector, select the
twitter-widget-ibooks.wdgtwidget we created before:
Previewing the book on your iPad shows the following results:

To see the real-time tweets for London, click the Twitter icon, and you should see an overlay with real-time tweets for London. Clicking on the X icon on the overlay will bring you back to the book's page.

Similarly, iBooks Author also supports importing 3D models as an interactive content within our books. Download a COLLADA (
.daefile) model from http://sketchup.google.com/3dwarehouse/details?mid=e47ab8e194c03e5d5e73daf3c0b064fa.
Extract the 3D model and import the same within our Attractions chapter, as shown in the following screenshot:

Preview the book on your iPad to see the 3D model in action!
The HTML5 widget is a collection of HTML, JavaScript, images, and an Info.plist file that notifies the iBooks app to render an HTML code.
Apple has added support for 3D objects in a completed book with up to 50,000 moderately-textured polygons for the second-generation iPad and iPads with a Retina display; for the first-gen iPad, this number is 20,000. The format supported right now is COLLADA—an interchangeable file format for 3D applications supported by most companies and 3D modeling software.
Apple has put a good overview on how HTML widgets can be compiled, and specifications for the can be found at http://support.apple.com/kb/HT5068.
Question: I cannot preview my book on my iPad from iBooks Author.
Answer: Make sure the iBooks app on your iPad is open and you have connected your iPad to your MacBook or iMac.
Question: I cannot download some books from iBookstore.
Answer: The iBookstore collection varies from country to country; some books may not be available in all countries.
Question: Does iBooks Author support custom fonts?
Answer: Yes, iBooks Author supports custom fonts; only true type fonts (.ttf) and open type fonts (.otf) are supported for now.
Question: Can I sell my books on iBookstore?
Answer: Yes, you can distribute your books for free or can allow paid books to be downloaded from the iBookstore similar to paid apps, with the 70-30 distribution model.
Question: Can I export my book created with iBooks Author in other formats?
Answer: Yes, iBooks Author supports exporting the book in PDF and plain text.
Question: My 3D model does not load quickly in my book.
Answer: This may depend on the number of polygons in your 3D models, for large models, try to reduce the polygon count for faster loads.