


Welcome to Apache ServiceMix How-to. Creating a reliable integration solution can be easy if you only choose the right tools for the job. Apache Camel and ServiceMix are leading integration technologies dedicated to dealing with the complexity of messaging solutions. Learn how to efficiently create integration solutions with bleeding-edge open source Apache software.
This book will guide you on how to install ServiceMix and will help you to get it up and running in no time. It will take you through a number of practical recipes, starting with the basic commands of the Apache Karaf container and ending with the deployment of JMS and Web Service solutions.
This recipe will quickly guide you through the process of installing the ServiceMix container.
Before we install ServiceMix, we need to decide the distribution we want to use. ServiceMix comes in two flavors. The first one is a standard open source bundle—usually called ServiceMix. The second popular type of ServiceMix distribution (provided by the commercial vendor FuseSource) is called FuseESB.
In this book we will focus on the standard ServiceMix distribution. The argument behind this decision is that pure ServiceMix is an open source project from the Apache Software Foundation, and for learning purposes, it is always better to stick to the open Apache standards. However, migrating from ServiceMix to FuseESB is a painless process, so if you know how to use ServiceMix, you will also know how to deal with the FuseESB as well.
Before we start, make sure that you have Java JRE Version 6 installed on your machine. Also make sure that you have got at least 100 MB of free hard disk space. ServiceMix can be installed on machines running either Unix or Windows operating systems.
Begin by downloading a ServiceMix distribution from one of the Apache mirror sites. Suggested locations are listed on the ServiceMix download page (http://servicemix.apache.org/downloads.html). The ServiceMix downloads are available in several flavors, called assemblies. For now, we are interested in the latest Default assembly of ServiceMix available for your platform. If you are curious what the other flavors of ServiceMix available for download are, read the There's more… section of this recipe.
After you download the archive appropriate for your operating system, decompress it to the desired directory. From this point onwards, we will refer to this directory as SERVICEMIX_HOME.
Download the Default assembly of ServiceMix from the project site.
Unpack it to the desired directory.
If you want to make a quick sanity check of your ServiceMix installation, use the command line to navigate to your SERVICEMIX_HOME directory and execute the following (bin/servicemix.bat if you are running on Windows):
script – bin/servicemix
If you see an output similar to the following, then you can congratulate yourself, as you have just started your very first ServiceMix container.

ServiceMix comes in several flavors and distributions. Some of them are maintained by commercial companies. Here is some extra information that will throw more light on these issues.
One of the questions that almost always arises when somebody starts to work with ServiceMix is whether you should choose the pure ServiceMix distribution or the FuseESB. Although we consequently use the standard ServiceMix distribution throughout this book, it's recommended to stick to the FuseESB in a production environment whenever possible. There are almost no technical differences between ServiceMix and FuseESB, however, the latter comes with commercial support and some additional utilities. This aspect of FuseESB may be critical for the business people, who decide about the future of a project in your company.
FuseSource (http://fusesource.com) is the company behind the FuseESB distribution of ServiceMix. What cannot be overemphasized is the fact that FuseESB hires (http://fusesource.com/community/apache-committers-and-fuse) more than twenty committers and PMCs (Project Management Committee) to their ServiceMix stack subprojects (Apache ServiceMix, Apache Camel, Apache CXF, and Apache ActiveMQ).
Note that ServiceMix is in a fact a customized distribution of Apache Karaf. So technically speaking, you are actually installing an Apache Karaf instance on your hard drive.
Apache Karaf (http://karaf.apache.org) is a mature OSGI container framework. It supports both Apache Felix (http://felix.apache.org) and Eclipse Equinox (http://www.eclipse.org/equinox) OSGI runtimes.
Apache ServiceMix is available for download in the following bundles, called assemblies:
Default assembly: This is the standard distribution of ServiceMix, which downloads additional dependencies from the Internet if needed. This assembly is what you need to download in the majority of the cases.
Source assembly: This is compressed archive of the sources of ServiceMix. You can build ServiceMix with these sources. It's good for ServiceMix experts with some special needs that can be fulfilled only with a custom build.
Full assembly: This is ServiceMix with optional dependencies downloaded already. This is useful when installing ServiceMix in an offline environment. Keep in mind that the size of the Full assembly is significant as it already contains all the optional features of ServiceMix.
JBI assembly: The JBI assembly is deprecated ever since Version 4 of ServiceMix was released. Use this assembly if you want to migrate from ServiceMix 3 (that is, install your legacy JBI artifacts on ServiceMix 4). JBI (Java Business Integration) and is the JSR-based specification of how SOA (Service-Oriented Architecture) should be implemented in Java. You can read more about JBI from http://en.wikipedia.org/wiki/Java_Business_Integration.
Minimal assembly: This assembly allows you to compose a custom version of ServiceMix at runtime. This option is suitable for advanced users who want to install ServiceMix in a resource-restrictive environment.
This book covers the raw ServiceMix distribution from the Apache team. Unfortunately, the default ServiceMix installation doesn't come with a GUI (Graphical User Interface) installer. So if you prefer to install software products from GUI windows instead of the text-based command line, you need to take a look at another ServiceMix distribution. The option that may suit you well is FuseESB (also available as a free download). FuseESB is a ServiceMix distribution developed and supported by the FuseSource company. One of the additional features that FuseESB brings to its ServiceMix distribution is the GUI installer.
JBI is a specification of the SOA (Service Oriented Architecture) and ESB (Enterprise Service Bus) standards for Java platforms. JBI is described by the JSR-208 and JSR-312. You can learn more about JBI from the Wikipedia article at http://en.wikipedia.org/wiki/Java_Business_Integration.
The ServiceMix JBI assembly distribution comes with a set of preinstalled JBI bundles. In particular, JBI bundle starts the NMR (Normalized Message Router). NMR is the central component of the JBI container. It is responsible for routing the XML messages formatted according to the JBI specification.
While skipping through the table of contents of this book, you may have noticed that there are no recipes dedicated for the JBI topic except for this one. You may also wonder why is that so.
The answer to this question is quite simple: JBI is considered by the ServiceMix team as a deprecated technology. In fact, the JBI specification will no longer be maintained by the Java Community Process. JBI support is officially deprecated in ServiceMix 4, and will possibly be removed in the future versions of ServiceMix.
In the author's opinion, a major flaw of the JBI is that components developed according to this specification are unnecessarily complicated with respect to development and maintenance. The official guidelines from the ServiceMix team suggest starting new projects using Camel routing in favor of the JBI components. And, in fact, if you try to compare the same integration solution based on JBI and Camel, you will see clearly that Camel routes are much more readable (and therefore maintainable). Camel also provides much more components out of the box compared to the ones available for the ServiceMix JBI.
Sometimes, however, you may want to use JBI components for ServiceMix. You may be migrating from the previous version of ServiceMix to Version 4 (which makes heavy usage of the JBI-based routing). You may also use JBI for some other reasons. If you plan to use JBI, you should install the JBI-enabled version of ServiceMix.
If for some reason you need to work with JBI, this recipe will guide you through the process of installing ServiceMix with JBI support enabled.
In order to use JBI with ServiceMix, download the version of ServiceMix distribution called the JBI assembly. The installation process of the JBI-ready ServiceMix is exactly the same as in the case of a regular ServiceMix distribution described in the previous recipe. The only difference is that you need to download JBI assembly from the ServiceMix downloads page (http://servicemix.apache.org/downloads.html).
Download and install ServiceMix with JBI support enabled.
Deploy your JBI Service Assemblies into the ServiceMix container.
The details of the installation process of the ServiceMix bundle is described in the previous recipe.
This section provides some additional information associated to JBI and ServiceMix working together.
Apache Camel is the recommended routing engine for ServiceMix starting from Version 4. You can think of ServiceMix 3 as the JBI-centric ESB with Camel support. In this case, ServiceMix 4 is a Camel-centric ESB with the optional JBI support for legacy purposes.
Apache Camel provides a JBI component (http://camel.apache.org/jbi.html), which integrates ServiceMix implementation of NMR with Camel routes. If you plan a marriage of your legacy JBI modules with a new integration code written in Camel, consider applying this useful component.
If you are interested in the opinions of ServiceMix authors regarding JBI support in ServiceMix, consider reading this blog post: http://gnodet.blogspot.com/2010/12/thoughts-about-servicemix.html and this discussion thread: http://servicemix.396122.n5.nabble.com/DISCUSS-ServiceMix-future-td3212177.html. This is a mandatory lecture for all the integration architects planning to start a greenfield ServiceMix-based project using JBI.
This recipe will guide you through the process of starting the ServiceMix container. This recipe will focus on running ServiceMix as a daemon, since you already learned how to start ServiceMix in the interactive mode from the previous recipe.
In all the recipes of this book, we will refer to the ServiceMix installation directory as SERVICEMIX_HOME. Note that, in fact, there is no environmental variable with such a name. This is just a logical term that will make ServiceMix examples clearer (you can think of it as a variable in a programming language).
So before we start, make sure that you have ServiceMix properly installed on your hard drive. You also need to know the value of your SERVICEMIX_HOME (that is, where ServiceMix has been installed).
Execute ServiceMix's start script (SERVICEMIX_HOME/bin/start for Unix and SERVICEMIX_HOME/bin/start.bat for Windows).
Just after you confirm the start command, ServiceMix will be executed as a background process. That also means that the command-line control will be returned to you almost immediately.
After you start ServiceMix, it should validate that the start command has actually done what it ought to. To check that everything went as we expected, connect to the running ServiceMix instance with the shell. You can do it with the following command-line instruction:
SERVICEMIX_HOME/bin/client -u smx -p smx
If you start ServiceMix on Windows instead of Unix, use the following version of the client command:
SERVICEMIX_HOME/bin/client.bat -u smx -p smx
The following screenshot shows how the ServiceMix shell looks like:
After you connect to ServiceMix with the interactive shell, you can fire the log:tail command to track ServiceMix's log (similarly as you would with Unix's tail command). To stop displaying logs with the tail command, press Ctrl + C in the ServiceMix console. An example of the output of the tail session is shown as follows:
smx@root> log:tail
22:04:01,608 | INFO  | rint Extender: 3 | TransportServerThreadSupport     | 50 - org.apache.activemq.activemq-core - 5.5.1 | Listening for connections at: stomp://localhost:61613
22:04:01,610 | INFO  | rint Extender: 3 | TransportConnector               | 50 - org.apache.activemq.activemq-core - 5.5.1 | Connector stomp Started
22:04:01,611 | INFO  | rint Extender: 3 | BrokerService                    | 50 - org.apache.activemq.activemq-core - 5.5.1 | ActiveMQ JMS Message Broker (default, ID:drone-48785-1340136241458-0:1) started
^C
smx@root>
It is easy to guess that if you want to stop ServiceMix, you need to use a command similar to the one you used to start it:
SERVICEMIX_HOME/bin/stop
And the following command on the Windows operating system:
SERVICEMIX_HOME/bin/stop.bat
You can check whether ServiceMix has been stopped properly by looking into the container logfile. The location of the ServiceMix logfile is SERVICEMIX_HOME/data/log/servicemix.log. After you stop your ServiceMix instance, information similar to that presented as follows will be appended at the end of the logfile:
22:08:38,615 | INFO  | FelixStartLevel  | Activator                        | 4 - org.ops4j.pax.logging.pax-logging-api - 1.6.3 | Disabling SLF4J API support.
22:08:38,615 | INFO  | FelixStartLevel  | Activator                        | 4 - org.ops4j.pax.logging.pax-logging-api - 1.6.3 | Disabling Jakarta Commons Logging API support.
22:08:38,616 | INFO  | FelixStartLevel  | Activator                        | 4 - org.ops4j.pax.logging.pax-logging-api - 1.6.3 | Disabling Log4J API support.
22:08:38,616 | INFO  | FelixStartLevel  | Activator                        | 4 - org.ops4j.pax.logging.pax-logging-api - 1.6.3 | Disabling Avalon Logger API support.
22:08:38,616 | INFO  | FelixStartLevel  | Activator                        | 4 - org.ops4j.pax.logging.pax-logging-api - 1.6.3 | Disabling JULI Logger API support.
The commands we presented in this recipe are, in fact, administrative commands of the Apache Karaf container. When you start ServiceMix, you actually start a Karaf instance and tell it to load ServiceMix OSGI modules. The typical ServiceMix modules are Camel-based routes, embedded ActiveMQ message brokers, CXF web services, or Spring contexts.
Following is some interesting information that will be useful when you start to work with ServiceMix and Apache Karaf.
Displaying the tail of the logfile is a very convenient way of tracking the ServiceMix activity. You might be interested in some tips that would make working with the tail command even smoother.
In this recipe we demonstrated two ways of displaying ServiceMix logs. The first one via the Apache Karaf console (using the log:tail command) and the second one by displaying raw logs from the SERVICEMIX_HOME/data/log/servicemix.log file. You may be curious to know the preferred way to trace ServiceMix logs. In general, playing around with the Karaf console is useful when you want to dynamically tune the configuration of the ServiceMix logger and see the results in the logfile immediately. On the other hand, a raw logfile is useful to perform some deeper analysis of events that occurred to your ServiceMix instance (this kind of research is usually performed with Unix tools such as grep, sed, or awk).
Since ServiceMix is based on Apache Karaf, it leverages all the pros of the OSGI specification. The OSGI feature that is probably the most interesting in the context of this recipe is called hot deployment. In many (not to say the majority) of the cases, you will not need to restart ServiceMix in order to update or extend your integration solution. Camel routes are deployable as OSGI modules, so whenever you want to create a new routing patch or want to modify the existing one, you just drop a new version of the OSGI bundle to the SERVICEMIX_HOME/deploy directory. You can use a similar method to stop the Camel route, just remove the route's bundle from the deploy directory. The ServiceMix solution that can be updated at runtime with OSGI bundles (instead of hard redeployment of the entire application) is likely a piece of software with a well thought-out and well designed architecture. In the upcoming recipes, we will cover details of hot redeployments with ServiceMix and OSGI.
If you are a Linux user, you probably know how useful is the history search feature of the Bash shell. In this shell, the history search is invoked with the Ctrl + R keyboard shortcut. Good news is that Apache Karaf supports the Ctrl + R key combination as well. Try to execute it during the Apache Karaf session and type a fragment of one of the commands you issued before. You will see that ServiceMix is searching your command's history for the specified text string. If you are not happy with the current search results, just hit Ctrl + R again and ServiceMix will search for the next occurrence of the given text. The search feature is extremely useful (not to say a lifesaver) when you need to find some complex command you issued a month before and remember only a single keyword from it.
Linux systems come with the tail command, which is extremely useful for tracking applications logs. If you execute the tail command against a text file (a logfile in particular), you will display the most recent lines from that file (the tail of the file). What is particularly interesting about the tail command is its ability to watch and display lines appended to the file (the follow option). This feature makes tail an excellent tool for taking a sneak peak into the logs, since log records are usually appended at the end of the text file. For example, the following command displays the last 100 lines from the ServiceMix log and then searches for the new lines appended to the file:
tail -f -n 100 SERVICEMIX_HOME/data/log/servicemix.log
Unfortunately, the tail command is available out of the box only for Unix operating systems. However, tracking system logs with the tail command is so useful that the ServiceMix team decided to add the tail command for the Karaf Console. You will learn more about tracking ServiceMix logs using the tail command in the next recipe.
Analysis of the ServiceMix logs is a main source of information regarding the current state of your system. This recipe will show you how to effectively display logs generated by the ServiceMix container.
The default location of the ServiceMix logfile is SERVICEMIX_HOME/data/log/servicemix.log. You can open this file with your favorite text editor and check that the running ServiceMix instance tells you pretty much about its activity by adding interesting records to its logfile. Unfortunately, logfiles tend to get extremely large as the application continues to append new records to the log. This is the reason why opening logfiles in text editors is considered as a bad practice—the majority of the text editors do not handle large text files well; especially when some other process is still appending to the latter file.
Instead of opening the log in the text editor, we tail it, that is, display only a certain number of lines from the end of the file.
Connect to your ServiceMix instance with the interactive Karaf console.
Enter the
log:tailcommand in the Karaf shell.Press Ctrl + C to stop displaying the logs.
The usual method of displaying application logs is to use Unix's tail command. This command, however, is natively available only for Unix systems. The ServiceMix method of checking its own logs is to use the tail command available in the interactive console.
The log:tail command available in the ServiceMix console works similar to the tail -f command available under Unix systems. It displays the last lines of the logfiles and continues to show the new ones appended to the file, as shown here:
2012-06-23 21:41:42,589 | INFO  | rint Extender: 1 | KarArtifactInstaller  | ?   ? | 42 - org.apache.karaf.deployer.kar - 2.2.4 | Karaf archives will be extracted to /home/hekonsek/Desktop/apache-servicemix-4.4.2/local-repo 2012-06-23 21:41:42,590 | INFO  | rint Extender:1 | KarArtifactInstaller  |  ?  ? | 42 - org.apache.karaf.deployer.kar - 2.2.4 | Timestamps for Karafarchives will be extracted to /home/hekonsek/Desktop/apache-servicemix-4.4.2/local-repo/.timestamps
2012-06-23 21:41:42,637 | INFO  | FelixStartLevel  | ultOsgiApplicationContextCreator | ?  ? | 76 - org.springframework.osgi.extender - 1.2.1 | Discovered configurations {osgibundle:/META-INF/spring/*.xml} in bundle [Apache CXF Bundle Jar (org.apache.cxf.bundle)]To stop displaying the log,press Ctrl+C. The ServiceMix console will stop processing the log file and will return to the prompt.
2012-06-23 21:41:52,178 | INFO  | rint Extender: 3 | TransportServerThreadSupport  | ?  ? | 50 -org.apache.activemq.activemq-core - 5.5.1 | Listening for connections at: stomp://localhost:616132012-06-23 21:41:52,179 | INFO  | rint Extender: 3 | TransportConnector  | ?  ? | 50 - org.apache.activemq.activemq-core - 5.5.1 | Connector stomp Started 2012-06-23 21:41:52,180 |INFO  | rint Extender: 3 | BrokerService  | ?  ? | 50 - org.apache.activemq.activemq-core - 5.5.1 |ActiveMQ JMS Message Broker (default, ID:drone-49934-1340480512024-0:1) started ^C
karaf@root>
The tail of the file includes the last records from the ServiceMix log, to which the container appends by default. Even if the logfile is very long, the tail command displays only the most recent lines. The tailed logfile will also be monitored for new records, which will be displayed on the screen as they appear.
One particularly interesting use case when working with the logfile is to show the last exception that occurred in the system. This can be done with the log:display-exception command. If your application is healthy, then this command should return no results annotated with the recent timestamp. If a new stacktrace appears, then you should examine it, fix the bug, and deploy the patched module to the ServiceMix container (or improve the exception handling).
Don't be afraid to use the ServiceMix tail command with the popular parameters available for the Linux command line. For example, you can use the -n 200 option to display the last 200 lines from the logfile. Also keep in mind that you can see all the options available for tail by typing the log:tail –help command.
In the previous recipe, you learned how to read from the ServiceMix logfile. While the default configuration settings of the ServiceMix logger are reasonable for most production systems, sooner or later you will need to customize the content of the logfile to better suit your needs. This recipe will guide you through the configuration process of the ServiceMix logging system, so you can tune it according to your needs.
If we have got our ServiceMix instance installed and running, we can take a peek into the logs in order to check what is happening under the ServiceMix's hood. Sometimes, however, the amount or kinds of information we see in the logs are not necessarily the same as we need. In particular, you may want to change the verbosity level of the selected loggers. You might also decide to change the appender of the logger from the default to one transporting log messages via JMS or JDBC.
The Log4j (http://logging.apache.org/log4j) configuration file used by ServiceMix to read the logging configuration is located at SERVICEMIX_HOME/etc directory and named org.ops4j.pax.logging.cfg. This file is a regular Log4J configuration file, so all you need to do in order to adjust your logging setting is to change some Log4J properties.
Open the
SERVICEMIX_HOME/etc/org.ops4j.pax.logging.cfgfile in your favorite text editor.Edit this file as a regular Log4 configuration file.
Under the hood, ServiceMix uses Pax Logging (http://www.ops4j.org/projects/pax/logging) as a logger service. Pax is an OSGI-based wrapper for existing logging services. By default, log messages are delegated to the one of the most popular logging frameworks in the Java environment—Log4J (http://logging.apache.org/log4j). This means that you can just edit ServiceMix's Log4j configuration file in order to change the default logging settings.
By default, the root logger of ServiceMix is set to the INFO level. The following is the content of the default Log4J configuration file provided with ServiceMix:
# Root logger
log4j.rootLogger=INFO, out, osgi:VmLogAppender
log4j.throwableRenderer=org.apache.log4j.OsgiThrowableRenderer
If you encounter some kind of problem with your integration solution deployed on ServiceMix, you would probably like to change the logging level to a more fine-grained one. The following is the default ServiceMix logger configuration file with the logging level changed to DEBUG:
# Root logger
log4j.rootLogger=DEBUG, out, osgi:VmLogAppender
log4j.throwableRenderer=org.apache.log4j.OsgiThrowableRenderer
After the configuration file is saved, you will notice that the default logging level is now set to DEBUG instead of INFO. Keep in mind that the DEBUG logging level should be used only for the time of debugging the problem, as it generates much more log information than INFO.
Log4j is not the only logging API available in the Java universe. Take a look at the following information in order to know more about ServiceMix's support for the other logging libraries. You may also be interested in knowing some details related to the startup of the ServiceMix logging system.
Although by default ServiceMix uses Log4J as its logging framework provider, you can change it and take advantage of your favorite logging system. You can configure ServiceMix to use one among a variety of loggers including SLF4J, JCL (Jakarta Commons Logging), and JDK logger. If you want to learn more about the Pax Logging project and the loggers it supports, visit the Pax project website (http://www.ops4j.org/projects/pax/logging).
Although in the example provided in this recipe, you don't have to restart ServiceMix in order to apply the changes to the running system, sometime you will be forced to restart your container and refresh the logging system configuration. However, this is only in the case of some complex changes to the logging configuration file.
This recipe will guide you through the process of adjusting the configuration of the ServiceMix logging system while the container is up and running.
Usually a static logger configuration defined in the properties file is not flexible enough for real-life deployment scenarios. A detailed level of logging leads to an excessive number of writes to the application log, which obviously leads to a performance penalty. The high number of messages also makes the application log less readable. That is why you usually would like to stick to the course-grained level of logging, such as info or even warning. Switching to the more detailed (fine-grained) logging (such as debug or trace) is useful when you try to spot a bug or want to analyze an unusual behavior in the system. However, due to performance reasons mentioned earlier, you would like the logger to report detailed information only for the time of the debugging session. With the interactive ServiceMix console, you can temporarily change the logging level to fine-grained, and when you are done with the bug, switch back again to the inexpensive brief one.
Connect to your ServiceMix instance with the interactive shell.
Type the
log:set LEVEL LOGGERcommand.
The ServiceMix console together with the Pax logging is an excellent tool to adjust the settings of your logger at runtime. In order to change the latter configurations when ServiceMix is running, you need to connect to your container with an interactive Karaf console.
Before you change the logging level of the given logger, you might want to check its current settings. To return to the current level of the given logger, issue the log:get command. The following code listing demonstrates an example of checking the current level of the selected logger.
smx@root> log:get com.example.Logger
Level: INFO
After you check the current level of the logger you are interested in, you can safely change it to the desired value. To change the level of a given logger, use the log:set command. The following code listing demonstrates how to change the logger settings during an interactive ServiceMix console session:
smx@root> log:get com.example.Logger
Level: INFO
smx@root> log:set DEBUG com.example.Logger
smx@root> log:get com.example.Logger
Level: DEBUG
At startup, ServiceMix reads the default settings of the Log4J logger from the SERVICEMIX_HOME/org.ops4j.pax.logging.cfg file. After the default settings are loaded, ServiceMix looks in the SERVICEMIX_HOME/data/cache directory for the changes in the logging configuration that have been made during the runtime of the container. The latter's settings (that is, the cached runtime) overrides the former (read from the static configuration saved in the etc directory). Any changes made to the logger configuration at runtime are immediately applied to ServiceMix and stored in the SERVICEMIX_HOME/data/cache directory.
Before you proceed to the next recipe, take a quick look at the following logging-related hints. You may find them useful when working with ServiceMix in a production environment.
When dealing with larger systems, you may encounter a functional requirement called audit logging. When a system provides audit logging functionality, it can store a detailed record of activities that have been performed within its bounds. The recorded data usually includes traced user activity. Such data can then be used by the system administrator to retrieve detailed information about a given user and his/her actions performed on the system. Audit logging is a challenging topic mainly due to the amount of data that is stored and processed by the audit tools. In many cases, audit logging is performed using a standard logging facade (such as SLF4J or Log4J) in conjunction with an asynchronous messaging and persistent data stores. If you use a standard logging facade to handle your audit requirements, you will also additionally benefit from ServiceMix's logger runtime tuning.
Using the ServiceMix console for tuning the logger is very useful, but it is not the only way to change your logging settings at runtime. A Java tool called JMX (http://en.wikipedia.org/wiki/Java_Management_Extensions) allows you to connect to your JVM instance and configure its runtime settings as well. The majority of the logging frameworks in Java come with built-in support for dynamic configuration via JMX. Note, however, that changes made to the logging configuration using JMX are not persisted between ServiceMix restarts (while configurations modified with the ServiceMix console are cached by a container in order to be available after the restart).
Sometimes you might feel that you have made too many changes to the runtime configuration of your ServiceMix logger. If you start to lose control over your logging settings, you can delete your cached runtime logging settings from the SERVICEMIX_HOME/data/cache directory. Finding the right directory to delete is not a trivial task, since all subdirectories of the cache are named bundleX (where X is an identifier of the OSGI bundle). To reset the logger settings, you need to remove the bundle directory containing the file named logging.config. If you are using a Linux operating system, try to issue the find data/cache -iname 'logging.config' command, which may be helpful in locating the proper bundle directory.
Libraries and modules are deployed to ServiceMix in the form of OSGI bundles. This recipe will guide you through the process of listing bundles installed into your container.
Before you list the OSGI features installed in your running ServiceMix instance, you need to connect to it with the ServiceMix console.
Connect to ServiceMix with the interactive console.
In the interactive shell, type the
osgi:listcommand.
Apache Karaf (the OSGI framework on top of which ServiceMix is built) organizes deployment units into modules called bundles. These modules can be installed, updated, or removed while ServiceMix is up and running (without the need to restart the container). After you install a new OSGI bundle containing your Camel route or CXF web service, you probably would like to see if the bundle together with its dependencies has been properly installed. This recipe demonstrates how you can list bundles deployed into your ServiceMix instance.
If you issue the osgi:list command in the interactive ServiceMix console, it will return results similar to the following output:
karaf@root> osgi:list
START LEVEL 100 , List Threshold: 50
  ID           State       Blueprint        Spring          Level                  Name
[ 43]      [Active]        [Created]          [ ]           [ 60]       activemq-broker.xml (0.0.0)
[ 45]      [Active]           [ ]             [ ]           [ 60]       kahadb (5.5.1)
[ 46]      [Active]           [ ]             [ ]           [ 60]       activemq-pool (5.5.1)
[ 47]      [Active]           [ ]             [ ]           [ 60]       activemq-console (5.5.1)
[ 48]      [Active]           [ ]             [ ]           [ 60]       Apache Aries Transaction Manager(0.2.0.incubating)
[ 49]      [Active]           [ ]             [ ]           [ 60]       activemq-ra (5.5.1)
Now you know how to display the list of the bundles installed into your ServiceMix instance. However, you are probably wondering about the exact meaning of each column displayed in the list:
ID: The unique ID of the installed bundle used to identify it in the other Karaf commands. For example, you will use the preceding ID to tell Karaf to start or stop a particular bundle.
State: The state of the OSGI bundle tells you whether the bundle is just deployed (Resolved state) or has already started (Active state).
Blueprint: The state of the Blueprint container assigned to this bundle. This column tells you whether the Blueprint context has already been properly initialized.
Spring: The same as the above but for the Spring framework.
Level: The bundle start level. This value tells ServiceMix in which order bundles should be initialized during the container startup.
Name: This is the name and the version of the bundle.
The volume of output generated by the osgi:list command may be overwhelming. On the other hand, sometimes you will notice that not all bundles are displayed on the listing. The following hints will help you to deal with these problems.
If your ServiceMix instance has many bundles deployed into it, the osgi:list command can generate a lot of output. If you want to narrow the results only to the lines containing the given text, use the grep command available for the interactive Karaf shell. You can use it almost exactly the same way as you would for Unix systems. For example, to display only CXF-related bundles, issue the osgi:list | grep cxf command. Also consider adding the -i option to the grep command—executing the osgi:list | grep -i cxf command will help you to find all the CXF-related bundles regardless of the letter case of their names.
Bundles with a startup level equal or less than 50 are usually used by the ServiceMix infrastructural features (that is, are used by the container itself). Due to that fact, by default ServiceMix lists only bundles with a startup level higher than 50 (that is, user bundles). If for some reason, you still want to display bundles with a startup level below 50, change the list threshold level with the -
t parameter. For example, to list all the bundles, issue the osgi:list -t 0 command.
The OSGI bundles do not form a loose set of elements without any specified structure. In order to organize bundles into bigger logical packages, ServiceMix provides the notion of a feature. A feature is a logical module containing a set of related artifacts. In this recipe, you will learn how to list features that are available for your ServiceMix installation. By selecting which of the features to install (or uninstall), the administrator can easily control which blocks of functionality are available for the container.
Before you list the features available for your ServiceMix instance, you must connect to it with the interactive console.
Connect to ServiceMix with the interactive Karaf console.
In the Karaf shell, type the
features:listcommand.
After you issue the features:list command, you should see results similar to the following output:
karaf@root> features:listState        Version                 Name              Repository          Description

[installed]                              [2.2.4]             karaf-framework       karaf-2.2.4

[uninstalled]                         [2.5.6.SEC02]          spring                karaf-2.2.4

[uninstalled]                         [2.5.6.SEC02]          spring-web            karaf-2.2.4

[installed]                           [3.0.6.RELEASE]        spring                karaf-2.2.4

[uninstalled]                         [3.0.6.RELEASE]        spring-aspects        karaf-2.2.4
As you can see, the features:list command displays features available for your ServiceMix instance. If you take a closer look at the resulting output, you will see that a feature is identified by the name and the version (this is an identity technique similar to the one used in the OSGI bundles versioning). As you can also notice, features are located in the repositories (the last column of the listing tells you the name of the repository in which the feature is located). And last but not least, the very first column of the discussed listing indicates whether the given feature has been already installed in your ServiceMix container or not.
At first glance, you may be overwhelmed by the amount of the features available for your ServiceMix instance. The following hints may be useful to work efficiently with the features listings.
If you feel overwhelmed by the amount of features available for the installation (and you likely will), use the grep command to narrow down the results to the features you are interested in. For example, if you need to transform incoming messages to the CSV (Comma Separated Values) data format, type the features:list | grep csv command. Also keep in mind that adding the -i option to the grep command tells ServiceMix to filter results regardless of the letter case of the output generated by the execution of the feature:list command.
In the previous recipe you learned how to list OSGI features available for your ServiceMix installation. This recipe will show how to install the feature of your choice into the ServiceMix container.
For the purpose of this recipe, we will assume that you have your ServiceMix instance already installed and running.
The easiest way to install the desired feature is to use the Apache Karaf console bundled with ServiceMix. After you open the console, list the features available for installation. The way to list features that can be installed into your ServiceMix container is described in the previous recipe.
Connect to your container using the interactive ServiceMix console.
In the ServiceMix console, type the
feature:install featureNamecommand
ServiceMix uses features to group OSGI bundles into logical modules. When you install a given feature, Karaf retrieves all the necessary bundles from the feature repository. Downloaded artifacts are held in the SERVICEMIX_HOME/data/cache directory. For example, if you want to use the jibx data format in your application's routes, type feature:install camel-jibx. This command tells ServiceMix to download the feature and all the related bundles from the Camel features repository and install it into your container.
Working with the features listings can be difficult due to the high number of options available for the installation. The following hints will guide you through some of the tricks that will make browsing through the features listings easier.
One of the very useful features of the Apache Karaf console is its tab-completion abilities. For example, if you want to know what Camel features are available for installation, you can type feature:install camel- and then press the Tab button. You should see an output similar to the following listing:
karaf@root> features:install camel-
camel-ahc         camel-atom           camel-aws          camel-bam            camel-bean-validator
camel-bindy       camel-cache          camel-cometd       camel-context        camel-crypto
If you are curious about which bundles are included in the feature, you can use the features:info ServiceMix command to retrieve this kind of information. For example, to list details of the camel-cxf feature, issue the features:info camel-cxf command in the Karaf console.
Sooner or later you would like to include a non-OSGI JAR file into your ServiceMix project. This recipe will guide you through the process of installing regular JAR files as OSGI bundles.
In the ServiceMix shell, execute the following command: osgi:install wrap:mvn:groupId/artifactId/version. For example, to install Apache Commons Logging library in Version 1.1 as the OSGI bundle, type osgi:install wrap:mvn:commons-logging/commons-logging/1.1.
ServiceMix uses the OSGI bundles to organize the modules deployed into it (as well as their dependencies). If we want to use a JAR file as the OSGI dependency, it has to be OSGI-ready. We basically say that JAR is OSGI-ready when it contains a special file called META-INF/MANIFEST.MF filled with the proper bundle description. The main purpose of this file is to define the JAR meta-data, such as dependencies of a given OSGI module. The manifest file also includes the export line, which tells which Java packages contained within the JAR should be exposed as the public OSGI packages.
If you want to deploy a plain JAR as the OSGI dependency, you need to convert it into the OSGI bundle. The wrap protocol used in this recipe analyzes the dependencies of the JAR file and tries to create a generic OSGI manifest for it.
OSGI bundles are the main—but not the only—type of artifacts possible to deploy into ServiceMix. The following is some useful information regarding the OSGI bundles in the context of the ServiceMix topic.
You can deploy many different types of artifacts into the ServiceMix OSGI container. Some of them are JAR, WAR, Blueprint, Spring, and JBI. In this book we focus on the OSGI bundle's deployment because this approach is the most common in ServiceMix production scenarios.
Before you start making your JAR dependencies OSGI-friendly, always find out if they are not distributed as OSGI bundles already. Many projects take OSGI into consideration while releasing their artifacts, so the JAR you used as the dependency in your project may be an OSGI bundle out of the box. The simplest way to check out if the JAR is OSGI-aware is to take a look into its manifest file. If you see lines starting with the Bundle- keyword, then you can safely assume that the JAR is OSGI-ready.
While the ServiceMix console is an excellent tool for managing your container, some users prefer to configure their runtime using the web interface. This recipe will guide you through the process of starting and navigating over the ServiceMix web console.
In order to get advantage of the ServiceMix web console, install the feature in which it is contained. ServiceMix features are installed using the interactive shell, so connect to your container instance with the ServiceMix console before you proceed.
Connect to ServiceMix with the interactive shell.
In the interactive shell, type the
features:install webconsolecommand.Open the
http://localhost:8181/system/consoleURL in your browser in order to verify that the ServiceMix web console has been successfully started.Use the default login and password as credentials (login ID and password is
smx).
The Web Console is actually a feature of Apache Karaf. Since ServiceMix is based on Apache Karaf, it can benefit from the ability to monitor the container at runtime. When you install the webconsole feature, ServiceMix starts the embedded Jetty instance on port 8181. When the Web Console feature is installed, it will be automatically started even after ServiceMix is restarted.
The following screenshot shows how the ServiceMix Web Console could look:

The Karaf Web Console is a very powerful tool that can make the administration of ServiceMix much easier. However, there are some issues you should be aware of before you start to use the Web Console in a production environment.
If you feel more comfortable with the web interface than with the raw console shell, you can use the Web Console to perform the majority of the administrative activities that are described in this book. For example, the Web Console can be used to easily manage the bundles and features. You can also use it to configure the ServiceMix logger and monitor events that occur within the system.
Remember that the moment you start the Web Console, it is exposed via the HTTP protocol. Being visible as the HTTP server essentially means that the Web Console can be accessed by any browser from within your network. Remember to change the default username and password for the administrative user as soon as possible in order to restrict any unauthorized access to your ServiceMix instance. To change the default username and password, edit the etc/users.properties file.
If you want to change the default port of the ServiceMix web console from 8181 to the number of your choice, create the etc/org.ops4j.pax.web.cfg configuration file. The property you are interested in is named org.osgi.service.http.port. If you add the org.osgi.service.http.port=8182 line to the web console configuration file, the web console server will listen on HTTP port 8182.
The most common type of module deployed to ServiceMix is probably the Camel-based routing bundle. This recipe will guide you through the process of creating and deploying a new Camel route to the ServiceMix container.
To create a new Camel routing project, we will use the Maven Archetype mechanism (http://maven.apache.org/archetype/maven-archetype-plugin), so make sure that you have Maven properly installed and available in your command-line path.
We will also assume that your ServiceMix instance is already running.
Create a new Mavenized Camel routing project from the
org.apache.camel.archetypes:camel-archetype-springarchetype. Name itcamel-route.Change your working directory to the new project (
cd camel-route).Build and install the project by executing the
mvn installMaven command.Deploy the project to ServiceMix by copying the JAR from the
camel-route/target (camel-route/target/camel-route-1.0-SNAPSHOT.jar) directory to theSERVICEMIX_HOME/deploydirectoryThe command needed to create a new project from the the Camel Maven archetype (step one) is presented as follows:
mvn archetype:generate -DarchetypeGroupId=org.apache.camel.archetypes -DarchetypeArtifactId=camel-archetype-spring -DgroupId=com.packtpub.servicemixhowto -DartifactId=camel-route -Dversion=1.0-SNAPSHOT
We used the Maven Archetype mechanism to create a new Camel routing project. Archetypes are basically the templates of the projects that can be used to generate the stub of new Maven modules. In this particular case, we create the stub of the Camel routing module.
The Camel module we have created contains the Spring configuration file used to bootstrap it by ServiceMix. The mentioned Spring XML wiring file is located at camel-route/src/main/resources/META-INF/spring/camel-context.xml. By default, this file contains an initial Camel Context configuration and some sample routes that can be used as a base for your custom routing rules. Feel free to experiment a little bit and change the route to make it suitable for your needs. For example, in order to create the Camel route that sends a message to ServiceMix log every 5 seconds, you could replace the Camel Context definition in the camel-context.xml file with the following route:
<camel:camelContext xmlns="http://camel.apache.org/schema/spring">
<camel:route>
<camel:from uri="timer://myTimer?fixedRate=true&period=5000"/>
<camel:to uri="log:EXAMPLE-ROUTE"/>
</camel:route>
</camel:camelContext>In the preceding example, we used the Timer (http://camel.apache.org/timer.html) and Log (http://camel.apache.org/log.html) components of Apache Camel. To redeploy the route, just build it again with Maven (mvn install) and replace the file in SERVICEMIX_HOME/deploy with the new version of the generated artifact (camel-route/target/camel-route-1.0-SNAPSHOT.jar)
Apache Camel is a Swiss army knife for message routing and system integration. Since this book is focused only on ServiceMix, we will suggest you find more information about Camel itself. We will also write some additional information about how Camel cooperates with Karaf.
If you are not sure how to create proper routes in Camel, don't hesitate to learn more about it. Keep in mind that you cannot effectively use ServiceMix without having some solid Camel knowledge. There are two main sources of information about Apache Camel: The project documentation site (http://camel.apache.org/documentation.html) and the excellent Camel In Action book from Manning Publishing (http://www.manning.com/ibsen).
When you deploy the Camel routing module to the ServiceMix instance, Karaf will create a new Camel context for you. It is important to remember that ServiceMix doesn't operate on the single Camel Context shared by multiple routes, but rather on a set of small context instances. This is a preferable way of dealing with Camel routing in ServiceMix, since it leverages the modularity provided by the OSGI technology.
One of the most important features provided by ServiceMix is the ability to redeploy a given module without restarting the whole container. This recipe will demonstrate how to redeploy the Camel routing module created in the previous recipe.
In the previous recipe you learned how to create and deploy a new Camel route module into your ServiceMix instance. In this recipe, we will show you how to update the routing module without restarting ServiceMix.
To make this recipe as simple as possible, we will demonstrate how to update the Camel routing module created in the previous recipe. Let's assume that you modified the routing module by changing the camel-context.xml file in the route project (just as a reminder, the file is located at camel-route/src/main/resources/META-INF/spring/camel-context.xml).
Update the Camel routing XML file (
camel-route/src/main/resources/META-INF/spring/camel-context.xml)Start the command line.
Change the working directory to the Camel module you want to update (
camel-routein our example).Build the updated project by executing the
mvn installcommand.Drop the
camel-route/target/camel-route-1.0-SNAPSHOT.jarfile to theSERVICEMIX_HOME/deploydirectory.
Camel routing modules can be deployed to ServiceMix without restarting the container. As soon as ServiceMix detects that a new version of the Camel routing module has been dropped into the deploy directory, it replaces the existing version of the bundle with the new one. For example, you could enrich your Camel context with the following route:
  <camel:route>
     <camel:from uri="file:///home/inbox"/>
     <camel:to uri="log:FROM-DIRECTORY"/>
  </camel:route>
The preceding routing rule reads files from the /home/inbox directory and sends their content as messages to the dedicated logger. After this modification, your Camel context will look liike the following XML snippet:
<camel:camelContext xmlns="http://camel.apache.org/schema/spring">
<camel:route>
<camel:from uri="timer://myTimer?fixedRate=true&period=5000"/>
<camel:to uri="log:EXAMPLE-ROUTE"/>
</camel:route>
<camel:route>
<camel:from uri="file:///home/inbox"/>
<camel:to uri="log:FROM-DIRECTORY"/>
</camel:route>After you redeploy the route, you will see that the /home/inbox directory will be automatically created by Camel. If you try to drop a text file into this directory, it will be picked up by Camel and sent to the ServiceMix logger.
Versioning of the modules deployed to ServiceMix is a powerful tool that can be used to simultaneously manage multiple versions of the same module.
The version of the Maven artifact representing the Camel route is also the version of the OSGI bundle. This means that if you update the version of the Maven module, you can also deploy two versions of a similar route running concurrently in ServiceMix. This behavior is very useful when you want to preserve the older version of the route for legacy clients. Remember, however, that similar routes deployed to the same container may generate conflicts (for example, if two consumer endpoints read from the data source that does not support concurrent access).
One of the fundamental integration technologies in the Java world is JMS (Java Message Servi ce). While ServiceMix can connect to any JMS-compliant messaging system, this recipe demonstrates how to connect to the Apache ActiveMQ message broker.
ServiceMix comes with an embedded ActiveMQ JMS broker that listens to the client connections on the port 61616. In order to use the embedded broker, you don't have to perform any additional administrative activities. The embedded ActiveMQ broker distributed out of the box with ServiceMix is configured with default settings and is ready to be used.
Create a new Camel routing Maven project (if you don't know how to do it, refer to the Creating and deploying a new Camel route (Must know) recipe).
In the
camel-context.xmlfile, add a new Camel routing rule that produces to or consumes from the Camel ActiveMQ component with the default configuration.Build and deploy the routing module to your ServiceMix instance (if you don't know how to do it, please refer to the Creating and deploying a new Camel route (Must know) recipe).
ServiceMix starts the embedded AcvtiveMQ broker on port 61616. This is also the default port of the Camel ActiveMQ component. This basically means that when you deploy to your Camel route, similar to the one presented here, Camel will automatically connect to the embedded ActiveMQ broker instance:
<camel:route>
<camel:from uri="timer://fireJmsMessage?period=5000"/>
<camel:to uri="activemq:myQueue"/>
</camel:route>
Since Camel ActiveMQ with the default configuration also listens on the same port (and on localhost loopback address), it will by default connect to the ActiveMQ instance embedded in ServiceMix.
In the preceding example, we created the Camel route that sends message to the embedded ActiveMQ broker's queue named myQueue every five seconds.
ActiveMQ itself is a comprehensive and advanced messaging solution. It is possible to configure both your broker and client component (that is, the Camel endpoint) with a variety of parameters and options. This section will describe some of them, but remember that there is much more available out there.
You may be wondering if it is necessary to create the myQueue queue from the preceding example. Fortunately ActiveMQ will create the queue for us as soon as it will receive the first message addressed to the latter queue. We say that the queue is created on demand.
If, for some reason, you need to change the default port used by the embedded ActiveMQ broker (61616), just change the value of the activemq.port property in SERVICEMIX_HOME/etc/system.properties. Remember that you also need to change the port in the component configuration of your Camel routes. Refer to the Camel ActiveMQ component documentation at http://camel.apache.org/activemq.html for more details.
If you want to learn more about ActiveMQ itself, we recommend the excellent book from Manning Publishing, ActiveMQ in Action (http://www.manning.com/snyder), written by the topic experts Bruce Snyder, Dejan Bosanac, and Rob Davies. You can also visit the project Apache site at http://activemq.apache.org, where you can find the latest news regarding ActiveMQ.
In the previous recipe, you learned how to connect to the embedded Active MQ broker coming with ServiceMix out of the box. In real-world, however, you would probably need to connect to the standalone JMS broker.
In this recipe, we will assume that you have a standalone ActiveMQ broker installed, started, and is operational. To make the examples as simple as possible, we will also assume that the broker is exposed via the tcp://192.168.1.1:61616 TCP transport.
Create a new Camel routing project using Maven (if you don't know how to do it, refer to the Creating and deploying a new Camel route (Must know) recipe).
In the
camel-context.xmlfile, add the new Camel routing rule that produces to or consumes from the Camel ActiveMQ component connected to the standalone router.Build and deploy the routing module to your ServiceMix instance (if you don't know how to do it, refer to the Creating and deploying a new Camel route (Must know) recipe).
Connecting to the external ActiveMQ broker is very similar to working with the embedded ActiveMQ broker provided with ServiceMix. The only difference is that instead of using the default settings of the Camel ActiveMQ component, you need to configure your route to consume from (or produce to) the standalone ActiveMQ broker.
The Camel ActiveMQ component can be configured in many ways. One of the possible solutions is to register the component manually in the Spring application context. The following example demonstrates how to register and configure an ActiveMQ component in the Spring context:
<camel:camelContext xmlns="http://camel.apache.org/schema/spring">
  <camel:route>
         <camel:from uri="timer:jmsMessageTrigger?period=5000"/>
         <camel:to uri="activemq:myQueue"/>
   </camel:route>
</camel:camelContext>
<bean id="activemq"
    class="org.apache.activemq.camel.component.ActiveMQComponent">
      <property name="brokerURL" value="tcp://192.168.1.1:61616"/>
</bean>You can connect to many types of messaging brokers with ServiceMix. The Camel routing engine allows ServiceMix to integrate with any JMS-compatible messaging solutions. Camel also comes with support for some non-JMS messaging systems (such as XMPP, AMPQ, or Amazon SQS). The following is some additional information regarding the messaging support in ServiceMix.
If you need to connect to a JMS broker other than ActiveMQ, use the Camel JMS component instead of the ActiveMQ component. The camel JMS component (http://camel.apache.org/jms.html) can be used to connect to any JMS-compatible messaging server (including ActiveMQ). Keep in mind, however, that if you connect to the ActiveMQ broker, it is better to stick to the dedicated ActiveMQ component, as the latter is optimized for the Apache message broker. As a result, you can expect easier configuration and slighter better performance when using a dedicated ActiveMQ component.
A common mistake regarding the usage of JMS is to open a new client connection for each message sent to the broker. Creating a new connection to the broker is an expensive operation. The typical solution to optimize the JMS connection management is to reuse the already opened ones. This approach is called "Connection pooling", ActiveMQ comes with the connection factory that supports connection pooling; it is named org.apache.activemq.pool.PooledConnectionFactory. You should remember it whenever you configure your ActiveMQ connection in Camel.
Web services are a very popular way to introduce communication between heterogeneous IT systems. Probably the most common type of web services in the industry are WSDL (Web Services Description Language) ones. This recipe will guide you through the process of creating and deploying a WSDL web service into the ServiceMix container.
ServiceMix uses Apache CXF as the preferred engine for its web service stack. In this recipe, we will use the Maven Archetype mechanism to generate a new OSGI module with CXF support enabled. The module with CXF support is the one that starts the CXF endpoint exposing in our service. Before we start our CXF module, we will again use Maven, this time to generate the Java code from the WSDL file.
As you can see, Maven is an essential tool to complete this task, so make sure that you have this useful utility properly installed in your system.
We will also assume that your ServiceMix instance is already installed and running.
Create a CXF project using the Maven Archetype called
org.apache.servicemix.tooling:servicemix-cxf-wsdl-first-osgi-bundle.Add the WSDL file containing your contract to the project.
Generate the sources from the WSDL file using the
mvn generate-sourcesMaven command.Add business logic implementation to the generated Java classes.
Build and deploy the module. (If you don't remember how to build and deploy modules to ServiceMix, please refer to the Creating and deploying a new Camel route (Must know) recipe
A web service created from the WSDL file is called a contract-first web service. Web service created as a Java POJO with WSDL generated from it is called a code-first web service. In this recipe, we will focus on the contract-first services.
At the beginning of this recipe, you should generate the code-first CXF module you will work on. We will use the Maven archetype mechanism (http://maven.apache.org/archetype/maven-archetype-plugin) for this purpose.
The following Maven command can be used to generate a new CXF WSDL-first project:
mvn archetype:generate -DarchetypeGroupId=org.apache.servicemix.tooling -DarchetypeArtifactId=servicemix-cxf-wsdl-first-osgi-bundle -DgroupId=com.packtpub.servicemixhowto -DartifactId=cxf-wsdl-first-example -Dversion=1.0-SNAPSHOT
We use the servicemix-cxf-wsdl-first-osgi-bundle Maven archetype from the org.apachemix.tooling group as a template for our module. We name our project cxf-wsdl-first-example. We will create our example in the Maven group namespaced as com.packtpub.servicemix and assign it the 1.0-SNAPSHOT version.
The stub of the contract-first module we have just generated with Maven contains the following WSDL file under cxf-code-first-example/src/main/resources/wsdl/person.wsdl path.
This file defines the very simple WSDL contract that exposes the person service to the world. The person service can be used to generate friendly messages for the given name. The fragment of the person service WSDL file should look as the following snippet:
    <wsdl:message name="GetPersonRequest">

        <wsdl:part name="payload" element="typens:GetPerson"/>

    </wsdl:message>
    <wsdl:message name="GetPersonResponse">

        <wsdl:part name="payload" element="typens:GetPersonResponse"/>

    </wsdl:message>

    <wsdl:message name="UnknownPersonFault">

      <wsdl:part name="payload" element="typens:UnknownPersonFault"/>

    </wsdl:message>

    <wsdl:portType name="Person">

        <wsdl:operation name="GetPerson">

            <wsdl:input message="tns:GetPersonRequest"/>

            <wsdl:output message="tns:GetPersonResponse"/>

            <wsdl:fault name="UnknownPerson" message="tns:UnknownPersonFault"/>

        </wsdl:operation>

    </wsdl:portType>

    <wsdl:service name="PersonService">

        <wsdl:port binding="tns:PersonSOAPBinding" name="soap">

           <soap:address location="http://localhost:8080/cxf/PersonService" />

       </wsdl:port>

   </wsdl:service>
As you can see, a WSDL contract, even for the tiniest service, can be pretty long.
We started by generating the stub of the CXF project from the Maven archetype. The template of the project from which the module is built contains a sample WSDL file with a web service contract. What is important to us is that the generated project comes with the Maven CXF plugin configuration and basic Spring context bootstraping CXF endpoint.
Now we can generate classes from the WSDL file provided by us. The CXF Maven plugin will create the stub implementation of the service for us. Execute the following command to create Java classes from the WSDL contract, compile the source, and create a deployable ServiceMix module:
mvn install
If you deploy a JAR created by the preceding command to ServiceMix (cxf-code-first-example /target/cxf-code-first-example-1.0-SNAPSHOT.jar), the person service will be exposed under the http://localhost:8080/cxf/PersonService URL.
You are probably wondering why you should consider using contract-first web services in favor of the code-first approach, and how to deal with WSDL maintenance. The following tips may be useful for you, as they throw some light on these issues.
You may be wondering why you should bother with the contract-first approach to web service development instead of using a code-first approach, in which we just need to annotate the implementation of the service. While this approach may be tempting, the contract-first web service development is perceived as safer from the contract point of view. Web services are usually exposed to be consumed by some third-party clients. As a service exposer, you should be always sure that the exposed contract looks exactly as you want it to be. In code-first approach, the contract file is generated, so you basically cannot guarantee that the WSDL file imported by the clients defines your public API exactly as you expected.
Creating a WSDL contract from scratch is almost impossible as it is a very verbose XML document with a very complex schema. If you plan to stick to the contract-first approach, try the WSDL editor for the Eclipse IDE (http://wiki.eclipse.org/index.php/Introduction_to_the_WSDL_Editor). We strongly discourage you from creating or modifying the WSDL file without a proper tool unless you are web service expert.
In the previous recipe, you learned how to expose a web service starting from the WSDL file. This recipe will guide you through the process of exposing a POJO instance as the web service with a WSDL contract automatically generated for you.
ServiceMix uses Apache CXF as an engine of its web service stack. In this recipe, we will create a Mavenized ServiceMix module, exposing Java code as a SOAP-based web service via the CXF endpoint. In order to generate such a module, we will use the Maven Archetype mechanism.
As you can see, Maven is an essential tool to complete this task, so make sure that you have this useful utility properly installed in your system. We will also assume that your ServiceMix instance is already installed and running.
Generate a new CXF code-first project using the Maven archetype.
Create the JAX-WS compatible class.
Build the module with the
mvn installcommand.Deploy the generated artifact (
target/cxfcode-first-example-1.0-SNAPSHOT.jar) to theSERVICEMIX_HOME/deploydirectory.
We will start the development of our code-first web service module by generating a new Apache CXF code-first project from the Maven Archetype (http:/maven.apache.org/archetype/maven-archetype-plugin). The following Maven command can be used to generate a new module from the archetype named org.apache.servicemix.tooling:servicemix-cxf-code-first-osgi-bundle:
mvn archetype:generate -DarchetypeGroupId=org.apache.servicemix.tooling -DarchetypeArtifactId=servicemix-cxf-code-first-osgi-bundle -DgroupId=com.packtpub.servicemix -DartifactId=cxf-code-first-example-Dversion=1.0-SNAPSHOT
The generated project will contain the bootstrap configuration of the OSGI-based ServiceMix module with the Spring configuration, as well as the simple Person web service written in JAX-WS:
package com.packtpub.servicemix;

import javax.jws.WebMethod;
import javax.jws.WebParam;
import javax.jws.WebParam.Mode;
import javax.jws.WebService;
import javax.xml.bind.annotation.XmlSeeAlso;
import javax.xml.ws.RequestWrapper;
import javax.xml.ws.ResponseWrapper;
@WebService
@XmlSeeAlso({com.packtpub.servicemix.types.ObjectFactory.class})
public interface Person {

    @RequestWrapper(localName = "GetPerson", className = "com.packtpub.servicemix.types.GetPerson")

    @ResponseWrapper(localName = "GetPersonResponse", className = "com.packtpub.servicemix.types.GetPersonResponse")
    @WebMethod(operationName = "GetPerson")
    public void getPerson(
        @WebParam(mode = WebParam.Mode.INOUT, name = "personId")
        javax.xml.ws.Holder<java.lang.String> personId,
        @WebParam(mode = WebParam.Mode.OUT, name = "ssn")
        javax.xml.ws.Holder<java.lang.String> ssn,
        @WebParam(mode = WebParam.Mode.OUT, name = "name")
        javax.xml.ws.Holder<java.lang.String> name
    ) throws UnknownPersonFault;

}
Maven Archetype also generates the stub implementation of the Person service. The implementation class is responsible for handling the actual business logic of the service:
package com.packtpub.servicemix;

import javax.jws.WebService;
import javax.xml.ws.Holder;
import com.packtpub.servicemix.types.GetPerson;
import com.packtpub.servicemix.types.GetPersonResponse;
@WebService(serviceName = "PersonService", endpointInterface = "com.packtpub.servicemix.Person")
public class PersonImpl implements Person {

    public void getPerson(Holder<String> personId, Holder<String> ssn, Holder<String> name)
        throws UnknownPersonFault
    {
        if (personId.value == null || personId.value.length() == 0) {
            com.packtpub.servicemix.types.UnknownPersonFault fault
= new com.packtpub.servicemix.types.UnknownPersonFault();
            fault.setPersonId(personId.value);
            throw new UnknownPersonFault(null,fault);
        }
        name.value = "Guillaume";
        ssn.value = "000-000-0000";
    }

}
We will not delve into the details of the JAX-WS annotations here. If you are interested in a good tutorial about JAX-WS web services, I recommend you read the excellent book from O'Reilly Publishing, called Java Web Services: Up and Running, authored by Martin Kalin.
The Person service is exposed via the CXF JAX-WS endpoint in the bean.xml file:
<jaxws:endpoint id="HTTPEndpoint"
implementor="com.packtpub.servicemix.PersonImpl"
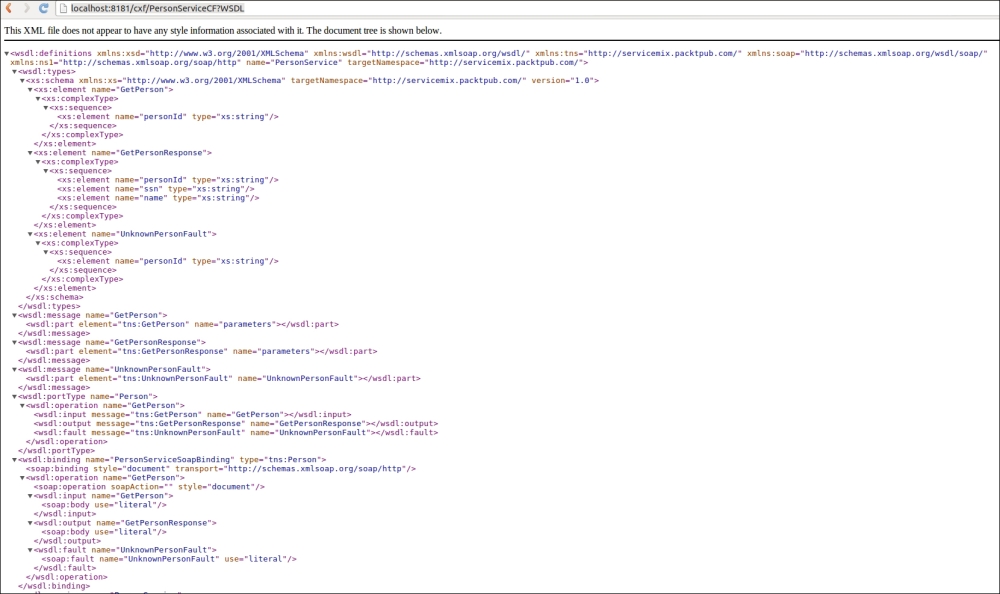
address="/PersonServiceCF"/>When you deploy the generated CXF module to ServiceMix, it starts a new Spring context defined in the beans.xml file. In particular, the CXF endpoint is started and exposes the PersonImpl instance to the outside world via the /cxf/PersonServiceCF URL. If you add the ?WSDL parameter at the end of the service URL (http://localhost:8181/cxf/PersonServiceCF?WSDL), you will see the WSDL file generated by the CXF stack.
To validate that your CXF module has been successfully deployed to ServiceMix, open the URL mentioned above in the browser (as demonstrated in the following screenshot):
If you want to expose a new code-first service via ServiceMix and CXF, all you need to do is to create a new JAX-WS-compatible service and register it in cxf-code-first-example/src/main/resources/META-INF/spring/beans.xml as the JAX-WS endpoint.
Code-first is probably the most popular approach to web services development. If you are interested in the code-first approach with JAX-WS, you might also be interested in the tips presented here.
When exploring the Java web service stack, you may encounter the JAX-RPC acronym. JAX-RPC is the ancestor of JAX-WS. It is the old web service stack from the J2EE 4 specifications. Java EE 5 introduced a new, annotation-based web service specification called JAX-WS. In general, you can think of JAX-RPC as a legacy technology that is not used in new projects.
The CXF endpoint configuration generated by Maven Archetype is a very basic one. If you want to learn more about CXF usage and configuration, please refer to the documentation on the project site at http://cxf.apache.org/docs/index.html. Keep in mind that CXF is a web services Swiss army knife, so it is good to learn more about the features it provides.
From the previous recipes, you learned how to expose WSDL-based web services. This recipe will guide you through the process of exposing REST (REpresentational State Transfer) services on top of the ServiceMix container.
Let's start by creating a new Camel module for ServiceMix. The recipe titled How to create and deploy a new Camel route explains how to do this. As the name of the generated artifact, choose rest-example. The command you need to execute is presented here.
mvn archetype:generate -DarchetypeGroupId=org.apache.camel.archetypes-DarchetypeArtifactId=camel-archetype-spring -DgroupId=com.packtpub.servicemixhowto -DartifactId=rest-example -Dversion=1.0-SNAPSHOT
In order to expose the class via the restful web service, we need to create this class in the first place. Save the following content to the rest-example/src/main/java/c
om/packtpub/servicemixhowto/PersonService.java file.
To expose our Java class as a web service, we will use JAX-RS annotations. JAX-RS (Java API for RESTful Web Services) is the JEE standard for exposing REST web services in Java:
package com.packtpub.servicemixhowto;

import javax.ws.rs.GET;
import javax.ws.rs.Path;
import javax.ws.rs.Produces;
import javax.ws.rs.QueryParam;
import javax.xml.bind.annotation.XmlRootElement;

@Path("person")
public class PersonService {

    @GET
    @Produces("application/xml")
    public Person getPersonByName(@QueryParam("name") String name) {
        return new Person(name);
    }
}

@XmlRootElement
class Person {

    private String name;

    public Person(){
    }

    public Person(String name) {
        this.name = name;

    public String getName() {
        return name;
    }


    public void setName(String name) {
        this.name = name;
    }
}
The PersonService class is a simple JAX-RS-compatible class. The Person object is a POJO (Plain Old Java Object) annotated with the JAXB annotations. We use JAXB to tell the Java runtime how the response object generated by the service should be converted to XML. JAXB (Java Architecture for XML Binding) is JEE standard for creating bidirectional mappings between XML and Java objects. For the purpose of this recipe, we assume that you already know the basics of JAX-RS and JAXB specifications.
Register
PersonServiceas a regular Spring bean in thecamel-context.xmlfile.Register the CXF JAX-RS server in the
camel-context.xmlfile. Wire the JAX-RS server with thePersonServiceclass.Add the JAX-RS dependency to the
pom.xmlfile.Build you project (
mvn install) and deploy the module to theSERVICEMIX_HOME/deploydirectory.
The following camel-context.xml file demonstrates how Spring together with CXF can be used to expose the PersonService bean via the JAX-RS restful API:
1.	<beans xmlns="http://www.springframework.org/schema/beans"
2.	       xmlns:xsi="http://www.w3.org/2001/XMLSchema-instance"
3.	       xmlns:jaxrs="http://cxf.apache.org/jaxrs"
4.	       xsi:schemaLocation="
5.	       http://www.springframework.org/schema/beans http://www.springframework.org/schema/beans/spring-beans.xsd
6.	       http://cxf.apache.org/jaxrs http://cxf.apache.org/schemas/jaxrs.xsd">
7.

8.	 <bean id="personService" class="com.packtpub.servicemixhowto.PersonService" />

9.	    <jaxrs:server id="restService"
10.	                  address="http://localhost:9000/rest">
11.	        <jaxrs:serviceBeans>
12.	            <ref bean="personService"/>
13.	        </jaxrs:serviceBeans>
14.	    </jaxrs:server>

15.	</beans>
The line 8 defines the singleton instance of our PersonService class using the standard Spring mechanisms.
Lines 9-14 start the CXF restful server. The restful API will be exposed via the HTTP connector on port 9000. All services will start with the /rest prefix.
In lines 11-13, we wire our instance of the PersonService class into the CXF server. Beans marked with the JAX-RS annotations (such as @Path) and wired to the JAX-RS server are automatically exposed under the appropriate URL. In this particular example, the annotation @Path("person") tells CXF to expose the PersonService class under the http://localhost:9000/rest/person URL.
If you deploy your Camel module into ServiceMix and try to connect to the previously mentioned URL with an HTTP GET method and name parameter (http://localhost:9000/rest/person?name=foo), CXF will call the appropriate method (getPersonByName) of the PersonService class.
The results will be serialized to XML using the JAXB API. The response you will see in the web browser will look like the following XML listing:
<person>
<name>foo</name>
</person>
Remember that in order to compile your JAX-RS-annotated classes (such as PersonService), you need to include the JAX-RS API in your pom.xml file:
  <dependencies>
    ...
        <dependency>
              <groupId>javax.ws.rs</groupId>
              <artifactId>jsr311-api</artifactId>
              <version>1.1</version>
        </dependency>
    …
</dependencies>This recipe uses the JAX-RS API in order to expose a simple POJO bean as a web service. In the following, you can find some additional information related to the JAX-RS.
You may be wondering what is the JSR-311 JAR that we included in our pom.xml file. The mentioned JSR (Java Specification Request) defines the JAX-RS API, including the JAX-RS annotations. The javax.ws.rs:jsr311-api JAR contains core annotations used to expose beans via JAX-RS.
While generating the XML response with JAX-RS is very simple, you don't need to do much more in order to generate responses in JSON (Java Script Object Notation). All you need to do is register the JSON serializer in the Spring XML file and wire it to the CXF REST server bean.
<bean id="jsonProvider" class="org.apache.cxf.jaxrs.provider.json.JSONProvider"/>

    <jaxrs:server id="restService"

                  address="http://localhost:9000/rest">

        <jaxrs:serviceBeans>

            <ref bean="personService"/>
        </jaxrs:serviceBeans>

    <jaxrs:providers>

      <ref bean="jsonProvider"/>

    </jaxrs:providers>

    </jaxrs:server>
Then just change the value of the @Produces annotation to application/json:
@GET

 @Produces("application/json")

 public Person getPersonByName(@QueryParam("name") String name) {
After this change, your web service will return JSON instead of XML:
{"person":{"name":"foo"}}Camel provides a very useful component binding a CXF REST service directly to the routing layer of ServiceMix. This component is named camel-cxfrs and works as a facade on the top of ServiceMix. All messages received by the REST service exposed via the camel-cxfrs component will be automatically forwarded to Camel routes. Please read the following documentation page if you are interested in knowing more about this component (http://camel.apache.org/cxfrs.html).
This recipe will guide you through the basic concepts of clustering ServiceMix using the JMS and competing consumers pattern. Clustering is the process of distributing an application's workload among multiple servers.
Let's assume that your integration solution reads from several sources of messages and then processes them using some custom processing class:
1.	public class NonClusteredRoute extends RouteBuilder {
2.
3.   public void configure() throws Exception {
4.
5.    from("direct:processor").process(new BusinessProcessor()).to("jms:processedMessages");
6.
7.	    from("file:/home/myapp/inbox").to("direct:processor");
8.	    from("jms:incomingMessages").to("direct:processor");
9.	    from("pop3://username@mymailserver.com?password=secret").
10.	      to("direct:processor");
11.	  }
12.
13.	}
Lines 5-6 tell Camel to use BusinessProcessor in order to process messages incoming to the system.
Line 7 defines the File consumer, which reads data from the local file system and converts it into the messages ready to be consumed by BusinessProcessor.
Line 8 defines a JMS consumer reading messages directly from the queue named incomingMessages.
Lines 9-10 create a POP3 consumer that reads e-mails from the mail.com server and sends them to the same BusinessProcessor as the rest of the system does.
The problem with the integration solution above is that whenever BusinessProcessor processes the messages too slow, reading from the source endpoints will wait idle until our system will process the incoming messages.
What we want to do is to cluster the solution above, so we could split it across many machines. In order to achieve ServiceMix clustering, we will take advantage of the JMS feature called competing consuming.
Create a separated route for each source endpoint (
FileRoute,MailRoute,JmsRoute).Send messages from every source endpoint to the same JMS queue.
Create a fourth route (
BusinessProcessingRoute) consuming messages from common JMS queue.Deploy each route on a separate physical machine.
To increase the processing capacity of the
BusinessProcessor, deploy an additional machine withBusinessProcessingRoute.
At some point of the load, your integration solution will become incapable of processing incoming messages. Or at least incapable of processing incoming messages within the required period of time. Such a scenario happens usually when the Camel consumer endpoints start to receive more messages than the processing part of the solution can handle.
One approach to the load issue is to scale your ServiceMix up. Scaling up means basically the same as scaling vertically, that is, adding more hardware resources to the single ServiceMix instance. Of course, more CPU, additional cores, or some extra memory can make your ServiceMix process incoming messages faster.
But you cannot add additional resources to the same physical machine infinitely. At some point, even the strongest (and most terribly expensive) computer will reach its limits. And this will basically mean that all the money invested into your super-computer will become insufficient.
In practice, software architects rarely scale their solutions up. Instead they scale their architecture out (horizontally). Scaling out means adding more processing nodes to the existing software infrastructure. So how can multiple ServiceMix instances communicate with each other in order to process incoming messages concurrently? We have to split our monolithic route into three smaller consumer routes—each one will read from another message source.
The following route demonstrates how can we read from file system and immediately forward processing to the JMS queue.
1.	public class FileRoute extends RouteBuilder {
2.
3.	  public void configure() throws Exception {
4.	    from("file:/home/myapp/inbox").to("jms:businessQueue");
5.	  }
6.
7.	}
In line 4 of the preceding route, we read messages from the file system and then send them to the common JMS queue named businessQueue.
The following route applies the same logic to the source JMS queue:
public class JmsRoute extends RouteBuilder {

  public void configure() throws Exception {
   	from("jms:incomingMessages").to("jms:businessQueue");
  }

}
The fourth line of the above route forwards messages from the source JMS queue (incomingMessages) to the same common queue as the rest of the source routes (FileRoute and MailRoute).
public class MailRoute extends RouteBuilder {

  public void configure() throws Exception {
     from("pop3://username@mymailserver.com?password=secret").to("jms:businessQueue");
  }

}
All the source routes (FileRoute, MailRoute, and JmsRoute) delegate the processing logic to the dedicated ServiceMix instances. Messages to be processed are sent to the JMS queue named businessQueue. The following code listing demonstrates how Camel can be used to read from that queue and process the collected messages:
public class BusinessProcessingRoute extends RouteBuilder {

  public void configure() throws Exception {
   	from("jms:businessQueue").
      process(new BusinessProcessor()).
      to("jms:processedMessages");
  }

}
We can deploy any number of BusinessProcessingRoute classes. JMS will take care of the synchronization of the consumers reading from the queue and guarantee us that each message from the businessQueue queue will be read only by one consumer (this feature of the JMS is called the competing consumers support).
Instead of having a single ServiceMix instance consuming messages from all possible sources, we created separated routes that read from the various sources independently and delegate processing to the JMS queue (businessQueue). If at some point of the message's traffic, two BusinessProcessingRoute routes will not be able to process the messages sufficiently fast, you can start another machine with the additional BusinessProcessingRoute deployed to it.
The competing JMS consumer is one of the ways to cluster ServiceMix. Keep in mind, however, that load balancing of the ESB highly depends on what kind of services are deployed into it. We decided to focus on the competing consumers model in this book, as this is probably the easiest way to scale the majority of the messaging solutions.
Managing multiple ServiceMix instances may be a tough task. If you want to make it easier, consider using Apache Karaf Cellar or FuseFabric. Cellar (http://karaf.apache.org/index/subprojects/cellar.html) is a subproject of Karaf, dedicated for clustering the latter with Hazelcast (http://www.hazelcast.com). Fabric (http://fuse.fusesource.org/fabric) is another tool for managing multiple ServiceMix instances, however it takes advantage of Apache ZooKeeper (http://zookeeper.apache.org) to organize Karaf nodes.