


Welcome to Instant Android Systems Development How-to. This book will equip you with all the necessary skills needed to become a successful Android systems programmer. We will cover a range of topics right from building the source code to flashing actual Android phones. The book assumes familiarity and an understanding of the Android software development kit. The reader is requested to practically perform all the steps in each recipe to gain a better understanding of how to develop for the Android operating system.
This recipe sets up your build computer and instructs you on how to download and build the Android operating system from scratch.
You need Ubuntu 10.04 LTS or later (Mac OS X is also supported by the build system, but we will be using Ubuntu for this book). This is the supported build operating system, and the one for which you will get the most help from the online community. In my examples, I use Ubuntu 11.04, which is also reasonably well supported. You need approximately 6 GB of free space for the Android code files. For a complete build, you need 25 GB of free space. If you are using Linux in a virtual machine, make sure the RAM or the swap size is at least 16 GB, and you have 30 GB of disk space to complete the build.
As of Android Versions 2.3 (Gingerbread) and later, building the system is only possible on 64-bit computers. Using 32-bit machines is still possible if you work with Froyo (Android 2.2). However, you can still build later versions on a 32-bit computer using a few "hacks" on the build scripts that I will describe later.
The following steps outline the process needed to set up a build environment and compile the Android framework and kernel:
Setting up a build environment
Downloading the Android framework sources
Building the Android framework
Building a custom kernel
In general, your (Ubuntu Linux) build computer needs the following:
Git 1.7 or newer (GIT is a source code management tool), JDK 6 to build Gingerbread and later versions, or JDK 5 to build Froyo and older versions
Python 2.5 – 2.7
GNU Make 3.81 – 3.82
We will first set up the build environment with the help of the following steps:
Install the required JDK by executing the following command:
JDK6
sudo add-apt-repository "deb http://archive.canonical.com/ lucid partner"
sudo apt-get update
sudo apt-get install sun-java6-jdk
JDK5
sudo add-apt-repository "deb http://archive.ubuntu.com/ubuntu hardy main multiverse"
sudo add-apt-repository "deb http://archive.ubuntu.com/ubuntu hardy-updates main multiverse"
sudo apt-get update
sudo apt-get install sun-java5-jdk
Install the required library dependencies:
sudo apt-get install git-core gnupg flex bison gperf build-essential \
  zip curl zlib1g-dev libc6-dev lib32ncurses5-dev ia32-libs \
  x11proto-core-dev libx11-dev lib32readline5-dev lib32z-dev \
  libgl1-mesa-dev g++-multilib mingw32 tofrodos python-markdown \
  libxml2-utils xsltproc
[OPTIONAL]. On Ubuntu 10.10, a symlink is not created between
libGL.so.1andlibGL.so, which sometimes causes the build process to fail:sudo ln -s /usr/lib32/mesa/libGL.so.1 /usr/lib32/mesa/libGL.so[OPTIONAL] On Ubuntu 11.10, an extra dependency is required:
sudo apt-get install libx11-dev:i386Now, we will download the Android sources from Google's repository.
Install repo. Make sure you have a
/bindirectory and that it exists in yourPATHvariable:mkdir ~/bin PATH=~/bin:$PATH curl https://dl-ssl.google.com/dl/googlesource/git-repo/repo > ~/bin/repo chmod a+x ~/bin/repo
Initialize repo.
In this step, you need to decide the branch of the Android source you wish to download. If you wish to make use of Gerrit, which is the source code reviewing tool used, make sure you have a live Google mail address. You will be prompted to use this e-mail address when repo initializes.
Create a working directory on your local machine. We will call this
android_src:mkdir android_src cd android_src
The following command will initialize repo to download the "master" branch:
repo init -u https://android.googlesource.com/platform/manifestThe following command will initialize repo to download the Gingerbread 2.3.4 branch:
repo init -u https://android.googlesource.com/platform/manifest -b android-2.3.4_r1The
-bswitch is used to specify the branch you wish to download.Once repo is configured, we are ready to obtain the source files. The format of the command is as follows:
repo sync -jXThe following command will sync all the necessary source files for the Android framework. Note that these steps are only to download the Android framework files. Kernel download is a separate process.
repo sync -j16Note
The source code access is anonymous, that is, you do not need to be registered with Google to be able to download the source code. The servers allocate a fixed quota to each IP address that accesses the source code. This is to protect the servers against excessive download traffic. If you happen to be behind a NAT and share an IP address with others, who also wish to download the code, you may encounter error messages from the source code servers warning about excessive usage. In this case, you can solve the problem with authenticated access. In this method, you get a separate quota based on your user ID, generated by the password generator system. The password generator and associated instructions are available at https://android.googlesource.com/new-password.
Once you have obtained a user ID/password and set up your system appropriately, you can force authentication by using the following command:
repo init -u https://android.googlesource.com/a/platform/manifestNotice the
/a/in the URI. This indicates authenticated access.
Next, we describe the steps needed to build the Android framework sources:
Initialize the terminal environment.
Certain build-time tools need to be included in your current terminal environment. So, navigate to your source directory:
cd android_src/
source build/envsetup.sh
The sources can be built for various targets. Each target descriptor has the
BUILD-BUILDTYPEformat:BUILD: Refers to a specific combination of the source code for a certain device. For example,full_magurotargets Galaxy Nexus orgenerictargets the emulator.BUILDTYPE: This can be one of the following three values:user: Suitable for production buildsuserdebug: Similar touser, with with root access in ADB for easier debuggingeng: Development build only
We will be building for the emulator in our current example. Issue the following command to do so:
lunch full-engTo actually build the code, we will use
make. The format is as follows:make -jXWhere
Xindicates the number of parallel builds. The usual rule is:Xis the number of CPU cores + 2.This is an experimental formula, and the reader should feel free to test it with different values.
To build the code:
make -j6Now, we must wait till the build is complete. Depending on your system's specifications, this can take anywhere between 20 minutes and 1 hour. At the end of a successful build, the output looks similar to the following (note that this may vary depending on your target):
...
target Dex: SystemUI
Copying: out/target/common/obj/APPS/SystemUI_intermediates/noproguard.classes.dex
target Package: SystemUI (out/target/product/generic/obj/APPS/SystemUI_intermediates/package.apk)
 'out/target/common/obj/APPS/SystemUI_intermediates//classes.dex' as 'classes.dex'...
Install: out/target/product/generic/system/app/SystemUI.apk
Finding NOTICE files: out/target/product/generic/obj/NOTICE_FILES/hash-timestamp
Combining NOTICE files: out/target/product/generic/obj/NOTICE.html
Target system fs image: out/target/product/generic/obj/PACKAGING/systemimage_intermediates/system.img
Install system fs image: out/target/product/generic/system.img
Installed file list: out/target/product/generic/installed-files.txt
DroidDoc took 440 sec. to write docs to out/target/common/docs/doc-comment-check
A better check for a successful build is to examine the newly created files inside the following directory.
The build produces a few main files inside
android_src/out/target/product/<DEVICE>/, which are as follows:system.img: The system image fileboot.img: Contains the kernelrecovery.img: Contains code for recovery partition of the device
In the case of an emulator build, the preceding files will appear at
android_src/out/target/product/generic/.Now, we can test our build simply by issuing the
emulatorcommand:emulatorThis launches an Android emulator, as shown in the following screenshot, running the code we've just built:
Note
The code we've downloaded contains prebuilt Linux kernels for each supported target. If you only wish to change the framework files, you can use the prebuilt kernels, which are automatically included in the build images. If you are making specific changes to the kernel, you will have to obtain a specific kernel and build it separately (shown here), which is explained later:
Faster Builds – CCACHEThe framework code contains C language and Java code. The majority of the C language code exists as shared objects that are built during the build process. If you issue the
make cleancommand, which deletes all the built code (simply deleting the build output directory has the same effect as well) and then rebuild, it will take a significant amount of time. If no changes were made to these shared libraries, the build time can be sped up withCCACHE, which is a compiler cache.In the root of the source directory
android_src/, use the following command:export USE_CCACHE=1 export CCACHE_DIR=<PATH_TO_YOUR_CCACHE_DIR>
To set a cache size:
prebuilt/linux-x86/ccache/ccache -M 50GThis reserves a cache size of 50 GB.
To watch how the cache is used during the build process, use the following command (navigate to your source directory in another terminal):
watch -n1 -d prebuilt/linux-x86/ccache/ccache -sIn this part, we will obtain the sources and build the
goldfishemulator kernel. Building kernels for devices is done in a similar way.Get the kernel sources:
Create a subdirectory of
android_src:mkdir kernel_code cd kernel_code git clone https://android.googlesource.com/kernel/goldfish.git git branch -r
This will clone
goldfish.gitinto a folder namedgoldfish(created automatically) and then list the remote branches available. The output should look like the following (this is seen after the execution of thegitbranch):origin/HEAD -> origin/master origin/android-goldfish-2.6.29 origin/linux-goldfish-3.0-wip origin/master
Here, in the following command, we notice
origin/android-goldfish-2.6.29, which is the kernel we wish to obtain:cd goldfish git checkout --track -b android-goldfish-2.6.29 origin/android-goldfish-2.6.29
This will obtain the kernel code:
Set up the build environment.
We need to initialize the terminal environment by updating the system
PATHvariable to point to a cross compiler which will be used to compile the Linux kernel. This cross compiler is already available as a prebuilt binary distributed with the Android framework sources:export PATH=<PATH_TO_YOUR_ANDROID_SRC_DIR>/prebuilt/linux-x86/toolchain/arm-eabi-4.4.3/bin:$PATHRun an emulator (you may choose to run the emulator with the system image that we just built earlier. We need this to obtain the kernel configuration file. Instead of manually configuring it, we choose to pull the config file of a running kernel.
Tip
Make sure ADB is still in your path. It will be in your
PATHvariable if you haven't closed the terminal window since building the framework code, otherwise execute the following steps sequentially.(Note that you have to change directory to
ANDROID_SRCto execute the following command).source build/envsetup.sh lunch full_eng adb pull /proc/config.gz gunzip config.gz cp config .config
The preceding command will copy the confi g fi le of the running kernel into our kernel build tree.
Start the compilation process:
export ARCH=arm
export SUBARCH=arm
make
If the following comes up:
Misc devices (MISC_DEVICES) [Y/n/?] y
  Android pmem allocator (ANDROID_PMEM) [Y/n] y
  Enclosure Services (ENCLOSURE_SERVICES) [N/y/?] n
  Kernel Debugger Core (KERNEL_DEBUGGER_CORE) [N/y/?] n
  UID based statistics tracking exported to /proc/uid_stat (UID_STAT) [N/y] n
  Virtual Device for QEMU tracing (QEMU_TRACE) [Y/n/?] y
  Virtual Device for QEMU pipes (QEMU_PIPE) [N/y/?] (NEW)
Enter
yas the answer. This is some additional Android-specific configuration needed for the build.Now we have to wait till the build is complete. The final lines of the build output should look like the following (note that this can change depending on your target):
...
    LD      vmlinux
  SYSMAP  System.map
  SYSMAP  .tmp_System.map
  OBJCOPY arch/arm/boot/Image
  Kernel: arch/arm/boot/Image is ready
  AS      arch/arm/boot/compressed/head.o
  GZIP    arch/arm/boot/compressed/piggy.gz
  AS      arch/arm/boot/compressed/piggy.o
  CC      arch/arm/boot/compressed/misc.o
  LD      arch/arm/boot/compressed/vmlinux
  OBJCOPY arch/arm/boot/zImage
  Kernel: arch/arm/boot/zImage is ready
As the last line states, the new
zImageis available insidearch/arm/boot/.To test it, we boot the emulator with this newly built image.
Copy
zImageto an appropriate directory. I just copied it toandroid_src/:emulator -kernel zImageTo verify that the emulator is indeed running our kernel, use the following command:
adb shell
# cat /proc/version
The output will look like:
Linux version 2.6.29-gef9c64a (earlence@earlence-Satellite-L650) (gcc version 4.4.3 (GCC) ) #1 Mon Jun 4 16:35:00 CEST 2012This is our custom kernel, since we observe the custom build string (
earlence@earlence-Satellite-L650) present as well as the time of the compilation. The build string will be the name of your computer.Once the emulator has booted up, you will see a window similar to the following:
Following are the steps required to build the framework on a 32-bit system:
Make the following simple changes to build Gingerbread on 32-bit Ubuntu. Note that these steps assume that you have set up the system for a Froyo build. Assuming a Froyo build computer setup, the following steps guide you on incrementally making changes such that Gingerbread and later builds are possible. To set up for Froyo, please follow the steps explained at http://source.android.com/source/initializing.html. In
build/core/main.mk, changeifneq (64,$(findstring 64,$(build_arch)))toifneq (i686,$(findstring i686,$(build_arch))).Note that there are two changes on that line.
In the following files:
external/clearsilver/cgi/Android.mkexternal/clearsilver/java-jni/Android.mkexternal/clearsilver/util/Android.mkexternal/clearsilver/cs/Android.mkchange:
LOCAL_CFLAGS += -m64
LOCAL_LDFLAGS += -m64
to:
LOCAL_CFLAGS += -m32
LOCAL_LDFLAGS += -m32
Install the following packages (in addition to the packages you must have installed for the Froyo build):
sudo apt-get install lib64z1-dev libc6-dev-amd64 g++-multilib
lib64stdc++6
Install Java 1.6 using the following command:
sudo apt-get install sun-java6-jdk
The Android build system is a combination of several standard tools and custom wrappers. Repo is one such wrapper script that takes care of GIT operations and makes it easier for us to work with the Android sources.
The kernel trees are maintained separately from the framework source trees. Hence, if you need to make customizations to a particular kernel, you will have to download and build it separately. The keen reader may be wondering how we are able to run the emulator if we never built a kernel in when we just compiled the framework. Android framework sources include prebuilt binaries for certain targets. These binaries are located in the /prebuilt directory under the framework source root directory.
The kernel build process is more or less the same as building kernels for desktop systems. There are only a few Android-specific compilation switches, which we have shown to be easily configurable given an existing configuration file for the intended target.
The sources consist of C/C++ and Java code. The framework does not include the kernel sources, as these are maintained in a separate GIT tree. In the next recipe, we will explain the framework code organization. It is important to understand how and where to make changes while developing custom builds.
In this recipe, we analyze the source structure of the framework sources.
You need to use a suitable code editor/viewer. I usually make use of gedit with several code-related options enabled. Some people prefer to use vi, emacs, or Eclipse. Use whatever you are comfortable with to view the sources.
As you read the following table, refer to the directories of your Android source copy and feel free to explore the subdirectories. The top level folders are as follows:
Note
All folders are relative to the Android source root, unless specified otherwise. Also note that the source structure can and will change with the addition of new folders or subfolders in subsequent Android versions. This description is for Gingerbread.
|
Directory name |
Description |
|---|---|
|
|
This contains the minimal libc (standard C library subset) implementation by Google, specifically for Android. It contains the sources for libm, libstdc++, and the dynamic linking library in addition to the linker. |
|
|
Includes a bootloader example. It also contains the code for the recovery environment. |
|
|
Contains all the build scripts used to build and maintain an Android framework source distribution. Includes the |
|
|
Contains test cases to validate different parts of the framework. |
|
|
Contains the Dalvik Virtual Machine sources, the |
|
|
Contains various dev time tools, scripts to build an SDK version and an NDK version. |
|
|
Device specific code such as Platform libraries, Add-ons, Hardware abstraction code, and so on. |
|
|
This is a local copy of an open source external project used internally in Android, such as SQLite and WebKit. |
|
|
Contains all of the core framework code. |
|
|
Contains all Android class library code. This is linked with each Android application. |
|
|
The most important item here is the |
|
|
Runtime System Servers. This represents the core functionality provided by Android to user apps. |
|
|
Contains various user space Android applications, including the system apps such as Settings, Clock, and so on. |
|
|
Contains binaries of compilers, linkers for different host environments, and also prebuilt linux kernel images for Android. |
|
|
Contains several native code ( |
All of these subdirectories are part of the Android framework (note that they also contain code which is not exactly part of the framework such as the code under /system, but the definition of what exactly is in the framework can be relaxed a bit). During a system build, most of these are pulled together with the help of Android make files that exist in these directories. Creating new folders is not advised, since all vendor-specific code can be added under the /vendor directory (not shown earlier). This directory is created when you build for a particular device and it contains proprietary binaries among other things, such as vendor-specific framework code.
In this recipe, we will go through the steps the system performs while booting up. Please refer to the files mentioned here as we walk you through the process.
Keep your code editor/viewer ready, as we will open a lot of source files and inspect their contents.
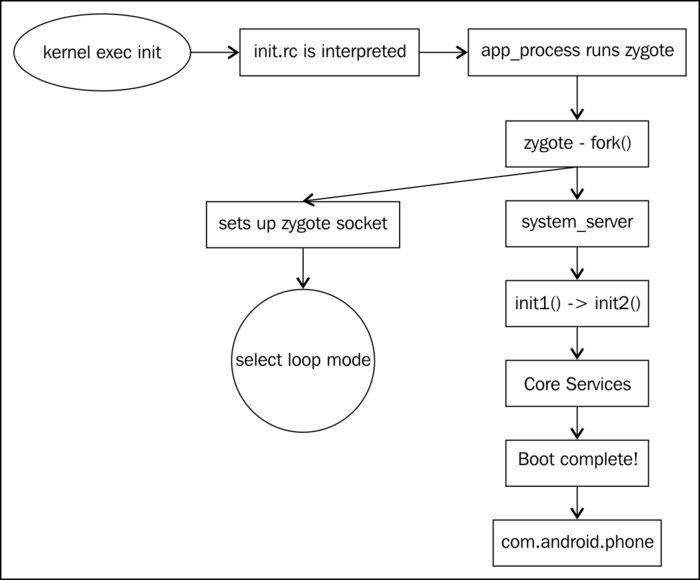
There are three major phases for the bootup of an Android Phone, which are as follows:
Phase 1 – firmware start: After power up, the firmware starts executing. This is usually a first-stage bootloader. Eventually, the kernel is loaded into RAM, and a jump is executed to the kernel entry point.
Phase 2 – kernel boot: The kernel starts through its usual boot procedure. Memory and I/O is initialized. Interrupts are enabled, the process table is created, and eventually
initis run.Phase 3 – user space framework boot: There are three steps in this process. It begins with the execution of the
init.rcscript. This is located atANDROID_SRC/system/core/rootdir/init.rc.
Whenever we refer to a source extract, open up that file in your code viewer.
If we analyze the contents of the startup script, we observe that it sets up various environment variables—including
PATHandBOOTCLASSPATH—that contain the paths to Java libraries needed by android processes.After this, it creates a bunch of directories and sets up proper access rights. It also writes various configuration parameters for core services, such as
lowmemorykiller, for example. It does this through the/prockernel interface. Here is an example extract frominit.rc:# Write value must be consistent with the above properties. # Note that the driver only supports 6 slots, so we have combined some of # the classes into the same memory level; the associated processes of higher # classes will still be killed first. write /sys/module/lowmemorykiller/parameters/adj 0,1,2,4,7,15
Android has a specific init language, which is described in detail at the following location in the Android sources:
ANDROID_SRC/system/core/init/readme.txt
Following this, there is a startup procedure for Zygote and system_server.
Note
Zygote is the second init process from the point of view of the kernel, and the first Android process from the point of view of the framework.
The following extract from init.rc is the initialization of Zygote:
service zygote /system/bin/app_process -Xzygote /system/bin --zygote –start-system-server
Here, app_process is a binary that fires up the zygote process during system initialization. The last flag (--start-system-server) indicates that the system_server process is to be started. The system_server process encompasses all the core services provided by the Android platform. Examples are the ActivityManagerService, LocationManagerService, and so on.
The app_process binary invokes the functionality of AndroidRuntime, which is the entry point to start the dalvik environment; AndroidRuntime.cpp is located at ANDROID_SRC/frameworks/base/core/jni/.
The app_process binary's code eventually comes down to the following in AndroidRuntime.cpp:
void AndroidRuntime::start(const char* className, const bool startSystemServer)
This then calls int AndroidRuntime::startVm(JavaVM** pJavaVM, JNIEnv** pEnv).
The preceding line of code then loads the DVM into the native process, and results in a call to the main method of ZygoteInit.java located at ANDROID_SRC/frameworks/base/core/java/com/android/internal/os.
The ZygoteInit.main() method is invoked, which causes the invocation of startSystemServer in that file. This method passes command-line arguments to the system server. An extract is shown as follows:
String args[] = {
            "--setuid=1000",
            "--setgid=1000",
            "--setgroups=1001,1002,1003,1004,1005,1006,1007,1008,1009,1010,1018,3001,3002,3003",
            "--capabilities=130104352,130104352",
            "--runtime-init",
            "--nice-name=system_server",
            "com.android.server.SystemServer",
        };
After starting the system server (details to follow), the zygote socket is set up and then the process runs in "select loop mode". In this mode, the process spins waiting for requests to start up new Android processes.
We will now take a look at the system_server startup process. The code for this process can be located at frameworks/base/services/java/com/android/server/SystemServer.java.
There are two methods called during startup, one of which is shown here:
native public static void init1(String[] args);
This method is called by zygote (as we have seen earlier), and its job is to initialize native services which exist in the android_servers native object file. Examples of these native services are SurfaceFlinger, AudioFlinger, and so on. The init1() method is implemented at ANDROID_SRC/frameworks/base/cmds/system_server/library/system_init.cpp.
The init1() method bootstraps init2 via the following line in system_init.cpp:
runtime->callStatic("com/android/server/SystemServer", "init2");Now, the execution is back inside SystemServer.java, and init2 is run. It creates a thread and then proceeds to start up system servers.
An example start sequence for the servers is as follows (based on Gingerbread 2.3.4_r1):
Entropy Service
Power Manager
Activity Manager
Telephony Registry
Package Manager
Account Manager
Content Manager
This code can be seen inside the run() method of SystemServer.java. Once the ActivityManagerService class is started (and boot is completed), the first few Android applications are started up, as shown here:
com.android.phone – The phone app.
android.process.acore – The home screen and core apps.
Note
Zygote is forked every time a new android process is needed. So, when a user launches an application through the UI, zygote is forked and a process is created.
The complete booting system sequence is shown in the following diagram:
We will now take a look at some pointers on good and secure code style to be followed when writing code for Android.
Adherence to secure coding practice is of vital importance when modifying the system. As a developer, it is your responsibility to ensure that you do not inadvertently make the system insecure by your changes. To aid you in this process, here are a few points to keep in mind:
Always use permission strings to protect functionality: Whenever you add new functionalities to the system, protect the methods with a
checkPermission(...)call.Ensure modified code does not evade permission checks: The framework code usually invokes the
checkPermission(...)method before the functionality of a method is executed. When you modify such code, make sure no code paths are introduced which bypass the checks. Do this using local test cases. If test cases exist for the method you are modifying, execute them after making your changes.Read the security documentation in the code: Many system services—for example,
PackageManagerService.java—have internal documentation in the form of comments. Just follow these instructions.Document your newly added code: If there are specific security guidelines to be followed if someone modifies your code, mention these clearly.
We will apply previously learned concepts, such as working with the build system, the Android startup process, and the common Android systems design patterns, to build a complete working system with a custom system service. In our example, we will create a simple service to implement a small hashing function. We will then add this service to the startup process. As stated in the recipe on Common Design patterns, a system service is a long running task that implements some functionality such as providing the device's GPS co-ordinates, for example.
The interface file is written in Android Interface Definition Language (AIDL). The interface represents the public remote interface for the service.
We will write the code at ANDROID_SRC/frameworks/base/core/java/android/os/packt. The code is written at this location because it follows the conventions of Android systems coding and, more importantly, the build system is designed to automatically pick up files from these pre-known locations. Hence, to avoid modifications to the build system, we write our code at standard locations. Another reason is that since we are writing framework-level extensions, they have to be tightly integrated with the framework, and the above location is where all such code is written.
Create a directory called packt under /os. This helps us to better organize the code and easily distinguish custom code from framework code. This is important since you are modifying an already tested open source system. Simply due to the sheer size of Android, making indiscriminate changes to the code can introduce really hard-to-find bugs. Hence, having a clear separation between newly added code and framework code is a good practice.
The following code represents the Android interface definition of the system service. It specifies the methods that are exposed by the service for use by clients.
Our example exposes a single method named getMD5(String) that calculates the MD5 hash for the input parameter.
Save the following code file as IPacktCrypto.aidl:
package android.os.packt;

interface IPacktCrypto
{
  byte [] getMD5(String data);
}
We have to communicate this new file to the build system. This is done by adding the following line to the LOCAL_SRC_FILES entry in the Android.mk file located at ANDROID_SRC/frameworks/base.
Scroll to the LOCAL_SRC_FILES directive. The last few lines should look like the following (GingerBread 2.3.4_r1):
…
voip/java/android/net/sip/ISipSessionListener.aidl \
voip/java/android/net/sip/ISipService.aidl \
core/java/android/os/packt/IPacktCrypto.aidl
Notice that we have specified our newly added interface definition file. Inclusion of the filename here results in the invocation of the AIDL compiler on the file to generate the proxy and stub classes (the proxy/stub classes contain marshalling code).
Proxy/stub marshalling code is needed because the system server runs in its own process. Thus, to invoke its functions from other processes, you need an intermediate layer that marshals calls from one process to another. In case of Android, generated stub/proxy classes constitute this layer.
The AIDL file has to be compiled by the build system with the help of the AIDL compiler. Therefore, we list the name of our file towards the end of the existing framework files in the make file. When the system is being built, AIDL will be invoked on IPacktCrypto.aidl, and will result in the generation of proxy and stub classes. These classes are generated at android_src/out/target/common/obj/JAVA_LIBRARIES/framework_intermediates/src/core/java/android/os.
In this recipe, we will create the outline code of our custom system service. This will help us in understanding the basic mechanics and components of system services. To refresh your memory, a system service is a long running task that provides useful functionalities to Android applications. An example is the GPS services that interface with the GPS hardware and provide services such as proximity alerts.
We will add our system server code to ANDROID_SRC/frameworks/base/services/java/com/android.
Create a directory called packt at the preceding location. Inside that directory, create a file named PacktCrypto.java.
Write the following code and save it as
PacktCrypto.java. This is the main system service class file:package com.android.packt; import java.security.MessageDigest; import java.io.UnsupportedEncodingException; import java.security.NoSuchAlgorithmException; import android.util.Log; import android.os.packt.IPacktCrypto; /* Our system server provides a hashing service */ public class PacktCrypto extends IPacktCrypto.Stub { private static final String TAG = "PacktCrypto"; //use this for logging private static PacktCrypto mSelf; private PacktCrypto() { //perform one-time initialization here //if needed. } /* This is a singleton pattern. Only one instance of PacktCrypto may exist in the entire system */ public static PacktCrypto getInstance() { if(mSelf == null) mSelf = new PacktCrypto(); return mSelf; }Tip
Downloading the example code
You can download the example code files for all Packt books you have purchased from your account at http://www.packtpub.com. If you purchased this book elsewhere, you can visit http://www.packtpub.com/support and register to have the files e-mailed directly to you.
The following method implements the functionality of the system service. You may have noticed that the method name and signature is identical to the one specified in the AIDL file. This is crucial as it has to match for the correct marshalling code to be generated.
  /*
  The interface method specified in IPacktCrypto.aidl
  */
  public byte [] getMD5(String data)
  {
    byte [] dataBytes = null;
    MessageDigest md5 = null;

    try {

      dataBytes = data.getBytes("UTF-8");
      md5 = MessageDigest.getInstance("MD5");
      Log.i(TAG, "MD5 digestion invoked");

    } catch(java.io.UnsupportedEncodingException uee)
    {
      Log.e(TAG, "Unsupported Encoding UTF8");
    }
    catch(java.security.NoSuchAlgorithmException nsae)
    {
      Log.e(TAG, "No Algorithm MD5");
    }
    catch(Exception e)

    {
 }
    if(md5 != null)
      return md5.digest(dataBytes);
    else
      return null;
  }
}
The preceding code block represents the system service. It extends
IPacktCrypto.Stub, which is a stub class that will be generated by the AIDL compiler when it is run on theIPacktCrypto.aidlfile. We use a singleton pattern to instantiate the class to ensure that only one object ofPacktCryptoexists in the system. We need to ensure this, as only one service will be entered into the service directory. The code also illustrates various other best practices. For example, the use of a log tag and the singleton pattern of service instantiation. These are common coding styles for system services.At this stage, we have created an interface definition for our service, created methods to obtain a reference to the service, and also we have implemented the functionality provided by the service, that is, the hashing function.
Now we can run a test build to make sure everything compiles fine. Open up a terminal emulator and initiate a build for the emulator:
cd android_src
. build/envsetup.sh
lunch
select option for generic-eng
make -jX where X = number of CPU cores + 2
Traditionally, proxy classes represent the code component that executes on the client side of a remote request. Likewise, stubs execute on the server side. Therefore, our system server extends IPacktCrypto.Stub, which was generated during the build process from the IPacktCrypto.aidl file. We also have to implement the getMD5() interface method as it will provide the required functionality to the client. We choose to utilize the singleton pattern for our service to guarantee that only one object of the service exists in the system. This makes sense, since only one copy of the system service may exist in the service directory.
We need to register our service with the Android system and create an object. The Service Manager is a component that maintains a mapping of the service name and the associated service object. Processes invoke the Service Manager to obtain a reference to the system server by name. The method invoked to obtain a reference to a service object is ServiceManager.getService(String). You can think of the Service Manager as a directory service that is available to service consumers.
We will add our custom server to SystemServer.java located at ANDROID_SRC/frameworks/base/services/java/com/android/server.
The following code represents modifications you need to make to the SystemServer.java file. Locate the run() method and add the following lines at an appropriate location. For the purpose of illustration, we choose to add this after all services have been started.
...
//begin packt
Slog.i(TAG, "PacktCrypto service");
com.android.packt.PacktCrypto pcrypt = com.android.packt.PacktCrypto.getInstance();
ServiceManager.addService("PacktCryptoService", pcrypt);
//end packt
…The preceding code modification obtains a reference to an object of type PacktCrypto. It then adds that object to the ServiceManager class, which, if you recall, is a directory service for all system services. It adds the PacktCrypto object to the directory by invoking the addService() method that takes as arguments a string service identifier and the object itself.
In the code fragment, we must create an object of PacktCrypto and add it to the Service Manager directory with a string name. We choose PacktCryptoService for our example. At this stage, our custom server will be created and registered with the Service Manager.
At this stage, we are ready to test the custom service (PacktCrypto) which provides a hashing functionality to clients. Therefore, we will write a small test case inside the SystemServer process itself. This case is executed after the custom server has started.
Write the following test code inside SystemServer.java itself after the location where you created the service, that is, the location where changes were made in the Adding a custom service to the SystemServer process recipe.
The following lines of codes are a few lines added to
SystemServer.java. Add it at a location after object creation of the service://PacktCrypto Test start android.os.packt.IPacktCrypto ipc = android.os.packt.IPacktCrypto.Stub.asInterface(ServiceManager.getService("PacktCryptoService")); try { byte [] hash = ipc.getMD5("packttest"); StringBuffer sb = new StringBuffer(); for (int i = 0; i < hash.length; i++) { sb.append(Integer.toString((hash[i] & 0xff) + 0x100, 16).substring(1)); } Log.i("PacktTest", "MD5 sum: " + sb.toString()); } catch(RemoteException re1) { Log.e("PacktTest", "remote exception"); } //PacktCrypto Test endAfter you have added the code, run a make and then start the emulator (for steps on how to do this, refer to the steps described in the first recipe).
The output in logcat should look like the following (after applying the appropriate filters to the log output). For example, if we use the following logging command:
adb logcat *:S PacktCrypto:I PacktTest:IThe output would be:
I/PacktCrypto(69): MD5 digestion invoked
I/PacktTest(67): MD5 sum: 422164113c2fc595dd0ab44a18925ac5
An Android phone contains a few basic partitions along with other supporting partitions. This knowledge is vital to understanding how and where code is flashed to devices.
On our test device—Samsung Galaxy Nexus (or emulator)—we can view these partitions with the following command executed inside an adb shell. To obtain a shell on the device, you should connect the device via USB and you should make sure that the USB Debugging option is enabled (located at Settings | Developer Options).
Note
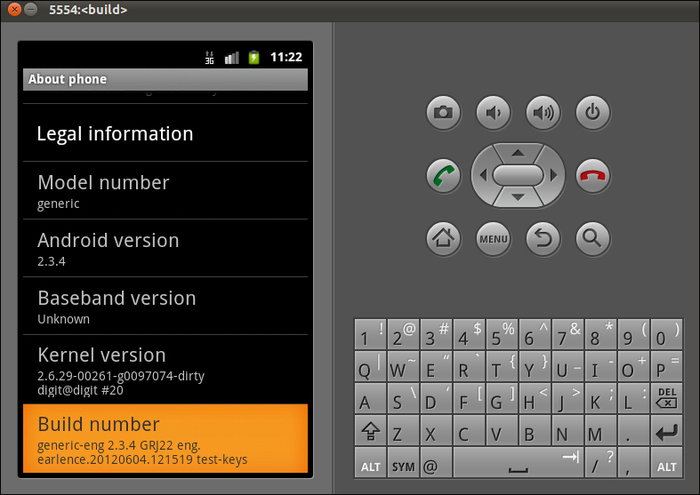
If you are using Jellybean or higher, the option is hidden, so you need to go to Settings | About Phone and keep tapping on the build number until a Toast pops up saying that you are now a developer. The Developer Options will appear at the usual location.
Finally, to actually obtain a shell, while the device is connected, fire up a terminal and type in adb shell and press Enter.
Execute the following command in a terminal with Samsung Galaxy Nexus connected and with debugging enabled. The following output is generated when we list the device's partitions:
shell@android:/ $ ls -l /dev/block/platform/omap/omap_hsmmc.0/by-name
lrwxrwxrwx root     root              2012-06-28 22:03 boot -> /dev/block/mmcblk0p7
lrwxrwxrwx root     root              2012-06-28 22:03 cache -> /dev/block/mmcblk0p11
lrwxrwxrwx root     root              2012-06-28 22:03 dgs -> /dev/block/mmcblk0p6
lrwxrwxrwx root     root              2012-06-28 22:03 efs -> /dev/block/mmcblk0p3
lrwxrwxrwx root     root              2012-06-28 22:03 metadata -> /dev/block/mmcblk0p13
lrwxrwxrwx root     root              2012-06-28 22:03 misc -> /dev/block/mmcblk0p5
lrwxrwxrwx root     root              2012-06-28 22:03 param -> /dev/block/mmcblk0p4
lrwxrwxrwx root     root              2012-06-28 22:03 radio -> /dev/block/mmcblk0p9
lrwxrwxrwx root     root              2012-06-28 22:03 recovery -> /dev/block/mmcblk0p8
lrwxrwxrwx root     root              2012-06-28 22:03 sbl -> /dev/block/mmcblk0p2
lrwxrwxrwx root     root              2012-06-28 22:03 system -> /dev/block/mmcblk0p10
lrwxrwxrwx root     root              2012-06-28 22:03 userdata -> /dev/block/mmcblk0p12
lrwxrwxrwx root     root              2012-06-28 22:03 xloader -> /dev/block/mmcblk0p1
Similarly, on the Nexus S and Nexus One device, we can view the partitions mounted with the command. The following command lists the contents of the
mtdproc file:cat /proc/mtdThe output looks similar to the following:
dev:    size   erasesize  name
mtd0: 00200000 00040000 "bootloader"
mtd1: 00140000 00040000 "misc"
mtd2: 00800000 00040000 "boot"
mtd3: 00800000 00040000 "recovery"
mtd4: 1d580000 00040000 "cache"
mtd5: 00d80000 00040000 "radio"
mtd6: 006c0000 00040000 "efs"
The following output is observed when the same command is executed on Nexus One:
dev:    size   erasesize  name
mtd0: 00040000 00020000 "misc"
mtd1: 00500000 00020000 "recovery"
mtd2: 00280000 00020000 "boot"
mtd3: 04380000 00020000 "system"
mtd4: 04380000 00020000 "cache"
mtd5: 04ac0000 00020000 "userdata"
The main thing to notice here is the existence of a few common partitions which are important to flashing new software. The following are major partitions on most Android devices:
/boot: This contains the kernel image and the associated RAM disk. This is executed by the bootloader during the startup process. Any newly built kernel is written to this partition. The phone will not boot if this partition is empty./system: This contains the Android framework and the related system applications. During system operation, this is mounted as read-only so that critical system files are never modified./recovery: Is an alternative boot partition used to boot the device into recovery mode. The recovery code is located atANDROID_SRC/bootable/recovery. There are many custom recovery firmware images available. A notable example isClockWorkMod.
The three partitions just mentioned are the ones involved in flashing a new build of Android on to a device. In addition to these, there are a few other partitions that exist:
/data: This contains user data and is sometimes called the user-data partition. All user-installed applications, settings, and personal data are stored in this partition./cache: Will contain frequently accessed applications./sdcard: This is the SD card attached to the phone. It is not a partition on the internal device memory.
Device-specific binaries are flashed to the various partitions just described. The framework needs to be compiled for a specific target. The target represents the device to which you want to flash the binaries.
Note
Build variants: The build system provides several types of builds. These builds result in minor changes to the final binaries.
engineering (eng): Is the default option. Plain make defaults to this. Includes all modules tagged eng, user, debug, and userdebug. ADB is enabled and will run commands as root user.
user: This is intended for the final production build. ADB is disabled and will not run commands as the root user.
userdebug: Basically, the same as user, but the system is debuggable and ADB is enabled by default.
All of these tags are assigned to projects in the Android.mk file. If you open up any of these files, it is mentioned with the help of the LOCAL_MODULE_TAGS command.
Navigate to your Android source directory and include the build environment as usual. (source build/envsetup.sh).
To obtain a list of available targets supported by the source version you are working with, use the
lunchcommand in a terminal:lunch The output (for 2.3.4_r1) should look like: You're building on Linux Lunch menu... pick a combo: 1. generic-eng 2. simulator 3. full_passion-userdebug full_crespo-userdebug
Before you initiate a build for a particular target, you need to obtain the proprietary binaries for the phone and unzip them into your source directory. Usually, an agreement and unzipping script accompany the binaries. After scrolling through the agreement, type
I AGREEand press Enter. The required files will be unzipped to the correct location in the source directory.Here is an example of downloading the Orientation Sensor for Nexus S, Build GRJ22:
Navigate to https://developers.google.com/android/nexus/drivers#crespogrj22.
Download the ZIP file for Orientation Sensor and place it in the Android sources directory on your computer.
Unzip it to the current directory. A file called
extract-akm-crespo.shwill be created.Execute it and scroll down the agreement. At the end, type in
I AGREE. Then the binaries will be extracted.Follow a similar procedure for the other files of your device.
Note
The binaries for the Nexus One have to be extracted from the device itself. In the source directory,
ANDROID_SRC/device/htc/passion, a shell script exists to pull the needed binaries directly from the device. Connect your Nexus One to a computer and over adb execute the following:./extract-files.shThis will pull various proprietary binaries and copy them to the appropriate location in the source directory (
ANDROID_SRC/vendor/).
The lunch command is part of the build environment. It provides a list of available targets you can build with your current source distribution. In all the distributions, the simulator and generic-eng targets are available. Simulator was used before the QEMU emulator became available. This target is now deprecated and should not be used.
We can build the code for a generic target (the emulator), or a simulator target (currently outdated, this existed when the QEMU emulator was not ready). The more interesting options are full_passion-userdebug and full_crespo-userbedug. The first one represents the Google Nexus One device. Passion is the code name for that device. Similarly, the latter represents the Google Nexus S.
Google Nexus One – Passion
Google Nexus S – Crespo + crespo4g
Galaxy Nexus – Maguro + Toro
Therefore, based on your target device, you can select the desired build target and execute a make.
Although Android is an open source project, certain hardware drivers are closed source. These include the graphics drivers, the WiFi chipset drivers on certain models, orientation sensors, the radio baseband software, and camera drivers. Therefore, if you create a build just with the source downloaded from the Android GIT tree, certain phone functions will not work. For example, if the correct radio image was not included, you will not be able to make and receive phone calls. However, these drivers are made available in binary format for download from https://developers.google.com/android/nexus/drivers.
In the event that something went wrong with your custom code and the device becomes unusable, you will need to restore it to a working state. Google provides Factory images for its developer devices. They contain the usual system.img, boot.img, and recovery.img images that will restore the device to its factory state. These are available at https://developers.google.com/android/nexus/images.
Note
The files for the Nexus One are not available at that location, and you will need to obtain it from an alternate location, such as Cyanogen Mod or modaco.
You may need to execute the following command after including proprietary binaries to make sure they are included in the generated software images:
make clobber
Fastboot is a tool and a protocol used to communicate with bootloaders. It exists as a binary and gets included in your path when you work with the Android sources. Fastboot is also a part of the standard SDK (under platform-tools).
Before you can flash any software, you need to boot the device into fastboot mode. There are two ways of doing this:
Using key combinations:
First, power off the phone completely
(Nexus One) Passion: Press and hold the trackball, then press Power
(Nexus S) Crespo: Press and hold Volume Up, then press and hold Power
(Galaxy Nexus) Maguro: Press and hold both Volume Up and Volume Down, then press and hold Power
Using ADB commands: The following command reboots the device into recovery mode. This has the same effect as the key combinations.
adb reboot-bootloaderUnlock the bootloader: You can flash software only if the bootloader allows it. We need to unlock the bootloader with the following command once the device is in fastboot mode.
fastboot oem unlockNote
Be sure to back up whatever files/data you need from the device, since this operation erases all device memory.
And follow the onscreen instructions.
To flash, you need to ensure you are connected to the device in fastboot mode. The following command will display the device's serial number on the terminal:
fastboot devicesThen, execute the following in order:
fastboot erase userdata
fastboot erase cache
fastboot flash boot boot.img
fastboot flash recovery recovery.img
fastboot flash system system.img
fastboot reboot
The device will boot into the custom operation system. For additional information on different fastboot commands and the flashing process in general, refer to http://source.android.com/source/building-devices.html.
Note
After a successful build, the required system images will be available at
ANDROID_SRC/target/out/product/<NAME>/.Here,
<NAME>refers to the target. For the emulator, it isgeneric, similarly, for the Nexus S, it will becrespo. The available images will besystem.img,boot.img, andrecovery.img.
Fastboot is a protocol to communicate with device bootloaders. This was designed such that flashing can be independent of the underlying bootloader. The process of unlocking the bootloader is available on developer devices. This is a recent feature starting with Nexus S. Relocking bootloaders allows you to lock the bootloader preventing the installation of new firmware.
Google developer phones can be loaded with custom software that we have been building in the previous recipes (Google developer phones are special devices designed for platform developers and not for the typical consumer). Firmware can be written to these devices' flash memory as the bootloader is unlocked. Consumer devices normally lock their bootloaders and flashing is not possible. The workflow for all three of the developer phones (Nexus One, Nexus S, and Galaxy Nexus) is, for the most part, identical. Fastboot is a protocol and a flashing tool used to write new software images to the device.
For more details on the fastboot protocol, refer ANDROID_SRC/bootable/bootloader/legacy/fastboot_protocol.txt.
Now, we are ready to build a custom system image. We will re-use the previously written code and test it on an actual device. Therefore, you will need to build the custom system server code and flash it to the Nexus S device in this recipe.
Navigate to the proprietary binary page for the Nexus S and download all files for the GRJ22 build. Unzip and extract them.
Lunch the
full_crespo-userdebugtarget.Execute a full make. Once successful, navigate to
ANDROID_SRC/target/out/product/crespo/.Flash
system.img,boot.img, andrecovery.imgas described above.Reboot the phone. You can use:
fastboot reboot
The code images are cross compiled for an ARM architecture and the proprietary binaries are included in them. The appropriate prebuilt kernel image is picked up and included in boot.img during the build process.
In the preceding recipes, we created a custom service that can be invoked by obtaining a reference directly to the service via the Service Manager. In this recipe, we will create a class library that abstracts much of that code away into a clean interface. The advantage of creating a class library is that it acts like an SDK-API for our custom service. The example we go through here will also guide us in adding code to the Android class library. The code is generally independent of system services and can be used for other purposes as well. An example of an Android class library is android.app.Activity, which is a commonly used class to represent Android activities. This class is part of the Android class library.
In this recipe, we will create a class library which accesses our custom system server.
Create a directory at ANDROID_SRC/frameworks/base/core/java/android. We will name it packt. Inside it, we have the following code file.
We need to write a wrapper around PacktCryptoService, which provides us the MD5 creation functionality. The wrapper we write will be the class library. I chose to wrap a service call, as this pattern is followed by many of Android's class libraries, that is, they wrap the service functionality. However, you are not restricted to using this type of wrapper:
For this recipe, we need to write the following code which wraps
PacktCryptoService. Save it in a file namedPacktCryptoService.java.package android.packt; import android.os.packt.IPacktCrypto; import android.os.packt.PacktCryptoNative; import android.os.ServiceManager; import android.os.RemoteException; import android.util.Log; /* Custom Class Library PacktCrypto The class library is linked into the Android application and this code is executed as part of the applications process. It makes an IPC to the custom system server. This is just one example of the use of a class library. */ public class PacktCrypto { IPacktCrypto pcRef; private static final String SERVICE_NAME = "PacktCryptoService"; private static final String TAG = "PacktCryptoClassLibrary"; public PacktCrypto() { pcRef = PacktCryptoNative.asInterface(ServiceManager.getService(SERVICE_NAME)); } public byte [] getMD5(String data) { byte [] hash = null; try { if(pcRef != null) hash = pcRef.getMD5(data); } catch(RemoteException re) { Log.e(TAG, Log.getStackTraceString(re)); } return hash; } }Now run
make update-api, since we have modified the public API of the system. Android maintains a list of interfaces, permissions, and methods in the XML files underANDROID_SRC/frameworks/base/api. The notable file iscurrent.xml. This file represents the interfaces, methods, and permissions that are part of the public API supported by Android. Since our custom class library is intended to be a part of the public API, we need to updatecurrent.xml. Hence, use the following command:make update-apiIn this example, we will do something slightly different to test our code. We will build our custom SDK. Building the SDK generates JAR files that contain the Android class library. For example, when using the SDK to build normal applications, there is the
android.jarfile located within our project hierarchy. This file is the SDK that provides Android framework classes. We need to build an updatedandroid.jarfile with our newly added class library. Note that the SDK does not need to include the services we add to the platform as these only exist on the Android OS. They are not needed for SDK-based development. To build a new SDK, issue the following command.make sdkThis command builds the SDK. At the end of the build, the output should look similar to the following:
[previous output lines omitted for brevity]
DroidDoc took 0 sec. to write docs to out/target/common/docs/dexdeps
Package SDK Stubs: out/target/common/obj/PACKAGING/android_jar_intermediates/android.jar
Package SDK: out/host/linux-x86/sdk/android-sdk_eng.earlence_linux-x86.zip
If you open up
android-sdk_eng.earlence_linux-x86.zipand examine its contents, you'll find that it's basically the same as a normal Android SDK. The difference is that we have built this with our custom code additions. Using this SDK, we can build an APK which uses the custom class library.Copy the SDK ZIP file to some external location (external to
ANDROID_SRC). Now run a normal build by issuing themakecommand as described in the earlier recipes. This will build system images that contain the custom system service. These system images are used to run an emulator on which we will test our code.
Our class library simply obtains a reference to the custom server from the Service Manager. It then invokes the getMD5() method. The advantage of this is that we have a simpler and more uniform API to access our custom server. The other advantage is that it can be packaged into an SDK without the need to package the actual system service itself. This makes sense, since no system services are ever packaged in the SDK, only the APIs that access them are packaged.
We will write an Android application that utilizes our custom SDK build in the previous recipe.
Note
In this recipe, I assume that you have already installed Eclipse and a functional Android SDK is installed and configured with the ADT Eclipse plugin. These steps are the same as those found on the Android Developer site (http://developer.android.com/index.html).
We need to make our custom SDK visible to the existing Android SDK. So, unzip the generated custom SDK. Inside, there will be the platforms/android-2.3.4 directory. We are interested in the android-2.3.4 directory. Rename it to android-packt and copy it into ANDROID_SDK/platforms/, where ANDROID_SDK is the path to your Android SDK installation.
Next, we need to update the API level number, so as not to clash with an existing installation of the same API level. Inside android-packt, a file with the name build.prop exists. Change the following line:
ro.build.version.sdk=10
to
ro.build.version.sdk=-20
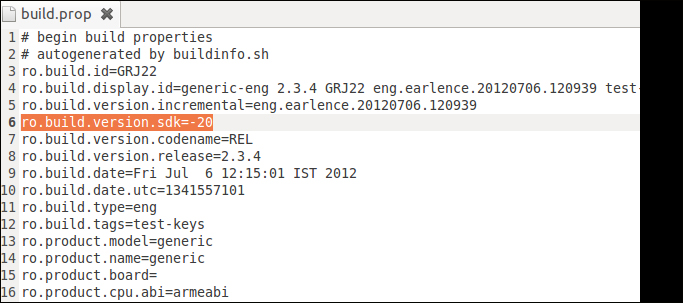
Here, -20 is an arbitrary number. This is needed to prevent clashes.
Start Eclipse and navigate to the SDK Manager. You should see something similar to the following:
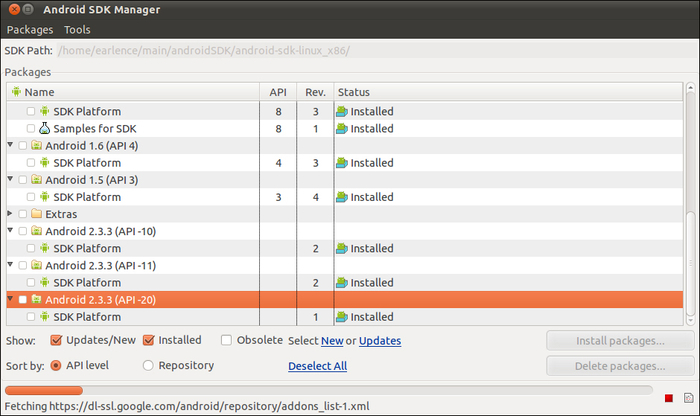
Notice that the plugin has detected a new installation of an SDK with an API level of -20, which is our custom SDK.
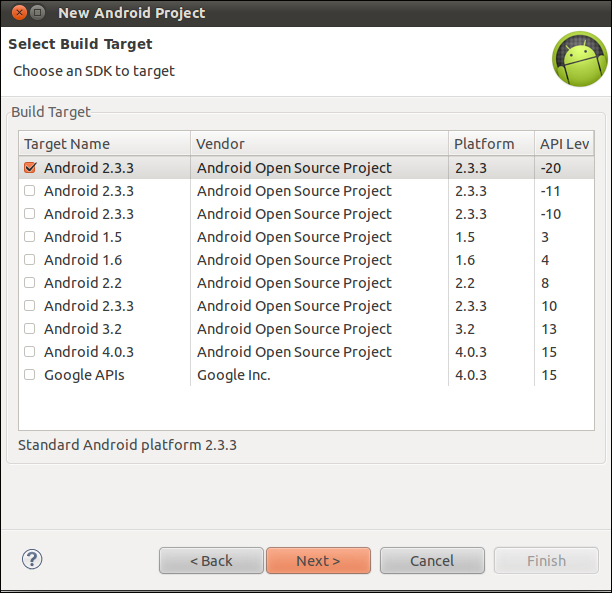
Now follow the usual steps to create a skeleton Android application. Be sure to select the correct target when prompted to do so. As shown in the following screenshot, API level -20 has to be selected. This is our custom SDK:
Now, we can access our PacktCrypto class library just like any other Android API.
Write the following simple test activity. Save the following code in a file named
PacktTestActivity.java:package com.packt.test; import android.app.Activity; import android.os.Bundle; import android.packt.PacktCrypto; import android.util.Log; public class PacktTestActivity extends Activity { /** Called when the activity is first created. */ @Override public void onCreate(Bundle savedInstanceState) { super.onCreate(savedInstanceState); setContentView(R.layout.main); PacktCrypto pc = new PacktCrypto(); byte [] hash = pc.getMD5("packtest"); StringBuffer sb = new StringBuffer(); for (int i = 0; i < hash.length; i++) { sb.append(Integer.toString((hash[i] & 0xff) + 0x100, 16).substring(1)); } Log.i("PacktTest", "MD5 sum: " + sb.toString()); } }In the preceding code, we simply create an object of type
PacktCrypto, initialize it, and then call thegetMD5method that calls into our custom system server.
The PacktCrypto class library methods are available in the new SDK framework.jar file. This helps in compiling the application. When deployed to the emulator, the class library obtains a reference to the PacktCrypto service that is running on the system and provides its functionality to the Android application.
This is a very simple recipe, which we use to verify that the class library works as expected.
If you haven't already started an emulator with our custom system image (explained earlier), do so now.
Build the APK. Install it via the command line (adb install). The SDK will not detect the running emulator since the SDK we use is standard/unmodified, and hence will not understand the dummy API level -20. Therefore, a launch from Eclipse will not work. However, the installation procedure is no different from a normal app installation via the command line. As specified in the Android Developer documentation, an APK may be installed by specifying the adb install command with an APK filename. The output looks like the following:

The emulator is running an image of the firmware that contains the PacktCrypto service. This was started at the system boot time. The class library simply obtains a copy of the service object through the Service Manager and invokes the getMD5() method. This is abstracted away in the class library which allows development of applications independently of code that runs on an actual system.
In the preceding recipes, our modifications have been tightly integrated with the platform code. In certain cases, such levels of integration may not be needed, but new features need to be added to the system. In such cases, a developer can add code to the framework in the form of a platform library. In this recipe, we will learn how to create a platform library and learn how to write an application which uses it.
We write simple methods to use the Data Encryption Standard (DES) to encrypt and decrypt a string using an 8-byte password. Our encryption library is named PacktPlatformLibrary.
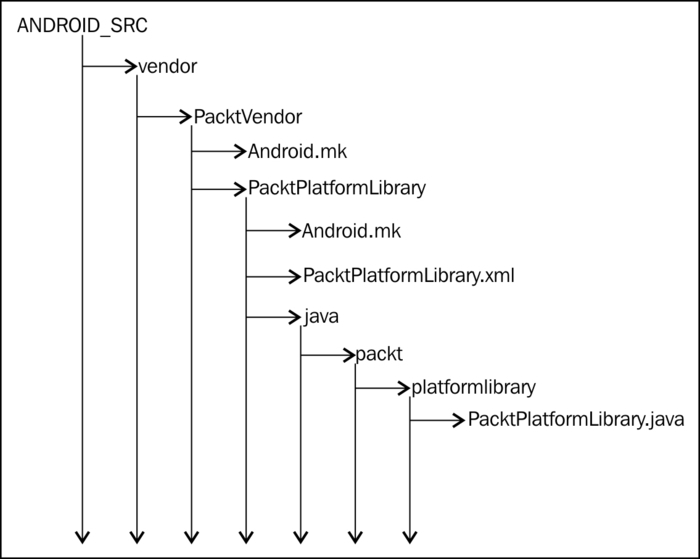
Since this code is external to the framework and does not need to be tightly integrated with the system, we will place it in a separate directory called /vendor under ANDROID_SRC. Usually, inside this directory, vendor-specific files are added. Create ANDROID_SRC/vendor/PacktVendor. Inside that, include the following one-liner Android.mk file, so that subsequent make files are called during build.
We start out by writing a one-liner make file for the project. This file is saved as
Android.mkand is the top-level make file:include $(call all-subdir-makefiles)
Under PacktVendor, create a directory named PacktPlatformLibrary. Inside this we will create the platform library and write its code.
Create a directory named
java/packt/platformlibraryunderPacktPlatformLibrary/. This will hold the source code for the library.Save the following code as
PacktPlatformLibrary.java:package packt.platformlibrary; import java.io.UnsupportedEncodingException; import java.security.InvalidKeyException; import java.security.NoSuchAlgorithmException; import java.security.spec.InvalidKeySpecException; import javax.crypto.BadPaddingException; import javax.crypto.Cipher; import javax.crypto.IllegalBlockSizeException; import javax.crypto.NoSuchPaddingException; import javax.crypto.SecretKey; import javax.crypto.SecretKeyFactory; import javax.crypto.spec.DESKeySpec; import android.util.Log; public class PacktPlatformLibrary { private static final String TAG = "packt.PlatformLibrary"; /* key has to be 8 bytes */ public static byte [] encryptDES(String key, String data) { byte [] encr = null; DESKeySpec keySpec; try { keySpec = new DESKeySpec(key.getBytes("UTF8")); SecretKeyFactory keyFactory = SecretKeyFactory.getInstance("DES"); SecretKey skey = keyFactory.generateSecret(keySpec); Cipher cipher = Cipher.getInstance("DES"); cipher.init(Cipher.ENCRYPT_MODE, skey); encr = cipher.doFinal(data.getBytes("UTF8")); } catch (InvalidKeyException e) { Log.e(TAG, Log.getStackTraceString(e)); } catch (UnsupportedEncodingException e) { Log.e(TAG, Log.getStackTraceString(e)); } catch (NoSuchAlgorithmException e) { Log.e(TAG, Log.getStackTraceString(e)); } catch (InvalidKeySpecException e) { Log.e(TAG, Log.getStackTraceString(e)); } catch (NoSuchPaddingException e) { Log.e(TAG, Log.getStackTraceString(e)); } catch (IllegalBlockSizeException e) { Log.e(TAG, Log.getStackTraceString(e)); } catch (BadPaddingException e) { Log.e(TAG, Log.getStackTraceString(e)); } return encr; }The preceding method simply DES encrypts a string. You can replace the function with anything you like. The point of the example is to demonstrate a platform library:
 public static String decryptDES(String key, byte [] data)
    {
      DESKeySpec keySpec;
      byte [] unencr = null;
    try {
      keySpec = new DESKeySpec(key.getBytes("UTF8"));
      SecretKeyFactory keyFactory = SecretKeyFactory.getInstance("DES");
        SecretKey skey = keyFactory.generateSecret(keySpec);
        Cipher cipher = Cipher.getInstance("DES");// cipher is not thread safe
        cipher.init(Cipher.DECRYPT_MODE, skey);
        unencr = cipher.doFinal(data);

} catch (InvalidKeyException e) {
      Log.e(TAG, Log.getStackTraceString(e));

} catch (UnsupportedEncodingException e) {
      Log.e(TAG, Log.getStackTraceString(e));

    } catch (NoSuchAlgorithmException e) {
      Log.e(TAG, Log.getStackTraceString(e));

    } catch (InvalidKeySpecException e) {
      Log.e(TAG, Log.getStackTraceString(e));

    } catch (NoSuchPaddingException e) {
      Log.e(TAG, Log.getStackTraceString(e));

    } catch (IllegalBlockSizeException e) {
      Log.e(TAG, Log.getStackTraceString(e));

    } catch (BadPaddingException e) {
      Log.e(TAG, Log.getStackTraceString(e));

    }
    return new String(unencr);
    }

    public static void printHex(byte [] data)

    {
      StringBuffer sb = new StringBuffer();

      for (int i = 0; i < data.length; i++)
      {

          sb.append(Integer.toString((data[i] & 0xff) + 0x100, 16).substring(1));

      }
      Log.i("PacktDESTest", "DES bytes: " + sb.toString());

    }

}
Similarly,
decryptDESperforms the opposite function ofencryptDES. You can again choose to replace this with a function of your choice. If you choose to do so, keep in mind that later files will have to be adjusted a bit based on the new functions. However, no change is needed in any of the build files:The Android system requires that an XML file is to be created for every new platform library. Create an XML file at
ANDROID_SRC/vendor/PacktVendor/PacktPlatformLibrary/. Save this XML file asPacktPlatformLibrary.xml:<permissions> <library name="PacktPlatformLibrary" file="/system/framework/PacktPlatformLibrary.jar"/> </permissions>
Finally, we need a make file to pull all the components together. Create an
Android.mkfile in the same directory as the preceding file:This code is saved as Android.mk # # PacktPlatformLibrary LOCAL_PATH := $(call my-dir) # the library # ============================================================ include $(CLEAR_VARS) LOCAL_SRC_FILES := $(call all-subdir-java-files) LOCAL_MODULE_TAGS := optional # This is the target being built. LOCAL_MODULE:= PacktPlatformLibrary include $(BUILD_JAVA_LIBRARY) # the documentation # ============================================================ include $(CLEAR_VARS) LOCAL_SRC_FILES := $(call all-subdir-java-files) $(call all-subdir-html-files) LOCAL_MODULE:= PacktPlatformLibrary LOCAL_DROIDDOC_OPTIONS := PacktPlatformLibrary LOCAL_MODULE_CLASS := JAVA_LIBRARIES LOCAL_DROIDDOC_USE_STANDARD_DOCLET := true include $(BUILD_DROIDDOC) ######################## include $(CLEAR_VARS) LOCAL_MODULE := PacktPlatformLibrary.xml LOCAL_MODULE_TAGS := optional LOCAL_MODULE_CLASS := ETC # This will install the file in /system/etc/permissions # LOCAL_MODULE_PATH := $(TARGET_OUT_ETC)/permissions LOCAL_SRC_FILES := $(LOCAL_MODULE) include $(BUILD_PREBUILT)
The preceding file has three sections. The first compiles the java code for the library and creates a JAR file. The name of this JAR is specified in the
LOCAL_MODULEtag. Next, if the project directory contains documentation, that is built. Finally, we need to ensure the XML file is added to/system/etc/permissions/in the system image.LOCAL_MODULE_CLASSis used to specify this. Now, we need to build the components. On a terminal, insideANDROID_SRC, issue the following command:make PacktPlatformLibraryThe following command will compile the java code, generate a signed JAR, and place it in
system/framework/:make PacktPlatformLibrary.xmlThis will place the XML file at
/system/etc/permissions/.
The platform library has two main components. One is the library itself, which is written in Java or C, and is packaged into a JAR (with an optional shared object if native code is used). The second component is an XML file that declares the JAR to the system as a platform library. This component is important as it helps the system to identify the location of the platform library when it is needed for loading into an application.
The module class ETC specified in the make file for the XML file is used to place files into the /system/etc directory of the firmware image.
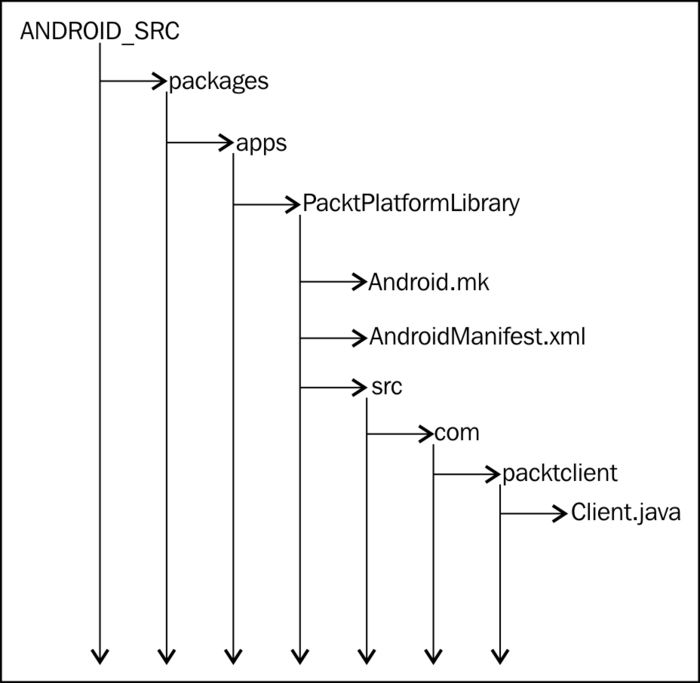
To test the platform library created, we need to create an Android application that uses the library. To do this, we will create a new "System APK". A System APK is an Android application that lives in the Read-Only /system partition on the device, similar to applications such as settings and contacts. System applications live in ANDROID_SRC/packages/apps.
Create a directory named PacktLibraryClient at that location. Inside, we write a small Android application that accesses the platform library and invokes a method.
Create the following file at ANDROID_SRC/packages/apps/PacktLibraryClient/src/com/packtclient.
We begin by writing the client file that will access our platform library. The following code is saved as
Client.java:package com.packtclient; import packt.platformlibrary.PacktPlatformLibrary; import android.app.Activity; import android.os.Bundle; /** * utilize the packt DES encryption platform library */ public class Client extends Activity { @Override public void onCreate(Bundle savedInstanceState) { super.onCreate(savedInstanceState); byte [] encr = PacktPlatformLibrary.encryptDES("password", "Packt"); PacktPlatformLibrary.printHex(encr); } }Like any other Android application, we need a manifest file, which is created at
ANDROID_SRC/packages/apps/PacktLibraryClient/. The following code is saved in a file namedAndroidManifest.xml:<?xml version="1.0" encoding="utf-8"?> <!-- This is an example of writing a client application for a custom platform library. --> <manifest xmlns:android="http://schemas.android.com/apk/res/android" package="com.packtclient"> <application android:label="Packt Library Client"> <!-- This tells the system about the custom library used by the application, so that it can be properly loaded and linked to the app when the app is initialized. --> <uses-library android:name="PacktPlatformLibrary" /> <activity android:name="Client"> <intent-filter> <action android:name="android.intent.action.MAIN"/> <category android:name="android.intent.category.LAUNCHER"/> </intent-filter> </activity> </application> </manifest>The new addition here is the
<uses-library>tag. Notice that we have to specify the name of our custom platform library to indicate to the runtime that it is to be loaded with our client application.Finally, we need a make file at the same directory level as the preceding file. Save this make file as
Android.mk:# This makefile is an example of writing an application that will link against # a custom shared library included with an Android system. LOCAL_PATH:= $(call my-dir) include $(CLEAR_VARS) LOCAL_MODULE_TAGS := optional # This is the target being built. LOCAL_PACKAGE_NAME := PacktLibraryClient # Only compile source java files in this apk. LOCAL_SRC_FILES := $(call all-java-files-under, src) # Link against the current Android SDK. #LOCAL_SDK_VERSION := current # Also link against our own custom library. LOCAL_JAVA_LIBRARIES := PacktPlatformLibrary LOCAL_PROGUARD_ENABLED := disabled include $(BUILD_PACKAGE)
Now we are ready to build our client APK. In a terminal, execute the following command (assuming the terminal environment is properly set up; for instructions, refer to the first recipe of this book):
make PacktLibraryClientFinally, we need to build the system image for the emulator to test our code:
makeEnsure that the following files are included in the system image. This is done by inspecting the contents of
installed-files.txt, which is located atANDROID_SRC/out/target/product/generic/in the case of an emulator build. Here, I have extracted the relevant contents from my copy:1978 /system/framework/PacktPlatformLibrary.jar 119 /system/etc/permissions/PacktPlatformLibrary.xml 3563 /system/app/PlatformLibraryClient.apkTherefore, all of the required pieces have been integrated into the system image. Start the emulator, and click on the
PlatformLibraryClientapplication. Logcat should output something similar to the following:I/PacktDESTest( 425): DES bytes: fd068bdc755be524
The platform client is simply another Android application. The only difference here is that it is bundled with the system image and is installed at /system/app—the read-only partition.
The most important line in the make file for the application is the LOCAL_JAVA_LIBRARIES tag. This specifies that we will use the functionality of the platform client.
To help clarify the concepts presented in this recipe, it is often helpful to visualize the project structure. In the following text, we pictorially depict what platform libraries look like in the Android sources.
Most platform libraries are structured as shown in the next figure. As stated earlier, the top-level directory can change from ANDROID_SRC/vendor to ANDROID_SRC/device/ if you move from Gingerbread development to Ice Cream Sandwich development.
System applications have the following structure within the Android Sources. This figure depicts the organization in terms of the PacktLibraryClient system application we just built, but the organization is similar to other system applications. The point to note here is that system applications live under ANDROID_SRC/packages/apps and for the most part, the directory structure is the same as a normal Android application.
Our previous system service contained only Java code; however, such services may also contain calls to native code. Developers may choose to use native code for a variety of reasons. The most common being speed over interpreted code and re-use of existing libraries. In the next recipe, we will show you how to use native functions inside our PacktCrypto system service.
Also, before jumping to the next recipe, I assume that you are comfortable with JNI technology. If not, I recommend reading the excellent book: The Java Native Interface: Programmer's Guide and Specification by Sheng Liang. (http://www.amazon.com/Java-Native-Interface-Programmers-Specification/dp/0201325772).
The native methods for system servers are implemented at ANDROID_SRC/frameworks/base/services/jni. This directory contains an Android.mk file.
We start by implementing the native method in C code. In this example, I choose to implement the popular quick sort algorithm. Note that the file has to be named as per the naming conventions. This is simply the package name in reverse order, but with underscores instead of dots as delimiters.
Fire up your favorite text/code editor.
Write the following code in a file named
com_android_packt_PacktCrypto.cpp; it contains the native method:/* Native code for System Servers */ #define LOG_TAG "PacktCrypto" #include "jni.h" #include "JNIHelp.h" #include "android_runtime/AndroidRuntime.h" #include <utils/misc.h> #include <utils/Log.h> namespace android { //taken from http://www.algorithmist.com/index.php/Quicksort.c void qsort(int *data, int N) { int i, j; int v, t; if(N <= 1) return; // Partition elements v = data[0]; i = 0; j = N; for(;;) { while(data[++i] < v && i < N) { } while(data[--j] > v) { } if( i >= j ) break; t = data[i]; data[i] = data[j]; data[j] = t; } t = data[i-1]; data[i-1] = data[0]; data[0] = t; qsort(data, i-1); qsort(data+i, N-i); } jintArray quickSort(JNIEnv* env, jobject *clazz, jintArray data) { jsize len = env->GetArrayLength(data); jint *arr = env->GetIntArrayElements(data, 0); jintArray result = env->NewIntArray(len); qsort(arr, len); env->SetIntArrayRegion(result, 0, len, arr); env->ReleaseIntArrayElements(data, arr, 0); return result; } //specify the method table with pointers to our functions static JNINativeMethod method_table[] = { { "quickSort", "([I)[I", (void *) quickSort } }; //register the method table int register_android_packt_PacktCrypto(JNIEnv *env) { return jniRegisterNativeMethods(env, "com/android/packt/PacktCrypto", method_table, NELEM(method_table)); } };Next, modify the
onload.cppfile. There are two locations where you need to make additions. The first is under thenamespace android {block. There will be a list of registration functions, as shown in the following code snippet:namespace android { int register_android_server_AlarmManagerService(JNIEnv* env); int register_android_server_BatteryService(JNIEnv* env); int register_android_server_InputManager(JNIEnv* env); int register_android_server_LightsService(JNIEnv* env); int register_android_server_PowerManagerService(JNIEnv* env); int register_android_server_UsbService(JNIEnv* env); int register_android_server_VibratorService(JNIEnv* env); int register_android_server_SystemServer(JNIEnv* env); int register_android_server_location_GpsLocationProvider(JNIEnv* env); };We need to add a line with our custom registration function. Add the following line inside the
namespaceblock towards the end://PacktCrypto int register_android_packt_PacktCrypto(JNIEnv *env);
This is the registration function we've written in
com_android_packt_PacktCrypto.cpp.The second addition is inside
JNI_OnLoadin the same file—onload.cpp. Add the following line towards the end of all the registration function calls://PacktCrypto register_android_packt_PacktCrypto(env);
Finally, we need to communicate to the build system that some new code has been added. Modify the
Android.mkfile (in the same directory as all the other files we've been modifying) by adding the following line towards the end of theLOCAL_SRC_FILEStag:com_android_packt_PacktCrypto.cpp
Therefore, the new tag would look like:
LOCAL_SRC_FILES:= \
    com_android_server_AlarmManagerService.cpp \
    com_android_server_BatteryService.cpp \
    com_android_server_InputManager.cpp \
    com_android_server_LightsService.cpp \
    com_android_server_PowerManagerService.cpp \
    com_android_server_SystemServer.cpp \
    com_android_server_UsbService.cpp \
    com_android_server_VibratorService.cpp \
    com_android_server_location_GpsLocationProvider.cpp \
    onload.cpp \
    com_android_packt_PacktCrypto.cpp
The native methods we write have to be loaded and identified. The Android framework provides a function called jniRegisterNativeMethods that takes as input a method table and a fully qualified class name of the Java class that will call the native method. In this case, it is our PacktCrypto system service. The method table uses the JNI method descriptor notation to indicate the type of input/output parameters. It also includes a function pointer to the native method implementation. The JNI_OnLoad event is called whenever a native library is loaded into the virtual machine. At this point, we register our native methods, like other system servers. NELEM is a framework-provided macro to calculate the length of an array. It is defined as follows and is located inside the frameworks/base/include/utils/misc.h file:
# define NELEM(x) ((int) (sizeof(x) / sizeof((x)[0])))
To test our native library, we need to write some Java code that will call the native function. I will re-use code from an earlier example, where we created and tested the PacktCrypto system service.
We need to call the native code from the Java-based PacktCrypto service. Hence, in this recipe, we will modify the PacktCrypto system service so that it can call a native method.
Open up the PacktCrypto.java file that is located in the services/java/com/android/packt directory and change it by adding the following lines towards the end of the file.
To test the
sortmethod, I simply call thesort()method inside our existinggetMD5method. I am doing this so that you can quickly test whether the native code works as expected without making too many changes. If you recall, we have already written a test harness forgetMD5insideSystemServer.java. The first step is to modify thePacktCrypto.javafile by adding the following lines towards the end of the file.This is a fragment of the
PacktCrypto.javafile that tests our native function:void sort(int [] data) { int [] sorted = quickSort(data); for(int i = 0; i < data.length; i++) Log.i(TAG, "s: " + sorted[i]); } native int [] quickSort(int [] data);By adding the following lines to the
getMD5method towards the end, we will be able to quickly test our native code. The new version ofgetMD5()is as follows:public byte [] getMD5(String data) { byte [] dataBytes = null; MessageDigest md5 = null; try { dataBytes = data.getBytes("UTF-8"); md5 = MessageDigest.getInstance("MD5"); Log.i(TAG, "MD5 digestion invoked"); } catch(java.io.UnsupportedEncodingException uee) { Log.e(TAG, "Unsupported Encoding UTF8"); } catch(java.security.NoSuchAlgorithmException nsae) { Log.e(TAG, "No Algorithm MD5"); } //quick hack to test our native method int toSort [] = { 5, -1, 0, 30, 4, 0, 1, 3, 15, 3 }; sort(toSort); if(md5 != null) return md5.digest(dataBytes); else return null; }Notice the call to
sort().Now, we can build our code. In a terminal, as usual, issue the
makecommand. Once the build is complete, run the emulator and observe the logs:I/SystemServer( 67): PacktCrypto service I/PacktCrypto( 67): MD5 digestion invoked I/PacktCrypto( 67): s: -1 I/PacktCrypto( 67): s: 0 I/PacktCrypto( 67): s: 0 I/PacktCrypto( 67): s: 1 I/PacktCrypto( 67): s: 3 I/PacktCrypto( 67): s: 3 I/PacktCrypto( 67): s: 4 I/PacktCrypto( 67): s: 5 I/PacktCrypto( 67): s: 15 I/PacktCrypto( 67): s: 30 I/PacktTest( 67): MD5 sum: 422164113c2fc595dd0ab44a18925ac5
The Java code contains a native method definition. The framework loads the native code and during the onload event, our native implementation is loaded and registered. When getMD5() is called, our native code is executed and the output is visible on the logger.
In the next recipe, we will learn how some of the most important core Android services are organized and how to make changes to these services. We will also learn how to secure our changes with custom permissions added to the framework.
The Internet infrastructure on Android requires discussion as its design is non-conventional as compared to other services such as the Location Manager service.
The ActivityManagerService class is probably one of the most important of all services that exist in an Android system. In this recipe, we will go through its major functions and highlight peculiarities of the service.
ActivityManagerService.java is the source file and is located at ANDROID_SRC/frameworks/base/services/java/com/android/server/am.
Open this file in a code editor of your choice. We will move through the
ActivityManagerServicefile and understand its various components.The Activity Manager extends a class known as
ActivityManagerNative, which implements the binder protocol for remote invocation. This code is written manually like we've written in the recipe on using IPC with our system service code. This was done as the AIDL compiler did not exist the time the Activity Manager code was written by Google employees.In the beginning of the file, there are various control variables for different aspects related to activities. One such variable is:
static final int MAX_ACTIVITIES = 20;
This defines the maximum number of activities that can be in the stack. It means the maximum number of activities that could be running at a time.
Another interesting variable is the duration the system waits for a process to be launched.
static final int PROC_START_TIMEOUT = 10*1000;
SDK developers will know that when using a broadcast receiver, the
onReceive()method should finish fast. The timeout is governed by:static final int BROADCAST_TIMEOUT = 10*1000;
which is around
10seconds.Scroll down in the file, there is a handler which does the majority of the work that does not require immediate return. As you may know, Android has the concept of a handler, which basically is a mechanism to execute code in a separate thread and have it return results later. The handler is defined as:
final Handler mHandler = new Handler() {Some example tasks performed are the ANR dialogs, indicated by case
SHOW_NOT_RESPONDING_MSGand the sending of broadcasts to registered receivers.Other functionality is implemented as methods that return synchronously. An asynchronous return means that the results of a request are returned to the caller at a later time, and not immediately, like a synchronous call.
There is a separate section in the sources for permissions manipulation and verification. The only public entry point for permissions checking is the method:
public int checkPermission(String permission, int pid, int uid)
All permission checks that are executed in the system go through this one method. Hence it serves as a reliable checkpoint to understand what processes are doing with respect to protected data and operations.
Following this, the Activity Manager has a group of methods that manage tasks by manipulating the activity stack. The stack is a data structure defined in the
ActivityStack.javafile in the same directory as the activity manager service.The following method is executed when the system has completely booted and is ready to start launching user processes:
public void systemReady(final Runnable goingCallback)
There are separate sections managing services, content providers, and broadcasts. At the start of each section, a comment indicates what type of methods follow. Various API methods such as
registerReceiver,startActivity, andstartServiceare implemented by theActivityManagerServiceclass in the same file.
The Activity Manager service is started early during the bootup process. At the end, when all the initialization tasks are complete, the systemReady method is executed and the system boot complete broadcast is fired. This method is called by the SystemServer service. It is used to notify the ActivityManagerService that the system is at a point where it is possible to start running third-party code. While the ActivityManagerService does not immediately do this, it gets itself ready when it receives the systemReady call.
Whenever you make changes to the ActivityManagerService class, make sure that you don't introduce code paths that make the service vulnerable or leak sensitive data to malicious applications. Always follow the principles of secure coding and protect your methods by permission checks. If you don't want third-party developers to access your functionality, assign a signature permission to that method. The keen reader will have noticed that the ActivityManagerService class is like any other system service and executes in the context of the SystemServer service. Hence, now you realize that your custom system service executes alongside such important services. Any bugs in your system service have the potential to bring down the whole framework. So be careful when writing such code!
In this example, we will guide you through the steps needed to introduce a custom permission and learn how to make use of it to protect a method we add to the Activity Manager service.
We will edit the following files:
|
Filename |
Location |
|---|---|
|
|
|
|
|
|
|
|
|
|
|
|
|
|
|
|
|
|
We begin by adding a new transaction and method prototype to
IActivityManager.java.The following code is appended to
IActivityManager.java://Packt - Add this towards the end of the file int PACKT_TRANSACTION = IBinder.FIRST_CALL_TRANSACTION + 118; public int packtSensitiveMethod(int data) throws RemoteException;
The number 118 is just 1 plus the last transaction number I have on my version of the source code. The ones you may see may differ. Use whatever number you see in your version and add one to it.
The preceding lines basically set a transaction number for our method. Since the underlying binder driver uses these numbers to match which methods need to be performed when an IPC call is made, we set our method's transaction number to be one plus the last transaction known. Depending on the source code version you are working with, the number written above may have to be increased. The logic is simply adding 1 to the last transaction number you see. The IPC method needs to throw a
RemoteExceptionsince this is mandated by the Binder IPC protocol. We then create the public interface for this method. To do this, add the following lines toActivityManager.java, towards the end of the file:/* Packt sensitive method demo */ public int packtSensitiveMethod(int data) { try { return ActivityManagerNative.getDefault().packtSensitiveMethod(data); } catch (RemoteException e) { } return -1; }This is a very simple method that does nothing useful. The aim of this recipe is to help you understand the mechanics of adding a new method to the Activity Manager service.
Next, we will implement the marshalling code for this method. The concept of marshalling is no different than other interprocess frameworks. The basic aim is to serialize complex structures.
Inside
ActivityManagerNative.java, we make two changes. The first is inside theActivityManagerProxyclass that is inside the file. The code is organized in a way such that theActivityManagerProxyclass is towards the end of the file. Therefore, we write our proxy implementation ofpacktSensitiveMethodtowards the end of theActivityManagerNative.javafile inside the scope of theActivityManagerProxyclass.The following code is added to
ActivityManagerNative.javatowards the end. It is thepacktSensitiveMethodproxy implementation://Packt public int packtSensitiveMethod(int data) throws RemoteException { Parcel out = Parcel.obtain(); Parcel reply = Parcel.obtain(); out.writeInterfaceToken(IActivityManager.descriptor); out.writeInt(data); mRemote.transact(PACKT_TRANSACTION, out, reply, 0); int result = reply.readInt(); out.recycle(); reply.recycle(); return result; }The second change is made in the
onTransactmethod of the file. At the lastcasestatement, we add ourcasecode://Packt case PACKT_TRANSACTION: data.enforceInterface(IActivityManager.descriptor); int param = data.readInt(); int result = packtSensitiveMethod(param); reply.writeInt(result); reply.writeNoException(); return true;Finally, we have to implement this method. The following implementation is written inside
ActivityManagerService.java://=========================================================== // PACKT //=========================================================== public int packtSensitiveMethod(int data) throws RemoteException { if(checkCallingPermission("packt.PACKT_PERMISSION") != PackageManager.PERMISSION_GRANTED) { throw new SecurityException("Requires permission packt.PACKT_PERMISSION"); } else { Log.i("PACKTinAMS", "sensitive method called with parameter: " + data); return data * 2; } }
In Android, the ActivityManagerService class executes within the context of the system server process. Hence, calls into it will be remote calls. Therefore, we have to make use of the Binder IPC mechanism. The IActivityManager.java file contains the set of remote calls exposed by the Activity Manager service. Hence, we add a new interface method packtSensitiveMethod() and a transaction constant PACKT_TRANSACTION that will correspond to this method.
ActivityManager.java represents a class library that user applications use to access the functionality of the Activity Manager service. This is similar to the custom class library we added in the earlier recipe on creating custom class libraries. As I've stated before, our implementations follow the design guidelines used in the Android code. Therefore, you will see several existing parallels in the Android source code. This is just one of the many examples that exist. Hence, we add a shim method to that file that invokes the real method through a remote procedure call.
As stated earlier, the Activity Manager service was written before the AIDL compiler existed, therefore the proxies and stubs for all remote calls are implemented manually. Hence, we add marshalling code to ActivityManagerNative.java.
You may wonder why we still add the marshalling code manually. The answer is that even though the AIDL compiler is now available, the build process was never updated for the ActivityManagerService class to make use of the AIDL compiler.
In this recipe, we will add a custom permission to the framework so that only authorized processes may access and execute our newly added method to ActivityManagerService.
Now we will edit the manifest to insert a new permission object. Just add these code lines to
AndroidManifest.xml:<!-- ==================================== --> <!-- Packt system permissions --> <!-- ==================================== --> <eat-comment /> <permission-group android:name="android.permission-group.PACKT" android:label="@string/permgrouplab_packt" android:description="@string/permgroupdesc_packt" /> <!-- PACKT Test permission --> <permission android:name="packt.PACKT_PERMISSION" android:permissionGroup="android.permission-group.PACKT" android:protectionLevel="signature" android:description="@string/packt_permDesc" android:label="@string/packt_label" />Therefore, open up the file (location given in the preceding table) and append the following code to
strings.xml:<!-- Packt Permission Strings --> <string name="permgrouplab_packt">Packt Permission Group Label</string> <string name="permgroupdesc_packt">Packt Permission Group Description</string> <string name="packt_permDesc">Packt Permission Description</string> <string name="packt_label">Packt Permission Label</string>At this stage, we should ensure that everything compiles fine. First issue the following command as we have changed the public API by adding methods to
ActivityManager.java:make update-apiNext, issue a normal
makecommand.
Even the Android framework has a manifest file. This file contains permission definitions for all permissions that exist in the system. The permission tag requires you to specify a permission description among other parameters. The system uses these strings for user display. For example, the permission description parameter is shown to a user while installing the application which asks for the permission in question.
We need to test our newly added method. Therefore, we make use of the PacktLibraryClient application that we created in the Writing the platform library source code recipe.
Open up Client.java from the PacktLibraryClient application, which is located at ANDROID_SRC/packages/apps/PacktLibraryClient/src/com/packtclient/.
The following code represents the client code that makes use of the newly added method and is saved in a file named
Client.java:package com.packtclient; import packt.platformlibrary.PacktPlatformLibrary; import android.app.Activity; import android.app.ActivityManager; import android.os.Bundle; import android.util.Log; public class Client extends Activity { @Override public void onCreate(Bundle savedInstanceState) { super.onCreate(savedInstanceState); //byte [] encr = PacktPlatformLibrary.encryptDES("password", "Packt"); //PacktPlatformLibrary.printHex(encr); invokeNewPacktAMSMethod(); } void invokeNewPacktAMSMethod() { ActivityManager am = (ActivityManager) getSystemService(ACTIVITY_SERVICE); int val = am.packtSensitiveMethod(2); Log.i("CustomAMS", "return: " + val); } }I have just commented the earlier code and added a method to execute
packtSensitiveMethod.Now, run a full system make and start the emulator.
Note
Sometimes, the emulator may complain that the partition size is too small and it has to be resized. In this case, you can use the memory and partition size switches. (Note that this command will work only if you issue it in the same window in which Android was built. Otherwise, you will have to use the fully qualified paths and specify the full paths to the emulator images—kernel image, system image as well.)
For example, emulator memory as 512 and partition-size as 1024.
Launch the
PacktLibraryClientapplication. Observe logcat. The output will be similar to the following:I/ActivityManager( 63): Start proc com.packtclient for activity com.packtclient/.Client: pid=344 uid=10010 gids={} I/dalvikvm( 63): Jit: resizing JitTable from 512 to 1024 I/ARMAssembler( 63): generated scanline__00000177:03515104_00001002_00000000 [ 87 ipp] (110 ins) at [0x4386b6f0:0x4386b8a8] in 1311254 ns D/AndroidRuntime( 344): Shutting down VM W/dalvikvm( 344): threadid=1: thread exiting with uncaught exception (group=0x40015560) E/AndroidRuntime( 344): FATAL EXCEPTION: main E/AndroidRuntime( 344): java.lang.RuntimeException: Unable to start activity ComponentInfo{com.packtclient/com.packtclient.Client}: java.lang.SecurityException: Requires permission packt.PACKT_PERMISSION E/AndroidRuntime( 344): at android.app.ActivityThread.performLaunchActivity(ActivityThread.java:1647) E/AndroidRuntime( 344): at android.app.ActivityThread.handleLaunchActivity(ActivityThread.java:1663) E/AndroidRuntime( 344): at android.app.ActivityThread.access$1500(ActivityThread.java:117) E/AndroidRuntime( 344): at android.app.ActivityThread$H.handleMessage(ActivityThread.java:931) E/AndroidRuntime( 344): at android.os.Handler.dispatchMessage(Handler.java:99) E/AndroidRuntime( 344): at android.os.Looper.loop(Looper.java:130) E/AndroidRuntime( 344): at android.app.ActivityThread.main(ActivityThread.java:3683) E/AndroidRuntime( 344): at java.lang.reflect.Method.invokeNative(Native Method) E/AndroidRuntime( 344): at java.lang.reflect.Method.invoke(Method.java:507) E/AndroidRuntime( 344): at com.android.internal.os.ZygoteInit$MethodAndArgsCaller.run(ZygoteInit.java:839) E/AndroidRuntime( 344): at com.android.internal.os.ZygoteInit.main(ZygoteInit.java:597) E/AndroidRuntime( 344): at dalvik.system.NativeStart.main(Native Method) E/AndroidRuntime( 344): Caused by: java.lang.SecurityException: Requires permission packt.PACKT_PERMISSION E/AndroidRuntime( 344): at android.os.Parcel.readException(Parcel.java:1322) E/AndroidRuntime( 344): at android.os.Parcel.readException(Parcel.java:1276) E/AndroidRuntime( 344): at android.app.ActivityManagerProxy.packtSensitiveMethod(ActivityManagerNative.java:2918) E/AndroidRuntime( 344): at android.app.ActivityManager.packtSensitiveMethod(ActivityManager.java:1077) E/AndroidRuntime( 344): at com.packtclient.Client.invokeNewPacktAMSMethod(Client.java:28) E/AndroidRuntime( 344): at com.packtclient.Client.onCreate(Client.java:22) E/AndroidRuntime( 344): at android.app.Instrumentation.callActivityOnCreate(Instrumentation.java:1047) E/AndroidRuntime( 344): at android.app.ActivityThread.performLaunchActivity(ActivityThread.java:1611) E/AndroidRuntime( 344): ... 11 more W/ActivityManager( 63): Force finishing activity com.packtclient/.ClientWhat went wrong here? On analyzing the logs, we notice that a security exception was thrown. So, our code works! The sensitive method is protected. But, if
PacktLibraryClientis a legitimate application and needs access topacktSensitiveMethod, we need to do two things:Grant it
PACKT_PERMISSION.Sign the APK with the platform certificate since the permission is a signature level permission.
To do this, edit the
AndroidManifest.xmlfile ofPacktLibraryClientby adding the following tag outside theapplicationtag:<uses-permission android:name="packt.PACKT_PERMISSION" />
Next, edit its
Android.mkfile by adding the following line:LOCAL_CERTIFICATE := platformNow we will use a shortcut to quickly build the APK. In a terminal, navigate to the root of your android sources and use the following command:
mmm packages/apps/PacktLibraryClientThis will build the APK, but won't place it into the system image or push it into the emulator. To do this, we will remount the system partition as read/write and then push it manually. If you want to place it into the system image directly and have it rerun the emulator, use the following command:
mmm packages/apps/PacktLibraryClient snodIf you closed the emulator, start it again. Then drop into a shell via
adb.To find out on which block device
/systemis mounted, use:cat /proc/mtdThe output looks like:
dev:    size   erasesize  name
mtd0: 3e100000 00020000 "system"
mtd1: 3e100000 00020000 "userdata"
mtd2: 04000000 00020000 "cache"
Hence,
/systemismtd0.To remount as read/write:
mount -o rw,remount -t yaffs2 /dev/block/mtd0 /system
chmod 777 /system/app
Now exit the
adbshell, and push the built APK. The APK will be available atANDROID_SRC/out/target/product/generic/system/app.The following command will automatically reinstall the APK onto the emulator. Start the application again and observe the logs.
adb push PacktLibraryClient.apk /system/app
I/PACKTinAMS(   68): sensitive method called with parameter: 2
I/CustomAMS(  372): return: 4
We see that everything has worked fine.
The application obtains a reference to the Activity Manager service. This reference is in the form of an ActivityManager object. The packtSensitiveMethod shim is executed in the client, which cause an RPC to be sent out to the Activity Manager service, which performs a permission check before executing the main body of the method. When our APK wasn't signed with the platform key and didn't include the correct <uses-permission> tag, this check failed and the application crashed. In the second instance, we made the appropriate changes and the permission check succeeded.
The Package Manager service is a central service in the Android system and is one of the most important. It manages all the packages in the system and is central to platform security. It maintains a mapping between user/group identifiers and higher-level permission strings. In this recipe, we will see how permissions are managed and granted by the Package Manager service. As you may know, the fundamental aspect of the Android Security Model is the permissions system. This system is managed by the PackageManagerService class.
The source code of the Package Manager service is located at ANDROID_SRC/frameworks/base/services/java/com/android/server/. Open up the file named PackageManagerService.java in your favorite code editor.
Built-in permission UID mappings are stored on the filesystem at
/system/etc/permissions/platform.xml. This is loaded into the Package Manager service into the following variable:final SparseArray<HashSet<String>> mSystemPermissions = new SparseArray<HashSet<String>>();The service maintains user application permissions in the filesystem at
/data/system/packages.xml. Fire up the emulator and drop into anadbshell. We will inspect the contents of thepackages.xmlfile. Obtain a copy with the following command:adb pull /data/system/packages.xmlOpen up the file in a text editor and search for the term "packt":
<package name="com.packtclient" codePath="/system/app/PacktLibraryClient.apk" nativeLibraryPath="/data/data/com.packtclient/lib" flags="1" ft="1389a1a82a8" it="13879fbb780" ut="1389a1b8ae2" version="10" userId="10010">
<sigs count="1">
<cert index="1" />
</sigs>
</package>
Here we notice that
PacktLibraryClienthas been assigned auserIdof10010.
The Package Manager service stores and manages all configuration data in XML files with proper Linux permissions on these files. Internally, the service makes use of XML pull parsers to read and process these files. This service is interrogated by other services, most notably the Activity Manager service, as to whether a package possesses a certain permission or not.
Whenever you make changes to this service, please rethink your design carefully and only if there is no other way to accomplish the task, run the unit tests.
To run these tests, run the following command in a terminal (as always, I assume you have set up a build environment by including build/envsetup.sh):
mmm frameworks/base/tests/AndroidTests
Then start the emulator and execute this in a terminal over ADB:
adb install -r -f out/target/product/passion/data/app/AndroidTests.apk
Finally drop into an adb shell and execute:
adb shell am instrument -w -e class com.android.unit_tests.PackageManagerTests com.android.unit_tests/android.test.InstrumentationTestRunner
The unit tests are part of the Compatibility Test Suite (CTS). The CTS is part of the Android compatibility program. The aim is to achieve standardization among Android vendor implementations. The interested reader is referred to an overview of the compatibility program at http://source.android.com/compatibility/overview.html. Details on the CTS itself may be found at http://source.android.com/compatibility/cts-intro.html.
Processes/applications access the network (WiFi-based or GSM-based networks) using network sockets. Java code makes use of the Apache Harmony socket implementation and native code uses standard bionic sockets that are identical to libc socket calls. There is no Internet service. In this recipe, we will analyze how the network is accessed and how these accesses are guarded.
We will look at a kernel source file in this recipe, so locate the kernel sources you had downloaded and built in the first recipe of this book.
The code for network access in Java is implemented in the Apache Harmony library in OSNetworkSystem.java located at ANDROID_SRC/libcore/luni/src/main/java/org/apache/harmony/luni/platform.
This is the final point before native socket calls are invoked.
Navigate to the kernel sources we downloaded and built in the introductory recipe of this book.
Open the file
ANDROID_SRC/kernel_code/goldfish/goldfish/net/ipv4/af_inet.c.In this file, we observe the following addition:
#ifdef CONFIG_ANDROID_PARANOID_NETWORK
#include <linux/android_aid.h>

static inline int current_has_network(void)
{
  return in_egroup_p(AID_INET) || capable(CAP_NET_RAW);
}
#else
static inline int current_has_network(void)
{
  return 1;
}
#endif
This function makes a check as to whether the process currently executing in a function call is part of the
AID_INETgroup or not. For example, look at the function namedinet_create.There is a call to
current_has_network()and, if not, it returns-EACCES.
The OSNetworkSystem.java file contains native methods that ultimately make use of libc socket calls to perform I/O on the network. System library calls eventually invoke system calls implemented in the kernel. On Android, the network calls were changed to only allow execution if the process currently executing the system call belongs to a particular group. That group is named inet.
When an application requests android.permission.INTERNET, and when it is about to be run, the Package Manager service notifies Zygote that the application is to be run as part of the inet group.
Later on, the modified system calls verify that the process is running as a member of inet and the call succeeds.
The current_has_network() function makes use of the function in_egroup_p(gid_t) to check the group identifier of the process executing it. An Android process runs as a member of this group only if it has been granted android.permission.INTERNET.
The system applications are installed on the system/read-only partition of an Android device. The applications are signed with the one of system certificates (There are four certificates: testkey, platform, shared, and media) and perform certain privileged tasks. Examples include the Contacts application and the Settings application. Sometimes, your design may require a change of these system applications. In the next recipe, we will learn the purpose of the most important system applications and learn how to compile changes made to them.
The source code for all system applications are located at ANDROID_SRC/packages/. In this recipe, we will learn the significance of the most important packages at this location.
The following table summarizes the four top-level directories and the code they contain:
|
Directory name |
Purpose |
|---|---|
|
|
Contains code for Activity-based applications. Always contains a UI element. |
|
|
Random tools maintained by Googlers. Contents may be archived without notice. |
|
|
The sources for the three default IMEs (as per 2.3.4_r1), that is LatinIME, OpenWnn, and PinyinIME |
|
|
Code for all major content providers including Contacts and SMS/MMS |
|
|
Code for wallpapers that ship with the open source system |
Now, we will learn the purpose of the most important directories under Apps and Providers.
Directories under /Apps:
|
Directory name |
Purpose |
|---|---|
|
|
The frontend of the Android browser |
|
|
The camera app |
|
|
Frontend Contacts application |
|
|
Application that lets you view images and videos on your SD card |
|
|
The default launcher screen |
|
|
MMS/SMS application |
|
|
NFC control application including native library that interacts with NFC chip. Includes the NFC manager and Nfc service |
|
|
The dialer application and call-answering UI |
|
|
System settings and secure settings application |
Directories under /Providers:
|
Directory name |
Purpose |
|---|---|
|
|
Maintains a database of all installed applications |
|
|
Code that maintains the Contacts datastore that is used by innumerable services on the device |
|
|
Stores three types of data: SMS content, MMS content, and current network configuration |
In this recipe, we will modify the default search text in the quick search widget. The aim of this recipe is to make the reader comfortable with making changes, compiling them, and testing those changes.
The search widget's code is in the directory named QuickSearchBox under ANDROID_SRC/packages/apps/. Navigate to this directory and open up ANDROID_SRC/packages/apps/QuickSearchBox/res/drawable/text_field_search_empty_google.xml.
Edit the XML layout file by replacing:
<item android:drawable="@drawable/hint_google" />
with
<item android:drawable="@drawable/packt" />
Now, use a popular image editor to create an icon of your choice with dimensions of 97 x 40 pixels. We create a Packt logo variant for this task in GIMP. Make sure you save the image as a PNG type. Copy this image to three locations:
drawable-hdpi,drawable-ldpi, anddrawable-mdpi.Now we will build the new
QuickSearchWidgetapplication. In a terminal, as usual, navigate to the Android source directory, include the environment setup and lunch the emulator target. Issue the following command:mmm packages/app/QuickSearchWidgetThis will build only the search widget. After building is complete, start the emulator and drop to an
adbshell. We need to remount the system partition as read/write, since system applications are installed on to this partition which is mounted read-only. To be able to write a new executable of theQuickSearchWidgetapplication, and without rebuilding and reflashing the entire operating system, we will simply "push" the generated APK onto the remounted directory.We need to find out where the
/systempartition is mounted. In anadbshell, execute the following command:cat /proc/mtdThe output will be similar to the following:
dev:    size   erasesize  name

mtd0: 0c200000 00020000 "system"

mtd1: 0c200000 00020000 "userdata"

mtd2: 04000000 00020000 "cache"
We see that
/systemexists inmtd0. To remount as read/write, in anadbshell:mount -o rw,remount -t yaffs2 /dev/block/mtd0 /system chmod 777 /system/app
Now, exit the
adbshell and navigate toANDROID_SRC/out/target/product/generic/system/app. This is where the built APK is stored.In a terminal, execute the following command:
adb push QuickSearchWidget.apk /system/appThis will install the new widget. The change should be visible on the emulator:

The mmm command selectively builds code. The argument to it is the path to the source directory containing an Android.mk file. The path should end with the name of a target that can be built. For example, if you open the Android.mk file, the target is identified by the LOCAL_PACKAGE_NAME tag.
As we have seen in earlier recipes, the system partition is mounted as read-only for security reasons. To install a system application, we need to remount this. The remount can only be done by a root user. On the emulator, ADB runs as root by default.
The side effect of simply pushing an APK to /system/app results in its installation.
The different drawable directories are used based on different screen densities. This has the same meaning as the directories used when writing SDK-based apps.
The CCACHE is a compiler cache for C/C++ code. The Android framework distribution consists of several native libraries that live in the /external directory. You may have noticed that on a clean build, these libraries are rebuilt, even if they were never changed. The rebuilding of these libraries takes a lot of time. To save you that time, you can use the CCACHE mechanism. In this recipe, we will highlight certain tips and tricks that make the life of an Android systems developer easier. In particular, we will explain how to use the CCACHE mechanism, how to selectively compile modules, and how to test them.
Navigate to your Android sources root and issue the make clean command. We want to build up the cache from scratch.
In a terminal at the Android sources root, execute the following commands:
export USE_CCACHE=1
export CCACHE_DIR=/<path_of_your_choice>/.ccache
The preceding two environment variables control whether we use CCACHE, and if so, where the CCACHE directory is located. You are free to use any directory for the CCACHE.
Inside
prebuilt/linux-x86, there is theccachedirectory that contains the ccache binary. Just executing the following command presents us with options of what this binary can do:prebuilt/linux-x86/ccache/ccacheThis command provides an output like:
ccache, a compiler cache. Version 2.4
Copyright Andrew Tridgell, 2002
Usage:
  ccache [options]
  ccache compiler [compile options]
  compiler [compile options]    (via symbolic link)
Options:
-s                      show statistics summary
-z                      zero statistics
-c                      run a cache cleanup
-C                      clear the cache completely
-F <maxfiles>           set maximum files in cache
-M <maxsize>            set maximum size of cache (use G, M or K)
-h                      this help page
-V                      print version number
Therefore, we can set the maximum cache size with the help of the following command:
prebuilt/linux-x86/ccache/ccache -M 20GThis will set it to be 20 GB.
Now, if you start a make for any target (choose emulator since it's the easiest), we can watch how the CCACHE is being used. In another terminal, use the following command:
watch -n1 -d prebuilt/linux-x86/ccache/ccache -sThe
watchcommand is used to monitor the cache status and usage.The helper file should be saved as
build_helper.sh:#!/bin/sh source build/envsetup.sh export USE_CCACHE=1 export CCACHE_DIR=<YOUR_CACHE_PATH>/.ccache prebuilt/linux-x86/ccache/ccache -M 20G lunch $1
An example invocation for the emulator target is:
./build_helper.sh 1and it outputs the following:
including device/htc/passion/vendorsetup.sh
including device/samsung/crespo/vendorsetup.sh
Set cache size limit to 20971520k

=========================================

PLATFORM_VERSION_CODENAME=REL
PLATFORM_VERSION=2.3.4
TARGET_PRODUCT=generic
TARGET_BUILD_VARIANT=eng
TARGET_SIMULATOR=false
TARGET_BUILD_TYPE=release
TARGET_BUILD_APPS=
TARGET_ARCH=arm
HOST_ARCH=x86
HOST_OS=linux
HOST_BUILD_TYPE=release
BUILD_ID=GRJ22

=========================================
The Android build system is written in such a way that if CCACHE is activated by the environment variable, it will be used automatically.
The above shell script is really simple and simplifies the developer's task of initializing an environment for further work. The commands within the shell script have to be executed whenever a new terminal is opened for Android systems development. Hence it is easier to execute one shell script instead of several individual commands.
Sometimes, you do not need to compile the entire framework for one code change. In such a case, you can make use of selective compilation.
As an example, we will use selective compilation to rebuild the Phone application under ANDROID_SRC/packages/apps/Phone.
Make a small change, like adding a comment to one of the source files:
To rebuild, use the following:
mmm packages/apps/PhoneTo test your changes on a running device/emulator, simply use the system partition remounting technique covered earlier.
mmm invokes the build system only on the specified argument and places the output at the specified location (this is inferred from the make file of the module being compiled).
You can follow this technique for any module as long as you replace all rebuilt components on the device/emulator.
This recipe will equip you with some of the lesser known make command options.
The following table lists the command options for the standard make:
|
Command |
Purpose |
|---|---|
|
|
Builds the SDK |
|
|
Builds system image from currently available binaries |
|
|
Creates the services JAR that contains all system services |
|
|
Builds native code which serves as the glue between the Java-based Android framework and native stuff used for its functionality |
|
|
The default make |
|
|
Shows a list of all modules that can be built by using |
|
|
Completely clears all compiled files |
|
|
Same as |
|
|
Only cleans up any built files for |
These commands can be regularly used for several tasks during development. As an example, suppose I want to rebuild the Android framework and push it to the emulator, I can use the following sequence of commands written as a shell script:
You can save this build file as mk_frmwrk.sh:
#!/bin/sh
mmm -j4 frameworks/base frameworks/base/core/res snod
adb shell stop
adb sync
adb shell start
This will recompile the framework code, recompile the resources, rebuild system.img and sync it to the currently connected device.