


Inkscape is an open source, free program that creates vector-based graphics that can be used in web, print, and screen design as well as interface and logo creation, and material cutting. Its capabilities are similar to those of commercial products such as Adobe Illustrator, Macromedia Freehand, and CorelDraw and can be used for any number of practical purposes—creating vector graphics for use in illustrations, business letterheads, computer and electronic wallpapers, designing logos, and—as is the focus of this book—designing web pages and the elements within web page design.
This book's purpose is to help you learn to use Inkscape to help develop web pages. We'll start at the beginning of design, the principles of web design, then move to wireframe and mockups development and then learn how to export all of your images and files for use in the HTML development. There will also be information about how to enhance your web page designs by learning the ins and outs of using Inkscape as a graphics tool for creating icons, backgrounds, buttons, blog designs, flowcharts, diagrams, site maps, banner advertisements, and more.
Specifically this book will teach you how to:
Use Inkscape for web design
Create graphics, logos, and icons
Develop wireframes and web site mockups
Learn about Scalable Vector Graphics (SVG)
Integrate graphics into HTML, HTML5, and Cascading Style Sheets (CSS)
However, before learning the details on how to use Inkscape, let's take a step back and define vector graphics, how computer displays and vector graphics work together, and why we want to use them in web design.
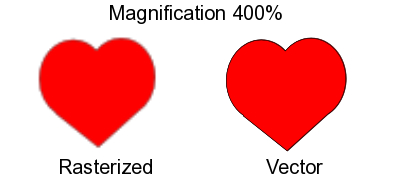
Vector graphics are made up of paths. Each path is basically a line with a start and end point, curves, angles, and points that are calculated with a mathematical equation. These paths are not limited to being straight—they can be of any shape, size, and even encompass any number of curves. When you combine them, they create drawings, diagrams, and can even help create certain fonts.
These characteristics make vector graphics very different than JPEGs, GIFs, or BMP images—all of which are considered rasterized or bitmap images made up of tiny squares which are called pixels or bits. If you magnify these images, you will see they are made up of a grid (bitmaps) and if you keep magnifying them, they will become blurry and grainy as each pixel with bitmap square's zoom level grows larger.
Computer monitors also use pixels in a grid. However, they use millions of them so that when you look at a display, your eyes see a picture. In high-resolution monitors, the pixels are smaller and closer together to give a crisper image.
How does this all relate to vector-based graphics? Vector-based graphics aren't made up of squares. Since they are based on paths, you can make them larger (by scaling) and the image quality stays the same, lines and edges stay clean, and the same images can be used on items as small as letterheads or business cards or blown up to be billboards or used in high definition animation sequences. This flexibility, often accompanied by smaller file sizes, makes vector graphics ideal—especially in the world of the Internet, varying computer displays, and hosting services for web spaces, which leads us nicely to Inkscape, a tool that can be invaluable for use in web design.
Inkscape is a free, open source program developed by a group of volunteers under the GNU General Public License (GPL). You not only get a free download but can use the program to create items with it and freely distribute them, modify the program itself, and share that modified program with others.
Inkscape uses Scalable Vector Graphics (SVG), a vector-based drawing language that uses some basic principles:
A drawing can (and should) be scalable to any size without losing detail
A drawing can use an unlimited number of smaller drawings used in any number of ways (and reused) and still be a part of a larger whole
SVG and World Wide Web Consortium (W3C) web standards are built into Inkscape which give it a number of features including a rich body of XML (eXtensible Markup Language) format with complete descriptions and animations. Inkscape drawings can be reused in other SVG-compliant drawing programs and can adapt to different presentation methods. It has support across most web browsers (Firefox, Chrome, Opera, Safari, Internet Explorer).
When you draw your objects (rectangles, circles, and so on.), arbitrary paths, and text in Inkscape, you also give them attributes such as color, gradient, or patterned fills. Inkscape automatically creates a web code (XML) for each of these objects and tags your images with this code. If need be, the graphics can then be transformed, cloned, and grouped in the code itself, Hyperlinks can even be added for use in web browsers, multi-lingual scripting (which isn't available in most commercial vector-based programs) and more—all within Inkscape or in a native programming language. It makes your vector graphics more versatile in the web space than a standard JPG or GIF graphic.
There are still some limitations in the Inkscape program, even though it aims to be fully SVG compliant. For example, as of version 0.48 it still does not support animation or SVG fonts—though there are plans to add these capabilities into future versions.
Inkscape is available for download for Windows, Macintosh, Linux, or Solaris operating systems.
Note
To run on the Mac OS X operating system, it typically runs under X11—an implementation of the X Window System software that makes it possible to run X11-based applications in Mac OS X. The X11 application has shipped with the Mac OS X since version 10.5.
When you open Inkscape on a Mac, it will first open X11 and run Inkscape within that program. Loss of some shortcut key options will occur but all functionality is present using menus and toolbars.
Let's briefly go over how to download and install Inkscape:
Go to the official Inkscape website at: http://www.in kscape.org/ and download the appropriate version of the software for your computer.
For the Mac OS X Leopard software, you will also need to download an additional application. It is the X11 application package 2.4.0 or greater from this website: http://xquartz.macosforge.org/trac/wi ki/X112.4.0.
Once downloaded, double-click the X11-2.4.0.DMG package first. It will open another folder with the X11 application installer. Double-click that icon to be prompted through an installation wizard.
Double-click the downloaded Inkscape installation package to start the installation.
Note
For the Mac OS, a
DMGfile is downloaded. Double-click on it and then drag and drop the Inkscape package to the Application Folder. For any Windows device, an.EXEfile is downloaded. Double-click that file to start and complete the installation. For Linux-based computers, there are a number of distributions available. Be sure to download and install the correct installation package for your system.Now find the Inkscape icon in the Application or Programs folders to open the program.

Double-click the Inkscape icon and the program will automatically open to the main screen.
When you open Inkscape for the first time, you'll see that the main screen and a new blank document opened are ready to go.
Note
If you are using a Macintosh computer, Inkscape opens within the X11 application and may take slightly longer to load.
The Inkscape interface is based on the GNOME UI standard which uses visual cues and feedback for any icons. For example:
Hovering your mouse over any icon displays a pop-up description of the icon.
If an icon has a dark gray border, it is active and can be used.
If an icon is grayed out, it is not currently available to use with the current selection.
All icons that are in execution mode (or busy) are covered by a dark shadow. This signifies that the application is busy and won't respond to any edit request.
There is a Notification Display on the main screen that displays dynamic help messages to key shortcuts and basic information on how to use the Inkscape software in its current state or based on what objects and tools are selected.
Within the main screen there is the main menu, a command, snap and status bar, tool controls, and a palette bar.
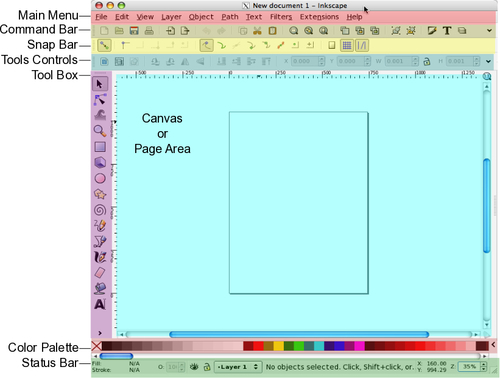
You will use the main menu bar the most when working on your projects. This is the central location to find every tool and menu item in the program—even those found in the visual-based toolbars below it on the screen. When you select a main menu item the Inkscape dialog displays the icon, a text description, and shortcut key combination for the feature. This can be helpful while first learning the program—as it provides you with easier and often faster ways to use your most commonly used functions of the program.

Let's take a general tour of the tool bars seen on this main screen. We'll pay close attention to the tools we'll use most frequently.
If you don't like the location of any of the toolbars, you can also make them as floating windows on your screen. This lets you move them from their pre-defined locations and move them to a location of your liking. To move any of the toolbars, from their docking point on the left side, click and drag them out of the window. When you click the upper left button to close the toolbar window, it will be relocated back into the screen.
This toolbar represents the common and most frequently used commands in Inkscape:

As seen in the previous screenshot you can create a new document, open an existing one, save, print, cut, paste, zoom, add text, and much more. Hover your mouse over each icon for details on its function. By default, when you open Inkscape, this toolbar is on the right side of the main screen.
Also found vertically on the right side of the main screen, this toolbar is designed to help with the Snap to features of Inkscape. It lets you easily align items (snap to guides), force objects to align to paths (snap to paths), or snap to bounding boxes and edges.

This toolbar's options change depending on which tool you have selected in the toolbox (described in the next section). When you are creating objects, it provides you all the detailed options—size, position, angles, and attributes specific to the tool you are currently using. By default, it looks like the following screenshot:

You have options to select/deselect objects within a layer, rotate or mirror objects, adjust object locations on the canvas, and scaling options and much more. Use it to define object properties when they are selected on the canvas.
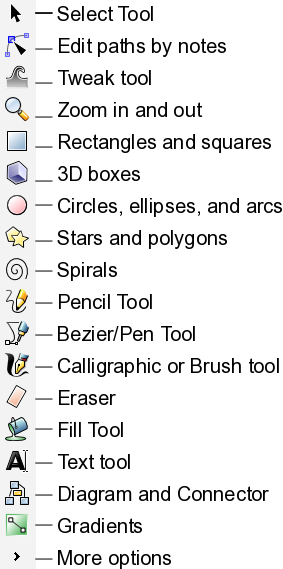
You'll use the tool box frequently. It contains all of the main tools for creating objects, selecting and modifying objects, and drawing. To select a tool, click the icon. If you double-click a tool, you can see that tool's preferences (and change them).
If you are new to Inkscape, there are a couple of hints about creating and editing text. The Text tool (A icon) in the Tool Box shown above is the only way of creating new text on the canvas. The T icon shown in the Command Bar is used only while editing text that already exists on the canvas.
This section of the Inkscape screen controls fill and stroke color options. Fill is the color that fills the object or shape. Alternatively, stroke is the outline around the object or shape.

There are a few ways you can set the fill and stroke in Inkscape:
From the Palette bar, click a color and drag it from the palette onto objects to change their Fill. If you hold the Shift key and drag a color box onto an object, it will set the stroke color.
Select an object on your canvas, and then right-click a color box in the palette. A pop-up menu appears with options to set the fill and stroke.
Select the object on your canvas and then left-click a color box in the palette to immediately set the fill of an object. Shift+Left-Click a color box to immediately set the stroke color.
There are a large number of color boxes to choose from. Use the Palette bar scroll bar along the bottom to see more choices to the right of those displaying on the screen.
This toolbar contains information relating to a selected object within the canvas or page of your document.
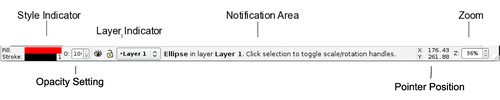
You can also use it to modify canvas settings. Here are the details:
Style Indicator: This focuses a bit more on the selected object. If you choose any object in your canvas, you can change its fill (overall color of the object) or stroke (border color). Drag a color from the palette to this section for easy color changes. Right-clicking the Style Indicators provides a pop-up menu letting you make quick and easy coloring edits. Double-clicking the Style Indicators will launch the Fill & Stroke Menu. If you right-click the number next to the Stroke Style Indicator, you get a choice of Stroke thicknesses to choose from.
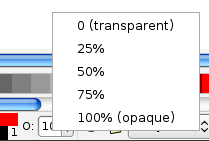
Opacity Setting: This is the drop down box near the Style Indicators. Right-click the drop down box to change the opacity percentage (%) value (the default is 100%). A pop-up menu displays a set of preset values to choose from.
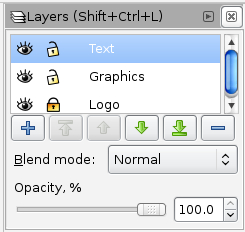
Layer Indicator: Within Inkscape when you create documents you can have many layers of objects. This gives great flexibility when creating web layouts. You can move groups of objects at once (placing a group of them on a layer), separate objects by layer to manipulate and play with how they interact with one another when stacked, re-ordered, or hidden. You can also set certain settings by layer. You can even create drafts or different versions of mockups and keep all of this in one file.
The Layer Indicator drop down menu lets you choose which layer you are currently using and placing objects to—this is called the drawing layer. You can then set whether this layer is visible or locked. Sometimes you can use your documents as a "working draft" and decide to hide certain layers while developing others. You might also lock layers when you have specified the exact positioning determined and you don't want it accidentally changed while manipulating other layers.
Notification Area: This contains hints or tricks about the objects or area you currently have selected in your document. Keep an eye on this area because it guides you with helpful information as you work within the layer. This feature is unique to Inkscape and the help messages change and update as you work with objects to reflect your available options.
Pointer or Cursor Position: When designing any space—print or web—it is often important to get precise placement of objects. To help do this, sometimes you want to see when/where your cursor or pointer is placed on the screen. This is the area on the Inkscape main screen where you can always see the exact x (horizontal) and y (vertical) placement of your cursor within the document.
Zoom: Use the zoom tools to magnify your canvas for super close-up work or zoom out to see the whole canvas in one shot. If you right-click the zoom field a pop-up menu with commonly used preset zoom levels is displayed and you can select one to immediately adjust the canvas to. It's nice because you can customize your viewable magnification at any time, and to whatever level you would like.
Window resize: By default, Inkscape opens to a default window size. With the resize window option in the lower right side of this area you can click, hold, and drag the window to an appropriate size for your computer screen. Or you can choose to make the window full screen by going to the main menu and choosing View and then Full Screen (press F11 on a Windows or Linux-based system).
Let's open a new document in Inkscape and discuss this portion of the screen.
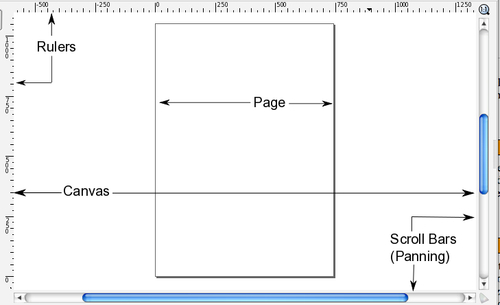
The terms canvas and page are used interchangeably within the Inkscape interface. For simplicity, we'll refer to the canvas as the entire portion of the open document screen. A page is the portion of the canvas that is contained within the printable area—seen as a black bordered box in the previous screenshot.
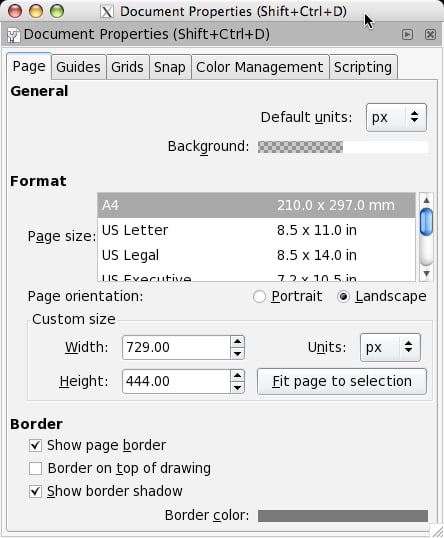
You can always adjust the page—or printable area—size. Go to the main menu and select File and then Document Properties. In Document Properties window Page tab, look in the Format field. You can select any number of pre-defined sizes, or change the Custom Size field measurements to your liking.
The pre-defined sizes are specific to print media, while those found in the main menu, File | New path give common web design, logo, or web banner sized templates.
As soon as you make changes to these properties, you can see them reflected on your screen.
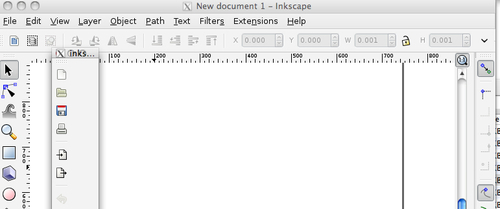
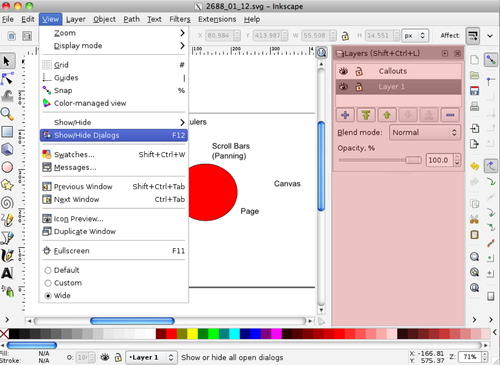
Dockable Dialogs are a great feature in Inkscape 0.48. They give you more freedom in your screen layout. You can Show (or Hide) dialog boxes on the right side of your screen or move to the top of your screen.
Useful dialogs to be shown here are:
Layers
Transform
Path Effect
SVG Font Editor
Filter Editor
The docked dialogs can be minimized, rearranged, stacked, and pulled into a separate window on your desktop. Here's how to do some of the basics:
Showing dialog boxes: To show these dialog boxes, on the main menu select View and select Show/Hide Dialogs. Then go to the Layer, Object, Path, or Text menus and choose the Editor, Layer, or Property options to show the correlating dialog box.
Displaying more than one dialog box: If you open more than one dialog box, they stack in the order they were opened in the Dialog area of the main screen. Use the scroll bar to see those below the first viewable.
Minimizing dialog boxes: To minimize a dialog, press the right arrow button, along the right side of the title bar of each dialog box. This places a shortcut along the left side of the Inkscape screen. To re-open it, just click the text/icon and the dialog re-opens to the large state on the screen.
Floating dialog boxes: Dialogs can also be dragged off of the main window into their own window. Each dialog can have its own window or they can be grouped in floating docks.
Closing dialog boxes: To close the dialog window, you can click the X on title bar for that box. It immediately closes.
For initial web design using these docks can be extremely useful. Particularly useful is having the Layers Dock visible, as it lets you re-order and select layers and the items in each layer quickly. To determine which dialog you have opened, there is a visual cue—the layer's menu title will be a darker in title.
There are several ways to view your canvas or page in an open document. Panning means moving left, right, or up and down on the main screen.

The easiest way to pan to the left and right is to use the horizontal scroll bar along the bottom of your Inkscape screen. Panning up and down can be done with the vertical scroll bar on the right side of the screen. But, if you own a mouse with a scroll wheel you can use it to pan as well. Just scrolling with the wheel moves the canvas up and down, pressing Shift on the keyboard and then using the scroll wheel moves it sideways.
As discussed in the Status bar overview, you can use the Zoom tool to magnify your canvas so that you can see a lot of detail (zoomed in) or the entire canvas at a glance (zoomed out). By default, Inkscape opens documents at about 35%. You can also use the Zoom tool on the Tool box  , a mouse with a scroll wheel, or use your keypad (= or + zoom in and – zooms out).
As stated when you first open Inkscape, a new document is opened and ready to start. However, it uses a default canvas sizes as 8.5in x 11in (standard letter size) and you likely need orientations and sizes for web design elements.
You'll love that if you choose File and then New from the main menu, Inkscape has many pre-defined sizes for you already generated. For web design, you can choose from:
Desktops with sizes: 1024 x 768, 1600 x 1200, 640 x 480, 800 x 600
Web Banners 468 x 60 or 728 x 90
Icon sizes: ranging from 16 x 16, 32 x 32, and 48 x 48
If you want to manually change your document properties just go to the main menu and select File and then Document Properties. You'll see the Document Properties window displayed with a number of options for customizing your canvas and "printable" page.
Some of the web-based elements are also listed in the pre-define Format list on this screen. You can select any item in that field (i.e. Banner 468 X 60 or Icon 48 X 48) and return to the Inkscape main screen to begin.
To open an existing file, go to the main menu and choose File, then Open (or Open Recent).
Inkscape supports a number of graphic formats. Particularly it can import or open a number of vector and bitmap based graphic formats, PDFs, and even text files. Some require additional plug-ins to be installed. See this version of the Inkscape manual for the fully supported formats and the caveats of importing each: http://tavmjong.free.fr/INKSCAPE/MANUAL/html/F ile-Import.html.
Remember, if you import and open a non-native Inkscape file, you may not be able edit all of the elements. Inkscape imports non-native files as flattened graphic files, so you can't edit anything within the graphic, but can manipulate or use the flattened image within Inkscape.
You'll notice when you are ready to save the document, Inkscape suggests saving in the Inkscape SVG format. Always save a version of your file in this format to allow editing at a later time. If file size is a concern, you can also save in the Inkscape compressed format of SVGZ.
For web design, it is possible that you can use the SVG files directly in the HTML/XML code. However, work with your programming team to confirm that they can use the SVG format (not all browsers or platforms support this). Using a file in any other non-Inkscape-SVG-format won't be editable to the extent of the original. So, always save the native Inkscape document and then export bitmaps and other graphics and or use File | Save Copy As to save in another format.
Exporting an entire canvas in PNG format is useful in web design when the client wants to see the graphical layout of the web design (a mockup) without having a need to interact with a live web site. Details on how to perform this export will be given in Chapter 2, Designing Site Layouts.
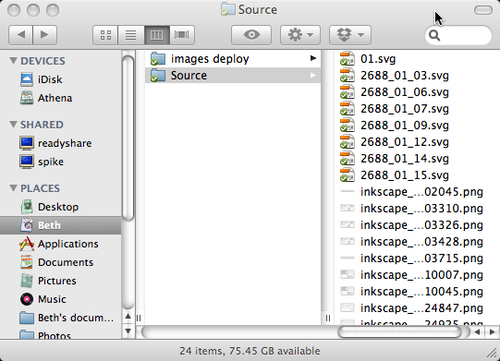
Since you can export objects themselves or entire "pages" of content, you will need to create a directory—or folder—where you store all of the files for one project.
Just create a project folder on your computer in an easy to access location. Whenever you create a new file in Inkscape, you can save those source Inkscape files in a folder named Source. Then you can also create a Deployment folder (or another intuitive name) where you export all files in the various formats you need to hand off to a developer for web site integration.
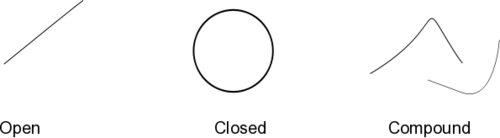
Paths have no pre-defined lengths or widths. They are arbitrary in nature and come in three basic types: open paths (have two ends), closed paths (have no ends, like a circle), or compound paths (uses a combination of two open and/or closed paths).
In Inkscape there are a few ways we can make paths: the Pencil (Freehand), Bezier (Pen), and Calligraphy tools—all of which are found in the tool box. They can also be created by converting a regular shape or text object into paths.
Paths are used in web design to create unique text styling (discussed in Chapter 4, Styling Text), when tracing other images like photographs (examples shown in Chapter 3, Working with Images) and when building icons, buttons, and logos (Chapter 6, Building Icons, Buttons, and Logos).
In general, we use paths to build unique objects that aren't part of the SVG standard shapes in Inkscape discussed in the next section. Since we can combine paths and make them closed objects—they again can be resized, manipulated, and then exported as web graphics.
Different from paths, Inkscape can also create shapes that are part of the SVG standard. These are:
Rectangles and squares 3D boxes
Circles, ellipses, and arcs
Stars
Polygons
Spirals
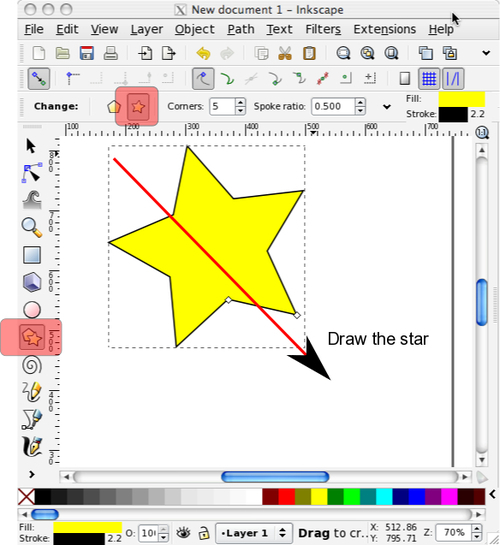
To create any of these shapes, see the following screenshot. Select (click) the shape tool icon in the tool box and then draw the shape on the canvas by clicking, holding, and then dragging the shape to the size you want on the canvas.
Note
To switch between creating stars and polygons, select that star/polygon icon in the tool box on the left hand side of your screen, and then select either the polygon or the star icon in the Tool controls (just above the canvas).
Once the shape is drawn you can:
Change the fill color of the shape by selecting a color in the color palette
Change the stroke or border color by pressing and holding the Shift key and then selecting that color from the color palette
Change the position of the shape on the canvas by choosing the Select tool in the tool box, clicking and holding the shape and moving it where you need it to be
Change the size of the shape by also choosing the Select tool from the tool box, clicking and holding the edge of the shape at the node (small square or circles at edges) and dragging it outward to grow larger or inward to shrink until the shape is of the desired size.
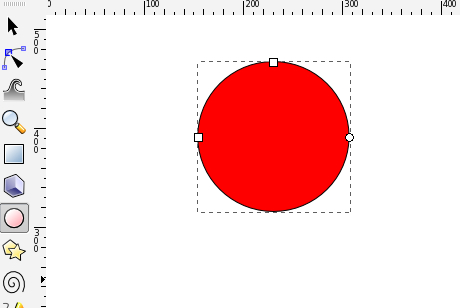
When creating the circle-based shapes you can get fancier. Just as with any other shape, you select the circle or ellipse tool and then click, hold, and drag on the canvas to create the initial shape. The shape now has a set of nodes (small white squares, circles, or diamonds) that you can move to change the size (if you want a perfect circle, press the Ctrl key while resizing).
For more help when transforming a shape with the nodes, watch the Notification Display along the bottom of the Inkscape screen. Descriptions of next steps and combination keys are in bold text.

Here's how to convert an ellipse into an arc:
Make sure that the Circle/Ellipse tool is still selected and you can see the nodes on the shape on the canvas.
Drag an arc node (the circle one) to set one end of the arc.
Once you "pull" or drag one of the arc nodes, you will see that there were actually two overlapping arc nodes for you to manipulate.
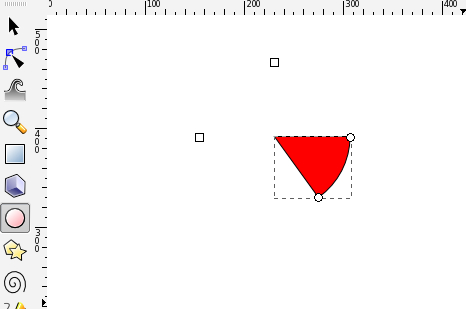
Drag the second arc node (in the original position) to the other end of the arc.
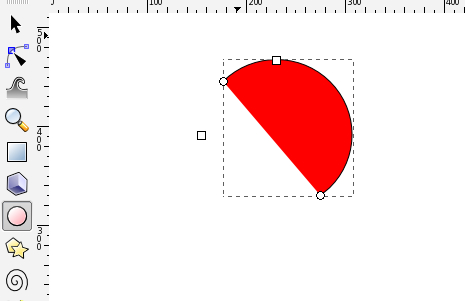
Hold the Ctrl key while dragging an arc node, to force the angle of the arc to begin or end at a multiple of the Rotation snap angle (15 degrees by default). To precisely place objects on the canvas, an object is made to snap to a target that is an object, guide, grid, or in this case an angle. Drag one of the arc nodes outside the curve of original ellipse (outside the dashed box); the arc node icon turns blue and a wedge is created at the center of the shape.
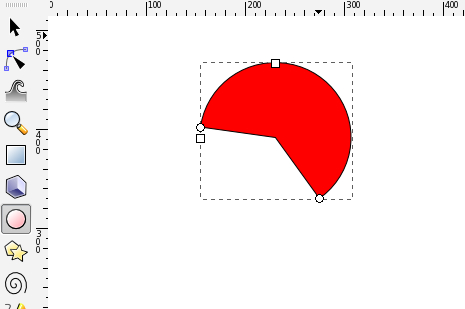
If the arc node is dragged with the cursor inside the curve, the segment defining the arc starts and stops at the two arc nodes, as shown below:

Once the arc is created and selected on the canvas, you can use the Tool Control bar to set specific locations for the start and stop arc nodes.

Sometimes as a designer you are asked to create logos or shapes that are outside the standard ones provided in the software. Since Inkscape is vector-based, you can combine simple shapes, masking, hiding, and layering them to create these more complex shapes. Let's perform a couple of examples to see how this can be done.
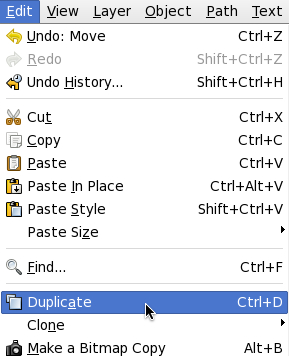
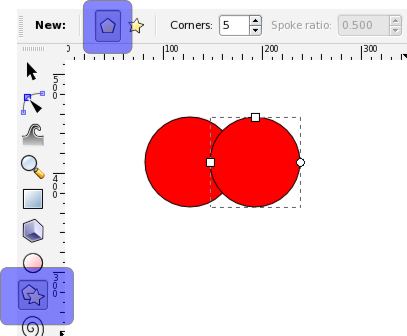
So the simplest way to create more complex shapes is to combine others into one—or merge the shapes. Let's show how we can do this by creating a heart with two circles and a polygon shape.
Open a new document (any size will do, since we are just practicing).
Select the Circle/Ellipse tool in the tool box.

On the main menu and choose Edit and then Duplicate.
From the tool box, choose the Select tool and then select the topmost circle object (the duplicate) and move that circle to the right side of the first, to make the crest of the heart. Press and hold the Ctrl key while you drag the circle to lock the horizontal axis of both circles.

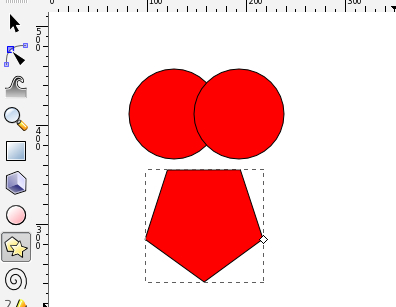
From the tool box, choose the Star/Polygon tool.
In the Tool Control bar, make sure that the Polygon tool is selected.
Draw a polygon just below the circles on the canvas, with a point facing downward.
Tip
Rotating an object
While drawing the polygon on the canvas, you can swivel it up, down, left, and right to position it with a point downward (for the bottom of the heart).
It is okay if you don't do this while drawing it initially, you can always choose the Select tool from the tool box, and click the polygon until the nodes turn to arrows with curves (this might require you to click the polygon object a couple of times). When you see the curved arrow nodes, click and drag on a corner node to rotate the object until it is positioned correctly.
Now choose the Select tool from the tool box, and drag the polygon so it creates bottom point of the heart.

To readjust the size of the polygon so that the "top" doesn't ruin the crest of the heart and so that side points align with the sides of the circles just make sure the Select tool is active, and click the polygon. The resize nodes appear.
Click the node on a side that needs to be adjusted and resize. Repeat this as necessary until the polygon "fits" within the circles correctly.

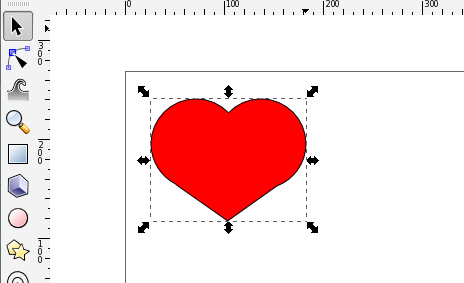
With the polygon still selected, press and hold the Shift key, while you select each circle so all objects are selected.
On the main menu select Path and then Union.

This merges all three shapes into one... and voila, it's a heart!
You can also use the Bezier (Pen) Tool to create objects in a bit more freehand form. This tool allows you to create straight lines and curves and connect them to create a freehand object. Here's an example of how to create a lightening bolt:
From a new document, choose the Bezier Pen tool from the tool box.

Click somewhere on the canvas to start drawing a straight line on the canvas, click to establish a node. Click again to change the direction of the straight line to create an angle in our lightening bolt.
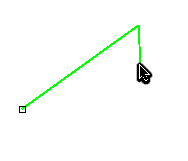
Continue to create the lightening bolt object by joining line segments.
Tip
Don't worry if you stop a line and realize you need to extend its length. Just drag a straight line to add on to the original to make it as long as you need. Click again when you are ready to change directions.
Also, if you made a mistake, there's no need to start over. Press the Backspace or Delete key and it removes the last line segment.
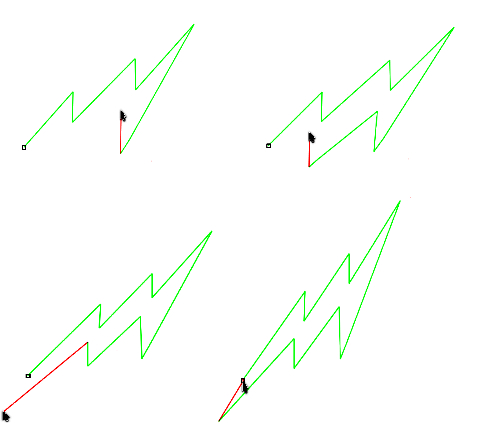
To "close" the lightening bolt, just create a line segment and join it to the starting point with a final click. You'll see that all of the lines are combined into one continuous closed path—a lightning bolt.

When you select the lightning bolt, the entire object is selected. You can resize it, fill it with a color (select it and choose a color from the color palette), and move it to another location on the canvas. It's become a unique object for you to work with.
The Bezier Pen tool also allows you to create controlled curves to create even more complex and unique objects. Try creating objects on your own and experimenting. These complex objects can be used for icons, banners, and for unique logo designs.
We spent much of this chapter understanding vector graphics—what they are, how they differ from the rasterized images, what this means in terms of their creation, and how best to use them on the web.
Then we dove right into the basics about Inkscape, what the program is about, what it can do for you, installation, and then the details about all the menus, tools, and using the basics in the software. We even created some simple and complex objects to reacquaint ourselves with the Inkscape software and its capabilities. All of this should be a great foundation (or a review for those of you who have been using the software for a while) to start building web page designs. Which we'll be starting in the next chapter with our first site design mock up!

