


Before any professional caterer leaves for a job, they double-check to ensure that all food items and equipment, needed for the specific job, are present. This chapter is intended to operate as a double-check of your Infusionsoft before taking off into the recipes contained in this book.
The first four recipes are designed to be a good checklist to go through when adding a new user; the latter ones are mainly admin or set it and forget it functions.
By ensuring that the following things are set up, you'll be able to get things done faster while maximizing the functionality available to you.
For all recipes in this book, we are assuming that the user is logged in to a specific Infusionsoft account and has the necessary access permissions.
Each user inside Infusionsoft has their own profile that contains a customizable signature, which can be merged into automated communications, such as letters and e-mails. Having a user's signature set will save time when configuring those communications.

The following screenshot shows a preview of an HTML signature:
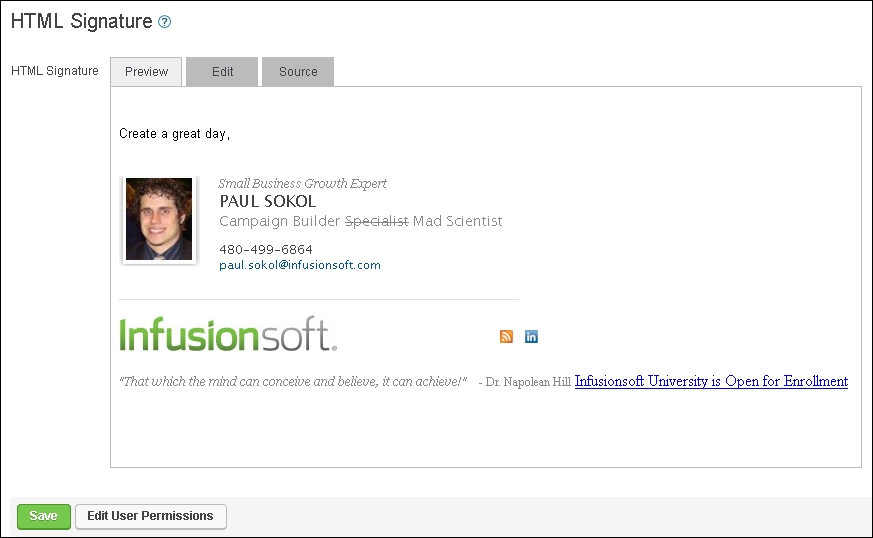
Every communication sent affords us an opportunity to personalize it with one of the users' signatures (such as a sales representative signing off in an e-mail). When this occurs, the system will use whatever is set in this area of the user profile. In most cases, you can choose which signature type you want to merge—either the plain text or the full HTML signature, as shown in the following screenshot:
Each user has a calendar that will show any scheduled tasks, appointments, or sales opportunities. The calendar settings can be configured to ensure smoother daily operations.
Hover over the person symbol in the upper-right corner of the page and select Edit My Profile.
Click on the Preferences tab to display the available user options.
In the Calendar section toward the middle of the page, we can configure the following:
Default Calendar View: This is what is displayed when you click on Calendar by navigating—the day when you log in (Day), the Week, or the Month
Default Start Hour: This indicates the time when the workday typically begins
Default End Hour: This indicates the time when the workday typically ends
Time Zone: This is the local time zone for the user; Infusionsoft assumes Eastern Time Zone by default
Click on Save at the bottom of the page.
Depending on your job function, you may rely heavily on the calendar to plan and take action. By setting up the calendar to the user's specifications, it ensures that they will have the best user experience while performing their daily activities.
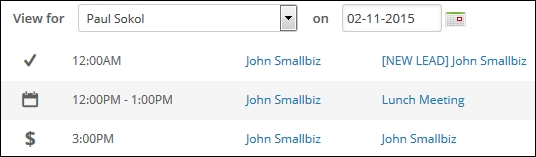
While looking at a user's calendar, there are visual cues to inform what kind of item is in a time slot. A task will be symbolized by a checkmark. An appointment will be symbolized by a tiny calendar symbol. A sales opportunity will be symbolized by a $ sign.
The following screenshot shows the three items in a time slot:
Infusionsoft can leverage your Facebook account in the following two ways:
First, you can post an e-mail broadcast, landing page, or web form out to your account
Second, you can point a Social snippet inside an e-mail to your account and build your social network
Connecting your Facebook account to your user profile ensures you can maximize the social functions within the program.
Hover over the person symbol in the upper-right corner of the page and select Edit My Profile.
Scroll to the bottom of the page and click on the Social Accounts tab.
Using the Add an Account dropdown, select Facebook.
In the pop up message that appears, click on Authorize Account; this will open a new tab in the browser.
Follow the authorization instructions provided by Facebook.
Back in the browser tab with Infusionsoft, click on Done.
Infusionsoft can leverage your Twitter account in two ways:
First, you can post an e-mail broadcast, landing page or web form out to your account
Second, you can point a Social snippet inside an e-mail to your account and build your social network
Connecting your Twitter account to your user profile ensures that you can maximize the social functions within the program.
Hover over the person symbol in the upper-right corner of the page and select Edit My Profile.
Scroll to the bottom of the page and click on the Social Accounts tab.
Using the Add an Account dropdown, select Twitter.
In the pop-up message that appears, click on Authorize Account; this will open a new tab in the browser.
Follow the authorization instructions provided by Twitter.
Back in the browser tab with Infusionsoft, click on Done.
Infusionsoft uses Twitter's secure authentication process to connect the user's Infusionsoft account with Twitter; it uses the same OAuth process as the Facebook connection.
One of the most common marketing assets used in your messaging is your company's logo. To save time while creating messages and stay consistent with your branding, there is a Branding Center where we can upload an image to be the company's logo. The system uses this logo where appropriate.
We need to be logged in to Infusionsoft, also inside a specific account, and have the appropriate access permissions.
Hover over the Infusionsoft symbol in the upper-left corner of the page, navigate to the Admin column, and click on Branding Center as shown in the following screenshot:

Click on the Logos tab.
In the Default Logo section, click on Edit in the lower-right corner of the logo preview.
From here, you can either:
Select an existing image from the file box using the dropdown
Upload your logo using the Add New Image button
Click on the Save button.
Infusionsoft understands that a company's logo can be leveraged in many different ways. In other areas of the software where a logo is contextually relevant, it will pull from this area of the Branding Center.
The size of logo uploaded determines how it is displayed. Avoid using really large images to save time when configuring e-mails; having a 600 px width is a good size.
There are three locations where a logo might show up:
When we upload a default logo using the mentioned recipe, the system automatically sets that for the three logo locations. If you want to further customize the logo for each of these locations, there is an Edit button that allows you to go through a similar process as the recipe mentioned earlier.
It is very important to use the formal Logo snippet while creating e-mails and other messages in the drag & drop builder. This ensures that updating your company's branding is easy. All we do is upload a new logo to the Branding Center, and the next time anything is sent containing a Logo snippet, Infusionsoft will use the new one. If we don't use the Logo snippet, but instead use a different method, such as an Image snippet, and our logo changes, we'll have to manually go into each individual e-mail, one by one, and update it to the new Logo. Using the Logo snippet is a huge time saver that also creates scalability.
There are other areas of the Branding Center that can help to save you a ton of time as well. It is here that we can create the default layouts for different objects in the system, such as e-mails, landing pages, and web forms. At the very least, create a branded Campaign Email template. This way, when we are cooking up the recipes in future chapters, every time we create a new e-mail, it will pull in our branding and we can begin writing immediately.
Legally, every e-mail that comes from an Infusionsoft e-mail server must contain the address of the company sending it and a link for the recipient to unsubscribe from future mailings. It is important to ensure that the address we set is real and can receive physical mails to protect the business legally should any disputes arise.
Hover over the Infusionsoft symbol in the upper-left corner of the page, navigate to the Marketing column and click on Settings in the bottom row as shown in the following screenshot:

Click on Email Defaults option in the Template Settings menu on the left-hand side of the page.
Fill in the contact information you would like to display at the bottom of every e-mail:

The Layout dropdown at the bottom of the Address Block fields lets you choose how the CAN-SPAM block displays; you can choose between a one-line and multiline layout. The preceding image is showing a preview of the one-line layout.
Scroll to the bottom of the page and click on Save.
This is the specific area designed to set the CAN-SPAM address block for all e-mails sent by Infusionsoft. This ensures that all e-mails being sent are legally compliant with the CAN-SPAM laws. Otherwise, a user would be at legal risk if they experience excessive spam complaints.
While the Company and Phone fields are available, they are not required. Only the address fields highlighted in orange are required.
In the Email section beneath the Address Block section of this page, there are some miscellaneous settings we might want to familiarize ourselves with. In particular, we can set the default opt-in (confirmation) and opt-out links to save time while creating e-mails. This is also where we would go to find the action trigger to cook the Building a Vaynerchuk opt-out recipe found in Chapter 7, Wowing Existing Customers with Great Experiences.
As a small business grows, there is a need to add more users to Infusionsoft.
Hover over the Infusionsoft symbol in the upper-left corner of the page, navigate to the Admin column, and click on Users as shown in the following screenshot:

Click on the green Add Users button:

Provide the new user's first name and e-mail address. You can also give them full system access by clicking on the switch to make them an admin.
Click on Send Email Invitation:

After completing the preceding recipe, the new user will receive an e-mail invitation to log in to Infusionsoft. The new user will then need to follow the instructions to claim their invitation.
From the list of users we see in the first step of this recipe, you can resend the user invite e-mail if someone is having difficulty locating the original invite e-mail.
Each Infusionsoft account has a certain number of available user licenses. However, next to the Add Users button, there is also a green Add Partner button. If we are working with an Infusionsoft Certified Partner and we want to give them access to our account without taking a user license, we can add their Infusionsoft ID there.
The number of user licenses is based on how many active users exist. Therefore, if we need to add a user but have no more licenses, we have the option to deactivate a user to free up space.