


 Download code from GitHub
Working within the Design Workspace
Fusion 360 is a fantastic 3D parametric, mesh design, and CNC program that you can use to create almost anything imaginable. In this chapter, first, you will get an idea of how to navigate the workspace and learn where most of the tools are located. Then, you will learn the difference between top-down and bottom-up design before understanding the various pricing methods of Fusion 360 and how to get the hobbyist license. The main goals of this chapter are to give you a basic understanding of Fusion 360 and help you locate tools, as well as show you where to find more help when you run into any problems.
In this chapter, we’re going to cover the following main topics:
- The basics of the user interface (UI)
- Exploring the various design approaches
- Various pricing methods of Fusion 360
Technical requirements
There are no technical requirements for this chapter, but it is highly recommended that you use a three-button mouse while using Fusion 360.
Please take a look at the technical requirements for installing Fusion 360 on the Autodesk website: knowledge.autodesk.com/support/fusion-360.
Basics of the UI
The Fusion 360 UI has been laid out to resemble most current-day program interfaces, with a toolbar at the top holding the most used commands, a data panel to the left, and a large workspace in the center. The UI will change as you select certain buttons and change to other workspaces. Like most programs, if you hover your mouse over a button and wait, you can see what the command does, and by hitting Ctrl + /, you can pull up the help menu for that command. If that doesn’t work, try restarting Fusion 360 and trying again.
The following figure (Figure 1.1) shows a brief overview of the Fusion 360 UI, with the data panel open on the left and a gestures palette (see 6) open on the right. The gestures command can be used with Shift + right-click, then mousing over the location of the command you wish to use:
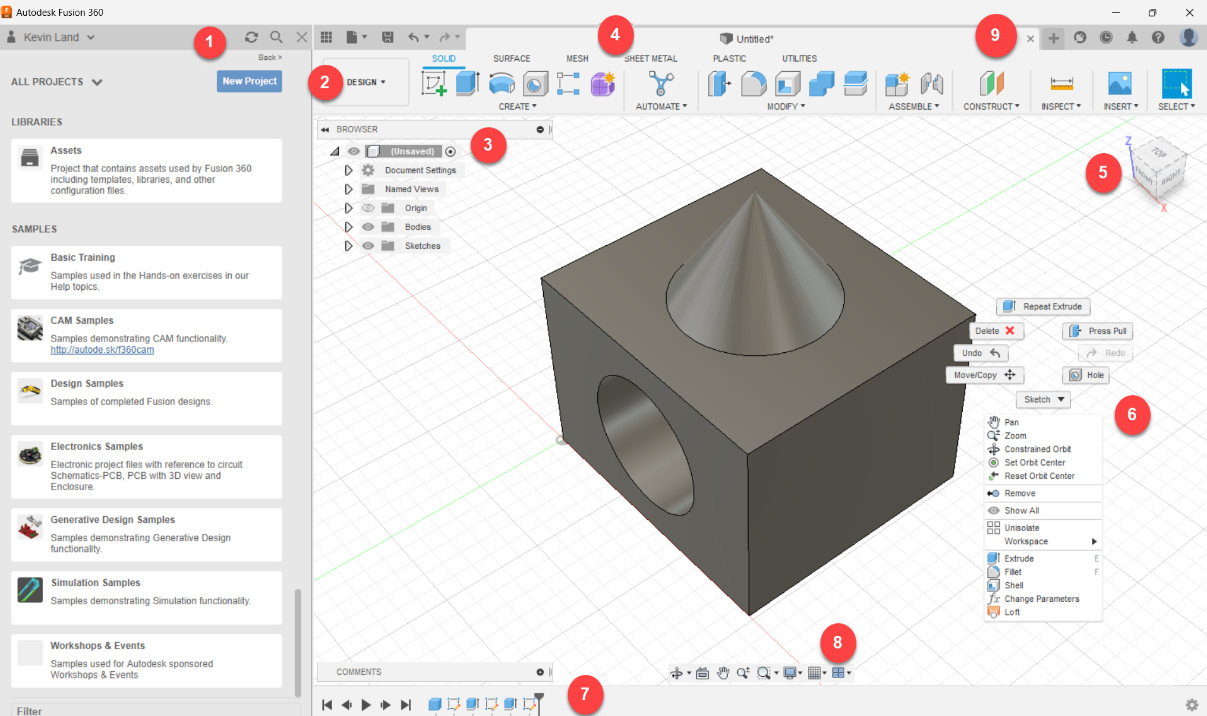
Figure 1.1 – The user interface of Fusion 360
This chart legend will help you understand the location of a button and what it is used for. We will look at these commands in more depth as we use our projects:
|
Bubble # |
Icon |
Name |
Description |
|
1 |
|
Data panel |
Stores your designs and manages projects. Click once to open and again to close. |
|
2 |
|
Workspace |
Each workspace changes the ribbon at the top of the screen. They are separated into DESIGN, GENERATIVE DESIGN, RENDER, ANIMATION, SIMULATION, MANUFACTURE, and DRAWING. Some workspaces may have limited capabilities, depending on your subscription. |
|
3 |
|
Browser |
Shows a list of all assemblies, bodies, sketches, and other tools that you used while creating your part. |
|
4 |
|
Toolbar |
The ribbon will change as the workspace changes. It is separated into multiple tabs to make locating commands easier. |
|
5 |
|
View cube |
Orbit by left-clicking and dragging over the cube. Left-click once on the corners or faces to view your 3D model. |
|
6 |
Shift + right-click |
Marking menu |
Typically known as the gestures menu, you can invoke certain commands by quickly holding down Shift + right-clicking and dragging your mouse to a specific location to start the command. |
|
7 |
|
Timeline |
Shows the list of command operations in order. This order can be manipulated by clicking and dragging on icons within certain rules. You can right-click on the icons to make changes to that command at that moment in time. |
|
8 |
|
Navigation bar |
Contains the locations for Zoom, Pan, and Orbit. Changes the look of the model and the appearance of the UI. |
|
9 |
|
Application bar |
The application bar contains items to the left of the screen, such as the data panel, File, Save, Undo, and Redo, as well as items to the right, such as Extensions, Job status, Notifications, Help, and My Profile. |
Now that we understand where items are placed within the Fusion 360 UI, we will now take a look at one of the most important and frequently used buttons that I look for when first learning a new software, which is the help button. The help button is essential for learning any new software, and Fusion 360 has an enhanced feature to make it even easier to learn while using help.
The help menu
One of the main reasons I chose to create a project-based learning book is due to the amazing existing help selections that have been created for Fusion 360. There are so many options out on the internet, either on YouTube or directly on the Autodesk website, from which you can locate any command and learn its function.
When learning any new software, it is important to locate the help menu as it can be difficult to remember what a command does or even where it is located. We will only discuss the most important and frequently used ones but keep this area in mind whenever you have more questions about Fusion 360.
You can quickly get to the help menu by going to the top right of the UI and left-clicking on the question mark icon. You can also access this menu by mousing over a button in the ribbon and hitting Ctrl + / to quickly open the Learning Panel area:
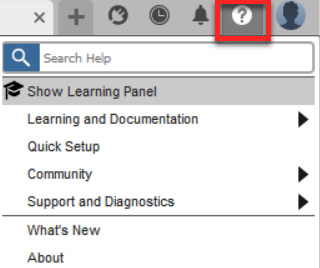
Figure 1.2 – The location of the help menu
The help menu contains a few different menu options within it, such as the redesigned Learning Panel area (Figure 1.3), which, if left open, will update as you click on different button commands in the UI:
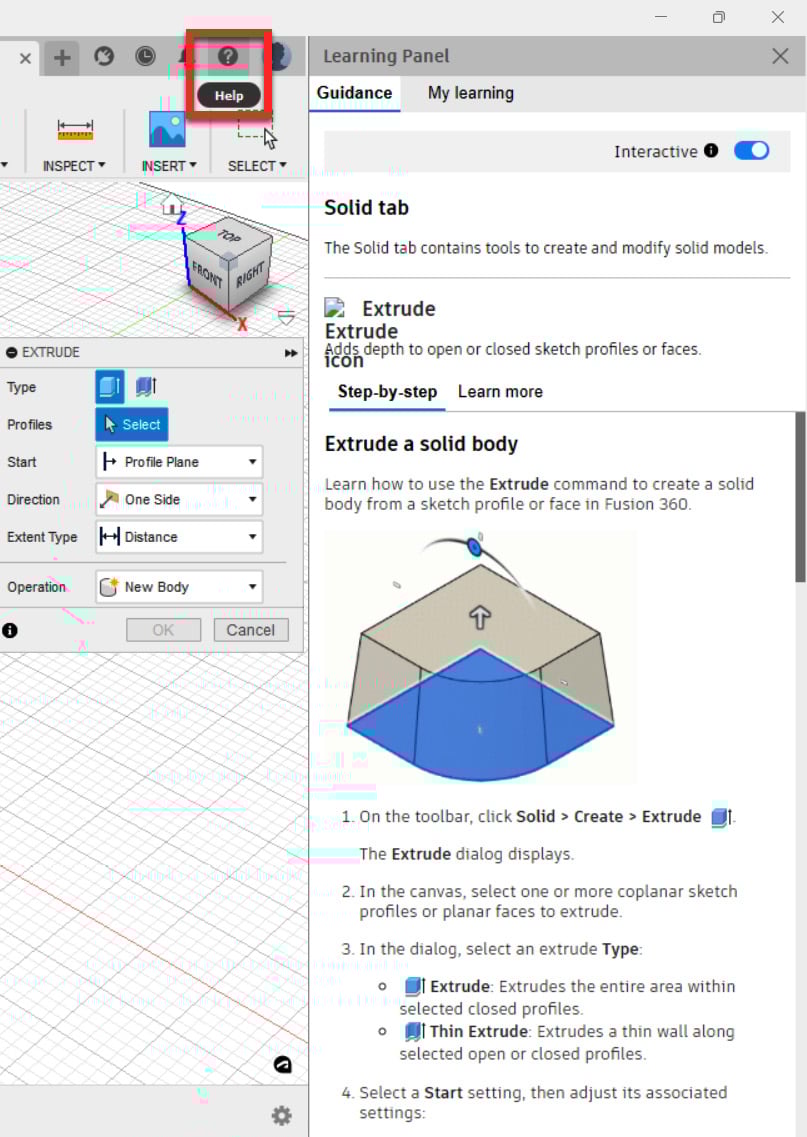
Figure 1.3 – The interactive Learning Panel area
The help menu of Fusion 360 is a great tool to have when learning this program. There is a lot of great information located within here and I’d recommend keeping it out when you’re first learning the commands and their purpose.
Another great resource for gathering ideas and seeing how other Fusion 360 creators have built their projects is the Autodesk Community Gallery: https://www.autodesk.com/community/gallery. Within this web page, you can view pictures and sometimes the 3D models of the projects themselves and see how other users built their products.
Preferences
If you are used to working in another program or would like to change something you don’t like, the first stop is usually in Preferences. This is where you can set up Fusion 360 the way you want it to work. You can find Preferences to the right of your screen by clicking on the person icon:
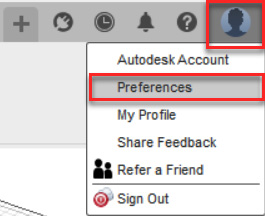
Figure 1.4 – Preferences
Within the Preferences panel, under the General tab, you can set which default Z orientation (shown in red in Figure 1.5) you would like to work with. This is important as the default Z direction can change between computer programs such as Blender or SolidWorks. I typically like mine facing up rather than toward my screen. If you are completely new to the X, Y, and Z axes, don’t worry – I will explain them while we are working on the projects.
Axis orientation note
There are three main axes in Fusion 360, which are the X-axis, the Y-axis, and the Z-axis. The purpose of these axes is to give you a sense of direction when modeling in 3D space. Refer to Chapter 2 for more information on how they can be used in Fusion 360.
The Pan, Zoom, Orbit shortcuts area (shown in green in Figure 1.5) is typically the next thing to customize. You can set this to either the default application of Fusion 360 or Alias, Inventor, SolidWorks, Tinkercad, or PowerMILL. I have mine set to Tinkercad as it’s close to AutoCAD, which I’ve worked with for over 20 years; old habits are hard to break.
The last setting here is Reverse zoom direction (shown in yellow in Figure 1.5). If you’re using a three-button mouse, by default, scrolling in with your mouse will zoom you in toward whatever object you have on screen. If you check this box, it will reverse that direction:
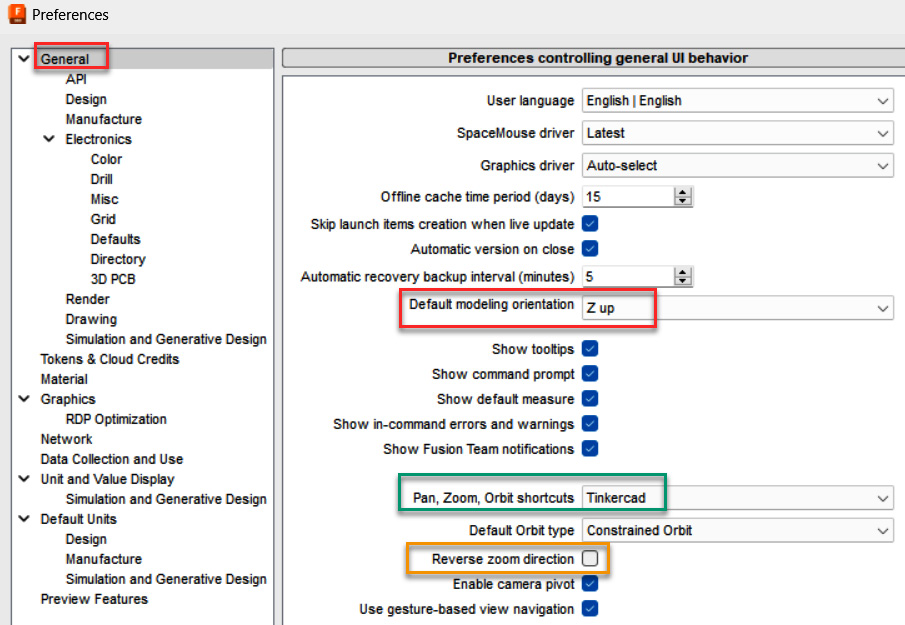
Figure 1.5 – The Preferences panel
There are many other preferences to search through, too many for this book, but I recommend looking through all of these to become familiar with settings that you may want to tweak at some point. The other recommendation I would say is to check out the Preview Features section (see Figure 1.6). This area shows some new tools that are still in beta version and lets you experiment with them before they become part of Fusion 360 (or don’t):
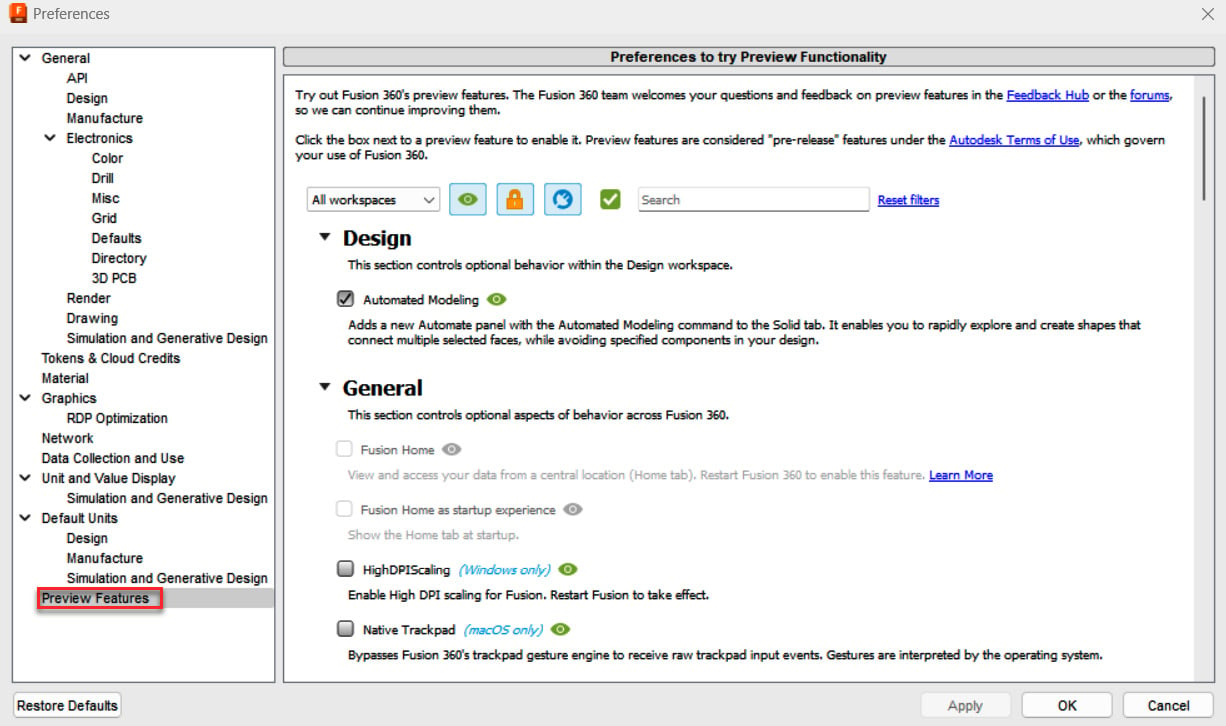
Figure 1.6 – The Preferences panel
The data panel
The data panel is where all of your projects will be stored, as well as any subsequent drawings, PDFs, images, or any other project information that may be relevant:

Figure 1.7 – The data panel
It is best to keep things organized, as you would in a typical project, by hitting the New Project button (shown in red in Figure 1.8) to create a project folder. This folder can be shared with other designers working on your project so that users can collaborate without having to create multiple drawings.
If you have trouble locating a project file, you can search for a particular name by clicking the magnifying glass icon toward the top right (shown in green in Figure 1.8):
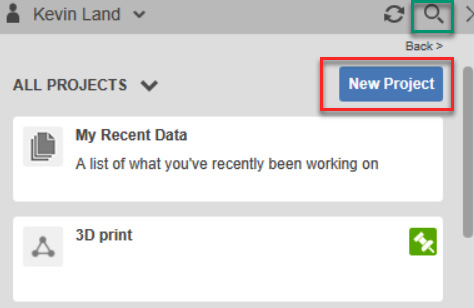
Figure 1.8 – The New Project button’s location
If you scroll to the bottom of the data panel, you will find links to some sample projects that you can practice with and see how they were all put together:
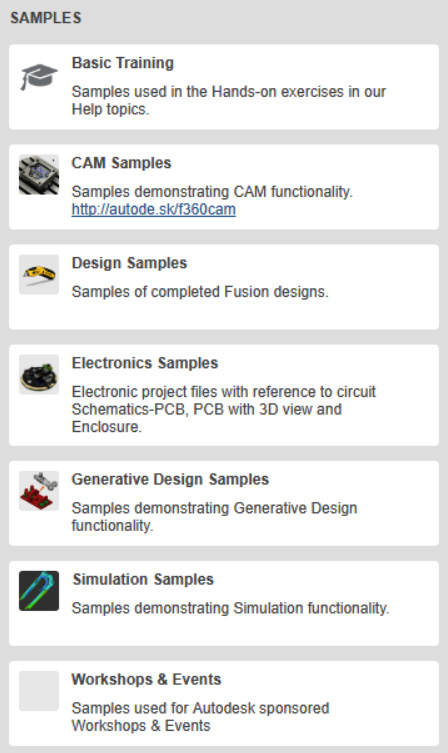
Figure 1.9 – The location of sample projects, which can be found toward the bottom of the data panel
Workspaces
Fusion 360 has seven different workspaces. Each will change how the ribbon will look and allow you to switch to a different design space to suit another design purpose. Most of the time, you will do your creating in the DESIGN workspace, which is also the default space that Fusion 360 starts with. Once you have finished your design, you may want to move on to testing it within the SIMULATION workspace or create a quick render or animation to send off to a client through the RENDER or ANIMATION workspace, respectively, or send your design for manufacturing on a CNC machine through the MANUFACTURE workspace. Each workspace will take some time to work in and some are harder than others to learn as some may require engineering knowledge of weights, pressure, and materials. Do not be afraid of these workspaces, though; experiment and learn by taking a look at each workspace and seeing what can be done within each:
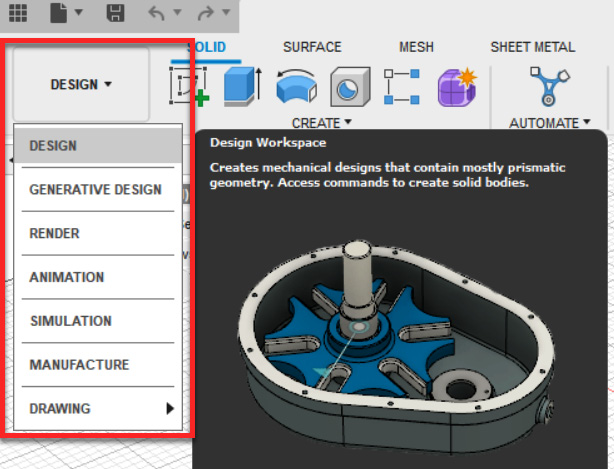
Figure 1.10 – The seven different workspaces
Toolbar
The toolbar, like most Windows-based programs, containerizes button locations into tabs such as SOLID, SURFACE, MESH, SHEET METAL, PLASTIC, and UTILITIES, and then into separate groups such as CREATE, AUTOMATE (this only appears in paid versions), MODIFY, ASSEMBLY, CONSTRUCT, INSPECT, INSERT, and SELECT. We will go over each as we work through a variety of projects in this book. For now, get a basic understanding of where buttons are located and how each tab will change the group of buttons within it:

Figure 1.11 – The DESIGN toolbar
The toolbar buttons can be reorganized within their grouping by clicking and dragging a button to a new location. If you want to add a new button to the toolbar, do the following:
- Hover over a button that you would like to add.
- Go to the right of the button and click on the three vertical dots.
- Check the Pin to Toolbar box.
- Now, you can rearrange its location by clicking and dragging the button icon on the toolbar:
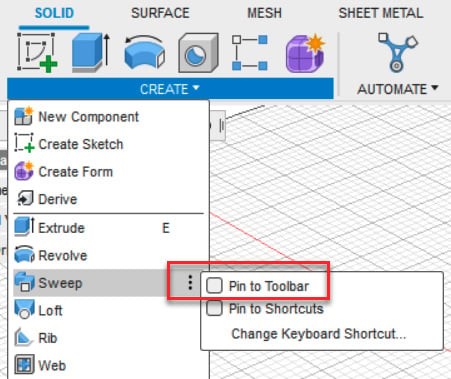
Figure 1.12 – The location of the Pin to Toolbar checkbox
While there are various shortcut keys that you can use in Fusion, all of which we will explore while working on our projects, most of your time will be spent locating tools within the toolbar. It’s a good idea to get familiar with locating the most used tools and customizing the toolbar to help you work faster.
Now that we are familiar with the basics of the UI, such as the help menu, the Preferences panel, and the toolbar, we will now go over two different ways to design products. One is the top-down approach, wherein a completely new design is created, while the other is the bottom-up approach, wherein we use existing products to update them to fit new needs.
Exploring the various design approaches
There are various ways to create a simple object in Fusion 360. I will go over a few different ways to draw, each of which has its benefits and downsides. It’s up to you, as a designer, to choose which approach works best for you and the next changes you will make to the model. The main questions to think about when designing are how quickly the object can be created, how easy it would be to modify it if there were a design change, and how accurate the model is.
The top-down design method
Designing from the top down means that you can create custom parts within Fusion 360 and design them to fit other custom parts. You take the time to plan out your model before anything is created. This is a more structured approach. These custom parts can control other parts, as shown in Figure 1.13. The custom legs control the design of the custom tabletop:
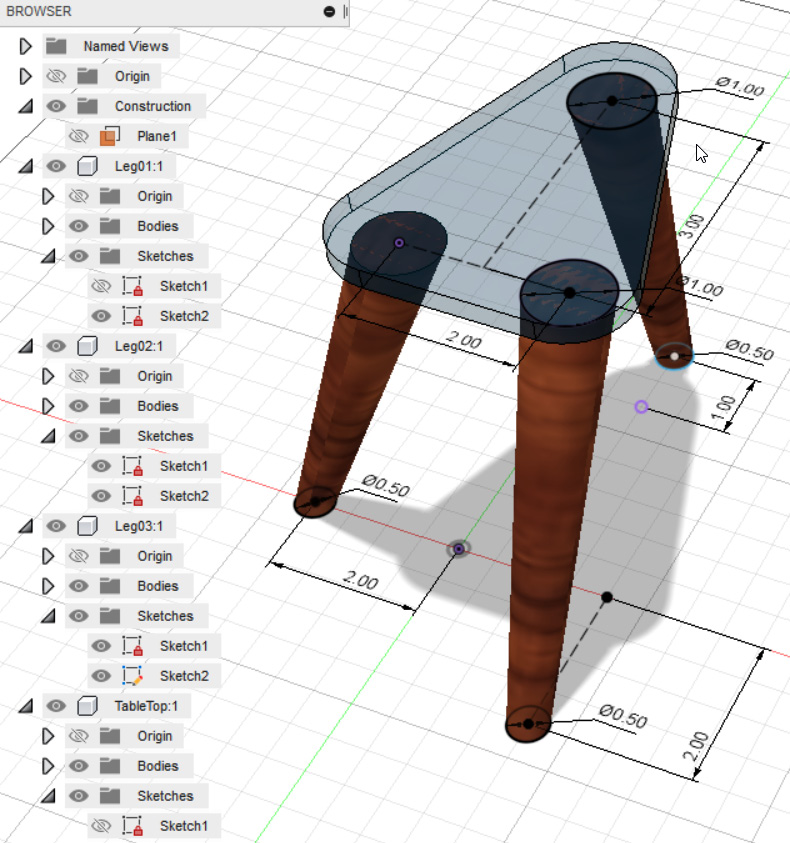
Figure 1.13 – A top-down approach to modeling that involves taking a custom table and using its legs to control the design of the tabletop
As the legs change to different locations, the table will change as well (see Figure 1.14). The parts that you design can be exported to other models if need be:
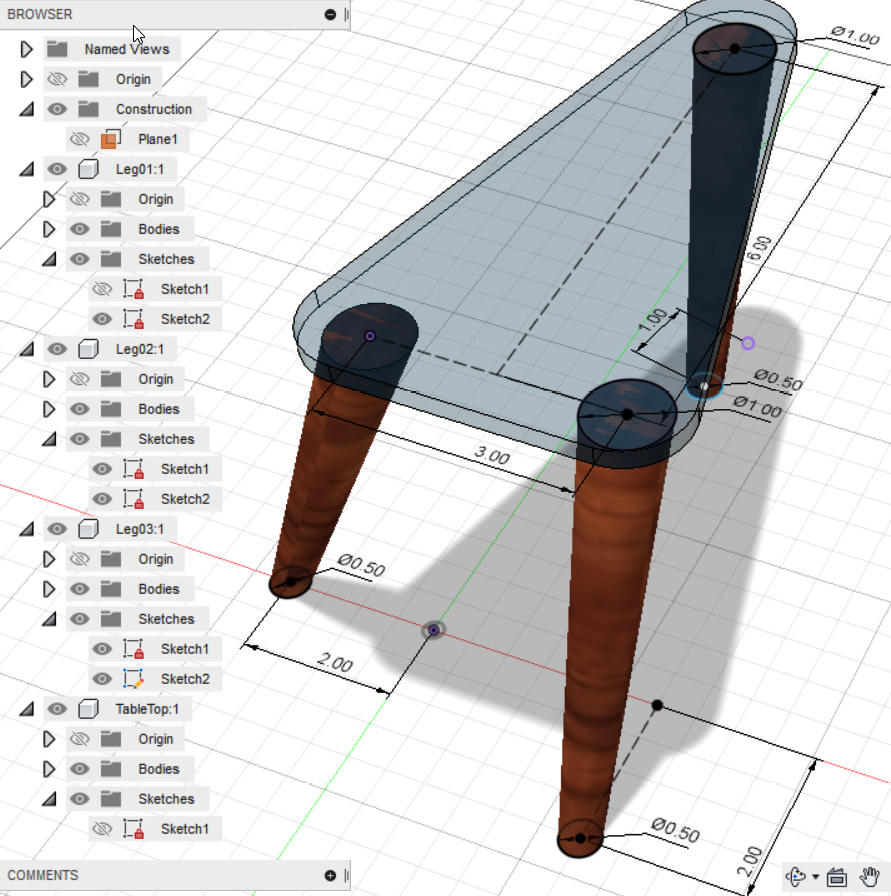
Figure 1.14 – A design change controlled by the table legs’ dimensions
This is a very powerful design method but requires some forethought as to what part you want to drive other parts. The best way to learn which design method is best is through experimenting.
The bottom-up design method
Design from the bottom up involves starting with smaller pieces and building to a larger project. This takes on more of a creative side to design since you start from an existing part and create from there. An example of this is when you know of the design goal and have all the main parts to insert into Fusion, such parts as from another designer on your team or parts from McMaster-Carr. You pull all these parts into Fusion 360 and then start assembling them to build the main assembly. Then, you design some other parts to fit this assembly and manipulate them as you design. You will end up with more separate models in your library, but these models can be used across other designs:
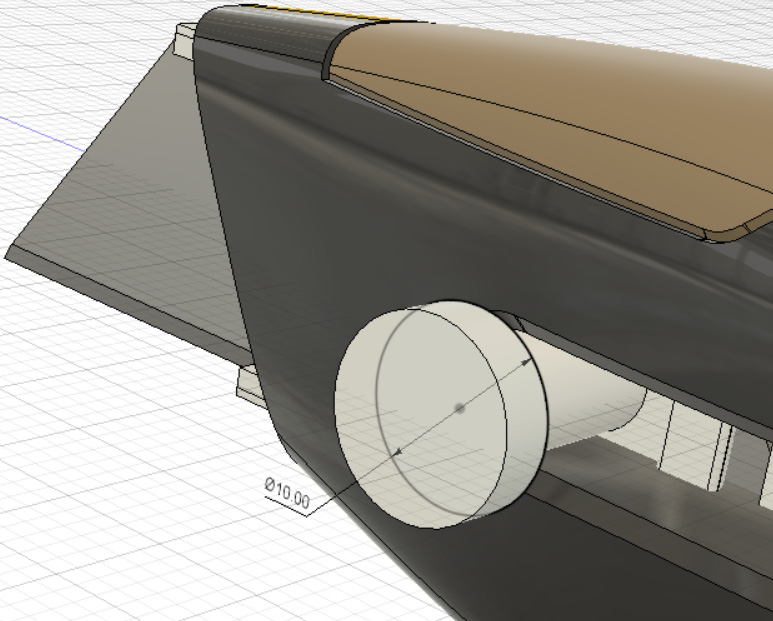
Figure 1.15 – A bottom-up approach to modeling and adding to an existing model
Some prefer one way to design over the other but a blend of both can often provide the best results. You will often find that starting from the top down is the easier way to start, but as you grow as a modeler, using both methods will make you a much stronger designer. Being able to switch how you work and not be confined to a certain methodology will make your models much more efficient to work with:
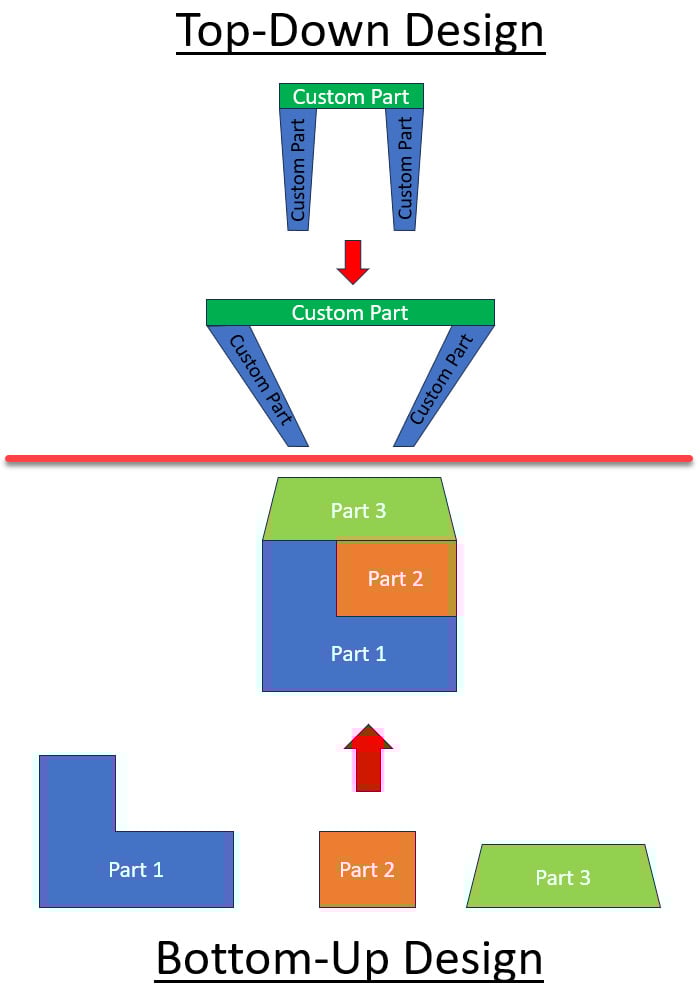
Figure 1.16 – The top-down and bottom-up design workflow
Now that we’ve learned about the UI and the difference between top-down and bottom-up designs, let’s take a look at the different subscription models and how to get the hobbyist (free) version.
Various subscription options
There are a few different pricing options regarding Fusion 360 and knowing which one to get can save you a lot of money and wasted time. If you are a student or hobbyist, you can use it for free; if you are a professional, then you can purchase a monthly or yearly subscription, as well as get various other add-ons.
The free hobbyist version
This version is the most common for people using Fusion 360 and is what helped Fusion 360 get off the ground as a useful tool for hobbyists and students alike. Back in 2020, Autodesk changed what the free version used to offer, such as the free use of multiple simulation tools, unlimited part design storage space, and limitations on some tools in other workspaces. The new hobbyist version can also be a bit confusing regarding how to access it as the free 30-day trial version is the only free version that they advertise on the Autodesk website. To access the free hobbyist version, follow these steps:
- Go to the Autodesk Fusion 360 website: Autodesk.com/Products/Fusion-360.
- Click on the Download free trial button.
- There will be two different trial versions on this page, one for business and one for education. The student version will ask for your school student ID. If you do not have a student ID, you will need to get the business version.
- Once you download and install the business version, your 30-day trial will begin.
- Once the 30-day trial is up, Fusion 360 will ask you to select a paid version, at which point you can choose the 1-year free hobbyist subscription. You can then renew this version every year.
The top part of your Fusion 360 workspace will look something similar to this when you are using the free for personal use version:

Figure 1.17 – The top left of the screen showing the personal us license
At the top right of your screen, you will notice that you have a limited number of projects that can be active at one time. This doesn’t mean that you are limited to 10 only, just that you can only have 10 active at once:
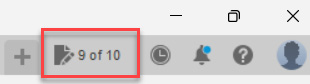
Figure 1.18 – The top right of the screen showing the limited number of projects of the personal use license
To be able to switch from an active project to an inactive project or vice versa, do the following:
- Click on the icon for the limited number of projects; this will open your data panel.
- Select any project within the data panel that you would like to activate or deactivate.
- Your number of selected projects will then change, depending on your selection.
The paid version
This version gives you unlimited cloud storage space for your projects, no limitations on creating drawings, and limited access to simulations. To get full access to simulations, you will need to purchase an extension.
Extensions
Once you have a paid version, you can add any extra extensions that may help your design, such as simulations, generative design, advanced machining, and fabrication. Each has its own pricing and learning curve. We will not go over this in this book, but if you become more advanced, these extensions will greatly help your designs take on a new life.
To find out more about the changes within the different versions, go to Autodesk.com/Campaigns/Fusion-360-Personal-Use-Changes.
Summary
In this chapter, you learned how to navigate the Fusion 360 UI by learning where the help menu is located and how to use the Learning Panel area. You learned where your project files are stored within the data panel, how to change to the seven different workspaces and understood what they do, and learned how to manipulate your toolbar to add buttons that you may use more frequently. We also looked at the different design approaches, such as top-down and bottom-up, and how merging the two will make you a stronger designer. Finally, you were introduced to the different subscription options of Fusion 360. At this point, you should be able to decide which one will work best for you.
In the next chapter, we will learn about planes, sketches, constraints, and parametric constraints.
