


Microsoft Dynamics NAV 2013 is an Enterprise Resource Planning (ERP) system targeted at small and medium-sized companies.
An ERP is a system, a software, that integrates the internal and external management information across an entire organization. The purpose of an ERP is to facilitate the flow of information between all business functions inside the boundaries of the organizations. An ERP system is meant to handle all the organization areas on a single software system. This way, the output of an area can be used as input of another area, without the need to manually duplicate data.
This chapter gives you an idea of what Dynamics NAV is and what you can expect from it. The topics covered in this chapter are:
What is an ERP
Functional areas found on Microsoft Dynamics NAV 2013
A bit of history of Dynamics NAV
How to use Dynamics NAV on different environments (the Windows client, the Web client, the SharePoint framework, Web Services, and so on)
Microsoft Dynamics NAV 2013 is a RoleTailored ERP, : it is focused on roles. The system is based around the individuals within an organization, their roles, and the tasks they perform. When users first enter Dynamics NAV, they see the data needed for the daily tasks they do according to their role. Users belonging to different roles will have a different view of the system; each of them will see the functions they need to properly perform their daily tasks. Dynamics NAV 2013 covers the following functional areas inside an organization:
Financial Management: The following functionalities are covered under financial management: accounting, G/L budgets, account schedules, financial reporting, cash management, receivables and payables, fixed assets, VAT reporting, intercompany transactions, cost accounting, consolidation, multicurrency, and intrastat
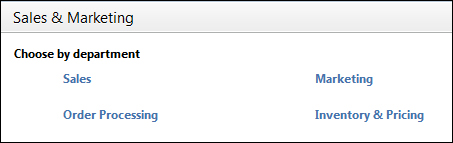
Sales & Marketing: This area covers customers, order processing, pricing, contacts, marketing campaigns, and so on
Purchase: This area includes vendors, order processing, approvals, planning, costing, and other such areas
Warehouse: Under the warehouse area you will find inventory, shipping and receiving, locations, picking, assembly, and likewise
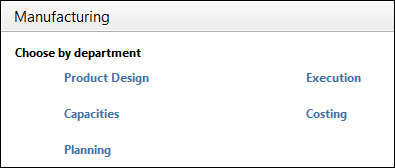
Manufacturing: The manufacturing area includes product design, capacities, planning, execution, costing, subcontracting, and so on
Job: Within the job area you can create projects, phases and tasks, planning, time sheets, work in process, and likewise
Resource Planning: This area includes resources, capacity, and other such areas
Service: Within the service area you can manage service items, contract management, order processing, planning & dispatching, service tasks, and so on
Human Resources: It allows you to manage employees, absences, and so on
These areas are covered in more detail in the next section of this chapter.
A good thing about Dynamics NAV is that it can be customized. A brand new functional area can be created from scratch or new features can be added to an existing area. All the development is done with a proprietary programming language called C/AL.
When someone creates a new functional area, a vertical or horizontal solution, they usually create it as an add-on. An add-on can be registered and is now available to anyone who pays the corresponding fee. If some features are added to an existing area, usually it is a customization that will only be used on the database of the customer who asked for the feature.
A bad thing abut Dynamics NAV is that the code of the application is not on a multilayer architecture. All code is located on a single layer. Therefore, if you customize an area, you have to do it by modifying the standard code and adding code in the middle of the standard object definition. This makes it hard to upgrade to new versions of Dynamics NAV. Dynamics NAV 2013 uses a three-tier architecture:
SQL Server is the data tier and is used to store the data into a database.
Microsoft Dynamics NAV Server is the middle or server tier, managing all business logics and communication. It also provides an additional layer of security between clients and the database, and an additional layer for user authentication.
On the client tier we find the RoleTailored clients, such as the Windows clients and the Web client. Dynamics NAV 2013 also supports other kind of clients, including Web Services (both SOAP and OData), a SharePoint client through Microsoft Dynamics NAV Portal Framework, and a NAS service.

In the previous diagram you can see a simple installation. You can install Dynamics NAV in more complex scenarios, as you can have multiple instances of any of the core components.
We are not historians, but we thought that it is important to know where we come from and where are we going. Some of the current restrictions or features can be better understood if we know a bit of the history of Dynamics NAV. This is why we have added this section.
Dynamics NAV was first eveloped by a Danish firm and the program was called Navision A/S. In 2002, Microsoft bought Navision A/S and included it on the Microsoft Business Solution division. The product has gone through several name changes. The names Navision Financials, Navision Attain, and Microsoft Business solutions Navision Edition have been used to refer to this product that is currently called Microsoft Dynamics NAV. Note that all the previous names included the word Navision. This is why many people keep calling it Navision instead of NAV.
In the early 90s, with the release of Navision 3.04, the AL programming language was introduced along with the designing tools for designing screens, tables, reports, imports, batches, and functions. This way of designing the application objects has persisted over the years. Major changes were made to the designer tools later on when Pages and RTC reports stepped in with the release of Dynamics NAV 2009. NAV 2009 also introduced the possibility to use the .NET framework in the AL language.
RTC reports brought in a big change because the layout of the report had to be designed in Visual Studio, outside Dynamics NAV, to bring in the advantages of SQL Server Reporting Services technology; while the Pages changed the way of developing the user interface. Until that moment, while developing the user interface, you could just see what the user was going to see. But with Pages report you could create an indented structure to determine the fields and actions, and how to group the demand; whereas the rendering of that structure was left to the RTC client. The reason was to make the design independent of the client who was going to run it. We can perceive the benefits of this change in the architecture with the release of Dynamics NAV 2013 that brought us two new clients. We will discuss it later in this chapter.
The release of Navision Financials 2.50 brought the SQL option for Navision with itself. From Navision Financials 2.50 to Dynamics NAV 2009, two database options coexisted: the native Server and the SQL Server. With the release of Dynamics NAV 2013, the only option possible is SQL. This really makes a difference, because we can get rid of the restrictions that were only there to assure compatibility between the two options. As an example, Dynamics NAV 2013 has bought the new Query object; with this new object we can now specify a set of data from multiple tables. The query gets converted to a single SQL statement, using the SQL JOIN clause. This is something that was not possible at all in the native option. Now that this option does not exist, the restriction is gone, and we can use multiple JOIN clauses within Dynamics NAV.
The release of Microsoft Business Solutions NAV 4.0 introduced the Menu Suite, which completely changed the menu structure of the product. This was the first step in making the menu role-orientated instead of functionality-oriented. The look and feel of the new menu was very similar to Outlook, bringing NAV closer to other Microsoft products.
The three-tier architecture appeared with the release of Dynamics NAV 2009, along with the RTC client, the new Page object, designing Report layouts on Visual Studio, and Web Services. The old client was renamed and called the Classic client. In Dynamics NAV 2013 the Classic client disappears, but this release includes the new Web client and the SharePoint client.
For existing customers, upgrading to NAV 2009 with the new RTC client was a huge effort. This is why many companies chose to do a technical upgrade – to take advantage of the new Web Services interface. But they used the Classic client and therefore did not move to the full three-tier architecture.
And finally Dynamics NAV 2013 has been released, and this is what the book is all about.
From a functional perspective, Dynamics NAV hasn't changed much over the years. Lately, no new functional areas have appeared and the existing one just like they worked in many previous versions. In the last version of NAV 2009, Microsoft was focused on changing the whole architecture (for good), and NAV 2013 is the consolidation of the new architecture. All those architectural changes were made to bring Dynamics NAV closer to the existing Microsoft technologies, namely, Microsoft Office, .NET, SQL Server, and so on; in the meantime, functionality has been left behind. Although NAV 2013 includes a few new minor features that will be covered later in the book, we are willing to see plenty of new feature in future versions.
Anyway this section is about the existing functionality and what can we expect from each area. As we have seen earlier in this chapter, Dynamics NAV 2013 covers all the following functional areas:
Financial Management
Sales & Marketing
Purchase
Warehouse
Manufacturing
Job
Resource Planning
Service
Human Resources
In order to use Dynamics NAV, all organizations have to use the Financial Management area. It is the epicenter of the whole application. Any other area is optional and their usage depends on the organization's needs. The sales and the purchase areas are also used in almost any implementationDynamics NAV.
Now let's take a closer view of each area.
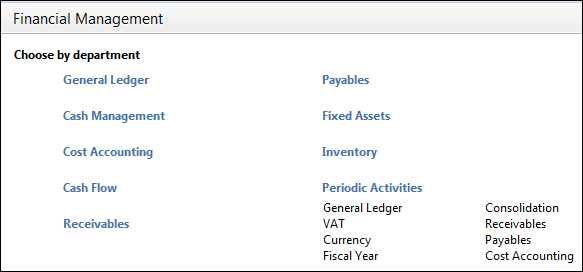
As we said, financial management is the epicenter of Dynamics NAV. Actually, accountancy is the epicenter, and the general ledger is included inside the Financial Management area. What else can be found? The following screenshot shows the main page of the Financial Management department:
We'll give a few details about each of these areas.
Accountancy is the act of recording, classifying, and summarizing, in terms of money, the transactions and events that take place in the company. Accountancy is thousands of years old; the earliest accounting records, dating back to more than 7,000 years, were found in Mesopotamia. Of course, nowadays we don't use the same accounting system, but it is interesting that accounting is useful in every single company, no matter how different it is from any other company. Probably the fact that keeping accounting records is mandatory in almost all countries helps! You know you have to do it, so at least we have to have a benefit from it.
Hey, no, we are serious! Accountancy is useful. Sometimes it's too strict, most of the time completely illogical for techies like us, but it's useful.
Accountancy has its own language: accounts, credit amounts, and debit amounts. This language is managed through strict and clear rules. Dynamics NAV has implemented those rules using posting groups, so the system can translate everything to accounting language and post it to the general ledger entries on the fly.
An important difference between Dynamics NAV and the other accounting systems is that you don't need to open an individual account for each customer, each vendor, each bank, or each fixed asset. Dynamics NAV does not keep detailed information about them on the accountant system. Only one or a few accounts are needed for each group. This is something that shocks accountants when they use Dynamics NAV for the first time.
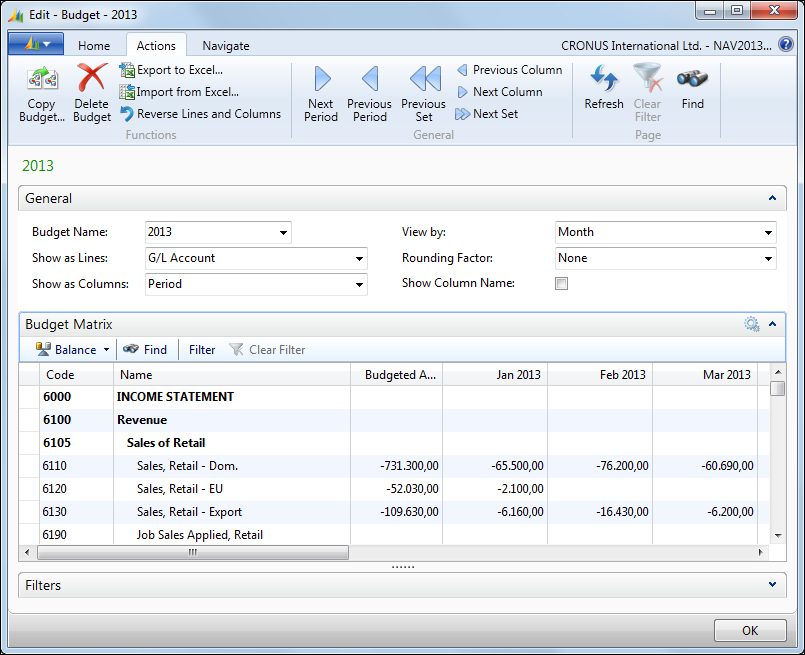
The General Ledger part also contains G/L budgets. This feature allows you to create accounting budgets with different levels of detail. You can break down the budget by different periods (day, week, month, quarter, year, or any accounting period), by accounts (on single posting accounts or heading accounts), by business units, or by dimensions.
The budget can be edited inside Dynamics NAV or can be exported to Excel, edited there, and then imported back to Dynamics NAV. You can do multiple imports from Excel and the new entries can be added to the existing ones.
You can also create distinct budgets inside Dynamics NAV and then combine them in a single budget. The following screenshot shows the main Budget page:
After presenting the budget, you can find different ways of tracking it. Either from the G/L Balance/Budget page, from Trial Balance/Budget report, or from the account schedules defined by you.
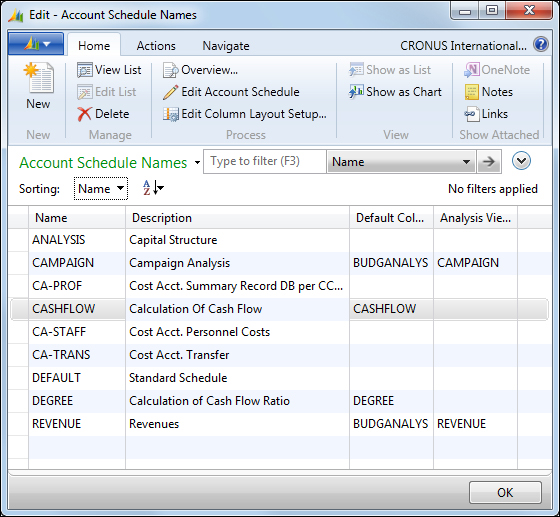
Account schedules are meant for reporting and analysis of financial statements. Dynamics NAV includes some standard statements, but the good thing about it is that you can modify the existing ones or you can create new ones in order to meet specific requirements of an organization. In the following screenshot you can see a list of the existing schedules:
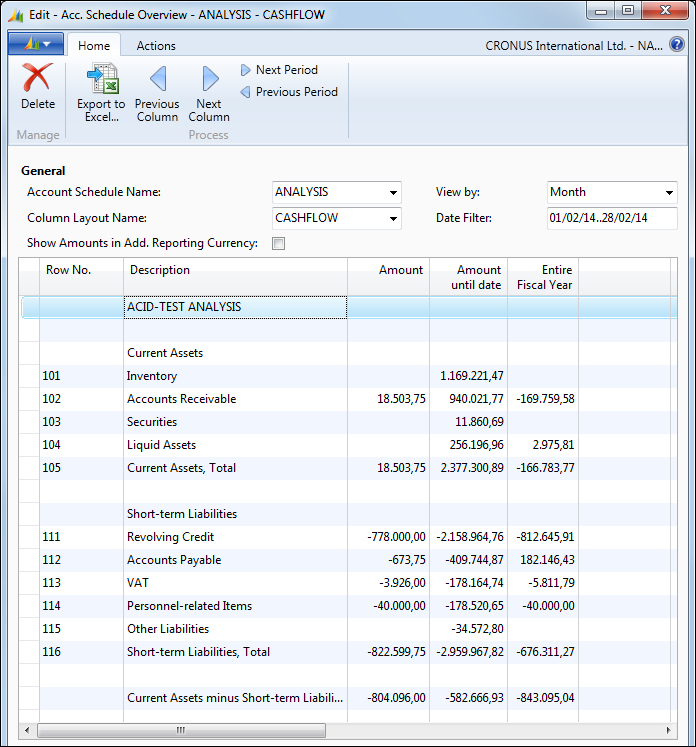
Account schedules can be made of ledger entries, budget entries, or analysis view entries. Analysis view entries are used to summarize ledger entries by a period and a set of dimensions. You can also combine entries from these different sources into a single schedule.
You can also define what kind of information is shown in the rows and the columns. Each column can show data from different periods so you can compare amounts over the periods. Account schedules are therefore a powerful tool that end users can use to create their own customized financial reports. The Acc. Schedule Overview window has been displayed in the following screenshot:
The cash management feature is used to manage the company's bank accounts. You can process the payments received from customers, payments to vendors, and bank reconciliation.
You can create a bank account card for each account the company has in the banks. Whenever a transaction is made in Dynamics NAV using a bank account, the system will post an entry in the bank account entry, plus a related G/L entry according to the bank posting group. The posting of bank entries is done from the cash receipt journal or from the payment journal. Other journals, such as the general journals could also be used.
The payment journal includes a suggest vendor payments action to help you decide what is to be paid.
The Fixed Assets functionality is used to manage the company's assets, their cost and depreciation, and also its related maintenance and insurances.
Fixed Assets has unlimited depreciation books that track the depreciation expense reliably. All the ordinary methods of depreciation are available, plus the ability to create custom depreciation methods is also available.
Fixed Assets include two different journals: the FA G/L journal and the FA journal. The FA G/L journal is used to post entries on the FA ledger entry and also a corresponding entry on the G/L entry. The FA journal is used only to create entries on the FA ledger entry. This means that depending on your configuration, you may not be posting anything related to FA in the G/L entry. You therefore need to be careful and know exactly when to post on the G/L and when not to, but keep everything synchronized.
VAT is the acronym of Value Added Tax. It is a transaction that is paid by the end consumer and business. In Dynamics NAV you can find a table called VAT Entry where all VAT transactions are recorded, mainly through purchase and sale invoices. In addition, the corresponding amounts are also posted on the accounts determined by its posting groups.
As in many other areas, all VAT processes are mainly based on their own entries, not in the amounts found in the accounting areas.
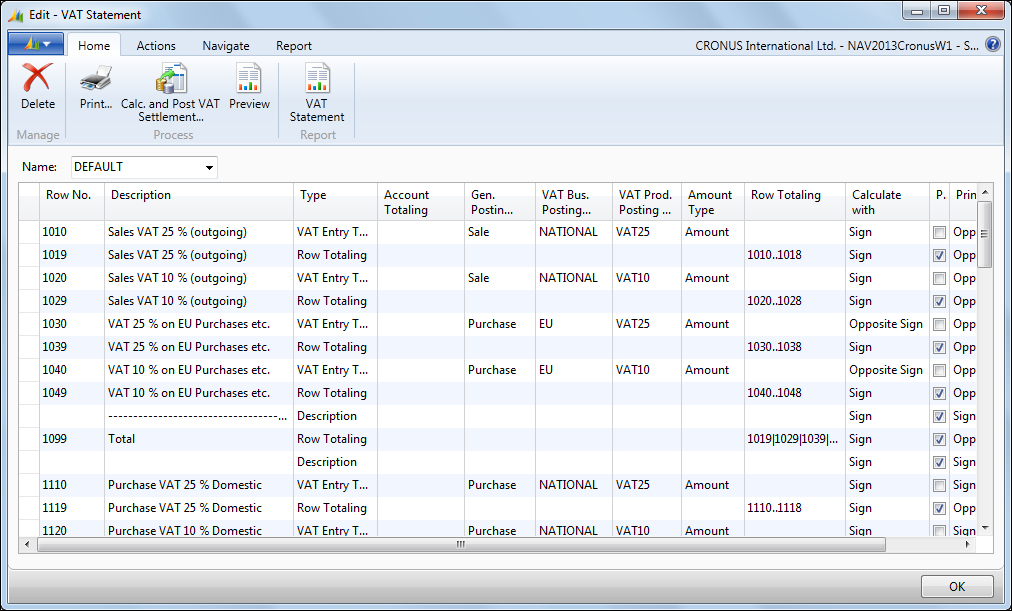
A process named Calculate and Post VAT Settlement helps you to post the G/L transactions for the VAT Settlement. Dynamics NAV also includes VAT statements that are pretty similar to the Account Schedules we discussed before. Therefore you can define your own VAT statements that will help you submit it to the tax authorities.
The following screenshot shows how a VAT Statement definition looks like:
Intrastat is a required reporting process for all European Union (EU) companies that trade with other EU countries/regions. Each company within the EU is responsible for reporting the movement of goods to their statistics authorities every month and delivering the report to the tax authority. In Dynamics NAV, the intrastat journal is used to complete periodic intrastat reports.
The intrastat journal requires item entries to contain information related to tariff numbers, transaction types, and transport methods. The tariff numbers are assigned on each item card, while transaction types and transport methods are assigned on sales and purchase documents.
Intercompany postings are used to transfer transactions electronically from one partner company to another. To be able to send and receive transactions, the companies involved need to agree on a common chart of accounts and a set of dimensions to use in the intercompany transactions. Therefore, a setup phase will be needed before you can start using this functionality. This setup phase will probably take longer than you expect.
When company A creates a document that needs to be sent to company B, the following flow occurs:
Company A creates the document and sends it to his IC outbox.
Company A sends all the transactions from his IC outbox.
Company B receives the transactions in his IC inbox.
Company B converts the IC inbox transactions to a document and processes it.
A transaction can be sent to the partner's inbox directly if both companies coexist on the same database, or you can also send transactions by e-mail or through XML files.
The consolidation is the process of adding up general ledger entries of two or more separate companies (subsidiaries) into a new company, called the consolidated company. Each individual company involved in a consolidation is called a business unit.
Note that we have only talked about adding up general ledger entries; no other entries on the system are used for consolidation purposes. In the chart of accounts of each business unit, you can indicate which accounts are to be included in the consolidation.
The consolidation process creates a summarized G/L entry on the consolidated company for the period you have selected while running the process, and for each account and combination of dimensions, if you choose to copy dimensions on the consolidated company. The consolidation functionality contains a process to help you register the consolidation eliminations.
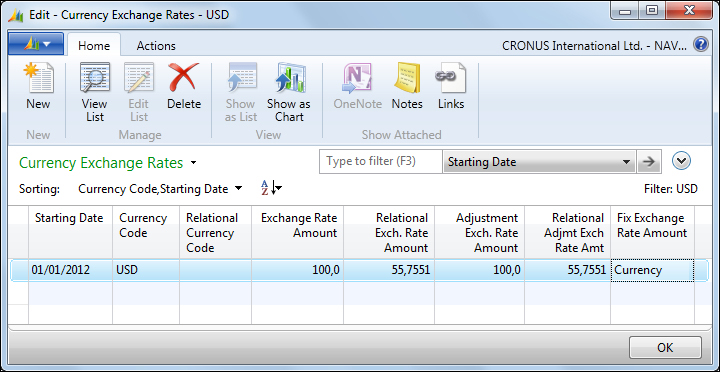
Multicurrency can be used if you buy or sell in other currencies besides your local currency. You can assign currency codes to bank accounts and also to customers and vendors. You can also use multicurrency to record general ledger transactions in an additional currency (besides your local currency). The additional currency feature is very useful for international companies that need to report in a currency different than the one they use in their daily transactions. You can register exchange rates for each foreign currency and specify from which dates the exchange rates are valid. Each time you post a transaction in a different currency, a conversion is made to translate that currency amount into the local currency amount. All entries in Dynamics NAV keep all the amounts in the transaction currency and in the local currency in separate fields.
The Adjust exchange rates process will help you to update the amounts of posted transactions to the new assigned rates. The following image shows how the currency exchange rates are defined for the USD currency:
The sales area can be used to manage all common sales processes information, such as quotes, orders, and returns. There are also tools to plan and manage different type of customers' information and transaction data. The following screenshot shows the main page of the Sales & Marketing area:
We'll give a few details about each of these areas later in the chapter.
In the Sales & Marketing area, everything revolves around customers. The customer card contains a lot of information, but only a few fields are mandatory in order to be used by the customer on transactions; they are the ones which corresponds to the posting groups. All other fields can be filled or not depending on how you want the sales area to work.
You can define a salesperson for the customer, to track the sales of each salesperson. You can set a credit limit for each customer, so that you get a warning when you try to create a new order for the customer and the credit is exceeded. You can group your customers by price and discounts groups to help you define prices. You can define different payment terms and methods. You can indicate how you are going to ship the goods to each customer, and you can also indicate a currency and a language for the customer. Besides that, you can also create multiple bank accounts and credit cards.
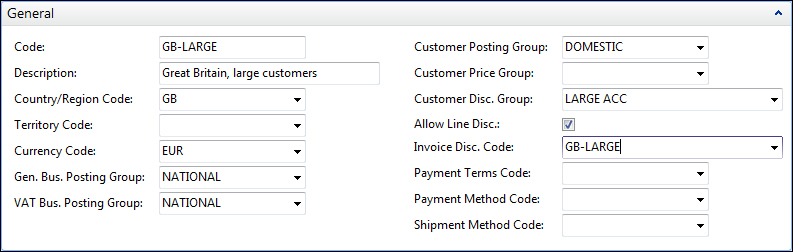
Many times, the company establishes a criteria for filling up all of this information. As an example, the company could have a norm that large customers will be part of a particular price group, will use specific posting groups, and will have particular payment terms. In this case you can create as many customer templates as the defined criteria, and apply a template each time a new customer is introduced to the system. In the following screenshot, you can see all the fields that can be included in a customer template:
The order processing part is all about documents. Dynamics NAV allows you to create quotes, blanket orders, orders, return orders, invoices, and credit memos.
The sales process can start with any of those documents, depending on the company's needs. In the following diagram you can see the information flow through the documents. The image documents with a gray background are the ones from where the process can start.
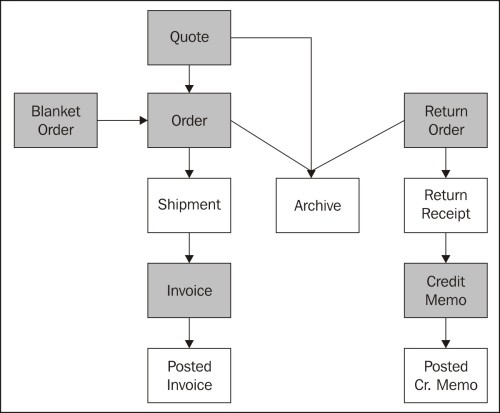
All the data from one document is carried forward to the next document. In addition, you can also create new documents by copying the data from any other sales document on the system.
In the previous diagram, the documents with the green background are passed to the documents with the white background through a posting process, but posting routines can take a while to process. Dynamics NAV 2013 has introduced a new feature, the background posting. If background posting is enabled, then the data is put in a queue and posted later in the background. This allows users to keep working while the system is posting their documents.
When you select a customer in a document, many fields from the customer card are copied to the document header. This is considered as default data from that customer. You can change most of that data on a particular document.
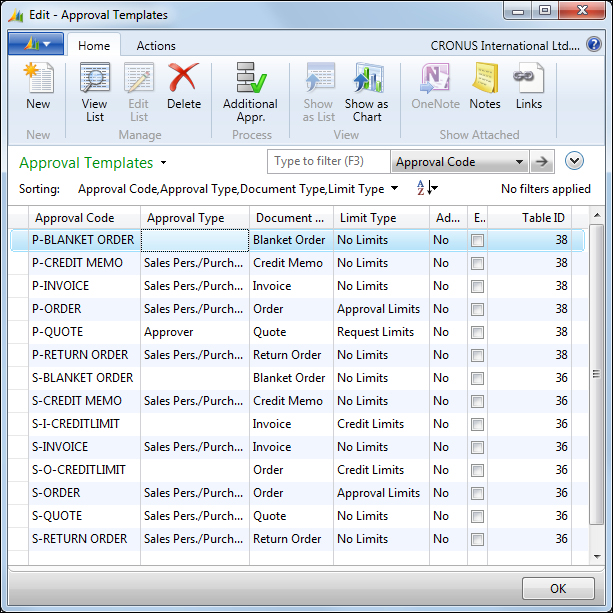
The approval system allows the user to submit a document for approval according to a predefined hierarchy of approval managers with certain approval amount limits. The approval of a document can be initiated by an e-mail notification sent to the user. Similarly, reminders of overdue approvals are also sent. Pending approvals can also be viewed from the Order Processing menu.
The system allows you to create several approval templates where you can choose the document types to be included in the approval process and which approval and limit type is to be used for each document. Document amounts are the main criteria to include a document in the approval process. The different limit types that can be used are as follows:
No limits: The document is included in the approval process, no matter how small or big the total amount is. It will then depend on the user setup.
Approval limits: The document is included in the approval process if the total amount is greater than the amount limit.
Credit limits: If a sales document that will put a customer over their credit limit is created, the document is sent for the credit limit approvals. After that, amount approvals may also have to approve the document.
The following screenshot shows how the Approval Templates page looks like:
The pricing option allows you to specify how you want to set up the sales prices agreements. You can specify prices and discounts. Both prices and discounts can be for an individual customer, a group of customers, all customers, and for a campaign. You need to specify one price for each item. If no price is found, the last sales price of the item is used. When a price agreement is created, you can specify if VAT is included in the price or not. Sales prices and sales discounts are introduced in separate tables.
Dynamics NAV always retrieves the best price. The best price is the lowest permissible price with the highest permissible line discount on a particular date.
In addition to specific item prices and discounts, you can also indicate invoice discounts or service charges. This can only be set up for individual customers, not for a group of customers or a campaign.
When you create a sales document, a Sales Line Details FactBox indicates how many Sales Price and Sales Line Discounts can be applied to the document.
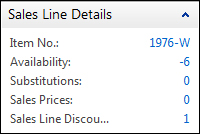
You can see the details by clicking on each blue number found on the FactBox. The sales price worksheet will help you change and update your current prices.
The marketing functionality revolves around contacts. You can create a contact and indicate his/her business relations. A contact can be related to customers, vendors, or bank accounts. You can categorize your contacts based on their industry groups or job responsibilities. Or you can create your own profile criteria, for example, educational level, marital status, or hobbies.
The task management feature allows you to create and organize marketing campaigns. You can create to-do lists and link them to contacts and/or campaigns.
The opportunity management area allows you to keep track of sales opportunities, have an overview of what is in the pipeline, and plan ahead accordingly.
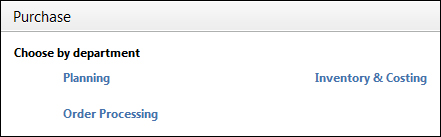
The purchase area can be used to manage all common purchase process' information, such as quotes, orders, and returns. There are also tools to plan your purchases according to your company's needs.
The main page of the Purchase area is shown in the following screenshot:
We'll give a few details about each of those areas, although most processes are similar to the ones we have discussed in the Sales & Marketing section.
In the Purchase area, everything revolves around vendors. Vendors' cards are pretty similar to customers' cards. Please refer to the Customer section of this chapter to see what you can expect from vendors.
The order processing part is all about documents. Dynamics NAV allows you to create quotes, blanket orders, orders, return orders, invoices, and credit memos.
Please refer to the Order Processing subsection of the Sales & Marketing section in this chapter to see what you can expect from order processing.
The approval system allows the user to submit a document for approval according to a predefined hierarchy of approval managers with certain approval amount limits. The approval system works just as explained in the Approvals subsection of the Sales & Marketing section of this chapter.
Besides the different limits explained before, the purchase approval system includes a new type of limit:
This option allows you to define purchase price agreements. It works just as the pricing model of the Sales section of this chapter, with one difference. In the Sales section, we said that both prices and discounts could be set for an individual customer, a group of customers, for all customers, and for a campaign. In the Purchases section it can only be set for individual vendors.
If you purchase goods, the requisition worksheet can help plan your purchases. You can manually enter items on the worksheet and fill in the relevant fields, or you can also run the Calculate Plan process. This calculates a replenishment plan for the items that have been set up with the replenishment system of purchase or transfer; for example, the program will automatically suggest an action you should take to replenish the item; it could be increasing the item quantity on an existing order or creating a new order.
You can also use the Drop Shipment function to fill in the requisition worksheet lines. This function retrieves the sales orders that you want to designate for a drop shipment. You use Drop Shipment when an item is shipped directly from your vendor to your customer. The system may sometimes suggest planning lines that need extra attention by the planner before they can be accepted.
The calculate plan batch job investigates the demand and supply situation of the item and calculates the projected available balance. The balance is defined as follows:
Inventory + Scheduled receipts + Planned receipts – Gross Requirements
It also respects the minimum order quantity, the maximum order quantity, and the order multiple of each item.
The following screenshot shows how the Req. Worksheet page looks like after you have run the calculate plan batch job:
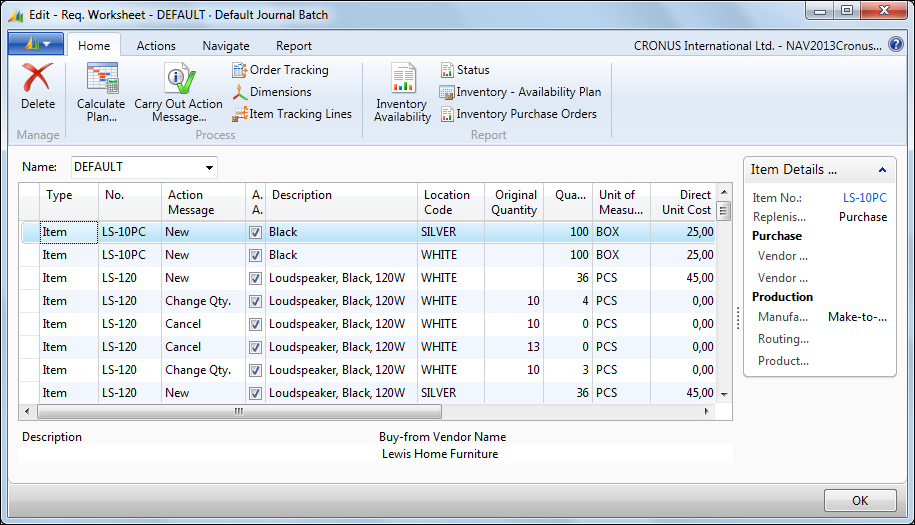
When you have finished reviewing the suggested purchases, you can use the Carry Out Action Message option to create new purchase orders and modify or cancel the existing ones.
After the goods have been received and before they are shipped, a series of internal warehouse activities take place to ensure the effective flow through the warehouse and to organize and maintain company inventories. Typical warehouse activities include putting items away, moving items inside or between warehouses, and picking items for assembly, production, or shipment. The following screenshot shows the main page of the Warehouse area:
In the Warehouse area, everything revolves around items. The item card contains a lot of information, but only a few fields are mandatory in order to be able to use the item on transactions: the base unit of measure and the fields corresponding to the posting groups.
All the other fields can be filled or unfilled depending on how you want the warehouse area to work.
You can create multiple units of measure. You can categorize your item using the item category code and the product group code. You can indicate a shelf no. for the item. You can use different costing methods, namely, FIFO, LIFO, Average, Standard, and so on. You can indicate how the replenishment of the product is going to be done (we have seen it in the Purchase section of this chapter). You can also set up lots of other information about the item, such as cross-references, substitutes, and so on.
One item can have multiple variants. This is useful if you have a large number of almost identical items, for example, the items that vary only in color. Instead of setting up each variant as a separate item, you can set up one item and then specify the various colors as variants of the item.
As part of your warehouse management you may need to use multiple locations. We will cover locations in the next section. If you use multiple locations, you can create stock-keeping units for your items. Stock-keeping units allow you to differentiate information about an item for a specific location. As an example, the replenishment system of an item may be different on different locations. Stock-keeping units also allow you to differentiate information between two variants of the same item. Information on the stock-keeping unit has priority over the item card.
One interesting feature about item is the item tracking. You can track an item by serial numbers, lot numbers, expiration dates, or a combination of all of them. You can create different tracking codes and set them up with the different tracking policies. The following screenshot shows an Item Tracking Code Card:
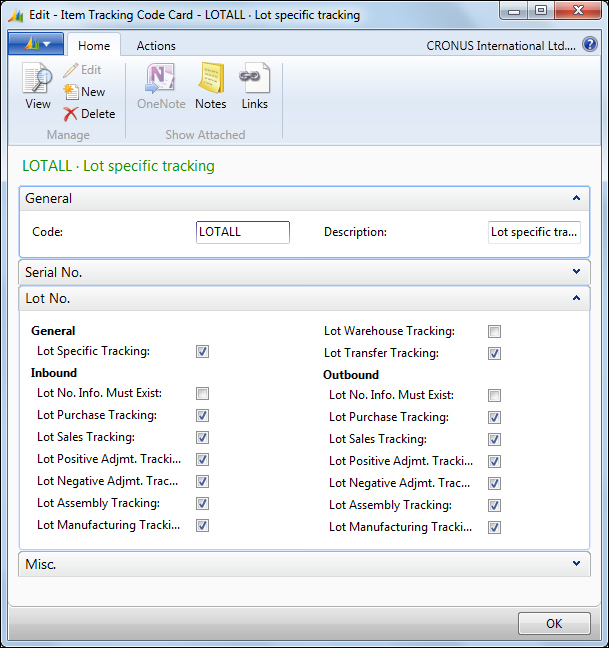
These policies reflect where it is mandatory to track the item, for example, you may only need to track lots on purchases but not on sales.
You must set up a location in Dynamics NAV for each warehouse location or distribution center. You can specify the location elsewhere in the program, for example, on purchase and sales documents. This will then record the transactions for the location when you post, and you will be able to track the item inventory and item value on each location.
You can specify an unlimited number of bins in each location. A bin denotes a physical storage unit. You can then use bins on put-away and pick operation, so that you can know where a specific item is stored.
Transfer orders are used to transfer items between locations. The transfer order is a document similar to a sales order or a purchase order. The transfer order contains information about the origin location, the destination location, and the date connected to the shipping and receiving of the order. An intransit location must be used when working with transfer orders. The posting process of transfer orders is done in two separate steps, shipping and receiving.
Assembly is used to create a new item, for example, a kit combining components in simple processes. This can be seen as a small manufacturing functionality.
To use this feature you need to define assembly items. An assembly item is an item defined as sellable, that contains an assembly BOM (Bill Of Materials). Items can be assembled to order or assembled to stock.
You can create assembly orders that are used to manage the assembly process and to connect the sales requirements with the involved warehouse activities. Assembly orders differ from the other order types because they involve both output and consumption when posting.
As this is a new functionality that Microsoft Dynamics NAV 2013 introduce, it will be covered in more detail in Chapter 2, What's New in NAV 2013.
Inventory can be organized and handled on locations at the bin level. Multiple variables can be defined per bin as:
Their type
The type of actions that can be performed on the bin: pick, put-away, ship, and receive
Their maximum capacity
Their desired minimum capacity, and so on
With all this information, you can create pick and put-away documents that will tell you:
Where to pick your inventory for shipment purposes
Where to store your inventory when it is received
There are also documents to manage internal inventory movements, to move inventory from one bin to another, to calculate the replenishment of pick bins, and so on.
Each single item card contains a field called Inventory that specifies how many units of the item are on inventory. Units are counted using the base unit of measure indicated on the item card. Dynamics NAV automatically calculates the content of the field using the Quantity field in the Item Ledger Entry table. This means that every time a new Item Ledger Entry record is created, for example, after posting a sales order, the inventory of the item is updated.
You can filter the Inventory field so that its contents are calculated only on the basis of one or any combination of global dimension values, locations, variants, lots, or serial numbers.
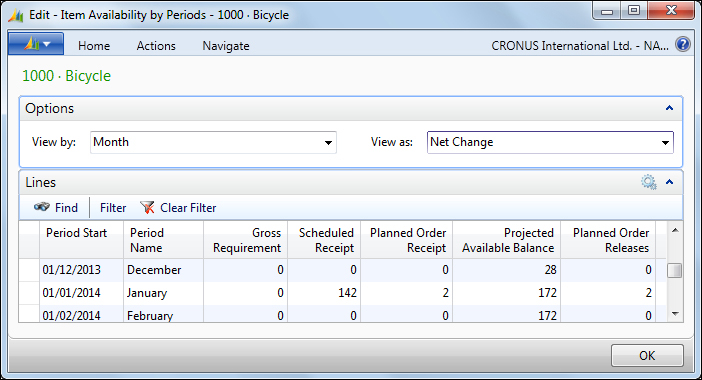
An inventory is used in combination with other fields to know the availability of an item. Item availability can be shown by event, by period, by variant, by location, by BOM level, and by timeline. The following screenshot shows the Item Availability by Periods page:
At least once in every fiscal year, you must take a physical inventory to see if the quantity registered is the same as the physical quantity in stock. The physical inventory journals designed to help you during such a task. But inventory is not only about units, it is also about the value of those units and their cost.
You can indicate different costing methods for an item. The choice determines the way the program calculates the unit cost. You can select any of the following costing methods: FIFO, LIFO, specific, average, and standard.
The system uses the value entries to keep track of each item ledger entry's cost. One or more value entries can exist per item ledger entry. Every time you post an order, invoice, credit memo, and so on, the program creates value entries because all of these operations affect the item value. In addition, you can use the revaluation journal to change any item ledger entry cost. Some other concepts, such as freight or handling charges, may also affect the item value. You can use item charges to assign those charges to item ledger entries.
The manufacturing area is used to manage production. Starting with the design and engineering work that will specify how and when items are handled, the components and resources that go into creating an end item, and the routings that define the process requirements of a given produced item.
The manufacturing area also provides tools to schedule production activities, manually or automatically pull production components for consumption, record time consumption, post finished operations that do not qualify as finished output but as scrapped material, and so on.
The following screenshot shows the main page of the Manufacturing area:
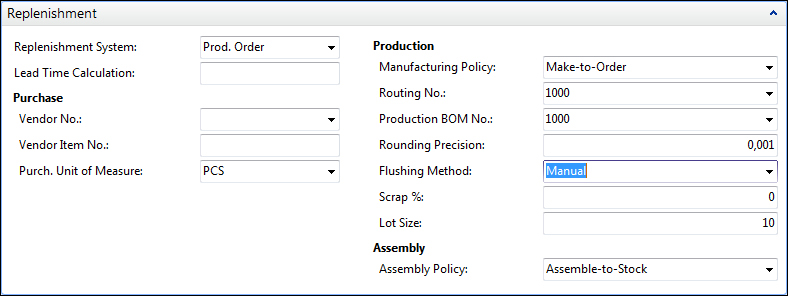
The product design starts on the item card. You need to create one item card for each end item that you want to produce, and also one item card for each component that you need to consume to obtain the end product.
For each component you have to specify whether you purchase it, assemble it, or produce it. You also need to specify if you need the component to stock or if you just need it when an order is made. You can specify all of this information on the Replenishment tab of the item card as shown in the following screenshot:
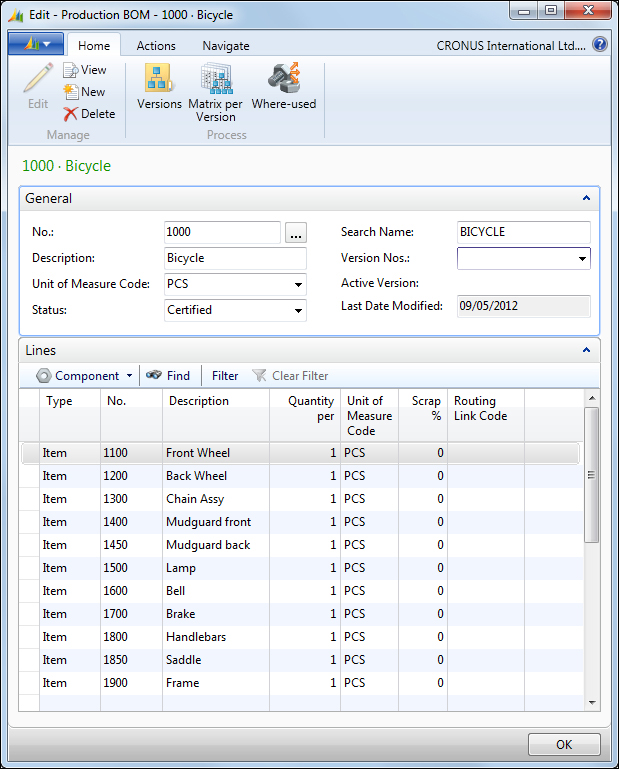
For items that need to be produced, you have to create a BOM . It is a listing of all the sub assemblies, intermediates, parts, and raw materials that go into a parent item and the quantities needed of each component.
Production BOMs may consist of several levels. You can use up to 50 levels. One production BOM always corresponds to one level. You have the possibility to copy the existing BOMs for creating a new BOM.
The following screenshot shows the production BOM for item no. 1000, Bicycle.
You also need to define routings to show the production process. The routings form the basis for production planning and control. Routings include detailed information about the method of manufacturing of a particular item. It includes the operations to be performed and sequenced. You can also include information about tools, resources, and personnel and quality measures.
Routing is the basis for process scheduling, capacity scheduling, material need scheduling, and the production documents.
The program also supports the production of parts families, that is, the same or similar item can be manufactured with a single routing. A production family is a group of individual items whose relationship is based on the similarity of their manufacturing processes. Forming production families can optimize material consumption.
The program distinguishes between three types of capacities:
Work centers
Machine centers
Resources
These are arranged hierarchically and each level contains subordinate levels. You can assign various machine centers to every work center. A machine center may only belong to one work center.
Planned capacity of a work center consists of the availability of the corresponding machine centers and the additional planned availability of the work center.
The planned availability of the work center group is thus the sum of all corresponding availabilities of the machine centers and work centers. The availability is stored in calendar entries. To work with capacities you need to create several calendars:
Shop calendar: This calendar defines a standard work week according to the start and end time of each working day and the work-ship relation. It also defines fixed holidays during a year.
Work center calendar: This calendar specifies the working days and hours, shifts, holidays, and absences that determine the work center's gross available capacity, measured in time, according to its defined efficiency and capacity values.
Machine center's availability: In this calendar you can define the time periods when machine centers cannot be used. The machine centers are not assigned their own shop calendar; the shop calendar of the work center is used. The calendar for the machine center is calculated from the entries of the assigned shop calendar and the calendar absence entries of the machine center.
Resource Capacities: Resources, such as technicians, have their own capacity. You can use work-hour templates that contain the typical working hours in your company; for example, you can create templates for full-time technicians and part-time technicians. You can use work-hour templates when you add capacity to resources.
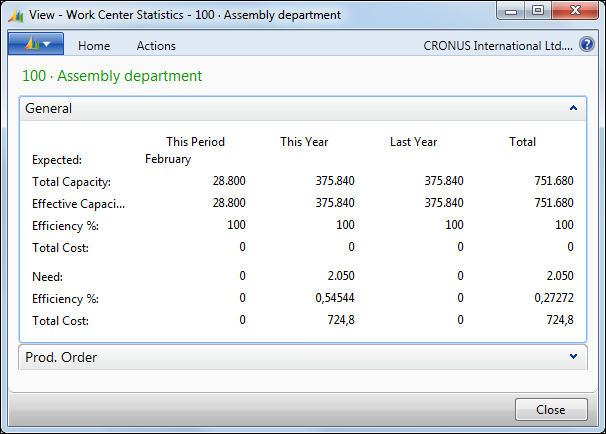
The following screenshot shows the statistics of one Work Center. It shows the total capacity calculated from all the calendar entries that were set up.
The planning system takes all demand and supply data into account, nets the results, and creates suggestions for balancing the supply to meet the demand. Another goal of the planning system is to ensure that the inventory does not grow unnecessarily.
The terms running the planning worksheet, or running MRP, refer to the calculation of the master production schedule and material requirements based on the actual and forecasted demand. The planning system can calculate either Master Planning Schedule (MPS) or Material Requirements Planning (MRP) on request, or it can calculate both at the same time.
MPS: It is the calculation of a master production schedule based on the actual demand and the production forecast. The MPS calculation is used for end items that have a forecast or a sales order line. These items are called MPS items and are identified dynamically when the calculation starts.
MRP: It is the calculation of material requirements based on the actual demand for components and the production forecast on the component level. MRP is calculated only for items that are not MPS items. The purpose of MRP is to provide time-phased formal plans, by item, to supply the appropriate item, at the appropriate time, in the appropriate location, and in the appropriate quantity.
Several planning parameters have to be filled in the item, or the stock-keeping unit and the manufacturing setup, in order to tell the system how you want to plan your supply. The planning parameters control when, how much, and how to replenish based on all the settings. Some of the planning parameters are: dampener period and quantity, quantity reorder policy and reorder point, maximum inventory, and manufacturing policy or combined MPS/MRP calculation.
Planning is affected by many additional factors, such as the planning horizon defined by the order and the ending dates specified when you run MPS/MRP from the Planning Worksheet or Order Planning page.
The forecasting functionality is used to create anticipated demand; it allows your company to create what-if scenarios to plan for and meet the demand. Accurate forecasting can make a critical difference in the custom levels with regard promised order dates and on-time delivery. The following screenshot shows the Production Forecast page:
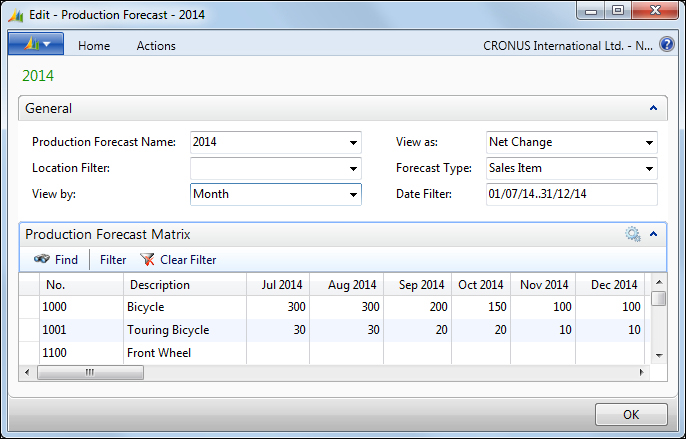
The sales forecast is the sales department's best guess at what will be sold in the future, and the production forecast is the production planner's projection of how many end items and derived sub-assemblies to produce in specific periods, to meet the forecasted sales.
When materials have been issued, the actual production operations can start and then be executed in the sequence defined by the production order routing.
An important part of executing production is to post the production output to report progress and to update inventory with the finished items. Output posting can be done manually, or it can be done automatically with the use of backward flushing. In that case, material consumption is automatically posted along with output when the production order changes to finished.
You also have to post the scrapped materials and consumed capacities that are not assigned to a production order, such as maintenance work. You can use the output journal and the capacity journal respectively, to perform those operations.
Finally, you need to put-away the output of the production. You will perform your put-away task according to how your warehouse is set up as a location. The inbound warehouse request will inform the warehouse that the production order is ready for put-away.
In basic warehousing where your warehouse location requires put-away processing, but not receive processing, you use the inventory put-away document to organize and record the put-away of output. In advanced warehousing where your location requires both put-away and receive processing, you create either an internal put-away document or a movement document to put away the output.
Many manufacturing companies select a valuation base of standard cost. This also applies to companies that perform light manufacturing, such as assembly and kitting. A standard cost system determines inventory unit cost based on some reasonable historical or expected cost. Studies of the past and estimated future cost data can then provide the basis for standard costs. These costs are frozen until a decision is made to change them. The actual cost to produce a product may differ from the estimated standard costs.
Standard costs of the manufactured item can consist of direct material cost, labor cost, subcontractor cost, and overhead cost. A batch job can be run to create suggestions to change item costs as well as standard cost on work center, machine center, or resource cards. After revising the suggested changes, another batch job will help you implement them.
When a vendor performs one or more operational steps in production, subcontracting is a standard operational step in many manufacturing companies. Subcontracting can be a rare occurrence or can be an integral part of all production processes. Dynamics NAV provides several tools for managing subcontract work:
Subcontract work center: This is a work center with an assigned vendor (subcontractor). The subcontract work center can be used on a routing operation, which allows you to process the subcontracted activity. In addition, the cost of the operation can be designated at the routing or the work center level.
Work center cost based on units or time: This feature enables you to specify whether costs associated with the work center are based on the production time or a flat charge per unit. Although subcontractors commonly use a flat charge per unit to charge for their services, the program can handle both options, production time and flat charge per unit.
Subcontracting worksheet: This feature allows you to find the production orders with material ready to send to a subcontractor, and to automatically create purchase orders for subcontract operations from the production order routings. Then the program automatically posts the purchase order charges to the production order during the posting of the purchase order. Only production orders with a released status can be accessed and used from a subcontracting worksheet.
The Jobs area supports common project management tasks, such as configuring a job and scheduling a resource, as well as providing the information needed to manage budgets and monitor progress. The jobs feature is meant to manage long-term projects that involve the use of man hours, machine hours, inventory items, and other types of usage that you need to keep track of.
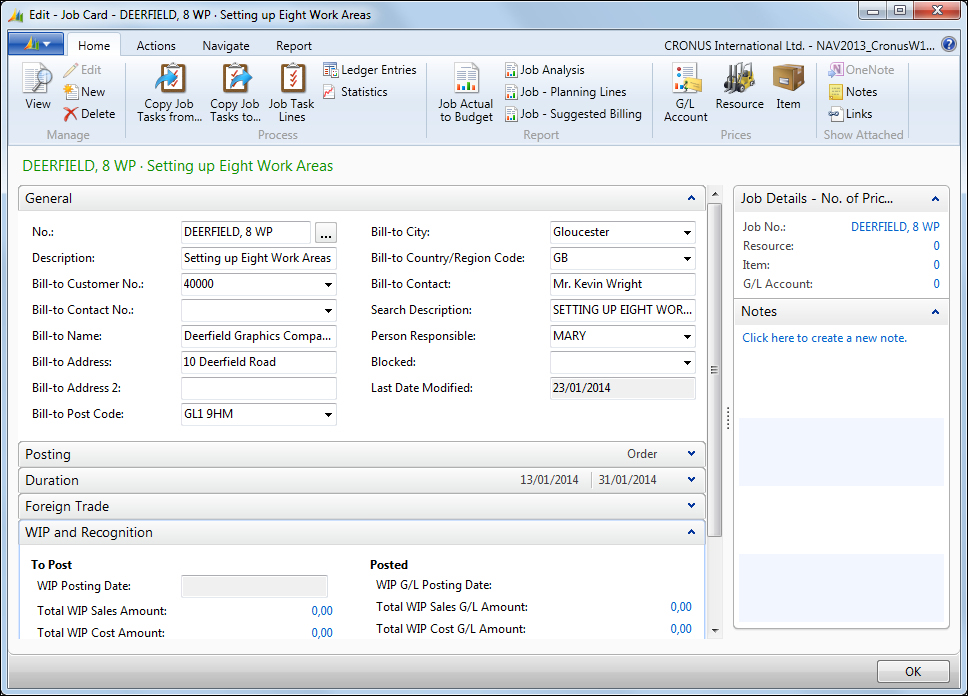
The Job card shows information about the job, such as the job number, job name, and information about job posting. There is one card for each job. The following screenshot shows a Job Card page:
A key part of setting up a new job is to specify the various tasks involved in the job. Every job must have a minimum of one task. You create tasks by adding Job Task Lines, as shown in the following screenshot:
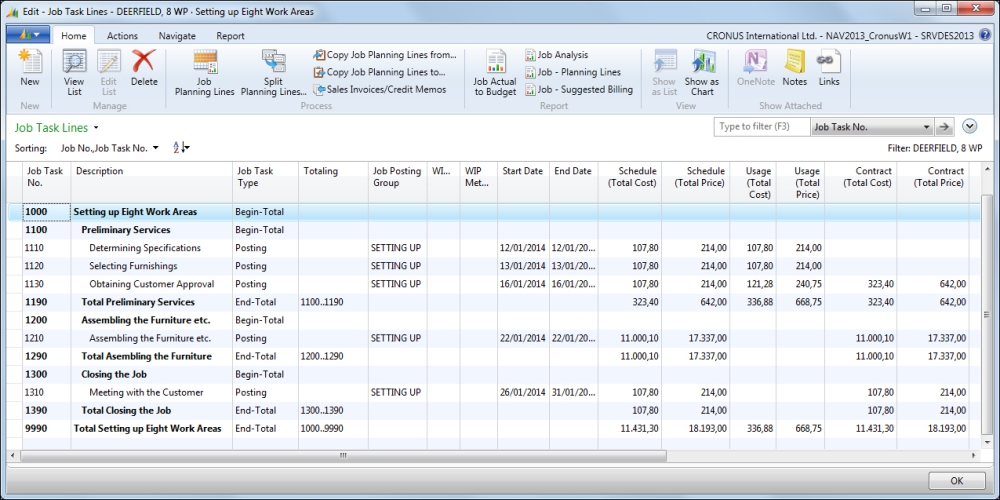
You have additional tools that help you copy task lines from one job task to another. You can copy from a job task in the job you are working with, or from a job task linked to a different job.
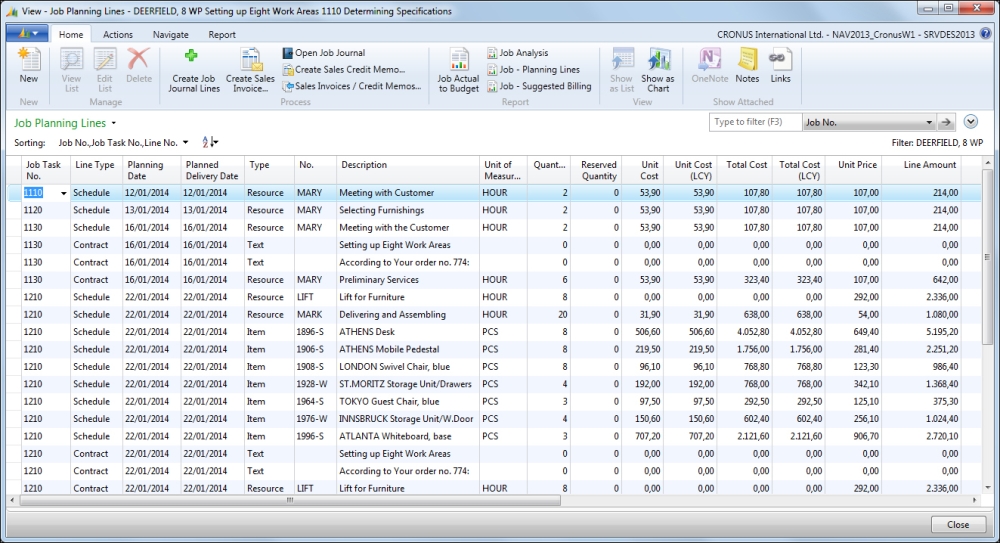
You can define each task that you have created for a job into planning lines. A planning line can be used to capture any information that you want to track for a job. You can use planning lines to add information such as which resources are required, or to capture which items are needed to fulfill the job.
For example, you may create a task to obtain customer approval. You can associate that task with planning lines for items such as meeting with the customer and creating a services contract.
For each planning line you must define a line type, which can be schedule, contract, or both, explained as follows:
Schedule: This line type provides estimated usage and costs for the job, typically in a time and materials type contract. Planning lines of this type cannot be invoiced.
Contract: This line type provides estimated invoicing to the customer, typically in a fixed price contract.
Both schedule and contract: This line type provides scheduled usage equal to what you want to invoice.
In addition, you can specify an account type and fill in information such as quantity. As you add information, cost information is automatically filled in; for example, when you enter a new line, the cost, price, and discount for resources and items are initially based on the information that is defined on the resource and item cards.
You can track machine and employee hours on the project by using time sheets. Using the jobs functionality will provide a good overview, not only of individual jobs, but also of the allocation of employees, machinery, and other resources being used in all projects. You can also use this functionality for many types of services and consultancy tasks.
Time sheets in Microsoft Dynamics NAV handle time registration in weekly increments of seven days. You use them to track the time used on job, service orders, and assembly orders. In addition, you can use them to record simple resource time registration and employee absences. Time sheets can be set up so an approval is required before you can post them to the relevant job journal.
During the job's development, job costs such as resource usage, materials, and job-related purchases can accumulate. As the job progresses, these transactions get posted to the job journal. It is important that all costs get recorded in the job journal before you invoice the customer.
You can invoice the whole job or only invoice the selected contract lines. Invoicing can be done after the job is finished or at certain intervals during the job's progress, based on an invoicing schedule.
If a job runs over a long period, you may want to transfer these costs to a Work In Process (WIP) account on the balance sheet while the job is being completed. You can then recognize the costs and sales in your income statement accounts when it is appropriate.
Dynamics NAV 2013 allows you to calculate the value of the WIP of your jobs. The calculation is based on the WIP method selected on individual jobs.
The WIP process creates WIP entries in connection with the jobs. This function only calculates WIP; it does not post it to the general ledger. To do so, another batch job must be run, the job posts WIP to G/L. There are several WIP methods that you can use on your jobs:
Cost value: It starts by calculating the value of what has been provided by taking a proportion of the estimated total costs, based on the percentage of completion. Invoiced costs are subtracted by taking a proportion of the estimated total costs, based on the invoiced percentage.
Cost of sales: It begins by calculating the recognized costs. Costs are recognized proportionally based on scheduled total costs.
Sales value: It recognizes revenue proportionally based on the usage total costs and the expected cost recovery ratio.
Percentage of completion: It recognizes revenue proportionally based on the percentage of completion, that is, the usage total costs against schedule costs.
Completed contract: Completed contract does not recognize revenue and costs until the job is complete. You may want to do this when there is high uncertainty about the estimates of costs and revenue for the job.
The system also allows you to create your own job WIP method that reflects the needs of your organization.
Many companies use resource management to track the time and effort that is involved with performing and providing services, for example, an employee may visit a site to talk with a customer about a project. That time and effort can be charged to the customer on a sales order.
Resource planning is integrated with jobs, services, and assembly orders. When resources are used or sold in a job, for example, the prices and costs associated with them are retrieved from the information set up in the resource planning area.
But before you can start selling services and jobs, or assigning resources to assembly projects, you must set up information about policy and pricing, which can be used in resource transactions. All pricing information is adjustable.
The resource card is used to specify resources, which can be employees, machinery, or other company resources. For most companies, an optimal assignment of resources is an important part of the planning and production process. The following screenshot shows the Resource Card page:
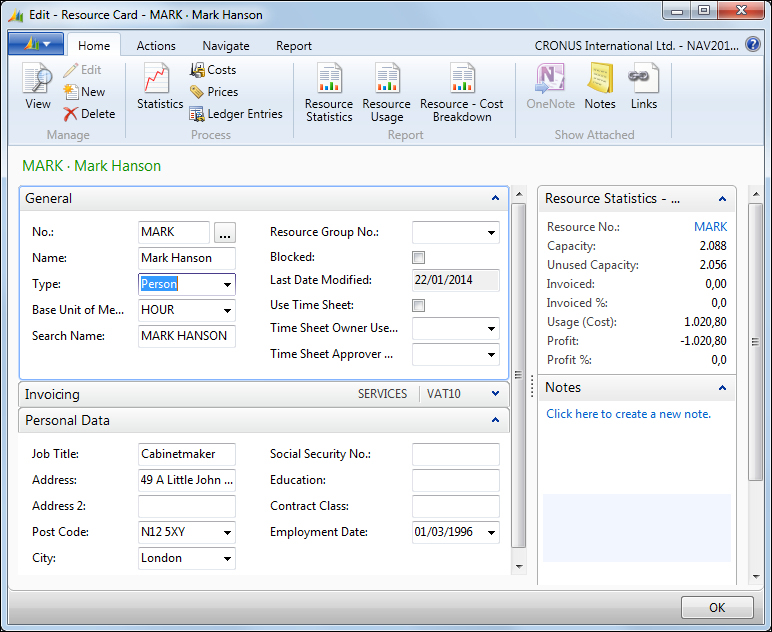
You can base production and project planning on the availability and capacity of resources. Resources can also be included in bills of materials, job planning, and job costing. Resources can be integrated with the general ledger. Resources can also be posted by using the documents in sales and receivables. Global dimensions can be used with resources.
You can invoice customers for sales that are composed of various resources. Resource costs can be calculated. You can use general ledger integration to post costs and revenues that are related to the sale of resources.
You can set up alternative costs for resources, for example, if you pay an employee a higher hourly rate for overtime, you can set up a resource cost for the overtime rate. The alternative cost that you set up for the resource will override the cost on the resource card when you use the resource in the resource journal.
You can specify the default amount per hour when the resource is created. For example, if you use a specific machine on a job for 5 hours, the job would be calculated based on the amount per hour.
To correctly manage resource activities, you must set up your resources and the related costs and prices. The job-related prices, discounts, and cost factor rules are set up on the job card. You can specify the costs and prices for individual resources, resource groups, or all available resources of the company. For services, you can adjust pricing in the Service Item worksheet.
A few batch jobs allow you to get resource price suggestions based on standard prices or based on alternative prices. You can then implement the price changes.
Providing ongoing service to customers is an important part of any business and that can be a source of customer satisfaction and loyalty, in addition to revenue. Managing and tracking service is not always easy, but Microsoft Dynamics NAV provide set of tools to help. These tools are designed to support repair shop and field service operations and can be used in business scenarios such as complex customer service distribution systems, industrial service environments with bills of materials, and high volume dispatching of service technicians with requirements for spare parts management. With these tools you can accomplish the following tasks:
Schedule service calls and set up service orders
Track repair parts and supplies
Assign service personnel based on skill and availability
Provide service estimates and service invoices
In addition, you can standardize coding, set up contracts, implement a discounting policy, and create route maps for service employees.
In general, there are two aspects to service management: configuring and setting up your system, and using it for pricing, contracts, orders, service personnel dispatch, and job scheduler. The following screenshot shows the main page of the Service area:
A service item is an item that has been sold to a customer and has been registered for service. A service item has a unique identification number and can be linked to an item. You can assign warranty to service items and specify the response time for their service. Service items can consist of many components.
Service items can be created automatically when you ship sold items, or you can create them manually. The following screenshot shows the Service Item Card page:
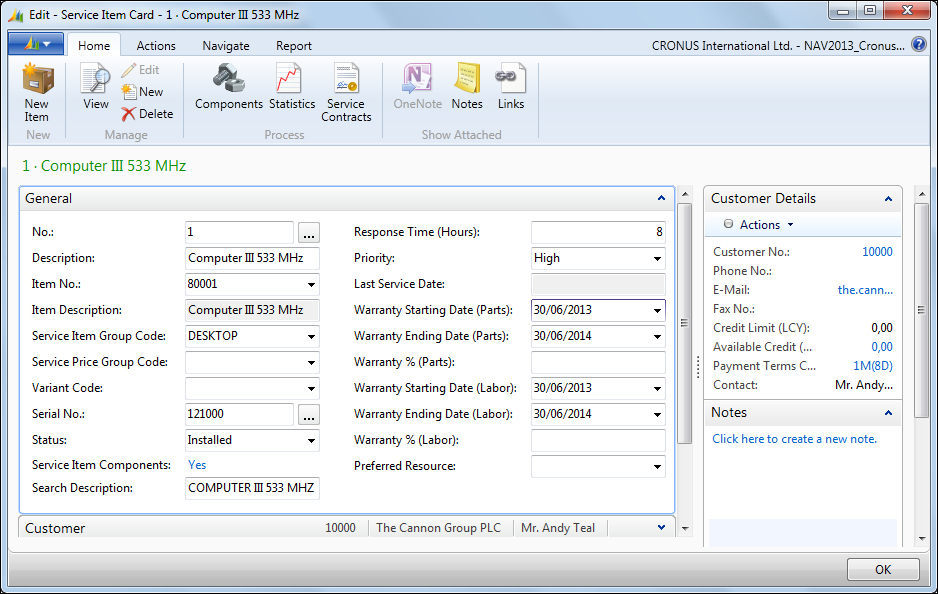
When you have set up service items, you can register them in service orders and service contracts.
Servicing some service items may require specific skills. If this is the case, you can assign skill codes to the items that these service items are linked to, or directly to these service items. This way, when a service is scheduled for the item, you will be able to assign the proper resource to do the job.
Sometimes, you cannot repair a service item, but you can choose to replace it instead. Dynamics NAV offers you the chance to replace it either temporarily or permanently.
One way to set up a service management business is to have standard contractual agreements between you and your customers that describe the level of service and the service expectations. You can set up contract templates, which you can then use to create standardized contracts for your business. In addition, you can set up a system to create quotes for service and to turn those quotes into contracts.
After you have set up the template, you can customize the resulting contract to keep track of service hours, or other items that may vary from customer to customer.
Contracts specify the general information, which includes information about the serviced customer, the starting date of the contract, the service period, the response time, the bill-to customer, the invoice period, the annual amount, the prepaid and income accounts, price update specifications, and so on. A contract can include more than one service item.
You can also set up a system to keep track of contract status, and view how gain and loss information about your contracts is being posted.
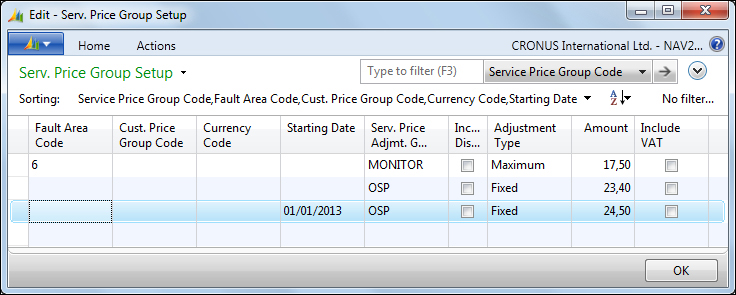
This feature allows you to apply the best price to service orders and set up personalized service price agreements for customers. You can set up different service price groups, so you can consider the service item or service item group, in addition to the type of fault that the service task involves. You can set up these groups for a limited period of time, or for a specific customer or currency. You can use price calculation structures as templates to assign a specific price to a specific service task.
For instance, this makes it possible to assign specific items included in the service price, in addition to the type of work included. This also makes it possible to use different VAT and discount amounts for different service price groups. To make sure that the correct prices are applied, you can assign fixed, minimum, or maximum prices, depending on the agreements that you have with your customers.
Before adjusting the price of a service item on a service order, you are provided with an overview of what the results of the price adjustment will be. You can approve these results, or you can make additional changes if you want to have a different result. The whole adjustment is performed line-by-line, which means that there are no additional lines created.
The service price adjustment groups are also used to set up the different types of price adjustments. For example, you can set up a service price adjustment group that adjusts prices for spare parts, one that adjust prices for labor, one that adjusts prices for costs, and so on. You can also specify whether the service price adjustment should be applied to just one specific item or resource, or to all items or resources.
Each service price adjustment group holds the information about the adjustments that you want to make on the service lines, as you can see in the following screenshot:
The service price adjustment function does not apply to service items that belong to service contracts. You can only adjust the service prices of items that are part of a service order. You cannot adjust the price of a service item if it has a warranty. You cannot adjust the price of a service item on a service order if the service line linked to it has been posted as an invoice, either completely or in part.
Service orders are the documents in the Dynamics NAV Service Management application area in which you can enter information about services (repair and maintenance) on service items. Service orders are created in the following instances:
When a customer requests a service.
Automatically by the program at the time intervals defined in service contracts.
When you convert a service quote to a service order. A service quote can be used as a preliminary draft for a service order.
Service orders and service quotes are composed of the following instances:
Service header: It contains general information about the service, such as the customer, the contract related to the order, the service order status, or the start and finish dates
Service item lines: They contain information related to the service item such as the service item number, its description, the serial number, or the response time
Service lines: They contain information about the service costs, such as spare parts (items) used on the order, resource hours, G/L accounts payments, and general costs
You can lend customers loaner items to temporarily replace the service items that you have received for servicing.
After you have created a service order or service quote, registered service item lines, and allocated resources to the service items in the order or quote, you can start repairing and maintaining the service items.
The service task page can give you an overview of the service items that need servicing. You can update the information on the service items for each task, such as the repair status, or enter service lines for that service item.
When the customer brings in a service item for repair, you can assign a fault code to indicate the nature of the fault. The fault code can be used with the resolution code to determine the possible repair method to use. In the following screenshot you can see an example of Fault Codes and Resolution Codes:
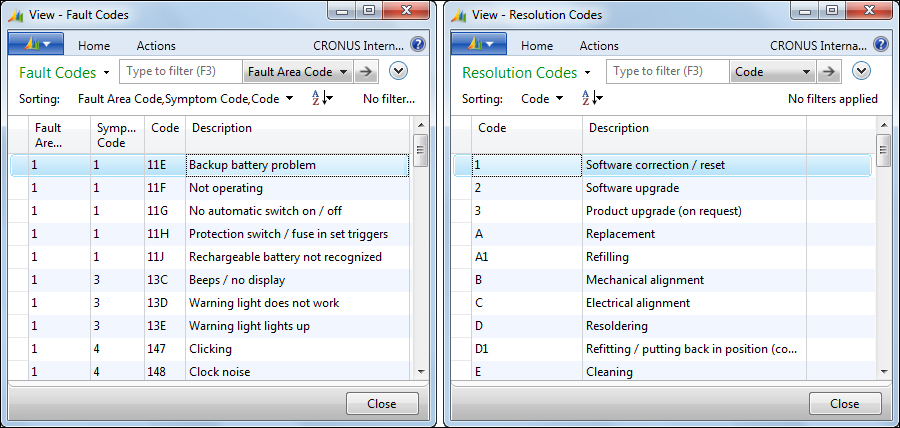
Depending on the level of fault reporting in a company, you might also need to register fault area codes symptom codes.
The human resources feature lets you keep detailed records of your employees. You can register and maintain employee information, such as employment contracts, confidential information, qualifications, and employee contacts. You can also use the human resources feature to register employee absence.
To use the human resources feature, you need to create employee cards. From the employee card, you can enter basic information about the employee. The following screenshot shows the Employee Card page:
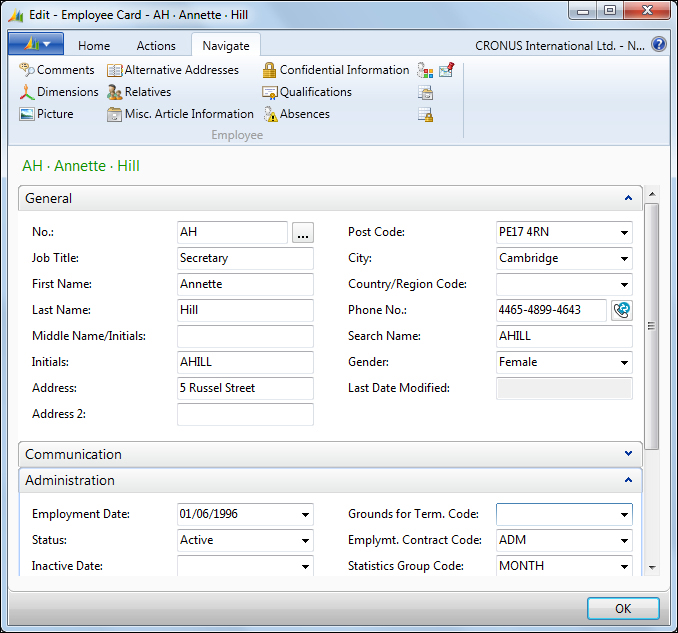
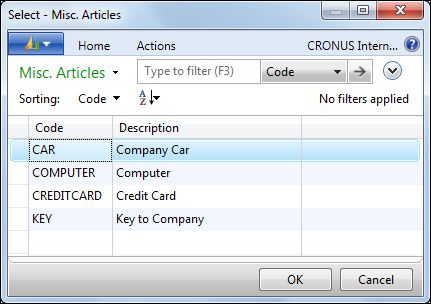
Linked to the employee card, you can set up alternative addresses, relatives, qualifications, and miscellaneous information where you can keep track of any information you want, for example, if the employee uses a company car. In the following screenshot you can see an example of miscellaneous articles. You can create as many miscellaneous articles as you need and link them to the employees.
The human resources application area is linked to the resources application area. So when you update certain basic information about the employee (such as name, address, social security number, employment date, and so on) in the Employee table, the program automatically updates the resource card for the employee.
You can register employee absences and assign different causes of absences. You can then see the information in various ways throughout the program and analyze employee absences. For example, you can compare your company's rate of absenteeism to national or industry-related averages for absenteeism.
A sudden increase in an employee's absences may reflect personal problems on the employee's part. With the Employee Absence table, you can take notice of these problems at an early.
Dynamics NAV comes with some country/region local functionalities to address specific needs. Most of these local functionalities are related to tax registering and tax reporting, or are legal requirements for the country.
You will find a complete list of local functionalities on this website: http://msdn.microsoft.com/en-us/library/hh922908(v=nav.70).aspx
As we said earlier in this chapter, a good thing about Dynamics NAV is that it can be customized. A brand new functional area can be created from scratch or new features can be added to an existing area.
Many people and companies have developed new functional areas or have expanded the existing ones, and they have registered their solution as an add-on. This means that the standard functionality of Dynamics NAV is much more extended than the functional areas we have covered in this chapter.
Actually, you can find almost 2,000 registered add-on or third-party solutions that cover all kinds of functional areas.
If a customer asks you for a huge modification of their Dynamics NAV, the best solution will probably be to look for an existing add-on that already covers your customer's needs. Implementing this solution usually consists of configuration and some limited custom development. On the other hand, if you choose to develop it all from scratch, you might get a lengthy high-cost and high-risk project.
In the past, Dynamics NAV had a single client access. But technology has changed, evolved, and so has Dynamics NAV. The release of Dynamics NAV 2009 already brought two new ways of accessing the application: the RoleTailored client and Web Services. Dynamics NAV 2013 also brings new accessibility options: the Web client and the SharePoint client. It has also removed an accessibility option, the Classic client, although it has been maintained and converted for development purposes.
In this section we will explain the different environments in which you can access your Microsoft Dynamics NAV 2013 application.
The Windows client is also known as the RoleTailored client, or the RTC client. That was its name when the client was first released on Dynamics NAV 2009. But Dynamics NAV 2013 introduces a new client, the Web client, which is also a RoleTailored client. So, we cannot call it the RoleTailored client anymore.
The Windows client is based around the individuals within an organization, their roles, and the tasks they perform. When users first enter Dynamics NAV, they see the data needed for the daily tasks they do according to their role. Users belonging to different roles will have a different view of the system, each of them seeing only those functions they need to be able to perform their daily tasks.
For those of you who haven't used Dynamics NAV 2009 yet, but had the chance to work with Microsoft Dynamics NAV 4.0 or 5.0, you might remember how difficult it was sometimes to locate a specific feature in the jungle of the navigation pane. Switching back and forth between the specific menus in search of a menu item was a frustrating experience, especially for users performing tasks in several functional areas of the application. Unless you used shortcuts, accessing any feature required three of four clicks, provided you knew exactly where it was. The system also didn't do much to help users focus on what was needed to be done, and after you found the feature you needed, you typically had to spend extra time searching for documents or tasks that needed your attention. With the RoleTailored client, the feature jungle was gone.
The Windows client allows users to widely customize the data they see on each page. They have the ability to personalize the pages according to their requirements by hiding, moving, and configuring parts contained on pages, and also by saving queries, adding filters, and adding or removing fields. The ribbon can also be customized, you can add, remove, and rename actions, menus, and tabs.
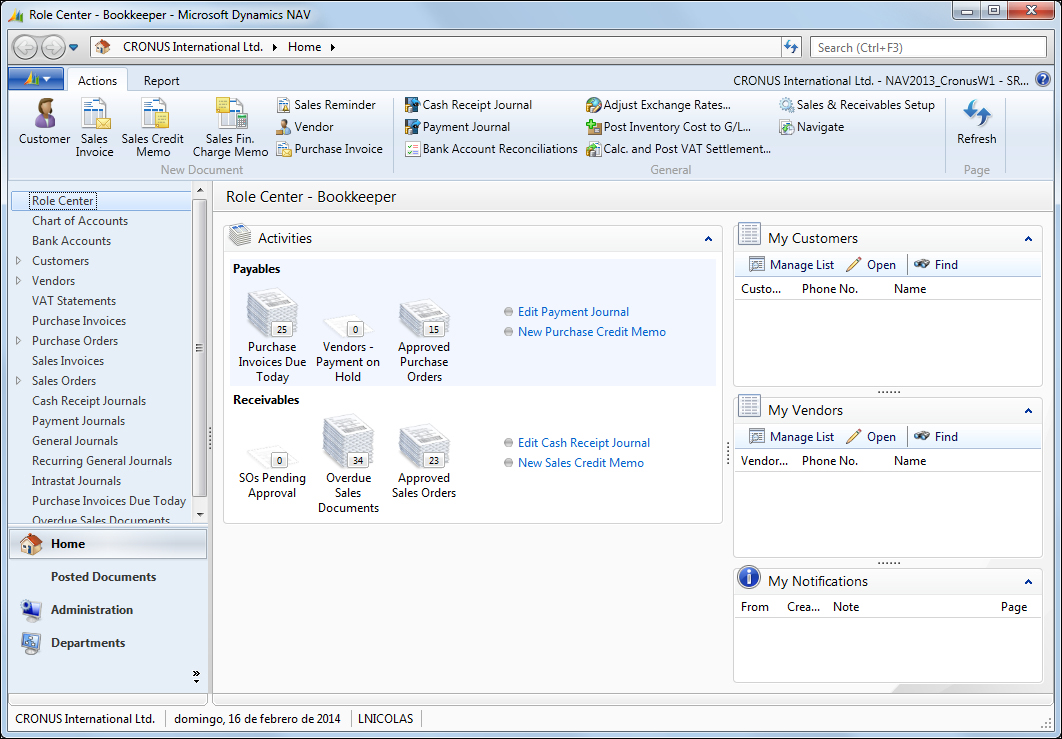
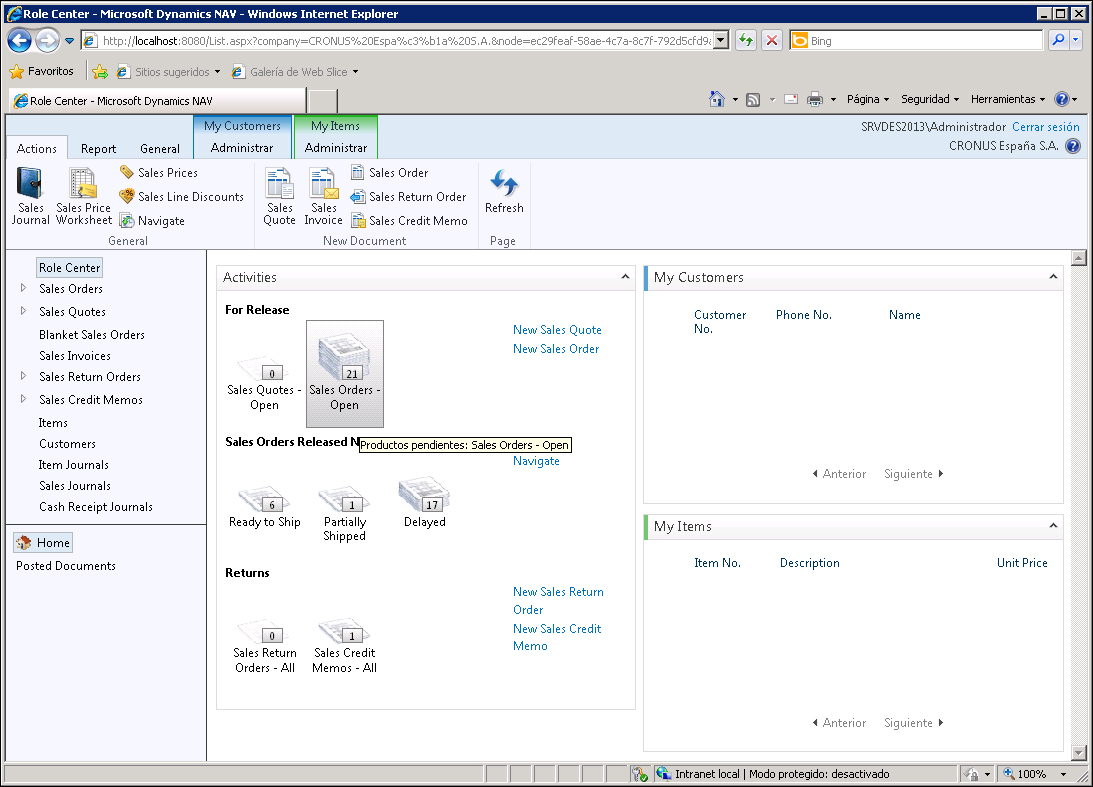
The following screenshot shows how the Role Center of the Windows client looks like. The Role Center is the main page of the client, and it is the first page a user sees when entering Dynamics NAV.
The Windows client supports three methods for authenticating users who try to access the Dynamics NAV Web client:
Windows: This credential type authenticates users using their Windows credentials (Active Directory, local workgroup, or the local computer's users). Because they are authenticated through Windows, Windows users are not prompted for credentials when they start the Windows client.
Username: This setting prompts the user for username/password credentials when starting the client. These credentials are then validated against Windows authentication by the Microsoft Dynamics NAV Server.
NavUserPassword: This setting manages the authentication by Microsoft Dynamics NAV Server but is not based on Windows users or Active Directory. The user is prompted for username/password credentials when they start the client. The credentials are then validated by an external mechanism.
The Microsoft Dynamics NAV Web client gives users access to Microsoft Dynamics NAV data over a network, such a the Internet. From a web browser, users can view and modify data from a user-friendly interface that resembles the Windows client, where the starting point is the Role Center. The Role Center can be customized to the user's individual needs based on their role, company, and daily tasks. The Web client does not replace the Windows client but complements it by enabling scenarios that are not possible with the Windows client. The following screenshot shows how the Role Center of the Web client looks like:
The Microsoft Dynamics NAV Web client supports most of the features that the Microsoft Dynamics NAV Windows client supports, but there are some exceptions and limitations:
Chart parts are not supported
The Departments button does not appear in the navigation pane of Role Center in the Web client
The search feature is only partially supported
Users cannot perform configuration and personalization tasks on the Web client
Navigate page types are not shown on the Windows client
This is to name just a few limitations. There are some other limitations that will need to be taken into account while choosing to use the Web client.
The Web client supports four methods for authenticating users who try to access the Dynamics NAV Web client:
Windows: This credential type authenticates the users to use their Windows credentials (Active Directory, local workgroup, or the local computer users). Because they are authenticated through Windows, Windows users are not prompted for credentials when they start the RoleTailored client.
Username: This setting prompts the user for username/password credentials while starting the client. These credentials are then validated against Windows authentication by Microsoft Dynamics NAV Server.
NavUserPassword: This setting manages the authentication by Microsoft Dynamics NAV Server but is not based on Windows users or Active Directory. The user is prompted for username/password credentials when they start the client. The credentials are then validated by an external mechanism.
AccessControlService: This setting makes Microsoft Dynamics NAV rely on Windows Azure Access Control Service (ACS) for user authentication services. ACS is a cloud-based service that provides user authentication and authorization for web applications and services. ACS integrates with standards-based identity providers, including enterprise directories such as Active Directory, and web identities such as Windows Live ID, Google, Yahoo!, and Facebook.
As the Web client is a new feature released with Dynamics NAV 2013, it will be covered in more detail in Chapter 2, What's New in NAV 2013.
Microsoft Dynamics NAV SharePoint client enables you to interact with Dynamics NAV data from a Microsoft SharePoint website. The Microsoft Dynamics NAV SharePoint client is built on the Microsoft Dynamics NAV Portal Framework for Microsoft SharePoint 2010, which is a web-based application framework that integrates Microsoft Dynamics NAV with the Microsoft SharePoint applications. By integrating with SharePoint, the Microsoft Dynamics NAV SharePoint client can use the business and administration features in Microsoft SharePoint, including workflows, business connectivity services, workspaces, SharePoint authentication, and scalability.
With Microsoft Dynamics NAV Portal Framework for Microsoft SharePoint 2010, you can also do the following:
Display Microsoft Dynamics NAV pages and reports on SharePoint sites using an URL
Add a page by using a Microsoft Dynamics NAV web part and connect the web part to other web parts on a SharePoint page
Edit data on pages in web applications and update the changes in the Microsoft Dynamics NAV 2013 database by using the same metadata and business logic that is rendered in the Microsoft Dynamics NAV Windows client
Working with Microsoft Dynamics NAV pages and reports in the SharePoint client is very similar to working with the pages and reports in Microsoft Dynamics NAV Windows client or Microsoft Dynamics NAV Web client. The Microsoft Dynamics NAV SharePoint client is designed for occasional users who typically need an overview of their daily work status and perform relatively simple or light data entry.
As the Web client, some features are not supported or are partially supported on the SharePoint client. The SharePoint client will be covered in more detail in Chapter 2, What's New in NAV 2013.
Microsoft Dynamics NAV 2013 provides Web Services, which makes it easy for other systems to integrate with Microsoft Dynamics NAV. Web Services allow you to expose the business logic of Dynamics NAV to the other environments.
Web Services are a lightweight, industry-standard way to make an application functionality available to a wide range of external systems and users. Microsoft Dynamics NAV 2013 supports creation and publishing of Microsoft Dynamics NAV functionality as Web Services. You can expose pages, codeunits, or queries as Web Services and even enhance a page Web service with an extension codeunit. When you publish Microsoft Dynamics NAV objects as Web Services, they are immediately available on the network.
Developers can publish two types of Web Services from Microsoft Dynamics NAV objects:
SOAP Web Services: You can publish either Microsoft Dynamics NAV pages or codeunits as SOAP services.
OData Web Services: You can publish either pages or queries as OData services. The OData protocol offers new and flexible opportunities for interacting with Microsoft Dynamics NAV data. For example, you can use OData Web Services to publish a refreshable link to Microsoft Dynamics NAV data that can be displayed in Microsoft Excel with Power Pivot or in SharePoint.
Three different objects can be exposed as Web Services:
Page Web Services: When you expose a page as an OData Web service, you can query that data to return a service metadata (EDMX) document or an AtomPub document. When you expose a page as a SOAP Web Service, you expose a default set of operations that you can use to manage common operations such as create, read, update, and delete. For SOAP services, you can also use extension codeunits to extend the default set of operations that are available on a page.
Codeunit Web Services: Currently available only for SOAP Web Services, codeunit Web Services provide you with maximum control and flexibility. When a codeunit is exposed as a web service, all functions defined in the codeunit are exposed as operations.
Query Web Services: When you expose a Microsoft Dynamics NAV query as an OData Web Service, you can query that data to return a service metadata (EDMX) document or an AtomPub document.
OData Web Services are a new addition to Microsoft Dynamics NAV 2013 and they will be covered in detail in Chapter 2, What's New in NAV 2013.
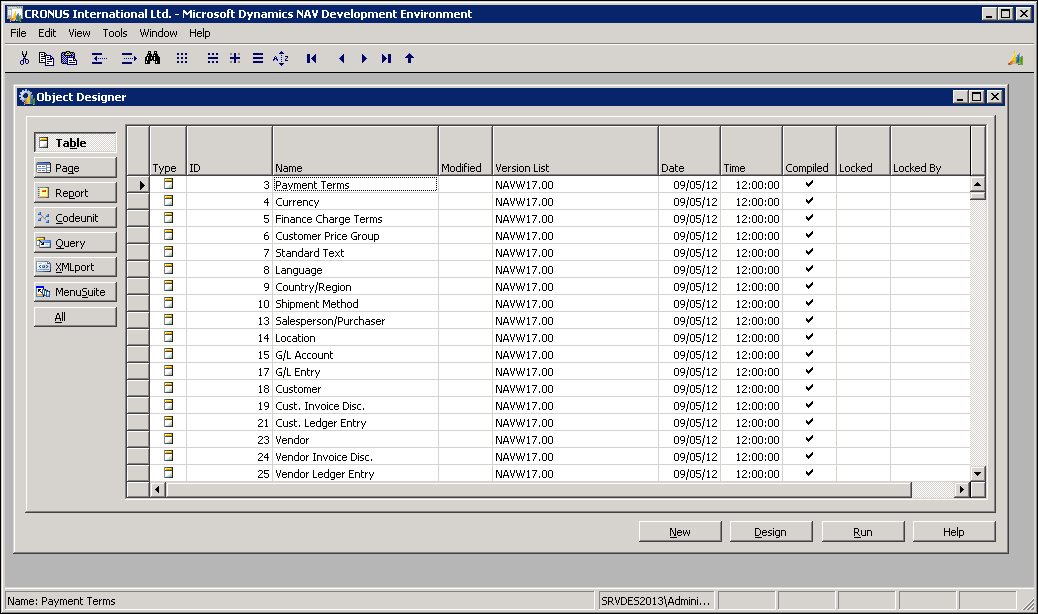
You use the Microsoft Dynamics NAV Development Environment to develop Microsoft Dynamics NAV applications. This component, which was also an end user client in the earlier versions of Microsoft Dynamics NAV, was formerly known as the Classic client.
When you open the development environment, the Object Designer opens, which gives you access to Microsoft Dynamics NAV objects. You use the Object Designer to modify the application or to create new application areas.
You can also use the development environment to create and manage Microsoft Dynamics NAV 2013 databases, to create and manage Microsoft Dynamics NAV companies, and to upload or change Microsoft Dynamics NAV licenses.
The following screenshot displays how the Development Environment looks like:
In this chapter we have seen that Dynamics NAV is an ERP system targeted at small and medium-sized companies.
Dynamics NAV is focused on roles and their daily tasks, and offers solutions in different functional areas, including financial management, sales and marketing, purchase, warehouse, manufacturing, job, resource planning, service, human resources, and add-ons created by partners. We have described each functional area so that you know what can be expected.
Dynamics NAV can be used on different environments such as the Windows client, the Web client, the SharePoint client, or an external application that connects to Dynamics NAV via the Web Services. The development environment is used to develop new features on top of Dynamics NAV.
In the next chapter we will cover the new features released with Microsoft Dynamics NAV 2013 in detail.