Installing and Configuring Active Directory
From Windows Server 2000, Active Directory Domain Services (AD DS) has become the default identity provider for Windows operating systems. AD DS represents a central point for authentication and management of all AD DS objects, such as users, groups, and computer accounts. The AD DS database, a central store in AD DS, stores information related to users, groups, computers, services, and all other resources in the AD DS hierarchical structure, and is also known as the directory. AD DS gives us the ability to search objects through the hierarchically organized directory structure and to apply configuration and security settings to all active directory objects.
In this chapter, you will learn why we need AD DS, the components of AD DS, how AD DS is installed and configured, and how to create and manage AD DS objects.
We will learn about the following topics in this chapter:
- Introduction to Active Directory
- Installing and configuring Active Directory
- Active Directory users and computers
- Active Directory groups and organizational units
Introduction to Active Directory
Every AD DS is composed of both logical and physical components. All components work together and each component has a specific role in the proper functioning of AD DS. In this section, you'll learn what those components are and why they're important. We'll also look at which tools can be used to manage AD DS and what's new in AD DS in Windows Server 2016.
A knowledge of logical components is important for the proper implementation of appropriate AD DS design for an organization.
The following table shows the logical and physical components of AD DS:
| Logical components | Physical components |
|
|
Logical components
Logical components in AD DS are structures that are used to implement AD DS design. Different designs are appropriate for different organizations, so knowledge of logical components and their purpose is very important. In the following section, we'll describe the logical components in more detail.
Partitions
A partition is a portion of the AD DS database. Although the AD DS database stores all the data in one file, C:\Windows\NTDS\ntds.dit, the AD DS database is composed of a few different partitions and each partition contains different data. The AD DS database is logically separated into the following directory partitions:
- Schema partition: There is only one schema partition per forest. The schema partition is stored on all domain controllers in the forest and contains definitions of all objects and attributes of objects.
- Configuration partition: The configuration partition contains information about the forest-wide AD DS structure, as well as information about the domains and sites in a forest and the domain controllers that are installed in a forest.
- Domain partition: Domain partitions are stored on every domain controller in a domain and contain information about users, groups, computers, and organizational units. All objects from the domain partition are stored in the global catalog.
- Application partition: Every application in AD DS needs to store, categorize, and use specific information. This information is stored in the Application partition that can be domain- or forest-wide, depending on the application type.
Partitions are replicated through directory replication and are stored on every domain controller in the domain and forest.
Schemas
A schema defines all object classes and attributes that AD DS uses to store data. Each AD DS object has a lot of attributes that need to be populated, such as the name, sAMAccountname, the canonical name, and the location. All of these are controlled by the schema. All domains in a single forest contain a copy of the schema that applies to the forest level. Each change in the schema is replicated from the schema master to every domain controller in the forest. The schema master is typically the first domain controller installed in a forest. An AD DS schema can be changed or modified, but only when necessary. The schema is responsible for information-storage controls, and every untested schema change can potentially affect other applications in the forest that use AD DS. Any schema changes must be performed by the Schema Admins and from the schema master.
Schema changes are one-way. You can't delete anything from a schema, you can only extend or modify schema attributes or classes.
In most cases, a schema needs to be updated for specific applications. For example, if you want to install Microsoft Exchange Server 2016, you must apply the Exchange Server 2016 Active Directory schema changes. This will be done during the installation of the Exchange Server and will be performed without user interaction.
Domains
The domain is a logical component that acts as a central administrative point for AD DS objects, such as users, groups, and computers. Domains use a specific portion of the AD DS database and can be connected to other domains in a parent-child structure or a tree structure. The AD DS database stores all domain objects, and each domain controller holds a copy of the AD DS database.
AD DS uses a multi-master replication model. This means that every domain controller in the domain can make a change to the objects in the domain and that change will be replicated in all other domain controllers.
The AD DS domain provides authentication and authorization for domain-joined users. Every time the domain user wants to sign in to a domain-joined computer, AD DS must authenticate the login. Windows operating systems use authorization and access-control technologies to allow authenticated users to access resources.
Every domain in a forest has some objects that are unique to that domain:
- Domain Admins group: By default, every domain has an administrator account and a Domain Admins group. The administrator account is a member of the Domain Admins groups, and the Domain Admins groups is, also by default, a member of the local Administrators group on each domain-joined computer.
- RID master role: The Relative Identifier (RID) master role is a domain-specific role that's responsible for assigning a unique SID to the new AD DS object. If the RID master server isn't online, you might have issues adding new objects to the domain.
- Infrastructure master role: This FSMO role is responsible for inter-domain object references, when objects from one domain are part of a group in another domain. If servers with this role are unavailable, domain controllers that aren't configured as a global catalog servers won't be able to authenticate users.
- PDC emulator role: The Primary Domain Controller (PDC) emulator FSMO role is responsible for time synchronization. The PDC master is the time source for a domain and all PDC masters in the forest synchronize their time with the PDC in the forest root domain. The PDC master is a domain controller that receives information if the user changes their password and replicates that information to other domain controllers. The PDC emulator also plays a big role in editing the GPO, because a PDC holds an editing copy. This prevents potential issues if multiple administrators want to edit the same GPO at the same time.
Domain controllers don't have local users and groups, so local Administrator groups don't exist on domain controllers.
Domain trees
A domain tree is a hierarchical collection of domains in the same forest that share the same root domain name. In the domain tree structure, AD DS domains are organized as parent-child domains.
Forests
A forest is a collection of one or more domain trees that share the AD DS root domain and schema. The first configured domain in the forest is called the root domain. A forest can either contain only one domain or it can be composed of hundreds of domains in different domain trees. The root forest domain contains a few objects that only exist in the forest root domain:
- Schema master role: This special, forest-wide FSMO role can only exist once in a forest. As mentioned earlier, a schema can only be changed from the domain controller that holds this role.
- Domain-naming master role: This is another special, forest-wide FSMO role that can only exist once in a forest. The domain-naming master role is responsible for adding new domains, so if the domain controller that holds this role isn't online, new domains can't be added to the forest.
- Enterprise Admins group: By default, the Enterprise Admins group has the Administrator account for the forest root domain as a member. The Enterprise Admins group is the most powerful group in the forest, because it's a member of the local Administrators group in every domain in the forest. Members of the Enterprise Admins group have full administrative control in every domain in the forest.
- Schema Admins group: By default, the Schema Admins group has no members. Only members of the Enterprise Admins group or the Domain Admins group (in the forest root domain) can add members to the Schema Admins group. Only members of the Schema Admins group can make changes to the schema.
Every forest has security and replication boundaries. Security boundaries, by default, are very strict. No one from outside the forest can access any resources inside it. If you need to provide access to one forest from another forest, you need to configure forest trust between them. Unlike the forest security boundaries, all the domains in a forest automatically trust the other domains in the forest. With this default configuration, access to resources, such as file shares and websites, is simple for all the users in a forest, regardless of the domain they belong to.
From a replication-boundaries perspective, only configuration and schema partitions from the AD DS database will be replicated to all domains in forest. Because of this, if you want to implement applications with incompatible schemas, you need to deploy additional forests. The global catalog is also part of replication boundaries. This makes it easy to search for AD DS objects from other domains in the forest.
Sites
The site is a logical representative of AD DS objects, such as computers and services, that are specific to a physical location. In a multisite environment, site implementation provides a better authentication process.
Organizational Units
An Organizational Unit (OU) is a logical object in AD DS for collecting users, groups, and computers. You can use OUs to consolidate users, computers, groups, and other objects for simplified management using GPOs linking, or to delegate administrative rights. You can also use OUs to represent a hierarchical and logical structure inside the organization domain. Although no specific rule exists for a logical OU structure, you can create OUs to represent departments in an organization, geographical regions, or anything else based on your organization needs.
If you want to organize the hierarchical and logical structure of your organization, it isn't recommended to add more than five levels of OUs nesting. Although there's no limit for the nesting of OUs, the Distinguished Names can become very long, which could cause problems for some applications.
Containers
A container is an object that provides an organizational framework for use in AD DS. Most containers are created by default. The biggest difference between a container and an OU is that containers don't have the ability to link to GPOs.
Physical components
The physical components are just as important as the logical components. These will be described in the following sections.
Domain controllers
The domain controller is the most important physical component of AD DS. Each domain controller contains a copy of the AD DS database and the SYSVOL folder. The domain controller uses multi-master replication to copy changed data from one domain controller to an other. As a replication mechanism, Windows Server 2016 can only use Distributed File Systems (DFS). The File Replication Service (FRS), which was used in earlier versions of Windows Server, was deprecated in Windows Server 2016.
Domain controllers host the Kerberos authentication service, which is used when a user or a computer account needs to sign in to the domain. The Key Distribution Center (KDC) issues the ticket-granting ticket (TGT) to the account that's signing in to the AD DS domain. Each domain controller can host a copy of the global catalog.
Read-only domain controllers
The read-only domain controller is a read-only installation of AD DS. By design, RODCs are ideal for branch offices that don't have appropriate physical security or dedicated IT support. By default, RODC doesn't cache any user passwords, but that's configurable.
Data stores
The data store is an AD DS database that's stored in C:\Windows\NTDS\ntds.dit. Each domain controller in the domain stores a copy of the AD DS database and all the related associated log files.
Global catalogs
The global catalog is a partial read-only copy of all objects in the forest. The purpose of the global catalog is to speed up searching for objects stored on different domains in the forest. Within a single domain, each query for objects is sent directly to the domain controllers in that domain, but if you want to include results from other domains in the forest, the query needs to be sent to the global catalog server. The global catalog server is the domain controller that hosts the global catalog, which, by default, is the first deployed domain controller in the forest root domain. The global catalog maintains the subset of attributes that are useful in cross-domain searches, such as givenName, displayName, and the mail.
It's highly recommended that the global catalog server and the infrastructure FSMO role are on separate servers. The infrastructure master communicates regularly with the global catalog server in order to keep cross-domain references up to date. When the infrastructure master detects that a cross-domain reference is out of date, it obtains the updated data from the global catalog server and replicates that to other DCs in its own domain. This process works well, but only in cases where the global catalog and the infrastructure master aren't on the same server.
You can find more information at https://support.microsoft.com/en-us/help/248047/phantoms-tombstones-and-the-infrastructure-master.
What's new in AD DS in Windows Server 2016
Like every new Windows Server version, Windows Server 2016 comes with several new features as part of AD DS:
- Privileged Access Management (PAM): This allows you to separate the permissions required for specific administrative tasks. With PAM implemented, the user needs to request permission to perform some specific tasks, instead of having permanent access or a membership with granted access. PAM is based on the Microsoft Identity Manager.
- Azure Active Directory Join (Azure AD Join): With Azure AD Join, you are now able to join on-premises devices to Azure AD and improve the management of cloud-only and hybrid environments. Azure AD Join allows you to join devices directly to the cloud, without having on-premise AD DS. For devices that are joined directly to the cloud, some MDM solutions need to be used for device management.
- Microsoft Passport: Microsoft Passport is one of the new AD DS features supported in Windows Server 2016. Microsoft Passport provides a certificate-based authentication against on-premise AD DS and Azure AD that can replace the use of passwords.
AD DS administration tools
AD DS management is one of the most common daily tasks for administrators. There are a few different options to manage AD DS environments. You can sign in to the domain controller directly, you can manage AD DS through RDS, you can use RSAT from your domain-joined computer, you can use Server Manager for Remote Management, or you can use PowerShell remoting.
If you decide to use the GUI, several tools and Microsoft Management Consoles (MMC) are included by default in Windows Server 2016:
- Active Directory Administrative Center: This GUI tool is natively Windows PowerShell-based. The improved functionalities of this management tool give you the ability to perform almost all known Active Directory tasks. The Active Directory Administrative Center can be installed on Windows Server 2008 R2 servers or later and Windows 7 or later operating systems. With Active Directory Administrative Center, you can perform the following actions:
- Create and manage users, computers, and groups
- Create and manage OUs
- Manage multiple domains within a single instance of the Active Directory Administrative Center
- Search and filter AD DS data
- Configure fine-grained password policies
- Recover objects from the Active Directory Recycle Bin
- Active Directory Users and Computers: An MMC snap-in that gives you the ability to manage most common tasks and resources, including users, groups, and computers.
- Active Directory Sites and Services: An MMC snap-in that manages replication, network topology, and other site-related services.
- Active Directory Domains and Trusts: An MMC snap-in that configures and maintains trust relationships between domains and forests.
- Active Directory Schema: An MMC snap-in that modifies the definitions of AD DS attributes and object classes.
- Active Directory module for Windows PowerShell: Supports AD DS administration. This is one of the most important management components.
By default, the Active Directory Schema snap-in isn't fully installed. In order to enable the Schema snap-in, you need to start Command Prompt as an Administrator and run the regsvr32 schmmgmt.dll command.
Installing and configuring the Active Directory
The process of configuring the Active Directory starts by installing the Active Directory Domain Services role on Windows Server 2016. Once you've done this, you'll have installed the AD DS role, but AD DS will not yet be configured on the server. During configuration, you need to answer a few questions in order to successfully deploy a new forest or an additional domain controller.
Installing a new forest and domain controller
Before, or during, the configuration of a new forest or an additional domain controller, you need to answer the following questions:
- Do you want to install a new forest, a new tree, or an additional domain controller?
- What is the FQDN of the domain?
- Which domain and forest functional level do you need?
- Do you want to install DNS on the domain controller?
- Does the domain controller host the global catalog?
- Do you want to install RODC?
- What will the Directory Service Restore Mode (DSRM) password be?
- What is the name of NetBIOS?
- Where will the AD DS database, logs, and SYSVOL be stored?
Once you have the answers to these questions, you can start by configuring new forests or additional domain controllers. The whole process can be done through a GUI wizard or PowerShell. Both approaches will be covered in this chapter.
Installing a new forest (GUI)
Configuring a new forest using the GUI wizard is a straightforward process. If you have the answers to all the questions listed previously, you just need to follow the wizard:
- Go to Deployment Configuration:
- Select Add a new forest.
- Enter a Root domain name.
- Go to Domain Controller Options:
- Select Forest and Domain functional level.
- Check Domain Name System (DNS) server.
- Type the DSRM password.
- Go to Additional Options and verify the NetBIOS name, or change it if you need to.
- Go to Paths and change the paths if necessary. Otherwise, you can skip this step and keep the default values.
- Go to Review Options. Once you have configured everything, you need to review the configuration and confirm it.
- Go to Prerequisites Check. If you pass all the prerequisite checks, you just need to click Install and wait for AD DS to install.
- After the installation of AD DS, the server will restart automatically.
Installing a new forest on a Server Core installation
If you want to install and configure AD DS on Server Core, you need to use PowerShell instead of the GUI wizard. The steps in the process are same, but the approach is different:
- To begin with, you need to install an AD DS role on the server using the following command:
Install-WindowsFeature AD-Domain-Services -IncludeAllSubFeature -IncludeManagementTools
In the Install-WindowsFeature cmdlet, the -IncludeAllSubFeatures and -IncludeManagementTolls switches are very important. In this case, without those switches, Group Policy Management and RSAT for AD DS and AD LDS won't be installed.
- Once you have successfully installed the Active Directory Domain Services role, you need to run the following commands:
Import-Module ADDSDeployment
Install-ADDSForest -DomainName "mcsacertguide.local" -CreateDnsDelegation:$false -ForestMode "WinThreshold" -DomainMode "WinThreshold" -DomainNetbiosName "MCSACERTGUIDE" -InstallDns:$true -DatabasePath "C:\Windows\NTDS" -LogPath "C:\Windows\NTDS" -SysvolPath "C:\Windows\SYSVOL" -NoRebootOnCompletion:$false -Force:$true
The WinThreshold parameter in the -DomainMode and -ForestMode PowerShell switches defines that the highest domain and forest functional level will be used.
The switch for the DSRM password isn't included in this command, but once you run it, you will be asked to enter and confirm the password.
Installing a domain controller from Install from Media (IFM)
Sometimes, the network connection between two sites can be slow or unreliable. Bad network connectivity can cause issues with user authentication and reduce productivity. In this case, the best solution is to deploy an additional domain controller to the secondary site. The domain controller on the site will improve the authentication process, but before you add an additional domain controller to the domain, you need to avoid bad network issues during the initial AD DS replication, because the complete AD DS database and SYSVOL folder need to be replicated to the additional domain controller. Using the Install from Media (IFM) option, you will significantly reduce the amount of network traffic during the initial replication. To install the domain controller by IFM, you basically need to create a backup of AD DS and save the data to a USB drive or shared location.
The process starts on a read-write domain controller. RODC isn't a candidate for IFM, because you can't perform AD DS backup on a read-only database. You need to use the ndtsutil command-line tools to create an AD DS backup, which will be used later to promote an additional domain controller:
Ntdsutil
Activate instance ntds
Ifm
create SYSVOL full C:\IFM
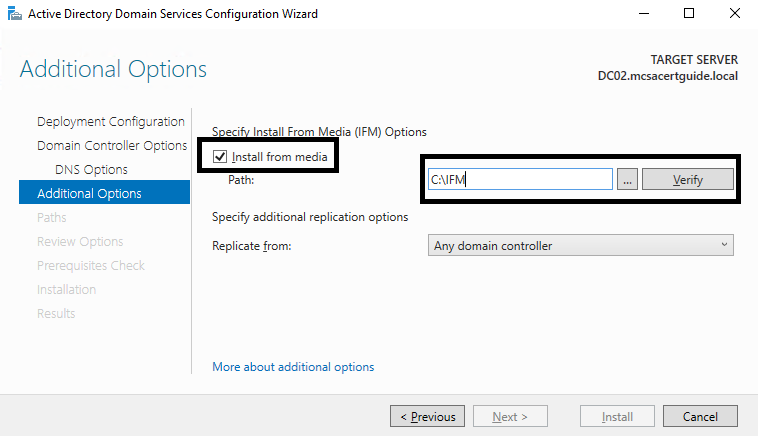
The whole process will last less than one minute, and then you can find all the necessary files in the provided folder. Once you have the AD DS backup on a local drive, you need to copy all the files to a new domain controller using a USB or external drive. The process of promoting a new domain controller using IFM is the same as the standard way, with only one difference. If you use the GUI wizard, on the Additional Setting tab, you just need to check the Install from Media checkbox and browse to the local folder where the AD DS backup files are stored.
The files will be verified automatically. If everything is fine with the AD DS backup, you will be able to go on to the next tab:
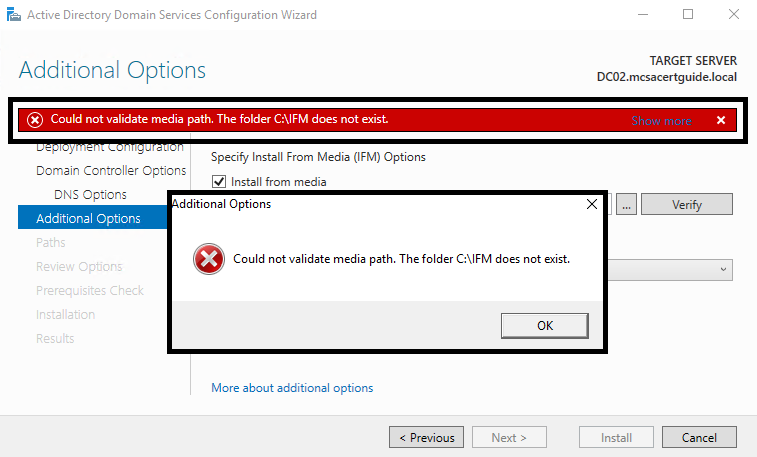
If the path isn't correct, you'll receive an error message:
If you use PowerShell to promote a new domain controller, you just need to add one more switch in the PowerShell command. You need to add a few more switches, so the command will look as follows:
Import-Module ADDSDeployment
Install-ADDSDomainController -DomainName "mcsacertguide.local" -CriticalReplicationOnly:$false -InstallationMediaPath "C:\IFM" -CreateDnsDelegation:$false -ForestMode "WinThreshold" -DomainMode "WinThreshold" -DomainNetbiosName "MCSACERTGUIDE" -InstallDns:$true -SiteName "Default-First-Site-Name" -DatabasePath "C:\Windows\NTDS" -LogPath "C:\Windows\NTDS" -SysvolPath "C:\Windows\SYSVOL" -NoRebootOnCompletion:$false -Force:$true
After initial replication using IFM, the new domain controller will replicate the other domain controllers using multi-master replication, the standard replication method.
Removing a domain controller from a domain
Adding a new domain controller was covered in the previous section. We now know how to deploy a new forest or an additional domain controller with the GUI wizard or with PowerShell commands. Sometimes, you need to remove the domain controller from the domain, a process that's logically different from adding a new domain controller.
The domain controller removal process consists of two steps: demoting the domain controller and removing an AD DS role from the server. Like other tasks, this can be done using either the GUI wizard or PowerShell commands.
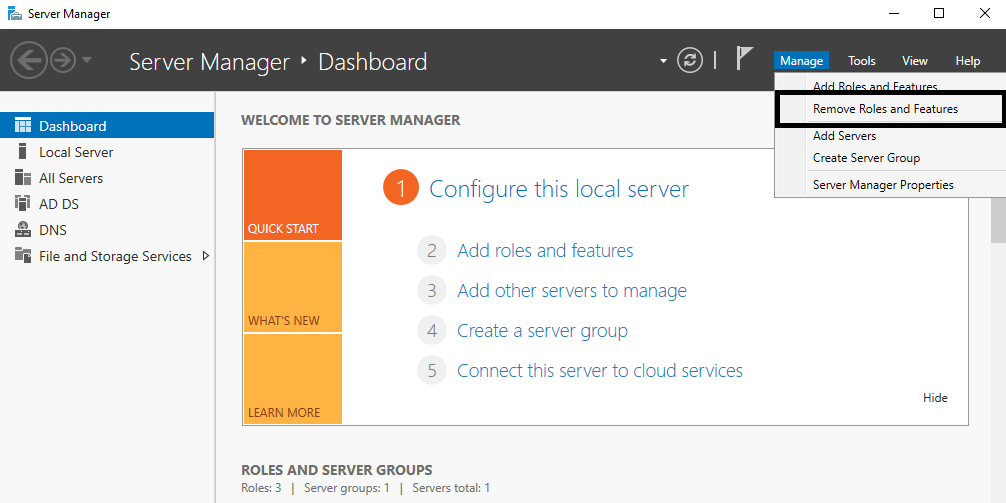
If you want to remove the domain controller using the GUI wizard, the removal process consists of several steps that need to be performed:
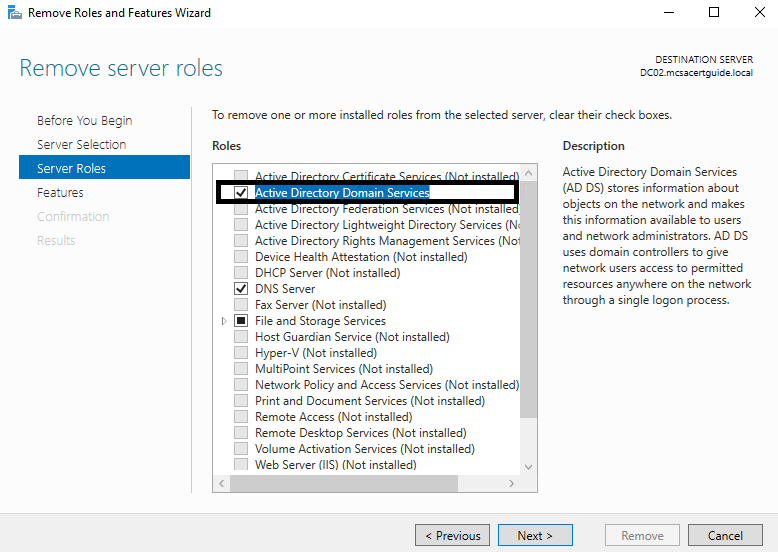
- The removal process starts with Remove Roles and Features using the Server Manager console:
- You need to select the Active Directory Domain Services role, as that role needs to be removed:
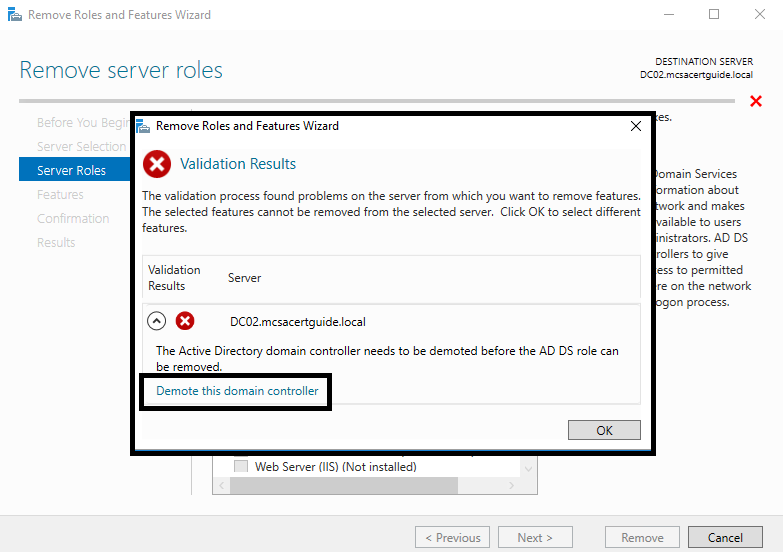
- Because the removal process is dependent on the demotion of the domain controller, the process will fail on validation. The wizard will give you the option to click on Demote this domain controller, as shown in the following screenshot. A new wizard for the demotion process will be opened automatically:
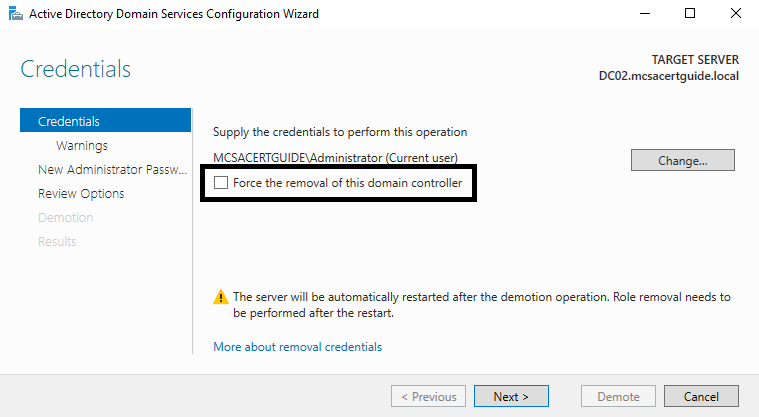
- If your domain controller is not the last in the domain, you don't need to check the Force the removal of this domain controller checkbox. If your domain controller is the last in the domain, or if it doesn't have any connectivity to other domain controllers, then you do need to check this checkbox:
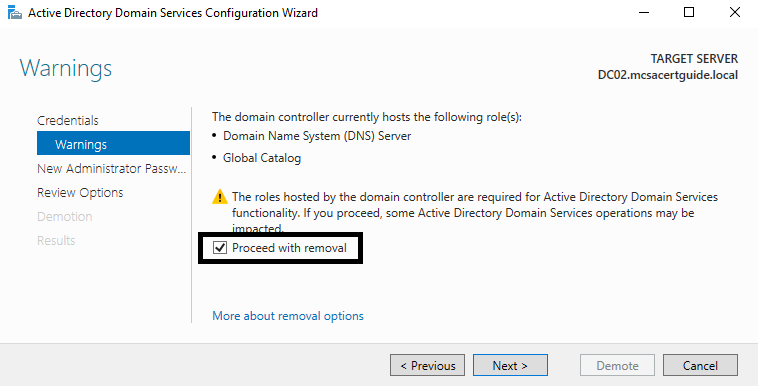
- Confirm that you want to proceed with the domain controller removal:
- Finally, you need to click on the Demote button to start the demotion process:
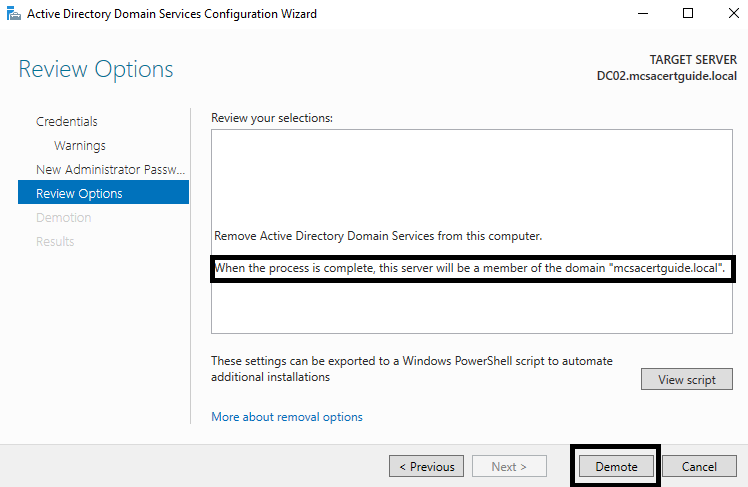
During the process, you'll be asked to enter your password twice. That is because the domain controller doesn't have local users or groups, and if you demote the domain controller from the server, the server will stay part of the domain as a member server. This means that the local users and groups will be active on the server again. The provided password is for the local Administrator account.
Once the domain controller is successfully demoted from the server, the server will restart. After the server is restarted, you need to start the AD DS removal process from the Server Manager in order to remove the AD DS role from the server.
If you decide to demote the domain controller and remove the AD DS role from the server using PowerShell, you need to start the process by demoting the domain controller. After that, you can remove the AD DS role from the server:
Import-Module ADDSDeployment
Uninstall-ADDSDomainController -DemoteOperationMasterRole:$true -Force:$true
You'll be asked to enter a new local administrator password twice. Once the PowerShell command successfully demotes the domain controller from the server, the server will restart. After the server is restarted, you need to run the following command to remove an AD DS role from the server:
Uninstall-WindowsFeature AD-Domain-Services -IncludeManagementTools -Restart
Upgrading a domain controller
Upgrading a domain controller is a process that's the same for all versions of Windows Server operating systems from Windows Server 2008. You can do this in one of two ways:
- Upgrade the operating system on existing domain controllers in place.
- Carry out a clean install and migrate to Windows Server 2016 as a new domain controller in the domain.
I personally prefer the second method, because when you finish, you will have a clean installation. The DNS records and AD DS database will be replicated on a new server.
In-place upgrade
If you want to upgrade an existing domain controller to Windows Server 2016, you need to perform an in-place upgrade. The source domain controller needs to be Windows Server 2008 or later. The in-place upgrade process doesn't perform an automatic schema and domain update; you need to run those command-line commands manually. The installation media includes the adprep.exe tool in \Support\Adprep. You need to run the following commands:
adprep.exe /forestprep
adprep.exe /domainprep
Once you have successfully performed the adprep commands, you can start by installing the upgraded operating system on a domain controller with the older OS version.
Domain-controller migration
If you decide to avoid potential in-place upgrade issues, but still want to upgrade your domain controllers to Windows Server 2016, you need to perform domain-controller migration. Although the word migration might make you nervous, domain-controller migration is actually a straightforward process. You just need to have Windows Server 2016 as a clean, installed operating system. Then, you can start the process of adding additional domain controllers in an existing domain, which is explained in one of the previous sections. During this process, DNS Zones, AD DS databases, and SYSVOL folders will be replicated on the new server.
Once you have at least two Windows Server 2016 domain controllers added to the existing domain, you can start the process of removing the old domain controllers. Before doing this, however, you need to do the following:
- Transfer all FSMO roles to new domain controllers.
- Change the IP addresses for the DNS servers to all domain computers.
Once you finish those tasks, you can start to remove the old domain controllers from the domain. When you remove the old domain controllers, you can upgrade the domain and the forest functional level to Windows Server 2016. After that, the domain and domain controllers are fully upgraded to the Windows Server 2016 version.
Configuring a global catalog server
As we've mentioned, the global catalog server is a domain controller that holds a global catalog. By default, the first domain controller in the forest root domain is the global catalog server. If you have a multi-domain environment that needs to be more scalable for cross-forest queries, you need to implement more than one global catalog server.
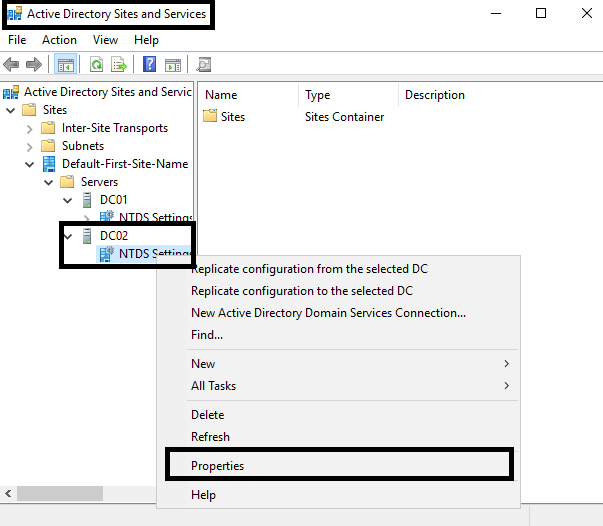
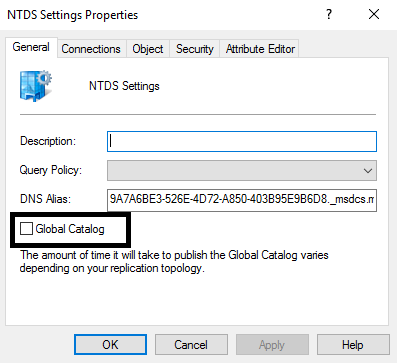
Configuring the global catalog on the domain controller can be done using the Active Directory Sites and Services MMC Snap-in or PowerShell commands. If you want to do this using a GUI, you just need to open the properties of domain controller and check the global catalog checkbox:
Once you open NTDS properties, you will be able to promote the server to a Global Catalog server and also remove the Global Catalog role from the server:
Using PowerShell, you need to run one of the following commands:
Set-ADObject -Identity (Get-ADDomainController DC02).ntdssettingsobjectdn -Replace @{options='1'}
Set-ADObject "CN=NTDS Settings,CN=DC02,CN=Servers,CN=Default-First-Site-Name,CN=Sites,CN=Configuration,DC=mcsacertguide,DC=local" -Replace @{options='1'}
Transferring and seizing operation master roles
Every forest and domain has FSMO roles that are important for a properly functioning AD DS environment. In some scenarios, such as a single domain infrastructure, the first domain controller in the forest root domain will hold all FSMO roles. Statistically, most organizations have this FSMO structure. Sometimes, however, you need to move one or more FSMO roles to another domain controller. This process can be planned, if we are demoting old domain controllers or workload balancing, or unplanned, due to a hardware failure of the domain controller that holds FSMO roles.
Transferring FSMO roles
Transferring an FSMO role is a planned action, in most cases, because we are demoting old domain controllers. When you transfer a role, the latest data will replicate to the target server. To transfer an FSMO role using the GUI, you need to use the following AD MMC Snap-ins:
| MMC Snap-in | FSMO role |
| Active Directory Users and Computers | PDC emulator, Infrastructure master, RID master |
| Active Directory Domain and Trust | Domain-naming master |
| Active Directory Schema | Schema master |
To transfer the PDC Emulator, Infrastructure master, and RID master FSMO roles, you need to use the Active Directory Users and Computers MMC Snap-in:
- Open MMC Snap-in.
- Select the domain and right-click on it.
- Select Operation Masters.
You will see three different tabs, one for each of these FSMO roles, and you can then perform a transfer.
To transfer the Domain-naming master FSMO role, you need to use the Active Directory Domain and Trust MMC Snap-in:
- Open MMC Snap-in.
- Select Active Directory Domains and Trusts and right-click on it.
- Select Operation Masters.
Then you will be able to perform the FSMO role transfer.
To transfer the Schema master FSMO role, you need to use a customized MMC Snap-in:
- If you haven't done so already, register the schema by running the regsvr32 schmmgmt.dll command.
- Open MMC Snap-in and open Active Directory Schema.
- Select the Active Directory Schema and right-click on it.
- Select Operation Masters.
Then you will be able to perform the FSMO role transfer.
Of course, the FSMO role transfer can also be done using PowerShell commands:
Move-ADDirectoryServerOperationMasterRole -Identity TargetDCName -OperationMasterRole FSMORoleName
As a parameter for the -OperationMasterRole switch in the PowerShell command, numbers can also be used instead of names. Here is a list of the roles and their corresponding numbers:
- PDCEmulator = 0
- RIDMaster = 1
- InfrastructureMaster = 2
- SchemaMaster = 3
- DomainNamingMaster = 4
Seizing FSMO roles
FSMO role-seizing is a last-resort action and is only used in scenarios in which the original domain controller isn't available, due to a hardware failure or accidental deletion. The available data on the other domain controllers might be incomplete or out of date. Unlike transferring, FSMO role-seizing can't be performed using Active Directory MMC Snap-ins. FSMO role-seizing can be completed only using PowerShell or the ntdsutil command-line tool.
The PowerShell command for FSMO role-seizing is the same as for transferring, but we need to include the -Force switch:
Move-ADDirectoryServerOperationMasterRole -Identity TargetDCName -OperationMasterRole FSMORoleName -Force
Installing and configuring a read-only domain controller (RODC)
As mentioned earlier, RODC is a read-only installation of AD DS. RODC installation can be performed in two different ways: a standard domain controller installation using the GUI wizard or PowerShell, or by creating a pre-staged computer account in AD DS for RODC. Both approaches will give you same result, but the pre-staged account configuration will force you to configure more settings related to RODC before promoting the server to RODC.
If you decide to go with the easier approach of using the GUI wizard, you just need to check the Read only domain controller (RODC) checkbox on the Domain Controller Options page:
- Go to Deployment Configuration and select Add a new domain to existing forest.
- Go to Domain Controller Options:
- Select the Forest and Domain functional level.
- Check Domain Name System (DNS) server.
- Check Read only domain controller (RODC).
- Type the DSRM password.
- Go to RODC Options:
- Define the RODC Administrator account (optional).
- Define which users or groups can replicate their passwords to RODC.
- Go to Additional Options and verify the NetBIOS name, or change it if you need to.
- Go to Paths and change the path if necessary. Otherwise, you can skip this step and keep the default values.
- Go to Review Options. Once you have configured everything, you need to review the configuration and confirm it.
- Go to Prerequisites Check. If you pass all prerequisite checks, you just need to click Install and wait for AD DS to install.
- After the installation of AD DS on the RODC, the server will restart automatically.
The PowerShell command that you will use to install RODC has a few more switches than the command that we used to install a standard domain controller:
Import-Module ADDSDeployment
Install-ADDSDomainController -DomainName "mcsacertguide.local" -InstallDns:$true -ReadOnlyReplica:$true -NoGlobalCatalog:$false -CriticalReplicationOnly:$false -AllowPasswordReplicationAccountName @("MCSACERTGUIDE\Allowed RODC Password Replication Group") -DenyPasswordReplicationAccountName @("BUILTIN\Administrators", "BUILTIN\Server Operators", "BUILTIN\Backup Operators", "BUILTIN\Account Operators", "MCSACERTGUIDE\Denied RODC Password Replication Group") -SiteName "Default-First-Site-Name" -DatabasePath "C:\Windows\NTDS" -LogPath "C:\Windows\NTDS" -SysvolPath "C:\Windows\SYSVOL" -NoRebootOnCompletion:$false -Force:$true
By default, RODC doesn't cache any passwords, for security reasons. In the RODC environment, you need to determine which passwords will be cached on RODC and which accounts need to be authenticated on a writable domain controller. By default, in the RODC environment, the system creates a domain-wide password-replication policy with two security groups:
- Allowed RODC Password Replication Group: Members of this group are allowed to cache passwords in RODC. By default, this group doesn't have any members.
- Denied RODC Password Replication Group: Members of this group aren't allowed to cache passwords in RODC. Some security-critical groups are members of this group by default, such as Administrators, Server Operators, Backup Operators, and Account Operators.
Configuring domain controller cloning
From Windows Server 2012, the fastest way to deploy a new domain controller is to clone computers. Prior to Windows Server 2012, only domain members could be cloned. Cloning copies the virtual drive of VMs and changes some configuration parameters, such as the IP address and the computer name. Cloning provides some benefits, such as rapidly provisioning computers with the same configuration and provisioning test environments.
Successful domain controller cloning requires the following:
- Hyper-V on Windows Server 2012 or later.
- Virtualized domain controllers that need to be Windows Server 2012 or later.
- A PDC emulator that runs on Windows Server 2012 or later. The PDC emulator must be online when the virtual domain controller clones start for the first time.
The domain-controller cloning process consist of several steps:
- Add the source domain controller to the Cloneable Domain Controllers group.
- Verify that the apps and services on the source domain support cloning and generate an XML file using the following PowerShell command:
Get-ADDCCloningExcludedApplicationList
Get-ADDCCloningExcludedApplicationList -GenerateXML
- Create the DCCloneConfig.xml file. When the cloning process recognizes it, a new domain controller will be created from the clone:
New-ADDCCloneConfigFile
- Shut down the source domain controller and export the virtual machine.
- Import a new virtual machine using the exported files.
- Name the new virtual machine and then copy the virtual machine (create a new unique ID).
- Start the cloned virtual machine.
Once you start the cloned domain controller, the clone checks whether the virtual machine identifier exists and reads the information stored in the previously created DCCloneConfig.xml file.
Active Directory users and computers
Although AD DS has a lot of object types, its users, groups, and computers are the most important. These accounts are directly related to users and their computers, and to the server infrastructure. In this section, we'll explain how you can create user and computer accounts. Group management will be covered in the next section of this chapter.
Creating and managing users accounts
Each user object in AD DS has more than a few attributes that can be configured. We can't cover all user object attributes here, but the most important attributes related to identity will be covered in this section.
All user accounts can be created using a few different GUI or command-line tools. For administrators who like to use GUI tools, there are two different MMC Snap-ins: Active Directory Administrative Center and Active Directory Users and Computers.
The Active Directory Administrative Center is important for this certification. It has a lot of improvements compared to Active Directory Users and Computers, and exam questions are focused on this MMC Snap-in.
For command-line-oriented administrators, the PowerShell and Dsadd command-line tools are valuable options.
To prepare for the exam, your focus needs to be on PowerShell, but some questions might be related to the Dsadd command-line tool. All examples in this section will present PowerShell commands.
Creating a user using GUI tools is a straightforward process, but it's different depending on which MMC Snap-in you decide to use. With Active Directory Users and Computers, creating a user requires only the most important attributes that need to be configured:
- First name
- Last name
- User login name
- Password
With this information in the user account, the user will be able to log in to the domain-joined machine. All other attributes, such as group membership, company name, and phone number, must be configured later if you use Active Directory Users and Computers. However, if you decide to use the Active Directory Administrative Center for user creation, the process will be a little bit different. You need to add all the attributes that were necessary when using Active Directory Users and Computers, but all other attributes can be added at the same time during the creation process.
The creation process using PowerShell can include several commands in a row. Depending on which switches are used in the PowerShell cmdlet, different attributes can be included. The following example shows you the command for user creation using PowerShell with the same parameters used in previous examples for GUI MMC Snap-ins:
New-ADUser -GivenName Vladimir -Surname Stefanovic -Name "Vladimir Stefanovic" -UserPrincipalName vladimir.stefanovic@mcsacertguide.local -SamAccountName vladimir.stefanovic –AccountPassword (Read-Host –AsSecureString "Enter password") -Enabled $true
Once a user account is created with PowerShell, it will not be enabled unless you include the -Enabled with parameter $true switch. If you forget to add that switch to the command, you can enable the account later using the PowerShell Enable-ADAccount cmdlet.
If, for any reason, you want to copy a user account, only Active Directory Users and Computers can offer this; the Active Directory Administrative Center doesn't have this option. With PowerShell, you can do this by creating scripts or creating a user from a template:
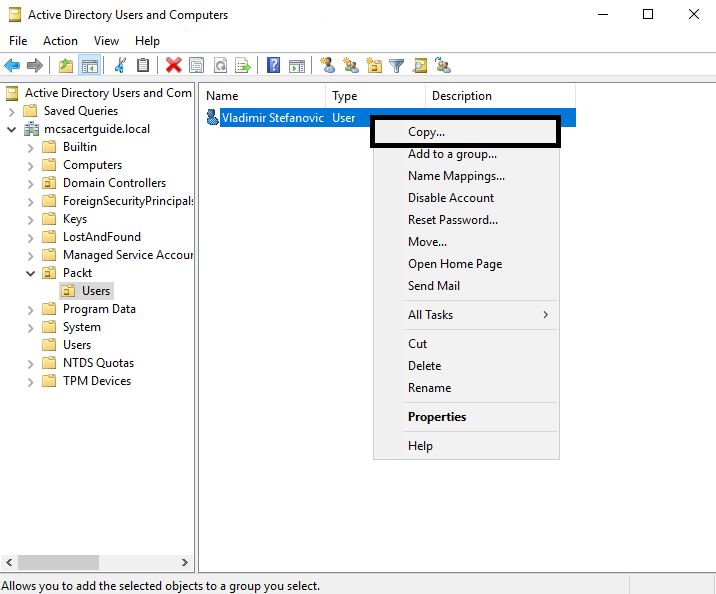
Only the most commonly used attributes are copied to the new user account:
- Group memberships
- Home directories
- Profile settings
- Logon scripts
- Logon hours
- Password settings
- Department name
- Manager
Once you create a user account, using any of the provided methods, the account will be fully operational and other users will be able to use them. If you want to change some of the attributes, which is one of the most common tasks for user accounts, this can also be done using the same MMC Snap-ins or PowerShell. If you want to use the GUI MMC Snap-in, you just need to go to the properties for the selected account and change the value of the specific attributes. The Set-ADUser PowerShell cmdlet needs to be used if you want to change the attributes, and you can add more than one switch in a PowerShell command:
Set-ADUser -Identity vladimir.stefanovic -Company "Packt" -Department "IT"
Deleting a user account can also be done using management tools, MMC Snap-ins, or PowerShell. In both MMC Snap-ins, you just need to right-click on the user account and select Delete. PowerShell for AD DS has the Remove-ADUser cmdlet. The following command will delete the user account without any additional questions:
Remove-ADUser -Identity vladimir.stefanovic -Confirm:$false
If you don't use -Confirm:$False, you'll be asked to confirm the deletion of the user account.
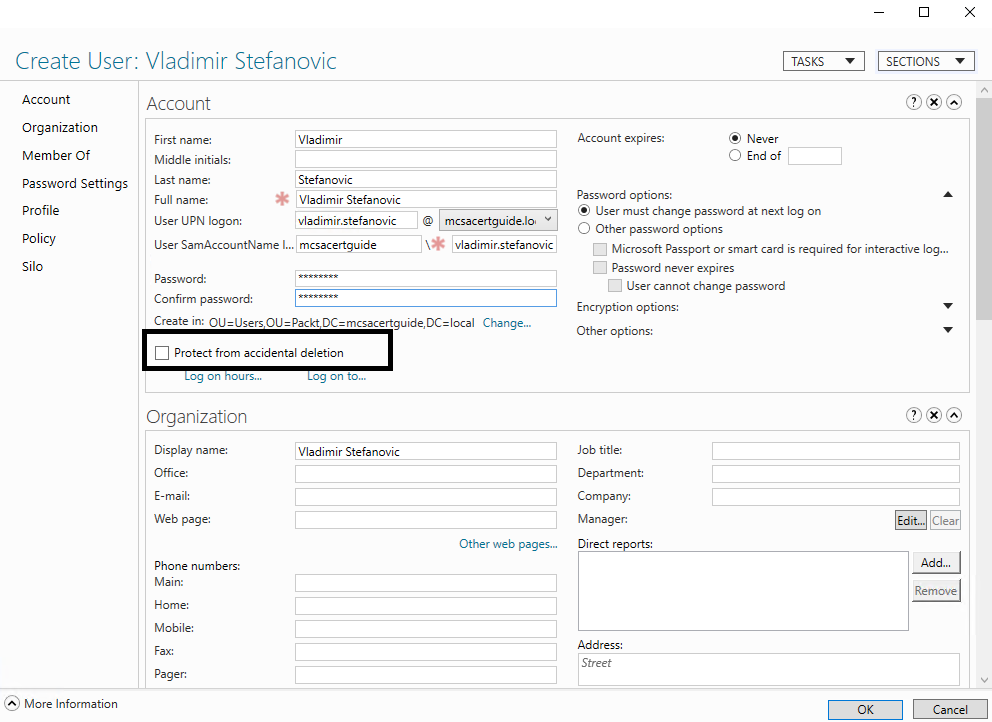
By default, the user account isn't protected from accidental deletion. That attribute is unchecked by design, and if you want to enable it, you need to make some changes to the user account. Protecting the user account from accidental deletion is very important, because once deleted account will prevent the user to log on to the system and access to corporate resources. The easiest way to do this using a GUI MMC Snap-in is to use the Active Directory Administrative Center. You just need to check the Protect from accidental deletion checkbox. Using this MMC Snap-in, you can configure this protection during the creation of your user account:
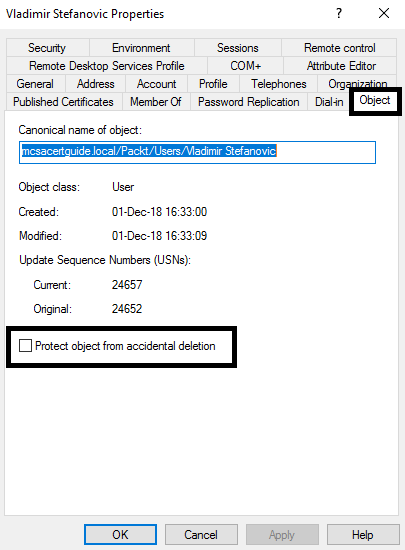
If you want to use the MMC Snap-in Active Directory Users and Computers, you need to edit the properties of the user account on the Object Tab, and check the Protect object from accidental deletion checkbox:
The PowerShell cmdlet for this task is Set-ADObject. This needs to be started once the user account is created:
Set-ADObject -Identity:"CN=Vladimir Stefanovic,OU=Users,OU=Packt,DC=mcsacertguide,DC=local"-ProtectedFromAccidentalDeletion:$true
In this cmdlet, the parameter for the -Identity switch is the object's Distinguished Name.
Creating and managing computer accounts
Computers, like users, are security principals in AD DS that have an account with a logon name and password. Unlike users, the password for computer accounts is managed by Windows Server and changes automatically on a periodic basis. Computer accounts also authenticate against the domain and belong to one or more groups in AD DS. The most common tasks for computer accounts are moving between OUs and configuring properties.
Although computer accounts are automatically created when joining a computer to a domain, the proper procedure for this task requires us to create a computer account manually in AD DS before joining the computer to the domain. The creation process is very similar to creating a user account, and like a user account, it can be done using either MMC Snap-ins or PowerShell. Using Active Directory Users and Computers, you just need to populate the Computer Name field, and all other attributes can be configured later. Using the Active Directory Administrative Center, you need to populate the Computer Name field, because that's mandatory, but you'll configure many other attributes as well. PowerShell lovers will use the following command to create a computer account:
New-ADComputer -Name Server03 -Path "OU=Computers,OU=Packt,DC=mcsacertguide,DC=local"
By default, all computer accounts that are created using the New-ADComputer PowerShell cmdlet and without the -Path switch will be stored in the Computers system container.
A computer account that's created while joining the computer to the domain will be stored in the Computers system container as well.
All management tasks on a computer account can be done using either MMC Snap-ins or PowerShell. If you want to use MMC Snap-ins, you just need to configure some properties of the computer account. If you want to make changes using PowerShell, however, you need to use the Set-ADComputer or Set-ADObject PowerShell cmdlets, depending on the attribute that needs to be changed. Like user accounts, computer accounts are not by default protected from accidental deletion. During the creation process, this can be done using the Active Directory Administrative Center MMC Snap-in by checking the Protect from accidental deletion checkbox. This parameter can also be changed using Active Directory Users and Computers or the Set-ADObject PowerShell cmdlet using the same command, as for a user account:
Set-ADObject -Identity "CN=Server03,OU=Computers,OU=Packt,DC=mcsacertguide,DC=local"-ProtectedFromAccidentalDeletion:$true
Configuring templates
As mentioned earlier, only the Active Directory Users and Computers MMC Snap-in gives you the ability to copy a user account. With the new Active Directory Administrative Center MMC Snap-in or PowerShell, it isn't possible to copy a user account. However, from Windows Server 2012, you can create a user account with the most common parameters for a specific job role or department configured and use that account as a template. As mentioned earlier, attributes that are copied to the new user account are as follows:
- Group memberships
- Home directories
- Profile settings
- Logon scripts
- Logon hours
- Password settings
- Department name
- Manager
The template user account can be created using PowerShell or either of the MMC Snap-ins. Creating a new user account from the template can be done with the Active Directory Users and Computers MMC Snap-in with the copy option, as mentioned earlier, or using the PowerShell command:
$Template = Get-ADUser -Identity vladimir.stefanovic -Properties Company

New-ADUser -GivenName John -Surname Doe -Name "John Doe" -UserPrincipalName john.doe@mcsacertguide.local -SamAccountName john.doe –AccountPassword (Read-Host –AsSecureString "Enter password") -Enabled $true -Instance $Template
Performing bulk Active Directory operations
The definition of a bulk operation is a single action that changes multiple objects. Performing a bulk operation is much faster than changing many objects individually. With any type of bulk operation, you need to be more accurate, because any typographic mistake will affect more than one object. The most common bulk operations are as follows:
- Creating new users from a CSV file
- Managing user attributes based on where they belong (OU, Department, Company, and so on)
- Disabling user accounts based on their activity
Although some bulk operations can be done using MMC Snap-ins, PowerShell is the most suitable tool to use. If you want to use PowerShell, you must understand the queries that will be used to list AD DS objects and how to work with .csv files. Then, you can create scripts that perform the bulk operations you need.
Using the Get-ADUser PowerShell cmdlet (for example), you can make a query to AD DS and list all user accounts. However, if you don't add a specific filter to your query, the result is likely to be useless. For this task, you need to understand the filtering parameters:
- SearchBase: Defines the AD DS path to begin searching.
- SearchScope: Defines at what level below the SearchBase the search should be performed.
- ResultSetSize: Defines how many objects to return in response to a query.
- Properties: Defines which object properties to return and display. To return all properties, type *.
All filtering of parameters, especially properties, can be made more precise using the following operators:
- -eq: Equal to
- -ne: Not equal to
- -lt: Less than
- -le: Less than or equal to
- -gt: Greater than
- -ge: Greater than or equal to
- -like: Uses wildcards for pattern matching
Once you make a correct query, you can use pipe ( | ) to perform another command to selected objects. For example, the following PowerShell command will configure the City attribute on all accounts that have the configured Department attribute with a value of IT:
Get-ADUser -Filter {Department -eq "IT"} | Set-ADUser -City London
Another suitable task for performing bulk operations is importing data from a CSV file. CSV files can contain more information than just lists and are often formatted as a spreadsheet. This approach is ideal if you need to create more than one user account at a time and the information populated in the file can be configured as an attribute in the user account. For example, the following is an example of a CSV file and the PowerShell script that will use the attribute from the CSV file:
Name,FirstName,LastName,UPN,SAM,Company

Vladimir Stefanovic,Vladimir, Stefanovic,vladimir.stefanovic@mcsacertguide.local,vladimir.stefanovic,Packt

Sasha Kranjac,Sasha,Kranjac,sasha.kranjac@mcsacertguide.local,sasha.kranjac,Packt

Import-Csv C:\Users.txt | foreach {New-ADUser -Name $_.Name -GivenName $_.FirstName -Surname $_.LastName -UserPrincipalName $_.UPN -SamAccountName $_.SAM –AccountPassword (Read-Host –AsSecureString Enter password) -Enabled $true }
Implementing offline domain joins
Windows Server 2008 R2 introduced offline domain joins. This is a feature that allows you to join a computer to a domain without communicating directly with the domain controller. This works with client computers running Windows 7 or later or Windows Server 2008 R2 or later. To perform offline domain joins, you need to use the djoin command-line tool, which generates a domain-join file that will then be imported to the client computer. Offline domain join is useful, and mainly used, in scenarios where the machine that needs to be joined to the domain doesn't have network connectivity with domain controller or when you need to perform unattended installation of the Windows operating system.
To generate a djoin file, you need to run the following command and define parameters, such as a domain name, a computer name, and a location to save the offline domain join file to:
djoin.exe /provision /domain mcsacertguide.local /machine server01 /savefile c:\server01odj.txt
Once you create the offline domain join file, you need to copy the file to the desired computer and run the following command:
djoin.exe /requestODJ /loadfile c:\server01odj.txt /windowspath %systemroot% /localos
Like a standard join to a domain, the computer needs to be restarted to complete the joining operation.
Managing accounts
For many different reasons, a user account might become inactive. If a user leaves a company for a certain period of time or resigns, and you think that the user doesn't need access to the account or the resources, the best practice is to disable a user account until you're sure it's safe to delete it. If you want to disable an account, you can use either of the MMC Snap-ins. All you need to do is select the desired user account and disable it by right-clicking and selecting Disable or Disable Account, depending on which MMC Snap-in you used. If you enable a user account, the procedure is same, but the options are different: Enable or Enable Account.
The PowerShell cmdlets that need to be used for this task are Enable-ADAccount and Disable-ADAccount, and the command needs to be as follows:
Disable-ADAccount -Identity vladimir.stefanovic
Enable-ADAccount -Identity vladimir.stefanovic
Active Directory groups and organizational units
In the previous section, we covered the management of user and computer accounts. You learned how to create and manage these types of accounts. In this section, we're going to look at the purpose of groups and organizational units.
In large enterprise networks, assigning permissions to user accounts is impractical. Adding users and computers to specific groups and then assigning permissions to resources is the only correct approach. It's important to understand group types and how to use them properly in order to manage access to resources or to assign management rights.
This section will also cover how to work with organizational units in AD DS.
Creating, configuring, and deleting groups
Like user and computer accounts, group accounts also need to be created. Once groups are created, they can be managed later. You can create groups using either of the MMC Snap-ins or PowerShell. You just need to know and define what group type and scope you need. Like all other objects covered in this chapter, Active Directory Users and Computers MMC Snap-in will give you the ability to create groups, but group configuration needs to be performed later, while the Active Directory Administrative Center MMC Snap-in allows you to configure more parameters at the same time.
If you decide to use Active Directory Users and Computers, you will see the following screen:

Active Directory Administrative Center is a little bit different. You will see the following screen:

If you want to use PowerShell for group creation, you need to use the New-ADGroup cmdlet:
New-ADGroup -Name "MCSA 2016" -GroupCategory Security -GroupScope Global -Path "OU=Packt,DC=mcsacertguide,DC=local"
Like user and computer accounts, group objects are not protected from accidental deletion by default. This needs to be configured, and the steps for MMC Snap-ins and PowerShell commands are the same as for user and computer accounts.
Configuring group nesting
Groups nesting is the process in which we add groups to other groups. This process creates a hierarchy of groups that can be helpful in supporting your roles and management rules. Microsoft recommends using IGDLA for group nesting, which is an acronym for the following:
(I) Identities (G) Global groups (DL) Domain-local groups (A) Access:
- Identities (user and computer accounts): Members of global groups
- Global groups represent specific business roles: Members of domain-local groups
- Domain-local groups: Represent rules for access, such as Sales Read-Only
- Access: Resources in which domain-local groups have a specific type of access
In order to implement group nesting properly, knowing the scope of the group is important:
| Group scope | Members | Assigned to |
| Local |
Users, computers, global groups, and universal groups from any domain in the forest. |
Local computer resources only |
| Domain-local |
Users, computers, global groups, and universal groups from any domain in the forest. |
Local domain resources only |
| Global |
Users, computers, and global groups from the same domain. |
Any domain resource in the forest |
| Universal |
Users, computers, global groups, and universal groups from any domain in the forest. |
Any domain resource in the forest |
Converting groups
Although changing the group scope looks like an easy process, in general, it's not.
The following list defines which group scope changes are allowed:
- Global group to domain local group: Not allowed directly. The global group first needs to be converted to a universal group. It can then be converted to a domain local group.
- Global group to universal group: Allowed only if the global group is not a member of another global group.
- Domain local group to global group: Not allowed directly. The domain local group first needs to be converted to a universal group. It can then be converted to a global group.
- Domain local group to universal group: Allowed only if the domain local group doesn't contain another domain local group.
In the following screenshot, you can see that the group scope is Global. If you want to change the group scope to Domain local, the option is grayed out and you can't do that. You can only convert the group to Universal:

Once you have converted the group from Global to Universal, you will be able to convert the group to Domain local:

Managing group membership using Group Policy
Sometimes, managing group memberships can be time-consuming. For example, let's say you need to add a group to the local Administrators or the Account Operator group on all client computers in the domain. In this case, you need to use Group Policy to speed up the task. Group Policy provides a setting, called Restricted Groups, that gives you the ability to control the membership of local groups on domain-joined computers. By default, there are no configured groups. You can find the Restricted Groups setting by going to Computer Configuration | Windows Settings | Security Settings:

Once you navigate to Restricted Groups, you need to create a new Restricted Group configuration in the GPO. In the following example, MCSA 2016 group will be a member of the Administrators on all computers where this policy is applied:

Enumerating group memberships
In a large-scale environment, enumerating group membership is often a regular task. The reasons why we need to enumerate group membership include security compliance and analyzing access to resources.
You can accomplish this task using either of the MMC Snap-ins by simply checking the Members tab in the group's object properties. If you decide to use Active Directory Users and Computers, you will see the following screen:

Active Directory Administrative Center is a little bit different:

This can also be done using the Get-ADGroupMember PowerShell cmdlet:
Get-ADGroupMember -Identity "MCSA 2016" | Format-Table Name
Automating group-membership management using Windows PowerShell
In the previous sections, we mentioned that PowerShell is the best native tool in Windows operating systems for automation. Although you can select more than one user in MMC Snap-ins and add them to the same group at one time, this approach has some limitations. Using PowerShell, you can make a query against AD DS with some filtering options, such as the company name or department name, and then add those accounts to the same groups.
The following command will show you how to add a member to a group based on their company name:
$Members = Get-ADUser -Filter {Company -eq "Packt"}

Add-ADGroupMember -Identity "MCSA 2016" -Members $Members
Delegating the creation and management of Active Directory groups
Users, groups, and computers are objects in AD DS that are stored in the OU. By default, all users and groups are stored in the Users container and the computers are stored in the Computers container. As mentioned earlier in the chapter, OUs need to be created to consolidate objects for simplified management using GPOs linking, or delegating administrative rights. One of the rights that you can delegate to a specific user or group is Create, delete and manage groups. With this delegate control, specific users or group members will be able to create, delete, and manage groups in the selected OU and all other OUs in the subtree:

Active Directory containers
Once you've configured the domain environment and installed the first domain controller in the root domain, many AD DS objects are created. Because of the AD DS design, these need to be stored in a container or in the OU. There are several container objects that are installed by default. They don't have the same properties as other generic Active Directory containers (such as sites, domains, and OUs). You can't delete the system container, nor can you create a new system container. And you can't link GPOs to those containers.
Creating, configuring, and deleting OUs
Creating OUs is straightforward, as is the case with other objects mentioned in this chapter. It can be done using the same tools: MMC Snap-ins and PowerShell. During the creation process, you need to define the name of the OU and it will be created. Unlike other objects covered in this chapter, OUs are, by default, protected from accidental deletion, regardless of what tool is used. Using Active Directory Administrative, you will see the following screen:

The Active Directory Users and Computers MMC Snap-in will give you a different look for the same task:

If you decide to use PowerShell, the New-ADOrganizationalUnit cmdlet needs to be used to create an OU:
New-ADOrganizationalUnit -Name Servers -Path "OU=Packt,DC=mcsacertguide,DC=local"
Summary
In this chapter, we learned the most important concepts related to AD DS. We learned about logical and physical components and their functions, which tools can be used to manage AD DS, and what's new in Windows Server 2016 AD DS. We also learned how to create a new forest, how to add a new domain in an existing forest, and what RODC is and how to install it. Along with this, we covered user, group, and computer management, so you should now be able to create and manage AD DS objects.
In the next chapter, we'll cover advanced AD DS management, including AD DS Forests, AD DS Sites and Replication, and AD DS Security.
Questions
- Which FSMO roles are forest-wide?
- Domain-naming master and Schema master
- Schema master and Infrastructure master
- Domain-naming master and PDC emulator
- Infrastructure master and PDC emulator
- Which tool needs to be used for IFM?
- Active Directory Users and Computers
- Ntdsutil.exe
- Active Directory Administrative Center
- AD DS module for PowerShell
- What is the first step in removing old domain controllers?
- Restart server
- Uninstall AD DS role
- Demote domain controller
- Move all FSMO roles to new domain controller
- Which tools can be used to copy user accounts?
- Active Directory Users and Computers
- Ntdsutil.exe
- Active Directory Administrative Center
- AD DS module for PowerShell
- Can a Global group be converted to a Domain Local group?
- Yes
- No
- Can a Domain Local group be converted to a Universal group?
- Yes
- No
- Which FSMO role shouldn't be deployed on the GC server?
- Schema master
- Infrastructure master
- Domain-naming master
- RID master
- Are user accounts protected against accidental deletion by default?
- Yes
- No
- Are OU objects protected against accidental deletion by default?
- Yes
- No
Further reading
Check out the following links for more information about AD DS: