Download code from GitHub
Getting Started with Ionic 3
Ionic has been evolving a lot over the years; ever since Ionic v1 has launched there has been continuous development and improvement going on with the framework. One of the smartest moves was to launch Ionic v2, which is based on Angular 2 by the Ionic team. Recently, Ionic 3 was launched, which is based on Angular 4 and TypeScript 2.2. Here in this book we will mainly be going through Ionic 2 and 3 and their advanced concepts. We will cover topics such as building an e-commerce app with Bluetooth beacons support for malls, integration with Firebase, and PWA support with Ionic applications. We will start with support for all three platforms: iOS, Android, and Windows, and will be demonstrating applications based on Internet of Things, which will be really exciting.
In this chapter, we will be going through all the essentials of Ionic, which will help to build large scale and enterprise grade applications. We have been working on Ionic 1x for the last 2-3 years and during that journey we have seen so much improvement in the framework and multiple features developed. After Angular 2 was released, a lot more improvement came in the framework and then the Ionic team planned on developing Ionic 2, which is based on Angular 2. Ionic 3 and Angular 4 are on similar lines and do not have major framework changes such as we had when we shifted from Ionic v1 to v2. With Ionic 3 you will now see improved performance, reduced code complexity, and the ability to build scalable applications has increased. Ionic is now targeting mobile web and desktop applications, which helps developers running same codebase everywhere. Ionic Native is another example of how the Ionic team is improving the product day by day and making developers' lives easier. We will initially look into some of the basics of Angular and Ionic, also how TypeScript can be a big asset for building enterprise applications. Ionic CLI and Ionic Cloud products are as well as improving regularly, which we can use to speed up our development time and efficiently test or share our applications. In this chapter, we will cover:
- Angular 4, Ionic 3, and TypeScript
- Installation and setup
- Directory structure and modularity
- Theming with SASS
- Ionic CLI
Angular 4, Ionic 3, and TypeScript
Many of us coming from the Angular 1 world to Angular 2 or 4 will surely see that it's an entire rewrite of the application and a steep learning curve. I felt the same when I initially started Ionic and Angular, but gradually as I read about the concepts of Angular, many of the problems we used to face in Angular 1 were automatically solved without any effort. Initially you will miss the old controllers, services, filters, and other concepts in Angular 1 and most importantly the navigation and routing. But when you dive deep into the topics you will find that corresponding modules such as component, providers, and pipe are available and that they can be used in similar ways. Navigation and router are also now used as push and pop mechanisms for navigating from one page to another page. In the initial beta versions of Ionic 2, we don't have proper URL-based routing as users can't land on a specific page in the application. But after a stable Angular-router is released it has been added to Ionic 2, which has opened the path for better support for progressive web apps, which will allow the same Ionic apps to be shipped as mobile web applications. Ionic 3 also added support for responsive grids, which will help when we will be building desktop applications. Lazy Loading is another important feature added, which reduces the initial loading time of the application. Still, as Ionic 3 is in initial days, we can expect these features to become a lot more stable. As, we know Ionic 2 and 3 did not have any major framework changes, so initially we will be comparing Angular 1 and 2 in this chapter so it helps users understand the difference and how they can migrate to the latest Ionic versions.
Angular and Ionic myths
As you go forward, you will hear many myths that are not true in respect to Angular 2 or upgrading to Angular 4. One of the most common is the Angular 4 doesn't support two-way data binding, which is not true. The Angular team has made sure that we use forms as simple as we use in Angular 4, they just have a new syntax:
      [(property-name)]="expression"

   <input type="text"
      [(ngMmodel)]="model.name" />
We still have two-way data binding. Although, to improve the Angular digest cycle and performance by default, we don't use two-way data binding. It uses a unidirectional binding that we can extend to two-way binding when we require it. You can refer to Angular template syntax to demystify all other syntax's and their uses available with Angular 4.
Ionic lack URL navigation is another discussion going on at the Ionic forum. Again this is also partially correct; because Angular-router was not stable enough, the Ionic team decided to remove it in the initial beta version. As of now, Angular-router is stable and will be in Ionic. The Ionic team understands how critical it is to have a proper routing mechanism and to make a developer feel at home while moving towards Ionic 3.
Upgradation is entirely rewritten: Angular 2 is itself rewritten, but you don't have to rewrite your app also. Initially when I started I felt the same and thought that we had to redevelop our current application. But there are many tools and documentation (http://ionicframework.com/files/Ionic2Migration.pdf ) available for a smooth upgrade from Ionic 1 to Ionic 2 or 3. You just have to be careful as if you have a complex application then you might have to do many things manually. But one thing is for sure that upgrading the application will surely not take that much time when you build the same application from scratch if you have proper expertise and a concept of Angular 2. One of the reasons behind this is that you already have a running application where you just have to assemble the moving parts in different ways, as most of the application logic will be same.
Personally, my learning process with Ionic didn't think too much about I upgrading to a new version. Rather I took it as new improved concepts that came in new Angular versions, designed to ease the learning and understanding.
Mapping Ionic 1 to Ionic 3
Life will be really easy for any developer who can easily understand the mapping of different concepts that were in Angular 1 and how they are
catered to in Angular 4. Also, I am sure that most of the questions will be answered automatically.
Controllers match components
Components are the backbone of Angular and Ionic applications; you will see that almost everything is a component. You can compare controllers in Angular 1 to components in Angular 4. In controllers we used to define most of our code's logical part. We used to register the controllers with our main module. Now, in a similar way, we define our code in components in Angular 4 and if required we can export that Component class:
    // Angular & Ionic 1

angular.module('wedding.controllers', [])
 .controller('LoginCtrl',
 function($scope, CategoryService) {
 // controller function and DI of CategoryService
 }
 );

// Angular 4 & Ionic 32

import {Component} from '@angular/core';
import {NavController} from 'ionic-angular';

@Component({
 templateUrl: 'build/pages/catalog/categories.html'
})
export class CategoryPage {
 // DI of NavController for navigation
   constructor(private navCtrl: NavController) {
   this.nav = navCtrl;
 }
}
We have dependency injection in Angular 1 as controller function arguments, while in Angular 4 we pass it inside the constructor function. Many other things such as the IIFE syntax, which we have to define in Angular 1 for keeping out controller code of the global namespace, now are not required in Angular 4 because ES 2015 modules handle name spacing for us. Also, as you can see, we have exported the CategoryPage class, we can now import it wherever this module is required.
Another major change is that $scope is replaced by the this keyword. $scope had many performance issues and already in Angular 1 developers have reduced the usage of $scope.
Filters match pipes
Angular 4 pipes are similar to what we use Filters for in Angular 1. Pipes provide the same formatting and transformation for data in the template. Almost all of the inbuilt filters that Angular 1 has correspond to pipes in Angular 4:
// Filter - Angular 1
<td>{{movie.price | currency}}</td>

// Pipes in Angular 4
<td>{{movie.price | currency:'USD':true}}
</td>
Due to performance reasons, filter and orderBy filters have been removed from Pipes, although you can at anytime build a custom pipe if similar code is reused in multiple templates.
Services match providers
Services and Factory are important parts of Angular 1x where we communicate with a remote server for data. We used to define APIs call inside factory functions that controllers calls for fetching data from the servers:
 // Factory method in Angular 1x

 angular.module('wedding.services', [])

// DI of $http for HTTP calls to servers
// $q  for promises
.factory('CategoryService', function ($http, $q) {
    var catalog   = {};

    catalog.getCategories = function () {
        // here we will call APIs
    }
})
Now you will see how we have migrated our code to Angular 4 providers. The same getCategories() method that was inside factory in Angular 1, will now be moved inside the CategoryData() class in Angular 4:
// Provider in Angular 4

import { Injectable } from '@angular/core';
import { Http } from '@angular/http';

@Injectable()
export class CategoryData {

  constructor(private http: Http) {}

  getCategories() {

    return new Promise(resolve => {
      // We're using Angular Http provider
         to request the data,
      // then on the response it'll map the
         JSON data to a parsed JS object.
      // Next we process the data and
         resolve the promise with the new
         data.

 this.http.get('www.veloice.com/data.json').subscribe(res
     => {
        // we've got back the raw data, now
           generate the core schedule data
        // and save the data for later
           reference
        this.data = this.processData(res.json());
        resolve(this.data);
      });
    });
  }
}
You will notice that the Provider class has a @Injectable decorator. This decorator lets Angular 4 know that the specific class can be used with the dependency injector.
TypeScript comes to the rescue
TypeScript is basically a superset of Javascript, which is a statically typed language. TypeScript does similar to what LESS or SASS does to CSS. TypeScript compiles to Javascript and has almost the same syntax. Anyone from an object-oriented world will find it really, familiar with concepts such as classes, constructors, inheritance, and interfaces.
Many developers will be confused with all these keywords such as ES5, ES6, TypeScript, AtScript, and many others. JavaScript is a community-driven language, and accordingly, browser manufacturers implement those features that are mostly used. Currently, ES5, that is ECMAScript 5, is a standardization by ECMA international. ES6 and ES7 are future standards of JavaScript with tons of new features. We can develop applications in ES6 and ES7 directly with the use of Babel, which is a transpiler. Transpilers are source-to-source compilers that take input in one programming language and output the equivalent code in another language. Although it is recommended to use TypeScript as the majority of work going on in the Ionic community is on TypeScript. Also, you will easily get resources and community help.
When we start a new Ionic 3 project it create the project with TypeScript, although in Ionic 2 and CLI v2 we had option for creating project with TypeScript. As mentioned, we should use TypeScript because, as the project will become a large scale project, things will be easier to maintain and understand. I want to clear up one important point here about Angular 4: whether it's TypeScript or ES 6 whenever you run the Ionic server, our app folder is transpiled into ES5, as that is what currently all major browsers support. There are many new features available in TypeScript that we will be mainly using in our Ionic or Angular applications. Some of them are listed here:
- Class and module support
- Static type-checking
- Similar syntax to other object-oriented languages
- ES6 features such as template string support
- Decorator, annotation support, and dependency injection
- Arrow functions
Installation and setup
As we are going through Ionic 3, most of the developers have previous experience of Ionic installation. We can install ionic via the NPM package; currently Ionic CLI v3 is in beta which has entirely changed how CLI works and now the default project that Ionic will create is based on Ionic 3:
$ npm install -g ionic
It's recommended to use the 6x version for node and the 3x version of npm. This beta release supports both Ionic 1 and 2 projects. Now let's get started with a project:
// will create Ionic 3x project
$ ionic start wedding-planner sidemenu
// will create Ionic 1x project
$ ionic start wedding-planner sidemenu --type ionic1
// move to projedct directory
  $ cd wedding-planner

  // run project with ionic serve
  $ ionic serve
Now the next steps will be to add specific platforms and plugins required in the application:
   // For adding specific platforms
$ ionic cordova:platform add android

// running application on real device
$ ionic cordova:run android

// running inside an emulator
$ ionic cordova:emulate android
Next, we will be looking at how we can get started with an Ionic 2 application code base. You have to understand how each file and folder is structured and how they work.
Directory structure and modularity
Previously in Ionic 1x, we didn't have the best directory or project structure. Slowly as Ionic and Angular evolved, developers tended to move towards the modular approach for organizing their files and folders. There were many different ways to manage your files and folders in Ionic 1x. Usually the default structure you will see in the Ionic 1x build can be used in many small projects where we don't have to deal with many files and for small projects; mainly two structures are followed for Ionic 1x based projects: byFolderType and byFeatureType. With Ionic 3, one of the best things is that we have the project structure set up in a modular way where you will have pages, providers, pipes, theme folders, and respective subsequent folders in them. Let's go through some important files inside Ionic 3 projects:
./src
In this folder we have our entire application code base and it is the most important:
./node_modules
Here we have all our dependencies and NPM packages that are required to run the application:
./platforms
Here we have specific platform-based folder entries, which our app is using. When we run the ionic platform add command, you will see a specific folder created inside the platform folder:
./plugins
All the plugins used in our application are hosted here:
./resources
An entire set of icons and splash screens are inside this folder, organized according to various platforms and devices:
./www
Here is our index.html file, and after compilation of the code base in the src folder bundle, files, images, and SASS compiled css files are placed inside www:
./www/index.html
This is the entry point to our application or we can say every hybrid application. We mainly have scripts and style sheets declared in this file to run the application. As in Ionic 1 we use ng-app, here in Ionic 3 we check for <ion-app></ion-app> inside your index.html file:
./package.json
This defines the project metadata and dependencies that will be added to the node_modules folder. It also has information about the Cordova platform and plugins used in the application:
./ionic.config.json
This file contains project-specific settings such as names, IDs, proxies, and other information:
./src/app/main.ts
This is where we start towards the code base and also we bootstrap our application inside this file:
./src/app/app.module.ts
In this file we declare the pages, directives, and providers used inside our application:
./src/app/app.component.ts
We set the root page here and root-component is called first, which controls the application, similar to what the app.js file does in Ionic 1. However, this component is not different from other components in our application; it is just declared in the app folder. As we start to build applications in upcoming chapters, we will get to know more closely how we work around all these files and code bases.
Theming up SASS
Ionic has support for SASS (CSS extension language) to create, customize, and maintain CSS. It eases the process of customizing the existing colors and themes of Ionic for specific platforms. Ionic 3 as a default has SASS setup and you will find that inside the theme folder there will be an variable.scss file. In this file we will be doing custom color changes and overriding platform variables.
Earlier in Ionic 1x, the application was hooked to the Ionic's precompiled files, which you can find at the www/lib/ionic/css directory, and file resources and paths are linked in index.html. Previously, in Ionic 1x, we used to set up SASS using CLI:
$ ionic setup sass
This used to automatically remove other file paths and uncomment the ionic.app.css files used for SASS styling inside index.html. Now with Ionic 3 we don't have to set up SASS, it comes by default when we start or create an application.
Customizing
Now the basic setup is ready for SASS and also while running ionic serve you will add all custom styling and SASS related changes in all different files for each of the components or pages. Let's start with changing one of the color variables by default present in the variable.scss file:
    /*
To customize the look and feel of
    Ionic, you can override the variables
For example, you might change some of
    the default colors:

$colors: (
  primary:    #387ef5,
  secondary:  #32db64,
  danger:     #f53d3d,
  light:      #f4f4f4,
  dark:       #222,
  favorite:   #69BB7B,
  twitter:    #53ACEB,
  github:     #000000,
  instagram:  #235D8D
);

// Fastest way to change the theme of
       your Ionic app is to set new value
       for primary color
You can see that we have added custom colors such as Twitter and GitHub. We can further customize it by supplying base and contrast properties:
    $colors: (
  facebook:(
    base: #3b5998,
    contrast: #ffffff
  )
)
You can now use this color key as a property to many components, such as buttons:
<button facebook>Share on Facebook</button>
SASS is really powerful and it speeds up the CSS development process. It acts as a Swiss army knife for CSS, where we can do multiple things with minimum lines of code and then with just some changes we can easily change the entire look and feel of the application. There are so many examples of how we can use SASS, but as we are more into Ionic development, I recommend going through some good SASS documentation and Ionic 3 theming docs once so that detailed information will be provided.
Automatically creating icons and splash screen resources
Ionic tools are so beautiful that now you don't have to struggle like we all used to, some years back in hybrid development. You can avoid the headache of adding icons, splash screens, and so on for every platform with different sizes. Now we don't have to deal with all this stress and Ionic have made it possible for us with a single command:
$ ionic resources
Ionic automatically crops, resizes, and creates icons and splash screens from source images for each platform and it does this in different sizes for different devices such as mobiles, tablets, and so on. All these are generated on Ionic's resizing and cropping servers without any overload from installing libraries or plugins on local machines.
Image sizes and specifications
Ionic resources have some specification of the source image of the icon and splash screen. Images can be either .png files, Photoshop.psd files, or Illustrator .ai files. There is a minimum size requirement for the source images for both. An icon's minimum size should be 192x192 px, and it should not have rounded corners. In case of splash screen, the minimum requirement is 2208x2208 px so that for every platform Ionic can prepare resources. The splash screen's artwork should roughly fit within a center square (1200x1200 px). Additionally, when the orientation preference configuration is set to either landscape or portrait mode, then only the necessary images will be generated.
For creating just icons or splash screen, the ionic resources command has two flags that allow you to create just icons or splash screens, not both:
    $ ionic resources --icon
$ ionic resources --splash
If a proper size is not provided for the source files, this will only create resources that are less than the size of the source image. For example, there might be chances that resources for tablets or high resolution screens are not generated.
Platform specific resources
Ionic provides support for building icons and splash screen resources for various platforms and devices. For building resources, we just need to place the source image inside the resources folder with the name icon.png and splash.png. This way you will get the extracted icons and splash screens for each platform, such as a Native rounded corners icon for iOS, and transparent background for an Android icon.
To summarize the steps:
- Add files to the resources folder naming icon.png and splash.png. (.psd and .ai can also be used).
- Make sure the minimum size requirements for icon are 192x192 px and for splash 2208x2208 px.
- Run the ionic resources command from the CLI.
Adding Crosswalk browser
Older Android versions (4.0 - 4.3) that stock web view have low performance and lack many of the latest HTML5, CSS3, and JS features. You will see a lot of difference when you deploy your application on the latest Android 7.0 and in older versions. Here is when Crosswalk comes into the frame; Crosswalk gives the latest web view aligned with Chrome on Android. This increases the performance of both HTML/CSS rendering and JavaScript performance ten times. It reduces fluctuations and fragmentation among devices. Another set of features that Crosswalk brings is access to webGL, WebRTC, CSS3 features, and various APIs. It provides improved performance and debugging applications become really easy. The Cordova Crosswalk plugin helps you easily add the Crosswalk browser in your application:
$ ionic cordova:plugin add cordova-plugin-crosswalk-
  webview
Currently, supported browsers are Crosswalk and Crosswalk-lite for Android. You can use Crosswalk lite mode by passing a variable flag:
 $ ionic cordova:plugin add cordova-plugin-crosswalk-
   webview --variable XWALK_MODE="lite"
Please take care that running these step will replace the default browser. Although you can anytime revert back by uninstalling the plugin and build again. The following are some advantages of using Crosswalk:
- Gain in performance
- Reduced fluctuations and fragmentation
- Ease of debugging
- HTML5 and CSS3 features
- Access to webRTC, webGL, web Sockets, and so on
Another thing to note is that after you have added the Crosswalk browser you will see the size of your APK increase by around 15-20 MB and increased of size on disk when installed around 50 MB.
Ionic CLI tasks
Ionic is improving day by day and many new features are coming to the platform.
Local development with Ionic serve
During the development process we need continuous testing. With Hybrid development you have the advantage that you can test your application in multiple ways:
- In desktop browsers
- iOS/Android simulators
- Mobile browsers
- Installing as a Native application
So for development purposes, testing in a desktop browser is the quickest and easiest. Many moving parts can be tested on desktop browsers. For running on desktop browsers, the Ionic CLI provides a command for it:
    $ ionic serve [options]
$ ionic serve --lab
Adding platforms
The ionic platform command adds and removes platforms:
    $ ionic cordova:platform <action> <PLATFORM>
      [options]
    $ ionic cordova:platform add android
    $ ionic cordova:platform remove ios
      Running applications on devices
Running application on devices
The ionic run command helps in running the application with the connected device:
    $ ionic cordova:run [options] <PLATFORM>
    $ ionic cordova:run android
      There is also an option of Emulate. Emulate an
      Ionic
      project on a simulator or emulator.
    $ ionic cordova:emulate [options] <PLATFORM>
The list of available tasks has been increasing in Ionic CLI. The best way to get in touch with all the latest tasks with extended details can be found by using ionic --help:
$ ionic--help
This will list all the tasks with options and flags for each. You can easily try them all on a test project and this will help you understanding them more closely.
Uploading and sharing Ionic application
While developing the application you now have features to share your application with a testing team or friends for reviewing. The Ionic platform provides this feature and the best part is that you don't even need to build locally and then send everyone APK files. Uploading and sharing an application is not just some easy steps. Ionic for organization is another service available for collaboration between employees of an organization.
Ionic upload
Ionic upload is used for uploading new snapshot of your app to your Ionic account. Before this command you need to run ionic link which will add app_id and create an application on Ionic Cloud:
$ ionic upload
Arguments or flags for the upload command:
- [--deploy]: Deploy snapshot to specific channel
- [--note]: The note to signify the upload description
Generating components
The ionic generate command create new pipes, components, pages, directive and providers. Also, this will create entry inside you app.module.ts for example if you create have created a provider it will be imported in app.module.ts and injected in providers. Once you create any of the page, component, directive, or pipe you will see a folder create with it TypeScript file where you can now start writing your logic:
$ ionic generate [type] [name]
- [--type]: Type of generator such as page, directive, and pipe
- [--name]: Name of the component generated
// Some example commands
$ ionic generate pipe NumberPipe
$ ionic generate page About
Ionic share
While you are building your application, you can directly test it on the Ionic View application where you can mention the app ID and it will automatically download your application from the ionic.io server where you uploaded your application:
$ ionic share <email>
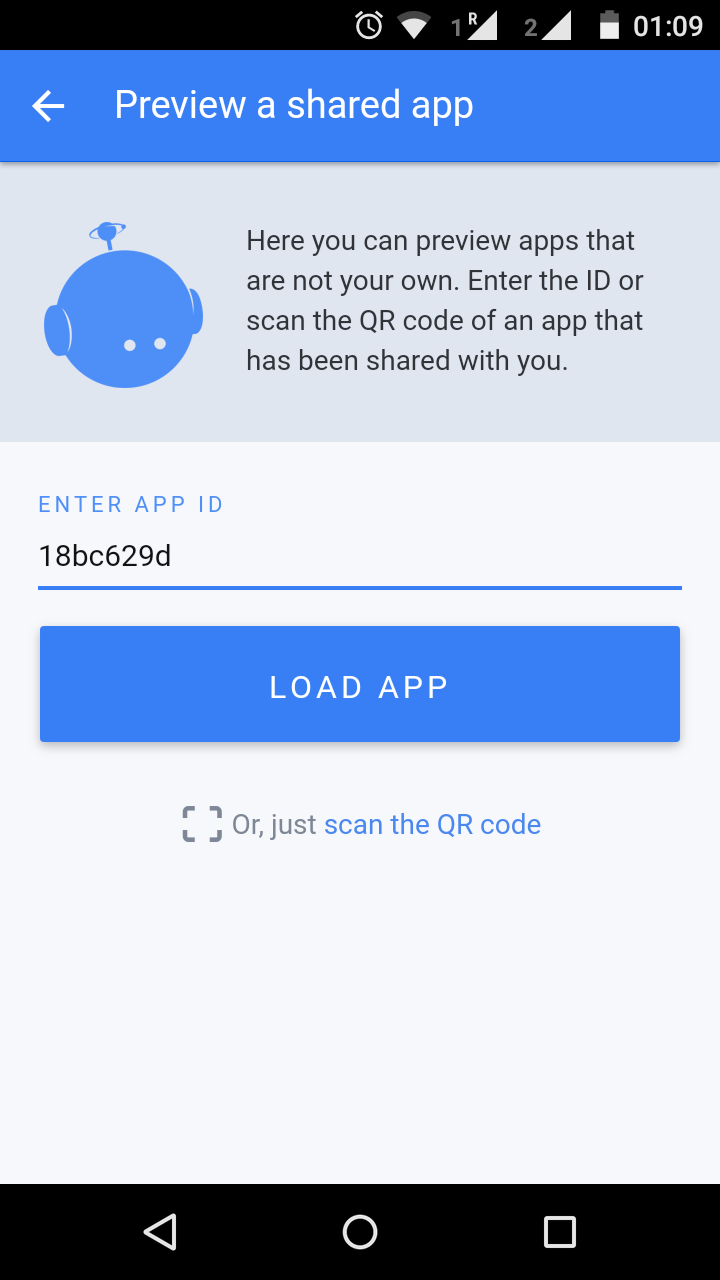
After you are done with uploading and sharing your application with users with specific e-mail addresses, the person you sent the invitation to will get an e-mail with a link to view the app. You can also test your application directly on the Ionic View application, which is available on Google Play Store and Apple Store. You can also directly share your app ID to enter building your application, so you can directly test it on the Ionic View application. The preceding screenshot shows how you can add an app ID and test the application.
Summary
We've now covered the get started part of Ionic and have gone through various aspects of what to take care of while building a large application. We now know how important it is to organize your files and folders in a project. We also discussed various setups, such as customizing applications through SASS, automatically creating icons and splash screens for various platforms, and uploading/sharing applications. Later in the chapter we went on to cover many Ionic CLI commands that help us quickly develop and debug applications. Ionic CLI is advancing day by day and many new features and tasks are coming. What we all should do is regularly update Ionic CLI and check for new features so that in our next application we can take advantage of them. We are now prepared to dig more deeply into Ionic and its components. In Chapter 2, Ionic Components, we will be going around with the Ionic components and this is where we will move onto real application building where we will be using lists, virtual scrolling, localization, navigation, and many other components. This will help us make complex applications where we will have many tasks at hand. UI customization is another aspect we will look into, as almost every application will have a different design and we can easily build them over the current Ionic components with small tweak. Another important aspect we will look into is the custom modules built by the Ionic community, which we can directly use inside our application.