


"I long to accomplish a great and noble task, but it is my chief duty to accomplish small tasks as if they were great and noble."
– Helen Keller
In this first chapter we will learn the basics of creating an HTML5 application. We will create an application template to be used as a starting point for building new applications quickly and with minimal effort. Then, we'll use that template to create a simple tasklist application. Along the way we will discover how to interact with the user and manipulate the application's user interface. We will also learn about our first new HTML5 feature, the Web Storage API.
In this chapter we will learn:
The three basic components of an HTML5 application, HTML, CSS, and JavaScript
Some jQuery basics for those of you unfamiliar with the JavaScript library
How to initialize an application and handle user interactions
How to manipulate the DOM to add, remove, change, and move elements
How to create reusable HTML templates
How to use the HTML5 Web Storage API to store and retrieve an application's state
Before we get started building our first application, we need to learn some HTML5 application basics. HTML5 applications are like applications written in any other programming language. There is a certain amount of infrastructure and plumbing that needs to be put in place before we can start working on the fun part.
Web applications are pretty good when it comes to scaffolding out a project. You could just start from scratch every time you begin a new application. But as you write more and more applications, you begin to notice that you are doing the same basic things over and over every time you get started, so it makes sense to create an application template to get started up quickly without reinventing the wheel every time.
To understand how HTML5 applications are built, we will start from scratch and build our own application template which we can use when creating new applications. We will use this template as a base for all of the applications that we build throughout this book.
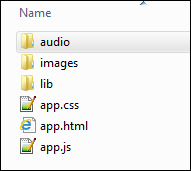
Every web application starts with three components: HTML, CSS, and JavaScript. You can put them all in one file, and that might be acceptable for a very simple application, but we are learning how to build real applications here. So we will start by creating three files, one for each component, and placing them in a folder named template. They will be named app.html, app.css, and app.js.
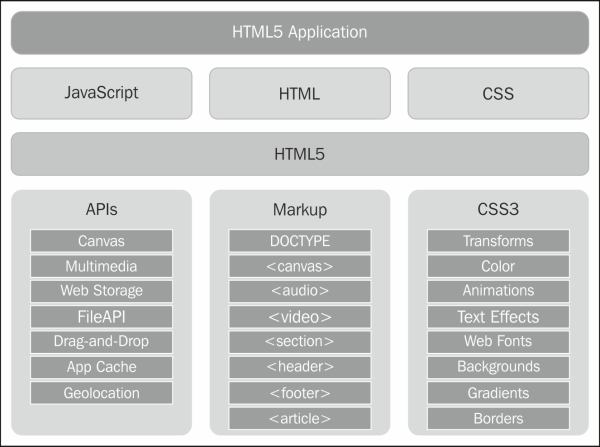
The following diagram is an interpretation of an HTML5 application and its components. Our application is built upon HTML, CSS, and JavaScript. Those in turn are built on top of CSS3 and the HTML5 framework, which consists of new markup elements and JavaScript APIs.
Let's look at the folder structure for our applications. We will put all of the files that we create at the root of our application's folder. We will also add a folder named lib which contains any third-party JavaScript libraries our application may need. Since we will always use the jQuery library, we will put a copy of it in there. If there are any other assets, such as images or audio files, we will put them in the images and audio folders respectively:
The first component we will build is our base HTML file, app.html. We will keep our HTML as clean as possible. It should contain only markup. There should not be any styling or blocks of script mixed in it. Keeping markup, style, and behavior separated will make your applications easier to debug and maintain. For example, if there is a problem with the way something looks, we will know the problem is in the CSS file and not the JavaScript file. Another benefit is that you can completely restyle the user interface of your application by changing the CSS without ever touching its functionality.
Here is the markup for our base HTML file. All it does is include our CSS and JavaScript as well as the jQuery library, and defines a simple body structure that most of our applications will use. It is a good place to start for the applications we will be writing.
<!DOCTYPE html>
<html>
  <head>
    <title>App</title>
    <link href="app.css" rel="StyleSheet" />
    <script src="lib/jquery-1.8.1.min.js"></script>
    <script src="app.js"></script>
  </head>
  <body>
    <div id="app">
      <header>App</header>
      <div id="main"></div>
      <footer></footer>
    </div>
  </body>
</html>
Tip
Downloading the example code
You can download the example code files for all Packt books you have purchased from your account at http://www.packtpub.com. If you purchased this book elsewhere, you can visit http://www.packtpub.com/support and register to have the files e-mailed directly to you.
One of the major differences between HTML5 markup and previous versions of HTML is the document type declaration this has been greatly simplified. As you may recall, doctypes before HTML5 were very verbose and impossible for mere mortals to remember. They looked something like this:
<!DOCTYPE HTML PUBLIC "-//W3C//DTD HTML 4.01//EN" "http://www.w3.org/TR/html4/strict.dtd">
Now meet the new and improved HTML5 document type declaration. It's simple, it's elegant, and best of all it's easy to remember:
<!DOCTYPE html>
Another difference you may notice are the <header> and <footer> elements. These are new semantic elements in HTML5 that are essentially the same as <div> elements. HTML5 actually has a whole array of new semantic elements that are designed to give HTML markup more meaning than just wrapping everything in a <div> tag.
Since we are building applications here and not writing content pages, we won't be focusing on these semantic elements too much. Most of the time we will use the plain old <div> elements. But just to familiarize you with them, here is an overview of some of the most useful new semantic elements:
<article>: Defines an article in the document<aside>: Defines content aside from the other page content<footer>: Defines the footer for a section in the document<header>: Defines the header for a section in the document<nav>: Contains page navigation links<section>: Defines a section in a document
A few elements and attributes that existed in previous versions of HTML are now not present in HTML5. These are mostly elements having to do with layout and fonts, including <big>, <center>, <font>, <strike>, and <u>. Obsolete elements such as <frame> and <applet> are also out.
Now let's take a look at the contents of the <body> element in our markup. First there is a <div id="app"> element. This will wrap the application's entire markup. Other markup, such as site navigation or anything else not related to the application, can go outside this element.
Inside the app element we have three more elements. Here we use a couple of the new semantic elements. First we have a <header> element in our application that will contain the name of the application, such as a title bar (not to be confused with the <title> element in the document <head> section). The <div id="main"> element is where the markup for the main part of the application will go. We add a <footer> element below it that will be used like a status bar to display the status of the application.
Next we'll create our base CSS file named app.css. This will have all of the basic styling that will be used by our applications, such as the default font and colors. The first part of the CSS file contains some document-wide element styles that set the basic look and feel.
body
{
    font: 1em Verdana, Geneva, sans-serif;
    padding: 0;
    margin: 5px;
    color: Black;
    background-color: WhiteSmoke;
}
div
{
    padding: 0;
    margin: 0;
}
button
{
    cursor: pointer;
}
.hidden
{
    display: none;
}
First we set the style to be applied to the body, which will trickle down to the other elements. I like to set the font size to 1em instead of a fixed pixel size so that it uses the browser's default font size. Then you can base other measurements off of that using ems or percent to give you a more reactive layout and make it easier to change the look of your application later on. Constant pixel sizes are good when you always need something to be the same size no matter what, or for small values for borders and margins, and so on.
Next we make sure all padding and margins are removed from all the div elements, so we zero them out. It's also nice to have the cursor change to a pointer when the user hovers over a button, so we'll set that here too. Finally, there is a .hidden class selector that can be added to any element to hide it from being displayed.
We'll finish the CSS off with some styles for the app and main elements. All we're setting at this point are margins, padding, and colors:
#app
{
    margin: 4px;
    background-color: #bbc;
}
#app>header
{
    padding: 0 0.5em;
    font-size: 1.5em;
    color: WhiteSmoke;
    background-color: #006;
}
#app>footer
{
    padding: 0.25em;
    color: WhiteSmoke;
    background-color: #006;
}
#main
{
    margin: 1em;
}Let's move on to the JavaScript file, app.js. Here we'll stub out a basic outline for our application template. If you don't know what the dollar signs are for, they are aliases for the jQuery library. We'll go over some jQuery basics in a moment.
"use strict";

function MyApp()
{
    var version = "v1.0";

    function setStatus(message)
    {
        $("#app>footer").text(message);
    }

    this.start = function()
    {
        $("#app>header").append(version);
        setStatus("ready");
    };
}
Starting at the top we will include "use strict" in our JavaScript files. This informs the JavaScript runtime to use newer and stricter standards when running our code. For example, in older versions of JavaScript it was completely legal to use a variable name without declaring it first using the var keyword. This had the side effect of making it a global variable attached to the window object. When "use strict" is defined, you will get an error if you try to do that. It helps you find bad coding mistakes that could lead to bugs in your program.
Note
If you are using some older JavaScript library that doesn't work in strict mode you can add "use strict" inside of function declarations instead, to make only that block of code use strict mode.
function strict()
{
    "use strict";
    // Everything inside here will use strict
// mode
}
Next we define the main application object, myApp. There are many ways to define an object in JavaScript, including using object literals and constructor functions. Object literals are the simplest way to define an object, but those objects are created as soon as the JavaScript is loaded, usually before the DOM is ready. Here's what our object would look like as an object literal:
var myApp = {
    version: "v1.0",
    setStatus: function(message)
    {
        $("#app>footer").text(message);
    },
    start: function()
    {
        $("#app>header").append(this.version);
        this.setStatus("ready");
    };
};
Since our applications are manipulating the Document Object Model (DOM), we don't want to create the object until the DOM is ready. That's why we will be using the function constructor form for creating an object.
The DOM, or Document Object Model, is the internal representation of the HTML markup. It's a hierarchical tree of objects that represents the HTML elements.
Another problem with using object literals is that everything defined in it is a member of the object, and therefore must be accessed using the this keyword. Notice in the preceding object literal form how we must use this to access version and setStatus(). However, when creating an object using a constructor, we can define functions and variables inside of the constructor without making them members of the object. Since they aren't members, you don't have to use the this keyword to access them.
So what's wrong with using this? After you've programmed in JavaScript for a while, you become aware that the this keyword can cause a lot of confusion because it can mean different things at different times. In other languages, such as C# and Java, this always points to the object that you are inside of. In JavaScript, this is a pointer to the object that called the function, which for event handlers is usually the window object. So the more we avoid using it, the better.
Another advantage of using a constructor is being able to define private and public methods. Notice that the setStatus() method is defined using a normal function declaration. This will make it a private method that can only be accessed from within the object that encloses it, and doesn't require using this to call it. The start() method, on the other hand, is assigned to the object using this. That will make start() a public method that can only be accessed from an instance of the object. We will use this paradigm throughout our JavaScript to implement the private and public members of our objects.
The last thing we need is a document-ready event handler. The document-ready event gets fired once the page has loaded and the DOM hierarchy has been fully constructed. There are two ways to add this event handler using jQuery. The first and more verbose way is what you would expect:
$(document).ready(handler);
However, since it is probably the most basic and important event you will need to implement, jQuery provides a shorthand form that is as simple as it gets:
$(handler);
Here is our document-ready event handler:
$(function() {
    window.app = new MyApp();
    window.app.start();
});
This is an important piece of code. It defines the starting point for our application. It is equivalent to the main() function in other languages, such as C, C++, C#, and Java.
Here we create an instance of our main application object, and then assign it to a global variable named app by attaching it to the window object. We make it global so it can be accessed throughout our application. Last but not least we call the start() method of our application object to get the application going.
We just created a template that we can use to start writing new applications with minimal startup time. It consists of HTML, CSS, and JavaScript files. At this point our template is finished, and we have the basics we will need to start writing new HTML5 applications.
You may have noticed dollar signs everywhere in our JavaScript code. The dollar sign is no more than an alias for the jQuery object. You could replace all dollar signs with jQuery and it would be the same, just more typing. If you already know about jQuery you might want to jump ahead. Otherwise I'll give a brief overview of jQuery.
jQuery is a popular JavaScript library that at its most basic level provides functions to access and manipulate the DOM. It also provides a lot of other useful functionality, such as event handling, animations, and AJAX support. In addition, it hides many of the different quirks between browsers, so you can concentrate on programming and not on how to make your code work in every browser. It makes writing JavaScript applications tolerable, and dare I say fun. I wouldn't think of writing an HTML5 application without it. It's to JavaScript what the System library is to Java and C#.
For the most part, jQuery uses the same query syntax as CSS to select elements. The typical pattern is to select one or more elements and then perform some action on them, or retrieve data from them. So, for example, here is a jQuery select to get all div elements in the DOM:
$("div")The following query would give you the element that has an ID of main:
$("#main")Just like CSS, the hash sign selects elements with a specific ID, and a dot selects elements that have a specific class. You can also use compound search criteria. This next query would return all of the elements that are descendants of the element with an ID of main and have a class of selected:
$(#main .selected")
After you have selected one or more elements you can perform some action on them. A jQuery select returns a jQuery object that is like an array, but also has lots of built-in functions to do all sorts of things, which we will learn about as we progress through this book. For example, the following line of code would hide all of the elements returned from the previous select (set their CSS display attribute to none):
$(#main .selected").hide()
Simple and powerful. So what is the deal with the dollar sign anyway? Some people assumed it was some sort of magic that jQuery could use the dollar sign as an alias. But apparently the dollar sign is a valid character to start a variable or function name within JavaScript.
Throughout this and the next couple of chapters, we will be building a tasklist application that uses HTML5 and CSS3. Before we get started we should spell out the specifications for our application so we know what we want to build.
Our tasklist application should allow the user to quickly type in one or more task names and display them in a list.
The user should be able to easily manipulate the tasks by editing them, deleting them, or moving them up or down in the order of the list.
The application should remember the tasks that were entered, so when the user comes back to it they can continue where they left off.
The UI should be reactive so that it can be used on a number of different devices with different screen sizes.
We will start off simple and build upon what we've done as we go along. Throughout the process we will build some JavaScript libraries that can be used in subsequent projects, so we can hit the ground running.
Now that we have the basics under our belt let's get started on the tasklist application. We'll call our application Task at Hand, or Task@Hand to be hip. First make a copy of our template folder and rename it to taskAtHand. Also rename the .html, .css, and .js files to taskAtHand. Now we're ready to start our first HTML5 application. You can find the code for this section in Chapter 1/example1.1.
The first thing we need to do is go into the HTML file and change the title and names of the CSS and JS files in the <head> element to taskAtHand:
<head>
  <title>Task@Hand</title>
  <link href="taskAtHand.css" rel="StyleSheet" />
  <script src="lib/jquery-1.8.1.min.js"></script>
  <script src="taskAtHand.js"></script>
</head>
Next we move on to the body. First we change the name of the application in the <header> element. Then go into the <div id="app"> element and add a text input field where the user can type in the name of a task. Finally, we add an empty list to hold our list of tasks. Since we are building a list we will use the unordered list <ul> element.
<body>
  <div id="app">
    <header>Task@Hand</header>
    <div id="main">
      <div id="add-task">
        <label for="new-task-name">Add a task</label>
        <input type="text" id="new-task-name" title="Enter a task name" placeholder="Enter a task name"/>
      </div>
      <ul id="task-list">
      </ul>
    </div>
    <footer>
    </footer>
  </div>
</body>
That's all of the markup we need for now. There is one thing to point out in here, that's new to HTML5. There is a new attribute for inputs called placeholder that displays some text in the field until the user starts typing something. This gives the user a hint as to what they should enter in the field. It is valid for input elements that allow the user to enter text.
Let's go into the JavaScript file and get coding. The first thing we'll do is rename the application object to TaskAtHandApp:
function TaskAtHandApp()
{
    // code not shown…
}
$(function() {
    window.app = new TaskAtHandApp();
    window.app.start();
});
Note
A standard in JavaScript is that only things that require a new statement (that is, object constructors) should start with a capital letter. This helps to distinguish what requires the new keyword to be created. Everything else, including variable and function names, should start with a lowercase letter.
When the user is done typing in a task name and hits the Enter key, we want to create a new list item element and add it to the list. The first thing we need to do is add an event handler to the text field so we get notified when a key is pressed. We will add this in the start() method of our application object:
this.start = function()
{
    $("#new-task-name").keypress(function(e) {
        if (e.which == 13) // Enter key
        {
            addTask();
            return false;
        }
    })
    .focus();

    $("#app header").append(version);
    setStatus("ready");
};
First we get the text field by doing a jQuery select on its ID, new-task-name. Then we add a keypress() event handler to that element passing in a function to execute every time the event is triggered. jQuery passes one parameter to the event handler function, which is a keypress event object. The event object contains a field named which that contains the character code of the key that was pressed. The one we are interested in here is the Enter key, which has a code of 13.
When the user presses the Enter key we call the addTask() method (defined next), and then it returns false. The reason we return false here is to tell the system that we handled the key press event, and don't want it to do the default action. Some browsers will perform other actions when the Enter key is pressed.
Next, we add another function call onto the end of the keypress() handler to set the focus back to the text field. At this point you're probably asking yourself, how does that work, calling a function on a function? This is called function chaining and is perhaps one of the most useful features of jQuery. Most of jQuery's methods return a pointer to the object itself, so we can perform multiple actions in a single line of code.
Now we'll write that addTask() method. This method will get the name of the task and add a new list item to the <ul> element in our HTML:
function addTask()
{
    var taskName = $("#new-task-name").val();
    if (taskName)
    {
        addTaskElement(taskName);
        // Reset the text field
        $("#new-task-name").val("").focus();
    }
}
function addTaskElement(taskName)
{
    var $task = $("<li></li>");
    $task.text(taskName);
    $("#task-list").append($task);
}
First we get the value of the new-task-name text field using jQuery's val() method, which is used to get the value of input fields. Just to make sure the user actually typed something in, we test that the taskName variable is "truthy", which in this case means it's not an empty string.
Next we call the addTaskElement() method. There we create a new <li> element. You can create a new element by passing in an element definition instead of select to jQuery. In this case we use "<li></li>" to create a new empty list item element, and then assign it to the $task variable. Then, we immediately fill that element with the task name using the text() method.
Note
When assigning a jQuery object to a variable, it's a good practice to start the variable name with $, so you know that it references a jQuery object.
Now that we have the new element we need to add it to the document in the correct place, which is inside the <ul id="task-list"> element. That is done by selecting the task-list element and calling the append() method. This adds our new <li> element to the end of the tasklist.
The last thing we do, back in the addTask() method, is clear out the value of the text input field and set the focus back on it so the user can immediately enter another task. We use function chaining here to do both in one statement. Notice that we used the jQuery val() method for both setting and getting the value of the text field. If you pass a value in, it sets the control's value; otherwise it returns the control's value. You'll find that a lot of the jQuery methods work this way. For example, the text() method will either set the text within an element, or return it if no value is passed in.

Now that we can add tasks to the list, let's add the ability to remove tasks. To do this we'll need a delete button for each task in the list. We'll add the code to create the button in the addTaskElement() method. You can find the code for this section in Chapter 1/example1.2.
function addTaskElement(taskName)
{
    var $task = $("<li></li>");
    var $delete = $("<button class='delete'>X</button>");
    $task.append($delete)
         .append("<span class='task-name'>" + taskName +
                 "</span>");
    $delete.click(function() { $task.remove(); });
}
The first thing this method does is create a new <button> element with a class of delete. Then it creates the list item element as we did before, except that first it appends the delete button and then appends the task name. Note that we are now wrapping the task name in a <span class='task-name'> element to help us keep track of it. Last we add a click event handler to the delete button. To delete the task from the list element we simply call the remove() method to remove it from the DOM. Voila, it's gone!
While we're at it, let's add buttons to move tasks up and down in the list. For this we'll add some more code to the addTaskElement() method. First we need to create move-up and move-down buttons, and then add them to the list element along with the delete button.
function addTaskElement(taskName)
{
    var $task = $("<li></li>");
    var $delete = $("<button class='delete'>X</button>");
    var $moveUp = $("<button class='move-up'>^</button>");
    var $moveDown = $("<button class='move-up'>v</button>");
    $task.append($delete)
        .append($moveUp)
        .append($moveDown)
        .append("<span class='task-name'>" + taskName +
                "</span>");
    $("#task-list").append($task);

    $delete.click(function() { $task.remove(); });
    $moveUp.click(function() {
        $task.insertBefore($task.prev());
    });
    $moveDown.click(function() {
        $task.insertAfter($task.next());
    });
}
When the move up or move down button is clicked, it finds the previous or next task element using the prev() and next() methods. Then it uses the jQuery insertBefore() and insertAfter() methods to move the task element up or down in the tasklist.
As you can see, things are getting a little messy in our addTaskElement() method. We are creating a bunch of elements programmatically in JavaScript and manually adding them to the DOM. Wouldn't it be a lot easier if we could just define what we want the task element's structure to look like in our HTML file and use it to create new tasks? Well we can, and we will. In this section we'll create an HTML template that we can reuse to easily create new tasks.
To start out we need a place to put the template's markup. So we'll add a <div id="templates"> to our HTML file outside of the app element and give it a class of hidden. As you may recall from our CSS, the hidden class sets display to none for an element. This will hide the template's markup so it is never seen by the user. Now let's define the template:
<div id="app">
  …
</div>
<div id="templates" class="hidden">
  <ul id="task-template">
    <li class="task">
      <div class="tools">
        <button class="delete" title="Delete">X</button>
        <button class="move-up" title="Up">^</button>
        <button class="move-down" title="Down">v</button>
      </div>
      <span class="task-name"></span>
    </li>
  </ul>
</div>
I don't know about you, but for me that's a lot easier than trying to build the task elements in the code. It's also a lot easier to read, add to, and maintain. You may have noticed a few other elements and attributes were added that would have been painful to add programmatically. A <div class="tools"> was placed around the buttons to group them together, and a title attribute was added to each button that will show up as tool tips in the browser.
Note that we did not use any ID attributes anywhere in the task elements. Instead we are using class attributes to identify different elements. The reason for this is that an ID uniquely identifies an element, so it should only be used once. If we create a template that has a bunch of IDs and start copying it, we will have duplicate IDs. An ID is pretty worthless for uniquely identifying an element if you use it more than once.
Before we move on, we need to add some styling to our CSS for the buttons and their container. We want the buttons to remain on the same line as the task name but their container <div> is a block-level element. Let's change it to inline-block so it doesn't break:
#task-list .task .tools
{
    display: inline-block;
}
We also want to remove the borders from the buttons, make them all the same size, and remove padding and margins so it's more compact:
#task-list .task .tools button
{
    margin: 0;
    padding: 0;
    width: 1.25em;
    height: 1.25em;
    border: none;
}
So, now that we have a task template what do we do with it? jQuery comes in handy here again. All we have to do is get the template element and use the clone() method to make a copy of it. Then insert the copy wherever we want to in the DOM. Here's what our new addTaskElement() method looks like:
function addTaskElement(taskName)
{
    var $task = $("#task-template .task").clone();
    $("span.task-name", $task).text(taskName);

    $("#task-list").append($task);

    $("button.delete", $task).click(function() {
        $task.remove();
    });
    $("button.move-up", $task).click(function() {
        $task.insertBefore($task.prev());
    });
    $("button.move-down", $task).click(function() {
        $task.insertAfter($task.next());
    });
}
We've replaced all those lines of creating elements with one line of code that gets the task template element and makes a copy of it using the clone() method. The second line fills the task name into the <span class="task-name"> element we have set up to hold it. If you look closely you will see that we are passing in a second parameter to jQuery in our select now. That tells jQuery to only search for elements that are descendants of the task element. Otherwise it would find every task name element in the document and change it. We do the same thing when selecting the buttons to hook up click event handlers to them, using their class name to identify them.
So far we have a tasklist that we can add tasks to, remove tasks from, and change the order of the tasks. Let's add some functionality to allow the user to change the name of a task. When the user clicks on a task name we will change it to a text input field. To do that we need to add a text input field to our task element template right after the task name:
<li class="task">
    <div class="tools">
        <button class="delete" title="Delete">X</button>
        <button class="move-up" title="Up">^</button>
        <button class="move-down" title="Down">v</button>
    </div>
    <span class="task-name"></span>
    <input type="text" class="task-name hidden"/>
</li>
We give it a class of task-name to identify it, and also add the hidden class so it's not visible by default. We only want to show it when the user clicks on the task name. So let's go into the JavaScript file and add an event handler on the <span> element to the end of our addTaskElement() method:
$("span.task-name", $task).click(function() {
    onEditTaskName($(this));
});
Let's break this down. First we get the span with the class of task-name that is a child of the task element. Then we add a click event handler that calls the onEditTaskName() method. The onEditTaskName() method takes a reference to the <span> element as a parameter. When you are in a jQuery event handler function, this refers to the element that was the source of the event. So $(this) creates a jQuery object that wraps the <span> element so we can call jQuery methods on it:
function onEditTaskName($span)
{
    $span.hide()
        .siblings("input.task-name")
        .val($span.text())
        .show()
        .focus();
}
Even though the onEditTaskName() method technically contains one line of code, there is a lot going on. It uses function chaining to do a lot of work in a compact statement. First it hides the <span> element. Then it gets the text input field by looking for a sibling of the <span> element, that is, an <input> element with a class of task-name. Then it sets the value of the text field with the task name which it gets from the <span> element using jQuery's text() method. Finally, it makes the text field visible and sets the focus on it.
When the user clicks on the task name, it appears to change into an editable text field right before their eyes. Now all we need is a way to change it back when the user is done editing the name. To do that we'll add a change event handler to the text field, which gets fired when the user changes the text field and hits Enter or leaves it. Add this to the end of the addTaskElement() method:
$("input.task-name", $task).change(function() {
    onChangeTaskName($(this));
});
This works the same way as the task name click event handler. We are going to call a method named onChangeTaskName()
and pass it a jQuery object that wraps the text field's input element:
function onChangeTaskName($input)
{
    $input.hide();
    var $span = $input.siblings("span.task-name");
    if ($input.val())
    {
        $span.text($input.val());
    }
    $span.show();
}
First we hide the text input field, and then get the task name <span> element and store it in a variable. Before updating the name we check to make sure that the user actually typed something in. If so, we update the task name. Finally, we call show() to make the task name visible again. The user sees the text field turn back into static text.
There is one last thing left to do. If the user clicks off the field without changing anything, we will not get a change event and the text field will not get hidden. We can get a blur event when this happens though. So let's add a blur event handler to the text field that hides it and shows the static task name <span> element:
$("input.task-name", $task).change(function() {
    onChangeTaskName($(this));
})
.blur(function() {
    $(this).hide().siblings("span.task-name").show();
});

We have a pretty functional tasklist application now. We can add, remove, and move tasks around. We can even edit the name of an existing task. There's only one problem. Since we added all of these task elements to the DOM dynamically, they won't be there the next time the user comes back to the application. We need a way to save the tasklist, so the next time the user comes back to the application the tasks will still be there. Otherwise, what's the point?
HTML5 has just the thing for that-Web Storage. Web Storage is a new API in HTML5 that allows you to store information on the client. In the past, the only kind of storage available on the client was cookies. But cookies aren't a great way to store data on the client. They are limited to only a few kilobytes of data and are also included in HTTP requests, inflating their size.
Web Storage, on the other hand, allows us to save much more data (up to 5 MB in most browsers) and adds nothing to the HTTP requests. It consists of two global objects that have the same interface,
localStorage
and sessionStorage
. The only difference between the two is that data stored in sessionStorage
goes away when the browser is closed, while data stored in localStorage doesn't. Since we want to save application data between sessions we will only use localStorage.
Data is stored as key/value pairs. You can set values using the setItem() method and retrieve values using getItem() as follows:
localStorage.setItem("myKey", "myValue");
var value = localStorage.getItem("myKey") // returns "myValue"
If you try to get a value using a key that doesn't exist in localStorage, it will return null. If you try to add a value to localStorage and there is not enough memory left, you will get a QUOTA_EXCEEDED_ERR exception.
There are a few limitations to localStorage:
The user doesn't necessarily have access to anything stored there (although it can be accessed through the browser's developer tools).
It is shared by all applications in a domain, so the storage limit is shared among all of your applications. This also means that all of your keys among all of your applications must be unique. If two applications use the same key they will end up overwriting each other's data.
Both keys and values must be strings. If you want to store something that is not a string, you must convert it to a string first. When you pull that value out of storage you must convert it back from a string to the type you're expecting.
Fortunately for us, JavaScript has a utility object called JSON that provides functions to convert values to and from strings. JSON stands for JavaScript Object Notation and is the standard for representing values as strings in a readable format. It is a subset of object literal notation in JavaScript, so if you know how to define object literals you know JSON. The JSON object has two methods; JSON.stringify() to convert a value to a string, and JSON.parse() to convert a string back into a value.
To help get around some of the limitations of localStorage we are going to create an object called AppStorage that provides a wrapper over the localStorage object. The AppStorage object will help us avoid key collisions and provide an easy way to store non-string values. Let's define this object in a new file called appStorage.js, so we can reuse it in all of our applications. You can find the code for this section in Chapter 1/example1.3.
function AppStorage(appName)
{
    var prefix = (appName ? appName + "." : "");
The constructor takes in the application name as a parameter. The next line sets a private variable named prefix that will be used to prefix all of our keys with the application name to avoid collisions. If an appName parameter is not provided, it will not use a prefix, which could be useful for data shared among all your applications. If we pass in "myApp" to the constructor, all of the keys for our app will start with "myApp" (for example, myApp.settings or myApp.data).
This next line creates a public variable that is used to determine if localStorage is supported by the browser. It simply checks to see if the global localStorage object exists:
this.localStorageSupported = (('localStorage' in window) && window['localStorage']);Let's implement the setValue() method used to set values in local storage first:
this.setValue = function(key, val)
{
    if (this.localStorageSupported)
        localStorage.setItem(prefix + key, JSON.stringify(val));
    return this;
};
The setValue() method takes a key and a value to put into local storage. It prepends the application prefix to the key to help avoid naming collisions. Since you can only put strings into local storage we use the JSON.stringify() method to convert the value to a string, and then call localStorage.setItem() to store it.
Now let's implement the getValue() method to get values from localStorage:
this.getValue = function(key)
{
    if (this.localStorageSupported)
        return JSON.parse(localStorage.getItem(prefix + key));
    else return null;
};
The getValue() method takes a key, prepends the prefix to it, and returns the string value associated with it in localStorage. It uses JSON.parse() to parse the string retrieved from localStorage into a value. If the key doesn't exist or local storage is not supported, these methods return null.
The next thing we need is a way to remove items. Let's implement the removeValue() method to do that. It simply calls localStorage.removeItem() passing in the prefixed key:
this.removeValue = function(key)
{
    if (this.localStorageSupported)
        localStorage.removeItem(prefix + key);
    return this;
};
While we're at it, let's add a method to remove all keys for an application. localStorage does have a clear() method, but that completely empties out localStorage for your domain, not just the values for our application. So we need to get all of the keys for our application and then delete them one-by-one:
this.removeAll = function()
{
    var keys = this.getKeys();
    for (var i in keys)
    {
        this.remove(keys[i]);
    }
    return this;
};
The removeAll() method references a getKeys() method. This method will return an array of all key names for the application. We will make the getKeys() method, so the user can also pass in a filter function to further filter the results by their own criteria if they wish:
this.getKeys = function(filter)
{
    var keys = [];
    if (this.localStorageSupported)
    {
        for (var key in localStorage)
        {
            if (isAppKey(key))
            {
                // Remove the prefix from the key
                if (prefix) key = key.slice(prefix.length);
                // Check the filter
                if (!filter || filter(key))
                {
                    keys.push(key);
                }
            }
        }
    }
    return keys;
};
function isAppKey(key)
{
    if (prefix)
    {
        return key.indexOf(prefix) === 0;
    }
    return true;
};
This method works by looping over all of the keys in localStorage, which you can get in the same way that you get all of the keys in an object or array, by implementing a loop using the in keyword. It calls the private method isAppKey() to determine if the key belongs to our application. If so, it removes the application prefix from the key. Lastly, if no filter is defined or the filter function returns true, add the key to the array of keys to pass back.
The private isAppKey() method takes a key name as the parameter and returns true if the key belongs to our application. If an application name prefix is not defined there's nothing to check. Otherwise we check to see if the key starts with the application prefix.
There's one last public method we need to write. The contains() method will determine if there is a value associated with a key. It simply tries to get the value associated with the key and checks to see if it exists:
this.contains = function(key)
{
    return this.get(key) !== null;
};Let's get back to the tasklist application. First we'll add a reference to appStorage.js in our HTML file:
<script src="appStorage.js"></script>
Next we'll add a private appStorage variable to the TaskAtHandApp object, passing in the name of the application to the constructor:
function TaskAtHandApp()
{
    var version = "v1.3",
        appStorage = new AppStorage("taskAtHand");
    //…
}
Now let's add a private method that can be called to save the tasks whenever a change is made:
function saveTaskList()
{
    var tasks = [];
    $("#task-list .task span.task-name").each(function() {
        tasks.push($(this).text())
    });
    appStorage.setValue("taskList", tasks);
}
The saveTaskList() method finds all of the task name <span> elements for each task in the list. Then it calls the jQuery each() method, which is used to iterate over the elements that were found by the select. The each() method takes a function as a parameter and calls that function for each element. Our function simply pushes the task name onto the end of the tasks array. Then we call appStorage.setValue() telling it to store the tasks array using the key "taskList".
Now we need to add a call to saveTaskList() every time the list changes. That would be in the addTask() and onChangeTaskName() methods. Also, in addTaskElement() we need to call it from the button click event handlers for delete, move-up, and move-down. To make things easier to read, let's do a little refactoring for the button event handlers by moving the inline handler code out to private methods:
function addTaskElement(taskName)
{
    // code not shown…
    $("button.delete", $task).click(function() {
        removeTask($task);
    });
    $("button.move-up", $task).click(function() {
        moveTask($task, true);
    });
    $("button.move-down", $task).click(function() {
        moveTask($task, false);
    });
    //…
}
function removeTask($task)
{
    $task.remove();
    saveTaskList();
}
function moveTask($task, moveUp)
{
    if (moveUp)
    {
        $task.insertBefore($task.prev());
    }
    else
    {
        $task.insertAfter($task.next());
    }
    saveTaskList();
}
Let's take a look at this in Chrome now. Go ahead and add a few tasks then press F12 to open developer tools. If you click on the Resources icon at the top of the window you will see a list of resources in the left pane. Expand the Local Storage item and click on the item under it. You should see all of the data that is stored in local storage for your domain in the right pane:
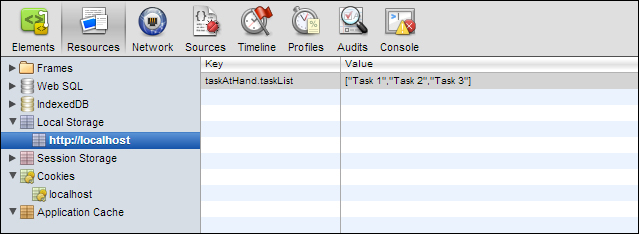
In the Key column you should find taskAtHand.taskList and see the JSON that represents our list of tasks in the Value column, which as you may recall is stored as an array.
Now go ahead and play around with it. Try adding, removing, editing, and moving tasks around. You should see the value in local storage get updated after every change. We now have a persistent tasklist.
Some browsers don't allow access to localStorage when using the file:// protocol (that is, you opened the file directly from the file system into your browser). If your localStorage isn't working, try it in another web browser or access your application through a web server, such as IIS or Apache.
We have the tasklist saved. But that doesn't do us much good if we can't load it. So let's add a new private method called loadTaskList():
function loadTaskList()
{
    var tasks = appStorage.getObject("taskList");
    if (tasks)
    {
        for (var i in tasks)
        {
            addTaskElement(tasks[i]);
        }
    }
}
This method calls appStorage.getValue() passing in the key for our tasklist. Then it checks to make sure we got something back. If so, it iterates over all of the tasks in the array calling the addTaskElement() method for each one.
The only thing left to do is add a call to loadTaskList() from the start() method, so the list is loaded when the application starts:
this.start = function()
{
    // Code not shown…
    loadTaskList();
    setStatus("ready");
};We used the AppStorage object in our tasklist application to store the tasklist to localStorage any time something changes, and then retrieve it and build the tasklist when the user returns.
Write a local storage browser application that can be used to look at the data for each application in your domain. At the top level, list all of the applications. When you drill down into the application, it shows all of its local storage items. When you click an item, it shows the contents of that item.
There you have it. We now have our first HTML5 application under our belts. A tasklist where we can add, remove, and edit tasks. The tasks are persisted, so that when the user returns to the application they can continue from where they left off. We covered the following concepts in this chapter:
We learned the basics of building an HTML5 application and its three components, HTML, CSS, and JS
We created an application template to help us get new applications started quickly
We learned how to use jQuery to access and manipulate the DOM
We learned how to initialize a web application and handle user interaction
We learned how to create HTML templates so we can define reusable element structures in markup
We learned how to use Web Storage to save and retrieve the state of an application, and created an
AppStorageobject to help us accesslocalStorage
Now that we've learned the basics of creating HTML5 applications and have our tasklist application working, we're ready to do some styling. In the next chapter, we will learn about some of the new CSS3 features that will make our application look as good, or better than, any desktop app.