


Back in the early years of the Internet, multimedia was limited to tinkering with MIDI files and animated GIFs—while these were considered very advanced at the time, some of us probably wonder why we ever used them, given the advanced state of web technologies available today!
If you wanted to include any multimedia file(s), you would be forced to include a cryptic block of code similar to the following code snippet:
<object width="425" height="344">
  <param name="movie"
value="http://www.youtube.com/v/9sEI1AUFJKw&hl=en_GB&fs=1&"></param>
  <param name="allowFullScreen"
    value="true"></param>
  <param name="allowscriptaccess"
    value="always"></param>
  <embed src="http://www.youtube.com/v/9sEI1AUFJKw&hl=en_GB&fs=1&"
    type="application/x-shockwave-flash" allowscriptaccess="always"
    allowfullscreen="true" width="425"
    height="344"></embed>
</object>
Tip
Downloading the example code
You can download the example code files for all Packt books you have purchased from your account at http://www.PacktPub.com. If you purchased this book elsewhere, you can visit http://www.PacktPub.com/support and register to have the files e-mailed directly to you.
Most of the preceding code snippet has now become redundant, at least for modern browsers, due to advances in HTML technology since 2005. As you will see later in this book, this code has been reduced down to three to four lines (although you can add more options later if you wish).
The downside of this is that while the HTML5 standard code has shrunk, browser support has unfortunately not kept up—developers using the HTML5 <video> and <audio> tags must make allowances for different formats, as you will see throughout this chapter.
To accommodate for some of the confusion still surrounding HTML5 video formats you, as a developer, will need to allow for a number of different platforms in order to ensure that support is kept as wide as possible, as shown in the following table:
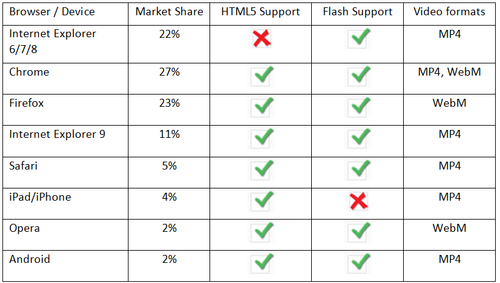
Data is correct as at April 2012 with http://www.longtailvideo.com/html5 as the source.
The net result is that you will need to cater for several formats for video—the main ones now are WebM and MP4; you can also convert to Ogg Vorbis format, although this format is not so widely used.
Note
Please note that all of the tasks in this book are based on using Windows as the author's preferred platform—wherever possible, suggestions for equivalents on the Apple Mac platform are provided.
In this chapter, we're going to begin with converting your video masterpiece into a format suitable for use with HTML5 video.
The following task will take you through the transcoding of a video into HTML5 format using a shareware application called Easy HTML5 Video Convertor, which is available at http://www.easyhtml5video.com. It's available free for non-commercial use. To remove the logo or use it for commercial purposes, you will need to purchase a license (which is $49 for a single website and $69 for multiple sites at the time of writing).
Before we can convert the videos, you need to download a copy of Easy HTML5 Video Convertor for your platform—it is available for Windows as well as Apple Macs. Make sure you also have a copy of your raw video at hand, ready for conversion. For the purposes of this task, I will assume it is in the .mov format.
The first step is to install the software; so let's go ahead and run the
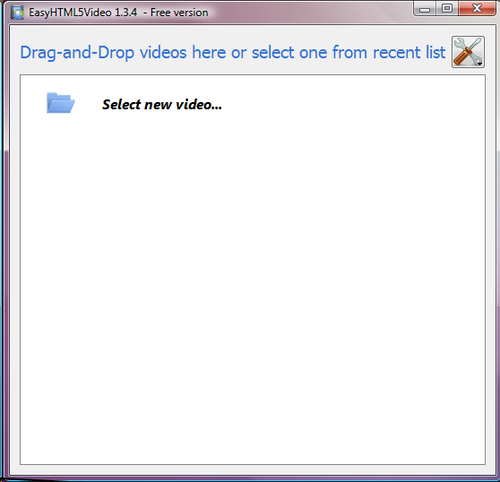
easyhtml5video-setup.exeprogram, accepting all defaults.Double-click on it to open up EasyHTML5Video 1.3.4 – Free version and click on Select new video…, then drag and drop your video onto the screen that looks similar to the following screenshot:
The screen will change to show the selected video and its properties, as shown in the following screenshot:
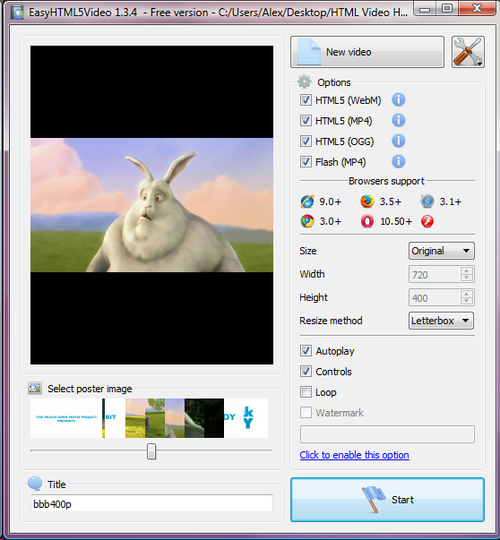
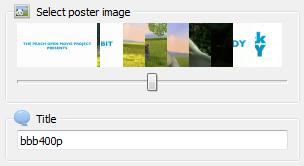
For the purposes of this task, we need Easy HTML5 Video to export copies of the videos into all of the required formats—this includes Flash as the fallback format. The only change you need to make is to the poster image that you want to use—change the slider to an appropriate frame as shown in the following screenshot:
This will act as the image displayed before the video is started. We will take a look at poster images in more detail in the next chapter.
We're going to keep the same filename as before, which will help with setting up the
<video>code later. So, go ahead and click on Start to begin the conversion process. At this point, you may want to go make a cup of coffee as the process will take quite a few minutes depending on the size of your video!The final stage of the conversion process is to select where the content will be published. By default, the files will be placed into a folder called
EasyHTML5Videowithin yourDocumentsfolder (as shown in the following screenshot); you can store the files elsewhere if you wish to:
Click on Publish. The file conversion process is now complete and an example of the video will start playing in your default browser. Also produced is a folder with some standard HTML5 video code that pulls in the appropriate video to play depending on which browser you use. We will take a look at that code later in this book.
Here we looked at how to simultaneously convert your video into formats suitable for playing using the new HTML5 <video> tags. EasyHTML5Video saves you a lot of hard work in the conversion process—it makes it a snap to convert the file into the right format, and automatically creates the basic code to allow basic playback in a browser.
In this example, we kept most of the settings at the defaults, which is perfectly acceptable for converting video files. You could also alter the size of the converted video if desired, or set it to automatically play when first shown (though this is not recommended as we will see in the next chapter).
Now that we have converted our videos, ready for playback, it's time to ensure that we can actually play them back on our PCs as well as in our browsers. Most of the latest browsers will play at least one of the formats we've created in the previous task, but it is likely that you won't be able to play them outside of the browser. Let's take a look at how we can fix this by updating the codecs installed in your PC.
Note
For those of you not familiar with codecs, they are designed to help encode assets when the video is created and decode them as part of the playback. Software and hardware makers will decide the makeup of each codec based on which containers and technologies they should support; a number of factors such as file size, quality, and bandwidth all play a part in their decisions.
Let's take a look at how we can update our PCs to allow for proper playback of HTML5 video.
There are many individuals or companies who have produced different codecs with differing results. We will take a look at one package that seems to work very well for Windows, which is the K-Lite Codec Pack . You will need to download a copy of the pack, which is available from http://fileforum.betanews.com/detail/KLite-Codec-Pack-Basic/1094057842/1—use the blue Download Now link on the right-hand side of the page. This will download the basic version, which is more than sufficient for our needs at this stage.
Let's go ahead and install the software! This task assumes you will be using Windows Media Player on a Windows PC platform.
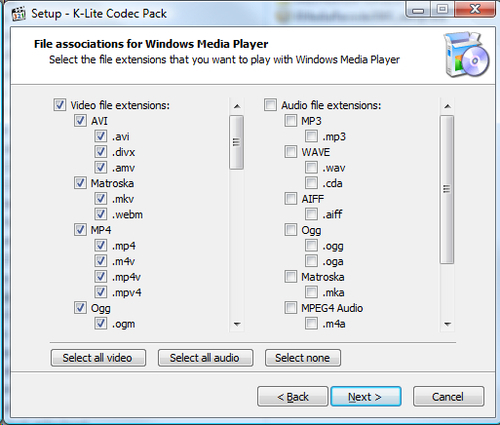
Go ahead and double-click on the K-Lite_Codec_Pack_860_Basic.exe setup file. Click on Next, and then accept all defaults until you reach the File associations for Windows Media Player screen (as shown in the following screenshot); when prompted for the Installation mode on screen 2, choose Advanced.
When you reach the File Associations for Windows Media Player screen, select the Select all video option to enable support for all video formats as shown in the following screenshot:
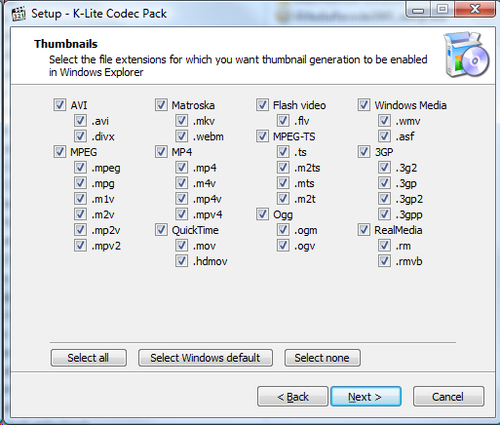
On the next screen, select Select all as shown in the following screenshot:
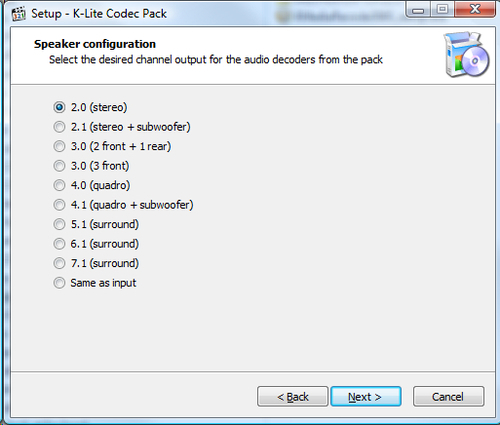
On the Speaker configuration screen (as shown in the following screenshot), select the 2.0 (stereo) option—while you can adjust this later, it is sufficient for the purposes of this task.
Click on Install and then Finish. The codecs have now been installed!
In order to play back HTML5 format videos in Windows Media Player, you need to ensure you have the correct support in place; Windows Media Player doesn't understand the encoding format of HTML5 videos by default. In order to overcome this, we need to install additional support for the playback of these videos using codecs designed for the various formats available—the K-Lite package aims to remove some of the pain of this process.
The package we've looked at in this task is only available for Windows; if you are a Mac user, you will need to use an alternative method. There are many options available: you can try using Perian, which will add MP4 and WebM formats to QuickTime and is available at http://www.perian.org. The OGG format is not supported natively on Apple Macs, so if you want to add support, you can do so using a third-party application such as the Quick Time Components from Xiph.org at http://www.xiph.org.
Now that we have our video in an HTML5 compatible format, and we can play it on our PC, we need to make it available for others to view. There are several options available to achieve this. In this task, we will look at two options, beginning with uploading to YouTube. In the second part of this task, we will focus on uploading videos to VideoBin.org.
For the purposes of this task, we're going to use one of the videos we converted from Task 1, so make sure you have this available.
In order to get the best results in the task to follow, you need to ensure that you use an HTML5 compatible browser. Also, you need to have a registered free account at YouTube and should have enrolled yourself in YouTube's HTML5 video trial at http://www.youtube.com/html5.
For the second part of this task, the only prerequisite to ensure optimal playback is that the video should be encoded to Ogg Theora format. This is to save bandwidth, although other formats can be used—VideoBin will automatically convert (or transcode) the videos on the fly. For the purposes of this task, I will assume you have used the video you converted in the previous task.
Browse to http://www.youtube.com and sign in to your account, then click on Upload to begin the process, as shown in the following screenshot:

We're going to upload one of the video files created from Task 1, so go ahead and click on Select files from your computer to choose a video, as shown in the following screenshot:

YouTube will upload your video (as shown in the following screenshot)—the video can be up to a maximum of 15 minutes in length:

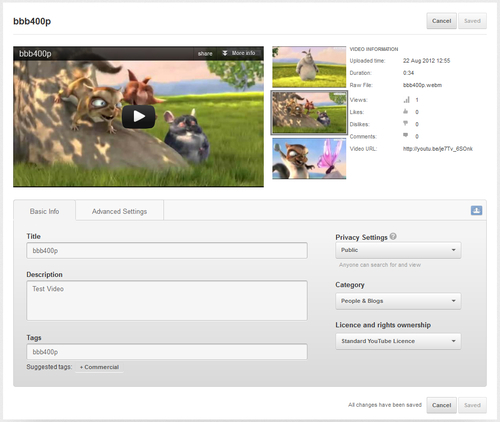
YouTube will show a confirmation once the video has been uploaded. At this stage, you can set the visibility (or who will be able to see this video) as well as the title, description, and tags for your video, as shown in the following screenshot:

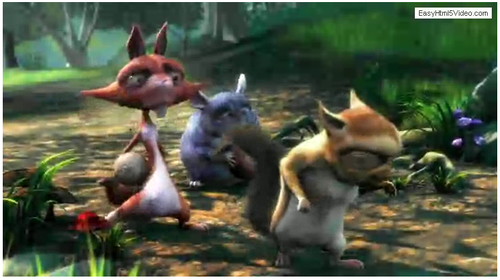
You will notice a link under the name of the uploaded video—you can click on this link to see how your video will appear in YouTube as seen by other users:

An alternative to using YouTube is to use another service, where licensing is not so restrictive; one such service is VideoBin, hosted at http://www.videobin.org. In this part of the task, we will look at how to upload and access content from this service.
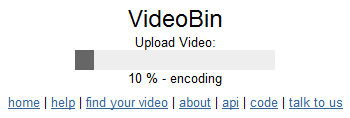
Browse to http://www.videobin.org and click on Select File.. to browse to your video and then click on Upload, as shown in the following screenshot:
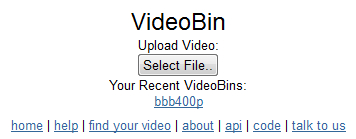
VideoBin.org will display a running total for the conversion process:
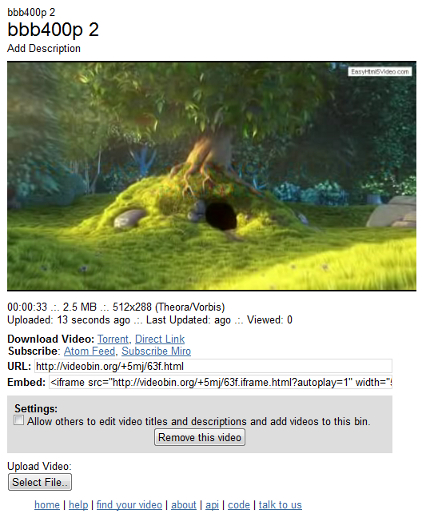
Once converted, the video will be displayed on screen along with details regarding its site, location, and time so that you can then embed the URL into your site at will, as shown in the following screenshot:
YouTube has designed its upload process to be flexible and very easy to use. You can upload any of the HTML5 format videos (such as the ones we created from Task 1) as well as AVI, MPEG-PS, WMV, and FLV formats. When the file is uploaded, it is automatically transcoded into WebM format—this is effectively a free version of the VP8 format developed by On2 Technologies, which was subsequently bought out by Google in 2010.
At this stage, you will have a perfectly working video hosted on YouTube that is available for you to embed into your site in the normal manner.
However, if you go to Video Manager from within YouTube, you can edit the settings assigned to this video such as Privacy, Video thumbnail, allowing Comments and ratings, depending on your own preferences, as shown in the following screenshot. You can even set Google Maps to show where you recorded your video!
In the second part of this task, we looked at using VideoBin.org—a free hosting service with a less restrictive licensing arrangement than YouTube. Written using Python and Django, converting videos through VideoBin.org has been designed to be kept simple, so that you can concentrate on hosting your main content without the worry of the additional demand or overheads of running a video on your own server. You will then be able to style your video player as you wish, using styles that fit in with your site; we will see how to do this later in this book.
The key thing to bear in mind is the format used—while the upload process is deliberately kept simple, you will notice a delay if the chosen video is not already using the Ogg Vorbis format. All uploaded videos are transcoded from their original format to Ogg Vorbis using ffmpeg2theora as part of the process.
In the next section, we will take a look at how to style your own video player, so that you can use your own styles that will fit in with your site's appearance.
Up until now, we've concentrated on preparing our video for use with the HTML5 video tags. Let us now turn our attention to how you can embed videos into your pages looking at the following sections:
Comparing HTML5 video code with Flash
Embedding videos using HTML5
Adding more options to HTML5 video code
Adding support for videos using mime types and codecs
Support for cross-browser playback
Some examples of prebuilt video players
Adapting for iPads/iPhones/Android
Note
All the screenshots, throughout this section (unless stated otherwise), are taken from "Big Buck Bunny", movie available from the Peach Open Movie Project; the video is (c) copyright 2008, Blender Foundation at www.bigbuckbunny.org.
We will begin this section with a timely reminder of how to embed videos into web pages using the classic <embed> and <object> tags.
For this task, you will need to avail yourself of two videos—one in SWF format and the other in WMV format. If you don't have any available at hand, there might be examples available on the Internet. One such example is the trailer for "Big Buck Bunny", available from the Peach Open Movie Project at http://www.bigbuckbunny.org/index.php/trailer-page/. You might have to convert it to the proper formats required for this demo—a good program to use for this is XMedia Recode, which is available at http://www.xmedia-recode.de (German language).
Open up your favourite text editor and add the following code snippet—save this as
videotemplate.html; we will be reusing this in later tasks:<!doctype html> <html> <head> <title>Embedding a video using <embed> and <object> tags</title> </head> <body> </body> </html>
Add the following code snippet in between the
<body></body>tags, replacingexample.swfandvideofilename.wmvwith the filenames of your chosen videos:<!-- code for embedding windows media player --> <object id="mediaplayer" width="192" height="190" classid="clsid:22d6f312-b0f6-11d0-94ab-0080c74c7e95"standby="Loading Windows Media Player components..." type="application/x-oleobject"><param name="filename" value="videofilename.wmv"><param name="autostart" value="false"><param name="showcontrols" value="true"><param name="showstatusbar" value="false"><param name="showdisplay" value="false"><embed type="application/x-mplayer2" src="videofilename.wmv" name="mediaplayer"width="192" height="190" showcontrols="1" showstatusbar="0" showdisplay="0" autostart="0"></embed></object> <!-- code for embedding adobe quicktime --> <object classid="clsid:d27cdb6e-ae6d-11cf-96b8-444553540000" codebase="http://download.macromedia.com/pub/shockwave/ cabs/flash/swflash.cab#version=6,0,40,0" width="468" height="60" id="mymoviename"> <param name="movie" value="example.swf" /><param name="quality" value="high" /> <param name="bgcolor" value="#ffffff" /> <embed src="example.swf" quality="high" bgcolor="#ffffff" width="468" height="60" name="mymoviename" align="" type="application/x-shockwave-flash" pluginspage="http://www.macromedia.com/go/getflashplayer"> </embed> </object>
This is an example of what you will see when using the Windows Media player code—I'm using a copy of the "One Big Rabbit" video, available from the Peach Open Movie Project, as shown in the following screenshot:

The code embeds an instance of each of the Windows Media Player and Adobe QuickTime plugins within the webpage; it uses the codebase attribute to reference the relevant plugin. If a hash value is included in the URL provided for this attribute, then the browser will compare this version with the one currently installed and either use it or download a more recent version.
The preceding code snippet highlights a couple of major drawbacks: the embed code doesn't work in all browsers despite using the <embed> and <object> tags within the code block; it also requires the use of external plugins in order to operate correctly.
In the next task, we will be looking at how the preceding code snippet can be simplified using HTML5's <video> tag.
In the previous task, we had a look at how you would have had to embed videos before the advent of HTML5. In this task, we will update the code to use the HTML5 equivalent version.
For this task, you will need a copy of one of the videos we converted in Task 1 of the previous section.
For the purposes of this task, I'm going to use the WebM format version. You will also need a copy of the videotemplate.html file saved from the previous task.
Crack open your usual text editor, load up a copy of the videotemplate.html file, and then make the changes shown in the following code snippet:
<!doctype html>
<html>
<head>
<title>HTML5 Video Test</title></head>
<body>
<video>
<source src="trailer_480p.webm" />
</video></body>
</html>
That's all you need to embed video—this will work perfectly in Firefox as shown in the following screenshot:
But as we will see later in this section, it won't work in all browsers!
The <video> attribute was designed as an attempt to standardize the HTML code required to embed videos within browsers; the source tags act as a form of browser sniffing, selecting the appropriate video format to play in the browser being used. In this instance, it will only display in Google Chrome, Opera, and Firefox. Other browsers will show nothing—although IE9 and Safari will play WebM format videos if third-party support has been added.
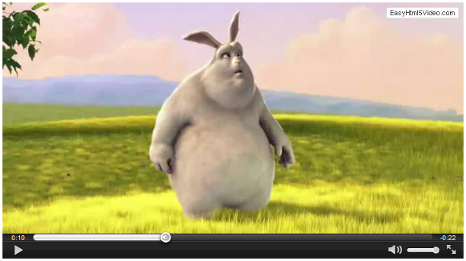
The previous task took us through the basics of how to embed video into a web page using the HTML5 <video> tag. However, there is a lot more functionality available with this tag, such as providing controls, controlling the height or width, and adding a "poster" image. In this task, we will take a look at some of this functionality.
For this task, you will need a copy of the code from the previous demo—we are going to alter it to provide a more functional player.
Open up a copy of the code from the previous demo in your usual text editor:
<!doctype html>
<html>
<head>
<title>HTML5 Video Test</title>
</head>
<body>
<video>
  <source src="trailer_480p.webm" />
</video>
</body>
</html>
The first change we're going to make is to specify a height and width for the video. So, make the following change to the code to set up a defined area for the video:
<video width="720" height="400" ><source src="trailer_480p.webm" />
</video>
The next change concerns the lack of controls, which is easy to fix:
<video width="720" height="400" controls="controls" ><source src="trailer_480p.webm" />
</video>
Another change we can make, which makes for a more rounded experience, is to add a poster image that will show whether the video is loading or the user has yet to click on play:
<video width="720" height="400" controls="controls"   poster="trailer_480p.jpg"><source src="trailer_480p.webm" />
</video>
The code will work in a similar fashion to that of the previous task, but this time we've added a request to show the standard browser controls for the <video> tag as well as asking it to load an image as a "placeholder" before the video is played.
There are some more tags that can be used when embedding HTML5 video as shown in the following table:
|
Name of attribute |
Value |
Description of attribute |
|---|---|---|
|
autoplay |
autoplay |
Specifies that the video will start playing as soon as it is ready |
|
loop |
loop |
Specifies that the video will start over again every time it finishes playing |
|
muted |
muted |
Specifies that the audio output of the video should be muted |
|
preload |
auto metadata none |
Specifies if and how the author thinks the video should be loaded when the page loads |
It is worth noting that these are available for use, although it is unlikely that you will want to use them by default; a good example is the autoplay option, which can place an unnecessary drain on bandwidth if not used carefully! (This is particularly true on iPhones, which will ignore autoplay by default.)
You will also notice that although we've only added one command to display the controls, the colors and design used will differ between browsers:
From top to bottom of the preceding screenshot, we have Internet Explorer, Safari, Google Chrome, and Firefox.
Now that we have set up the basic video code, it is time to try playing the video—in some circumstances, you may find that browsers will not play videos correctly if it can't determine the mime type to use. In this task, we implement an easy change to rectify this and allow videos to play correctly.
Note
Multi-Purpose Mail Extension (MIME) types are made up of two parts—a type and a subtype—and are means to help define file types so that a client PC can correctly interpret how to treat a file received from a server via the Internet. For example, the HTML5 video formats used in this book have the type of video, but the subtypes could be .ogg, .mp4, or .webm.
Crank up your favourite text editor and create a new text document. Save it as
.htaccessinto the root folder of your website.Add the following text and save the file:
AddType video/ogg .ogv
AddType video/mp4 .mp4
AddType video/webm .webm
Try playing the video now—hopefully, you may find nothing has changed, and that the video still continues to play. The change you've made now ensures that anyone playing the video will be able to play it properly depending on which browser they use.
In most instances, browsers will usually play the right video. However, the HTTP protocol doesn't know the concept of file extensions—this means you cannot rely on a browser being able to play the right video all of the time. To get around this, we add in this small configuration change, so that the browser is able to correctly determine the file format from the extension and play the video.
In all of the tasks so far, we've looked at support for one video using the WebM format. While this is arguably one of the better formats that is unencumbered with patents (being open source), it means that playback will be limited by default to Opera and Chrome as the other browsers don't support this format by default. In this task, we will take a look at modifying our code to make it work across multiple platforms.
For this task, you need to avail yourself of a copy of the code from the Extending the video code task as we are going to make some changes to this code. Other than this, make sure you have copies of your video in MP4 and OGG formats (while the latter format is not used as much, we will still include it in our code).
The first step is to crack open your text editor of choice and load up a copy of the code from the Extending the video code task:
<!doctype html>
<html>
<head>
<title>HTML5 Video Test</title>
</head>
<body>
<video width="720" height="400" controls="controls"   poster="trailer_480p.jpg">
  <source src="trailer_480p.webm" />
</video>
</body>
</html>
The first step is to add support for the MP4 format (used by all browsers except Firefox and Opera), so alter your code as follows:
<video width="720" height="400" controls="controls"   poster="trailer_480p.jpg">
  <source src="trailer_480p.webm" />
<source src="trailer_480p.mp4"; type="video/mp4" /></video>
We're also going to add in support for OGG format videos:
<video width="720" height="400" controls="controls"   poster="trailer_480p.jpg">
  <source src="trailer_480p.webm" />
  <source src="trailer_480p.mp4" />
<source src="trailer_480p.ogv" type="video/ogg" /></video>
The eagle-eyed amongst you will spot that the type and codec settings for the WebM format are not present, so let's correct that now:
<video width="720" height="400" controls="controls"   poster="trailer_480p.jpg">
<source src="trailer_480p.webm"
type="video/webm" /><source src="trailer_480p.mp4" type="video/mp4" />
  <source src="trailer_480p.ogv" type="video/ogg" />
</video>
The reason for specifying a number of different sources is to allow the browser to pick the right video to play; not all formats are compatible with all browsers. You will see that we've also specified the MIME types for each video format; this is to help the browser to decide whether it can play that video and also which format the video should be played in. If a MIME type is not specified, then the browser has to start downloading it in order to find out whether it can play the video; this can be wasteful of bandwidth.
Throughout most of this section, we've looked at code that will allow you to play a number of different videos. In most cases, the browser will work out automatically which video to play; in some instances, it may not get it right or refuse to play any of the videos listed in the code. In this task, we take a look at how to specify a codec for each video, which will help the browser determine how to play the chosen video properly.
All we need for this is a copy of the code from the previous task—the codecs should already be present on your PC if you installed them in the first section of this book.
The first step is to crack open your text editor of choice and load up a copy of the code from the Adding cross-browser su pport task:
<!doctype html>
<html>
<head>
<title>HTML5 Video Test</title>
</head>
<body>
<video width="720" height="400" controls="controls"
  poster="trailer_480p.jpg">
  <source src="trailer_480p.webm" type="video/webm" />
  <source src="trailer_480p.mp4" type="video/mp4" />
  <source src="trailer_480p.ogv" type="video/ogg" />
</video>
</body>
</html>
The next step is to add support for the MP4 format (used by all browsers except Firefox and Opera), so alter your code as follows:
<video width="720" height="400" controls="controls"   poster="trailer_480p.jpg">
  <source src="trailer_480p.webm" />
<source src="trailer_480p.mp4" type="video/mp4;
  codecs='avc1.42E01E, mp4a.40.2'" /></video>
We're also going to add in support for OGG format videos as follows:
<video width="720" height="400" controls="controls"   poster="trailer_480p.jpg">
  <source src="trailer_480p.webm" />
  <source src="trailer_480p.mp4" type='video/mp4;
  codecs="avc1.42E01E, mp4a.40.2"' />
<source src="trailer_480p.ogv" type='video/ogg;
  codecs="theora, vorbis"' /></video>
The eagle-eyed amongst you will spot that the type and codec settings for the WebM format are not present, so let's correct that now:
<video width="720" height="400" controls="controls"   poster="trailer_480p.jpg">
<source src="trailer_480p.webm"
type='video/webm;
  codecs="vp8, vorbis"' /><source src='trailer_480p.mp4; type='video/mp4;
  codecs="avc1.42E01E, mp4a.40.2"' />
  <source src='trailer_480p.ogv; type='video/ogg;
  codecs="theora, vorbis"' />
</video>
Working with codecs, particularly within the HTML5 arena, can open up a real minefield of confusion. The key to understanding it is that enabling codec support increases the likelihood that a browser will be able to correctly determine whether it is able to play that particular video correctly.
In the previous code, I've specified some typical codecs that can be used—while the codecs for WebM and Ogg are straightforward, the one for MP4 (or MPEG-4) is less so; the codec used here represents the Baseline profile for H.264 and the Low-complexity profile for AAC.
It is perfectly possible to use a number of different codecs with particular video types—one good example is the MP4 format. Care should be exercised when choosing an appropriate codec. If one is chosen that is not a popular codec, then it is possible that the video may not play. The reason for this is that if the browser recognizes the file type (either inline in the code or via the .htaccess file), but doesn't "see" the appropriate codec installed, it will then refuse to play the video.
A key part of using the HTML5 <video> tag is that while the format is still evolving as a standard, it is still necessary to provide some form of fallback support for older browsers that cannot support the tag. In this task, we will look at providing that support.
In order to get the best out of this task, you will need to avail yourself of some means to be able to view your video pages within an older browser. There are several ways to achieve this, depending on which browser you choose:
Adobe BrowserLab : This will allow testing in various versions of IE, Chrome, Safari, and Firefox.
Firefox Portable (http://portableapps.com/apps/internet/firefox_portable): This will allow you to install a standalone version of Firefox, which won't affect any existing profiles on your PC. Legacy versions are available for older browsers.
For Internet Explorer: The best option here is to try using IETester; this has versions of IE built in all the way from 5.5 up to version 9. This is available for download from http://www.my-debugbar.com/wiki/IETester/HomePage.
Lunascape 6 (from http://www.lunascape.tv/): This is a triple-engined browser with support for Trident (IE), Gecko (Firefox), and Webkit (Chrome and Safari)-based browsers.
To begin, open up your favourite text editor and copy in the following code snippet:
<!doctype html>
<html>
<head>
<title>HTML5 Video Test</title>
</head>
<body>
<video width="720" height="400" controls="controls"   poster="trailer_480p.jpg">
  <source src="trailer_480p.webm" type="video/webm" />
  <source src="trailer_480p.mp4" type="video/mp4" />
  <source src="trailer_480p.ogv" type="video/ogg" />
</video>
</body>
</html>
Over the following three steps, we will create a fair amount of code beginning with the embedding of the
<object>tag. Add in the following section of code immediately below the last<source>tag:<object type="application/x-shockwave-flash" data=flashfox.swf" width="720" height="400" style="position:relative;"> <param name="movie" value="flashfox.swf" /> <param name="allowFullScreen" value="true" /> <param name="flashVars" value="autoplay=true&controls=true&loop=true&src=trail er_480p.mp4" />
We also need to add in the equivalent using the
<embed>tag immediately afterwards:<embed src="flashfox.swf" width="720" height="400" style="position:relative;" flashVars="autoplay=true&controls=true& loop=true&poster=trailer_480p.jpg&src=trailer_480p.mp4" allowFullScreen="true" wmode="transparent" type="application/x-shockwave-flash" pluginspage="http://www.adobe.com/go/ getflashplayer_en" />
The last stage is to add in a background image, and fall-back text; we then finish with the closing
</object>tag:<img alt="trailer_480p" src="trailer_480p.jpg" style="position:absolute;left:0;" width="720" height="400" title="Video playback is not supported by your browser" /> </object>
The aim of the code is to provide fallback support for displaying a Flash-equivalent movie; this is achieved by using a SWF-based container from which we run the MP4 file that would otherwise be run from within the <video> source tags. We also include a plain image and set a title attribute for it—this will be the "last-call" route that the browser will take if it is unable to play any of the videos listed within the code.
While the previous code will work as a fall-back for the HTML5 video, there are some points to note:
The
<embed>tag is actually not a valid tag—it was designed to provide support for Netscape browsers in the early days, but more modern versions do support the<object>tag. The<object>tag was designed to provide support for IE browsers.The
<object>tag is valid within HTML5—as a minimum, this should be used when providing fall-back support; I have provided an example for using the<embed>tag as well, although this is optional.
Throughout this chapter, we've looked at the various elements required to play back HTML5 video in your pages. Whilst the code will work in modern desktop browsers, it will likely fail on handheld devices—we are going to rectify this in our next task.
For this task, you will need to ensure that you have videos that are of a suitable size for playback on mobile devices; you can try using a free conversion service such as Online-Convert.com at http://www.online-convert.com to convert the videos down to a preset size depending on which platform(s) you want to support.
Open up your text editor of choice and add in the following lines replacing
trailer_480pwith the name of your video:<!doctype html> <html> <head> <title>HTML5 Video Test</title> </head> <body> <video width="720" height="400" controls="controls" poster="trailer_480p.jpg"> <source src="trailer_480p.webm" type="video/webm" /> <source src="trailer_480p.mp4" type="video/mp4" /> <source src="trailer_480p.ogv" type="video/ogg" /> </video> </body> </html>
The first change we need to make is to the poster—iOS 3.x doesn't like the poster attribute, so unfortunately this needs to be removed:
<video width="720" height="400" controls="controls">
iOS 3.x is fussy about the order in which the videos appear—as it (and other handheld devices) can only play back MP4 format videos, this needs to appear as the first video source:
<video width="720" height="400" controls="controls">
<source src="trailer_480p.mp4" type="video/mp4" /><source src="trailer_480p.webm" type="video/webm" />
  <source src="trailer_480p.ogv" type="video/ogg" />
</video>
Android < 2.3 doesn't like the type attribute, so we need to remove it from the MP4 source tag (the only container Android currently supports). Here, the type attribute has been removed and the relevant codecs for the other two video source tags have also been added:
<video width="320" height="240" controls>
<source src="vid.mp4">
<source src="trailer_480p.webm" type='video/webm;
  codecs="vp8, vorbis"'>
<source src="trailer_480p.ogv" type='video/ogg;
  codecs="theora, vorbis"'> </video>
The changes made in this task are designed to get around some browser or OS quirks that still exist as well as the (still) limited support for video formats on the mobile platform. This task highlights one of the reasons HTML5 video can still be confusing for some—this is still largely due to HTML5 being an emerging technology for which support is still evolving.
The key to this task is that while the changes required are simple to make, you should expect to have to make changes in the future, until HTML5 for the mobile platform has matured. For example, as you will have seen from this task, support only exists for the MP4 format for most mobile platforms—this is likely to remain until mobile devices appear with hardware decoders for the WebM format built in. When this happens, it would mean that there would be no need to have to include the MP4 format as the first source; it is likely that the order would then not matter, although that is up to the mobile device manufacturers!
Note
If you are interested in the state of developments for the WebM project and particularly in respect of hardware support, then it is worth reading the WebM blog at http://blog.webmproject.org.
Throughout this section, we've had a look at the code required to produce a basic HTML5 video player on a web page as well as the options available for configuring the player. For this task and the next, we are going to look at a couple of examples of pre-built players that are available for download from the Internet - namely VideoJS and Kaltura. Both are open-source applications, and are available at no cost.
For this, we don't actually need to download any files—VideoJS is one of those rare players that is available on a Content Delivery Network (CDN); it is enough to link to the files for the purpose of this task.
Crank up your text editor and add the following code snippet:
<!doctype html>
<html>
<head>
<title>HTML5 Video Test</title>
</head>
<body>
</body>
</html>
Let's begin adding in the JavaScript library and CSS calls in your
<head>tags:<link href="http://vjs.zencdn.net/c/video-js.css" rel="stylesheet"> <script src="http://vjs.zencdn.net/c/video.js"></script>
The bulk of the code required to run the player is very similar to the code we've used throughout this section—the differences have been highlighted:
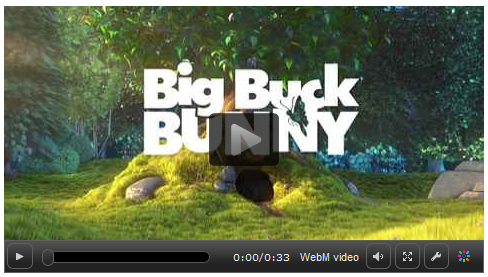
<video id="my_video_1" class="video-js vjs-default-skin"   controls preload="auto" width="720" height="400"     poster="trailer_480p.jpg" data-setup="{}">
  <source src="trailer_480p.mp4" type='video/mp4'>
  <source src="trailer_480p.webm" type='video/webm'>
</video>
If all is well, you will have a video playing similar to the following screenshot:
The player uses very similar code to that we've used throughout this section—the styling however has been customized using additional CSS and JavaScript (similar to what we will see in the next section). This means that a consistent style can be used throughout most (if not all) platforms, which is infinitely preferable to the mix of styles you will otherwise see if you are not using the same styles on all platforms! The added benefit here is that because the JS and CSS files are hosted on a CDN, you don't need to worry about updating the code as this is done for you automatically. The code can also be downloaded separately if you prefer to host it locally.
Tip
If you want to try out a few designs, visit http://www.kaltura.org/apis/html5lib/kplayer-examples/Player_Themable.html—this has a standalone player linked to jQuery UI's ThemeRoller, where you can choose different styles. Note: if you change to a different theme in the gallery, give it about five seconds to refresh the screen before continuing
In this task, we're going to take a look at the second of two example video players, which is the Kaltura open-source video player. The software is available at http://www.kaltura.org/project/HTML5_Video_Player, and can be used from a CDN link or a version downloaded locally.
Kaltura's Video Player is available from a CDN link—we'll be using this as part of the task, so we don't need anything extra for this task.
Open up your text editor of choice and insert the following code snippet:
<!DOCTYPE HTML>
<html>
<head>
  <title> Sample Fallback Player </title>
</head>
<body>
<div></div>
</body>
</html>
We start by adding in the call to jQuery and the Kaltura library:
<head>
  <title> Sample Fallback Player </title>
<script type="text/javascript"     src="http://html5.kaltura.org/js"></script> </head>
We need a container within which we hold the video, so go ahead and alter the
<div>tag as follows:<body> <div id="videoContainer" style="width:500px;height:300px;"></div>The final stage is to add in the code that calls the videos:
<div id="videoContainer" style="width:500px;height:300px;">
<video id="vid1" width="480" height="267" durationHint="33"
poster="trailer_480p.jpg">
<source type="video/webm" src="trailer_480p.webm" />
<sourcesrc="trailer_480p.mp4"/>
<source src="trailer_480p.ogv" />
</video></div>
If all is well, you will see something similar to the following screenshot:
The video player works by reusing the standard format code for <video>, but deploying CSS and some JavaScript to redesign the controls using progressive enhancement principles. Using jQuery UI, this gives the player a consistent theme across all browsers; the theme used can be altered at will using the Theme Roller applet as shown in the following screenshot:
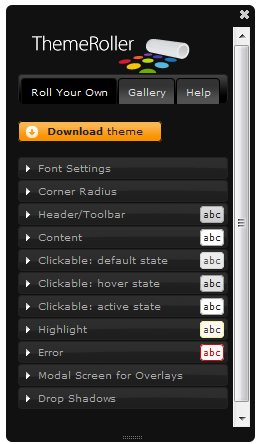
Unlike some players that rely on JavaScript to specify the video to play, Kaltura's video will still play if JavaScript is disabled as it will use the standard browser controls—this is known as progressive enhancement .
Note
If you would like to learn more about jQuery UI Theme development, it is worth having a look at jQuery UI Theme Development—A Beginner's Guide, by Adam Boduch.
So far, we've looked at how you can embed video using the <video> tags, as well as adapting your web pages to cater for video playback through a number of different browsers. In this section, we will focus on how you can write your own video player by looking at the following:
Building and packaging your own video player using jQuery
Adding controls to your video player
Styling your video player and providing a color theme
Inserting subtitles
Providing fall-back support using a jQuery polyfill
Displaying video through an Overlay
Note
For the purposes of each task, we're using the trailer videos for the open-source movie, "The Big Bunny", available from the Peach Open Movie Project at http://www.bigbuckbunny.org/index.php/trailer-page/. The videos are © copyright 2008, Blender Foundation/www.bigbuckbunny.org, unless otherwise indicated.
In the previous section, we took a look at the basic HTML code required to play videos using the <video> tag, and how it was crucial to include multiple sources to allow play back through a number of different platforms. In this task, we are going to take a copy of that code and extend it, in preparation for developing our own player.
All you need for this task is your favorite text editor, and copies of the videos we converted earlier in this book—the rest will be added during the task.
Create a new folder for storing your demo—call it
video demo. Open up the folder, and create the following new folders:js,css,media, andimages.Crack open the text editor of your choice, and add in the following lines:
<!doctype html>
<html>
<head>
<title>HTML5 Video Plugin Test</title>
</head>
<body>
<video controls="controls" poster="trailer_480p.jpg">
   <source src="media/trailer_480p.ogv" type="video/ogv" />
   <source src="media/trailer_480p.mp4" type="video/mp4" />
   <source src="media/trailer_480p.webm" type="video/webm" />
</video>
</body>
</html>
Save this as
videoplayer.htmlin the root of thevideo demofolder—we now need to set up the basic framework ready for the jQuery plugin, so create a new blank document, add in the following lines, and save that document asvideoplayer.js. This will be used later in this section:(function($) { $.fn.oPlayer = function(options) { return this.each(function() { }); }; })(jQuery);We also need to alter the HTML structure to add in the framework for customizing the controls—first, add in this (noting the addition of an ID for the video control):
<body>
<div class="video_player">
<video controls="controls" id="mainvideo"
         poster="media/trailer_480p.jpg" >
then alter the code accordingly:
</video>
<div class="custom_controls"></div>
</div>
</body>
If all is well, the browser will play the video when viewed in a browser using the inbuilt context menu controls.
We've taken a copy of the original HTML required to display videos using the HTML5 <video> tag and set it up with the names of the videos we will use, depending on which browser the page is viewed in. We've also created a blank template for the jQuery plugin that we will start to develop over this section. We've altered the code to allow for some changes that will be required for later tasks such as adding in the custom controls. You may also notice that there are no controls showing by default—this is because we've added in our own custom controls placeholder, but as there is nothing included within them, nothing will show!
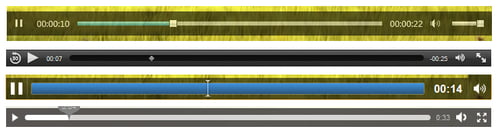
The first task of this section was quite a lengthy one, which was necessary so that we could add in the base framework required to display the video using our custom player. It's now time to add in the code for the custom controls—this will provide the framework for the play and pause buttons, as well as a slider for seeking, and a button for controlling the volume.
Open up the
videoplayer.htmlfile saved from the previous task, and add in the following code below the</video>closing tag. We start with the play, pause, and time slider placeholder elements:<div class="custom_controls"> <a class="play" title="Play"></a> <a class="pause" title="Pause"></a> <div class="time_slider"></div>
We then continue with the time placeholder elements:
<div id="time">
  <span class="timer">00:00:00</span> /
  <span class="duration">00:00:00</span>
</div>
We finish with the volume control element:
<div class="volume">
  <div class="volume_slider"></div>
    <a class="mute" title="Mute"></a>
    <a class="unmute" title="Unmute"></a>
  </div>
</div>
If we are using the <video> tags in HTML, then the browser will provide its own set of controls. However, as seen in the previous section, these controls will differ depending on which browser is used—they will not all be the same. The purpose of this section is to begin to create our own controls, so that we can provide a consistent appearance, no matter which browser you use to view the videos. There will be scope for you to add additional ones once you get more familiar with building players. A good example is the ability to show an icon that changes depending on what position the volume control has been set.
If you've tried to play your video at any stage during the first two tasks in this section, you will note that it doesn't look that professional, and also requires you to control it using the context menu—this isn't really user-friendly, is it? We're going to change that in this task by adding in some basic styles.
Before we can add any code, you need to avail yourself of some icons—there are some included with the code download for this book, or you can try looking on the Internet. You can try something like the icons created by Kevin Andersson, available from http://www.tabsicons.com/classic/#tabs_free. You will also notice from the CSS style code in this task that I've used sprites, along with CSS to position them—this results in a smoother result as the image is already cached. To create your sprite, you can use the free online service at http://www.csssprite.com; you will need to rename your resulting file accordingly—the site gives you the CSS required once the images have been converted.
We also need to add in images for the volume background as well as the playback seeker handle—again, you will need to look for suitable images on the Internet or you can use the ones included in the code download for this book.
Open up your text editor and load up the result from the previous task—you should have this in your editor:
<!DOCTYPE html>
<html>
  <head>
    <title>HTML5 Video Plugin Test</title>
  </head>
  <body>
    <div class="video_player">
      <video controls="controls" id="mainvideo"
        poster="media/trailer_480p.jpg" >
        <source src="media/trailer_480p.ogv"
        type="video/ogg" />
        <source src="media/trailer_480p.mp4"
        type="video/mp4" />
        <source src="media/trailer_480p.webm"
        type="video/webm" />
      </video>
    </div>
    <div class="custom_controls">
      <a class="play" title="Play"></a>
      <a class="pause" title="Pause"></a>
      <div class="time_slider"></div>
      <div id="time">
      <span class="timer">00:00:00</span> /
      <span class="duration">00:00:00</span>
      </div>
      <div class="volume">
      <div class="volume_slider"></div>
        <a class="mute" title="Mute"></a>
        <a class="unmute" title="Unmute"></a>
      </div>
    </div>
  </body>
</html>
Create a new blank file and save it as
videoplayer.cssinto thecssfolder (from the first task). Add the following into your header area:<link href="css/videoplayer.css" rel="stylesheet" type="text/css" />
We now need to add in the CSS styles to the
videoplayer.cssfile—there are a fair few required, so we will look at each section in turn, beginning with the basic containers:#mainvideo { width: 800px; } .video_player { width: 800px; } .video_player .custom_controls { background-color: #fcfcfc; clear: both; height: 23px; left: 20px; padding: 5px; position: relative; top: -50px; width: 90%; }We now focus on providing the play and pause buttons, so add in the following:
.play, .pause, .volume, .time_slider, .timer {float: left; }
.play, .pause, .mute, .unmute { cursor: pointer; }
.play, .pause { display: block; height: 24px; margin-left: 5px; margin-right: 15px; opacity: 0.8; width: 33px;
  background: url(../images/playpause-icon.png) no-repeat;

  transition: all 0.2s ease-in-out;
  -moz-transition: all 0.2s ease-in-out;
  -webkit-transition: all 0.2s ease-in-out;
  -o-transition: all 0.2s ease-in-out;
}
.play { background-position: 0 0; }
.pause { background-position: 0px -32px; display: none; }
.play:hover, .pause:hover { opacity: 1; }
The next item to add is a slider and handle for controlling our position in the video:
.ui-slider-handle { display: block; margin-left: -9px;
  position: absolute; z-index: 2; }
.ui-slider-range { bottom: 0; display: block; height: 100%;
  left: 0; position: absolute; width: 100%; z-index: 1; }
.time_slider { border: 1px solid #444; height: 10px; width:
  470px; margin-top: 5px; position: relative;
  border-radius: 15px 15px 15px 15px;
  -webkit-border-radius: 15px 15px 15px 15px;
  -moz-border-radius: 15px 15px 15px 15px;
  box-shadow: 0 -3px 3px #333 inset;
  -webkit-box-shadow: 0 -3px 3px #333 inset;
  background: -moz-linear-gradient(center top , #555, #333)
  repeat scroll 0 0 #555;
  background: -webkit-linear-gradient(center top , #555,
#333) repeat scroll 0 0 #555;
  background: -o-linear-gradient(center top , #555, #333)
    repeat scroll 0 0 #555;
  background: -ms-linear-gradient(center top , #555, #333)
  repeat scroll 0 0 #555;
}
.time_slider .ui-slider-handle { cursor: pointer; top: -2px;
  background: url(../images/handler.png) no-repeat;
  height: 16px; opacity: 0.8; width: 16px; }
.time_slider .ui-slider-handle.ui-state-hover { opacity: 1; }
.time_slider .ui-slider-range { border-radius: 5px; -moz-
  border-radius: 5px; -webkit-border-radius: 5px; }
We now need to adjust the styles used for the total playback time and time elapsed, so go ahead and add in this:
#time { color: #999999; font-weight: bold; margin-top: 5px;
  font-size: 0.7em; }
.timer { margin-left: 10px; margin-right: 5px; }
Unless we want to become prematurely deaf, we need some means to control the volume, so let's fix that now:
.volume { bottom: 0; color: #fff; height: 35px; overflow:
  hidden; padding: 5px 10px 0; position: absolute; right: 0;
  width: 33px; }
.volume:hover { background: url(../images/volume.png) no-
  repeat scroll 8px 0 transparent; height: 161px; }
.volume_slider { height: 105px; left: -1px; opacity: 0;
  position: relative; width: 33px; }
.volume:hover .volume_slider { opacity: 1; }
.volume_slider .ui-slider-handle { opacity: 0.8; width: 14px;
  background: url(../images/handler.png) no-repeat;
  height: 15px; left: 9px; margin-bottom: -15px; margin-left:
  0; }
.volume_slider .ui-slider-handle.ui-state-hover { opacity: 1; }
We need some means to automatically mute or un-mute our video, so go ahead and add in the following, which will take care of this:
.mute, .unmute { bottom: 7px; display: block; height: 23px;
   opacity: 0.8; position: absolute; text-indent: -999px;
   width: 33px; background: url(../images/volumefullmute-
   icon.png) no-repeat; }
.mute:hover, .unmute:hover { opacity: 1; }
.mute { background-position: 0px 0px; }
.unmute { background-position: 0px -32px; display: none; }
The last stage is to add a button that allows us to control the stopping and starting of the video by simply clicking on the video itself. We will be adding in jQuery code later to enable this functionality, but for now, add in the following:
.video-overlay { background: url("../images/button.png")
  no-repeat scroll 50% 50% rgba(0, 0, 0, 0.4); cursor:
  pointer; display: block; height: 100%; left: 0; position:
  absolute; top: 0; width: 100%; }
If all is well, we will end up with something like this, although the functionality won't work until we've added in the jQuery code:
In the previous tasks, we've focused on providing a basic style to the video controls as well as adding the requisite functionality for controlling the video through jQuery. A big drawback with the styles that we've looked at is that they are not terribly attractive; this is something we can easily fix by adding in the final styling code, which we will do now.
Create a blank file called
videoplayerstyles.cssand store this file in a subfolder calledcss, to which we will put a reference in our code using this line:<link href="css/videoplayerstyles.css" rel="stylesheet" type="text/css" />
We begin by adding in a short block of CSS, which will act as a reset on the base styles:
.video_player .custom_controls { background-color: #000;
  left: -5px; top: 0px; clear: both; height: 30px;
  padding-top: 8px; position: relative; width: 100%; }
We can now begin to style the main video container:
.video_player { border: 5px solid #61625D; float: left;
  font-family: Arial,Helvetica,sans-serif; padding: 10px;
  position: relative;
  border-radius: 5px 5px 5px 5px;
  -webkit-border-radius: 5px 5px 5px 5px;
  -moz-border-radius: 5px 5px 5px 5px;
  box-shadow: 0 15px 35px #535353 inset;
  -webkit-box-shadow: 0 15px 35px #535353 inset;
  background: -moz-linear-gradient(center top , #333, #000)
    repeat scroll 0 0 #000;
  background: -webkit-linear-gradient(center top , #333,
    #000) repeat scroll 0 0 #000;
  background: -ms-linear-gradient(center top , #333, #000)
    repeat scroll 0 0 #000;
  background: -o-linear-gradient(center top , #333, #000)
    repeat scroll 0 0 #000;
}
We need to provide a visual means to control the sliders by using a handle icon:
.time_slider .ui-slider-handle { opacity: 0.8; width: 16px;
  background: url("../images/handler.png") no-repeat scroll
  0 0 transparent; cursor: pointer; height: 16px; top: -
2px; }
It's time now to add some color and style to the seeker control that allows you to control where you are in the video playback:
.time_slider .ui-slider-range {
  border-radius: 5px 5px 5px 5px;
  -webkit-border-radius: 5px 5px 5px 5px;
  -moz-border-radius: 5px 5px 5px 5px;
  background: -moz-linear-gradient(center top , #434, #778)
   repeat scroll 0 0 #434;
  background: -moz-linear-gradient(center top , #434, #778)
    repeat scroll 0 0 #434;
  background: -moz-linear-gradient(center top , #434, #778)
    repeat scroll 0 0 #434;
  background: -moz-linear-gradient(center top , #434, #778)
    repeat scroll 0 0 #434;
}
If all is well, we should now have a more stylish player, albeit one that won't fully work (just yet)—here's a screenshot of one I prepared earlier:

Phew! That was a mammoth task! We've looked at a number of different styles in this task, with the key aim of designing something that displays a basic set of controls, and which can be customized at a later date. You will note also from the first screenshot in this recipe that there appears to be two sets of controls—the top one is the set of controls being styled by the code from this section; the bottom one (partially hidden), is the default set of controls shown by the browser.
The first part of this code overrides the original .video_player
.custom_controls CSS style; this is designed on the principle of progressive enhancement, where removing the new theme file will still allow the base style to be used. We've added some additional styles to give some color to the background container as well as the volume slider and volume handle.
We've also delved into the CSS required to set up styles for each element, such as volume control, a playback button, a pause button (not shown yet), and others—while you will find that these are yet to done, we've laid down the groundwork for the next task, which is to add in the jQuery functionality!
Now that we have split the CSS styles into two separate files (one for the base appearance and one for the theme), we can play with the colors used on the seeker controls. You can replace the .time_slider
.ui-slider-range style with any number of different colors—the choice is entirely up to you. A good source of color choices is in the themes offered as part of jQuery UI—try this blue-green color code as an example:
.time_slider .ui-slider-range {
  background: -moz-linear-gradient(center top , #2C4359,
  #E1E463) repeat scroll 0 0 #2C4359;
  background: -webkit-linear-gradient(center top , #2C4359,
  #E1E463) repeat scroll 0 0 #2C4359;
  background: linear-gradient(center top , #2C4359, #E1E463)
  repeat scroll 0 0 #2C4359;
  background: -o-linear-gradient(center top , #2C4359,
  #E1E463) repeat scroll 0 0 #2C4359;
  border-radius: 5px 5px 5px 5px;
  -webkit-border-radius: 5px 5px 5px 5px;
  -moz-border-radius: 5px 5px 5px 5px;
}So far, we've focused on providing some basic controls, and have added a set of rudimentary styles—as you've already seen from the screenshot, it doesn't look pretty, but it serves a functional purpose. We will develop this into a basic theme, but before doing this, we need to finish adding the jQuery functionality that will make the player work—this is the subject of this next task.
We need to retrieve a copy of the videoplayer.js file that we created earlier, so go ahead and load this into your normal text editor. Other than this, there isn't anything else required—we will add the necessary code as part of the task. I will assume that you're still using the files from previous demos—if this is not the case then please alter this accordingly.
The first change you need to make is in the
<header>section ofvideoplayer.html—go ahead and add in this:<script type="text/javascript" src=" http://code.jquery.com/jquery-1.7.2.min.js"></script> <script type="text/javascript" src="https://ajax.googleapis.com/ajax/libs/jqueryui/1.8.18/ jquery-ui.min.js"></script>
In our plugin file,
videoplayer.js, we need to add in a number of variables that are required for controlling various different elements of the player, so go and add in the following code:(function($) { $.fn.oPlayer = function(options) { return this.each(function() { // variables var $oMain = $(this); var $oVideo = $('video', $oMain); var $oPlay = $('.play', $oMain); var $oPause = $('.pause', $oMain); var $oTimeSlider = $('.time_slider', $oMain); var $oTimer = $('.timer', $oMain); var $oVolSlider = $('.volume_slider', $oMain); var $oMute = $('.mute', $oMain); var $oUnmute = $('.unmute', $oMain); var $oOverlay = $('.video-overlay', $oMain); var bTimeSlide = false; var iVolume = 1; var $oDuration = $('.duration', $oMain); }); }; })(jQuery);We now need to add in a function that will prepare the volume control, ready to display it on screen, so add in the following code snippet immediately below the last variable from the previous step:
var prepareTimeSlider = function() {
   if (! $oVideo[0].readyState) {
   setTimeout(prepareTimeSlider, 1000);
   } else {
   $oTimeSlider.slider({
      value: 0,
         step: 0.01,
      orientation: 'horizontal',
         range: 'min',
      max: $oVideo[0].duration,
      animate: true,
      slide: function() {
            bTimeSlide = true;
         },
         stop:function(e, ui) {
         bTimeSlide = false;
         $oVideo[0].currentTime = ui.value;
         }
      });
   };
};
Now that the basics are in place, let's turn our focus to making the controls work. We'll start with the most important, which are the play and pause buttons, so go ahead and add in this code:
$oPlay.click(function () {
   $oVideo[0].play();
   $oPlay.hide();
   $oPause.css('display', 'block');
   $oOverlay.fadeOut();
});
$oPause.click(function () {
   $oVideo[0].pause();
   $oPause.hide();
   $oPlay.css('display', 'block');
   $oOverlay.fadeIn();
});
The next two options will control the sound—here's the code for muting and un-muting the video:
$oMute.click(function () {
  $oVideo[0].muted = true;
  $oVolSlider.slider('value', '0');
  $oMute.hide();
  $oUnmute.css('display', 'block');
});
$oUnmute.click(function () {
  $oVideo[0].muted = false;
  $oVolSlider.slider('value', iVolume);
  $oUnmute.hide();
  $oMute.css('display', 'block');
});
Your users will expect to be able to click on the video to pause and play it at will—let's fix that by adding in a function to cover this:
$oVideo.click(function () {
  if($oVideo[0].paused) {
    $oPlay.click();
  } else {
  $oPause.click();
  }
  return false;
});
The basic player will now work perfectly OK, although there will be elements that won't function at all—one of these will be the right-click context menu. Let's fix that now, starting with the play option:
$oVideo.on("play", function() {
  $oPlay.click();
});
then continuing with the pause option:
$oVideo.on("pause", function() {
   $oPause.click();
});
This next function will rectify another element that is not quite right—when the video finishes, we need to reset the controls back to play, so that the next person can start the video:
$oVideo.bind('ended', function() {
   $oVideo[0].pause();
   $oPause.hide();
   $oPlay.css('display', 'block');
});
Our next function takes care of updating the time controls on the player:
$oVideo.bind('timeupdate', function() {
  var iNow = $oVideo[0].currentTime;
  $oTimer.text(rectime(iNow));
  if (! bTimeSlide)
  $oTimeSlider.slider('value', iNow);
});
We do need to know how long the video will be, so let's add in the code that will display this on screen:
$oVideo.on("canplay", function() {
  $oDuration.text(rectime($oVideo[0].duration));
});
While we now have the ability to turn the volume on or off, it will make for a better experience if we can provide finer control, so let's add that in now:
$oVolSlider.slider({
  value: 1,
  orientation: 'vertical',
  range: 'min',
  max: 1,
  step: 0.02,
  animate: true,
  slide: function(e, ui) {
    $oVideo[0].muted = false;
    iVolume = ui.value;
    $oVideo[0].volume = ui.value;
  }
});
Finally, we need to initialize the Time slider, and remove the default controls that show:
prepareTimeSlider();
$oVideo.removeAttr('controls');
Putting this all together should result in something similar to the following screenshot:

Throughout this task, we've worked stage by stage on providing the jQuery-based functionality required to operate the controls on the video; this is the functionality that would otherwise be provided by the browser's default video controls, which we will be hiding in the next task.
You will notice that I've used the Google CDN links for jQuery and jQuery UI—while this is perfectly acceptable (and in some cases preferable), you may prefer to use a custom download at least for jQuery UI, which can reduce the size of the file to a more manageable 20KB. If you want to use this alternative, you will need to build a custom download, at http://www.jqueryui.com/download, to include the Core, Widget, Mouse, and Slider elements. The code will need to be altered as well—change the Google CDN link for this (assuming you are following the structure outlined at the start of the task):
<script type="text/javascript" src="js/jquery.ui.min.js">
</script>
So far in our video player, we've added support to play back videos via the play/pause button, and through the right-click context menu. Although this results in a perfectly usable player, it is missing one important function. Most people expect to be able to simply click the video to play or pause it—this usually comes as part of an overlay that will slightly darken the picture, or show it at normal strength, depending on its current state. We're going to add this missing functionality to our video player as part of the next task.
For the purposes of this task, you will need to grab a suitable play icon that can be used on the overlay—the size is not critical, as long as it is of a proportional size to your video display. You will also need a copy of the videoplayer.css file that we've been working on throughout this section.
Crack open your usual text editor; we need to add in a placeholder for our overlay, so go ahead and modify the code as shown:
<div class="video_player">
<span class="video-overlay"></span><video controls="controls" id="mainvideo" poster="media/
  trailer_480p.jpg">
The overlay isn't going to be of any use if it doesn't have any color. Add the following into the
videoplayer.cssfile from the previous exercise:.video-overlay { background: url("../images/button.png") no- repeat scroll 50% 50% rgba(0, 0, 0, 0.4); cursor: pointer; display: block; height: 100%; left: 0; top: 0; position: absolute; width: 100%; }We now start to add in the requisite jQuery functionality, beginning with a click handler to allow us to fire off events that handle the playing and pausing of videos:
$oOverlay.click(function() {
  $oVideo.click();
});
The
Playevent needs to be adjusted:// events section $oPlay.click(function () { $oVideo[0].play(); $oPlay.hide(); $oPause.css('display', 'block'); $oOverlay.fadeOut(); });followed by the
Pausemethod:$oPause.click(function () { $oVideo[0].pause(); $oPause.hide(); $oPlay.css('display', 'block'); $oOverlay.fadeIn(); });We need the Overlay to reappear once the video has finished, so let's go ahead and adjust the event handler for this:
// bind extra inner events
$oVideo.bind('ended', function() {
  $oOverlay.fadeIn();
  $oVideo[0].pause();
  $oPause.hide();
  $oPlay.css('display', 'block');
});
The last step is to add in a variable for Overlay, which we define as an instance of the
.video-overlayclass—this is to make it easier when referencing it elsewhere in the code:var $oUnmute = $('.unmute', $oMain); var $oOverlay = $('.video-overlay', $oMain); var bTimeSlide = false;Once all of the code has been updated, you should see something similar to the following screenshot:

The code in this task has been made very simple, as we took care in an earlier exercise, to provide a common function in our code that handled the initiating of playback or pausing of the video.
There are three key elements to this task: the CSS styling, the placeholder for the overlay, and the jQuery functions to handle the playing or pausing of videos by clicking on the Overlay. We altered some of the existing event handlers to allow for the addition of the overlay—this is principally to fade it in or out, depending on the current state of the video. All of the code was made possible though by the use of the variable created to store an instance of the class that refers to the Overlay in the code.
In this modern day, a key element of running video is allowance for "accessibility"—this is not just being able to play videos in different browsers or on different platforms, but also providing support for those with disabilities. In this task, we're going to have a look at one element of this by providing subtitle support using a library called Cuepoint JS, which is available from http://www.cuepoint.org.
For this task, you need to avail yourself of a copy of Cuepoint JS, and copies of your videos from earlier tasks—ideally these should be in MP4, WebM, and Ogg formats. You will also need a copy of the subtitle background image used by the code—this is available in the code download that accompanies this book. Finally, you will also need a number of thumbnail images that can be used as jump links to specific sections of the video. In our task, we will use a video that is 768px wide; for the jump link images to fit in underneath nicely, we will use four images of 182px wide. You may need to alter your image sizes if you are using something different.
Open up the text editor of your choice and copy in the following code snippet:
<!DOCTYPE html>
<html lang="en" class="no-js">
<head>
<title>A Subtitles Test using Cuepoint JS</title>
</head>
<body>
   <div id="container">
   </div>
</body>
</html>
We need to add a reference to the Cuepoint library and jQuery, along with some styling, into the
<head>section of your code:<link rel="stylesheet" href="css/style.css" type="text/css" /> <script src="http://code.jquery.com/jquery-1.7.2.min.js"> </script> <script src='js/cuepoint.js'></script>
Cuepoint needs to be configured, so add the following to a new document in your text editor, and save it as
cuepointscript.js:$(document).ready(function(){ //Slides object with a time (integer) and a html string var slides = { 0: "This is the first subtitle. You can put html in here if you like", 4: "The home of Big Buck Bunny", 12: "Let's meet the cast of Big Buck Bunny...", 23: "Watch out - here they come!" } cuepoint.init(slides); $('#1').click(function(){ cuepoint.setTime(5)}); $('#2').click(function(){ cuepoint.setTime(10)}); $('#3').click(function(){ cuepoint.setTime(15)}); $('#4').click(function(){ cuepoint.setTime(25)}); });Add a reference to the
cuepointscript.jsfile, immediately below the code from step 2:<script src="js/cuepointscript.js"></script>
We now need to add in our video, so go ahead and add in the following code snippet:
<container>
<section id='cuePlayer'>
<video id='video' width="768" preload="auto" controls       poster="images/poster.jpg">
<source src='media/bbb400p.mp4' />
<source src='media/bbb400p.webm' />
<source src='media/bbb400p.ogv' />
</video>
<div id='subtitles'></div>
</section>
We also need to add in the thumbnails that will add as jump links, immediately below the closing
</section>tag:<div id='thumbs'> <img id='1' src='images/thumb1b.jpg' alt='cuepoint image' class='thumbnail' /> <img id='2' src='images/thumb2b.jpg' alt='cuepoint image' class='thumbnail' /> <img id='3' src='images/thumb3b.jpg' alt='cuepoint image' class='thumbnail' /> <img id='4' src='images/thumb4b.jpg' alt='cuepoint image' class='thumbnail' /> </div>
Finally, let's add in the requisite styling—go ahead and create a file called
style.cssand add the following:body { background: #eee;margin:20px;color:#999; font-family: Helvetica, Arial, sans-serif; } #container { width: 768px; margin: 0 auto; padding: 20px 0; overflow: hidden; } section { margin-bottom: 20px -5; overflow: hidden; } #cuePlayer { overflow: hidden; width: 768px; position: relative; } #video { width: 768px; margin: 0 auto 10px auto; background: #555; } #thumbs { width: 100%; overflow: hidden; clear: both; margin: 0 0 20px 0; } #thumbs .thumbnail { width: 182px; height: 182px; float: left; background: #333; display: block; margin-right: 13px; cursor: pointer; } #thumbs .thumbnail:last-child { margin-right: 0; } #subtitles { position:absolute; top:0;width:100%; color:#FFF; background:url(../images/subtitle.png) repeat; opacity: 1; height:40px; line-height:40px; padding:0 20px; }If all is well, you should see something similar to the following screenshot:

Here, Cuepoint collects together a number of statements into an array; these are displayed on screen according to the second count that must be provided as part of the array. The second part creates a number of calls to cuepoint.setTime() as individual functions, so that if you click on each in turn, it will advance the video to that time.
Cuepoint is one of a number of libraries that aim to provide similar functionality albeit using its own method, and not WebVTT files.
Whilst CuepointJS serves a purpose, it was only designed to be a simple implementation—if you want to learn more, it is worth getting to grips with the WebVTT format and files. Support for the format is still in a state of flux, and has yet to be included in all browsers; once this happens, it looks to become the standard format that can provide some consistency across a number of platforms.
Note
There are a number of articles on the Internet about the format—have a look at http://html5doctor.com/video-subtitling-and-webvtt/, which will give you a good grounding in it.
So far, we've concentrated on how to use the HTML5 video tags—this works well in current browsers, but what about older ones? In this age of responsive design, visitors to a website will be using any one of a number of different platforms to view content, and it is not necessarily going to be the same platform from one day to the next. To get around this, we have to provide some form of fall-back support, which will be the subject of our next task.
For this task, you will need to download a copy of mediaElement.js, which is available from http://www.mediaelementjs.com. You will also need copies of your videos; you can reuse the ones created earlier, as long as you have copies in WebM, MP4, and Ogg format. The download contains a number of files, of which you only need a few—you need to extract copies of the following files into a separate folder that we will call mediaelement demo:
mediaelement-and-player.jsandjquery.js– store in a folder calledjsflashmediaelement.swf– store in a folder calledmedia; put your video files in the same foldermediaelementplayer.css,background.png,bigplay.png,controls.png– store in the top levelmediaelementdemofolder
Let's begin with the basic framework, so open up your text editor, and save the following lines into a file named
mediaelementdemo.js:<!DOCType html> <html> <head> <code> <script src="js/jquery.js"></script> <script src="js/mediaelement-and-player.min.js"> </script> <link rel="stylesheet" href="mediaelementplayer.css" /> </code> </head> <body> </body> </html>Let's go ahead and add in the video links, beginning with the HTML5 video tag as shown in the following code snippet:
<video width="700" height="400" controls="controls
  poster="media/trailer_480p.jpg" " preload="none">
  <!-- MP4 for Safari, IE9, iPhone, iPad, Android, and
    Windows Phone 7 -->
  <source type="video/mp4" src="media/trailer_480p.mp4" />
  <!-- WebM/VP8 for Firefox4, Opera, and Chrome -->
  <source type="video/webm" src="media/trailer_480p.webm" />
  <!-- Ogg/Vorbis for older Firefox and Opera versions -->
  <source type="video/ogg" src="media/trailer_480p.ogv" />
  <!-- Flash fallback for non-HTML5 browsers without
  JavaScript -->
The second part of this is the fall-back video code—add in the following code snippet immediately below the first one:
<object width="320" height="240" type="application/x-
  shockwave-flash" data="flashmediaelement.swf">
  <param name="movie" value="flashmediaelement.swf" />
  <param name="flashvars"
  value="controls=true&file=media/trailer_480p.mp4" />
  <!-- Image as a last resort -->
  <img src="media/trailer_480p.jpg" width="320"
  height="240" title="No video playback capabilities" />
</object>
The last step is to add in the script call to
.mediaelementplayer():</video> <script> $('video').mediaelementplayer(); </script>If all is well, you will end up with something similar to the following screenshot:

The observant amongst you will have noticed something—you would be correct in thinking that the preceding code snippet is very similar to the one we used in one of our earlier recipes. If this is the case, then what's the reason for including it here?
The answer to this forms the key reason for this task: MediaElement.js acts as a polyfill, to provide a form of compatibility with older browsers, while still using the
<video> tags. It works by not trying to retrofit backward compatibility to a HTML5 video player, but instead providing forward compatibility and consistency; it starts with a baseline of using the MP4 format in the standard <object> tags, but switching this to the <video> tag if it can detect that the browser being used is able to use this tag.
One of the drawbacks of the <video> tags at present is the need to provide fall-back support for older browsers, at least for the next few years. The problem with this is that while development of the tags is still in something of a state of flux, there is no standard fall-back method to use. It's for this reason that people have provided their own polyfills. Some notable examples you can try include Modernizr (http://www.modernizr.com) or html5shiv (http://code.google.com/p/html5shiv/).
So far, we've concentrated on developing our basic video player, using jQuery. It's time now to change track, and take a look at another useful feature that you can use with HTML5 videos—overlays. This can help to give emphasis to displaying a video, as you can provide a mask to cover elements in the background, thereby removing some of the distraction.
For this task, you need to avail yourself of a copy of the shareware application VideoLightbox—at the time of writing, the latest version is 2.1, which is available from http://www.videolightbox.com. It is free for non-commercial use, so if you need to use it commercially, you will need to purchase a license that is $49 at the time of writing. You will also need a copy of a video in MP4 format—one of the ones you've converted, or used, from earlier will do fine.
Double-click on the videolightbox-setup.zip file, and run the
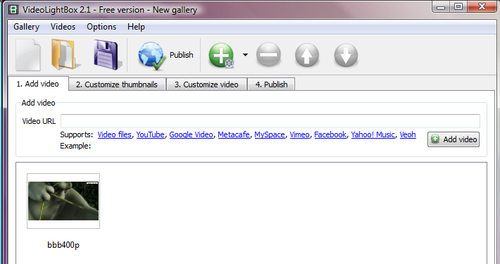
videolightbox-setup.exefile, accepting all of the defaults.Once in VideoLightbox, click on Videos, then Add video from file—select your file, then click on Open. You will see your video listed, as shown in the following screenshot:
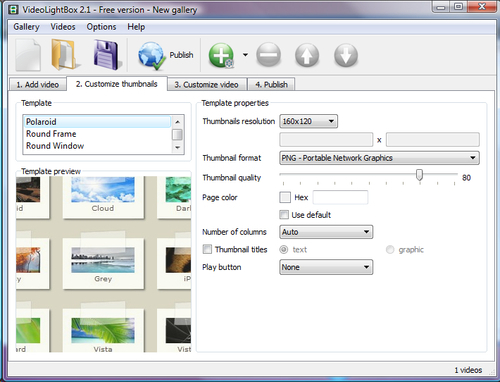
Click on the Customize thumbnails tab, and select your options—for the purposes of this demo, I've chosen Polaroid as the Template format, followed by PNG - Portable Network Graphics for the Thumbnail format and the Play button, as shown in the following screenshot:
On the next tab, Customize video, you can select from a number of options, including overlay template, resolution of video, and background color. For the purposes of this task, we will leave the defaults of Standard template, and a resolution of 640x480, unchanged.
Click on the Publish tab, then on the Publish button—this will by default publish the video and code to a folder called
VideoLightBoxin yourDocumentsfolder. VideoLightbox will generate the code for you, and display the results in your default browser:
We can then edit a copy of the source, and adapt it to our needs—here's a simplified example:
<!DOCTYPE html>
<html>
  <head>
    <title>VideoLightBox Test</title>
    <link type="text/css"rel="stylesheet"
    href="index_videolb/videolightbox.css" />
    <link rel="stylesheet" type="text/css"
    href="index_videolb/overlay-minimal.css"/>
    <script src="http://cdn.jquerytools.org/1.2.7/full/
    jquery.tools.min.js"></script>
    <script src="index_videolb/swfobject.js"
    type="text/javascript"></script>
  </head>
  <body bgcolor="#f0f0f0">
  <div class="videogallery">
    <a class="voverlay" href="index_videolb/player.swf?url=video/bbb400p.mp4&volume=10  0" title="bbb400p">
  <img src="index_videolb/thumbnails/bbb400p.png"     alt="bbb400p" />
  <span></span>
  </a>
  </div>
  <script src="index_videolb/videolightbox.js"     type="text/javascript"></script>
  </body>
</html>
VideoLightbox uses a combination of jQuery Tools (http://www.jquerytools.org) and the SWFObject library (http://code.google.com/p/swfobject/)—the SWFObject acts as a container, into which a base player file is stored, and from within which the MP4 video is played. The jQuery Tools library is used to provide the overlay functionality. A call is made to the player "container" (in this instance player.swf), which stores an instance of our video, and is used to provide the stop/start controls for video playback.
We've taken a look at a number of recipes, to show you how you can embed HTML5 video—using the new <video>
tag—within your pages. This is only just the start of what you can achieve using the new tag—there is a whole world out there to explore. I hope you've enjoyed working through the recipes, just as much as I have enjoyed writing this book!