


This chapter will give us a brief introduction on how to use HornetQ in standalone mode, and will implement an example of message production and consumption using the JMS API. To cover this topic, we will also create a fully working development environment for the first-time user. We will cover the following topics:
Downloading the software
Installing and running HornetQ as a standalone server
Installing the IDE for coding the example
Installing the NoSQL database for storing the results
HornetQ is an open source project for building multi-protocol, embeddable, very high performance, clustered, and asynchronous messaging systems. If we consider HornetQ from a higher level of abstraction, we could say that it is the Java implementation of a Message Oriented Middleware (MOM). Essentially, we could say that HornetQ is the Java implementation of a software built to send and receive messages in a distributed system. But, as it sometimes happens, this definition does not answer the main questions:
What is HornetQ suitable for?
Why should we adopt it in our code or in our infrastructure?
From a developer's perspective, we could state that HornetQ is a framework devoted to exchanging messages, which implement the JMS specifications. HornetQ can handle multiple message queues and provide a set of Java classes that can handle both the insertion and reading of these queues. Moreover, HornetQ provides classes for monitoring purposes, and by using the Java EE Connector Architecture (JCA), it can be integrated as the JMS messaging system for other application servers.
HornetQ implements the Java Messaging System (JMS) protocol along with its own protocol to exchange messages. It is highly configurable, even for clustered environments, and can be used natively inside the JBoss Application Server starting from Version 5 and onwards, or in standalone mode, and even in an embedded mode.
There are some interesting fields of application for high-performance, messaging-oriented middleware such as finance, medicine, and, in general, whenever there is the need of exchanging a chunk of information in a very fast way.
Throughout this book, we will use the same fictional example that will help us to describe, chapter by chapter, the various functionalities of HornetQ both for software coding and framework configuration. The example may seem far from everyday software coding, with a database as a backend, and a frontend that could be a web interface or a GUI. However, the trickiness of the configuration and of its requirements will really help you see the advantages of using HornetQ to exchange messages.
Our fictional example deals with a software house that is developing a software called HomeECG. The main purpose of this software is to allow people to do an Electrocardiography (ECG) exam at home. An ECG device is able to detect and amplify the tiny electrical changes on the skin that are caused by the heart during contractions. Using such biophysical signals, a doctor is able to detect abnormal heart functionality. Every person who needs this capability at home will be equipped with a device that is able to trace the ECG, and send the data using an HTTP connection to a server inside a health care institution.
Describing how such a system works is outside the scope of this book, so we won't explain in detail all the requirements such a measurement device should have. For the purpose of our demo, the important thing is that we have many messages coming from different patients, which need to be stored in a queue and transformed, to be inserted in a more structured way inside a database system.
Considering this case, we also have to deal with some important performance issues arising from the fact that a normal ECG could take three different measurements ten times per second. So our HomeECG framework should be able to manage—if one hundred patients do the ECG for ten minutes, all at the same time—potentially, nearly two billion messages!
So we need a messaging framework that is able to process a large number of messages (such as ECG measures) in an asynchronous way and store them in the final database. Now that we have described our fictional software, we need to move onto a developer PC to see how to install and configure a full, testing environment.
All the code for setting up a development environment and installing it is available at http://www.packtpub.com, and can be downloaded.
As we do for recipes, we need to identify the ingredients:
Operating system: All our examples have been developed using a 32-bit Windows 2008 Server R2, installed on a virtual machine. However, as HornetQ is based on Java, which is nearly system agnostic, all the examples can be carried out with some minor adjustments on a Linux-based OS. For this chapter, we will use Windows for our examples, but in Chapter 2, Setting Up HornetQ, we will also discuss in detail the installation procedure for a Linux environment.
Java development kit: This is an obvious requirement. However, it's less obvious which version is compatible with HornetQ. While writing this book, I used JDK 1.7. Chapter 2, Setting Up HornetQ, will detail which version should be used, according to the framework specifications.
HornetQ binaries: We have used the latest available stable release in this book—2.2.14. We only need to download the ZIP file from the HornetQ website (http://www.jboss.org/hornetq/downloads).
Eclipse Indigo for J2EE edition: This is the most popular IDE for Java coding. NetBeans is another great IDE for working in Java; however, we will not be considering all the differences between the configuration tasks of the two IDEs. Each of this book's examples can also be implemented using NetBeans, even if we don't cover every single step of the configuration; it can be easily mimicked by the Eclipse IDE.
MongoDB: This is the database system that will be used to show how to store a message from a HornetQ queue into a database. The choice of using a NoSQL database was done because Mongo is easy to set up and run, and is also easy to scale. For the interested reader, there is a Packt book called PHP and MongoDB Web Development Beginner's Guide by Rubayeet Islam. Coupled with Mongo, we also need the
jarconnector that allows data storage using Java.
In our example, we will download and use the standalone server, which means that we will run HornetQ without any interaction or dependencies with other frameworks or application servers. But the first HornetQ versions were developed to be fully integrated in JBoss Application Server, and in fact, HornetQ started with Version 2.0 because it was an evolved version of the JBoss JMS messaging framework. HornetQ can be easily integrated as the messaging framework for the JBoss Application Server. It can also be easily embedded in Java code, giving the developer the possible advantages of a messaging framework created and instantiated directly from the Java code.
HornetQ has been developed using Java so it can run on both Linux and Windows systems. A small portion of native code has been used for allowing HornetQ to use the Linux AIO feature. However, this is an optional feature, which we will not use in this book. We will cover every configuration on a Linux OS in depth. For testing purposes, we will use Ubuntu 12.04 (codename Precise Pangolin) and detail all the differences between running HornetQ on Windows and Linux systems.
The HornetQ stable version does not follow high-frequency releases, but you can find them all grouped on the HornetQ download page located at http://www.jboss.org/hornetq/downloads. Eclipse IDE for J2EE development, the Indigo version can be found at www.eclipse.org. Finally, the MongoDB version can be found at www.mongodb.org/downloads and the corresponding API for Java development can be found at http://www.mongodb.org/display/DOCS/Drivers.
We are going to install a HornetQ, non-clustered standalone server by carrying out the following steps:
Installing JDK from http://www.Java.net/. In a production environment, only JRE is needed, but we will use the JDK for compiling our example code.
Download HornetQ binaries as an archive from http://www.jboss.org/hornetq.
Unzip the archive.
Go to the
binfolder of the unzipped archive.Launch a script.
For our example, we will download the binaries directly so we have a HornetQ standalone server that can be launched directly from the command-line prompt. It is also possible to download the source code in an anonymous way and compile it from various sources. We will cover that possibility in Chapter 2, Setting Up HornetQ, as it is required for Maven to be configured and installed on the system. As HornetQ is based on Java code that is, with some minor changes, portable from Windows OS to Linux systems, you can download the same binary on a Linux platform and run the standalone version by using a simple bash script.
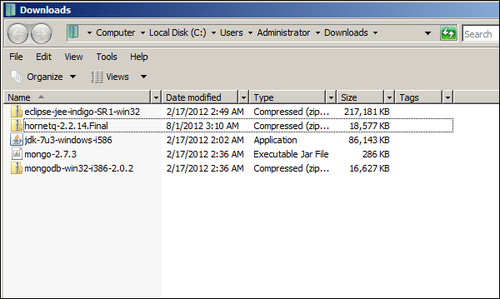
After downloading all the software from the previous list into a folder, you should have all the files displayed as shown in the following screenshot:
First of all, we need to install the JDK by double-clicking on the .exe application, and once finished, open a command prompt and enter the command Java –version. The output should be similar to the one in the following screenshot:

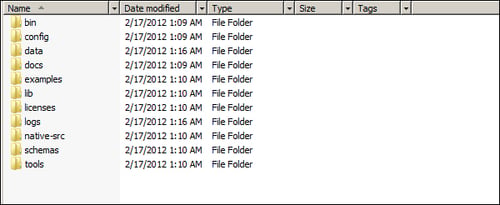
Now, we are ready to install the
HornetQ standalone server by simply unzipping the HornetQ2.2.5.final.zip to the C:\ and renaming it to hornetq. You can unzip it wherever you want, so to avoid any path-related issue from now on, we will refer to HORNETQ_ROOT as the location containing the unzipped folder. In our case, HORNETQ_ROOT will refer to c:\hornetq as shown in the following screenshot:
Now, we are ready to start the HornetQ standalone server by entering the HORNETQ_ROOT\bin folder and double-clicking on the run.bat file. This should open a command prompt that, after some logging messages, will show a last line saying HornetQ server started as shown in the following screenshot:
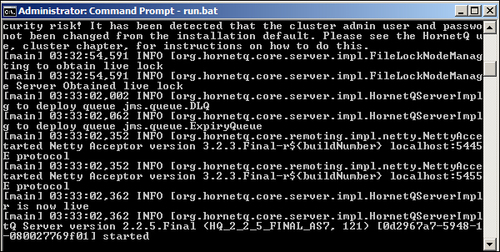
So there you are. You now have a full, HornetQ standalone server running on your machine, waiting to dispatch your messages.
In Chapter 2, Setting Up HornetQ, we will see how to set up the same server on Linux and consider which is the right version for your production purposes. However, if you have a Linux test machine (physical or virtual) and would like to try to install the HornetQ standalone server on it without going through all the details, here are the commands to execute it:
wget http://downloads.jboss.org/hornetq/hornetq-2.2.5.Final.tar.gz
tar –xvzf hornetq-2.2.5.Final.tar.gz
mv hornetq-2.2.5.Final hornetq
cd hornetq
chmod 777 run.sh
./run.sh
All you should see is the HornetQ logging messages summarizing your first successful HornetQ Linux startup.
Tip
Do not forget that as we will see the HornetQ JMS queue accept connection from port 1099, this port should be opened for the incoming TCP connection. This is the default port for the JNDI lookup, so it is needed for the lookup of the JMS ConnectionFactory.
Now we have
two more installation steps to complete before coding our first example. Installing Eclipse Indigo for J2EE development is not a hard task; again, we only need to unzip the ZIP file downloaded from the Eclipse website (http://www.eclipse.org/downloads) to the main hard disk (C:\), and rename the folder as eclipse. Once installed, you only need to go to the folder and double-click on the file eclipse.exe. The second step is installing and configuring MongoDB.
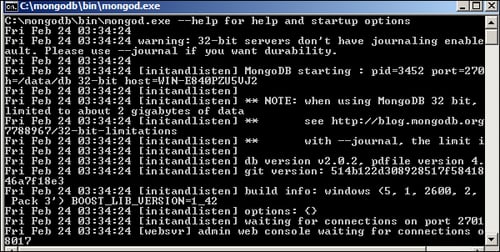
Lastly, we need to install MongoDB. MongoDB
only needs to create the folder where the database file will be created and saved. The default data folder for a Windows environment is C:\data\db. So, prior to unzipping the MongoDB ZIP file to your hard disk and renaming the folder to mongodb, you should create the data folder on C:\ and the db folder inside the C:\data\ folder. To launch MongoDB, go to the c:\mongodb folder and double-click on the mongod.exe file. As a result, you should see a command prompt window as shown in the following screenshot:
If you are using a Linux system, we suggest you refer to the tutorial on the MongoDB site at http://docs.mongodb.org/manual/tutorial/install-mongodb-on-debian-or-ubuntu-linux/.
You have now reached the end of the setup procedure. You have successfully installed:
HornetQ2.2.14-final, the standalone server version
Eclipse Indigo for the J2EE edition, as the IDE for developing our code
MongoDB for storing our message after consumer parsing
So you are now ready for your first code example with HornetQ.
Following our fictional
scenario, we now need to code the production and consumption of the message containing the ECG measurements that came from the patient's ECG device. Our first example will be done in a single Java class, but considering that most of the time you have two different softwares that write/read on HornetQ, a more realistic example will have two classes; one that writes messages to the queue and one that reads those messages from the queue. HornetQ implements the JMS specification, so we will use JMS messages for this example; in the next chapter, we will describe other ways to implement the messages. We will now describe the methods of the Java class that reflect the flow of the messages in our example. The next coding steps involve the implementation of these methods. We named
our class ECGMessageProducerConsumerExample.java; once created, we will call the following methods:
getInitialContext: This method will initialize the properties that will identify the HornetQ server and queueconnectAndCreateSession: This method is used for creating a shared connection and session from both the producer of the message and the consumer of the messageproduceMessage: A JMS message will be produced in this method and put on the queueconsumeMessage: This method will read the message just stored, and by connecting to MongoDB, store it in the databasecloseConnection: In the end, this method does a clean closing of the resources used
Before entering the coding phase, we need to set up Eclipse to be able to deal with all the HornetQ API that are needed from ECGMessageProducerConsumerExample.java, to talk to the server.
So after firing up Eclipse, follow these steps to create the project for our class:
Select File | New | Java Project so that a new window appears asking for the project name, which is
chapter01, and then click on Finish.Right-click on the project name and choose the Properties item.
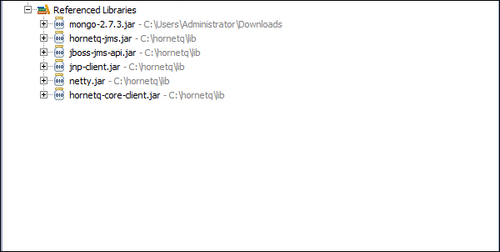
Once the Properties window is shown, choose Java Build path | Libraries, and click on the Add external jars button.
Go to the
HORNETQ_ROOT\libfolder and select the following.jarfiles—hornetq-jms.jar,jboss-jms-api.jar,jnp-client.jar,netty.jar, andhornetq-core-client.jar. Then click on OK.Click on the add external jars button again and go to where you have downloaded the
mongodb jarfrom the MongoDB website, add it to your build path, and close the Project properties windows.Right-click on the project name and choose New | Class. In the displayed pop-up window, enter
ECGMessageConsumerProducerExampleas the class name and check the public static void main (string[] args) checkbox, as shown in the following screenshot:
Most of our
examples will be implemented using this standard configuration, so remember to re-use it any time you need to code a project for HornetQ. If all the previous steps have been done correctly, in the Explorer tab of Eclipse, you should see the .jar files included, as shown in the following screenshot:
Now that we are ready for the coding phase, as mentioned previously, we only need to implement the various methods that we have listed. Moving from this, we need to code the following steps:
Adding class fields.
Initializing the HornetQ environment.
Creating a connection, session, and looking for a JMS queue.
Creating a message and sending it to the queue.
Receiving the message sent in the previous step.
Saving to MongoDB.
Closing all connections and freeing up resources.
Every time you need to access a HornetQ queue, you need to create a connection as for a database, and create a session. If you access a queue as a message producer or as a message consumer, you need to create a connection and a session in it. All the configuration options that are needed to identify the queue or manage the connections will be described in Chapter 2, Setting Up HornetQ. For the moment, we will only describe how to create the connection and session. In our example class, both the session and connection are shared between the message producer and message consumer, so we will instantiate them only once. But in most of the cases, if you decide to write separate classes that access the queue from the consumer or the producer layer, you have to configure and open the session in both, separately.
In our example, we
will avoid the import directive and use objects identified by their fully qualified namespace, so that the reader can see where the objects are located in the namespace. The import statements do not affect runtime performance even if they affect compile-time ones, but using a wildcard, in our opinion, affects core readability.
So let us start with the fields needed through the various methods:
	javax.naming.Context ic = null;
	javax.jms.ConnectionFactory cf = null;
	javax.jms.Connection connection =  null;
	javax.jms.Queue queue = null;
	javax.jms.Session session = null;

	com.mongodb.Mongo m;
	com.mongodb.DB db;

	String destinationName = "queue/DLQ";
Note
Downloading the example code
You can download the example code files for all Packt books you have purchased from your account at http://www.PacktPub.com. If you purchased this book elsewhere, you can visit http://www.PacktPub.com/support and register to have the files e-mailed directly to you.
As you can see, we need to have a Context object that is responsible for mapping names to the objects, because the discovery of the queue name and other configuration options is done using JNDI in a .xml configuration file.
We also have a ConnectionFactory object that is able to create multiple connections to HornetQ.
The connection is an object that will be used from the message producer layer and message consumer layer to send/receive messages.
The queue is an object that maps the queue defined in HornetQ configuration files. The DLQ queue is a particular one that we will use in this example, only to simplify the code. We will see how to create our own queues in the following chapters.
Finally, we have the Mongo and db objects that are responsible for connecting and storing data in the MongoDB database.
The destinationName string variable stores the queue name. The name should be exactly the one above otherwise our example will not work.
You are
probably asking yourself where all these configuration parameters are stored. We will describe them in depth in Chapter 2, Setting Up HornetQ; for now, all we can say is that you can mimic JBoss configuration files. Also, HornetQ comes with a set of XML-based configuration files that are stored in the HORNETQ_ROOT\config folder.
Now, we
are ready to code the GetInitialContext method. This method is implemented in the following way:
java.util.Properties p = new java.util.Properties();

p.put(javax.naming.Context.INITIAL_CONTEXT_FACTORY,
"org.jnp.interfaces.NamingContextFactory");

p.put(javax.naming.Context.URL_PKG_PREFIXES,
"org.jboss.naming:org.jnp.interfaces");

p.put(javax.naming.Context.PROVIDER_URL, "jnp://localhost:1099");

ic = new javax.naming.InitialContext(p);
We instantiate a Properties object to store three key/value properties that are needed by Context to identify where to find the .xml files that contain the information for the HornetQ instance that we are going to use. The most significant file, for the moment, is the third one that tells us where the HornetQ server is running. By default, when it is started without other configuration issues, the HornetQ server is running on localhost and starts a Java naming provider on port 1099. As you can see these values (hostname and port) are mapped as the value for the provider_url object.
When InitialContext is created as an object, it can throw a runtime javax.naming.NamingException, which should be managed in case something goes wrong; for example, the name/IP address of the Java naming provider server could be wrong or the port may not be accessible from other machines due to the firewall configuration. In our case, everything should work fine considering that we are running everything from the same machine.
Now
that we have our InitialContext object correctly assigned and created, we are ready to open the real connection to the HornetQ server.
This is done by the connectAndCreateSession method. The following code shows how to arrange the connection:
cf = (javax.jms.ConnectionFactory)ic.lookup("/ConnectionFactory");
queue = (javax.jms.Queue)ic.lookup(destinationName);
connection = cf.createConnection();
session = connection.createSession(false, javax.jms.Session.AUTO_ACKNOWLEDGE);
connection.start();
First, we
use a lookup on the context that is mapped to the hornetq-jms.xml file inside the HORNETQ_ROOT\config folder containing the configuration properties to identify the entry/ConnectionFactory. How JNDI queries the naming context to find the value is out of the scope of this book, but from a higher level of abstraction, it uses a tree directory-like structure. The ConnectionFactory object uses Netty, an asynchronous, event-driven application framework that supports lots of protocols, such as FTP , SMTP, HTTP, and SSL.
After the ConnectionFactory object has been created, we can also create the queue to store the messages. Using a lookup, we search for the queue whose name is queue/DLQ as defined in the class fields. It is important to notice that we use such a name because it was one of the default queues created by the standalone HornetQ server. If you take a look at the HornetQ default log stored in the HORNETQ_ROOT\logs folder, created when launching the run.bat script, you should see some lines like the following ones:
[main] 06:51:25,013 INFO trying to deploy queue jms.queue.DLQ
[main] 06:51:25,053 INFO trying to deploy queue jms.queue.ExpiryQueue
So the server that you started created two queues—one named DLQ and the other one named ExpiryQueue.
Now, you are ready to create the connection by calling the createConnection() method of ConnectionFactory. Before opening the connection, we will create a single session on it. Creating the session is pretty easy, but we need to describe the two parameters needed. The first one is a boolean value that tells if the session is transacted or not. This means that if you choose the session to be transacted, the delivery of the messages within that specific transaction will be made once you call the Commit() method of that session; so, this could potentially cause a significant overhead on the HornetQ server. In this case, we choose "not transacted" messages for easiness.
The second parameter tells us how the messages are delivered in that session.
The possible choices are:
Client_Acknowledge mode: This is not a feasible option (when you have the freedom to choose from the other two options) since the JMS server cannot send subsequent messages till it receives an acknowledgement from the client.
Auto_Acknowledge mode: This mode follows the policy of delivering the message once and only once, but it incurs an overhead on the server to maintain this policy.
Dups_Ok_Acknowledge: This mode has a different policy of sending the message more than once, thereby reducing the overhead on the server (imposed when using the Auto_Acknowledge mode), but imposing an overhead on the network traffic by sending the message more than once. The Auto_Acknowledge mode cleans up resources early from the persistent storage/memory, due to which the overhead is reduced.
Session_Transacted mode: This mode should be used when the session is transacted.
In summary, the Client_Acknowledge mode or Dups_Ok_Acknowledge mode give a better performance than the Auto_Acknowledge mode.
Apart from the specific parameter, it is always good to remember that the session is specific to the connection; so once opened and used, it is good practice to close it before closing the connection.
Finally, we are able to start the connection with the specific session inside it. So we are now ready to move on to the production of our first message. ECG observation can be stored using ANSI protocols like HL7. This is too specific to our purpose, so we code a simple string that contains the patient's unique identifier, which was the date when it was recorded and the three ECG signals that were recorded.
For example, propose that we use a string that is like a line of a CSV (Comma Separated Value), so one single measurement will be a string like the following one:
1;02/20/2012 14:01:59.010;1020,1021,1022
The string is pretty self explanatory, so we move on to the createMessage method.
We are now ready to create our first
JMS message and store it on queue/DLQ.
String theECG = "1;02/20/2012 14:01:59.010;1020,1021,1022";
javax.jms.MessageProducer publisher = session.createProducer(queue);
javax.jms.TextMessage message =
session.createTextMessage(theECG);
publisher.send(message);
System.out.println("Message sent!");
publisher.close();
Once we have instantiated the queue and the session, we create a MessageProducer object, and using a TextMessage object, we send it to the chosen queue. The pushing of the object on the "queue.DLQ" is done using the send method on the MessageProducer object. We recall for the moment that, following the JMS specifications, the message producer object is equipped with the following four main properties:
Destination: This is a JMS-administrated object
deliveryMode: This specifies how the message should be delivered
Priority: This specifies what the priority of the message is
timeToLive: This specifies how many milliseconds the message should be alive for, in the queue
At the moment, we won't specify any of the parameters; we will manage that when dealing with the expiration of messages in Chapter 5, Controlling Message Flow, but such parameters greatly impact the performance, so they need to be carefully configured in a high-performance environment.
As good programming practice, close the messageProducer object once it has done its job.
We are now ready to have a first run of our code. If everything is ok, you should see on the Console tab of the Eclipse IDE what is shown in the following screenshot:
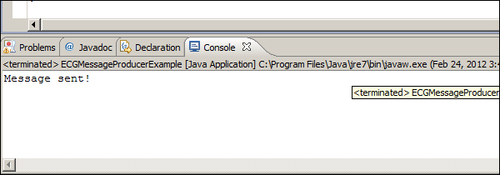
So your first program, publishing a JMS Message on HornetQ, has been successfully coded! But there are two more steps to be implemented to complete the example. First, we need to read the message just stored on the queue, retrieve it, and save it to the MongoDB database. In the end, we will close all the resources involved in the correct way.
Let us now start by
introducing the code for the consumeMessage method. Inside this, we will call a private method called storeIntoMongo
to perform the commit operation to MongoDB. How MongoDB manages and stores the document using the NoSQL paradigm is an extensive task, which does not affect this book. But we would like to demonstrate how to store information to a final destination. The reader should think that the consumer of the messages of a HornetQ server should do some other tasks apart from reading the messages. The obvious one would be to store the message for a second-stage analysis, such as storing log messages for parsing and using historical data.
Note
For the interested reader, I would like to suggest to you, only as an exercise, to think of how to code the message storing using your preferred RDBMS, or even modify the method we implemented to store the messages on a text file.
Before doing this exercise, you should take a look at the following consumeMessage code:
javax.jms.MessageConsumer messageConsumer = session.createConsumer(queue);
javax.jms.TextMessage messageReceived = (TextMessage)messageConsumer.receive(5000);
insertMongo(messageReceived);
System.out.println("Received message: " + messageReceived.getText());
messageConsumer.close();
As you can see, the code is
somewhat similar to the produceMessage method. On the same session object and the same queue that we used to produce the message, we consume it. This time, we create a MessageConsumer object. The messageConsumer object can receive messages in a synchronous or asynchronous way, the main difference being that the synchronous way can be obtained by simply calling the receive method; while in the asynchronous way, when a new message is received, an event is triggered. So with asynchronous message consumption, we need to register with the messageConsumer object a new MessageListener event whose onMessage() method will be called. In this case, we have implemented a synchronous receive() method using a long number that gives the time in milliseconds. In this case, messageConsumer receives the next message in a time frame of 5 seconds. Once we have the TextMessage message, we pass it to the method that will insert it into the MongoDB database, print the message to the console, and close the messageConsumer object.
As we said before, the messageConsumer object can receive the messages in a synchronous/asynchronous way. In both the cases, however, when you call the close method, the action is blocked until a receive method or message listener is in progress.
As the last part of our
example program, we will show you how to get the messageConsumer text message and store it in MongoDB. Again, we will not focus on the details too much, as managing push storage into a NoSQL database is a little bit different from a common insert statement in a classical RDBMS and requires different concepts. We won't be looking at this in much depth, but I would like to show you how things work.
The code of the insertMongo method is as follows:
try {
		m = new com.mongodb.Mongo();
		db = m.getDB( "hornetqdb" );
	} catch (UnknownHostException | MongoException e) {
		e.printStackTrace();
	}

	com.mongodb.DBCollection coll = db.getCollection("testCollection");
	com.mongodb.BasicDBObject doc = new com.mongodb.BasicDBObject();

   doc.put("name", "MongoDB");
   doc.put("type", "database");

   com.mongodb.BasicDBObject info = new com.mongodb.BasicDBObject();

   info.put("textmessage", messageReceived.getText());
The first try/catch block
creates a new instance of MongoDB and connects to the hornetqdb database. If the database does not exist the first time you launch the program, MongoDB will create it for you. Remember that if, at this time of your test, you have closed the command prompt that launched the MongoDB database, simply go into the main MongoDB root folder inside the bin folder, and relaunch it.
The next step
is to create a document collection that somehow is like a schema on a RDBMS database, declare it as a database, and put it inside a document named textmessage, whose value is the string we received from the message consumer, using the getText method of the messageReceived object. If you have your MongoDB window open, you should see a text message similar to the following:
Mon Feb 20 14:51:24 [initandlisten] connection accepted from 127.0.0.1:49867 #2
Mon Feb 20 14:51:24 [conn2] end connection 127.0.0.1:49867
This tells you that you were able to successfully store your message in MongoDB.
This first example is nearly over. Consider that the message producer and message consumer layer insist on the same connection, and on the same session. So, it is important to close them to free up the resources. The garbage collector is not in charge of closing unreferenced objects. Here is the closing connection method that follows the best practices in closing the connection and session associated to a JMS queue:
if (session != null ) {
		try {
			session.close();
		} catch (JMSException e) {
			e.printStackTrace();
		}
	}

	if (connection != null) {
		try {
			connection.close();
		} catch (JMSException e) {
e.printStackTrace();
		}
	}
The first step tries to close the session object, and if it succeeds, closes the associated connection. In this case, the connection has been closed in the simplest way, but we have to observe that if we deal with a transactional message producer, then a better way to deal with the closing would be to commit all the transactions that are still pending, or your code will be exposed to the problem of losing messages from the production layer. Similarly, if you use an asynchronous message consumer, you should make sure to close all the connections and sessions while you don't have messages in transaction.
We will cover more advanced features such as this in Chapter 5, Some More Advance Features of HornetQ. Let's recap what we have covered:
First of all, we set up a fully working environment to code a simple JMS example using HornetQ
For the moment, we chose a standalone, non-clustered server for our developing purpose, and we have seen how to launch it
As an optional task, we will also install and configure a single instance of the MongoDB NoSQL database
Using Eclipse, we coded a class for connecting to the default queue launched by HornetQ, and for creating a session on it
Within the session, we coded a simple JMS
messageProducerobject to send a composite string to the default queueFrom the same session object, we instantiated a synchronous
messageConsumerobject that reads the message stored and passes it for storing to the MongoDB instance we created
Before introducing the next chapter, I would invite you to code two classes starting from our example, one for the producer layer and one for the consumer layer, to see the issues arising from not having the connection shared in the same class. In such a more realistic example, you could also see, by launching the two classes separately, how message consumer and message producer layers work asynchronously with one queue. For the messageConsumer object, we also invite you to code a CSV writer, to allow the various messages to be stored in a file-based format.
One of the interesting features of HornetQ is its high interoperability with JBoss Application Server, and its ability to be run in several different OSs or embedded in code. It is also very configurable according to the user's needs. We will now move from our first example to a more configuration-focused chapter, where we will learn how to configure a standalone HornetQ server, and how to configure HornetQ so that it can be used by JBoss as its default JMS server.
We will also learn how to scale the machine to match the system requirements of HornetQ, and even how to run it as a service on both Windows and Linux.