


This book is about developing home automation examples using the Intel Galileo development board along with the existing home automation sensors and devices. In the book, a good review of Intel Galileo will be provided, which will teach you to develop native C/C++ applications for Intel Galileo.
After a good introduction to Intel Galileo, we will review home automation's history, concepts, technology, and current trends. When we have an understanding of home automation and the supporting technologies, we will develop some examples on two main concepts of home automation: energy management and security.
We will build some examples under energy management using electrical switches, light bulbs and switches, as well as temperature sensors. For security, we will use motion, water leak sensors, and a camera to create some examples. For all the examples, we will develop simple applications with C and C++.
Finally, when we are done building good and working examples, we will work on supporting software and technologies to create more user friendly home automation software.
In this chapter, we will take a look at the Intel Galileo development board, which will be the device that we will use to build all our applications; also, we will configure our host PC environment for software development.
The following are the prerequisites for this chapter:
A Linux PC for development purposes. All our work has been done on an Ubuntu 12.04 host computer, for this chapter and others as well. (If you use newer versions of Ubuntu, you might encounter problems with some things in this chapter.)
An Intel Galileo (Gen 2) development board with its power adapter.
A USB-to-TTL serial UART converter cable; the suggested cable is TTL-232R-3V3 to connect to the Intel Galileo Gen 2 board and your host system. You can see an example of a USB-to-TTL serial UART cable at http://www.amazon.com/GearMo%C2%AE-3-3v-Header-like-TTL-232R-3V3/dp/B004LBXO2A. If you are going to use Intel Galileo Gen 1, you will need a 3.5 mm jack-to-UART cable. You can see the mentioned cable at http://www.amazon.com/Intel-Galileo-Gen-Serial-cable/dp/B00O170JKY/.
An Ethernet cable connected to your modem or switch in order to connect Intel Galileo to the local network of your workplace.
A microSD card. Intel Galileo supports microSD cards up to 32 GB storage.
The Intel Galileo board is the first in a line of Arduino-certified development boards based on Intel x86 architecture. It is designed to be hardware and software pin-compatible with Arduino shields designed for the UNOR3.
Note
Arduino is an open source physical computing platform based on a simple microcontroller board, and it is a development environment for writing software for the board. Arduino can be used to develop interactive objects, by taking inputs from a variety of switches or sensors and controlling a variety of lights, motors, and other physical outputs.
The Intel Galileo board is based on the Intel Quark X1000 SoC, a 32-bit Intel Pentium processor-class system on a chip (SoC). In addition to Arduino compatible I/O pins, Intel Galileo inherited mini PCI Express slots, a 10/100 Mbps Ethernet RJ45 port, USB 2.0 host, and client I/O ports from the PC world.
Note
The Intel Galileo Gen 1 USB host is a micro USB slot. In order to use a generation 1 USB host with USB 2.0 cables, you will need an OTG (On-the-go) cable. You can see an example cable at http://www.amazon.com/Cable-Matters-2-Pack-Micro-USB-Adapter/dp/B00GM0OZ4O.
Another good feature of the Intel Galileo board is that it has open source hardware designed together with its software. Hardware design schematics and the bill of materials (BOM) are distributed on the Intel website. Intel Galileo runs on a custom embedded Linux operating system, and its firmware, bootloader, as well as kernel source code can be downloaded from https://downloadcenter.intel.com/Detail_Desc.aspx?DwnldID=23171.
Note
Another helpful URL to identify, locate, and ask questions about the latest changes in the software and hardware is the open source community at https://communities.intel.com/community/makers.
Intel delivered two versions of the Intel Galileo development board called Gen 1 and Gen 2. At the moment, only Gen 2 versions are available. There are some hardware changes in Gen 2, as compared to Gen 1. You can see both versions in the following image:
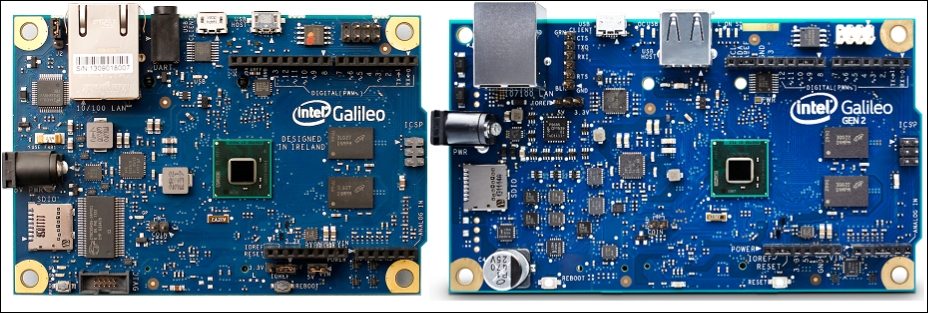
The first board (on the left-hand side) is the Intel Galileo Gen 1 version and the second one (on the right-hand side) is Intel Galileo Gen 2.
As mentioned in the previous section, Intel Galileo supports various sets of I/O peripherals. Arduino sensor shields and USB and mini PCI-E devices can be used to develop and create applications. Intel Galileo can be expanded with the help of I/O peripherals, so we can manage the sensors needed to automate our home.
When we take a look at the existing home automation modules in the market, we can see that preconfigured hubs or gateways manage these modules to automate homes. A hub or a gateway is programmed to send and receive data to/from home automation devices. Similarly, with the help of a Linux operating system running on Intel Galileo and the support of multiple I/O ports on the board, we will be able to manage home automation devices.
We will implement new applications or will port existing Linux applications to connect home automation devices. Connecting to the devices will enable us to collect data as well as receive and send commands to these devices. Being able to send and receive commands to and from these devices will make Intel Galileo a gateway or a hub for home automation.
It is also possible to develop simple home automation devices with the help of the existing sensors. Pinout helps us to connect sensors on the board and read/write data to sensors and come up with a device.
Finally, the power of open source and Linux on Intel Galileo will enable you to reuse the developed libraries for your projects. It can also be used to run existing open source projects on technologies such as Node.js and Python on the board together with our C application. This will help you to add more features and extend the board's capability, for example, serving a web user interface easily from Intel Galileo with Node.js.
The Intel Galileo board is an open source hardware design. The schematics, Cadence Allegro board files, and BOM can be downloaded from the Intel Galileo web page.
In this section, we will just take a look at some key hardware features for feature references to understand the hardware capability of Intel Galileo in order to make better decisions on software design.
Intel Galileo is an embedded system with the required RAM and flash storages included on the board to boot it and run without any additional hardware.
The following table shows the features of Intel Galileo:
|
Processor features | |
|
Storage | |
|
Power | |
|
Ports and connectors | |
|
Arduino compatible headers |
Intel delivers prebuilt images and binaries along with its board support package (BSP) to download the source code and build all related software with your development system.
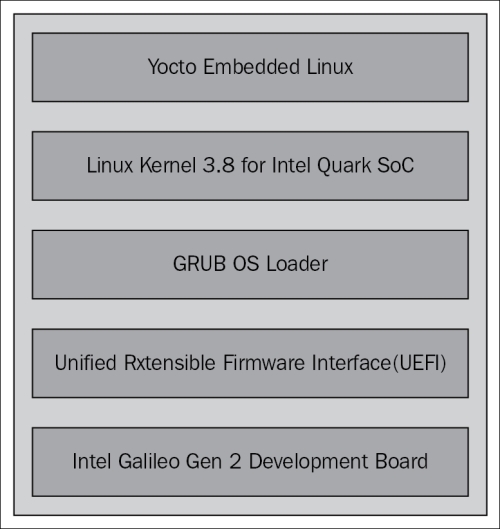
The running operating system on Intel Galileo is Linux; sometimes, it is called Yocto Linux because of the Linux filesystem, cross-compiled toolchain, and kernel images created by the Yocto Project's build mechanism.
Note
The Yocto Project is an open source collaboration project that provides templates, tools, and methods to help you create custom Linux-based systems for embedded products, regardless of the hardware architecture.
The following diagram shows the layers of the Intel Galileo development board:
Intel Galileo is an embedded Linux product; this means you need to compile your software on your development machine with the help of a cross-compiled toolchain or software development kit (SDK).
A cross-compiled toolchain/SDK can be created using the Yocto project; we will go over the instructions in the following sections. The toolchain includes the necessary compiler and linker for Intel Galileo to compile and build C/C++ applications for the Intel Galileo board. The binary created on your host with the Intel Galileo SDK will not work on the host machine since it is created for a different architecture.
With the help of the C/C++ APIs and libraries provided with the Intel Galileo SDK, you can build any C/C++ native application for Intel Galileo as well as port any existing native application (without a graphical user interface) to run on Intel Galileo.
We can now proceed to power up Intel Galileo and connect it to its terminal.
Before going forward with the board connection, you need to install a modem control program to your host system in order to connect Intel Galileo from its UART interface with minicom.
Note
Minicom is a text-based modem control and terminal emulation program for Unix-like operating systems. If you are not comfortable with text-based applications, you can use graphical serial terminals such as CuteCom or GtkTerm.
To start with Intel Galileo, perform the following steps:
Install minicom:
$ sudo apt-get install minicomTip
Downloading the example code
You can download the example code files from your account at http://www.packtpub.com for all the Packt Publishing books you have purchased. If you purchased this book elsewhere, you can visit http://www.packtpub.com/support and register to have the files e-mailed directly to you.
Attach the USB of your 6-pin TTL cable and start minicom for the first time with the
–soption:$ sudo minicom –sBefore going into the setup details, check the device is connected to your host. In our case, the serial device is
/dev/ttyUSB0on our host system. You can check it from your host's device messages (dmesg) to see the connected USB.When you start minicom with the
–soption, it will prompt you. From minicom's Configuration menu, select Serial port setup to set the values, as follows: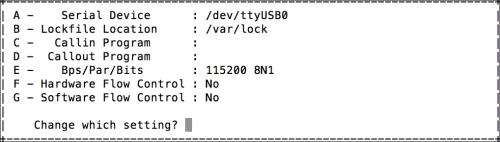
After setting up the serial device, select Exit to go to the terminal. This will prompt you with the booting sequence and launch the Linux console when the Intel Galileo serial device is connected and powered up.
Next, complete connections on Intel Galileo. Connect the TTL-232R cable to your Intel Galileo board's UART pins. UART pins are just next to the Ethernet port.
Make sure that you have connected the cables correctly. The black-colored cable on TTL is the ground connection. It is written on TTL pins which one is ground on Intel Galileo.
We are ready to power up Intel Galileo. After you plug the power cable into the board, you will see the Intel Galileo board's boot sequence on the terminal. When the booting process is completed, it will prompt you to log in; log in with the
rootuser, where no password is needed.The final prompt will be as follows; we are in the Intel Galileo Linux console, where you can just use basic Linux commands that already exist on the board to discover the Intel Galileo filesystem:
Poky 9.0.2 (Yocto Project 1.4 Reference Distro) 1.4.2 clanton
clanton login: root
root@clanton:~#
Your board will now look like the following image:

If you have connected Intel Galileo to a local network with an Ethernet cable, you can use Telnet to connect it without using a serial connection, after performing some simple steps:
Run the following commands on the Intel Galileo terminal:
root@clanton:~# ifup eth0
root@clanton:~# ifconfig
root@clanton:~# telnetd
The
ifupcommand brings the Ethernet interface up, and the second command starts the Telnet daemon. You can check the assigned IP address with theifconfigcommand.From your host system, run the following command with your Intel Galileo board's IP address to start a Telnet session with Intel Galileo:
$ telnet 192.168.2.168
We went through the software specifications of Intel Galileo in the previous section and booted Intel Galileo with the Linux image on its SPI flash.
In this section, we are going to cover how to build a customized image for Intel Galileo with some additional software packages using the Yocto Project, and we will boot Intel Galileo from the microSD card with our new Linux image.
Note
The Yocto Project is an open source project that helps embedded Linux developers by providing a set of tools such as Poky to ease the customization of Linux filesystems, building kernel images. This project uses a folder structure to store the metadata of the build information of individual software projects. Each software application or library has a metadata file called recipes with the .bb and .bbclass files. A quick start guide for developers is available at http://www.yoctoproject.org/docs/current/yocto-project-qs/yocto-project-qs.html, where you can get the basics of the Yocto Project.
You will also learn some basics of the Yocto Project to build and customize Linux filesystems for Intel Galileo.
Note
There are prebuilt SD card images for Intel Galileo; you can easily get them from the Intel download page at https://communities.intel.com/docs/DOC-22226.
Learning about the build process will teach you how to customize Linux for future needs. Before that, the following prerequisites are needed:
We need to first download the Intel Quark board support package from http://downloadcenter.intel.com/confirm.aspx?httpDown=http://downloadmirror.intel.com/23197/eng/Board_Support_Package_Sources_for_Intel_Quark_v1.0.1.7z&Lang=eng&Dwnldid=23197.
Then, we should download BSP patches to fix some of the problems with upstream sources. Download the patches from https://github.com/01org/Galileo-Runtime/archive/1.0.4.tar.gz. Patching instructions can be found in the following link: http://downloadmirror.intel.com/24355/eng/BSP-Patches-and-Build_Instructions.1.0.4.txt.
The next step is to extract the files. As the BSP package is distributed in 7-Zip format, make sure that you have 7-Zip installed on your host:
$ sudo apt-get install p7zip
A good way to deal with the build process and all the mess created is to create a unique folder in our home directory, such as /home/onur/galileo_build, and do all the build work in that directory. I will refer to our build in the directory as BUILD_DIR.
You need to follow these steps to build a Linux filesystem:
Put your downloaded files in your build directory and extract them, as follows:
$ cd /home/onur/galileo_build
$ mv ~/Downloads/board_support_package_sources_for_intel_quark_v1.0 .1.7z .
$ mv ~/Downloads/BSP-Patches-and- Build_Instructions.1.0.4.tar.bz2 .
$ 7z x board_support_package_sources_for_intel_quark_v1.0.1.7z
BSP includes packages for the layers of software for Intel Galileo. Grub OS Loader, Linux Filesystem build files for Yocto Project, EDKII (Firmware for Quark), Linux Kernel for Intel Quark, SPI-Flash tools, and System Image files are the packages required by developers to rebuild and reuse. Our focus will be on the
meta-clanton_v1.0.1.tar.gzfile to create the Linux filesystem to boot with the SD card.Note
You will see clanton in many places in the files you downloaded. It refers to systems with Intel Quark processors.
The
board_support_package_sources_for_intel_quark_v1.0.1.7zfile includes the following compressed files:grub-legacy_5775f32a+v1.0.1.tar.gzmeta-clanton_v1.0.1.tar.gzQuark_EDKII_v1.0.1.tar.gzquark_linux_v3.8.7+v1.0.1.tar.gzspi-flash-tools_v1.0.1.tar.gzsysimage_v1.0.1.tar.gzsha1sum.txt
The
BSP-Patches-and-Build_Instructionsfile includes a folder calledpatches. It has a number of patches to apply the Yocto Project metadata (recipe).bbfiles:$ tar xvf BSP-Patches-and-Build_Instructions.1.0.4.tar.bz2Extract metadata for the Intel Galileo development board to build the Linux filesystem. Metadata files will be extracted into the
meta-clanton_v1.0.1directory:$ tar xvf meta-clanton_v1.0.1.tar.gzTip
It is highly recommended that you apply patches inside the extracted
patchesfolder that comes along with theBSP_Patches_and_Instructionsfile. Instructions are stored in thepatches/patches.txtfile. If you don't apply the patches before starting the build process, you are highly likely to get errors.There are a couple of tools that you need to install on your host system to start the building process. Make sure you have installed them:
$ sudo apt-get install git diffstat texinfo gawk chrpath file build-essential gcc-multilib chrpathGo to the
meta-clanton_v1.0.1folder to start the build process:$ cd $BUILD_DIR/meta-clanton_v1.0.1This is where all the metadata is placed for building Linux filesystems. After applying the patches, we can start executing the scripts to start building:
The first step is to run the
setup.shscript in themeta-clanton_v1.0.1folder to get the required external sources. It will also create the folderyocto_buildwith the required configuration files to define metadata layers for the Yocto build tool BitBake:$ ./setup.shThen, we need to initialize the environment variables and specify the build folder for the output of the build process:
$ source poky/oe-init-build-env yocto_buildTip
If you've closed your current shell session and started on a new one, for each shell that you open, you need to source environment variables with
oe-init-build-env.After you initialize the environment variables, you will be redirected to the
yocto_buildfolder. This is the folder where all the downloaded sources and the output of the build process will be copied.Now we are ready to start the build process with the Yocto Project command tool BitBake.
Note
BitBake take cares of the entire build process by parsing configuration files in all the layers, the metadata (recipes), classes, and configurations files such as the
.bb,.bbclass, and.conffiles, respectively.There is already a metadata file defined to build a full image, which includes many open source projects such as Node.js, OpenCV, and additional kernel modules to support mini PCI-E Wi-Fi cards.
Start the build process with the following command:
$ bitbake image-full-galileoAn output similar to the following will be seen on your host machine:
Loading cache: 100% |##########################################################################################################################################################################################################| ETA:  00:00:00
Loaded 1617 entries from dependency cache.

Build Configuration:
BB_VERSION        = "1.18.0"
BUILD_SYS         = "x86_64-linux"
NATIVELSBSTRING   = "Ubuntu-12.04"
TARGET_SYS        = "i586-poky-linux-uclibc"
MACHINE           = "clanton"
DISTRO            = "clanton-tiny"
DISTRO_VERSION    = "1.4.2"
TUNE_FEATURES     = "m32 i586"
TARGET_FPU        = ""
meta
meta-yocto
meta-yocto-bsp    = "clanton:d734ab491a30078d43dee5440c03acce2d251425"
meta-intel        = "clanton:048def7bae8e3e1a11c91f5071f99bdcf8e6dd16"
meta-oe           = "clanton:13ae5105ee30410136beeae66ec41ee4a8a2e2b0"
meta-clanton-distro
meta-clanton-bsp  = "<unknown>:<unknown>"
Currently 12 running tasks (179 of 2924):
0: uclibc-initial- 0.9.33+gitAUTOINC+946799cd0ce0c6c803c9cb173a84f4d607bde350- r8.4 do_unpack (pid 32309)
1: binutils-cross-2.23.1-r3 do_unpack (pid 32304)
2: linux-libc-headers-3.8-r0 do_fetch (pid 32307)
3: gcc-cross-initial-4.7.2-r20 do_fetch (pid 32308)
4: libmpc-native-0.8.2-r1 do_compile (pid 32305)
5: python-native-2.7.3-r0.1 do_unpack (pid 32316)
6: uclibc- 0.9.33+gitAUTOINC+946799cd0ce0c6c803c9cb173a84f4d607bde350- r8.4 do_unpack (pid 32310)
7: elfutils-native-0.148-r11 do_compile (pid 32314)
8: file-native-5.13-r0 do_compile (pid 32315)
9: readline-native-6.2-r4 do_configure (pid 32311)
10: openssl-native-1.0.1h-r15.0 do_install (pid 32312)
11: attr-native-2.4.46-r4 do_configure (pid 32313)
The build process can take around 2 hours to finish, depending on the processing power of your host machine.
The build process will start by parsing recipes in the board's support package and will fetch the source code, configure, build, and install on the final Linux filesystem image.
If everything goes well and the build process finishes successfully, all the required files will be created in the $BUILD_DIR/meta_clanton_v1.0.1/yocto_build/tmp/deploy/images folder to be used for your SD card.
When the build process is successful, you can go ahead and copy the required files onto your microSD card to boot with Intel Galileo.
First, you need a microSD card; Intel Galileo supports SD cards up to 32 GB in capacity. Format your microSD card as FAT32 for first-time use and then copy the following files to your microSD card:
Format the SD card as FAT32, and check the assigned device file for the SD card on your system; something such as
/dev/sddor/dev/mmcblk0should be assigned to it. You can use device messages (thedmesgcommand) to check the assigned device file for the SD card. Run thedmesgcommand before and after you have attached the SD card on your host PC terminal. Then, you can see the assigned device file. In this section, we will use/dev/sdXto indicate the SD card's device file:$ sudo mkfs.msdos /dev/sdXMount the SD card on your host system:
$ sudo mount /dev/sdX /mnt/sdcardCopy the following files to your SD card:
$ cd $BUILD_DIR/meta- clanton_v1.0.1/yocto_build/tmp/deploy/images/
$ cp image-full-galileo-clanton.ext3 core-image-minimal- initramfs-clanton.cpio.gz bzImage grub.efi -t /mnt/sdcard
$ cp –r boot/ -t /mnt/sdcard
Note
The
image-full-galileo-clanton.ext3file includes the Linux root filesystem. ThebzImagefile is the Linux kernel image. Thecore-image-minimal-initramfs-clanton.cpio.gzfile is the initial RAM file system.grub.efiis the file, andGRUB/UEFIis the firmware for Intel Galileo. Thebootfolder includes the GRUB configuration.Unmount the SD card and detach it from your host system:
$ sudo unmount /mnt/sdcardInsert the microSD card into the slot next to the power port on the Intel Galileo development board.
Connect the serial cable, as shown in the previous section, and power up Intel Galileo. When Intel Galileo is booting from the SD card, an LED starts to blink. This is the LED on which the SD card is writing.
When you are prompted to log in, just like when you booted the SPI image in the previous section, you can log in with the root user and wander around the additional installed packages with the SD image.
An advantage of using an SD card instead of using an SPI flash image is that you will have more storage, so you can install more software.
Created files are also not volatile on an SD card; they will not be removed when you reboot the board. If you are using the Intel Galileo board from the SPI flash image, it will remove all the created files when you reboot the board.
While booting from the SD card, you may encounter problems. If the version of firmware on the Intel Galileo board and the BSP version that you build on the Linux filesystem don't match, the board doesn't boot the SD card. You can easily see this as the SD card's LED doesn't blink.
Check whether you formatted the SD card correctly to FAT32 and the files have been copied correctly. If the SD card format and files are not corrupted, it is suggested that you upgrade the firmware on the Intel Galileo board you have, as follows:
Download the Arduino IDE for Intel Galileo, for your host computer's architecture, from https://communities.intel.com/docs/DOC-22226.
Connect Intel Galileo to your PC using a micro USB-to-USB cable. When Intel Galileo is connected to the host device with a micro USB, it defines a new device,
/dev/ttyACM0. You can check the device messages (dmesg) to check whether Intel Galileo is connected correctly.Extract the downloaded file:
$ tar xvf arduino-linux64-1.0.4.tgzGo to the
arduino-linux64-1.0.4.tgzfolder and run theArduino IDEexecutable withsudo:$ cd arduino-linux-1.0.4.tgzIn the menu bar of the Arduino IDE, navigate to the following:
Tools | Serial Port | /dev/ttyACM0
Tools | Board | Intel Galileo (Gen 2)
Check for the firmware upgrade by navigating to Help | Galileo Firmware Update.
If the firmware on your device has a lower version, the Arduino IDE will prompt you to upgrade. Click on OK to upgrade the firmware and follow the instructions. This should take approximately 5 to 10 minutes. The Arduino IDE will prompt when the upgrade has been successfully installed.
We have gone through the steps to get the board's support packages and to build the Linux kernel as well as the filesystem. Since we are going to develop and build applications for Intel Galileo, we need an SDK to compile and build.
The Yocto Project allows you to easily create the SDK for embedded devices, similar to creating a filesystem. We need to run one more command right after we build the filesystem.
All the commands used to build an SDK are similar to the commands used to build a filesystem, but only the last command changes to create a toolchain, as follows:
$ bitbake image-full-galileo –c populate_sdk
After the successful execution of the populate_sdk command, the SDK installer will be deployed into the $BUILD_DIR/meta_clanton_v1.0.1/yocto_build/tmp/deploy/sdk folder:
$ ls tmp/deploy/sdk
clanton-tiny-uclibc-x86_64-i586-toolchain-1.4.2.sh
In this example, BitBake created an image for a 64-bit host; if you build on a 32-bit host, BitBake will create a toolchain for a 32-bit architecture.
In this section, we will go through the two ways of setting up a development environment for Intel Galileo on our host development system. In the previous section, we created the Intel Galileo SDK, and now we will go through how to use it:
Go to the deployment folder of your build directory:
$ cd $BUILD_DIR/meta-clanton/yocto_build/.tmp/deploy/sdkRun the SDK installer to install the Intel Galileo toolchain on your host filesystem. By default, the installation directory has been set to the
/opt/clanton-tiny/1.4.2directory; you can install any directory you want. You will get the following terminal output when you run the SDK installer script:$ sudo ./clanton-tiny-uclibc-x86_64-i586-toolchain-1.4.2.sh Enter target directory for SDK (default: /opt/clanton-tiny/1.4.2): You are about to install the SDK to "/opt/clanton-tiny/1.4.2". Proceed[Y/n]?Y Extracting SDK... Setting it up...done SDK has been successfully set up and is ready to be used.
The Intel Galileo SDK is installed on your host filesystem, and your host system is ready to compile and build C/C++ applications for the Intel Galileo development board.
To start development, you can either use basic text editors and compile the source code on your host machine's console, or you can configure an IDE to use the Intel Galileo SDK to develop applications.
If you don't want to use any IDE for software development, you can just use any text editor and compile your code from the Linux terminal after you set up the SDK environment variables.
After you install the SDK, it copies a Bash script to the SDK directory, and running it is enough to set up environment variables for the GCC compiler and linkers.
You can source the environment variables for the current session on your host machine as follows:
$ source /opt/clanton-tiny/1.4.2/environment-setup-i586-poky-linux-uclibc
You can check whether the setup is completed correctly for C, C++ cross compilers, and linker variables, respectively, as shown in the following code. $CC is a variable for the C compiler, $CXX is a variable for the C++ compiler, and $LD is for the Intel Galileo toolchain linker:
$ echo $CC
i586-poky-linux-uclibc-gcc -m32 -march=i586 --sysroot=/opt/clanton-tiny/1.4.2/sysroots/i586-poky-linux-uclibc
$ echo $CXX
i586-poky-linux-uclibc-g++ -m32 -march=i586 --sysroot=/opt/clanton-tiny/1.4.2/sysroots/i586-poky-linux-uclibc
$ echo $LD
i586-poky-linux-uclibc-ld --sysroot=/opt/clanton-tiny/1.4.2/sysroots/i586-poky-linux-uclibc
Let's write a simple Hello World C code with a text editor, compile it on the host console, and run it on Intel Galileo using the following steps:
Create an empty
.cfile with your favorite text editor or any console text editor. Write aprintffunction, as follows, and compile it:$ nano hello_world.c #include <stdio.h> int main (void){ printf("Hello World\n"); return 0; } $ $CC hello_world.c –o helloworldYou can copy the binary file on to the Intel Galileo development board with the
scpcommand. SSH and SCP tools are installed with the full image we built to boot with the SD card.If the board is connected to your local network, you can easily transfer files with the
scpcommand to the board from your host machine. Secure Copy Protocol (SCP) securely transfers computer files between a local host and a remote host. Therefore you can transfer files from Intel Galileo to your development PC or from your PC to the Intel Galileo board.$ scp helloworld root@192.168.2.88:/home/root/appsOpen the Intel Galileo board's terminal and run the application from the folder you copied in the binary file:
$ cd /home/root/apps
$ ./helloworld
Hello World
This method can be used to develop any application and deploy it to Intel Galileo. If you don't have a local network connection, it may be difficult for you to transfer files to the Intel Galileo board with a USB stick or with the SD card.
Another and more efficient way of working with embedded devices is to use the Eclipse IDE. Eclipse provides a good C/C++ development environment and remote debugging utilities for developers. Another reason to select the Eclipse IDE is that the Yocto Project has a plugin for Eclipse, and this makes it very easy to set up the SDK's location and cross-compile.
In this section, we will go through the setup process for the Eclipse IDE for development and for remote debugging.
Note
The Eclipse IDE requires Java to run. Make sure you have installed Java runtime on your host system.
Download the latest Eclipse IDE from its official download site at https://www.eclipse.org/downloads/ or install it from the Ubuntu repository, as follows:
$ sudo apt-get install eclipse
If Java is installed on your host system, you can start the Eclipse IDE from the command line:
$ eclipse
We need to install some necessary plugins for Eclipse before installing the Yocto Project plugin on it:
To install new software on the Eclipse IDE, from the menu bar, go to Help | Install New Software.
This will prompt you with a window to start the installation.
First, you need to select the download site for the plugins. On the host I use, Eclipse Kepler (the previous version is Juno) is installed so, from the Work With drop-down list, select the correct site.
Click on http://download.eclipse.org/releases/kepler.
This action will load the available plugins to the following list.
Select the required plugins to be installed. Perform the following steps to select plugins from the available software:
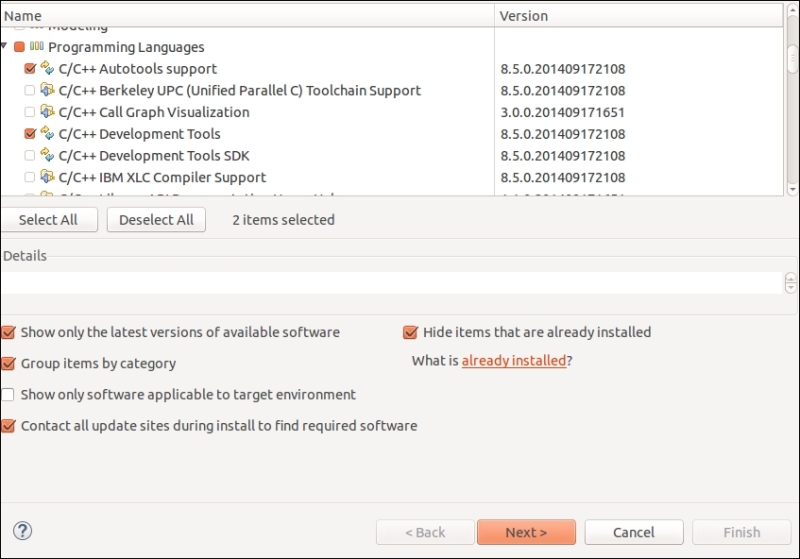
Expand Linux Tools and select LTTng – Linux Tracing Toolkit.
Expand Mobile and Device Development and select the following items from the list:
C/C++ Remote Launch (Requires Remote System Explorer)
Remote System Explorer End-user Runtime
Remote System Explorer User Actions
Target Management Terminal
TCF Remote System Explorer add-in
TCF Target Explorer
Expand Programming Languages and select C/C++ Autotools support and C/C++ Development Tools.
Then, click on the Next > button and read and accept the licenses agreement. This will install the plugins and restart the Eclipse IDE. The following screenshot shows you what to select from the list:
When C/C++ development and support tools for the Eclipse IDE have been installed, as described in the previous section, we are good to go with the Yocto Project's plugin installation.
You can perform the following steps to set up the Yocto Project plugin onto Eclipse:
Open the Install New Software Window again.
This time you should add the link for the Yocto Project plugin. Click on the Add button, which will open a smaller window. Enter a meaningful name (for example,
Yocto ADT Plugin), enter http://downloads.yoctoproject.org/releases/eclipse-plugin/1.6/kepler, and click on Add.When you add and select the new link from the Work with: menu, it will refresh the list of available packages to be installed.
Check the Yocto Project ADT Plug-in, Yocto Project Bitbake Commander Plug-in, and Yocto Project Documentation plug-in boxes.
Click on the Next > button, read and accept the license agreements, and finish the installation as shown in the following screenshot:

The Yocto plugin requires some parameters, such as the location or path of the toolchain on your host machine filesystem, to be pointed by the user.
To configure the Yocto plugin, follow these steps:
Click on Window from the Eclipse IDE menu and select Preferences from the list.
A new window will appear; from the list that appears on the left-hand side of the window, select Yocto Project ADT.
You need to enter the paths where you installed the toolchain, as shown in the following screenshot:

Click on Apply; if the Yocto Project plugin doesn't complain about anything, the configuration should work.
One last step in the Eclipse configuration is to configure the remote device. The Eclipse IDE makes it easy for developers to deploy and debug applications on remote devices. If we don't use a helpful tool such as Eclipse to deploy applications, we need to copy the binary to a remote device from the console or copy files to a USB stick in order to transfer the compiled binary to Intel Galileo.
The Eclipse IDE also makes it easy to debug applications on remote devices with the help of a user friendly Graphical User Interface (GUI): the Debug perspective. There are a couple of steps that need to be performed to complete the remote device configuration:
First, we will open Remote System Explorer in the Eclipse IDE.
Click on Window in the Eclipse IDE menu, hover over Open Perspective if Remote System Explorer is on the list. Click on it if it is not; then, click on Other and select Remote System Explorer in the opened window.
In the new perspective, define a new connection by clicking on the button where Remote Systems are listed or right-click to add a new connection.
This will open a new window called Select Remote System Type; select Linux and click on Next.
This will show you a window, as shown in following screenshot, where you need to type in the Intel Galileo development board's IP address and a description for the connection:

Select SSH Types in the following window when processing
.sshfiles,processes.shell.linux,ssh.shells, andssh.terminals.This process defines a remote connection. Now we need to configure Eclipse in order to run applications on a remote device, as follows:
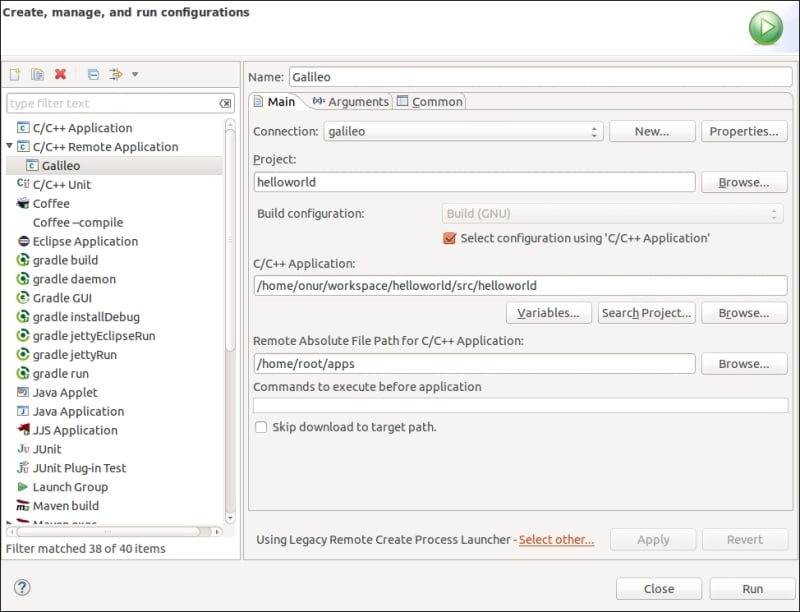
In the Eclipse menu, click on Run and select Run Configurations. When the new window appears, click on the icon with a plus sign on it in order to create a new configuration.
You need to fill the spaces according to your host system's configuration. Select the remote connection and remote path to deploy the application.
If you save this instance, you can use it later for any other project you create on Eclipse to run on Intel Galileo.
The fully configured remote device is shown in the following screenshot:
We completed all the necessary configurations for Eclipse, so we can easily create an application now without reconfiguring the Eclipse IDE for the Intel Galileo toolchain. Eclipse will create C/C++ projects with toolchain configurations, and you will be able to develop C/C++ applications easily with the Eclipse IDE.
After performing a couple of easy steps, you will be able to create a C project for Intel Galileo with all the toolchain configurations, as shown here:
Click on File from the Eclipse IDE menu, select New, and then click on C Project. This will open a new window, as shown in the following screenshot.
Expand Yocto Project ADT Autotools Project and select Hello World ANSI C Autotools Project:

After you finish this, all the related files will be created. You can just build the
Hello Worldsample by clicking on Build and running with the selection Run As, Remote Application on Intel Galileo.
In this chapter, we learned how to use the Intel Galileo development board, its software, and system development environment. It takes some time to get used to all the tools if you are not used to them. A little practice with Eclipse is very helpful to build applications and make remote connections or to write simple applications on the host console with a terminal and build them.
Let's go through all the points we have covered in this chapter. First, we read some general information about Intel Galileo and why we chose Intel Galileo, with some good reasons being Linux and the existing I/O ports on the board.
Then, we saw some more details about Intel Galileo's hardware and software specifications and understood how to work with them.
I believe understanding the internal working of Intel Galileo in building a Linux image and a kernel is a good practice, leading us to customize and run more tools on Intel Galileo.
Finally, we learned how to develop applications for Intel Galileo. First, we built an SDK and set up the development environment. There were more instructions about how to deploy the applications on Intel Galileo over a local network as well.
Then, we finished up by configuring the Eclipse IDE to quicken the development process for future development. In the next chapter, we will learn about home automation concepts and technologies.