Entering the haXe World.
In this chapter you will discover haXe's world and enter it. You'll install haXe and write your first program.
This is our first chapter and you will soon be taking your first steps with haXe. However, before you get into action, let's introduce you to haXe and set up your working environment.
In this chapter, you will:
Install haXe
Choose a code editor based on our requirements
Write and run your first program
Write a program interacting with the user
Seems like a long list? Don't be afraid, you will make it!
Enough talking, let's install haXe! You will see how easy it is.
You should know that there are two ways to install haXe, which are as follows:
Using the installer: An executable that will automatically install haXe for you.
Compiling from sources using the code repository located at the following URL:
One important thing to note is that haXe can be installed on on Windows, Linux, and MacOSX. This way, you don't have to worry about your operating system and can continue working in your environment.
Installing haXe on Windows is pretty easy, but there are some caveats that we should avoid.
So, carry out the following steps:
Go to http://www.haxe.org.
Click on the Download link.
There, you will find a link to download the Windows version of the installer. It comes as an executable file.
Run the executable.
Note that if you're working on Windows Vista or Windows 7, you will need to run the executable as Administrator. You can do so by right-clicking on the installer while holding the Shift key down and then clicking on Run as Administrator.
Installing haXe on MacOSX is very straightforward. Carry out the following steps:
Go to http://www.haxe.org.
Click on the Download link.
There, locate and click on the link to download the OSX Universal Installer.
The installer comes as a DMG image, if it's not automatically mounted; mount it by double-clicking on it.
Go to where the DMG image is mounted and run the installer.
That's it! You have haXe installed on MacOSX!
Some distributions have haXe in their repositories, so you may install it from your distribution's repository if it's available.
Alternatively, you can use the Linux Installer to install haXe; it does work on many distributions. Carry out the following steps to install haXe on Linux:
Go to http://www.haxe.org.
Click on the Downloads link.
Find the link to download the Linux version of the installer.
Uncompress the file by using the
tar–zxfhxinst-linux.tgzcommand.Add execution rights on the installer by using the
chmod+xhxinst-linuxcommand.Run the installer with administration rights either by using the
sudo–scommand or thesu–command, and then running./hxinst-linux.
Now, you should have haXe installed on your Linux machine.
If you need features that are not in the latest release, you can use the nightly builds to easily have access to binaries of what is in the repository without the need of compiling it on your own.
You will be able to find them on the haXe website's Download page for your operating system.
Note that the nightly builds do not come with an installer and therefore, you are advised to first install using the installer, so that it sets up all environment variables and then replaces installed files by the ones from the nightly builds archive.
On MacOSX and Linux machines, you should find them in /usr/lib/haxe, while on Windows, they should be in c:\haxe.
There are not many editors for haXe, but still there are some that you should know of. Although I do suggest that you look at these because they can help you increase productivity. I do think that it's also important in the beginning to use the haXe compiler (that is, the haxe command) on your own to understand how it works and how it is used. You'll get more and more comfortable as you go through the examples.
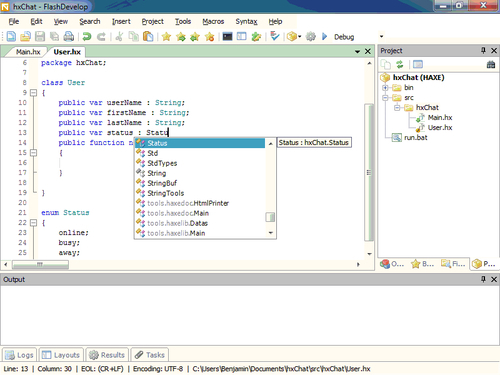
The FlashDevelop IDE supports haXe projects. This is certainly the most advanced haXe code editor on Windows at the time of writing and also, it is an open source software.
FlashDevelop supports auto-completion, project management, syntax highlighting, and compilation rights from the IDE.
You can download FlashDevelop for free from http://www.flashdevelop.org. If you want to have a quick look at it before trying it, the following screenshot shows how it looks:
TextMate is an easy-to-extend text editor for MacOSX. It can be extended by installing "bundles". There's a bundle providing haXe auto-completion, syntax highlighting and compilation from TextMate at http://github.com/freewizard/haxe2.tmbundle. You simply have to download the bundle as a ZIP file and rename it with the .tmbundle extension. Once this is done, double-click it. If you already have TextMate installed, the plugin should get installed.
The following screenshot shows what it looks like with the haXe bundle:
There are several scripts that you can install to add support for haXe in VIM. Many of these are collected at http://github.com/MarcWeber/vim-haxe. With those scripts, you get syntax highlighting and auto-completion. Although VIM is generally used by people using Linux, it can be used on Windows and MacOSX. This way, one can have the same tools across multiple platforms.
Let's create an application that will simply display the "Hello World" message. We will use only cross-platform code and will compile it to neko to begin.
Copy the following code in a file named
Main.hxclass Main { public static function main() { trace("Hello World"); } }Tip
Downloading the example code for this book
You can download the example code files for all Packt books you have purchased from your account at http://www.PacktPub.com. If you purchased this book elsewhere, you can visit http://www.PacktPub.com/support and register to have the files e-mailed directly to you.
Open a terminal; go to the directory where you saved
Main.hxand type thehaxe–main Main–neko helloworld.ncommand.Type this command:
neko helloworld.n.You will see the following output:
Main.hx:5:Hello World
As you've guessed, the program just wrote "Main.hx:5:Hello World" in our terminal and ended.
The code: In our code we declare a class named
Main, which has a public and static functionmain. The methodtraceis a method that allows one to debug an application by printing a message along with the file's name and line number of the call. If you don't really understand what classes are, don't worry, we are going to explain it to you soon.The compilation: The command in the second step compiles the haXe code to neko. Notice that the
–mainswitch that's followed by the name of the class containing the function has to be executed when launching the program. This function has to be a static function namedmainthat takes no parameters.Running the neko code: In the third step, we invoke the neko VM and tell it to execute the
helloworld.nfile.
Now that we've gone through the classic "Hello World", let's do something a bit more interesting; how about taking some parameters on the command line? If you're not familiar with commands, this is the usual way to take some information from the user without having to write an interactive program.
Now, we're going to create an application that takes your name as a parameter, greets you, and displays the number of characters in your name.
Copy the following code in a file named
Main.hxclass Main { public function new() { } public static function main() { var name = neko.Sys.args()[0]; trace("Hello " + name); trace("Your name is " + Std.string(name.length) + " characters long."); } }Open a terminal; go to the directory where you saved
Main.hxand type thehaxe–main Main-neko characterCounter.ncommand.Type the command (this is an example with my first name):
neko characterCounter.n BenjaminYou will see the following output:
Main.hx:12: Hello Benjamin
Main.hx:13: Your name is 8 characters long.
The program read your name from the command line, greeted you by appending your name to "Hello", and displayed the number of characters that make up your name.
The code: You already know the basics about the class and the main function. What is interesting to see here is how we get the arguments. When targeting neko, we can use the
argsfunction ofneko.Sys. This function takes no parameters and returns an Array of String.As you can see, we can access an array's item by its index using the square-brackets notation. Here we are accessing the item at index 0 (arrays are 0-based, that means that the first item is always at index 0).
Then, we use the
tracefunction that you've already seen to display "Hello" followed by the name of the user. As you can see here, string concatenation is done by using the+operator. It is still quite important to note that there are classes such asStringBufthat can be used to achieve the same behavior, if you are focused on performances.You'll also notice that
Stringhas a variable namedlengththat allows you to retrieve the number of characters in it.By the way, haXe is typed, and here we are using
Std.stringto convert the length of the string fromInttoString.Std.stringcan be used to convert any value to aString. This is not mandatory here, as when using the+operator, if one of the two values is not anIntnor aFloat, the operator will return aString. In this case, all operands will be considered asString.The compilation: Well, as you can see, there's absolutely nothing new in the compilation process. The only thing we've changed is the output file's name.
Running the neko code: In the third step, we invoke the neko VM and tell it to execute the
characterCounter.nfile by passing it an argument:Benjamin.Possible improvements: Our program is quite simple, but if you've some experience with programming, you may have noticed one point where our program may encounter an exception: we are relying on the fact that the user will give us at least one argument, and we access it directly without verifying that it's really there. So, if the user gives us no argument, we will encounter an exception. There are two ways to handle that: either we verify how many arguments the user has given, or we can also try to catch exceptions. This is something that we will explain later.
It is possible to install haXe on:
Windows
MacOSX
Linux
Android
iOS
What major version do we use nowadays?
haXe 1
haXe 2
haXe 3
haXe 4
The main function of a program has to be:
static and named main
public and named first
public and static, and named first
The debugging function that prints some text is named:
println
print
trace
debug
In this chapter, we have seen how to carry out your first steps with haXe. In particular, we've seen how to install haXe and how to write haXe programs. We've also seen how you can interact with the user in the console.
Now, let's go to the second chapter in which we will learn about the basic syntax and how to do branching.