


This chapter covers the following topics:
Installing a single-node Hadoop cluster
Installing a multi-node Hadoop cluster
Adding new nodes to existing Hadoop clusters
Executing the balancer command for uniform data distribution
Entering and exiting from the safe mode in a Hadoop cluster
Decommissioning
DataNodesPerforming benchmarking on a Hadoop cluster
Hadoop has been the primary platform for many people who deal with big data problems. It is the heart of big data. Hadoop was developed way back between 2003 and 2004 when Google published research papers on Google File System (GFS) and Map Reduce. Hadoop was structured around the crux of these research papers, and thus derived its shape. With the advancement of the Internet and social media, people slowly started realizing the power that Hadoop had, and it soon became the top platform used to handle big data. With a lot of hard work from dedicated contributors and open source groups to the project, Hadoop 1.0 was released and the IT industry welcomed it with open arms.
A lot of companies started using Hadoop as the primary platform for their Data Warehousing and Extract-Transform-Load (ETL) needs. They started deploying thousands of nodes in a Hadoop cluster and realized that there were scalability issues beyond the 4000+ node clusters that were already present. This was because JobTracker was not able to handle that many Task Trackers, and there was also the need for high availability in order to make sure that clusters were reliable to use. This gave birth to Hadoop 2.0.
In this introductory chapter, we are going to learn interesting recipes such as installing a single/multi-node Hadoop 2.0 cluster, its benchmarking, adding new nodes to existing clusters, and so on. So, let's get started.
In this recipe, we are going to learn how to install a single-node Hadoop cluster, which can be used for development and testing.
To install Hadoop, you need to have a machine with the UNIX operating system installed on it. You can choose from any well known UNIX OS such as Red Hat, CentOS, Ubuntu, Fedora, and Amazon Linux (this is in case you are using Amazon Web Service instances).
Here, we will be using the Ubuntu distribution for demonstration purposes.
Let's start installing Hadoop:
First of all, you need to download the required installers from the Internet. Here, we need to download Java and Hadoop installers. The following are the links to do this:
For the Java download, choose the latest version of the available JDK from http://www.oracle.com/technetwork/java/javase/downloads/jdk8-downloads-2133151.html.
You can also use Open JDK instead of Oracle.
For the Hadoop 2.7 Download, go to
http://www.eu.apache.org/dist/hadoop/common/hadoop-2.7.0/hadoop-2.7.0.tar.gz.
We will first install Java. Here, I am using
/usr/localas the installation directory and therootuser for all installations. You can choose a directory of your choice.Extract
tar.gzlike this:tar -xzf java-7-oracle.tar.gzRename the extracted folder to give the shorter name Java instead of java-7-oracle. Doing this will help you remember the folder name easily.
Alternately, you can install Java using the
apt-getpackage manager if your machine is connected to the Internet:sudo apt-get update sudo apt-get install openjdk-7-jdk
Similarly, we will extract and configure Hadoop. We will also rename the extracted folder for easier accessibility. Here, we will extract Hadoop to
path /usr/local:tar –xzf hadoop-2.7.0.tar.gz mv hadoop-2.7.0 hadoop
Next, in order to use Java and Hadoop from any folder, we would need to add these paths to the
~/.bashrcfile. The contents of the file get executed every time a user logs in:cd ~ vi .bashrc
Once the file is open, append the following environment variable settings to it. These variables are used by Java and Hadoop at runtime:
export JAVA_HOME=/usr/local/java
export PATH=$PATH:$JAVA_HOME/bin
export HADOOP_INSTALL=/usr/local/hadoop
export PATH=$PATH:$HADOOP_INSTALL/bin
export PATH=$PATH:$HADOOP_INSTALL/sbin
export HADOOP_MAPRED_HOME=$HADOOP_INSTALL
export HADOOP_COMMON_HOME=$HADOOP_INSTALL
export HADOOP_HDFS_HOME=$HADOOP_INSTALL
export YARN_HOME=$HADOOP_INSTALL
export HADOOP_COMMON_LIB_NATIVE_DIR=$HADOOP_INSTALL/lib/native
export HADOOP_OPTS="-Djava.library.path=$HADOOP_INSTALL/lib"
In order to verify whether our installation is perfect, close the terminal and restart it again. Also, check whether the Java and Hadoop versions can be seen:
$java -version
java version "1.7.0_45"
Java(TM) SE Runtime Environment (build 1.7.0_45-b18)
Java HotSpot(TM) Server VM (build 24.45-b08, mixed mode)

$ hadoop version
Hadoop 2.7.0
Subversion https://git-wip-us.apache.org/repos/asf/hadoop.git -r d4c8d4d4d203c934e8074b31289a28724c0842cf
Compiled by jenkins on 2015-04-10T18:40Z
Compiled with protoc 2.5.0
From source with checksum a9e90912c37a35c3195d23951fd18f
This command was run using
/usr/local/hadoop/share/hadoop/common/hadoop-common-2.7.0.jar.Now that Hadoop and Java are installed and verified, we need to install
ssh(Secure Shell) if it's not already available by default. If you are connected to the Internet, execute the following commands.SSHis used to secure data transfers between nodes:sudo apt-get install openssh-client sudo apt-get install openssh-server
Once the
sshinstallation is done, we need to execute thesshconfiguration in order to avail a passwordless access to remote hosts. Note that even though we are installing Hadoop on a single node, we need to perform ansshconfiguration in order to securely access the localhost.First of all, we need to generate public and private keys by executing the following command:
ssh-keygen -t rsa -P ""This will generate the private and public keys by default in the
$HOME/.sshfolder. In order to provide passwordless access, we need to append the public key toauthorized_keysfile:cat $HOME/.ssh/id_rsa.pub >> $HOME/.ssh/authorized_keysLet's check whether the
sshconfiguration is okay or not. To test it, execute and connect to the localhost like this:ssh localhostThis will prompt you to confirm whether to add this connection to the
known_hostsfile. Typeyes, and you should be connected tosshwithout prompting for the password.Once the
sshconfiguration is done and verified, we need to configure Hadoop. The Hadoop configuration begins with adding various configuration parameters to the following default files:hadoop-env.sh: This is where we need to perform the Java environment variable configuration.core-site.xml: This is where we need to performNameNode-related configurations.yarn-site.xml: This is where we need to perform configurations related to Yet Another Resource Negotiator (YARN).mapred-site.xml: This is where we need to the map reduce engine as YARN.hdfs-site.xml: This is where we need to perform configurations related to Hadoop Distributed File System (HDFS).
These configuration files can be found in the
/usr/local/hadoop/etc/hadoopfolder. If you install Hadoop as the root user, you will have access to edit these files, but if not, you will first need to get access to this folder before editing.
So, let's take a look at the configurations one by one.
Configure hadoop-env.sh and update the Java path like this:
Export
JAVA_HOME=/usr/local/java.Edit
core-site.xml, and add the host and port on which you wish to installNameNode. Here is the single node installation that we would need in order to add the localhost:<configuration> <property> <name>fs.default.name</name> <value>hdfs://localhost:9000/</value> </property> </configuration>Edit
yarn-site.xml, add the following properties to it:<configuration> <property> <name>yarn.nodemanager.aux-services</name> <value>mapreduce_shuffle</value> </property> <property> <name>yarn.nodemanager.aux-services.mapreduce.shuffle.class</name> <value>org.apache.hadoop.mapred.ShuffleHandler</value> </property> </configuration>The
yarn.nodemanager.aux-servicesproperty tellsNodeManagerthat an auxiliary service namedmapreduce.shuffleis present and needs to be implemented. The second property tellsNodeManagerabout the class by which means it needs to implement the shuffle auxiliary service. This specific configuration is needed as theMapReducejob involves shuffling of key value pairs.Next, edit
mapred-site.xmlto set the map reduce processing engine as YARN:<configuration> <property> <name>mapreduce.framework.name</name> <value>yarn</value> </property> </configuration>Edit
hdfs-site.xmlto set the folder paths that can be used byNameNodeanddatanode:<configuration> <property> <name>yarn.nodemanager.aux-services</name> <value>mapreduce_shuffle</value> </property> <property> <name>yarn.nodemanager.aux-services.mapreduce.shuffle.class</name> <value>org.apache.hadoop.mapred.ShuffleHandler</value> </property> </configuration>I am also setting the HDFS block replication factor to
1as this is a single node cluster installation.We also need to make sure that we create the previously mentioned folders and change their ownership to suit the current user. To do this, you can choose a folder path of your own choice:
sudo mkdir –p /usr/local/store/hdfs/namenode
sudo mkdir –p /usr/local/store/hdfs/datanode
sudo chown root:root –R /usr/local/store
Now, it's time to format
namenodeso that it creates the required folder structure by default:hadoop namenode -formatThe final step involves starting Hadoop daemons; here, we will first execute two scripts to start HDFS daemons and then start YARN daemons:
/usr/local/hadoop/sbin/start-dfs.sh
This will start NameNode, the secondary NameNode, and then DataNode daemons:
/usr/local/hadoop/sbin/start-yarn.sh
This will start NodeManager and ResourceManager. You can execute the jps command to take a look at the running daemons:
$jps
2184 DataNode
2765 NodeManager
2835 Jps
2403 SecondaryNameNode
2025 NameNode
2606 ResourceManager
We can also access the web portals for HDFS and YARN by accessing the following URLs:
For HDFS:
http://<hostname>:50070/For YARN:
http://<hostname>:8088/
Hadoop 2.0 has been majorly reformed in order to solve issues of scalability and high-availability. Earlier in Hadoop 1.0, Map Reduce was the only means of processing data stored in HDFS. With advancement of YARN, Map Reduce is one of the ways of processing data on Hadoop. Here is a pictorial difference between Hadoop 1.x and Hadoop 2.x:

Now, let's try to understand how HDFS and YARN works.
HDFS is a redundant, reliable storage for Hadoop. It consists of three important parts: NameNode, the secondary NameNode, and DataNodes. When a file needs to be processed on Hadoop, it first needs to be saved on HDFS. HDFS distributes the file in chunks of 64/128 MB data blocks across the data nodes. The blocks are replicated across data nodes for reliability. NameNode stores the metadata in the blocks and replicas. After a certain period of time, the metadata is backed up on the secondary NameNode. The default time is 60 seconds. We can modify this by setting a property called dfs.namenode.checkpoint.check.period in hdfs-site.xml.
YARN has been developed to address scalability issues and for the better management of jobs in Hadoop; till date, it has proved itself to be the perfect solution. It is responsible for the management of resources available in clusters. It consists of two important components: ResouceManager(Master) and NodeManager(Worker). NodeManager provides a node-level view of the cluster, while ResourceManager takes a view of a cluster. When an application is submitted by an application client, the following things happen:
The application talks to
ResourceManagerand provides details about it.ResourceManagermakes a container request on behalf of an application to any of the worker nodes andApplicationMasterstarts running within that container.ApplicationMasterthen makes subsequent requests for the containers to execute tasks on other nodes.These tasks then take care of all the communication. Once all the tasks are complete, containers are deallocated and
ApplicationMasterexits.After this, the application client also exits.
Now that your single node Hadoop cluster is up and running, you can try some HDFS file operations on it, such as creating a directory, copying a file from a local machine to HDFS, and so on. Here some sample commands.
To list all the files in the HDFS root directory, take a look at this:
hadoop fs –ls /
To create a new directory, take a look at this:
hadoop fs –mkdir /input
To copy a file from the local machine to HDFS, take a look at this:
hadoop fs –copyFromLocal /usr/local/hadoop/LICENSE.txt /input
In order to access all the command options that are available, go to https://hadoop.apache.org/docs/current/hadoop-project-dist/hadoop-common/FileSystemShell.html.
Now that we are comfortable with a single-node Hadoop installation, it's time to learn about a multi-node Hadoop installation.
In the previous recipe, we used a single Ubuntu machine for installation; in this recipe, we will be using three Ubuntu machines. If you are an individual trying to install Hadoop for your own purposes and you don't have three machines to try this recipe, I would suggest that you get three AWS EC2 Ubuntu machines. I am using the t2.small type of EC2 instances. For more information on this, go to https://aws.amazon.com/ec2/.
Apart from this, I've also performed the following configurations on all the EC2 instances that I have been using:
Create an AWS security group to allow access to traffic to EC2 instances, and add EC2 instances to this security group.
Change the hostname of EC2 instances to their public hostnames like this:
sudo hostname ec2-52-10-22-65.us-west-2.compute.amazonaws.comDisable firewalls for EC2 Ubuntu instances:
sudo ufw disable
There are a lot of similarities between single-node and multi-node Hadoop installations, so instead of repeating the steps, I would suggest that you refer to earlier recipes as and when they're mentioned. So, let's start installing a multi-node Hadoop cluster:
Install Java and Hadoop, as discussed in the previous recipe, on the master and slave nodes. Refer to steps 1-5 in the previous recipe.
AWS EC2 has a built-in installation of
sshso there's no need to install it again. To configure it, we need to perform the following steps.First, copy the PEM key with which you initiated EC2 instances to the master node. Next, you need to execute the following set of commands that will add an identity into the master's
sshconfigurations, which can be used to perform passwordless logins to slave machines:eval `ssh-agent -s` chmod 644 $HOME/.ssh/authorized_keys chmod 400 <my-pem-key>.pem ssh-add <my-pem-key>.pem
But if you are NOT using AWS EC2, then you need to generate the
sshkey on the master, and this key needs to be copied to slave machines. Here is a sample command to do this:ssh-keygen -t rsa -P "" ssh-copy-id -i $HOME/.ssh/id_rsa.pub ubuntu@slave1 ssh-copy-id -i $HOME/.ssh/id_rsa.pub ubuntu@slave2
Next, we need to perform the Hadoop configurations—most of the configuration files will be same as they were in the case of the single-node installation. These configurations are the same for all the nodes in the cluster. Refer to step 8 from the previous recipe for
hadoop-env.sh,mapred-site.xml, andhdfs-site.xml. Forcore-site.xmlandyarn-site.xml, we need to add some more properties, as shown here:Edit
core-site.xmland add the host and port on which you wish to installNameNode. As this is a multi-node Hadoop cluster installation, we will add the master's hostname instead of the localhost:<configuration> <property> <name>fs.default.name</name> <value>hdfs://<master's-host-name>:9000/</value> </property> </configuration>Edit
yarn-site.xmland add the following properties. As this is a multi-node installation, we also need to provide the address of the machine whereResourceManageris running:<configuration> <property> <name>yarn.nodemanager.aux-services</name> <value>mapreduce_shuffle</value> </property> <property> <name>yarn.nodemanager.aux-services.mapreduce.shuffle.class</name> <value>org.apache.hadoop.mapred.ShuffleHandler</value> </property> <property> <name>yarn.resourcemanager.hostname</name> <value><master's-host-name></value> </property> </configuration>In the case of
hdfs-site.xml, in the previous recipe, we set the replication factor to 1. As this is a multi-node cluster, we set it to 3. Don't forget to create storage folders configured inhdfs-site.xml.These configurations need to be made on all the machines of the cluster.
Now that we are done with configurations, execute the
namenodeformat command so that it creates the required subfolder structure:hadoop namenode -formatNow, we need to start specific services on specific nodes in order to start the cluster.
On the master node, execute following:
/usr/local/hadoop/sbin/hadoop-daemon.sh start namenode
/usr/local/hadoop/sbin/hadoop-daemon.sh start secondarynamenode
/usr/local/hadoop/sbin/yarn-daemon.sh start resourcemanager
On all slave nodes, execute following:
/usr/local/hadoop/sbin/hadoop-daemon.sh start datanode
/usr/local/hadoop/sbin/yarn-daemon.sh start nodemanager
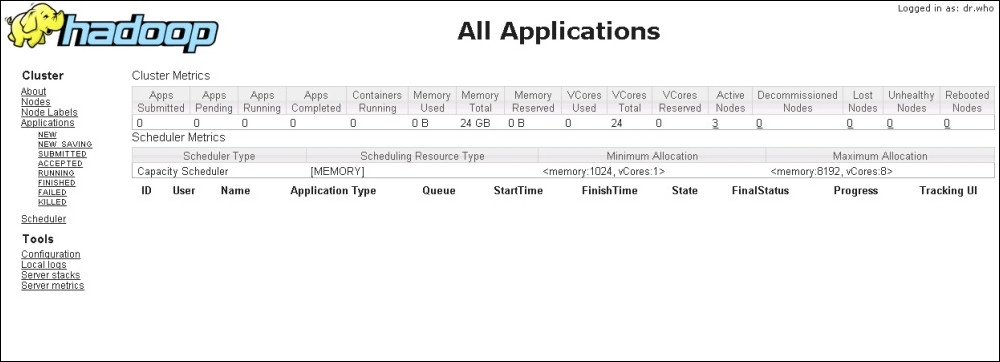
If everything goes well, you should be able to see the cluster running properly. You can also check out the web interfaces for
NameNodeand Resource Managers, for example, by going tohttp://<master-ip-hostname>:50070/.
For ResourceManager, go to http://<master-ip-hostname>/8088
Sometimes, it may happen that an existing Hadoop cluster's capacity is not adequate enough to handle all the data you may want to process. In this case, you can add new nodes to the existing Hadoop cluster without any downtime for the existing cluster. Hadoop supports horizontal scalability.
To perform this recipe, you should have a Hadoop cluster running. Also, you will need one more machine. If you are using AWS EC2, then you can launch an EC2 instance that's similar to what we did in the previous recipes. You will also need the same security group configurations in order to make the installation process smooth.
To add a new instance to an existing cluster, simply install and configure Hadoop the way we did for the previous recipe. Make sure that you put the same configurations in core-site.xml and yarn-site.xml, which will point to the correct master node.
Once all the configurations are done, simply execute commands to start the newly added datanode and nodemanager:
/usr/local/hadoop/sbin/hadoop-daemon.sh start datanode
/usr/local/hadoop/sbin/yarn-daemon.sh start nodemanager
If you take a look at the cluster again, you will find that the new node is registered. You can use the dfsadmin command to take a look at the number of nodes and amount of capacity that's been used:
hdfs dfsadmin -report
Here is a sample output for the preceding command:

Hadoop supports horizontal scalability. If the resources that are being used are not enough, we can always go ahead and add new nodes to the existing cluster without hiccups. In Hadoop, it's always the slave that reports to the master. So, while making configurations, we always configure the details of the master and do nothing about the slaves. This architecture helps achieve horizontal scalability as at any point of time, we can add new nodes by only providing the configurations of the master, and everything else is taken care of by the Hadoop cluster. As soon as the daemons start, the master node realizes that a new node has been added and it becomes part of the cluster.
Data in HDFS may not always be placed uniformly. There can be numerous reasons for this. One of the major reasons is the addition of new nodes to the cluster. In such a case, it's the Hadoop administrator's job to make sure that they execute the balancer command to rebalance the data load.
In the previous recipe, we added a new node to the cluster while the other three nodes were already part of the cluster. When you execute the dfsadmin report command, you would have noticed that the data is not uniformly balanced because of the addition of a new node. In my case, here is the state of the new node versus the old node.
This is the code for the old node:
Name: 172.31.0.9:50010 (ip-172-31-0-9.us-west-2.compute.internal)
Hostname: ip-172-31-0-9.us-west-2.compute.internal
Decommission Status : Normal
Configured Capacity: 8309932032 (7.74 GB)
DFS Used: 67551232 (64.42 MB)
Non DFS Used: 2193256448 (2.04 GB)
DFS Remaining: 6049124352 (5.63 GB)
DFS Used%: 0.81%
DFS Remaining%: 72.79%
Configured Cache Capacity: 0 (0 B)
Cache Used: 0 (0 B)
Cache Remaining: 0 (0 B)
Cache Used%: 100.00%
Cache Remaining%: 0.00%
Xceivers: 1
Last contact: Thu Oct 08 08:57:23 UTC 2015
This is the code for the new node:
Name: 172.31.18.55:50010 (ip-172-31-18-55.us-west-2.compute.internal)
Hostname: ip-172-31-18-55.us-west-2.compute.internal
Decommission Status : Normal
Configured Capacity: 8309932032 (7.74 GB)
DFS Used: 1127585 (1.08 MB)
Non DFS Used: 2372033375 (2.21 GB)
DFS Remaining: 5936771072 (5.53 GB)
DFS Used%: 0.01%
DFS Remaining%: 71.44%
Configured Cache Capacity: 0 (0 B)
Cache Used: 0 (0 B)
Cache Remaining: 0 (0 B)
Cache Used%: 100.00%
Cache Remaining%: 0.00%
Xceivers: 1
Last contact: Thu Oct 08 08:57:25 UTC 2015
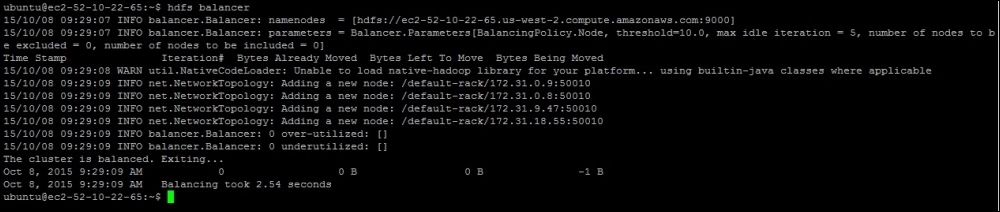
This means that the load on the cluster is not uniform. In this case, we can execute the balancer command to distribute the data uniformly throughout the data nodes:
hdfs balancer
This will initiate the block balancing activity across the cluster. By default, it will run the balancing activity to make sure that the block storage in the nodes does not differ by more than 10%. You can also decide on the threshold limit by setting an optional parameter called threshold:
hdfs balancer -threshold 5
This will execute the balancer command with 5% threshold. This is how the sample execution looks:
The balancer command provides instructions to namenode so that it can rebalance the data uniformly across datanode. This balancing is done by repositioning the blocks placed in datanode. So, if a data node is over utilized, some the blocks from that node would be repositioned to the node that is underutilized.
There are some options you can provide as arguments to this command:
Usage: hdfs balancer
        [-policy <policy>]      the balancing policy: datanode or blockpool
        [-threshold <threshold>]        Percentage of disk capacity
        [-exclude [-f <hosts-file> | <comma-separated list of hosts>]]  Excludes the specified datanodes.
        [-include [-f <hosts-file> | <comma-separated list of hosts>]]  Includes only the specified datanodes.
        [-idleiterations <idleiterations>]      Number of consecutive idle iterations (-1 for Infinite) before exit.
Sometimes, due to an unclear filesystem image state, the Hadoop cluster goes into safemode. In this recipe, we will see how to enter and exit from safemode.
Safemode is an HDFS state that does not allow any new writes to the filesystem. It also does not replicate or delete any blocks from the filesystem. In case you want to make any configuration changes to your cluster, you can put the system into safemode. Here is a command to enter the system into safemode:
hdfs dfsadmin -safemode enter
Now, if you try to make any writes to HDFS, it will not allow you do so. You can perform cluster maintenance and once this is done, you can switch off safemode:
hdfs dfsadmin -safemode leave
In case you are not aware of whether safemode is ON or OFF, you can get its status by executing the following command:
hdfs dfsadmin -safemode get
Generally, safemode is enabled automatically for NameNode on startup. It then tries to get the state of the filesystem from FSImage and EditLogs. Namenode waits until datanodes start reporting the block status of individual nodes. safemode is automatically disabled when datanodes report the availability of most of the blocks.
If we enter into safemode manually, we need to disable it manually. It won't be disabled automatically.
The Hadoop framework provides us with the option to remove certain nodes from the cluster if they are not needed any more. Here, we cannot simply shutdown the nodes that need to be removed as we might lose some of our data. They need to be decommissioned properly. In this recipe, we are going to learn how to decommission nodes from the Hadoop cluster.
To perform this recipe, you should have a Hadoop cluster, and you should have decided which node to decommission.
To decommission a node from the HDFS cluster, we need to perform the following steps:
Create a
dfs.excludefile in a folder, say/usr/local/hadoop/etc/hadoop, and add the hostname of the node you wish to decommission.Edit
hdfs-site.xmlonNameNodeto append the following property:<property> <name>dfs.hosts.exclude</name> <value>/usr/local/hadoop/etc/hadoop/dfs.exclude</value> </property>Next, we need to execute the
refreshNodescommand so that it rereads the HDFS configuration in order to start the decommissioning:hdfs dfsadmin –refreshNodes
This will start the decommissioning, and once successful execution of the dfsadmin report command, you will see that the node's status is changed to Decommissioned from Normal:
hdfs dfsadmin –report
Name: 172.31.18.55:50010 (ip-172-31-18-55.us-west-2.compute.internal)
Hostname: ip-172-31-18-55.us-west-2.compute.internal
Decommission Status : Decommissioned
Configured Capacity: 8309932032 (7.74 GB)
DFS Used: 1179648 (1.13 MB)
Non DFS Used: 2371989504 (2.21 GB)
DFS Remaining: 5936762880 (5.53 GB)
DFS Used%: 0.01%
DFS Remaining%: 71.44%
Configured Cache Capacity: 0 (0 B)
Cache Used: 0 (0 B)
Cache Remaining: 0 (0 B)
Cache Used%: 100.00%
Cache Remaining%: 0.00%
Xceivers: 1
Last contact: Thu Oct 08 10:56:49 UTC 2015
Generally, the decommissioning takes time as it requires block replications on other nodes. Once the decommissioning is complete, the node will be added to the decommissioned nodes list.
HDFS/Namenode reads the configurations from hdfs-site.xml. You can configure a file with the list of nodes to decommission and execute the refreshNodes command; it then rereads the configuration file. While doing this, it reads the configuration about the decommissioned nodes and will start rereplicating blocks to other available datanode. Depending on the size of datanode getting decommissioned, the time varies. Unless the completed decommissioning is not completed, it advisable for you to touch datanode.
The Hadoop framework supports built-in libraries so that we can perform benchmarking in order to take a look at how the Hadoop cluster configurations/hardware are performing. There are plenty of tests available that will perform the benchmarking of various aspects of the Hadoop cluster. In this recipe, we are going to take a look at how to perform benchmarking and read the results.
The Hadoop framework supports built-in support to benchmark various aspects. These tests are written in a library called hadoop-mapreduce-client-jobclient-2.7.0-tests.jar
To know the list of all the supported tests, you can execute the following command:
hadoop jar /usr/local/hadoop/share/hadoop/mapreduce/hadoop-mapreduce-client-jobclient-2.7.0-tests.jar
The result of the command will be similar to what is shown in this screenshot:
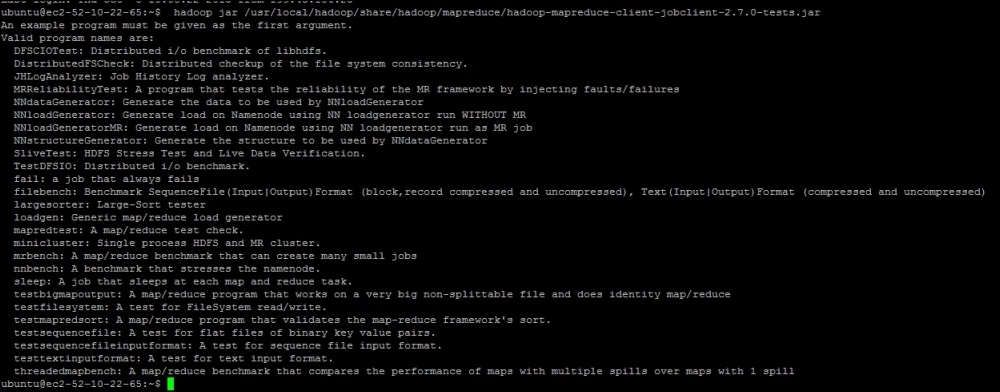
This is one the major tests that you may want to do in order to see how DFS is performing. So, we are now going to take a look at how to use these tests to know how efficiently HDFS is able to write and read data.
As seen in the preceding screenshot, the library provides tools to test DFS through an option called TestDFSIO. Now, let's execute the write test in order to understand how efficiently HDFS is able to write big files. The following is the command to execute the write test:
hadoop jar /usr/local/hadoop/share/hadoop/mapreduce/hadoop-mapreduce-client-jobclient-2.7.0-tests.jar TestDFSIO -write -nrFiles 2 -fileSize 1GB -resFile /tmp/TestDFSIOwrite.txt
Once you initiate the preceding command, a map reduce job will start, which will write two files to HDFS that are 1GB in size . You can choose any numbers based on your cluster size. These tests create data in HDFS under the /benchmarks directory. Once the execution is complete, you will see these results:
15/10/08 11:37:23 INFO fs.TestDFSIO: ----- TestDFSIO ----- : write
15/10/08 11:37:23 INFO fs.TestDFSIO:            Date & time: Thu Oct 08 11:37:23 UTC 2015
15/10/08 11:37:23 INFO fs.TestDFSIO:        Number of files: 2
15/10/08 11:37:23 INFO fs.TestDFSIO: Total MBytes processed: 2048.0
15/10/08 11:37:23 INFO fs.TestDFSIO:      Throughput mb/sec: 26.637185406776354
15/10/08 11:37:23 INFO fs.TestDFSIO: Average IO rate mb/sec: 26.63718605041504
15/10/08 11:37:23 INFO fs.TestDFSIO:  IO rate std deviation: 0.00829867575568246
15/10/08 11:37:23 INFO fs.TestDFSIO:     Test exec time sec: 69.023
The preceding data is calculated from the RAW data generated by the Map Reduce program. You can also view the raw data as follows:
hdfs dfs -cat /benchmarks/TestDFSIO/io_read/part*
f:rate  53274.37
f:sqrate        1419079.2
l:size  2147483648
l:tasks 2
l:time  76885
Tip
The following formulae are used to calculate throughput, the average IO rate, and standard deviation.
Throughput = size * 1000/time * 1048576
Average IO rate = rate/1000/tasks
Standard deviation = square root of (absolute value(sqrate/1000/tasks – Average IO Rate * Average IO Rate))
Similarly, you can perform benchmarking of HDFS read operations as well:
hadoop jar /usr/local/hadoop/share/hadoop/mapreduce/hadoop-mapreduce-client-jobclient-2.7.0-tests.jar TestDFSIO -read -nrFiles 2 -fileSize 1GB -resFile /tmp/TestDFSIOread.txt
At the end of the execution, a reducer will collect the data from the RAW results, and you will see calculated numbers for the DFSIO reads:
15/10/08 11:41:01 INFO fs.TestDFSIO: ----- TestDFSIO ----- : read
15/10/08 11:41:01 INFO fs.TestDFSIO:            Date & time: Thu Oct 08 11:41:01 UTC 2015
15/10/08 11:41:01 INFO fs.TestDFSIO:        Number of files: 2
15/10/08 11:41:01 INFO fs.TestDFSIO: Total MBytes processed: 2048.0
15/10/08 11:41:01 INFO fs.TestDFSIO:      Throughput mb/sec: 33.96633220001659
15/10/08 11:41:01 INFO fs.TestDFSIO: Average IO rate mb/sec: 33.968116760253906
15/10/08 11:41:01 INFO fs.TestDFSIO:  IO rate std deviation: 0.24641533955938721
15/10/08 11:41:01 INFO fs.TestDFSIO:     Test exec time sec: 59.343
Here, we can take a look at the RAW data as well:
hdfs dfs -cat /benchmarks/TestDFSIO/io_read/part*
f:rate  67936.234
f:sqrate        2307787.2
l:size  2147483648
l:tasks 2
l:time  60295
The same formulae are used to calculate the throughput, average IO rate, and standard deviation.
Similar to DFS IO, we can also perform benchmarking for NameNode:
hadoop jar /usr/local/hadoop/share/hadoop/mapreduce/hadoop-mapreduce-client-jobclient-2.7.0-tests.jar nnbench -operation create_write
MRBench helps us understand the average time taken for a job to execute for a given number of mappers and reducers. The following is a sample command to execute MRBench with default parameters:
hadoop jar /usr/local/hadoop/share/hadoop/mapreduce/hadoop-mapreduce-client-jobclient-2.7.0-tests.jar mrbench
Hadoop benchmark tests use the parameters and conditions provided by users. For every test, it executes a map reduce job and once complete, it displays the results on the screen. Generally, it is recommended that you run the benchmarking tests as soon as you have installed the Hadoop cluster in order to predict the performance of HDFS/Map Reduce and so on.
Most of the tests require a sequence in which they should be executed, for example, all write tests should be executed first, then read/delete, and so on.
Once the complete execution is done, make sure you clean up the data in the /benchmarks directory in HDFS.
Here is an example command to clean up the data generated by the TestDFSIO tests:
hadoop jar /usr/local/hadoop/share/hadoop/mapreduce/hadoop-mapreduce-client-jobclient-2.7.0-tests.jar TestDFSIO -clean