


In this chapter, we will cover:
Installing Groovy on Windows
Installing Groovy on Linux and OS X
Executing Groovy code from the command line
Using Groovy as a command-line text file editor
Using Groovy to start a server on the command line
Running Groovy with invokedynamic support
Building Groovy from source
Managing multiple Groovy installations on Linux
Using groovysh to try out Groovy commands
Starting groovyConsole to execute Groovy snippets
Configuring Groovy in Eclipse
Configuring Groovy in IntelliJ IDEA
The first chapter focuses on the basics of getting started with Groovy. We begin by showing how to install Groovy on the most popular operating systems and we move to some command-line tools available with the language distribution. The remaining recipes offer an overview of how the language easily integrates with the most popular Java IDEs.
In this recipe, we will provide instructions on installing the Groovy distribution on the Windows operating system.
The requirement for installing Groovy 2.0 is JDK 1.5 and higher. We assume that you have JDK installed and know how to use Java. In case you use JDK 7 or later, then you can take advantage of the dynamic language optimization present in that version. For instance, the invokedynamic bytecode instruction (see the Running Groovy with invokedynamic support recipe).
To install Groovy on Windows, you need to download the ZIP distribution from http://groovy.codehaus.org/Download.
The latest major version at the time of writing is 2.1.6. The latest minor version is 2.0.8. Since v2.0, Groovy has changed the release version numbering, so the next major version of Groovy will be 3.0 and the next minor versions will have the second digit increased (2.1, 2.2, 2.3, and so on).
Alternatively, you can build Groovy from the source distribution which is described in the Building Groovy from source recipe.
After downloading the zipped distribution, you need to unzip the archive to a directory of your choice and carry out the following steps to install Groovy on Windows:
For simplicity, we will assume that the directory is
C:\Applications\groovy-2.0. The contents of the directory should look as shown in the following screenshot:
In order to have the
groovycommand available on your command line, you need to add it to your system's path by setting the environment variable namedPATH. We also advise you to create aGROOVY_HOMEvariable for simpler reference.To access the Windows environment variables, you need to press the Windows + Break key combination. On Windows Vista, Windows 7, or later, it will open the Control Panel page for system settings.
Click on Advanced system settings to open the System Properties window.
Then you need to click on the Environment Variables... button to finally get to the list of the system variables.
Click on the New... button and add the
GROOVY_HOMEvariable pointing to your Groovy installation path:
Then find the
Pathvariable in the list of system variables and append or insert the%GROOVY_HOME%\bin;string to it:
You can now fire the Windows command line and verify that Groovy is installed correctly by issuing the
groovy --versioncommand:
If you get the output displayed as in the previous screenshot, your Groovy installation is complete.
This recipe gives you instructions for installing Groovy on any Linux distribution and Mac OS X.
As a starter, download the Groovy 2.0 binaries as described in the Installing Groovy on Windows recipe and perform the following steps to install Groovy on Linux and OS X:
Create a new folder for the Groovy distribution:
sudo mkdir /usr/share/groovyMove the unzipped Groovy folder into
/usr/share/groovyand create asymlinkto the folder, without using the version number:sudo mv groovy-2.1.6 /usr/share/groovy/ sudo ln -s /usr/share/groovy/groovy-2.1.6 current
Finally, add Groovy to the path by editing your
~/.profile(or~/.bash_profile) file. You can use vi or an editor of your choice:export GROOVY_HOME=/usr/share/groovy/current export PATH=$GROOVY_HOME/bin:$PATH
Your
JAVA_HOMEvariable should be set as well. On OS X, the recommended way to set the variable is as follows:export JAVA_HOME=$(/usr/libexec/java_home)Reload your
~/.profilefile by typing:source `~/.profile`To test if your installation is successful, type:
groovy -version
The output should display the installed Groovy version and the JDK in use.
Tip
Downloading the example code
You can download the example code files for all Packt books you have purchased from your account at http://www.packtpub.com. If you purchased this book elsewhere, you can visit http://www.packtpub.com/support and register to have the files e-mailed directly to you.
Using the symbolic link called current, which we created in step 2, makes it very easy to upgrade to a newer version of Groovy by changing the folder to which the symbolic link points to.
Most *nix-based operating systems (such as Linux or Mac OS X) have package manager systems that allow you to install Groovy by simply typing a command in the terminal.
In Ubuntu, Groovy can be installed by simply typing:
sudo apt-get install groovy
The version installed by the Ubuntu package manager is quite old (1.7.10), so you may want to install Groovy manually as described in this recipe.
In OS X, you can use Homebrew as follows:
brew install groovy
If you are happy with running a stable version of Groovy, but possibly not the most recent one, a package manager is the recommended way to get Groovy quickly and easily. If you want to install a beta version of Groovy or a version that is not yet available on the package manager system used by your OS, install the binaries from the website.
Groovy, by definition, is a language with scripting features. Many developers approach Groovy by writing short scripts to automate repetitive tasks. The language provides a set of command-line tools that help you create scripts that are usable within your favorite shell.
In this recipe, we will cover the execution of a simple script with the help of the groovy command, which is made available to you after a successful Groovy installation (see the Installing Groovy on Windows recipe and Installing Groovy on Linux and OS X recipe).
Let's start with the most abused example in programming books, printing Hello, World!:
The simplest way to execute Groovy code is by using the
-eoption and starting to write Groovy code on the same line:groovy -e "println 'Hello, World!'"You can also place the
println 'Hello, World!'statement in a separate file; for example,hello.groovy, and execute that script with the following simple command:groovy hello.groovyIn both cases, you'll see the same results:
Hello, World!
In step 1, the actual Groovy code resides in the double quotes (") and uses the predefined println method to print a Hello, World! string. But to explain where the println method actually comes from, we need to give a bit more details on Groovy internals.
Every script in Groovy (a command-line parameter or a standalone script file) is compiled on the fly into a class that extends the groovy.lang.Script class (Javadoc for this class can be found at http://groovy.codehaus.org/api/groovy/lang/Script.html).
Naturally, a Script class is eventually inherited from java.lang.Object, which is the base class for all classes in both Java and Groovy. But since Groovy adds its own extension methods to many standard JDK classes (see the Adding a functionality to the existing Java/Groovy classes recipe in Chapter 3, Using Groovy Language Features for Information on Custom Extension Modules), java.lang.Object is enriched with many useful methods including println (the relevant Java documentation can be found at http://groovy.codehaus.org/groovy-jdk/java/lang/Object.html#println(java.lang.Object)).
In fact, the groovy command has several other useful command-line options. If you type groovy --help, you can get a full list of them as shown in the following screenshot:
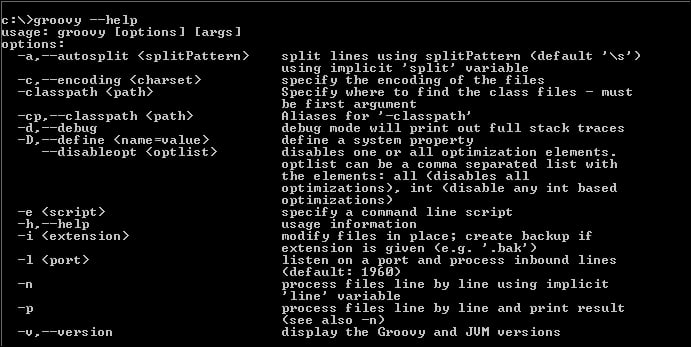
Let's go through some of those options to get a better overview of the possibilities.
First of all, -classpath, --classpath, and -cp options work in a very similar way to the java command. You just specify a list of the *.jar files or list of directories with the *.class files. The only peculiarity is that -classpath must come as the first parameter in the command line; otherwise Groovy will not recognize it.
Another parameter that is common with the java command is -D, which allows to pass the system properties to your script in the following way:
groovy -Dmessage=world-e "println 'Hello, ' + System.getProperty('message')"
One of the strengths of Groovy (as opposed to Java) is its conciseness. This rule is also applied to what Groovy prints out if an exception occurs in your script:
groovy -e "throw new Exception()"
Caught: java.lang.Exception
java.lang.Exception at script_from_command_line.run(script_from_command_line:1)
To print the conventional full Java stack trace, you can use the -d or -debug options (some stack trace lines are omitted for brevity):
groovy -d -e "throw new Exception()"
Caught: java.lang.Exception
java.lang.Exception
    at sun.reflect.Native...
    ...
    at script_from_command_line.run(script_from_command_line:1)
    ...
    at org.codehaus.groovy.tools.GroovyStarter.main(...)
For additional command-line features, please refer to the following recipes:
Using Groovy as a command-line text file editor
Using Groovy to start a server on the command line
For more information on the Groovy script structure and Groovy additions, go to:
The groovy command, which we introduced in the Executing Groovy code from the command line recipe, can also be used as a stream editor or text file filter. In this recipe, we will cover the -i, -n, and -p parameters that can be used to leverage file editing and processing functionality.
Assume that you have a file, data.txt, which contains five lines with numbers from 1 to 5:
To multiply each number by 2, you can use the following command:
groovy -n -e "println line.toLong() * 2" data.txtWe can even omit the
printlnmethod call if we pass additional the-pparameter to the command:groovy -n -p -e "line.toLong() * 2" data.txtIn both cases, Groovy will print the following output:
2
4
6
8
10
Due to the fact that we are using the -n option, the code in double quotes is applied to each line read from the datafile specified as the last parameter in the command line. The line variable is predefined by Groovy, and you can use it to access, filter, or modify the line's content.
If you add the -i option to the previous command, then it will actually modify the input file, with output values as follows:
groovy -i -n -p -e "line.toLong() * 2" data.txt
Adding a suffix .bak to the -i option will save the original input file data.txt under data.txt.bak:
groovy -i .bak -n -p -e "line.toLong() * 2" data.txt
You can use the -n and -p options to filter the input stream of other operating system commands. For example, if you want to filter the output of a directory listing command (dir) to show only the *.jar files, on Windows you can use the following command:
dir | groovy -n -e "if (line.contains('.jar')) println line"
Or on *nix-based operating systems, you can use the following command:
ls -la | groovy -n -e "if (line.contains('.jar')) println line"
Of course, the result of the previous commands can be easily achieved by more efficient operating system instructions. However, these examples are given to demonstrate that you can actually leverage the full power of the Groovy and Java programming languages to implement more complex processing rules.
In this recipe, we continue to explore the groovy command's features at one's disposal. This time, we show how to create a process capable of serving client requests through TCP/IP directly from the command line and with one line of code.
The command-line option that we are going to use for this purpose is -l:
By using the
-loption, it is trivial to start a simple socket server in Groovy:groovy -l 4444 -e "println new Date()"The previous line will start a server that listens to port 4444 and returns the date and time string for every line of data it receives from the clients:
groovy is listening on port 4444In order to test whether the server actually works, you can start any telnet-like program (for example, KiTTY, if you are on Windows) to connect to a localhost on port 4444, and type any string (for example,
What time is it?), and press Enter. The server should reply with a date/time string back as shown in the following screenshot:
In this way, you can quite easily organize communication channels for ad hoc notifications on different hosts.
One of the biggest improvements introduced in Groovy 2.0 is the support for the invokedynamic instruction. The invokedynamic is a new JVM instruction available in Java 7, which allows easier implementation and promises increased speed and efficiency of dynamic languages (for example, Groovy).
Dynamic languages generate a bytecode that often necessitates a number of JVM method invocations to perform a single operation. Furthermore, reflection and dynamic proxies are used extensively, which comes with a costly performance toll. Also, the JIT (Just-In-Time) compiler that helps to improve the runtime performance of a JVM, cannot work its magic by applying optimization to the bytecode because it lacks information and patterns, which are normally possible to optimize. The new bytecode instruction, invokedynamic, is able to mitigate partially these issues, including support for better JIT optimization.
In this recipe, we will show how to run Groovy with the invokedynamic (also known as indy) support and Java 7.
The invokedynamic support is a compile-time and runtime feature only. In other words, a developer cannot use it from within the source code. What invokedynamic brings to Groovy 2.0 (and even more to 2.1) is basically improved runtime performance.
As explained in the introduction, Java 7 is the required version of the JVM to compile Groovy code that leverages the invokedynamic instruction:
Make sure that Java 7 is your current JVM. Type
java -versionand confirm that the output mentions Version 7:java version "1.7.0_25"The following steps will let us fully enable the
indysupport in your Groovy distribution. First of all rename or remove all the JAR files starting withgroovy-in thelibdirectory of your Groovy 2.xhomedirectory.Replace them with the files in the
indydirectory located in the root of the Groovy distribution folder.Remove the
-indyclassifier from the JAR names.Finally, invoke either
groovyor thegroovyccompiler with the--indyflag to execute your code:groovy --indy my_script.groovy
It is important to note that if the --indy flag is omitted, the code will be compiled without the invokedynamic support, even if Java 7 is used and the Groovy JAR files have been replaced.
The performance gain introduced by the new JVM instruction greatly varies depending on a numbers of factors, including the actual JVM version and the type of code that is optimized. JVM support for the invokedynamic instruction improves at each version. The upcoming Java 8 will use invokedynamic to support lambda functions, so it is very likely that newer JVMs will offer even greater optimization. Given the current state of things, some benchmarks that we have run have shown an improvement of around 20 percent when given the same code compiled with the invokedynamic instruction enabled.
The InvokeDynamic support documentation at http://groovy.codehaus.org/InvokeDynamic+support
In this recipe, we introduce a procedure for building Groovy from the source code. The only requirement needed to build Groovy from source is Java JDK 1.7 or higher.
Java 7 is required to leverage the new invokedynamic instruction used by Groovy 2. You can read more about the benefits of invokedynamic in the Running Groovy with invokedynamic support recipe.
Like many of today's open source projects, Groovy source is maintained on GitHub. GitHub is a website that provides a Git hosting service. You have probably heard of Git, the version control system started by the Linux creator, Linus Torvalds.
In order to build Groovy, you need a local copy of the source code that must be fetched from GitHub via Git. If you are running a Linux or OS X operating system, chances are that you already have Git installed on your box.
For Windows, there are several ways to install Git. You may want to use Cygwin (http://www.cygwin.com/) or the officially released version available on the Git website (http://git-scm.com/download/win).
For this recipe, we assume that a recent version of Git is available in your shell. To test that Git is indeed available, open a shell and type the following command:
git --version
Assuming that git is installed and operational, we can proceed with the following steps to build Groovy from source:
Open a shell in your operating system and type:
git clone https://github.com/groovy/groovy-core.gitWait for Git to fetch all the source code and proceed to build Groovy. On Windows, open a DOS shell, move to the
groovy-corefolder you just cloned, and type:gradlew.bat clean distOn Linux or Mac OS X, open a shell, move to the
groovy-corefolder, and type:./gradlew clean distIf you already have Gradle installed, you can run the following command instead:
gradle clean dist
The git clone command in the first step fetches the Groovy repository, around 125 MB, so be patient if you are on a slow connection. Groovy has switched to the Gradle build tool from Ant. The gradlew command is a convenient wrapper for Gradle that takes care of downloading all the required dependencies and triggering the build. Chapter 2, Using Groovy Ecosystem, has a whole recipe dedicated to Gradle, so you may want to take a look at the Integrating Groovy into the build process using Gradle recipe to know more about this awesome tool. Furthermore, several recipes in this book will make use of Gradle to build the code examples.
The build process will download the required dependencies and compile the code. Upon successful compilation, the build will generate a ZIP file named groovy-binary-2.x.x-SNAPSHOT.zip that contains the binaries, under /target/distributions. Install the binaries in the same way as explained in the Installing Groovy on Windows and Installing Groovy on Linux and OS X recipes.
Note how two types of Groovy binaries are generated: a normal version and an indy version. The indy version will leverage the invokedynamic feature (see also the Running Groovy with invokedynamic support recipe).
If a developer needs to work with different Groovy distributions on the same machine, chances are that he or she would be involved in a lot of environment variable fiddling, such as PATH, JAVA_HOME, and GROOVY_HOME.
Luckily, there is a tool that helps to manage those variables as well as to download the required setup files on demand.
The name of this goody is GVM (Groovy enVironment Manager). GVM was inspired by similar tools from the Ruby ecosystem, RVM, and rbenv.
In this recipe, we will demonstrate how to use the GVM tool and show the benefits it delivers.
Use the package manager available on your Linux distribution to install curl, unzip, and java on your machine. For example, on Ubuntu it can be achieved with the following command sequence:
sudo apt-get update
sudo apt-get install curl
sudo apt-get install zip
sudo apt-get install openjdk-6-jdk
The GVM installation script will not work without those packages. You can skip the OpenJDK package in case you have Java 5 or later distribution already installed.
Then you need to fetch the installation script from GVM's website (http://get.gvmtool.net) and pass it to bash using the following command:
curl -s get.gvmtool.net | bash
It will start the set up process as shown in the following screenshot:
To finalize the installation, open a new terminal and run the following command:
source ~/.gvm/bin/gvm-init.sh
As soon as GVM is installed and running, you can start putting it to use:
To install the latest Groovy distribution, you can issue the following command:
> gvm install groovy
Downloading: groovy 2.1.6
...
Installing: groovy 2.1.6
Done installing!
At the end of the installation, it will ask you whether to make it the default or not. Since we all like "the latest and greatest", type
Y(yes):Do you want groovy 2.1.6 to be set as default? (Y/n): YTo install different Groovy distribution (for example, v1.8.6, which is still rather popular) you can fire the following command:
> gvm install groovy 1.8.6
Downloading: groovy 1.8.6
...
Installing: groovy 1.8.6
Done installing!
Again it will ask about setting
1.8.6as default Groovy distribution. Answern(no) in this case since we would like to keep v2 as the primary one:Do you want groovy 1.8.6 to be set as default? (Y/n): nTo set (or to ensure) Groovy version used by default, use the following command:
> gvm default groovy 2.1.6
Default groovy version set to 2.1.6
You can also verify that Groovy is running and is the requested version by typing:
> groovy --version
Groovy Version: 2.1.6 JVM: ...
To switch temporarily to a different Groovy distribution, just type:
> gvm use groovy 1.8.6
Using groovy version 1.8.6 in this shell.
Another way to check which version of Groovy is currently active is:
> gvm current groovy
Using groovy version 1.8.6
For example, this script will not run under 1.8.6:
> groovy -e "println new File('.').directorySize()"
Caught: groovy.lang.MissingMethodException:
   No signature of method:
      java.io.File.directorySize() is applicable ...
If we switch to the latest Groovy, the script will succeed as shown:
> gvm use groovy
Using groovy version 2.1.6 in this shell.
> groovy -e "println new File('.').directorySize()"
126818311
To remove the unnecessary distribution, we can just run:
> gvm uninstall groovy 1.8.6
Uninstalling groovy 1.8.6...
The reason the directorySize() method (steps 9 and 10) didn't work for v1.8.6 of Groovy is simply because this method was only introduced in v2.
As we already mentioned, GVM manages the values of environment variables to direct your Groovy commands to the proper distribution. It also downloads, unpacks, and caches Groovy installation archives under the ~/.gvm/var directory.
GVM also can manage other popular Groovy-based products; for example, Gradle (to build a framework that we are going to discuss in the Integrating Groovy into the build process using Gradle recipe in Chapter 2, Using Groovy Ecosystem), Grails (a web application framework), Griffon (a desktop application framework), and so on in a similar way.
This recipe can also be applied to a Mac running OS X. You can enjoy GVM on Windows too, but you need to install and run Cygwin (a Linux environment simulation for Windows).
Additional useful information can be found on the following product's home pages:
GVM home page: http://gvmtool.net/
Cygwin home page: http://www.cygwin.com/
Similar to many other languages (for example, Ruby or Perl), Groovy sports a so called Read - Evaluate - Print loop (REPL). REPL is a simple, interactive programming environment mostly used to quickly try out language features. Groovy's REPL is named groovysh, and in this recipe we are going to explore some of its features.
The groovysh command is a command-line tool available with the standard Groovy distribution. Install Groovy as described in one of the installation recipes (see the Installing Groovy on Windows recipe and Installing Groovy on Linux and OS X recipe) and you'll get the groovysh command available in your shell:
Open a shell on your operating system and type
groovysh, as shown in the following screenshot:
The Groovy shell allows you to evaluate simple expressions, such as:
groovy:000> println "Hello World!"
Hello World
===> null
It is also possible to evaluate more complex expressions such as functions or closures, (closures are discussed in great length in the Defining code as data in Groovy recipe in Chapter 3, Using Groovy Language Features):
groovy:000> helloClosure = { println ""Hello $it"" }
===> groovysh_evaluate$_run_closure1@7301061
groovy:000> counter = 1..5
===> 1..5
groovy:000> counter.each helloClosure
Hello 1
Hello 2
Hello 3
Hello 4
Hello 5
===> 1..5
The Groovy shell also supports creating classes:
groovy:000> class Vehicle {
groovy:001> String brand
groovy:002> String type
groovy:003> String engineType
groovy:004> }
===> true
groovy:000> v = new Vehicle()
===> Vehicle@7639fabd
groovy:000> v.brand = 'Ferrari'
===> Ferrari
groovy:000> v.type = 'Car'
===> Car
===> null
groovy:000> println v.brand
Ferrari
===> null
The dynamic nature of Groovy allows us to quickly list all the methods on a class:
groovy:000> GString.methods.each { println it}
public java.util.regex.Pattern groovy.lang.GString.negate()
public boolean groovy.lang.GString.equals(java.lang.Object)
public boolean groovy.lang.GString.equals(groovy.lang.GString)
public java.lang.String groovy.lang.GString.toString()
public int groovy.lang.GString.hashCode()
The groovysh command compiles and executes completed statements as soon as we press the Enter key. It then prints the result of that statement execution along with any output from the execution.
Autocompletion is supported through the JLine library that can be found at http://jline.sourceforge.net/. Pressing the Tab key automatically completes keywords and methods as we type:
groovy:000> string = "I'm a String!"
===> I'm a String!
groovy:000> string.
Display all 159 possibilities? (y or n)
groovy:000> string.toU

toURI()         toURL()         toUpperCase(    toUpperCase()
In step 2, the evaluated statement returned null. This is normal as groovysh is informing us that the last statement didn't return any value—hence null.
In step 4, we can see how groovysh supports code that spawns multiple lines. Note how the counter on the left of each statement increases at each line. The up and down arrows key will display the history of the typed commands. The history is preserved even across sessions so you can safely exit groovysh and you will still be able to access the history.
You may have noticed that in the previous examples, we didn't use any typed variables.A variable declared with def or a data type is not stored in the session and will be lost as soon as the command is issued:
groovy:000> def name = "Oscar"
===> Oscar
groovy:000> println name
ERROR groovy.lang.MissingPropertyException:
No such property: name for class: groovysh_evaluate
      at groovysh_evaluate.run (groovysh_evaluate:2)
This is a small gotcha you should remember when using groovysh.
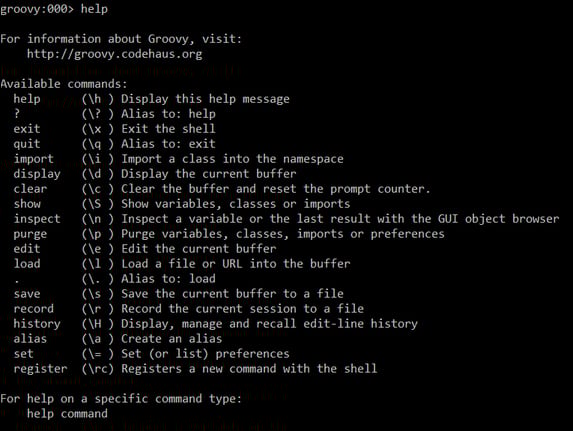
groovysh has a number of commands, which can be listed by typing help as shown in the following screenshot:
The import behaves like the standard import keyword in Groovy and Java. It allows to import packages from the JDK or the GDK:
groovy:000> import groovy.swing.SwingBuilder
===> [import groovy.swing.SwingBuilder]
groovy:000> swing = new SwingBuilder()
===> groovy.swing.SwingBuilder@6df59ac1
groovy:000> frame = swing.frame(title:'Frame') {
groovy:000>   textlabel = label(text:'hello world!')
groovy:000> }
===> javax.swing.JFrame[...]
groovy:000> frame.show()
===> null
The display command shows the current buffer and save allows to save it to a file:
groovy:000> display
Buffer is empty
groovy:000> class Person {
groovy:001> display
With clear, the buffer can be reset, in case you mistyped something.
The record command acts as a flying recorder. It saves the typed commands to a file as we type. Use record start and record stop to control the recording. It is preferable to specify a file to which you want the recorded commands to be stored:
groovy:000> record start Session1.txt
Recording session to: Session1.txt
===> Session1.txt
groovy:000> println 'hello world!'
hello world!
===> null
groovy:000> class Person {
groovy:001> String name
groovy:002> }
===> true
groovy:000> record stop
Recording stopped; session saved as: Session1.txt (202 bytes)
===> Session1.txt
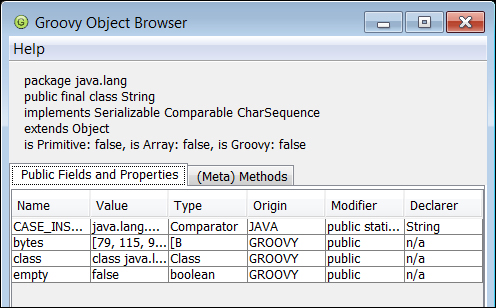
A very useful feature of the Groovy shell is the inspect command that displays the content of the last evaluated expression inside a GUI application, named Groovy Object Browser.
The Groovy Object Browser shows a good deal of information about the latest stored object, such as the class name, the implemented interfaces, and all the methods exposed by the object. The following screenshot shows some of the methods visible in the java.lang.String class:
groovy:000> name = "Oscar"
===> Oscar
inspect
The Groovy distribution has another option for developers who are more familiar with a graphical interface and want to try out code snippets. The tool in question is groovyConsole, which is very similar to groovysh (see the Using groovysh to try out Groovy commands recipe) except that it provides a GUI with syntax highlighting and basic code editor features.
In this recipe, we are going to cover basic GroovyConsole usage scenarios.
Open your shell and let's dive in:
To start GroovyConsole, you just need to fire the
groovyConsolecommand in your command line:
The GroovyConsole screen is divided into two logical parts. The top area is meant for script editing, and the bottom area displays the script execution output when a script is launched.
By pressing Ctrl + R (CMD + R on a Mac) or going to the Script menu and selecting Run, the script in the edit area will be executed:

Press Ctrl + W (CMD + W on a Mac) to clean the output in the lower pane.
The bottom panel displays an output similar to the
groovyshshell; that is, first the executed script is printed after the groovy> marker followed by the printed output and a result value, if any:
In the previous script, we set the value of the internal test property (this property is being stored within an instance of the
groovy.lang.Scriptclass that is used to execute all the code in the console). If you change that code to reuse the previous field value (for example,+=), you will actually notice that the value changes every time the code gets executed:
Similar to
groovysh, if you define a variable using thedefkeyword, then you can't reuse the previous value. Thedefkeyword is used to define locally scoped variables and in this case, it's bound only to single execution of the script:
Let's go through the editor features of the GroovyConsole application. The File menu offers standard functions to start over by clicking on the New File menu item, to open a new GroovyConsole window, to open a previously saved Groovy script, to save or print contents of the editor, and to close the application as shown in the following screenshot:

The Edit menu provides functionality available in any modern text editor such as copy, paste, and basic search functionality, as shown in the following screenshot:

The View menu has some interesting features for manipulating what is displayed in the bottom output area, as shown in the following screenshot:

It is possible to increase or decrease the font size and configure the way the output panel displays information. For instance, you can disable the script output or clear the output screen at each run.
The History menu allows you to revive previous script versions that you have executed during your session with GroovyConsole, as shown in the following screenshot:

Since GroovyConsole is all about executing a script, the Script menu presents the most valuable options, as shown in the following screenshot:

You can run or abort your script execution, force script compilation, and add additional libraries to the class path. Also, you can Clear Script Context, which will lead to clearing all the script's accumulated properties (for example, test).
Another useful feature is that you can select a part of your script in the editor and execute only that part by clicking on Run Selection in the Script menu, as shown in the following screenshot:

The GroovyConsole tool comes with a handy Object Browser that graphically shows the fields and methods available for a given class.
Press Ctrl + I (CMD + I on a Mac) to launch the browser and display the last evaluated expression. The following simple class would appear like in the following screenshot:
class Person {
  String name
  String lastName
}

p = new Person()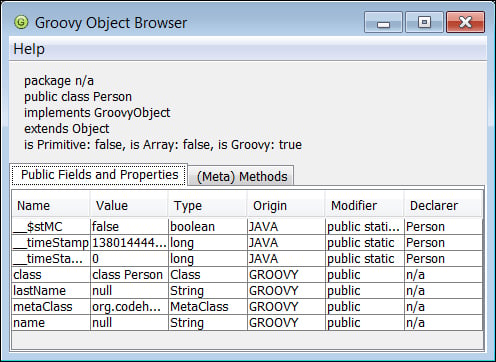
By pressing Ctrl + J (CMD + J on a Mac), we can display another view of the Object Browser, this time focused on the variables visible from within the script.
Eclipse is a popular IDE that is taking up a big share of the IDE market for JVM-based technologies, as well as other languages and platforms. In fact, Eclipse is a huge ecosystem devoted to building tooling for different areas such as dynamic languages, reporting, testing, modeling, analysis, and so on.
Eclipse is distributed in various combinations featuring different areas. A special distribution exists that comes prepackaged with an Eclipse plugin for Groovy (code named GRECLIPSE), as well as various other useful plugins. It can be downloaded from http://grails.org/products/ggts.
However, in this recipe we will describe the installation instructions for the Eclipse plugin for Groovy assuming that it is not part of the distribution that you already have.
The steps in the following section have been tested against Eclipse Indigo 3.7, but are very similar when using previous or later versions of Eclipse. For information on different Eclipse versions, you can always check http://groovy.codehaus.org/Eclipse+Plugin.
The plugin installation in Eclipse usually starts with opening the Install New Software... menu item under the Help menu. Perform the following steps to configure Groovy support in Eclipse:
In the Work with: textbox, you need to type a plugin update site URL, which is http://dist.springsource.org/release/GRECLIPSE/e3.7/ for the given version of Eclipse.
After you press Enter, Eclipse will load the updated site contents into the tree view.
You need to select the Groovy-Eclipse component and click on the Next button.
Then you will have to follow the standard Eclipse installation procedure by accepting the software license and restarting Eclipse workspace after the download and installation process is complete.
When your Eclipse instance starts again, it should be possible to create Groovy projects, as well as edit, compile, and execute Groovy source files.
To get started, let's create a new project first. Go to the New menu and select the Other... menu item.
In the New wizard window, you should select the Groovy Project item and then click on the Next button, as shown in the following screenshot:

The following dialog shows the new project's options, which are very similar to the one for Java projects:

You need to choose a project name (for example,
test-groovy), a project location (for example,C:\Work\test-groovy), a target JRE, and click on the Finish button for the project to be created in the current workspace, as shown in the following screenshot:
Now it's time to add some code. You can do it through the same New menu, and add a new Groovy Class to the recently created project.
The class creation dialog has many similarities to the one for Java classes:

Groovy shares almost 100 percent of Java syntax; therefore, you can start creating Groovy classes in the same way you would do it in Java. You will also get all the syntax highlighting and other IDE goodies when editing Groovy source files, as shown in the following screenshot:

The code shown in the previous section is actually Groovy code (even though it looks very much like Java) since we omitted semicolons and used the println method. The reasons for that method to be available were described in the Executing Groovy code from the command line recipe.
With the Eclipse plugin for Groovy, you also get the possibility to execute Groovy code right from your IDE. For that, you need to use the Run as... menu item from the Context Menu, as shown in the following screenshot:
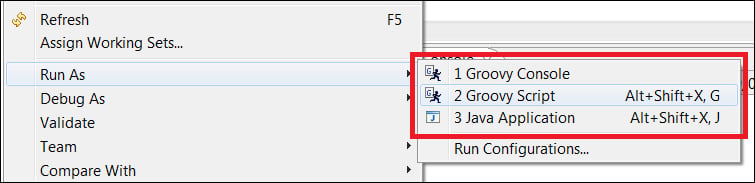
The Groovy Console executor will send your code to the
groovyConsoleinstance, which is described to a greater extent in the Starting groovyConsole to execute Groovy snippets recipe.The Groovy Script executor will run your code in the same way as
groovy HelloWorld.groovycommand would do it.The Java Application executor (similarly to how it works for Java classes) will try to invoke the main method of your class.
By running the example code with either the Groovy Script executor or Java Application executor, you should get the following output in Eclipse's Console view:

Groovy can be used to write standard classes. But as we have seen in the previous recipes, Groovy is also a scripting language, and the Eclipse IDE plugin supports this feature as well.
To define a Groovy script in your project, simply create a plain empty text file with the *.groovy extension anywhere in your project. The new file is a Groovy script, so you can start by typing the line of code, as shown in the following screenshot:
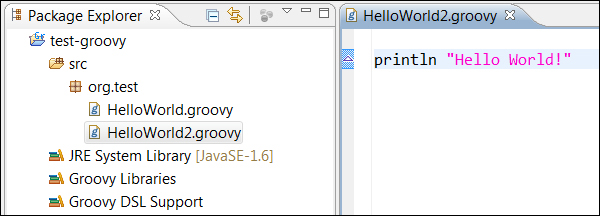
When you run your script (HelloWorld2.groovy) with the Groovy Script executor, you will get the same output as the previously mentioned Groovy source file (HelloWorld.groovy).
Conversely, if you run your Groovy script (HelloWorld2.groovy) using the Java Application executor, it will complain about a missing class, as shown in the following screenshot:
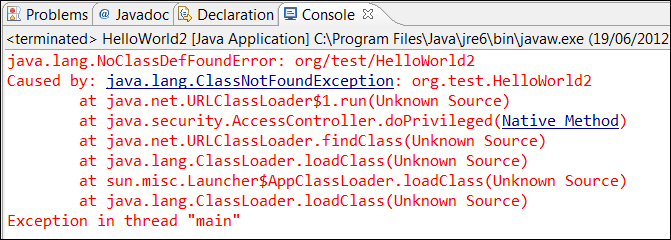
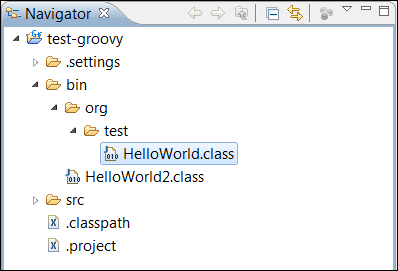
The reason for the exception lies in how Groovy distinguishes between script files and classes. If you look at the way Groovy script and Groovy classes are compiled in the Eclipse Navigator view, you can also see that even though the script source file resides in the package folder org.test under the src directory, that information is erased when the actual script is compiled into a class file:
You can also spot the difference between scripts and classes by looking at the list of the class generated methods by activating Package Explorer view, as shown in the following screenshot:
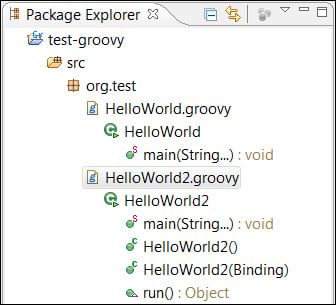
As you can see, the Groovy script class has additional constructors as well as the main and run methods. The Groovy class has only the methods that were defined by the class definition.
This distinction makes Groovy a very powerful addition to a Java tool set. Groovy allows you to use an alternative and more concise syntax to extend your existing Java applications, as well as writing short and concise scripts that leverage the richness of the Java platform.
Since v8, IntelliJ IDEA, one of the most popular Java IDEs, has native support for Groovy. There is no need to install a plugin to start coding in Groovy and benefit from a number of interesting features such as code completion and refactoring. The latest iteration of IntelliJ IDEA, Version 12, has full support for Groovy 2.0.
In this recipe, we are going to show how to set up a Groovy project in IDEA and showcase some of the most interesting qualities of the integration.
To get started with this recipe, you need v12 of IntelliJ IDEA. The IDE comes in two versions, Community Edition and Ultimate. JetBrains, the company behind IDEA, offers the Community Edition for free, while it charges for the Ultimate version. The good news is that Groovy support is available in the free version of the IDE so you can start using it straight away. Download IntelliJ IDEA from http://www.jetbrains.com.
You also need to install Java and a Groovy distribution. Refer to the installation recipes from earlier in this chapter.
Let's start with the project creation:
Click on the Create New Project link in the main IntelliJ IDEA start page, as shown in the following screenshot:

In the next wizard page, select Groovy Module and enter the name and location of your project, as shown in the following screenshot:

The Project SDK field should be set to the version of the JDK you want to use for this project. If the Project SDK is empty and there is nothing in the list, then click on the New... button, select JDK and locate the JDK installation directory in the open folder selection dialog.
After JDK is selected click on the Next button to get to the Groovy SDK selection page, as shown in the following screenshot:

If it is a fresh installation, most likely the Use library drop-down list will be empty. Click on the Create… button and locate the Groovy installation directory. That's it, click on the Finish button.
Once the project is created, the IDE allows to create Groovy classes as well as Groovy scripts. Scripts can be used as scrapbooks for testing code snippets and can be later integrated into a class:

You can also create Java classes that call methods on Groovy classes. Let's create a simple Groovy class, named
MyGroovyClass, as shown in the following screenshot:
The class defines three attributes and uses the concise Groovy approach, with no need for getters and setters to access the variables.
Now let's create a Java class,
MyJavaClass, as shown in the following screenshot:
As you can see in the previous screenshot, the code autocompletion works perfectly and it's even able to propose synthetic methods that are generated by the Groovy compiler, such as getters and setters.
For a broader look at the integration between Java and Groovy, take a look at the Using Java classes from Groovy recipe in Chapter 2, Using Groovy Ecosystem.
Several refactoring goodies are also available, including Extract Parameter that also works for closures (see the Defining code as data in Groovy recipe in Chapter 3, Using Groovy Language Features), as shown in the following screenshot:
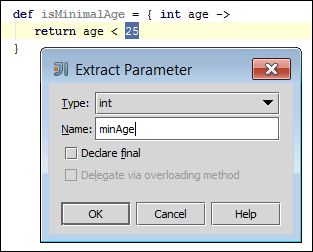
The result of the refactoring will be as shown in the following screenshot: